
Содержание статьи:
- Создание BAT файлов: на примерах
- Основы! С чего начать (Вариант 1: проверка пинга)
- Вариант 2: запуск игры с высоким приоритетом + откл. авто-поиска Wi-Fi сетей
- Вариант 3: создание резервной копий файлов и точки восстановления в Windows
- Вариант 4: очистка временных папок
- 📌 Вариант 5: форматирование диска/флешки (с ручным выбором буквы, имени и файловой системы)
- Как запускать BAT-файл от имени администратора (и по расписанию)
- Если при выполнении BAT-файла появятся крякозабры вместо русского текста 👌
- Вопросы и ответы: 6
Доброго дня!
На меня тут недавно «наехали» (в хорошем смысле 😊): «Дескать… говоришь вот создать BAT-файл*, а как это сделать-то? Учишь непонятно чему… лишь плохому…».
* Для справки.
BAT-файл — текстовый файл со списком команд. При его запуске (открытии) — интерпретатор ОС выполняет их одну за одной. Это очень удобно для выполнения повторяющихся задач (например, если вам нужно запускать каждый раз игру с высоким приоритетом, или чистить определенную папку, и др.).
*
Собственно, в рамках сегодняшней статьи решил исправиться — кратко показать, как их создавать, и дать несколько примеров для решения самых популярных рутинных задач (довольно часто для этого BAT’ники и используют).
Думаю, что многие пользователи смогут слегка до-корректировать мои примеры и создадут для себя вполне рабочие BAT-файлы. 😉
Итак…
*
Создание BAT файлов: на примерах
Основы! С чего начать (Вариант 1: проверка пинга)
Для начала покажу, как создать простейший BAT-файл для проверки пинга (для общего понимания процесса…).
ШАГ 1
Первым делом необходимо создать самый обычный текстовый файл (такой же, как вы создаете в блокноте). Достаточно кликнуть правой кнопкой мыши по любому свободному месту на рабочем столе и выбрать в меню «Текстовый файл» (Text Document). 👇
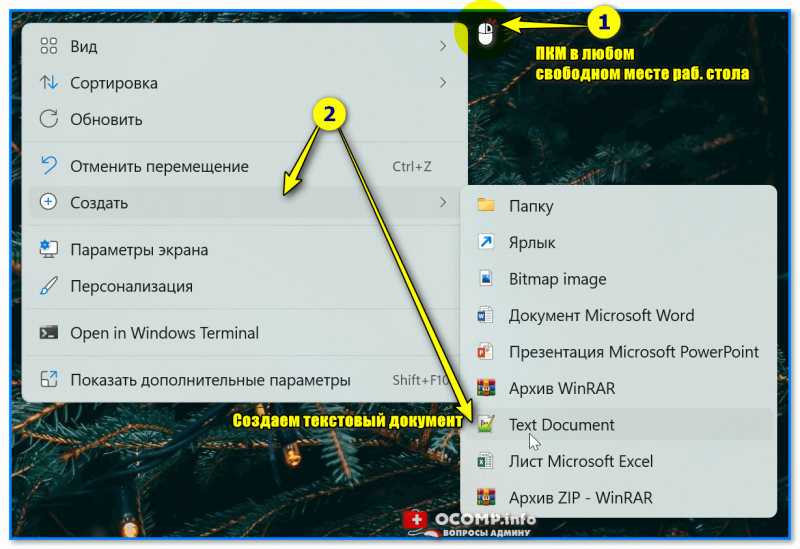
Создаем текстовый документ
ШАГ 2
Название файла у этого текстового документа может быть любым (но лучше использовать англ. символы).
Далее следует открыть этот файл и вписать в него нужные команды. В своем примере я впишу только одну (если вы делаете это впервые — рекомендую повторить ее вместе со мной):
ping ya.ru -t
Разумеется, файл нужно сохранить. Кстати, вместо ya.ru можно указать google.ru или любой другой адрес (обычно, многие указывают свой игровой сервер, и запускают этот BAT’ник, когда в игре наблюдаются лаги).
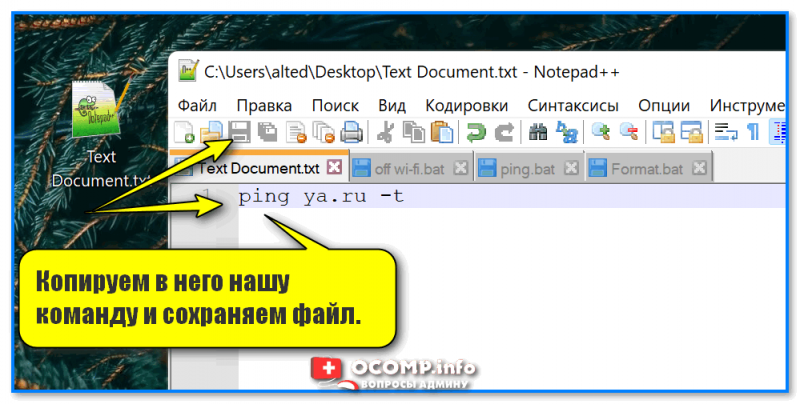
Копируем в него нашу команду и сохраняем файл.
ШАГ 3
Затем обратите внимание на расширение файла — у текстового файла оно «.TXT». Кстати, если у вас не отображаются расширения — можете 📌 прочитать эту заметку или просто введите в командной строке две вот эти команды (последовательно):
reg add «HKCU\Software\Microsoft\Windows\CurrentVersion\Explorer\Advanced» /v HideFileExt /t REG_DWORD /d 00000000 /f
taskkill /F /IM explorer.exe & start explorer
*
Нам нужно переименовать файл так, чтобы вместо «.TXT» — было новое расширение «.BAT»!
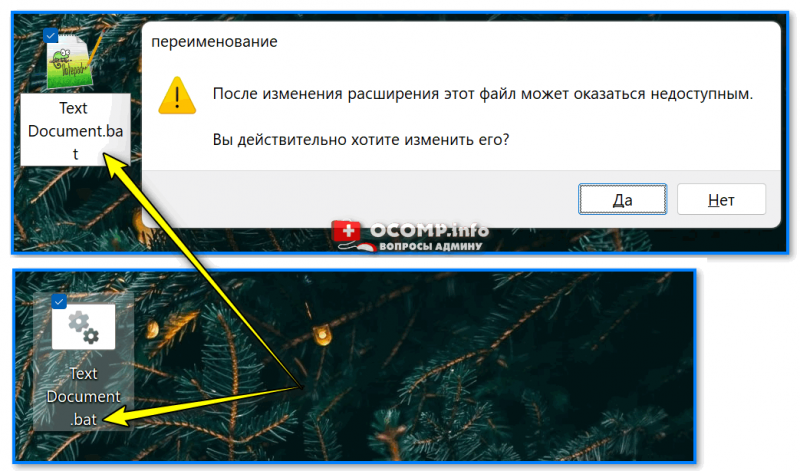
Меняем расширение TXT на BAT
ШАГ 4
Теперь достаточно кликнуть по «нашему» файлу правой кнопкой мыши и запустить его от имени администратора — автоматически появится окно командной строки с проверкой пинга. Удобно? Вполне! 👌
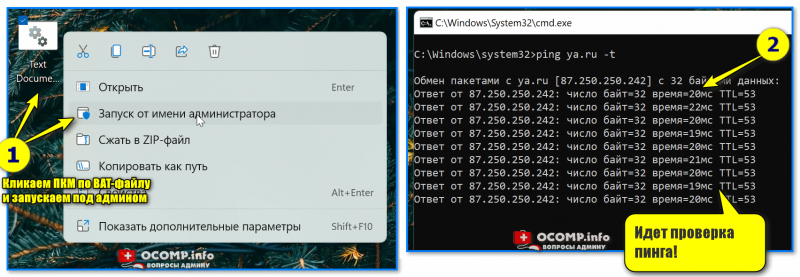
Идет проверка пинга!
ШАГ 5
Чтобы отредактировать BAT-файл (и каждый раз не переименовывать его туда-сюда) — рекомендую вам установить блокнот Notepad++ (уже ранее добавлял его в подборку).
После установки Notepad++ — достаточно кликнуть ПКМ по BAT-файлу — и в появившемся меню выбрать опцию редактирования…
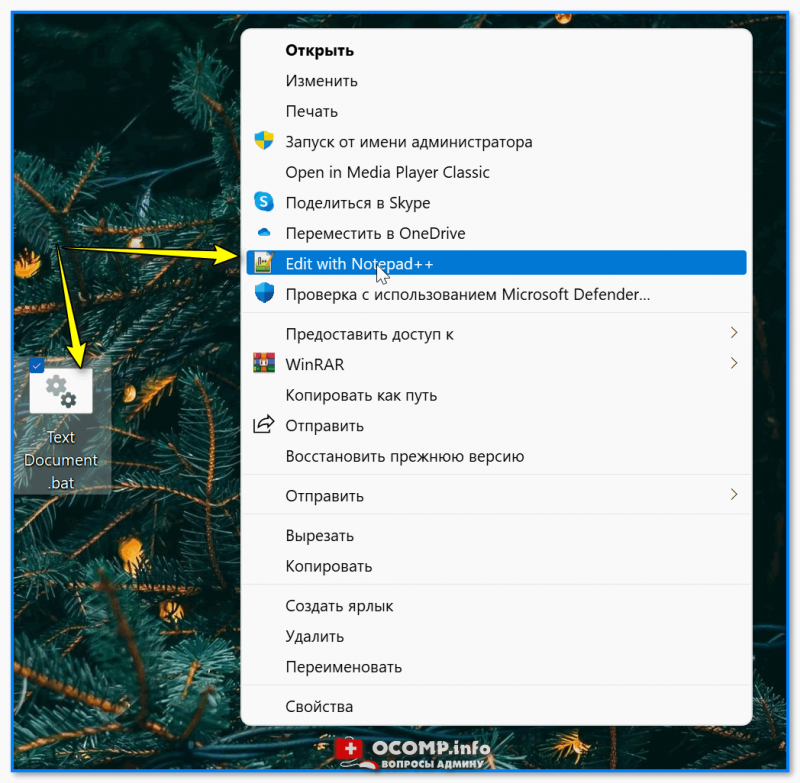
Редактировать BAT
*
Вариант 2: запуск игры с высоким приоритетом + откл. авто-поиска Wi-Fi сетей
Этот скрипт рекомендуется попробовать пользователям ноутбуков, кто играет в сетевые игры.
*
Этот BAT-файл я создал на одном своем рабочем ноутбуке (он уже довольно «старый», и нередко притормаживал при запуске игр). Однако, благодаря нескольким строкам кода — удается вполне комфортно играть. 👌
Что за строки нужно добавить в BAT (выделены коричневым):
cmd.exe /c start /high /D «C:\Games\Counter-Strike 1.6\» hl.exe -game cstrike -appid 10 -nojoy -noipx -noforcemparms -noforcemaccel
netsh wlan set autoconfig enabled=no interface=»Wi-Fi»
pause
netsh wlan set autoconfig enabled=yes interface=»Wi-Fi»
pause
*
Что он делает:
- запускает игру CS с высоким приоритетом (это позволяет снизить кол-во притормаживаний в играх). Разумеется, вместо строки «C:\Games\Counter-Strike 1.6\» hl.exe — вы можете указать свою игру и ее расположение;
- отключает авто-поиск Wi-Fi сетей (это снижаем пинг и увел. скорость сети // правда не дает подключаться к другим Wi-Fi сетям). Кстати, вместо «Wi-Fi» — нужно указать название своего адаптера (посмотрите так: нажмите Win+R, и используйте команду ncpa.cpl);

Название адаптера
- далее идет пауза — скрипт будет ждать нажатия какой-нибудь клавиши (примечание: т.к. у нас будет запущена игра — это окно скроется из вида, и оно не будет нам мешать);
- когда через часик-другой игра будет закрыта, — вы увидите окно командной строки и нажмете какую-нибудь клавишу — будет снова включен авто-поиск Wi-Fi сетей. Удобно? 😉

*
Вариант 3: создание резервной копий файлов и точки восстановления в Windows
Приведу наиболее простую и довольно надежную команду для создания резервных копий файлов и папок:
xcopy C:\Games D:\backup /f /i /y /s
*
Она копирует один каталог в другой (просто, без вопросов и расспросов). Если вам нужно скопировать 2 или 3 (или более) каталогов — просто создайте несколько подобных строк.
Расшифровка:
- C:\Games — тот каталог, который будем копировать (все подкаталоги и файлы из них тоже будут скопированы);
- D:\backup — тот каталог, куда будет всё скопировано;
- /f — выводит имена файлов (чтобы вы видели, что происходит);
- /i — создает новый каталог, если на диске «D:» нет каталога «backup» (см. строку выше);
- /y — перезаписывает старые файлы новыми;
- /s — копирует каталоги и подкаталоги, если в них есть какие-то файлы.
*
Для создания точки восстановления можно использовать следующий код:
wmic.exe /Namespace:\\root\default Path SystemRestore Call CreateRestorePoint «MyRestorePoint», 100, 7
pause
После запуска подобного BAT-файла — точка восстановления будет создана в авто-режиме! Это очень удобно делать перед установкой нового софта, железа и пр. (чтобы проверить есть ли точка — нажмите Win+R, и используйте команду: rstrui). 👇
Если точки нет (как в моем примере ниже) — прочитайте это!
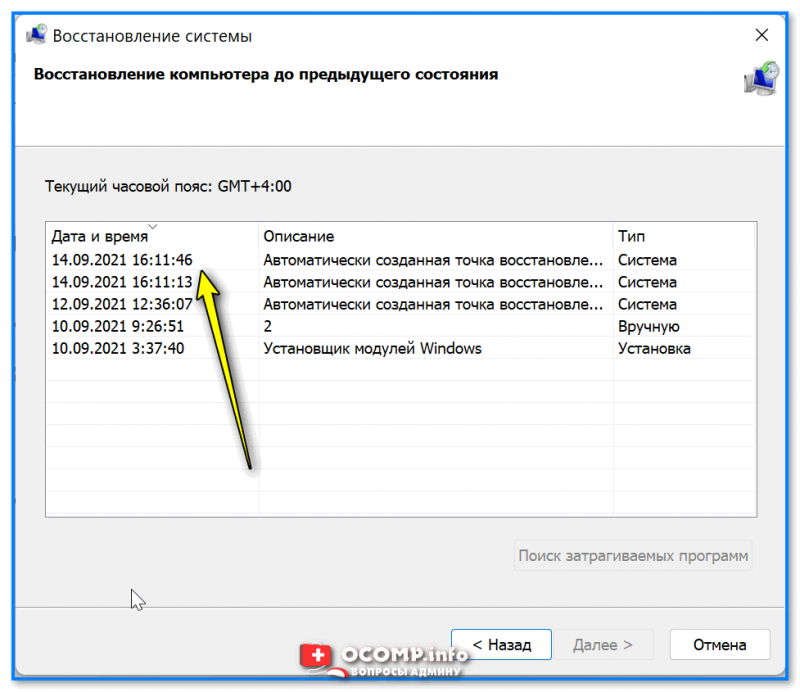
Точки восстановления создаются!
*
Вариант 4: очистка временных папок
Здесь есть несколько вариантов «подхода». Я приведу один из самых простейших, см. 4 строки ниже. 😉
del /q /f /s %WINDIR%\Temp\*.*
del /q /f /s %SYSTEMDRIVE%\Temp\*.*
del /q /f /s %Tmp%\*.*
del /q /f /s %Temp%\*.*
📌 Что это означает:
- BAT-файл с этими строками чистит временные папки в Windows (как правило, в них скапливается один «мусор», которые занимает лишь место на диске);
- %WINDIR%\Temp\ — это папка «C:\Windows\Temp»;
- %SYSTEMDRIVE% — это системный диск «C:\»;
- *.* — маска для удаления всех файлов;
- /q /f /s — удаление всех каталогов и подкаталогов (без вопросов).
*
📌 Что можно еще добавить в наш скрипт:
- del /q /f /s %WINDIR%\Prefetch\*.* — эта строка очистит папку Prefetch (в ней сохраняется кэш от различного софта. При удалении той или иной программы — кэш в папке остается, и со временем — ее размер может разрастись);
- del /q /f /s %SYSTEMDRIVE%\*.log — удаление всех Log-файлов с системного диска (это файлы, в которых содержится история запуска программы, например. Во многих случаях они бесполезны). Большинство программ, кстати, ведут логи, со временем они разрастаются и могут отнять сотни МБ на диске;
- При помощи предыдущей команды можно удалить и другие файлы с системного диска (например, с расширением .tmp или .bak // достаточно поменять лишь концовку команды) — однако, будьте аккуратны, легко можно что-нибудь запороть!
*
📌 Вариант 5: форматирование диска/флешки (с ручным выбором буквы, имени и файловой системы)
Этот мини-скриптик может быть весьма полезный (например, если у вас «подвисает» проводник при обращении к флешки // или не запускается управление дисками).
*
Собственно, здесь все делается аналогично. Чтобы не удлинять процесс — вот вам сразу же сам скриптик (ссылка на RAR-архив с BAT-файлом), который «набросал» за 5 мин. (и еще 10 потратил на проверку 😉). Его текст (выделен коричневым):
@echo off
wmic logicaldisk get name, VolumeName, Size, FileSystem, NumberOfBlocks, description
set /p adisk=»Введите букву диска/флешки для форматирования: «
set /p named=»Введите имя для диска/флешки (любое, например, my_disk): «
set /p number=»Нажмите l — для формат. в NTFS, 2 — в FAT32, 3 — для в ExFAT. Ваше число: «if «%number%» == «1» (
format %adisk%: /FS:NTFS /Q /V:%named%
pause
exit /b
)if «%number%» == «2» (
format %adisk%: /FS:FAT32 /Q /V:%named%
pause
exit /b
)if «%number%» == «3» (
format %adisk%: /FS:ExFAT /Q /V:%named%
pause
exit /b
)
*
Он довольно простой, но будьте с ним аккуратны! Если укажите не ту букву накопителя — можно легко отформатировать не тот диск…
Как он работает (запускать под именем администратора):
- сначала он показывает информацию по всем подключенным дискам (и их буквы);
- далее запрашивает букву диска/флешки, которую нужно отформатировать (в своем примере я ввел G и нажал Enter);
- затем нужно ввести название диска — может быть любым (главное, чтобы название было коротким и лучше использовать только латиницу!). Я использовал my_flash;
- после выбрать файловую систему (их тут три), и нажать Enter;
- если все введено корректно — диск/флешка будет отформатирована! 👌
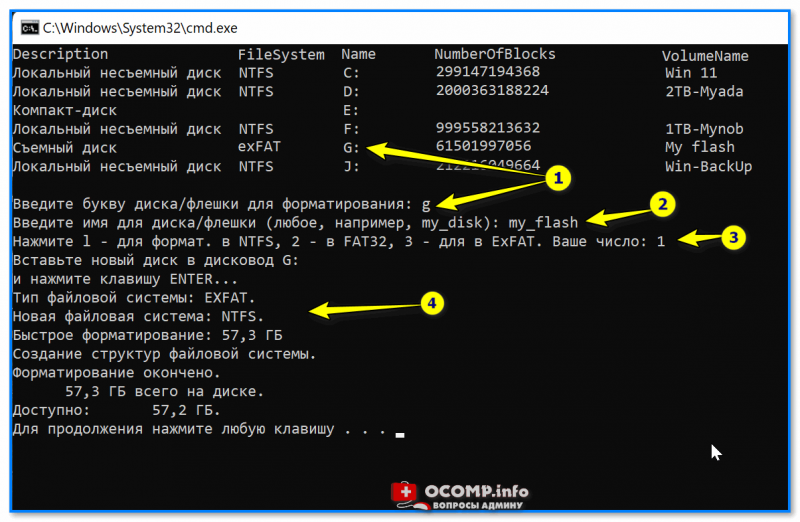
Пример работы BAT-файла для форматирования флешки
*
Как запускать BAT-файл от имени администратора (и по расписанию)
Способ 1
Самый простой вариант — нажать ПКМ по BAT-файлу и в контекстном меню выбрать «Запуск от имени администратора». См. скрин ниже. 👇
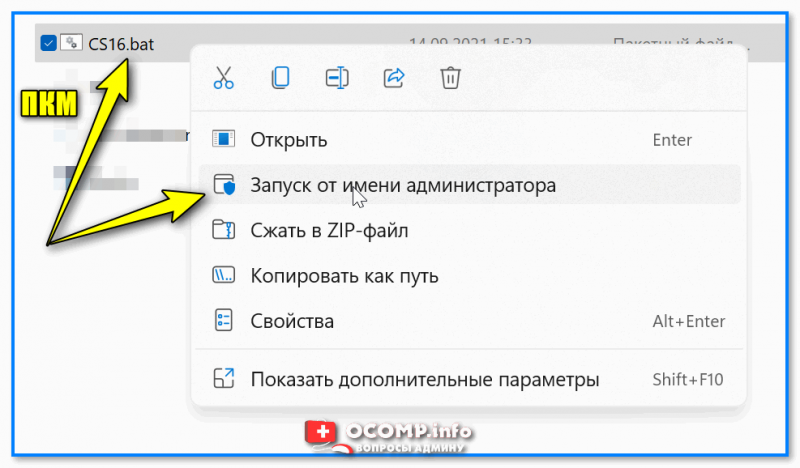
Нажать ПКМ по BAT-файлу
Способ 2
Можно нажать ПКМ по BAT-файлу и создать для него ярлык на рабочем столе. См. скрин ниже. 👇

Создание ярлыка к BAT-файлу
Далее в свойства ярлыка поставить галочку, что задача должна выполняться от имени администратора. Таким образом при каждом двойном клике по этому ярлыку — BAT’ник будет запускаться от админа. 👌
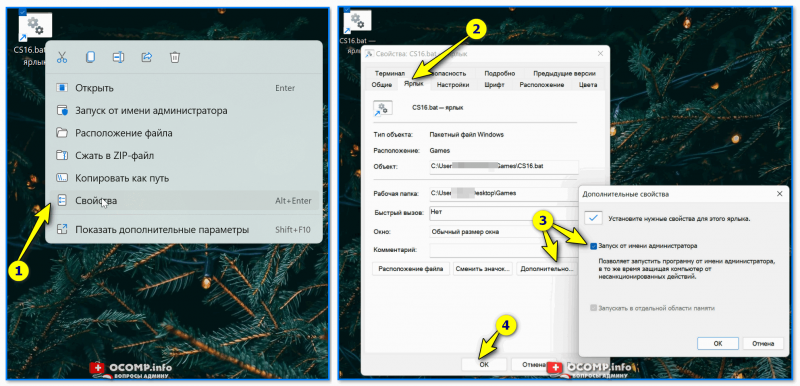
Свойства ярлыка — запускать с админ. правами
Способ 3
В планировщике заданий Windows (чтобы его открыть нажмите Win+R, и используйте команду control schedtasks) можно настроить запуск BAT-файла в нужное время и с нужными правами (т.е. автоматически). Это может быть весьма удобно, и серьезно упростить работу со множеством задач (очистка Windows от мусора, создание бэкапов и пр.) — точно никогда не забудете!
Более подробно о том, как создать задачу в планировщике заданий — я 📌 рассказывал в этой заметке.
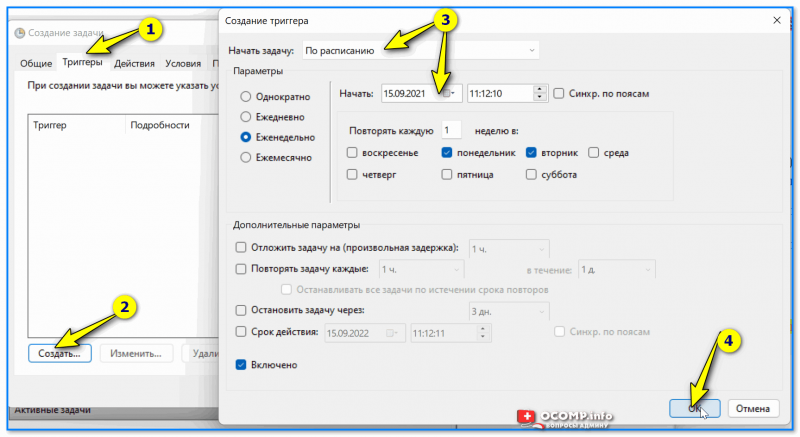
Триггеры — когда выполнять задачу, расписание
*
Если при выполнении BAT-файла появятся крякозабры вместо русского текста 👌
Чаще всего это бывает с теми BAT, в которых есть русские символы и выставлена «неправильная» кодировка (например, они часто встречаются в пути к папке: «C:\Games\Лучшие игры»). Кстати, в этом случае BAT-файл работать не будет: после попытки выполнения операции с «крякозабрами» — появится ошибка и окно CMD будет закрыто…
*
Что можно сделать:
- первое: попробуйте в начало BAT-файла добавить код @chcp 1251 (и сохраните файл!);
- второе: установите блокнот Notepad++ и задействуйте OEM-866 кодировку в меню: «Кодировки/Кодировки/Кириллица/OEM-866» (предварительно, для бэкапа, скопируйте весь текст текущего документа в другой файл).
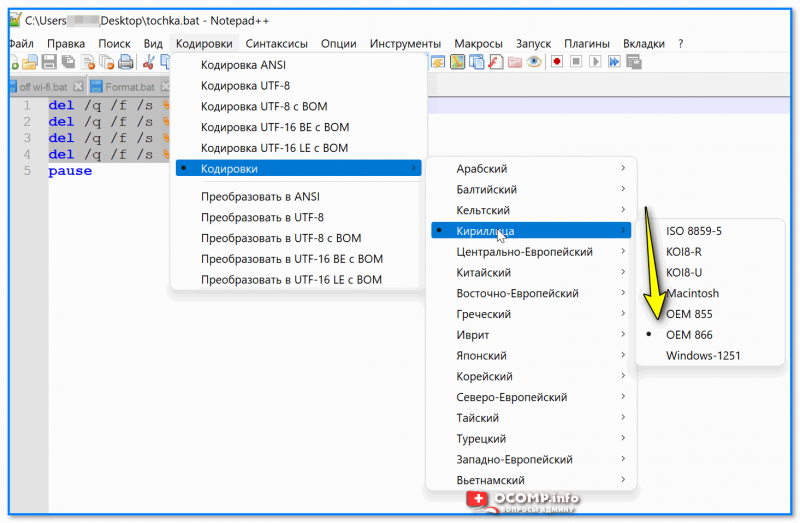
OEM 866 — пример, что нужно включить // программа Notepad++
*
👉 Доп. в помощь!
Вместо текста иероглифы, квадратики и крякозабры (в браузере, Word, тексте, окне Windows).
*
Дополнения по теме — приветствуются!
Удачи!
👋
A batch file refers to those text files that usually end with a «.bat» extension that contains multiple commands that the system can run in sequence from the Command Prompt to perform different tasks.
On Windows 11, you can use a batch file to quickly make system changes, query system information, automate routines, and launch apps while reducing the steps, mistakes, and time it could take to type the commands or perform specific actions.
Although you can always create more comprehensive scripts with PowerShell, batch files you can run on Command Prompt are still useful and easier to craft to perform an extended range of tasks.
This how-to guide will walk you through the different ways in which you can create and run a batch file on Windows 11.
How to create batch files on Windows 11
You can quickly write batch files with any text editor, such as Notepad or Visual Studio Code. You will only need some basic Command Prompt skills.
This guide will show you three examples. The first one will help you build a basic batch file with three lines of code. The second example is a little more advanced, outlining the basics of running multiple commands. Finally, the third example demonstrates that you can perform different actions.
Compose basic batch file
All the latest news, reviews, and guides for Windows and Xbox diehards.
To write a basic batch file on Windows 11, use these steps:
- Open Start.
- Search for Notepad and click the top result to open the text editor.
- Type the following lines of code in the text file:
@ECHO OFF
ECHO Hello World! This is my first batch file created on Windows 11.
PAUSE
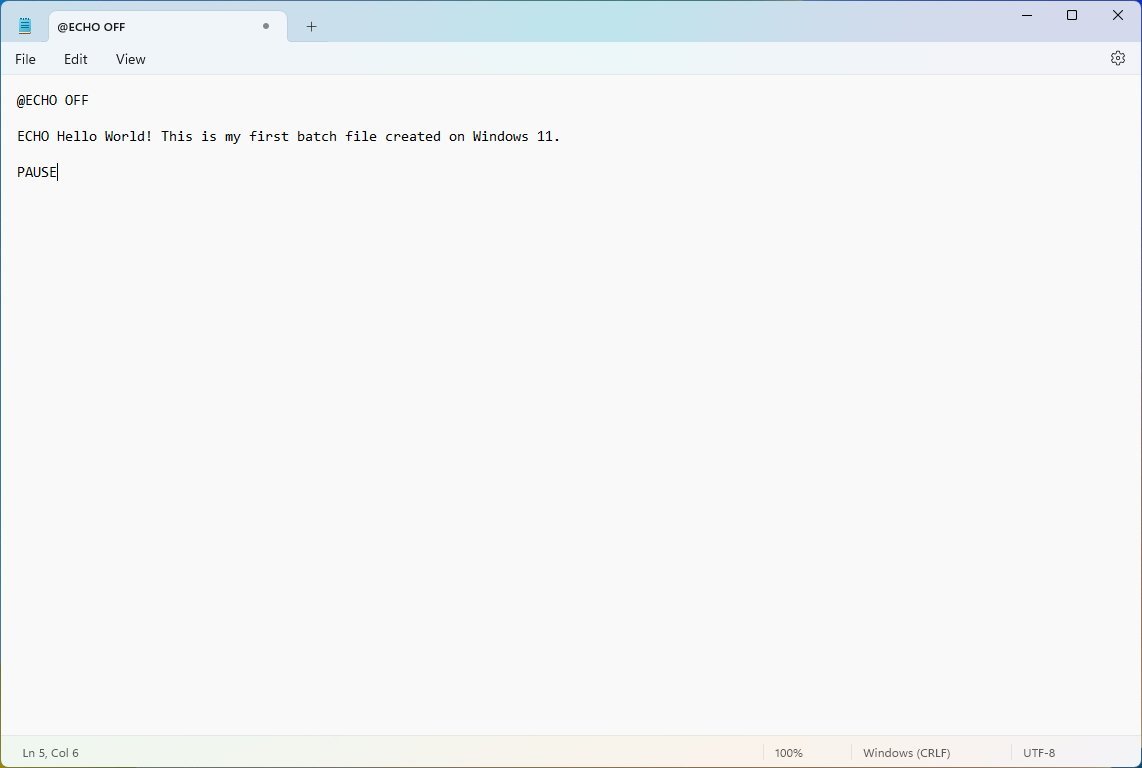
The above code will output the «Hello World! This is my first batch file created on Windows 11» message on the screen.
- Click the File menu and select the Save as option.
- Confirm a name for the script – for example, basic_batch.bat.
Once you complete the steps, double-click the file to run the script.
You will typically find batch files with the «.bat» extension, but it’s also possible to use the «.cmd» or «.btm» file extensions.
Here’s a break down of the commands:
- @ECHO OFF — Disables the display prompt and shows content in a clean line.
- ECHO — Prints the text after the space on the screen.
- PAUSE — Keeps the window open after running the commands. If you don’t use this option, the prompt will close automatically after the script finishes. You can use this command at the end of the script or after a specific command to insert a break on each line.
Compose advanced batch file
To create an advanced batch script, use these steps:
- Open Start.
- Search for Notepad and click the top result to open the text editor.
- Type the following lines in the text file to create an advanced script:
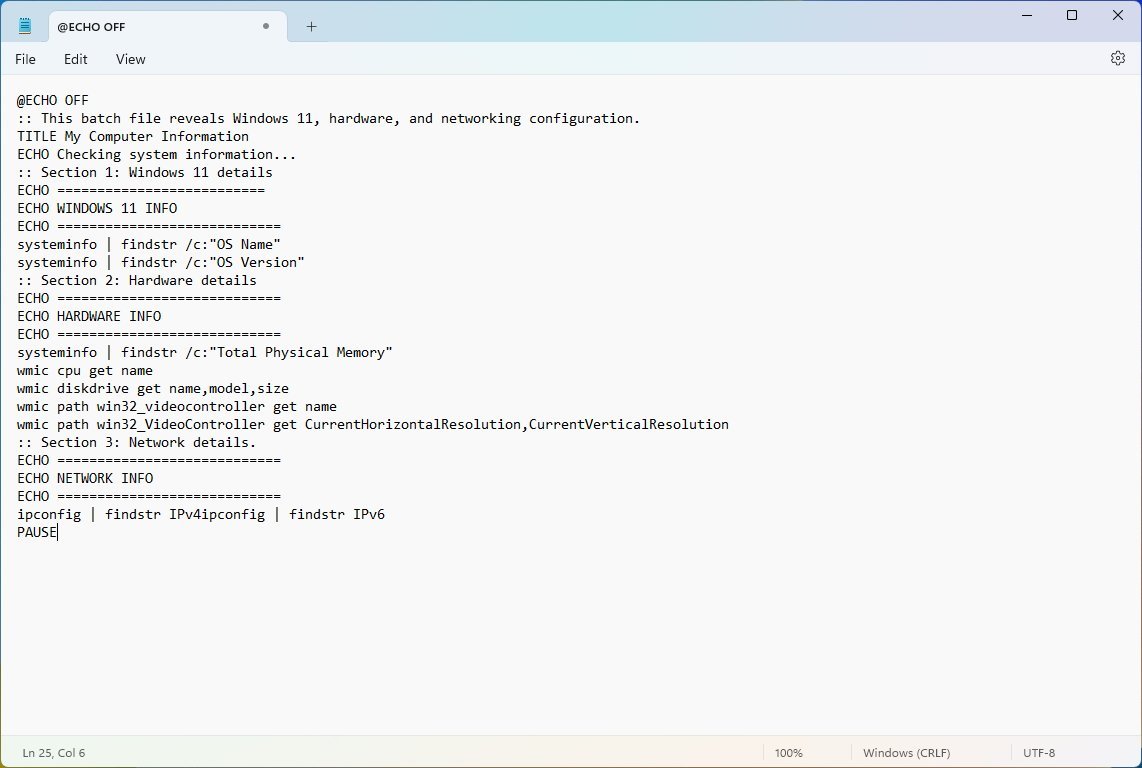
@ECHO OFF
:: This batch file reveals Windows 11, hardware, and networking configuration.
TITLE My Computer Information
ECHO Checking system information…
:: Section 1: Windows 11 details
ECHO ==========================
ECHO WINDOWS 11 INFO
ECHO ============================
systeminfo | findstr /c:»OS Name»
systeminfo | findstr /c:»OS Version»
:: Section 2: Hardware details
ECHO ============================
ECHO HARDWARE INFO
ECHO ============================
systeminfo | findstr /c:»Total Physical Memory»
wmic cpu get name
wmic diskdrive get name,model,size
wmic path win32_videocontroller get name
wmic path win32_VideoController get CurrentHorizontalResolution,CurrentVerticalResolution
:: Section 3: Network details.
ECHO ============================
ECHO NETWORK INFO
ECHO ============================
ipconfig | findstr IPv4ipconfig | findstr IPv6
PAUSE
This script executes multiple system commands in sequence and outputs the computer information in three different categories, including «Windows details,» «hardware details,» and «network details.»
- Click the File menu and select the Save as option.
- Type a name for the script — for example, advanced_batch.bat.
After you complete the steps, running the batch file will open a Command Prompt console outputting the results for each command.
Here’s a breakdown of the commands:
- @ECHO OFF — Disables the display prompt and shows content in a clean line.
- TITLE — Renders a custom name for the window title bar.
- :: — Ignores the contents of the line. Usually, it’s used to write comments and documentation information.
- ECHO — Prints the text after the space on the screen.
- PAUSE — Keeps the window open after running the commands.
Compose actionable batch file
One of the most common reasons to use scripts is to automatize different tasks to make system changes, such as connecting a network drive, installing an application, or changing system settings.
To create a script to change system settings on Windows 11, use these steps:
- Open Start.
- Search for Notepad and click the top result to open the app.
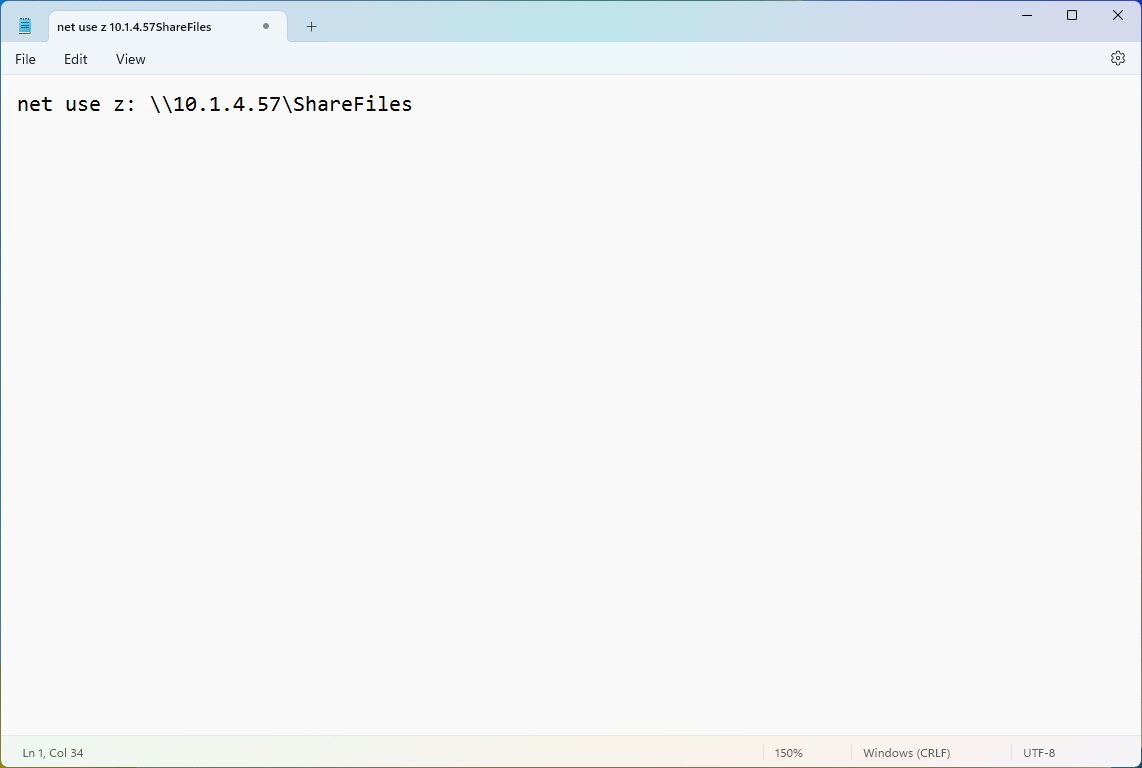
- Type the following command in the text editor: net use z: \\PATH-NETWORK-SHARE\FOLDER-NAME /user:USERNAME PASSWORD
In the command, replace the «\\PATH-NETWORK-SHARE\FOLDER-NAME» for the folder network path to mount on the device and «USERNAME PASSWORD» with the username and password that authenticates access to the network share. This example maps a network folder using «Z» as the drive letter: net use z: \\10.1.4.57\ShareFiles
- Click the File menu and select the Save as option.
- Confirm a name for the script — for example, network-drive-batch.bat.
Once you complete the steps, this particular batch file will map a network on File Explorer.
How to run batch files on Windows 11
On Windows 11, you can run batch files in at least three ways from Command Prompt, File Explorer, or automatically during startup.
Run script from Command Prompt
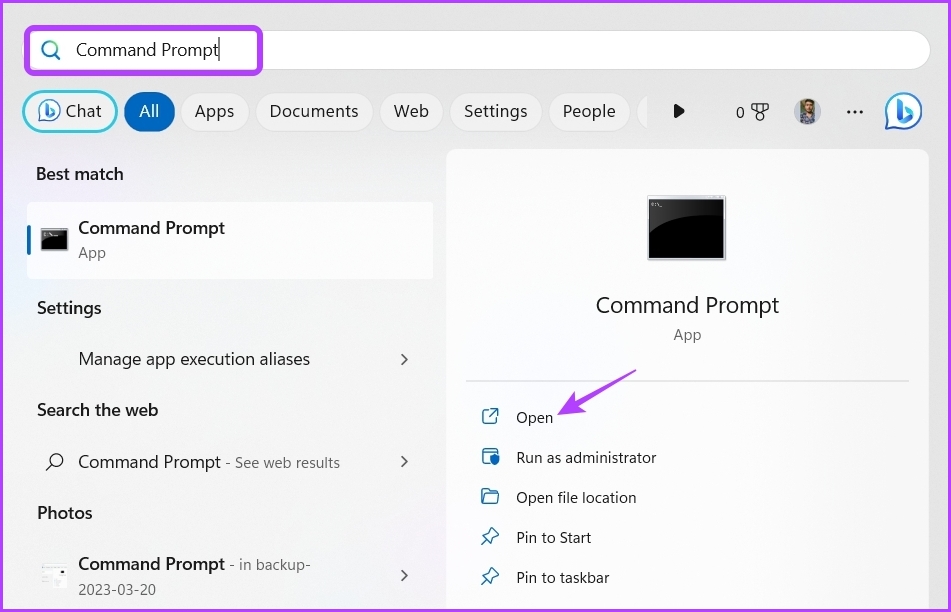
To run a batch file from Command Prompt on Windows 11, use these steps:
- Open Start.
- Search for Command Prompt, right-click the top result, and select the Run as administrator option.
- Type the following command to run a Windows 11 batch file and press Enter: C:\PATH\TO\FOLDER\BATCH.bat
In the command, specify the path and name for your script. This example runs the batch file located in the «scripts» folder inside the «Downloads» folder: C:\Users\ACCOUNT\Downloads\basic_batch.bat
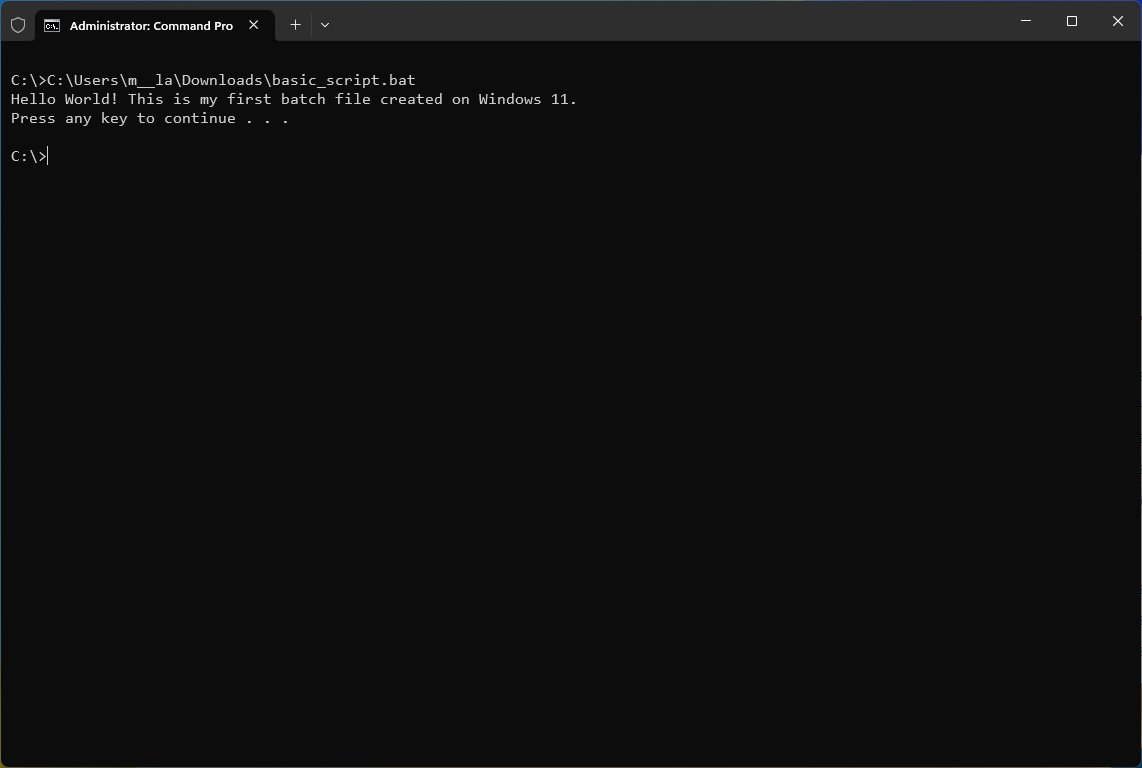
After you complete the steps, the batch file will run and display the results in the console. Since you opened Command Prompt manually, it won’t close automatically if the script doesn’t include the «Pause» option.
Run script from File Explorer
To run a script file from File Explorer on Windows 11, use these steps:
- Open File Explorer.
- Browse to the folder with the batch file.
- Right-click the file and select the Open option to run it.
- (Optional) Right-click the file and select the Run as administrator option if elevation is required.
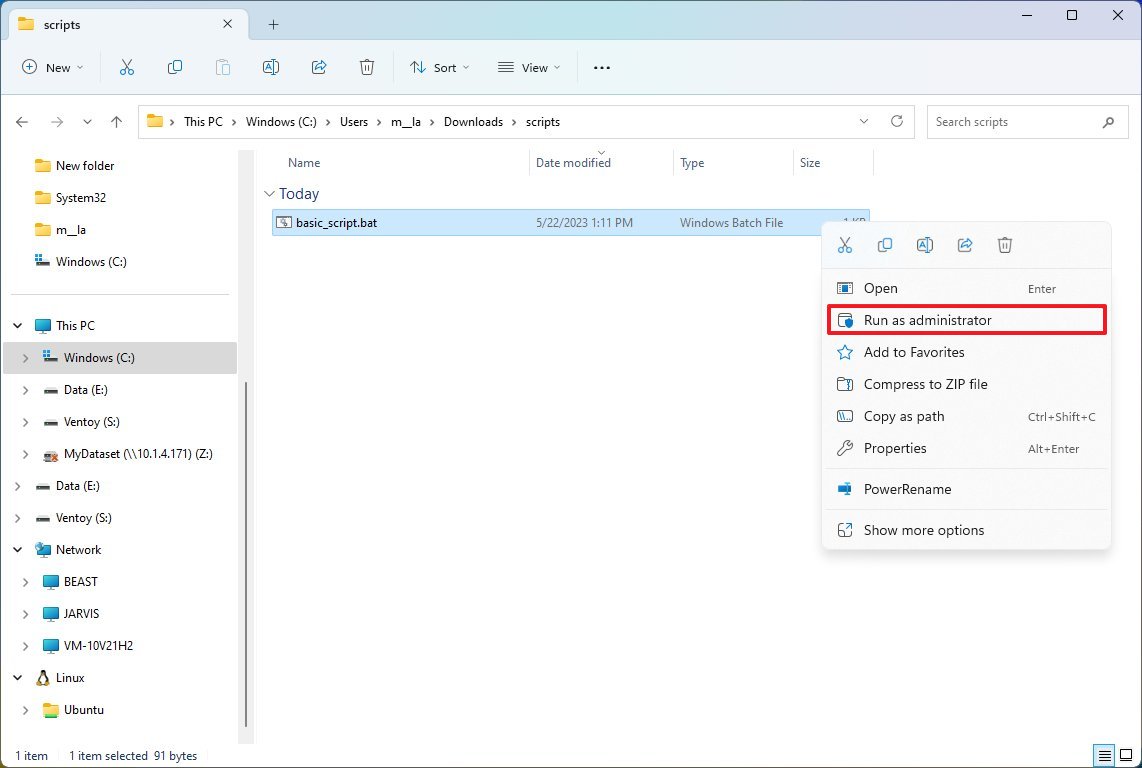
Once you complete the steps, the batch file will run and execute every command. If you have specified the «Pause» option, the window will remain open. Otherwise, it’ll close immediately after completing the sequence of commands.
Run script from Startup
To run a batch file on startup, use these steps:
- Open File Explorer.
- Open the folder with the batch file.
- Right-click the file and select the Copy option.
- Type the following command in the address bar and press Enter: shell:startup
- Click the Paste button from the command bar in the Startup folder.
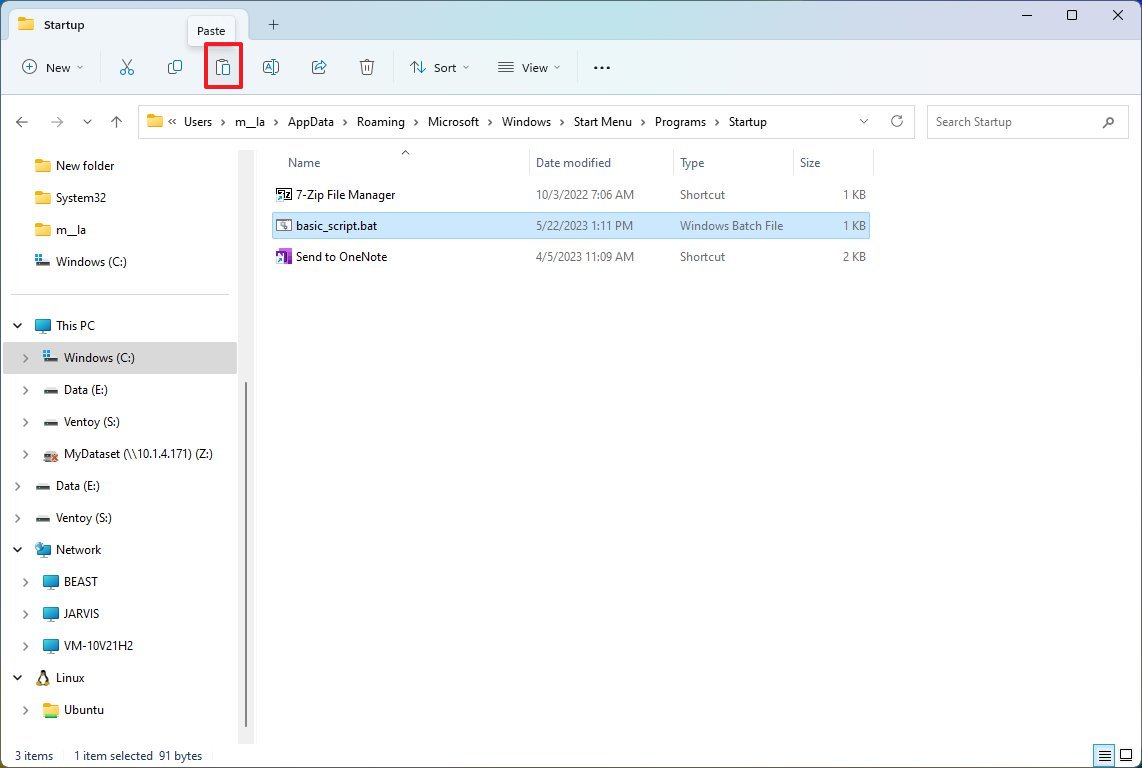
After you complete the steps, Windows 11 will run the script every time the computer starts, and the user logs in to the account.
More resources
For more helpful articles, coverage, and answers to common questions about Windows 10 and Windows 11, visit the following resources:
- Windows 11 on Windows Central — All you need to know
- Windows 10 on Windows Central — All you need to know
Key Takeaways
- A batch file is an automated script containing a sequence of commands executed in serial order, and these commands don’t require user input unless specified.
- You need a text editor like Notepad to create batch files on Windows 11.
- You can view batch files using different native features of Windows 11, including Notepad, Command Prompt, and your browser.
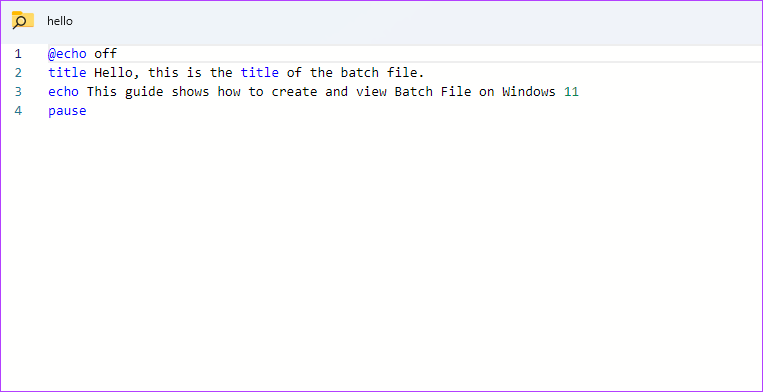
It’s easy to make a BAT file on Windows 11. You can use the Notepad app or any text editor on your Windows computer. Here’s a step-by-step instruction on how it’s done:
Step 1: Press the Windows key to open the Start Menu.
Step 2: Type Notepad in the search bar and press Enter.

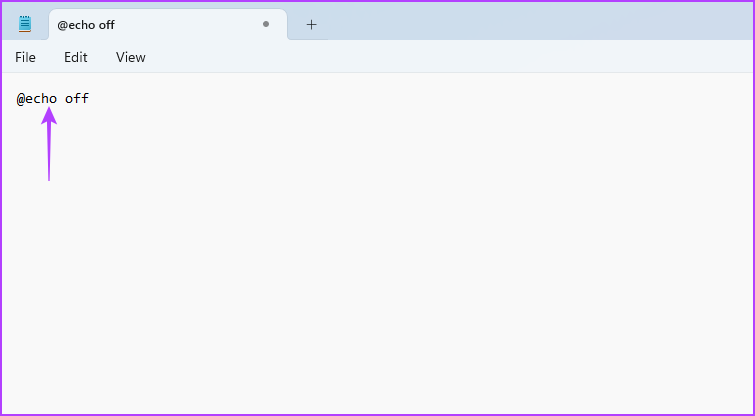
Step 3: Type the command below and press Enter to proceed to the next line. This command disables the display for the entire script, so you don’t see it while it runs.
@echo off
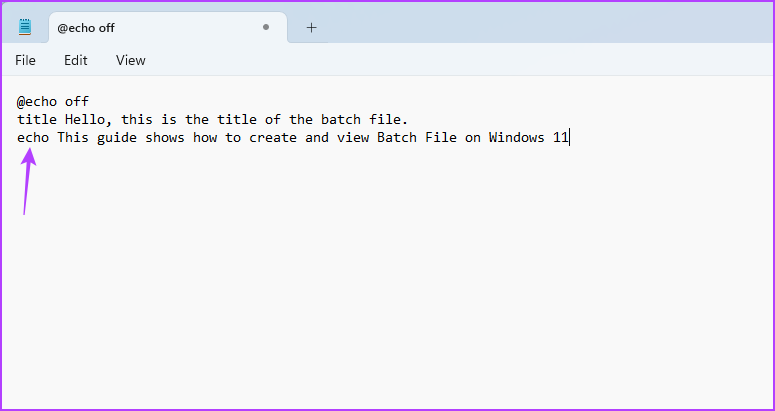
Step 4: Type title and write the title of your batch file. Then, press Enter.

Step 5: Type echo and the text you want to display on the output screen. Then, press Enter.
Step 6: Type pause and press Enter. This indicates the end of the batch file and keeps the Command Prompt window open, which otherwise would have been closed once the command is successfully executed.

Step 7: Click the File option at the top left corner and choose Save as from the context menu.

Step 8: Name the batch file and save it with the BAT extension—for instance, hello.bat.

To run the batch file, head toward its location and double-click on it. A Command Prompt window will appear, showing the output of the batch file.

The above was a simple example of a batch file. Similarly, you can create and run a batch file to perform more complex operations like fixing gpedit.msc missing error.
Open Batch File (.Bat) on Windows 11
There may be situations when you want to view the content of the batch file. It may be because you are suspicious about the file or want to edit its content. Fortunately, various ways to view a batch file on Windows 11 exist. Here are some:
Method 1: Using the File Explorer
The quickest way to view a batch file’s content is through the Windows File Explorer preview option. Here’s how to enable this option and view a batch file using it:
Step 1: Press the Windows + E keyboard shortcut to open the File Explorer.
Step 2: Click the View button at the top and choose Preview pane.

Step 3: Head to the batch file location.
Step 4: Click on the batch file to view its content in the preview pane.

Method 2: Opening With Notepad
While this process will work with any text editor, we show you how to use the built-in Notepad.
Step 1: Navigate to the location of the batch file.
Step 2: Right-click it and select Edit in Notepad.

Method 3: Using Command-Line Tools
Command-line tools like Command Prompt and Windows PowerShell display the output of a batch file and its content. Here’s how to use Command Prompt to view a batch file:
Step 1: Right-click on the batch file and choose Copy as path from the context menu.

Step 2: Open the Start Menu, type Command Prompt in the search bar, and choose Run as administrator from the right pane.
Step 3: Type more, followed by the copied path, and press Enter. So, the command will look like this:
more “copied path”
You’ll see the batch file content in the result.

To view a batch file using PowerShell, follow these steps:
Step 1: Copy the path of the batch file using the steps mentioned above.
Step 2: Launch the Start Menu, type Windows PowerShell, and choose Run as administrator.
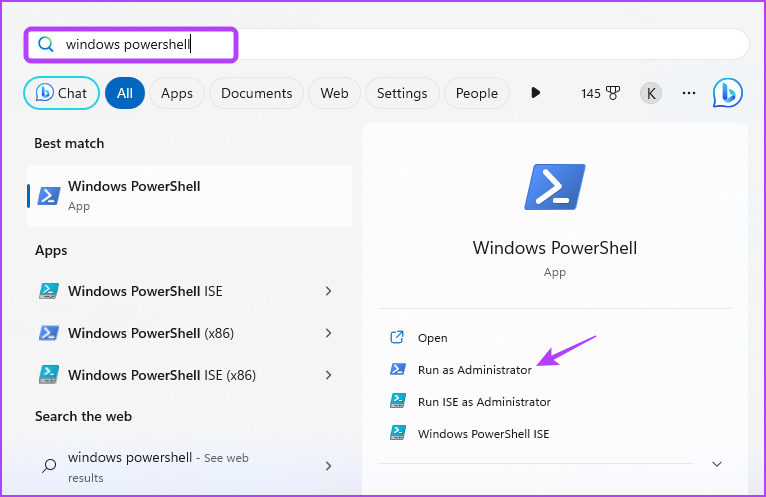
Step 3: Type get-content, followed by the copied path, and press Enter. So, the command will look this:
get-content “copied path”

PowerShell will show the content of the batch file in the result.

Method 4: Using a Browser
You can use your favorite browser to view the content of a batch file. Below are the steps to view batch files using Google Chrome.
Step 1: Navigate to the batch file location, right-click on it, and choose Copy as path.
Step 2: Open the Start Menu, type Google Chrome, and press Enter.

Step 3: Paste the copied address in the address bar and delete the double quotes. Then, press Enter.

Google Chrome will display the batch file content.

Method 5: Using Microsoft PowerToys
Microsoft PowerToys helps power users to enhance their productivity. You can also use this tool to view the content of a batch file. You should download and install it, then continue with the steps below. Here’s how:
Step 1: Launch the Start Menu, type PowerToys in the search bar, and press Enter.

Step 2: Choose Peek from the left sidebar and toggle on Enable Peek.

Step 3: Click the Pen icon next to Activation shortcut.
Step 4: Assign a shortcut key combination to trigger the peek feature. Ensure the shortcut starts with Windows, Alt, or Shift key. Then, click Save.

Step 5: Head to the location of the batch file.
Step 6: Click on the batch file and press the peek feature key combination.
Was this helpful?
Thanks for your feedback!
The article above may contain affiliate links which help support Guiding Tech. The content remains unbiased and authentic and will never affect our editorial integrity.
Readers help support Windows Report. We may get a commission if you buy through our links.
Read our disclosure page to find out how can you help Windows Report sustain the editorial team. Read more
Performing repetitive tasks or running a series of commands might be essential to your computing routine, but it can take a lot of time. That’s where creating a Batch (.bat) file on Windows 11 comes to the rescue.
In this guide, we will discuss step-by-step instructions to create a batch script file on Windows 11 to automate tasks while reducing errors and saving time.
Batch files can be beneficial for novice and experienced users:
- Automate repetitive tasks and streamline workflows, saving significant time & effort.
- Consistent execution of tasks, reducing human error and improving efficiency.
- Carry out specific tedious tasks like backups, system configuration, software installation & more.
- Help you execute commands on multiple computers at the same time.
- Can carry out complex procedures that involve multiple steps.
- Are portable and can be shared with other computers.
How do I create a batch file in Windows 11?
1. Create a basic batch file
- Press the Windows key, type notepad, and click Open.

- Type the following lines:
@ECHO OFF
ECHO Hi, this is my first batch file.
PAUSE
- Here @ECHO OFF – Disables the display prompts & shows content; ECHO – Prints the text after the space; PAUSE – Keeps the window open after executing commands.
- Go to File and click Save as.

- Name the file Test.bat, and for Save as type, select All files, then click Save.

- Once created, locate the file and double-click to open it. On the Command Prompt window, you will see the Hi, this is my first batch file message.


You can also save the .reg files in .bat file format to automate the modification of your registry files, which can minimize the risks involved.
2. Access network drives and folders
- Press the Windows key, type notepad, and click Open.
- Type the following line after replacing the driver letter F with the one you want:
Echo Create new F: drive mapping - Copy & paste the following command after replacing the Network path with the path you want to map to:
@net use F: \Network path /persistent: yes - Repeat the process if you want to add multiple drives. Type the following lines:
: exit
@pause
- Click File, then choose Save As. Now name the file and add a .bat extension. For Save as type, select All files, then click Save.
- Once the file is created, locate and double-click it to execute the task.

- Recent Windows 11 update lets you disable profanity filter in voice typing
- Microsoft wants Windows 10 users to upgrade to Windows 11 or Copilot + PCs
- Windows 11 KB5055627 update makes File Explorer more fluid
3. Add user inputs
To create a batch file that takes user input and displays a customized message, follow these steps:
- Press the Windows key, type notepad, and click Open.
- Type the following script:
@echo off
: start
set /p input = Enter the Name:
echo %input% We are thrilled to welcome you to the event!
pause
go to start
- You can change the Enter the Name instruction and the personalized message you see after that as per your task & preferences.
- Click File, then Save As. Name the file, add a .bat file extension and for Save as type, select All files, then click Save.
- Once the file is created, locate and double-click it to open it in the Command Prompt & execute the task.

4. Automate repetitive tasks
- Press the Windows key, type notepad, and click Open.
- Here, we will show you how we automated the process of opening frequently used apps on our computer.
- This is the script we used to open Google Chrome, Word, Slack, and ShareX:
@echo off
cd "C:\Program Files\Google\Chrome\Application\chrome.exe"
start chrome.exe
start – "C:\Program Files\Microsoft Office\root\Office16\WINWORD.EXE"
cd "C:\Program Files\ShareX\ShareX.exe"
start ShareX.exe
Exit
- You can use the script, but replace the app path with the one you want to open. Click the File menu and choose Save As.
- Name the file, add a .bat extension, for Save as type, select All files, then click Save.

5. Edit lines of code with the command window
- Press the Windows key, type notepad, and click Open.
- This script can help you replace lines in a simple code; let’s assume you have a file named code.txt, which has oldtext mentioned multiple times, and you want to replace it with newtext.

- For that, you can use this script:

@echo off

setlocal enabledelayedexpansion

set "inputFile=code.txt"
set "outputFile=code_modified.txt"
set "oldText=oldtext"
set "newText=newtext"

if not exist "%inputFile%" (
    echo Input file not found.
    exit /b
)

(
    for /f "usebackq delims=" %%a in ("%inputFile%") do (
        set "line=%%a"
        set "line=!line:%oldText%=%newText%!"
        echo !line!
    )
) > "%outputFile%"

echo Lines with '%oldText%' replaced by '%newText%' have been written to '%outputFile%'.

endlocal
You need to change code.txt with your file name and replace oldtext and newtext with the lines you want to use.
Now save the file using these steps:
- Click File and choose Save As. Name the file, add a .bat extension, for Save as type, select All files, then click Save.
- Locate and double-click the file to open it in the Command Prompt window & execute the task.
Now that you have created .bat file, you can use the Windows Task Scheduler to schedule it to run automatically at specific intervals.
How do I edit a batch file in Windows 11?
To edit a batch file, you can open Notepad and click File>Open, or you can locate and right-click the file and choose Edit from the context menu.
You can make the required changes once the file is opened in Notepad. Once edited, click Ctrl + S to save the changes.
To run the batch file in Windows 11, you can locate it in the File Explorer window and double-click it or open Command Prompt and use the cd command to go to the folder where the batch file is located, then type the batch file name and press Enter.
You should always save the batch script file to an accessible location like your user account’s Document or Desktop folder.
Remember that the batch files can execute commands, interact with your system, automate tasks, and edit simple codes; however, if you want to do sophisticated editing or code manipulation, we suggest you use a programming language like Python or PowerShell.
What tasks would you carry on using batch files? Feel free to mention them in the comments section below.
Srishti Sisodia
Windows Software Expert
Srishti Sisodia is an electronics engineer and writer with a passion for technology. She has extensive experience exploring the latest technological advancements and sharing her insights through informative blogs.
Her diverse interests bring a unique perspective to her work, and she approaches everything with commitment, enthusiasm, and a willingness to learn. That’s why she’s part of Windows Report’s Reviewers team, always willing to share the real-life experience with any software or hardware product. She’s also specialized in Azure, cloud computing, and AI.
Creating a batch file in Windows 11 is a straightforward process that involves writing a series of commands in a text file and then saving it with a .bat extension. Doing this allows you to automate repetitive tasks, making your computer experience much more efficient. With a bit of practice, you’ll be creating batch files like a pro in no time.
In this section, we’ll walk through the steps needed to create a batch file on your Windows 11 computer. By the end of this, you’ll know how to set up a simple batch file and get it running.
Step 1: Open Notepad
Start by pressing the Windows key, typing «Notepad,» and hitting Enter.
Notepad is a basic text editor that’s perfect for creating batch files. It’s simple and comes pre-installed on all Windows computers.
Step 2: Write Your Commands
In Notepad, type the commands you want to execute. For starters, you can write something simple like echo Hello, World!.
Commands are the instructions that your batch file will execute. You can include multiple commands, each on a new line.
Step 3: Save the File with a .bat Extension
Click «File» in the top menu, select «Save As,» and type your desired filename followed by .bat (e.g., example.bat). Choose «All Files» under the «Save as type» dropdown.
The .bat extension tells Windows to treat the file as a batch file, which can be executed to run your commands.
Step 4: Run the Batch File
Navigate to the location where you saved your batch file, then double-click it to run.
When you double-click your batch file, Windows will execute the commands you wrote, starting with the first and proceeding down the list.
Step 5: Troubleshoot if Necessary
If your batch file doesn’t run as expected, go back to Notepad and make sure there are no typos in your commands. Save the file again and try running it one more time.
It’s pretty common to make minor mistakes when writing commands, especially if you’re new to batch files. Correcting these small errors usually resolves any issues.
After completing these steps, your batch file will execute the commands you’ve written whenever you run it. This can save you lots of time, especially with repetitive tasks.
Tips for Creating a Batch File in Windows 11
- Start Simple: Begin with easy commands like
echoto get the hang of it before moving on to more complex tasks. - Use Comments: Add remarks in your file by starting a line with
REMto keep track of what each section does. - Test Regularly: Run your file after adding a few commands to catch errors early.
- Backup Your File: Before making significant changes, create a backup to avoid losing your progress.
- Learn Common Commands: Familiarize yourself with commonly used commands such as
cd,copy, anddel.
Frequently Asked Questions
What is a batch file?
A batch file is a text file containing a series of commands that are executed by the command line interpreter.
Can I edit a batch file after creating it?
Yes, you can open the batch file in Notepad, make changes, and save it again.
How do I run a batch file with administrative privileges?
Right-click the batch file and select «Run as administrator.»
Can batch files be harmful?
Yes, if they contain malicious commands. Only run batch files from trusted sources.
Do I need programming skills to create a batch file?
No, basic command-line knowledge is sufficient to create and understand simple batch files.
Summary
- Open Notepad.
- Write your commands.
- Save the file with a .bat extension.
- Run the batch file.
- Troubleshoot if necessary.
Conclusion
Creating a batch file in Windows 11 is a skill that can drastically improve your efficiency by automating repetitive tasks. Whether you’re a beginner or have some experience, the simplicity of batch files makes them accessible to everyone. Start small with basic commands, and gradually incorporate more complex instructions as you become comfortable.
Don’t be afraid to experiment and make mistakes. Each error is a learning opportunity that brings you one step closer to mastering batch files.
For more advanced usage, consider diving into scripting languages like PowerShell or learning about other types of automation tools available in Windows 11. Happy scripting!
Kermit Matthews is a freelance writer based in Philadelphia, Pennsylvania with more than a decade of experience writing technology guides. He has a Bachelor’s and Master’s degree in Computer Science and has spent much of his professional career in IT management.
He specializes in writing content about iPhones, Android devices, Microsoft Office, and many other popular applications and devices.
Read his full bio here.