
Лучше всего делать небольшие видеоклипы, объединяя их в один файл. Но как объединить видео в Windows 10? Если вы используете Windows 10, существует множество простых способов объединения видео, и этот пост даст вам четкое руководство о том, как это сделать. Кроме того, вы можете увидеть другие альтернативы для редактирования видео в Windows 8 и 11. Без лишних слов давайте рассмотрим рекомендуемые методы объединения видео в Windows 10!
Часть 1. Используйте Windows Photo для объединения видео в Windows 10/11
Новейшая версия Windows содержит лучшие встроенные функции. Одна из самых ожидаемых функций для 10 и 11 — обновленное приложение «Фотографии» с видеоредактором. Заглянув внутрь, он имеет настраиваемый интерфейс, куда вы можете загружать больше медиа-контента. Видеоредактор предоставляет элементы для редактирования, такие как обрезка, разделение, слияние и т. д. Он также имеет элементы для улучшения видеоклипов, включая фильтры, 3D-эффекты и текст. Объединяйте видео в Windows 10, следуя приведенным ниже демонстрациям:
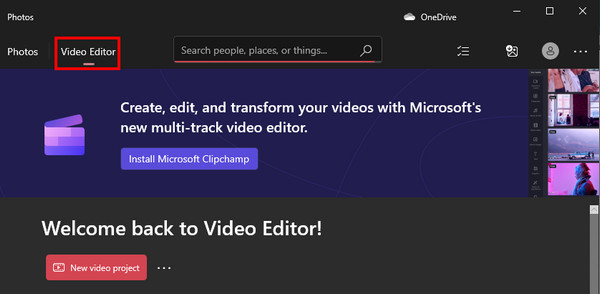
Шаг 1.Нажмите клавишу «Windows», чтобы открыть окно «Пуск». Введите приложение «Фото» в строке поиска и откройте приложение. Нажмите кнопку «Видеоредактор» в верхней части окна.
Шаг 2.Нажмите кнопку «Новый видеопроект» и укажите название нового проекта. Вы также можете нажать кнопку «Пропустить», чтобы назвать видео позже. Затем добавьте видеоклипы со своего компьютера.
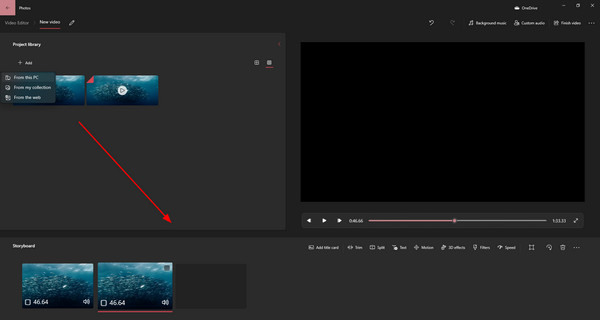
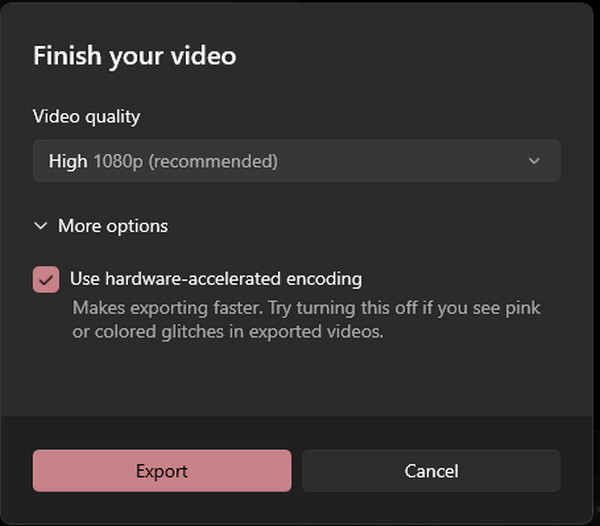
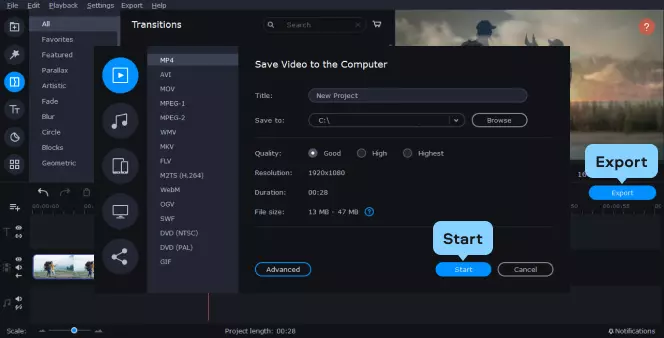
Шаг 3.Перетащите загруженные файлы на временную шкалу снизу и обрежьте клипы. Просмотрите результат и нажмите кнопку «Завершить видео». Завершите объединенный файл, нажав кнопку «Экспорт».
Часть 2. Используйте AnyRec для объединения видео на всех платформах Windows Online
Хотя Windows предлагает бесплатный видеоредактор, в нем отсутствуют параметры вывода для настройки видео для более высокого качества. Итак, в качестве альтернативы используйте AnyRec Бесплатное видео слияние онлайн для объединения видео на Windows 8/10/11 и Mac. Он позволяет быстро загружать видео и добавлять до пяти видеоклипов с разными входными форматами. Помимо настраиваемых параметров видео, Video Merger также позволяет настраивать звук для выходного формата, кодировщика, канала, частоты дискретизации и битрейта.
Функции:
- Поддержка различных форматов видео для слияния видео.
- Нет ограничений по размеру файла для загрузки видеоклипов.
- Предоставьте триммер для обрезки клипов перед объединением.
- Настройте параметры видео, такие как качество, код и т. д.
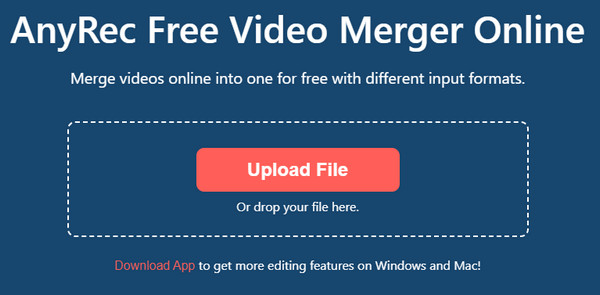
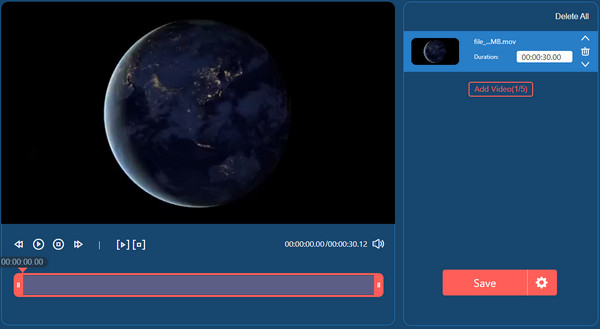
Шаг 1.Посетите AnyRec Free Video Merger Online и нажмите кнопку «Загрузить файл». Вы также можете напрямую загружать видео в интерфейс сайта из своей папки. Подождите, пока загрузка завершится.
Шаг 2.После загрузки первого клипа добавьте второй, нажав кнопку «Добавить видео». Затем обрежьте видео или переставьте клипы, используя элементы управления «Вверх» и «Вниз».
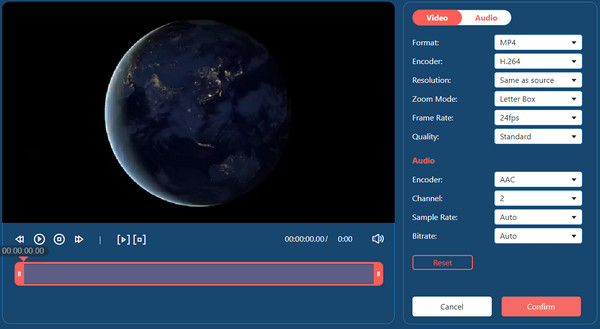
Шаг 3.В настройках «Вывод» нажмите кнопку «Шестеренка», чтобы изменить настройки видео. Перейдите на вкладку «Аудио», чтобы настроить параметры звука. Нажмите кнопку «Подтвердить», чтобы сохранить изменения.
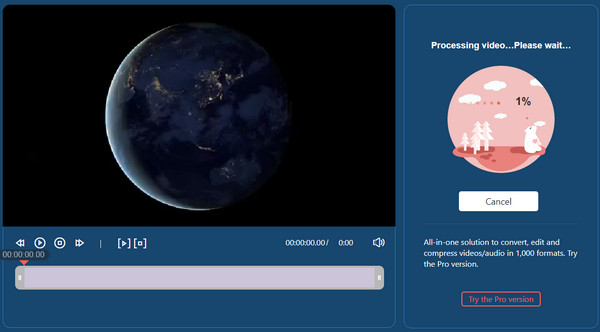
Шаг 4.Наконец, нажмите кнопку «Сохранить», чтобы загрузить результат. Имейте в виду, что видео будет сохраняться только в формате 720p, но вы можете получить более высокое разрешение, загрузив версию для ПК.
Часть 3: Проигрыватель Windows Media для объединения видео в Windows 8/10/11
Другой способ по умолчанию объединить видео в Windows 10 — использовать проигрыватель Windows Media. Видеоплеер позволяет плавно воспроизводить скачанные видео с некоторыми базовыми функциями редактирования. К сожалению, для объединения видео необходимо установить дополнительное программное обеспечение. Но это бесплатное приложение для медиаплеера, которое также редактирует популярные форматы видео, такие как MP4, AVI и MOV. Вот подробные и простые шаги по использованию Windows Media Joiner.
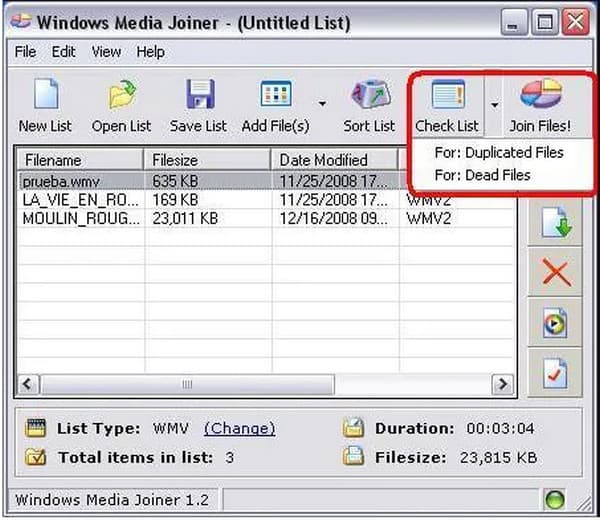
Шаг 1.Загрузите и установите Media Joiner. Затем запустите программное обеспечение, чтобы начать объединение видео. Перейдите в меню «Файл» и нажмите кнопку «Добавить файл», чтобы загрузить видеоклипы.
Шаг 2.Введите желаемый заголовок для вывода на вкладке «Имя». Нажмите кнопку «Объединить файлы», чтобы объединить клипы в один файл. Затем откройте вывод в проигрывателе Windows Media, чтобы просмотреть результат.
Часть 4. Объединение видео в одно с помощью Adobe Premiere во всех Windows
Adobe PR рекомендуется как профессиональный способ объединения видео в Windows 10. Этот настольный инструмент имеет все функции, необходимые для редактирования видео, включая анимацию, эффекты и звуковые эффекты. Он также гибок для многих форматов видео, таких как WMV, MP4, HEVC, MOV и т. д. Но помимо того, что Adobe PR является платным инструментом для профессионалов, многим пользователям все еще сложно ориентироваться. Если вы новичок в этом программном обеспечении, вот демонстрация:
Шаг 1.Запустите приложение на своем устройстве и загрузите видео из локальной папки. Повторяйте процедуру до тех пор, пока все видеоклипы не появятся в интерфейсе программы. Перетащите клипы на временную шкалу ниже.
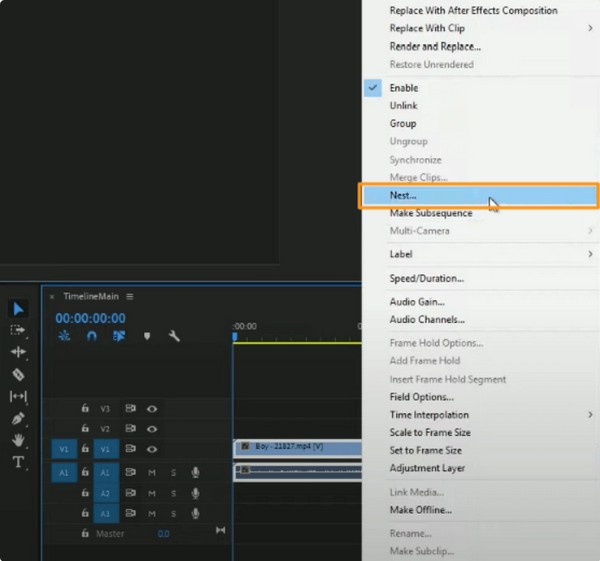
Шаг 2.Затем вы можете выбрать клипы, которые хотите объединить, нажав и удерживая клавишу «Shift». Щелкните правой кнопкой мыши и в раскрывающемся списке нажмите кнопку «Гнездо». Появится окно, где вы можете переименовать вывод. Нажмите кнопку «ОК», чтобы сохранить.
Часть 5. Объединение видео вместе с Movie Maker в Windows 8/10/11
Мощное приложение, предназначенное для редактирования и создания видео. Даже будучи сторонним приложением, Movie Maker известен как видеоредактор по умолчанию для таких версий Windows, как Vista и XP. Спасибо за последнее обновление. Вы также можете установить приложение в Windows 10 и 11. Оно обновляет все его функции, включая переходы, эффекты, фильтры и основные инструменты. Movie Maker — это бесплатная платформа, на которой вы можете объединять видео в Windows 10 в сделай видео длиннее, и их можно скачать из надежных источников.
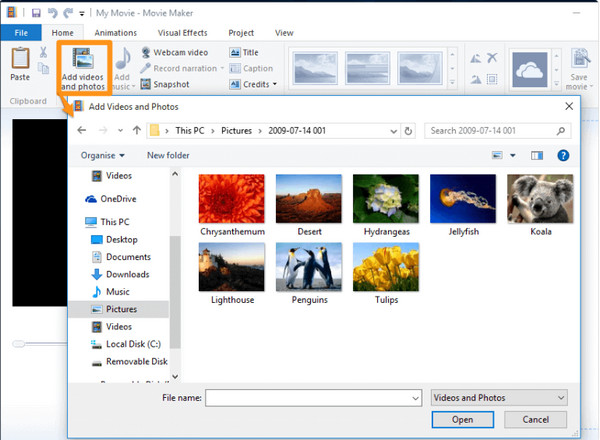
Шаг 1.После загрузки приложения запустите Movie Maker и нажмите кнопку «Добавить видео и фотографии» в верхнем меню.
Шаг 2.Когда все видеоклипы находятся в меню приложения, у вас есть возможность изменить их положение или отредактировать их целиком. Нажмите кнопку «Сохранить фильм» после объединения клипов.
Часть 6. Часто задаваемые вопросы об объединении видео в Windows 10
-
Как объединить видео на Android и iOS?
Используйте VivaVideo — видеоредактор и создатель на Android или iOS. Это бесплатное приложение с профессиональными инструментами для объединения различных клипов. Установите приложение и перейдите на Коллаж меню. Нажмите Плюс для импорта видео. Приступайте к обрезке клипов и их перестановке. Кран Проверять чтобы сохранить результат.
-
Могу ли я объединить видео на TikTok из моей галереи?
Да. Чтобы объединить несколько видео из вашей галереи в TikTok, откройте приложение и коснитесь Плюс. Нажмите Загрузить чтобы выбрать первое видео. После загрузки нажмите «Изменить» в инструментах редактирования в правом верхнем углу. Кран Плюс загрузить второй видеоклип. Опубликуйте результат в своей ленте новостей или сохраните видео.
-
Что следует учитывать при объединении видео?
Есть много вещей, с которыми нужно иметь дело при объединении видеоклипов. Качество и цветокоррекция должны быть одинаковыми для всех клипов и организации файлов перед их компиляцией. Чтобы упростить выполнение задачи, загрузите AnyRec Video Converter. В программном обеспечении есть все инструменты, необходимые для объединения и редактирования клипов.
Заключение
В заключение, есть несколько встроенных видеоредакторов. объединить видео в Windows 10 и 11. Это поможет вам легко комбинировать видеоклипы в приложении «Фотографии» и даже в проигрывателе Windows Media. Но поскольку эти инструменты по умолчанию предлагают только функции среднего уровня, такие как резка и обрезка видео в Windows 10, AnyRec Free Video Merger Online — рекомендуемая альтернатива бесплатному профессиональному видеоредактору для объединения видео в Windows 8/10/11. Посетите официальную веб-страницу, чтобы узнать о других эксклюзивных бесплатных онлайн-инструментах.
Статьи по Теме

How to Merge Videos on Windows 10: List of the Easiest Video Mergers
Merge your videos easily with Movavi Video Editor:
- Download and install the app.
- Add your files and arrange them on the timeline.
- Export your merged video in your preferred format.
By clicking the download button, you’re downloading a trial version of the program.*

If you have lots of small video clips and files, you may want to join them together into one big file. But how to merge videos in Windows 10/11? Well, there are many simple video joiners and video combiners you can use to combine videos on Windows. This guide will cover some of the simplest video mergers and solutions you can use today to combine multiple videos into one and join clips together on a PC, laptop, and other Windows devices.
Quick summary
-
Movavi Video Editor
Best for Users who want to be able to edit and adjust videos with ease
-
Windows Photos
Best for Users who don’t want to download or install extra apps
-
Windows Media Player
Best for Users who want a simple way to play their new videos
How to combine multiple videos into one with Movavi Video Editor
Step 1. Download and install Movavi Video Editor
Download and install Movavi Video Editor onto your Windows device. If you follow the installation instructions, the whole process should be complete in just a couple of minutes.
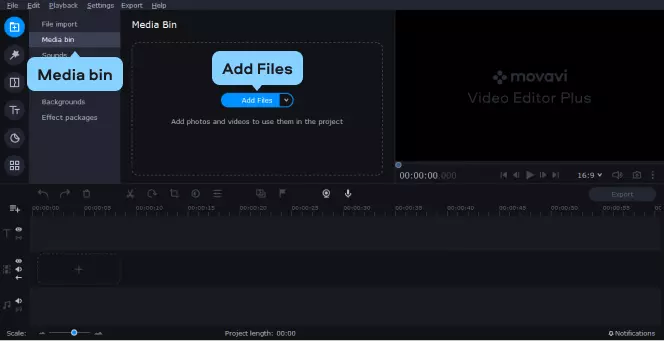
Step 2. Open the program and add your files
Once Movavi Video Editor has been installed on your Windows device, you can launch it. Click Add Files to add the video clips you’d like to join together. The clips should load in and appear in the Media Bin. Drag and drop the files to the Timeline section at the bottom of the window. You can adjust the order of the clips by dragging them around the Timeline.
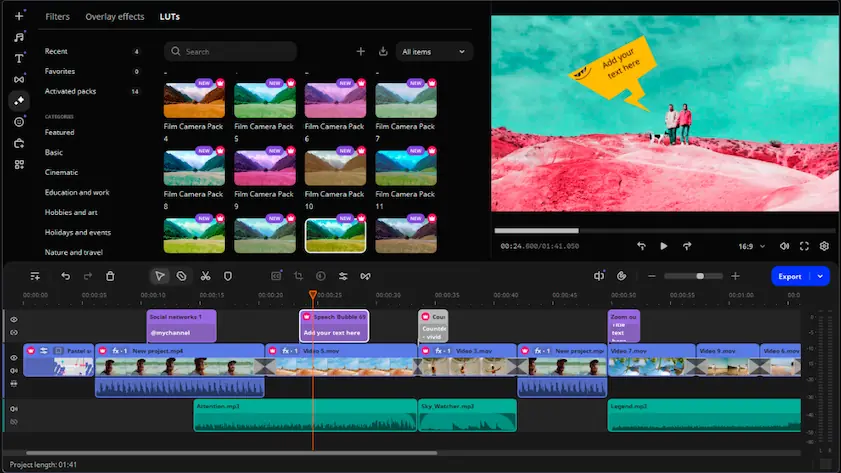
Step 3. Add transitions (optional)
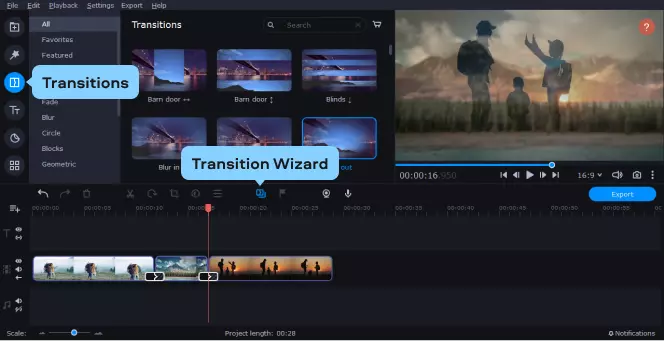
At this point, once your clips are all in the right order, you can simply continue to the final step and save your new full-length video. Or you can make use of Movavi Video Editor’ built-in features to add transitions in between the different clips to add some style to your final video.
To do this, open the Transitions tab and select the transitions you like. Drag them down to the Timeline between each clip to add them. You may also use the Transition Wizard to quickly add random transitions or pick one to use throughout your entire video.
Step 4. Save the edited video
Once your video clips have been assembled and you’re ready to merge them together, click on the Export button on the right side. A pop-up window should appear where you can adjust settings and choose from different presets for popular devices, as well as select a video format of your choice, such as AVI, WMV, and MP4. When you’ve selected the right parameters for your project, press the Start button to begin the merge process and save your new video file.
Let’s be honest, you want to complete your video project as quick as possible and to an excellent standard, I’ve wasted days of my life messing around with bad software, trying to force it to work. That doesn’t have to be the case, here’s our list of the easiest video mergers:

Create awesome videos easily
*The free version of Movavi Video Editor may have the following restrictions depending on the build: watermark on exported clips, 60-second video or 1/2 audio length limit, and/or some advanced features unavailable when exporting videos.
7 easiest video joiners for Windows 10/11 to merge videos together
Movavi Video Editor is another option to consider when you want to do some video stitching or splicing or if you need to concatenate several video files together. This is an advanced video-editing program, offering professional-level editor tools and features but with a beginner-friendly user interface that anyone can understand. Using Movavi Video Editor is really simple, and you can add tracks and assemble large new video files in a matter of minutes. You can also use this program to edit your files in other ways, with editing features like trim, crop, rotate, and advanced filters and transitions too.
Pros
-
Lots of advanced editing features
-
Beginner-friendly user interface
-
No ads and no watermark when using the premium version
Cons
-
Free trial only lasts for 7 days
How to use:
- Download and install Movavi Video Editor.
- Open the program, click Add Files to add some clips from your device. Then drag and drop your clips to the Timeline from Media Bin.
- Arrange clips as you see fit and add some transitions if you want.
- Click Export to save the edited video.
To learn how to merge videos with Movavi Video Editor, use the link below to move to the instructions.
Proceed to the guide
Everything from basic edits to something more comprehensive like chroma keying or noise compression, Movavi Video Editor has plenty of the tools to create professional-looking videos.

Create awesome videos easily
*The free version of Movavi Video Editor may have the following restrictions depending on the build: watermark on exported clips, 60-second video or 1/2 audio length limit, and/or some advanced features unavailable when exporting videos.
If you’re looking for a quick and easy way to combine two videos or combine several videos into one, without the need for any extra downloads or installations on Windows, you can use the platform’s built-in Windows Photos app. As well as being useful for viewing and editing video and picture files on your Windows devices, this app can also be used to stitch and splice clips together. It’s really simple to use and has the advantage of being already set up and ready to use on any modern Windows device.
Pros
-
Free to use
-
Ideal for beginners
-
Already installed on all Windows devices
How to use:
- First, open up the Photos app and start a new video project by clicking the New Video and New Video Project buttons in the top right.
- Next, add the files you want to compile together from your device or the web.
- Use the video-editing tools to edit your clips if desired and arrange them in the correct order in the timeline.
- When you’re ready to save, click on the Export or Finish Video button in the top right corner and then Export or Save your new video.
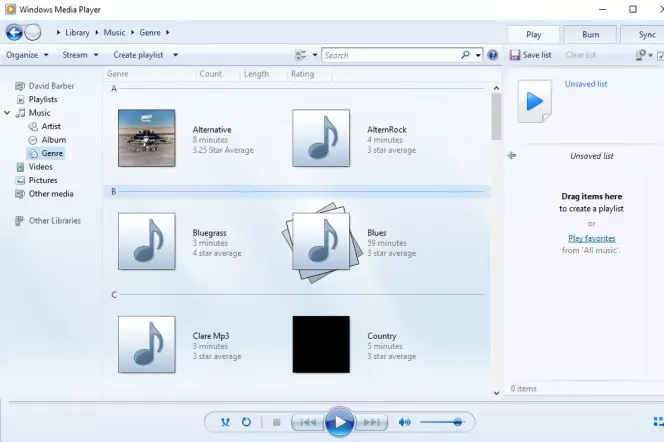
Windows Media Player is another built-in Windows tool you can use for video playback and basic editing. However, you won’t be able to use this program for combining or merging video files alone. You’ll need to also download some additional software in the form of Windows Media Joiner. This is a free app that you can use to put video clips together to then play in Windows Media Player. The media player is one of the best app options you can use on Windows to play movie files and music, supporting all the big video and audio formats like MOV files, MP4 files, and AVI files.
Pros
-
A reliable and widely-used media player
-
Supports disc burning and ripping
-
Completely free to use
Cons
-
Windows Media Joiner must be installed first
How to use:
- Download Windows Media Joiner and install it.
- Open the joiner program and click File, then Add File, and then add the several video files you want to combine.
- Enter a title for your project in the Name tab and then press Combine.
- Once the joiner has connected your videos, you can open the new file in Windows Media Player to watch it.
VLC is a free, open-source media player and editor that can be used for video conversions, playback, and collating videos together too. It’s seen by many as the easiest way to add three videos together, or more short clips, into one complete file. You can use VLC quickly and easily to combine clips and then play them back in the same app. This program supports all major video formats, such as MP4, AVI, MOV, and so on, and it can be used for audio files too, as well as for converting from one format to another in a matter of minutes.
Pros
-
Works as a media player
-
Lots of advanced editing features and functionalities
-
Easy merging in a matter of minutes
Cons
-
The interface is a little outdated
How to use:
-
Download, install and open VLC Media Player on your Windows device.
-
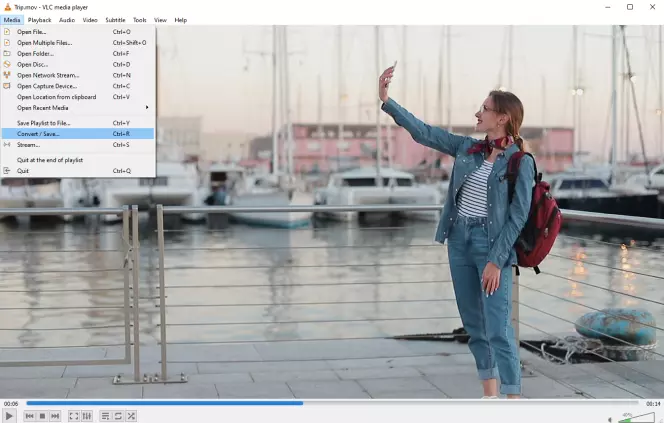
Click Media, then Open Multiple Files and choose the files you want to combine.
-
Once you’ve added the files to merge, press the Convert/Save button and click on Convert from the dropdown menu.
-
Next, press Browse and select a location for your new video to be saved.
-
Then adjust the settings to suit your needs and press Start to merge your clips together.
While it’s not often used for anything other than playing videos, I’ve found VLC to be a handy tool for joining a couple of clips together. In fact, it also has some other great features, such as screen capture and media conversion. Definitely worth checking out if you’re looking for a simple, free solution.
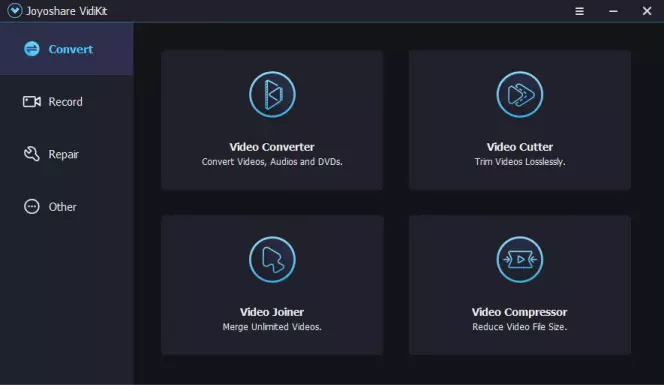
Joyoshare VidiKit is an all-in-one video merger, cutter, converter, and screen recorder. It offers very fast processing speeds, letting you merge clips together really quickly, and also provides many additional features and functionalities like screen recording, video compression, subtitle creation, and so on, but you will need to pay to unlock and use some of the more advanced features of this particular piece of software.
Pros
-
Very fast processing speeds
-
Lots of advanced features
-
Can be used for many different video editing tasks
Cons
-
The free version has limitations
How to use:
- Download, install and open the Joyoshare VidiKit program.
- Drag and drop files onto the window or click the Open File button to choose the files you want to merge.
- Choose your merging mode — you can select High-Speed mode to combine videos together very quickly or use Encoding mode if combining clips of different formats.
- Use the editing tools, if desired, to trim and edit your video.
- Click Convert to start the merging process and then save your new video to your device.
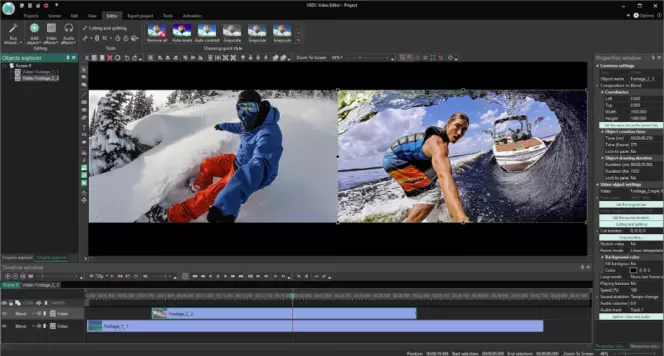
VSDC Free Video Editor is another video editing program you can use for joining video clips, as well as editing, adding effects, adjusting the audio, converting into different formats, authoring DVDs, and more. It’s free to use and available in many languages, designed mainly for intermediate and advanced users. Beginners might be put off by the complex user interface, but if you have video editing experience, you can find a lot to love about this program.
Pros
-
Pro-level video editing
-
Also supports conversion, DVD creation, and more
-
Completely free to use
Cons
-
May be too complex for beginners
How to use:
- Download, install and open VSDC.
- Start a new project and add multiple files to your timeline.
- Use the time buttons to set the time when each file appears so that they appear one after another.
- Adjust the order and make any edits, as needed, before saving your new video.
The VSDC Video Editor cannot only merge videos but because of its non-linear editing capabilities, it allows users to arrange and combine clips with precision. VSDC also provides export options optimized for various social media platforms, saving time during post-production. Although VSDC can seem complicated for new users there are always resources that you can access to help you through the process.


EaseUS Video Editor is another type of editing software you can use to merge videos together. Unlike certain other video editors, EaseUS is quite easy to use, even for beginners, with drag and drop systems and easy-to-read menus that can help you save time on simple editing tasks. Well-suited to users of all skill levels, it can be used to splice, trim, cut, rotate, and add effects to your videos.
Pros
-
Suitable for all skill levels
-
50+ effects and transitions
-
Useful for all kinds of editing
How to use:
- Download and install EaseUS Video Editor.
- Import the source videos via the Import button or using the drag and drop system.
- Add videos to your project using the Add to Project button.
- Expert the merged videos as one file using the Export button.
There are many situations when you might need to merge video files together, and as this guide shows, there are plenty of different tools and apps to help with this process. We hope that our guide has helped you find a trusted video merge tool for Windows that you can use now and in the future.

Here’s what Movavi’s team does to provide you with verified information:
-
When selecting products to include in our reviews, we research both demand and popularity.
-
All products mentioned in this article have been tested by Movavi Content Team.
-
When testing, we aim to highlight the best features of a product and what it’s best suited for.
-
We study user reviews from popular review platforms and make use of this information when writing our product reviews.
-
We collect feedback from our users and analyze their opinions of Movavi software as well as products from other companies.
Summary
Create awesome videos easily
*The free version of Movavi Video Editor may have the following restrictions depending on the build: watermark on exported clips, 60-second video or 1/2 audio length limit, and/or some advanced features unavailable when exporting videos.
Frequently asked questions
How do I combine videos on Windows for free?
To combine videos on Windows for free, you can simply make use of a free video merger tool, such as the built-in Windows Photos app or VLC media player.
How do I combine MP4 videos into one?
There are various tools and programs you can use to combine multiple MP4 clips into one large video file. Movavi Video Editor is a very useful program for this.
Can I merge videos on Windows Media Player?
You can’t use Windows Media Player alone to join video files together. Instead, you’ll need to install the Windows Media Joiner app, which is a separate download and install to Windows Media Player. You can then use this tool to merge your videos and then play them in Windows Media Player.
Can I merge videos on Windows Movie Maker?
Yes, it is possible to use Windows Media Maker to merge clips together. To do this, simply open the program, click Add Videos and Photos to add the files you want to combine. You can then arrange them in an order of your choosing and save the whole project as a new, large video.
Similar guides
-
9 Best 4K Video-Editing Software in 2025 [Edit 4K Easy]
-
Best Free MOV Editors 2025 | Free Video Editors For MOV Files
-
Top 5 HD Video-Editing Software | High Definition Editors
-
7 Best TikTok Video-Editing Apps | Create Engaging TikTok Videos
-
BEST FREE Video Editing Software for Windows 7 in 2025
-
The Hottest Affiliate Programs of 2025: A Comparison with the Movavi Affiliate Program
-
10 Best Online Video Cutters 2025 | [Online Video Splitters]
-
How To Create Animated Videos: Best Tips [2025 Guide]
-
Best Video-Editing Software for YouTube
-
CapCut for a PC: How to Use the Editor on Windows

Have questions?
If you can’t find the answer to your question, please feel free to contact our Support Team.
Join us for discounts, editing tips, and content ideas
1.5M+ users already subscribed to our newsletter
Since Microsoft discontinued Windows Movie Maker from Windows Essentials apps — is it possible to merge videos on Windows 10 without downloading or buying a third-party video editing app?
In this short guide, we show you more than one method of how to combine any number of clips into one video in Windows 10. We will show you how to —
A. Merge your videos into one file using the Windows Photos App
B. Combine multiple videos into one using Windows Video Editor
And as a bonus, we will also show you how you can merge and create stunning videos online using InVideo’s online video editor.
Let’s get straight to it!
Merge your video clips into one cinematic masterpiece
With the world’s easiest video editor

Try InVideo today
A. Merge your videos into one file using the Windows Photos App
You might have cropped, rotated, or added effects to your photos in the basic Windows Photos app before, but did you know that you could also use the tool to edit your videos, including merging multiple videos into one file?
Follow this step-by-step tutorial on how you can combine your videos into one using the Windows Photos app:
1. Launching the Photos App
Before you go to the Photos app, you might want to put all the videos or photos you want to merge together in one folder on your computer. This will help speed up the entire process.
In the search tab of your computer, type in ‘Photos’, and open the app when it pops up.
Searching the Photos App in Windows
2. Starting Your Video Project
When you have opened the Photos app, you want to launch your video project. To do so:
— Click on the New Video option on the top right side of your screen
— Select New Video Project to launch the editor mode

Starting a New Video Project In Photos
Other versions of Windows 10’s Photos app have different names for the second step of this process, such as:
— Create a video with music
— Create a video with text
— New video project
If you are using photos in your video project, you can also launch the editor mode directly from the photo. In that scenario:
— Open your file in the Photos app
— Click on Edit & Create
— Go to the Create a video with text option
3. Naming Your Video Project
You are now in the Photos app’s video editor mode. At this stage, you have to name your project before you start adding files to it. You can name your project by typing the title in the top left corner of your screen, in the name tab. You can edit your title anytime you want by clicking on the pencil icon next to your project’s name.
The Photos app’s video editor will not let you add files before you title your project. This means that a pop-up option will appear when you try to add a file, and you can type in the project’s name then and click OK or Create a Video to proceed.
4. Adding Your Files
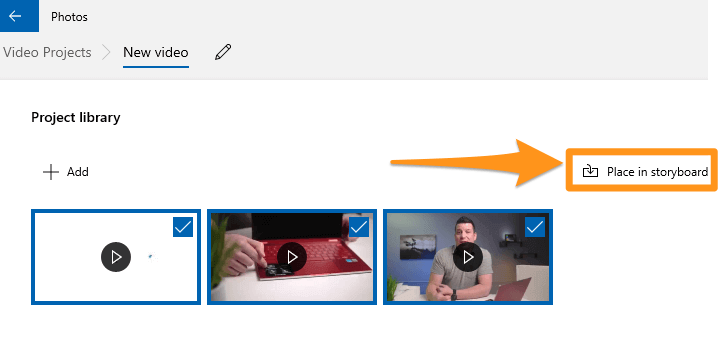
To add files to your video project, you have to click on the plus icon on your screen’s top left corner—this section is called Project Library.
The Photos app’s video editor mode allows for three options when adding new files. You can add files from:
— This PC
— My collection or
— The web
If you have all the files you want to merge into one video in one folder, you can choose from the ‘This PC’ option, select all the files, and add them to your project. You can also add the files one by one.
The tool will merge all your files into a single video automatically. You can edit them and rearrange their order in the storyboard.
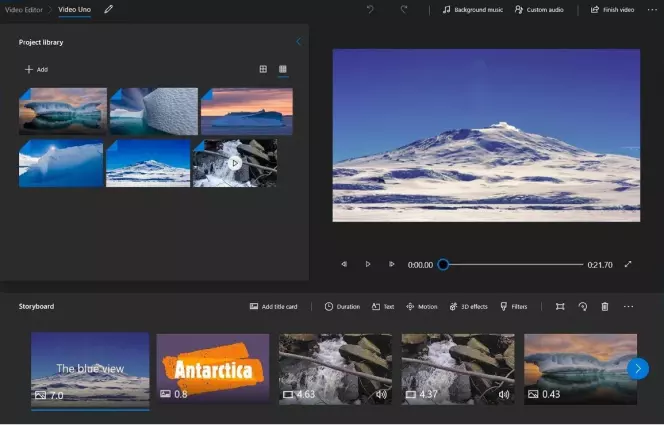
To begin working on your project, you need to move all the files you added to the video editor from your Project Library into the Storyboard section. The storyboard section is at the bottom of your screen, and you can drag and drop the files onto it immediately upon adding them to your Project Library.

Adding Files to the Storyboard
If you are uploading many files or clips that are longer than several minutes, be prepared to wait while Windows 10 adds them to your Project Library and then into the Storyboard section.
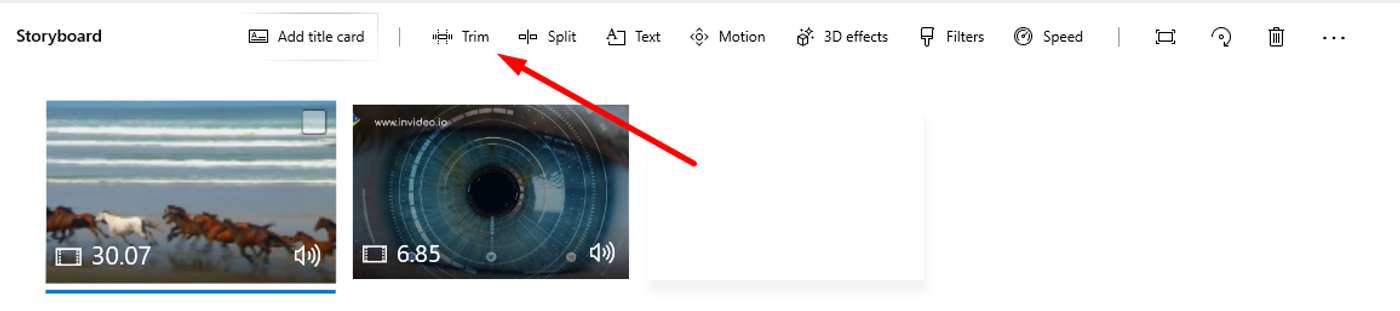
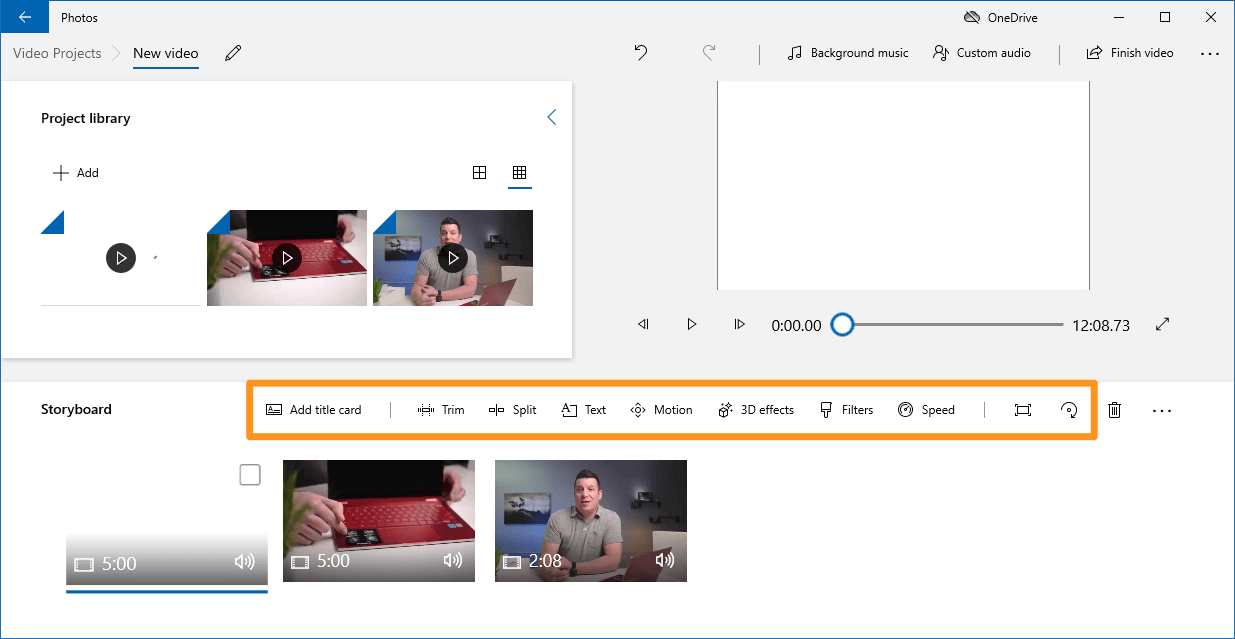
5. Trimming Your Files
If you need to trim your clip, you can do that too in the Photos app. Here’s how:
a. Select the Trim icon on your Storyboard
b. Shorten or extend the duration of your clip as you want by using the handlebar
c. Click Done
Trimming Files in the Photos App
6. Removing Sound and Adding Music
Now you might want to add music to your project or remove the existing sound from your videos. Follow these simple steps to do so:
a. Click on the Background Music option on the top-right corner of your screen
b. Mute the sound of your video or optimize its volume
c. Select different audio from the Microsoft library
If you want to add your own audio or voice-over to a clip:
a. Go to the Custom Audio option on the top-right corner of your screen
b. Choose to add an audio file
c. Select the file you want to import
d. Click Open
e. Edit the audio file as you wish
f. Select Done
You can now choose from the Windows library for different music options or upload your own.

Adding Music in the Photos App
7. Adding Text
If you want to add text to your video project, you can do that in the Windows video editor, but there aren’t many font style options. You also need to add and optimize your text to your liking for each clip individually, which certainly isn’t a time-efficient option.
To add text to your clips:
a. Select the little box icon on the clip you want to add text to
b. Choose Text
c. Type in the text you want to add in the empty box
d. Choose the font style
e. Customize where in the video you want your text to appear

Adding Text in the Photos App
You can also add 3D effects and filters by clicking on the little box of your clips. These need to be customized for each clip separately.
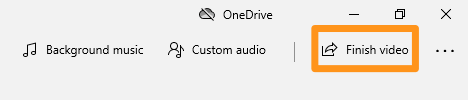
8. Exporting Your Finished Project
When you are satisfied with your video project, you can download it to your computer. To do that:
a. Click on the Export or Share or Finish video option in the top right corner of your screen
b. Choose the resolution in which you want your video to be saved
There are three resolution options the Photos app offers:
|
Video Quality |
Resolution |
|
High |
1080p |
|
Medium |
720p |
|
Low |
540p |
c. Click Export or Save
Don’t be surprised if it takes a while for Windows to save your file. The built-in editor will export your file either quickly or slowly, depending on your video size and duration.
It may seem surprising, but you can also crop and rotate a video in Windows without third-party video editing software.
Easily cut, merge and edit your videos
Even if you’ve never edited a video before

Try InVideo for free
B. Combine multiple videos into one using Windows Video Editor
You might not have known this, but Windows has its own free editing tool present on your system. You can also use the Windows Media Player to merge videos, however, the only catch is that you first need to download and install the Windows Media Joiner. This is a free app.
Here is a step-by-step guide on how you can merge your videos using the Windows Video Editor:
1. Type ‘Video Editor’ in the search bar of your system and click on the first suggestion.
2. Click on the blue block to start a new project
3. You will have to name your project to start working on the editor.
4. Click on the + Add button on the left side of your screen and you can import video files from your PC or even the web.
5. Once your video is imported, click on the Place in storyboard button or simply drag your video file down to the storyboard section to start working on it.
6. You can keep adding video files to your storyboard and the Windows Video Editor will seamlessly merge them. If you want you can also add effects, text, background music, etc to your merged video.
7. When you’re done editing your video, simply click on the Finish video button on the right hand corner of your screen. You can export your video file in high (1080p), medium (720p) and low (480p) resolution.
Bonus: Merge clips online and create stunning videos fast and easy with InVideo
You can only go so far with your video editing endeavors if you are relying on Windows 10’s built-in apps. Even if you are a beginner in the field of video making, the default apps will exhaust your creativity quickly since they offer very limited features and video editing tools.
You do not have to download third-party editing software to create better-looking videos than the ones you can make on the Windows Photos app. Instead, you can use efficient editing platforms online for free.
InVideo is one such cloud-based video editing solution that you can use in your browser. As soon as you make a free account on InVideo, you enter a world in which video editing is fun, quick, and efficient.
Here are some of our video editor’s characteristics that will make you fall in love with making videos:
|
InVideo Features |
Their Purpose |
|
Pre-made video templates |
You don’t have to start making videos from scratch. Our collection of 5000+ pre-made templates fits every use case. |
|
Text-to-Video |
You can easily transform every text or article into a video with our text-to-video templates. Why spend hours or even days on creating a video from a text when you can do it in minutes with InVideo by copying your text or article’s URL and pasting it in our editor? |
|
Support |
You won’t be left to your own devices when using InVideo. We have dozens of easy-to-follow tutorials to guide you as you are exploring the world of video editing. You can also chat with our support team 24/7. |
How To combine videos into one file using InVideo?
InVideo lets you upload your own media files
When it comes to video editing options, InVideo lacks none. Merging multiple clips and photos into one video file is only one among many feats you can accomplish within ten minutes using our platform.
To combine your videos into one file using InVideo, here’s what you will do:
1. Log in to your InVideo account or create one for free

2. Click Blank Template on the homepage and choose a format

3. Select the Upload option in your Asset Library on the left side of your screen and upload your files.

4. InVideo merges your files into one video automatically. Edit your video to your liking — you can add text, music, and effects to make your video interesting.
5. Select Export when you are satisfied with your project to download your new video.

InVideo offers a large number of media and special effects you can use to make your project more interested and professional.
Some of the most popular InVideo features that bring efficiency and functionality into video editing are:
#1 — Video Elements

Adding Elements in InVideo
You have at your disposal 8M+ stock footage, images, animated texts, stickers, shapes and royalty-free audio to help you make your video engaging. All of these tools are available on the online editor and can be accessed from the asset library on the left hand side of your screen.
#2 — Voice-over recording + automated text-to-speech feature
Adding a Voice-Over in InVideo
Our voice-over feature lets you do both:
— record your voice and attach it to your video
— or if you are not a fan of your voice, no problem! You can let one of our custom voices deliver your speech by simply typing in the text into our automated text-to-speech feature.
Watch this tutorial to see how you can add a voice-over to your video project in minutes.
#3 — Intelligent Video Assistant (IVA)
Using the Intelligent Video Assistant (IVA) in InVideo
If you’re not sure if you’re going in the right direction with your video, you can always let our Intelligent Video Assistant (IVA) give you feedback on the spot. IVA is an AI-driven tool you can use in InVideo to level up your video editing game.
#4 — Live customer support 24/7
If you would be more comfortable with having assistance from a real person, InVideo’s customer support is at your disposal 24/7. Click on the chat icon in the bottom-left corner of your screen and ask away. Whether you need suggestions for video editing or a short, easy-to-understand explanation on how to use our features, our customer support is here for you.
Wrapping up —
Merging your videos on Windows 10 is super simple with in-built apps like Photos and Video Editor. If you want to make your videos more interesting and professional-looking, use InVideo — which enables you to create high-quality videos in minutes! So what are you waiting for?
If you’ve found value in this article and are looking to learn more about video creation and how you can leverage InVideo’s editor, check out this playlist. If you’re a creator, you’d love what we have built at the InVideo community – a place for you to connect and learn from 25,000+ other marketers, business owners, and creators like yourself.
Looking to merge videos in Windows 10?
In this article, we show you the 5 best free ways to merge or combine videos on windows 10 with clear step-by-step instructions and pictures.
Here’s everything we’ll cover, feel free to jump around:
How to merge videos in Windows 10 using the built-in Photos app
How to merge a video in Windows Movie Maker
How to merge a video in VLC media player
How to merge videos in Adobe Premiere Pro
An Easy Way to Merge Videos in Windows 10
How to Merge Videos in Windows 10 using the Free, Built-in Photos App
Photos is an app that comes preinstalled on your Windows 10 OS. It’s used to open your photos and images by default on Windows 10. You can use Photos to easily combine or merge videos together on your Windows PC. Here are the steps to merge multiple video files in Windows 10 using the Photos app:
- First, locate the Photos app on your computer and open it. You can find it in your Start menu.
- Now create a new project. You can either create a video project by clicking on the big blue box that says New video project or by clicking on the New video button and selecting New video project from the dropdown menu. You can find the New video button in the top right corner of the app window.
- Then import the videos you want to merge together. To do that, use the blue + Add button right underneath the Project library text.
- Once you’ve imported all the videos you want to combine, select them and click on the Place in the storyboard button in the top right corner of the app window. This will add all the selected videos to the project’s storyboard.

- Optionally, you can now edit and fine-tune the videos. You can split or trim your videos. Or you can rotate and flip them. Photos provides you with all the basic video editing tools to manipulate your video footage.

- If you don’t want to make any changes to the videos, you can go ahead and click on the Finish video button in the top right corner of the app window to export or share the video.

Now let’s see how we can merge or combine videos on Windows 10 using a free tool that’s also from the creators of Windows.
How to Combine Videos on Windows 10 using Windows Movie Maker
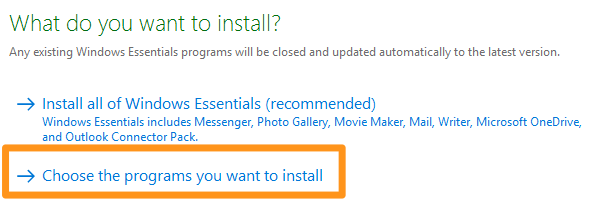
Even though Microsoft ended the support for the Windows Essentials Suite in 2010—Windows Movie Maker is a part of this suite—you can still download and install Windows Movie Maker with this official installer we retrieved using a web archiving service.
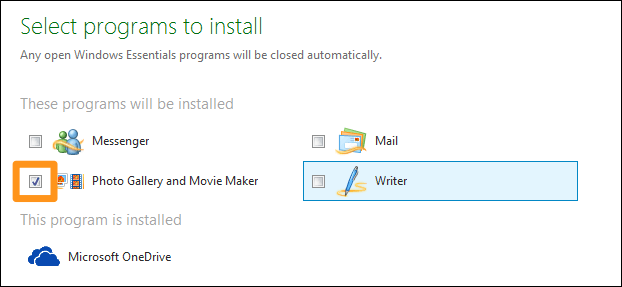
- First, install Windows Movie Maker on your computer. Double-click the installer file and pick the Choose the programs you want to install option.

- Leave the Photo gallery and movie maker checkbox ticked. Untick the rest of the checkboxes as you probably won’t need the other tools that come with this suite. Then click on the Install button.

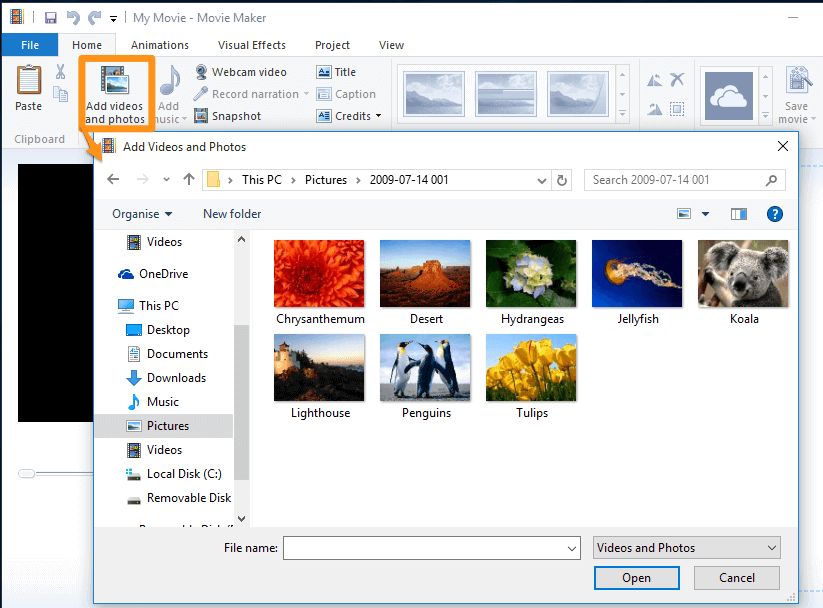
- Now import the videos you want to combine. You can drag and drop the videos onto the app window. Or you can import the videos by going to the Home tab and clicking on the Add photos and videos button.

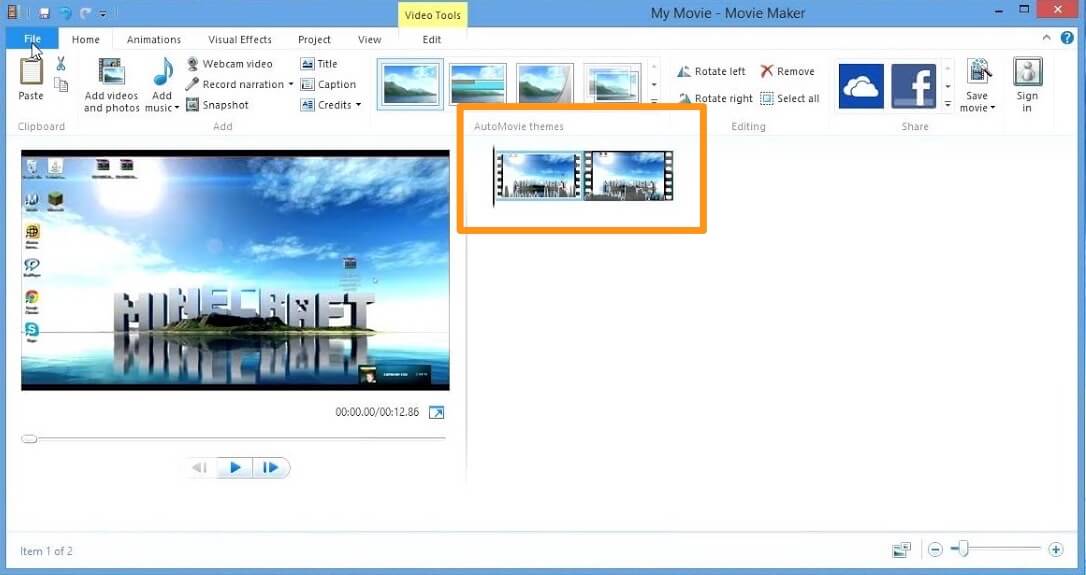
- Optionally, you can arrange the videos in the order in which you want them to appear. Simply click and drag the videos to rearrange them.

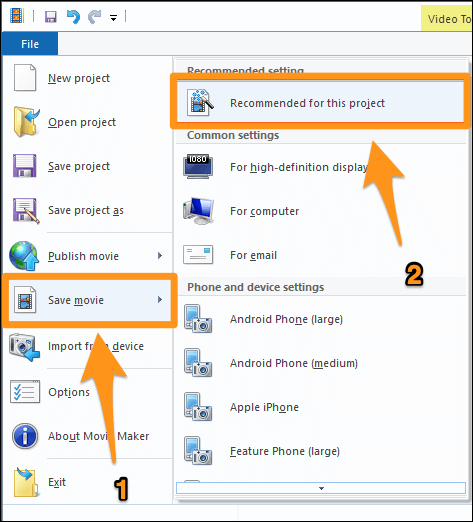
- Finally, save the video. Go to the File tab, select Save movie, and select Recommended for this project from the dropdown menu.

How to Merge Videos in Windows 10 using VLC Media Player
Yes, you can merge your videos together using VLC media player. If you already have VLC installed and would like to use it to merge your videos, you can check out our article on how to combine videos in VLC.
How to Merge a Video in Windows 10 using Adobe Premiere Pro
If you already have Adobe Premiere Pro installed on your Windows 10 PC, you can use it to merge your videos together into a single video. It’s a paid tool specifically built for professionals. Here’s our article on how to combine videos in Premiere Pro.
An Easy Way to Combine or Merge Videos in Windows 10
If you’re a Windows user, you can use Animaker’s video merger to easily merge multiple videos together for free! All it takes is 3 simple steps to merge your videos using our super-simple video merging tool.
For those who are unaware of Animaker, it is an all-in-one DIY video-making app designed to help non-designers make professional-quality videos from the comfort of their browser.
Our video merging software works on Chrome, Firefox, Safari, Internet Explorer, etc., and if you use one of these browsers, you can easily merge or combine your videos on your Windows computer.
If you’re looking to quickly merge your videos for Instagram, YouTube, or Facebook, then Animaker’s video merger is the best tool for the job. Also, you can merge videos in MP4, MPG, WebM, MOV, and more formats.
Merge Your Videos in 3 Simple Steps using Animaker
Sign up/Log in and Pick the Dimensions
Log into your account or create a free one. Now pick the dimensions for your output video file. Do you want it to be horizontal or vertical or square? You can pick one of the premade dimensions from the Create a video section in your dashboard.
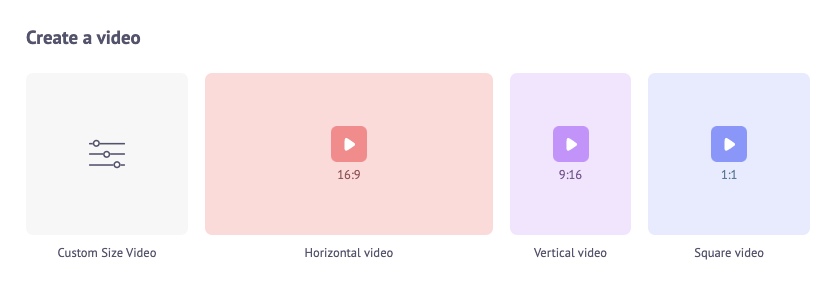
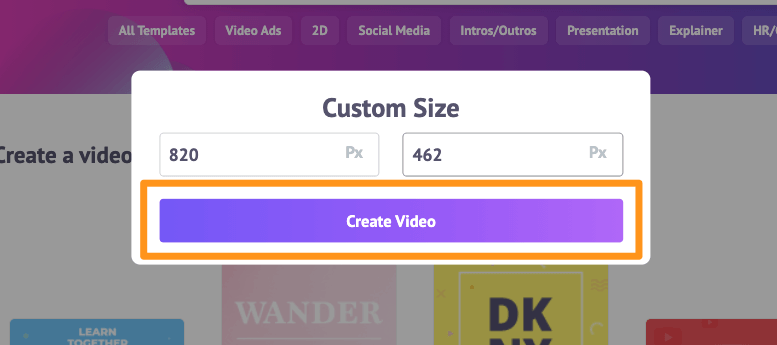
Or you can enter custom dimensions for your video by picking the Custom Size Video option from the same section above. Enter the width and height in pixels and hit Create Video.
Upload Your Videos and Merge Them Together
You can upload videos up to 20 GB in size. To upload your videos, go to the Upload tab in the main menu bar and click on the Upload button at the bottom of the tab window.
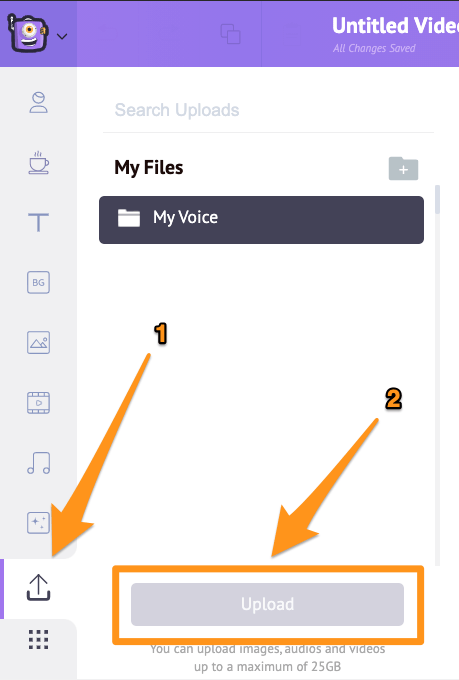
Alternatively, you can simply drag and drop your videos onto the area shown below.
In the Scenes section, you can see that a scene has already been added to the project.
You can now set your first video onto that existing scene. Simply click on a video in the Uploads section to set it onto a scene.
Now add a new scene for each video. To add a new scene, click on the plus button at the bottom of the scene.
Now click another uploaded video you’d like to add to this new scene. Repeat the same process for other videos you’d like to add and merge together.
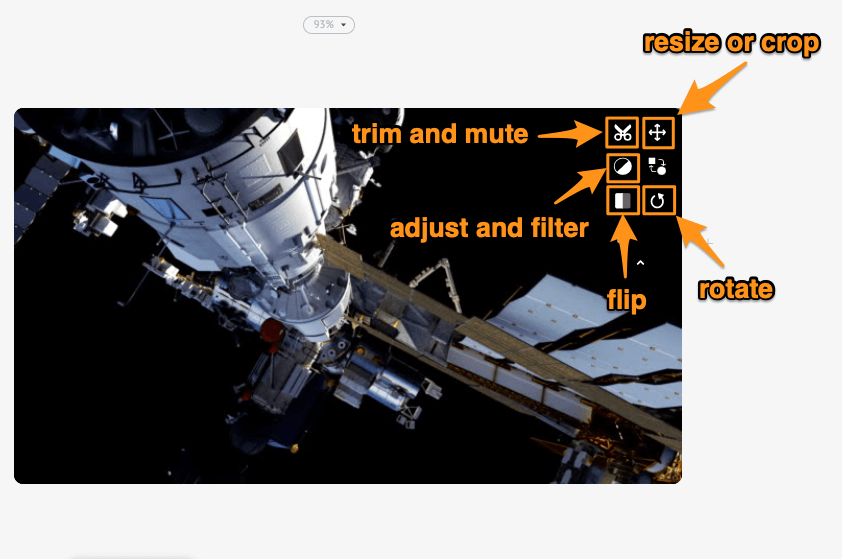
Optionally, you can fine-tune the video footage you just added. You can trim, resize, crop, rotate, flip, mute, and adjust the brightness and contrast of your video files.
You can also add music, transitions, images, emojis, shapes, stickers, GIFs, etc.
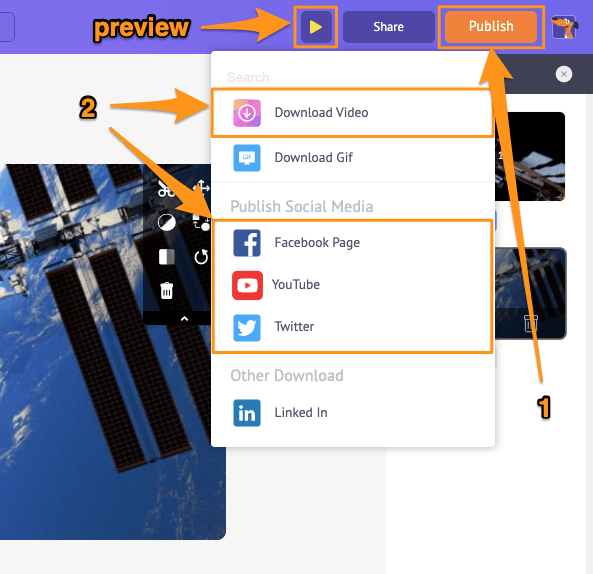
Preview and Download the Video
Once you’re done adding all your video files and fine-tuning them, you can preview the video by clicking on the play icon beside the Publish button. You can download the video to your local computer by clicking on the Publish button and then selecting Download Video from the resulting dropdown menu. Or you can share it directly to a social media platform from within the app.
Using Animaker’s online video editor, you can:
- Trim videos
- Rotate videos
- Flip videos
- Remove audio from videos
- Adjust video brightness, contrast, etc.
- Add filters to videos
And the list goes on… feel free to check out these video editing tools and learn why it’s the go-to video editor for marketers and content creators.
Got any questions about merging or combining your videos on Windows 10? Any interesting tips or tools to merge videos on Windows that we seem to have left out? Please let us know about them in the comment section below.

Applies ToClipchamp for personal accounts Clipchamp for work accounts
Объединение нескольких ресурсов в временная шкала
Если у вас есть два или более видео, которые вы хотите объединить вместе, легко сделайте это, объединяя ресурсы на временная шкала в Clipchamp.
-
Чтобы импортировать собственные видео, перейдите на вкладку мультимедиа на панели инструментов и нажмите кнопку импорта мультимедиа, а затем просмотрите файлы с устройства или OneDrive.
-
Чтобы использовать бесплатные стоковые видео, щелкните вкладку библиотека содержимого на панели инструментов, а затем щелкните стрелку раскрывающегося списка визуальных элементов и выберите категорию видео.
-
Перетащите ресурсы видео, которые вы хотите объединить, на временная шкала рядом. Это позволит автоматически объединить несколько клипов в одно длинное видео.
-
Измените длину всех видеоклипов с помощью средства обрезки. Это можно сделать двумя способами.
-
Щелкните ресурс на временная шкала, который вы хотите обрезать, а затем щелкните и перетащите маркеры обрезки.
-
Обрезка нескольких ресурсов одновременно с помощью функции редактирования с несколькими элементами , удерживая клавишу SHIFT или команды , а затем щелкните ресурсы, которые нужно обрезать, и перетащите маркеры обрезки для всех ресурсов.
-
-
Чтобы удалить пробелы между клипами, используйте функцию удаления зазоров , наместив курсор на пробел, а затем нажав клавишу DELETE на клавиатуре (как для Windows, так и для Mac).
Примечание. Вы также можете разделить видео, чтобы удалить ненужные части или добавить фильтры, текст и другие эффекты. Дополнительные сведения см. в статье Редактирование видео.
Добавление переходов между видеоклипами (необязательно)
-
Щелкните вкладку переходов на панели инструментов, чтобы просмотреть различные параметры.
-
Перетащите переход между двумя ресурсами на временная шкала.
-
Переход автоматически прикрепится к месту для объединения двух клипов.
Устранение неполадок при экспорте видео
Если вы не можете экспортировать видео или он экспортируется медленно, ознакомьтесь с этой статьей, чтобы экспортировать из Clipchamp (устранение неполадок).
Нужна дополнительная помощь?
Нужны дополнительные параметры?
Изучите преимущества подписки, просмотрите учебные курсы, узнайте, как защитить свое устройство и т. д.