Home
Windows
By
abhinash
BIOS checks the hardware and peripherals’ availability and provides a pathway for them to receive instructions from the CPU.
If the BIOS gets corrupted or damaged, the hardware will have no gateway to receive initiation signals. Then, your system will not boot at all and your motherboard will be considered bricked.
Having said that, it is also not an everyday thing for the BIOS to get damaged. We most often corrupt the firmware while updating BIOS. But your customized BIOS settings do get lost most of the time due to a faulty CMOS battery, by changing to default settings manually, or automatically because of system error.
Whatever the case, be it for recovery of BIOS or for loading your customized settings, it is better to backup the BIOS. It is quite easy to backup BIOS for some motherboards but for others, it can be quite tricky and you might need a few workarounds.
Nevertheless, you will be comfortable to backup the BIOS in your system after going through this article.
Before Backing Up the BIOS
You are probably looking to backup the BIOS as a preventive measure if something goes wrong while updating it. However, if you are able to resolve the issues on the motherboard or revert the settings that are causing you problems beforehand, you will not need to update or backup the BIOS.
If the problem lies on the motherboard setting, you may reset the board. To do so, you can either change the settings to default either from the BIOS page or clear the CMOS by removing the CMOS battery from the motherboard.

Similarly, if you are unable to boot your system, you can try to boot into secondary BIOS as some motherboards provide such dual-BIOS nowadays. Apart from these, sometimes changing boot mode to either UEFI or Legacy in BIOS also does the trick.
See if your problem is resolved after trying these steps. And if not, let’s move towards backing up the BIOS.
Backup Only The BIOS Settings of Motherboard
If you just want to backup your modified BIOS settings for future, you can manually note them down on your notebook or phone. You can also use a Frame Grabber to capture your BIOS or record the settings on your phone. Then, use that as your reference to change the BIOS settings.

Some motherboards also provide a list of changed settings when you try to load default settings on BIOS. After you press the key to Load Default settings, it will show you your customized settings that will be changed to default. You can take a screenshot of the settings there.
But, you should not apply the changes after pressing the Load Default key, otherwise, you might accidentally reset them without noting the modifications.
Note: Make sure to use the USB port from your motherboard. The front USB is connected through a hub inside and it can fail sometimes. If the port fails while saving backup, then it might create a corrupt BIOS image. This will brick your system when you restore the backup image next time.
Backup BIOS of Your Motherboard
Flashing a motherboard’s BIOS involves a few dangers. As we said earlier, if you installed the BIOS using a corrupted file, your system might get permanently damaged. So, most of the motherboards do not provide the feature to backup their BIOS to prevent users from updating BIOS from a corrupted backup, in case.
However, all motherboards have a function to update BIOS. You might be looking to backup BIOS to get back to this version at the time of need later. So, you can take advantage of the Update BIOS feature to downgrade your BIOS to the one you want.
Let’s see what you need for this and the process of doing it.
- Press Windows + ‘R’ to open the Run dialogue box.
- Type
msinfo32and press Enter. - You will see a window that has your motherboard’s name, current BIOS version, and other information. Note the current BIOS version.

- Go to your motherboard’s website and look for that particular version of BIOS.
- Download the BIOS file.
- Use the motherboard’s utility tool or BIOS page to update that version of BIOS.

Since it requires few precautions and has several methods, we have prepared a separate comprehensive guide for updating the BIOS.
Backup BIOS in Motherboard with Q-Flash Feature
If your system’s BIOS has a Q-Flash feature, you are in luck here. It is a feature provided in some motherboards with the primary purpose of updating the BIOS. But it also has the function to back up your system’s BIOS.
One of the motherboards to feature Q-flash is Gigabyte. Hence, we are using the system with a Gigabyte motherboard to explain the process. You will just need a USB drive to save the backup with this method.
- First, get a USB flash drive and insert the drive into your Laptop. On a desktop, make sure you have inserted the USB on the motherboard’s USB port on the back of your system.
- Restart your system and press repeatedly the Delete, Esc, F2, or the corresponding key that opens BIOS in your PC right after the system starts.
- A BIOS page will appear on your screen. Inside the page, find the Q-flash option in it. You can also press F8 while remaining on the BIOS page to open the Q-flash page.

- Alternatively, press TAB repeatedly while your system is booting up and you will land on the Q-flash page directly.
- There, you can see the Update BIOS and Save BIOS options. Click on the Save BIOS to Drive option.

- Follow the instructions and save the backup on your USB flash drive.


You now have a backup image of your current BIOS version. You can perform this process using the BIOS utility or Motherboard utility tool provided by your vendor if it has the Q-flash option. The steps are similar and you can open the utility from Windows itself.
Backup BIOS in Windows
If your motherboard is the one that does not provide the option to backup BIOS, you can do it directly from Windows. You will have to take help from third-party applications to do it for you.
One of such programs that accommodate the function of backup BIOS is the Universal BIOS Backup Toolkit.
Let’s see how you can do this using the Universal BIOS Backup Toolkit on your system.
- Download Universal BIOS Backup Toolkit on your PC and Install the application.
- Search with the keyword BIOS Backup on the search box on your windows.
- Right-click on Universal BIOS Backup Toolkit and click Run as administrator to open the application.
- When the program runs, click on the Read option.

- After the process completes, click on Ok and select the Backup option.

- Save the
.binfile on the drive of your choice.


You will find the backup file of your BIOS in the drive.
Backup BIOS Using CH341a Programmer
CH341a programmer is a USB-like device that is used to flash the IC of several electronics including the EEPROM of a computer. The BIOS is contained in the EEPROM of a computer.
Hence, you can use the CH341a programmer to detect, change, backup as well as update the BIOS of your motherboard. The programmer can be used for 24-series I2C and 25-series SPI IC chips of any system.
Let’s look at the connection you have to make and the steps to be followed to backup BIOS using the CH341a programmer.
- Buy a CH341a programmer or mini programmer from the nearest electronics vendor or online.
- You will find a circuit board connected to a USB dongle with a handle consisting of a yellow jumper connected to pins 1 and 2 for USB detection. Similarly, you will see a converter for a 25-series IC, another PCB where you can solder the IC, and an 8-pin clip converter with a PCB. We will be using this clip converter and PCB to connect to our BIOS chip.

- On the PCB, you will find pins with numbers from 1 to 8. Insert the connector to the pins such that the red color wire lies on pin 1. Remember a wrong connection can damage the BIOS chip.
- Now connect the PCB to the CH341a programmer in such a way that pin 1 of the circuit lies on the side near the handle.

- Disconnect all the connections to the motherboard whose BIOS you want to backup. Find the BIOS chip and connect the clip to it such that the pin of the red wire is connected to pin 1 of the BIOS.

- We advise you to use another computer to save the BIOS. Insert the programmer into the USB port keeping the handle downwards. Install the drivers for the device.

- Run the driver software after installing. If the installer does not appear, you can go to Device Manager and install it manually.
- Click on the Detect option to show the code of the BIOS file.

- Uncheck the Blank Check and Erase option on the Auto menu.
- Click on Read and then Verify after you see 100 % on the progress bar at the lower end.

- You see the Chip Main Memory and Buffer Same dialogue box at the end.

- Click Save and enter the file name to save the backup BIOS image of your motherboard.


You can use this backup image to flash your BIOS later.
How to Restore the Backup BIOS in Windows?
It is not helpful to backup your BIOS and not know how to install it in the time of need. But installing the BIOS from the backup image is pretty much the same as updating the BIOS. Some motherboards like Gigabyte automatically boot into backup bios if the current BIOS fails and re-flashes it.
You must know that updating or restoring BIOS is risky and it might permanently damage your computer. Hence, you have to make sure to have a stable power supply. You can use a UPS for a desktop computer while reinstalling BIOS. Also, please do not close the system in the middle of the process.
Now that you know about the risk and the safety measures, you will just need a USB drive and software called Rufus to make the drive bootable. Let’s see the way to install the backup .rom file to your system.
- Download Rufus on your system. If your system is not working, then use a working system.
- Insert the USB drive and Open Rufus on the PC either through its icon on the desktop or by searching it in windows.
- On the opened window, select the USB drive and choose FreeDOS on the Boot Selection Menu. Click Start.

- Copy the Backup file you saved earlier to the USB.
- Restart your system and press F8 or the corresponding key repeatedly to go to the Boot Options.
- Choose the USB drive which you have kept the file in.

- You will see a window similar to the command prompt.
- Enter
dirin the window and find the.romfile you saved earlier as the BIOS backup.
- Type the name of the file along with the extension name at the end and press Enter.
- Go through the instructions on the installation window and complete the restoring process.


You will find your BIOS restored from the backup file that you created earlier.
If you’re a tech enthusiast or need to back up or modify your laptop’s BIOS (Basic Input/Output System), you might be wondering how to dump the BIOS from your laptop. Whether it’s for troubleshooting, upgrading, or recovering a corrupted BIOS, the process requires some technical steps. In this guide, I will walk you through the methods of dumping your BIOS using both software tools and hardware techniques, ensuring that you can perform this task safely and effectively.
What is BIOS Dumping?
Before diving into the process, it’s important to understand what BIOS dumping is. BIOS dumping refers to the process of extracting the BIOS firmware from the motherboard of your laptop. The BIOS is a crucial component that allows your operating system to boot up. Dumping your BIOS means creating a backup copy of this firmware, which is helpful for situations like:
- Recovering from a failed BIOS update.
- Diagnosing issues with the BIOS.
- Restoring a corrupted BIOS to factory settings.
- Customizing BIOS settings or modifying firmware.
The process of dumping the BIOS can be useful if you need to tweak settings or reinstall a corrupted version. Let’s dive into the methods for dumping your laptop’s BIOS.
How to Dump the BIOS from Your Laptop: Software Methods
Method 1: Using Flashrom
One of the most popular tools for dumping BIOS from your laptop is Flashrom. Flashrom is an open-source utility that allows you to read, write, and verify the contents of your BIOS chip. It works well for Linux and Windows systems.
Steps to Use Flashrom:
- Install Flashrom: Download and install Flashrom for your operating system (Linux, Windows, or macOS). If you’re using Linux, you can install it using package managers like apt-get or yum. For Windows, download the installer from the official website.
- Run Flashrom: Open your command-line interface (CLI) and run Flashrom with administrator privileges. If you’re on Linux, you may need to use sudo to grant root permissions.
- Detect BIOS Chip: Flashrom will automatically detect your BIOS chip and the connected device. If your system doesn’t automatically recognize the chip, you might need to specify your motherboard’s chipset in the command line.
- Dump BIOS: Once Flashrom detects your BIOS chip, you can use the command flashrom -r bios_backup.bin to dump the BIOS into a binary file. This file will be stored in the specified location, typically on your desktop or a designated folder.
Flashrom is particularly effective for users with a bit of technical know-how, as it requires some command-line interaction.
Method 2: Using Manufacturer-Specific Tools
Many major laptop manufacturers, such as Dell, HP, Lenovo, and Asus, offer their own proprietary BIOS update tools that include options for dumping or backing up the BIOS. These tools are often built into the BIOS update utility itself.
Steps to Use Manufacturer-Specific Tools:
- Visit the Manufacturer’s Website: Go to your laptop manufacturer’s official support page. Search for the BIOS update utility specific to your laptop model.
- Download the Tool: Download the BIOS update tool or utility for your specific system model. Many of these tools have options to create a backup of your current BIOS before updating it.
- Run the Utility: Follow the on-screen instructions in the BIOS update utility. Most of these tools will have a clear option for dumping or backing up the BIOS.
- Save the BIOS File: After the process is completed, the tool will save the BIOS in a .bin file format, which you can use for future restorations or modifications.
These tools tend to be more user-friendly and are great for those who aren’t as familiar with command-line utilities like Flashrom.
Method 3: Using Universal BIOS Backup Toolkit
If your laptop manufacturer doesn’t offer a BIOS dumping utility, you can use third-party software like the Universal BIOS Backup Toolkit. This free tool works on most laptops and can help you extract the BIOS.
Steps to Use the Universal BIOS Backup Toolkit:
- Download the Toolkit: Find and download the Universal BIOS Backup Toolkit from a trusted source. Be cautious of the website you download it from, ensuring it’s secure and free of malware.
- Run the Program: After installing the tool, run the program with administrator privileges. You might need to disable antivirus software temporarily since some security tools flag BIOS-related programs as suspicious.
- Dump the BIOS: Click on the Read button to initiate the BIOS dumping process. The toolkit will automatically detect and read the BIOS from your laptop’s firmware.
- Save the BIOS: The BIOS file will be saved as a .bin file, which you can back up or use for modifications.
This tool is an excellent option for users who need a quick, no-frills solution to dump their BIOS.
Why Use Software-Based Methods?
Software-based methods are generally easier to perform, as they don’t require physical modifications to the laptop. They can also be done within the operating system without opening up the laptop or using additional hardware. However, these methods may not work if the laptop’s firmware is locked or protected by a password, write protection, or other security measures.
How to Dump the BIOS from Your Laptop: Hardware Methods
Sometimes, software tools fail due to locked BIOS or additional security layers. In such cases, you may need to resort to hardware-based methods, which are more complex but more effective in some scenarios.
Method 4: Using a CH341A Programmer
The CH341A programmer is a popular USB device that enables you to read and write EEPROM chips, including BIOS chips. This method is often used when software methods are blocked or the BIOS is protected.
Steps to Use CH341A Programmer:
- Prepare the Hardware:
- Buy a CH341A Programmer: Purchase a CH341A USB programmer and the necessary cables or clip connectors.
- Connect the Programmer: Attach the clip to the BIOS chip on your laptop’s motherboard. Depending on your laptop model, you may need to open the device to access the BIOS chip physically. The correct orientation is crucial, as improper connections can damage the chip.
- Install the Software:
- Install the CH341A programming software on your computer. The software will allow you to interact with the connected chip.
- Read the BIOS: After connecting the programmer and installing the software, you can use the program’s “Read” function to extract the BIOS. The programmer will directly read from the chip and generate a backup.
- Save the BIOS: Once the BIOS has been dumped, save it as a .bin file on your computer for backup or future use.
This method bypasses software-level restrictions and provides direct access to the BIOS chip, making it more reliable for advanced users.
Method 5: Soldering Directly to the Chip (Advanced)
In some cases, especially if the BIOS chip is physically damaged or if there are no accessible pins, you may need to solder wires directly to the chip to read the BIOS. This method is highly advanced and should only be attempted by users with knowledge of electronics.
Steps to Solder and Dump BIOS:
- Identify the BIOS Chip: Open up your laptop and locate the BIOS chip on the motherboard. It’s usually a small, rectangular chip labeled with a part number.
- Solder Wires: Using a fine soldering iron, attach small wires to the chip’s pins for reading and writing. This is a delicate process that requires precision.
- Use a Programmer: After soldering the wires, you can connect them to a programmer like the CH341A and dump the BIOS.
Why Use Hardware-Based Methods?
Hardware-based methods provide a more reliable way of dumping BIOS, especially when the firmware is locked or restricted by software. However, these methods require advanced knowledge of hardware and should only be attempted by experienced users.
Precautions When Dumping BIOS
- Backup First: Always back up your important data before proceeding. BIOS dumping and modifications can potentially cause your system to become unbootable.
- Check for Write Protection: Some laptops come with write protection enabled to prevent accidental BIOS corruption. Make sure you disable any write protection features before dumping the BIOS.
Use Trusted Tools: Only use trusted tools and methods to dump your BIOS. Malicious software could corrupt or compromise your system.
Final Conclusion
Learning how to dump the BIOS from your laptop can be incredibly useful for a variety of reasons—whether you’re troubleshooting, backing up data, or making modifications to your system. By following the methods outlined above, you can safely and efficiently extract the BIOS, whether using software tools or more advanced hardware techniques.
Make sure to take the necessary precautions and choose the method that best suits your needs and technical expertise. If you are still facing any problems, please let me know, I would like to help you with this. Happy tinkering!
FAQs About Dumping the BIOS
Can I use BIOS dumping for any laptop?
Yes, but it depends on the model. Some laptops have restrictions, such as write protection or secured boot settings, which can prevent BIOS dumping. However, most modern laptops support BIOS extraction using appropriate tools or hardware.
Is it safe to dump the BIOS?
If done correctly, it is generally safe. However, improper handling can lead to corruption of the BIOS or damage to the laptop. Always follow instructions carefully.
How do I restore a corrupted BIOS?
If the BIOS is corrupted, you can use a backup to restore it. Many modern laptops also have a secondary backup BIOS that can be used to recover from a failed BIOS update.
Can dumping the BIOS void my warranty?
Yes, modifying or dumping the BIOS could void your warranty, depending on the manufacturer’s policies. Always check the warranty terms before proceeding.
Nazim is a tech enthusiast and expert in laptops, computers, and cutting-edge technology. With a degree in Computer Engineering and experience as a Data Analyst, Nazim combines deep technical knowledge with real-world insights to help readers make informed decisions about their tech needs.
Skip to content
How many times people have told me to update the BIOS or the UEFI firmware of motherboards or the graphics card to make sure that you have the best support for the hardware. But sometimes after you have updated the firmware to a new version, it starts to show some problems and then you may want to downgrade the firmware to an earlier version. This is why you should always make a backup of your original firmware before performing an update. And as far as the graphics cards are considered, you can use the well known tool GPU-Z to create a backup of your graphics card’s BIOS or UEFI.
First of all you have to download the GPU-Z tool which is free and can be used on any version of Windows. As you launch this tool, it will ask you whether you wish to install it or run it in a portable mode. No matter which option you choose, you will see the familiar GPU-Z window displaying you all the features and properties of your graphics card.

You have to click on the small shortcut icon shown under the logo of your graphics card manufacturer like Intel, AMD or NVidia. After this you can choose the option to Save to file. This will launch a small tool that reads the BIOS/UEFI and saves it in the same folder where the GPU-Z program is located.
GPU-Z uses a command line utility to perform this operation. For example, in the case of NVidia graphics cards it uses the command nvflash.exe -b bios.rom to pull the BIOS/UEFI from the graphics card. For other cards manufactured by other corporations, it uses other similar utilities. But these utilities do not support all the cards or all the manufacturers and perhaps they might fail to work on your system.
You can download GPU-Z from https://www.techpowerup.com/download/gpu-z/.
Tagged with GPU
We use cookies on our website to give you the most relevant experience by remembering your preferences and repeat visits. By clicking “Accept”, you consent to the use of ALL the cookies.
Здравствуйте, уважаемые читатели сайта remontcompa.ru! Меня зовут Роман Нахват и я представляю вашему вниманию третью и заключительную часть статьи о восстановлении повреждённой прошивки BIOS (на примере ноутбука Acer Aspire E1-532). Перед прочтением данной части статьи рекомендуется ознакомиться с первой и второй частями, в которых мы выполнили разборку ноутбука Acer Aspire E1-532, извлекли из него материнскую плату, подключили к микросхеме BIOS программатор CH341A и сохранили поврежденную прошивку BIOS в отдельный файл. Продолжим нашу работу подготовкой нового файла прошивки BIOS и далее запишем его в микросхему BIOS.
Восстановление повреждённой прошивки BIOS на ноутбуке программатором, в случае, если ноутбук не загружается. Часть 3. Извлечение прошивки BIOS из exe файла для обновления БИОСа. Редактирование файла прошивки в HEX-редакторе и её запись в микросхему BIOS
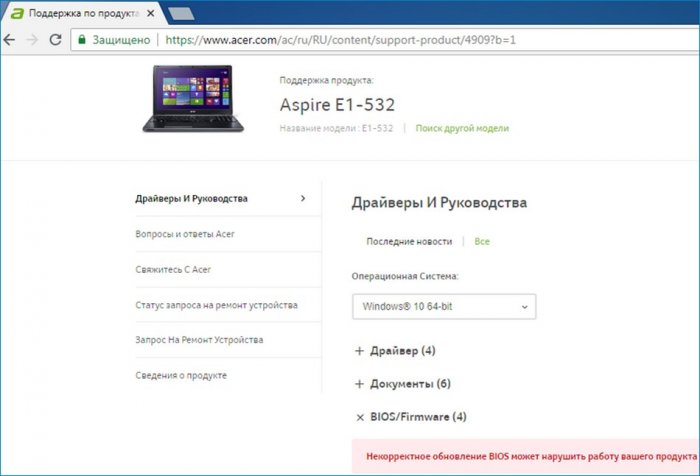
Перейдем на сайт компании Acer на страницу поддержки ноутбука Acer Aspire E1-532.
И выполним скачивание всех доступных прошивок BIOS.
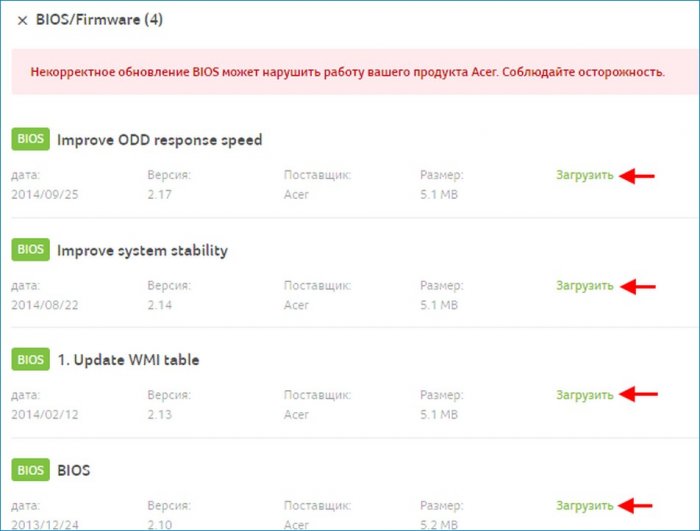
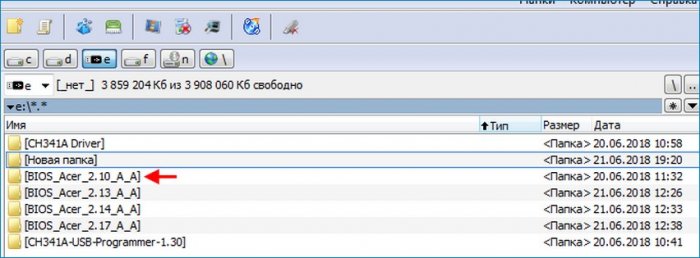
Например, откроем папку с прошивкой версии 2.10.
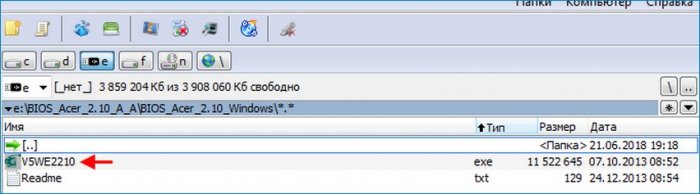
В данной папке мы видим обычный exe файл, запустим его.
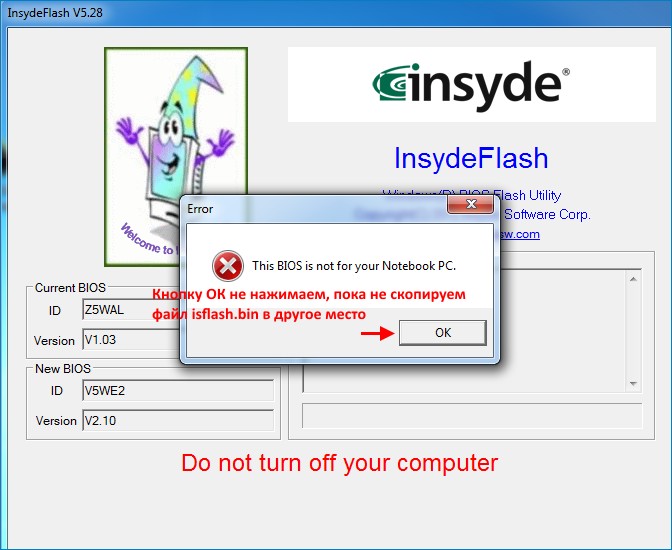
После запуска файла V5WE2210.exe получаем вот такое окно с ошибкой, в котором говорится о том, что данная прошивка BIOS не подходит для данного ноутбука или компьютера. Кнопку ОК пока не нажимаем, так как нам нужно из файла V5WE2210.exe извлечь файл прошивки BIOS для нашего ноутбука Acer Aspire E1-532.
{banner_google1}
Переходим на раздел С: по пути
C:\Пользователи\Имя пользователя\AppData\Local\Temp (имя пользователя может быть любым в зависимости от того, с каким именем создана учетная запись). В папке Temp видим временную папку 7zS2C4E.tmp, которая появилась после запуска файла V5WE2210.exe.
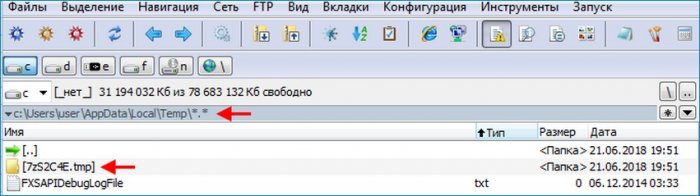
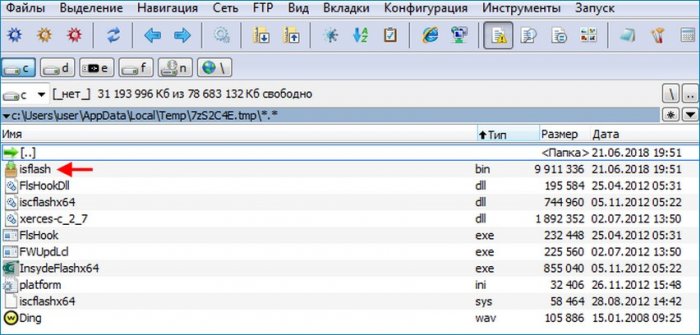
Откроем папку 7zS2C4E.tmp и видим в ней файл isflash.bin, который и является файлом прошивки микросхемы BIOS. Скопируем данный файл на флешку.
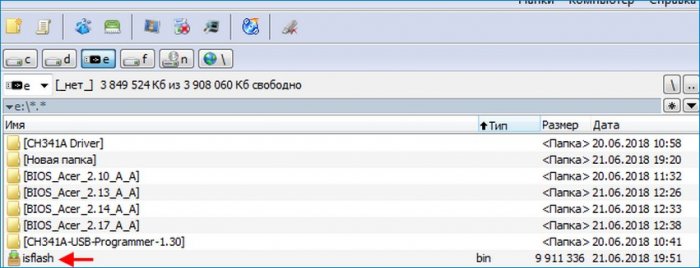
Файл isflash.bin, скопированный на флешку.
Размер данного файла прошивки BIOS составляет 9.45 MB.
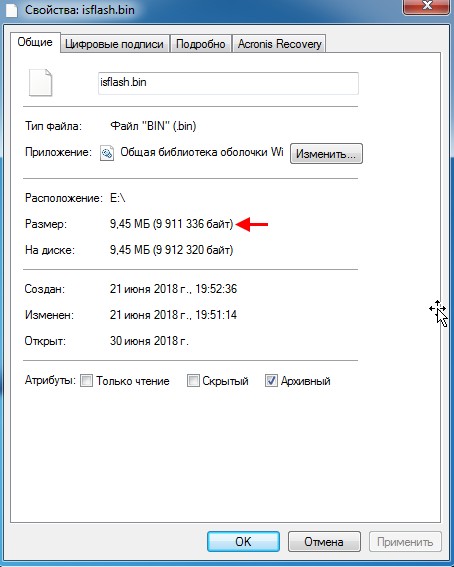
При попытке открытия этого файла прошивки в программе CH341A-USB получаем сообщение, что объем файла больше чем нужно, то есть данный файл прошивки слишком велик для того, чтобы использовать его для перепрошивки микросхемы Winbond W25Q64FV (а именно данная микросхема установлена на материнской плате ноутбука Acer Aspire E1-532).
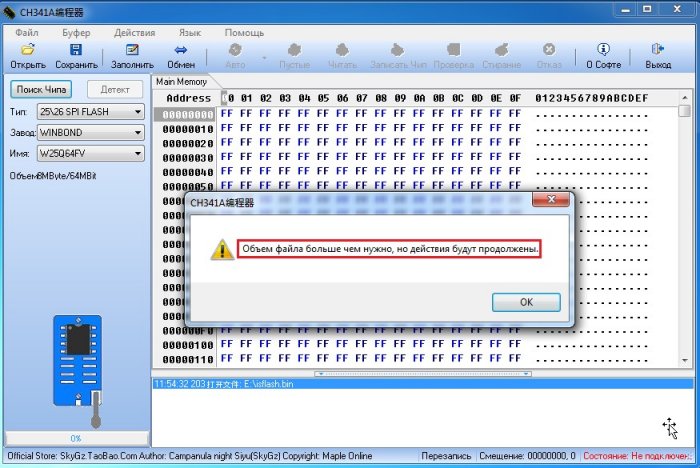
Микросхемы могут быть разных объёмов, рассмотрим это на примере микросхем Winbond. Как видно из таблицы, объём микросхемы может составлять 512, 256, 128, 64, 32 Mbit и так далее.
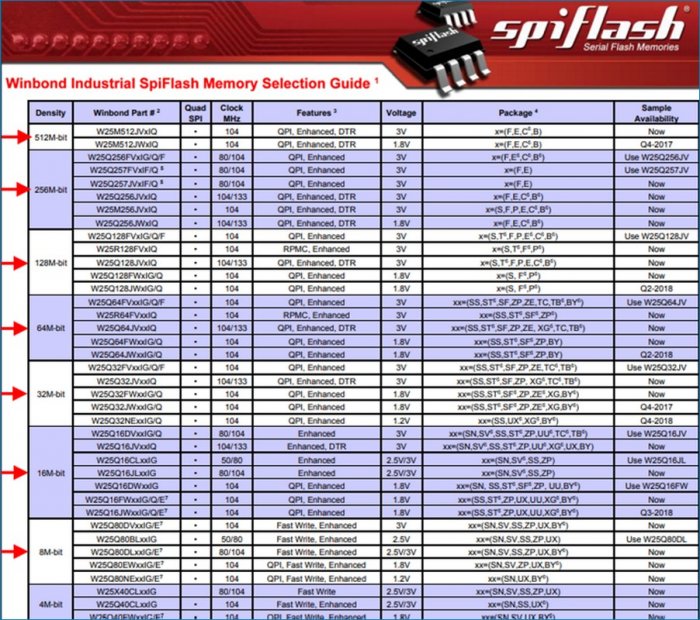
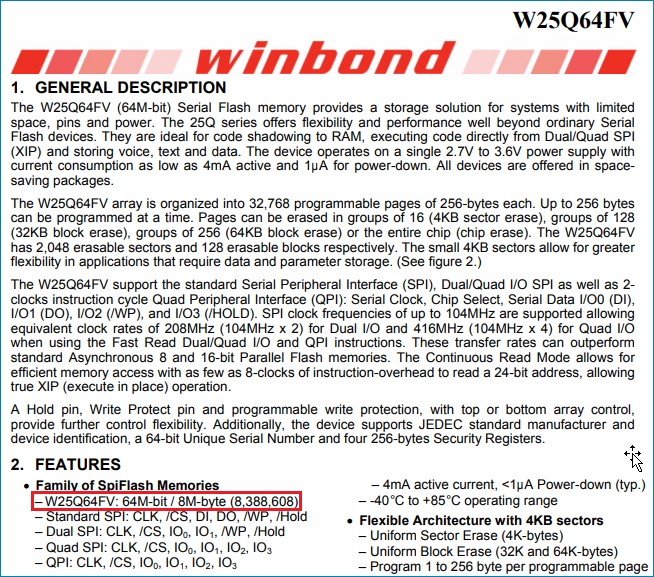
Микросхема W25Q64FV имеет объём 64 Mbit (или 8 MB).
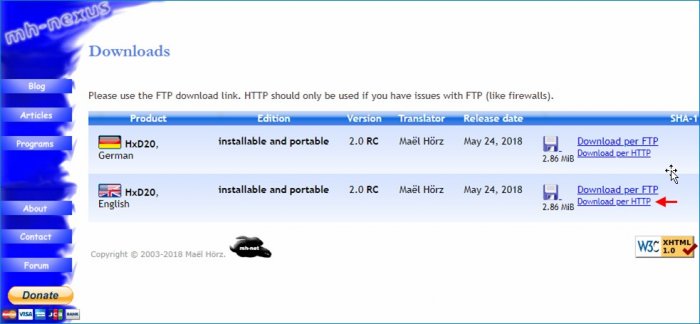
Так как наш файл прошивки BIOS isflash.bin, извлечённый выше из exe файла весит 9.45 MB, а объём микросхемы BIOS на материнской плате ноутбука Acer Aspire E1-532 составляет 8 MB, то для успешного восстановления прошивки BIOS нам необходимо уменьшить файл isflash.bin с 9.45 MB до 8 MB. Для этих целей воспользуемся hex редактором, например HxD. Переходим по адресу
https://mh-nexus.de/en/downloads.php?product=HxD20
и выполняем скачивание установочного файла hex редактора HxD
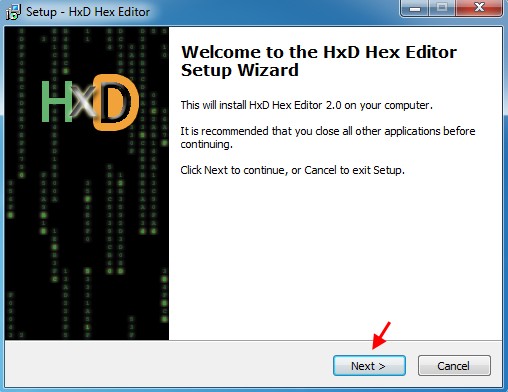
Щёлкаем по скачанному файлу и запускаем установку.
Далее.
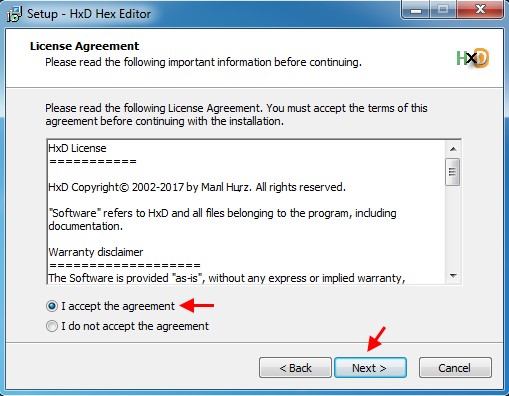
Принимаем лицензионное соглашение. Далее.
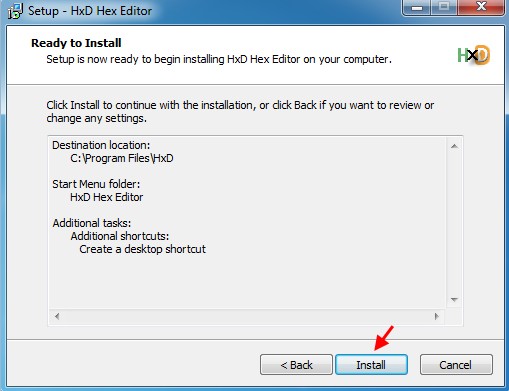
Установить.
{banner_google1}
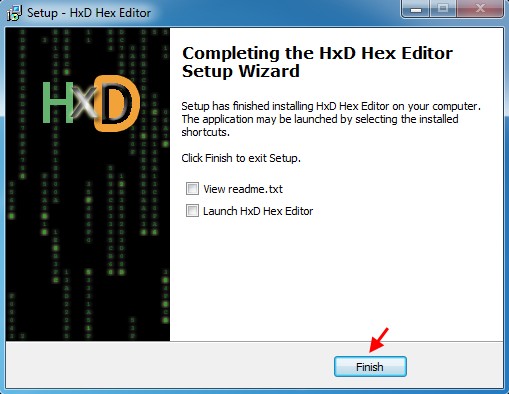
Установка завершена.
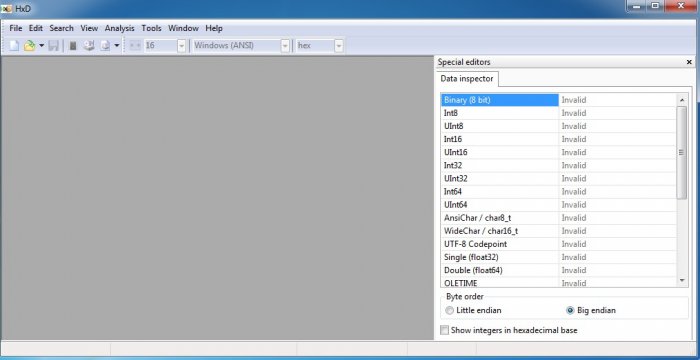
Щёлкаем по ярлыку hex редактора HxD и запускаем его.
Главное окно HxD.
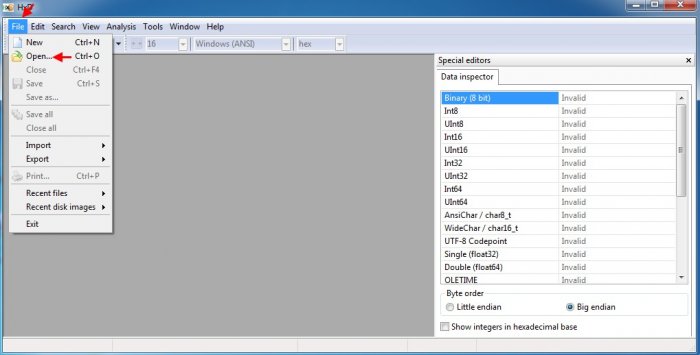
Щёлкаем по File-Open.
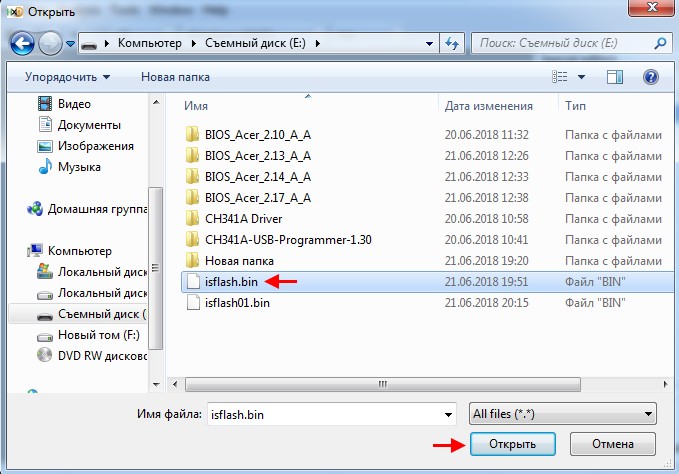
Выделяем файл isflash.bin и жмём «Открыть»
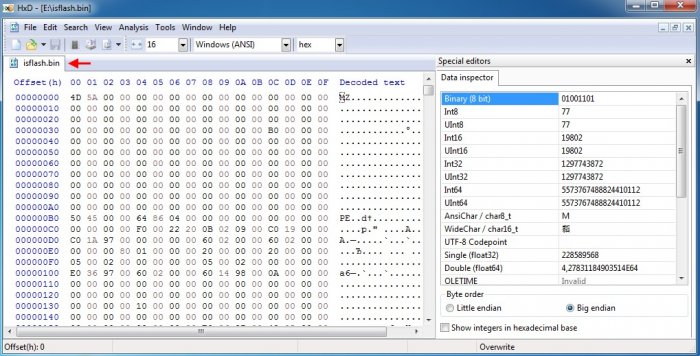
Получаем следующее.
Таким же образом открываем файл поврежденной прошивки BIOS isflash01.bin (который мы сохранили во второй части статьи).
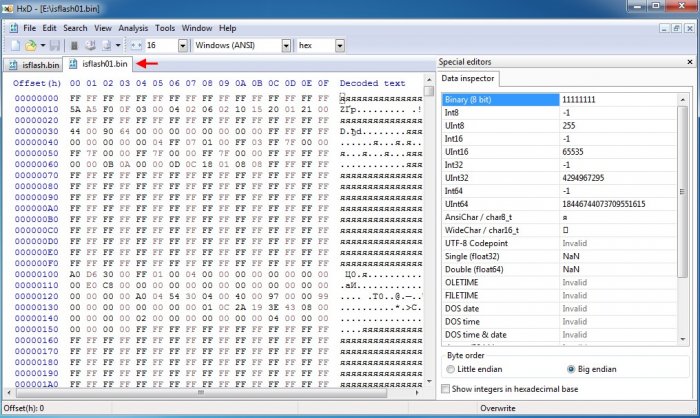
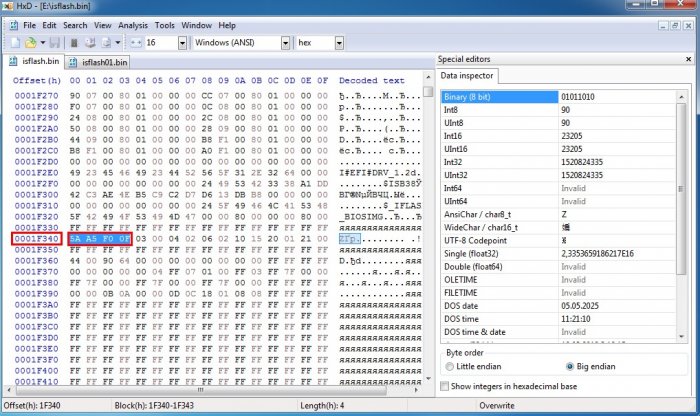
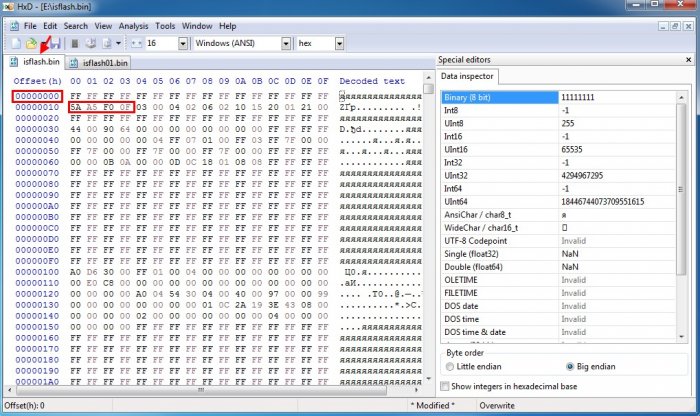
Рассмотрим внимательно структуру файла isflash01.bin. Как видим, файл прошивки isflash01.bin начинается со значений FF (строка 00000000), а в строке 00000010 присутствуют значения 5A A5 F0 0F.
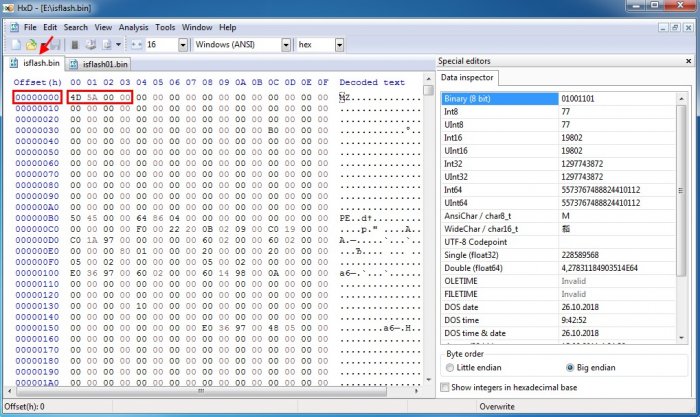
Теперь рассмотрим структуру файла isflash.bin. Видим, что данный файл прошивки начинается со значений 4D 5A 00 00 (строка 00000000). Нам нужно сделать так, чтобы файл isflash.bin начинался точно так же, как и файл isflash01.bin, то есть чтобы началом файла isflash.bin были значения FF (строка 00000000).
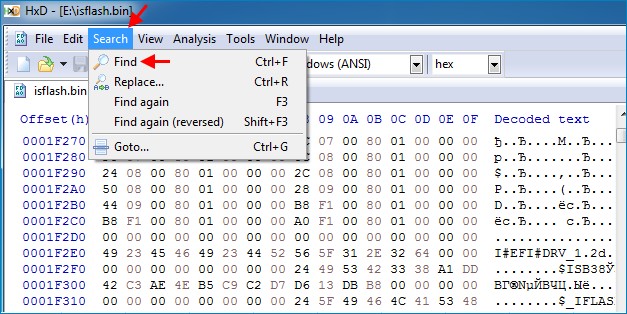
В открытом файле isflash.bin жмём Search-Find.
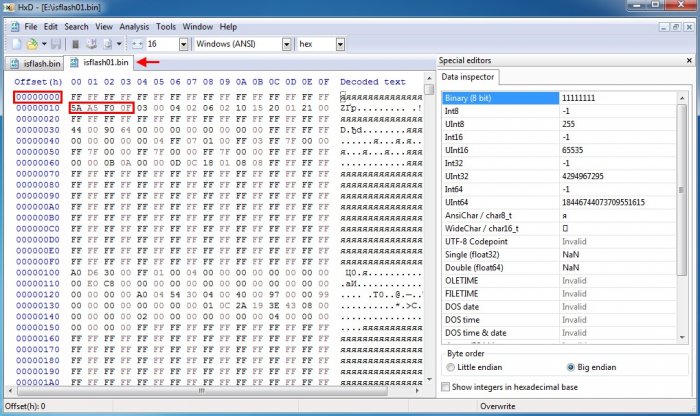
И выполняем поиск значения 5A A5 F0 0F.
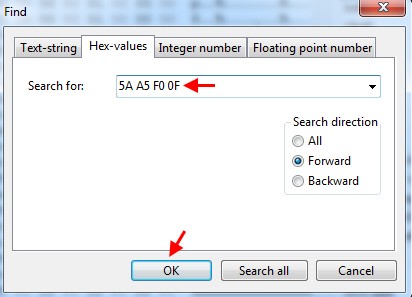
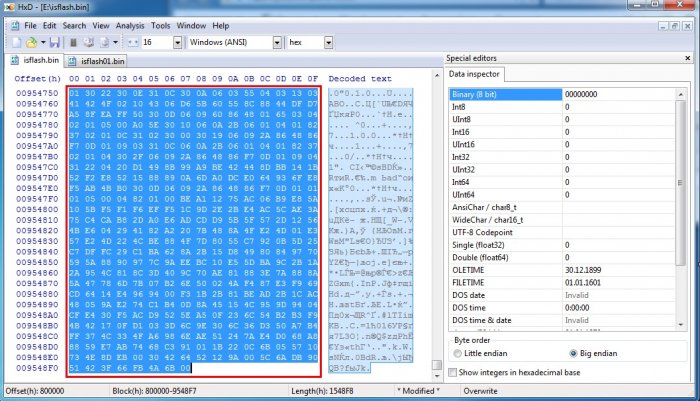
Видим, что значение 5A A5 F0 0F в файле isflash.bin находится в строке 0001F340, также выше в строке 0001F330 видим значения FF.
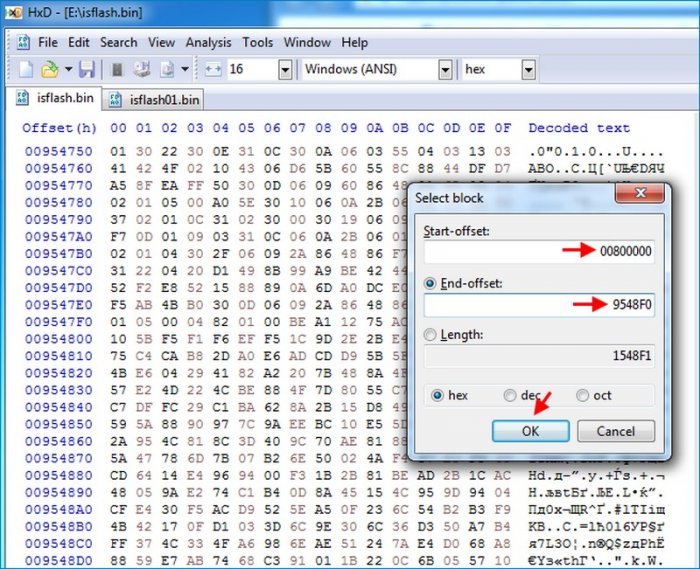
Выделим в файле isflash.bin диапазон строк 00000000-0001F320. Для этого выбираем Edit-Select block.
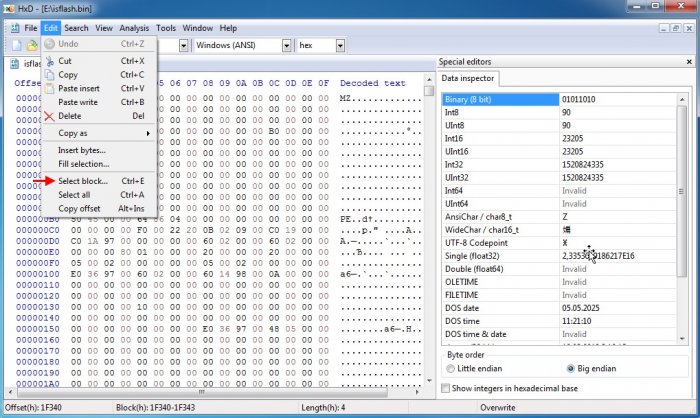
Указываем начальную (00000000) и конечную (1F320) строки выделяемого диапазона.
Выделенный диапазон строк 00000000-1F320.
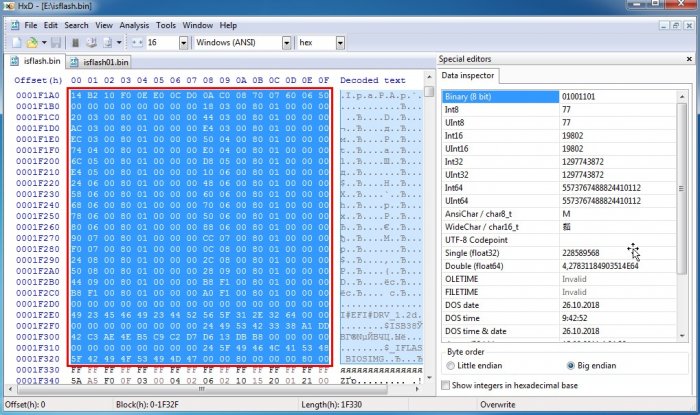
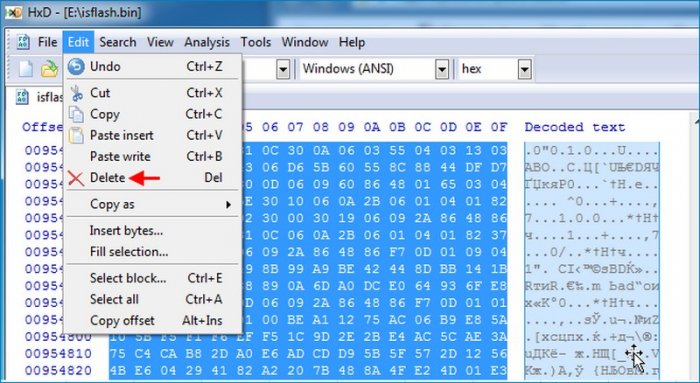
Удалим выделенный диапазон строк из файла isflash.bin, щёлкнув Delete.

Как видим, после удаления выделенных строк файл прошивки isflash.bin теперь начинается точно так же, как и файл isflash01.bin, а именно в строке 00000000 присутствуют значения FF, а в строке 00000010 значения 5A A5 F0 0F.
{banner_google1}
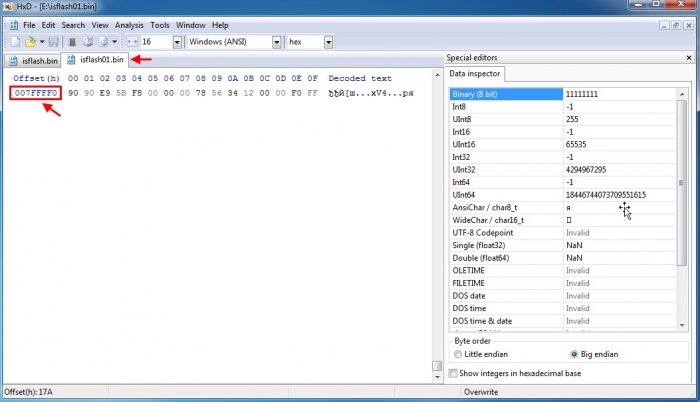
Вернёмся к файлу прошивки isflash01.bin. Пролистаем его до конца и видим, что он заканчивается строкой 007FFFF0.
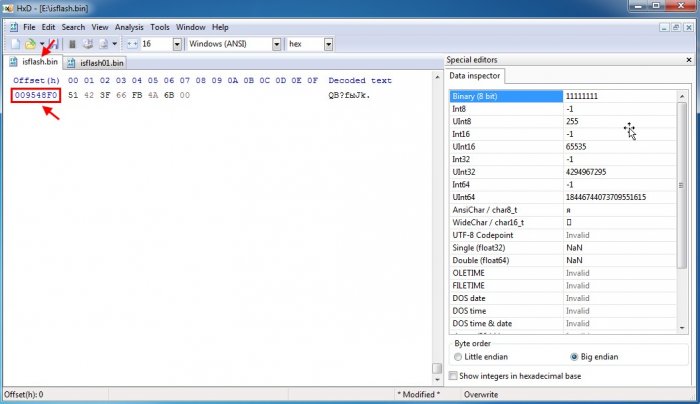
Если пролистать до конца файл isflash.bin, то видим, что он заканчивается строкой 009548F0.
Удалим из файла isflash.bin все строки, находящиеся в диапазоне 00800000-9548F0, то есть сделаем так, чтобы файл isflash.bin заканчивался строкой 007FFFF0. Жмём Edit-Select block.
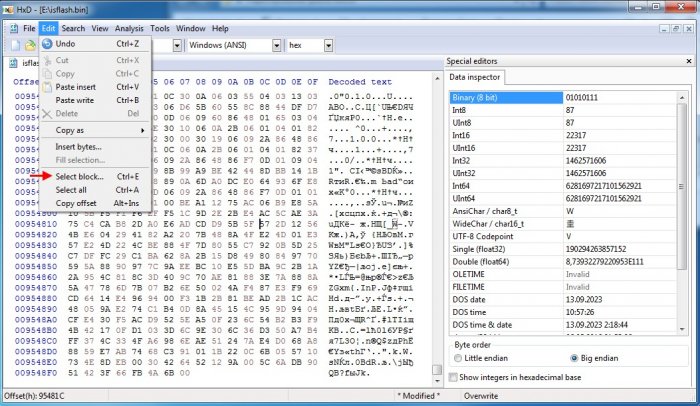
Указываем диапазон выделяемых строк.
Выделенный диапазон строк 00800000-9548F0.
Удалим выделенный диапазон срок 00800000-9548F0, щёлкнув Delete.
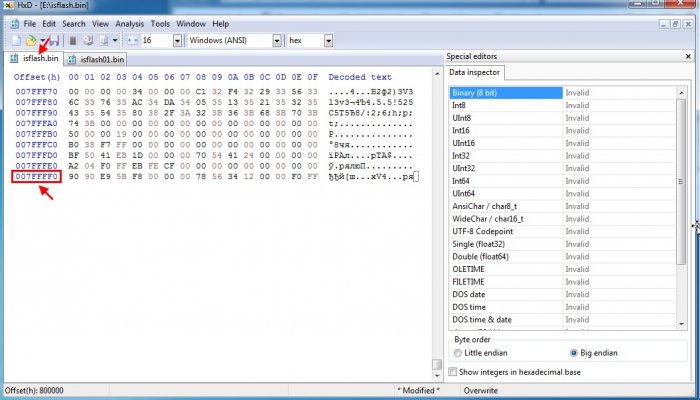
Как видим, теперь файл прошивки isflash.bin заканчивается строкой 007FFFF0.
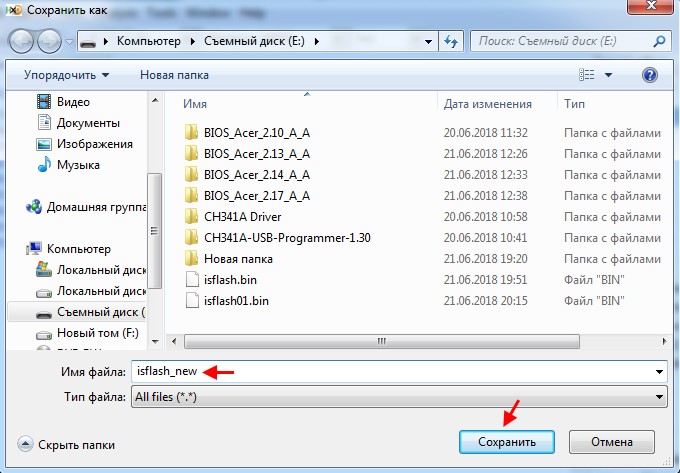
Сохраним файл прошивки BIOS под новым именем, выбрав Save as…

Указываем имя, например isflash_new и жмём Сохранить.
Новый файл прошивки BIOS isflash_new.bin.
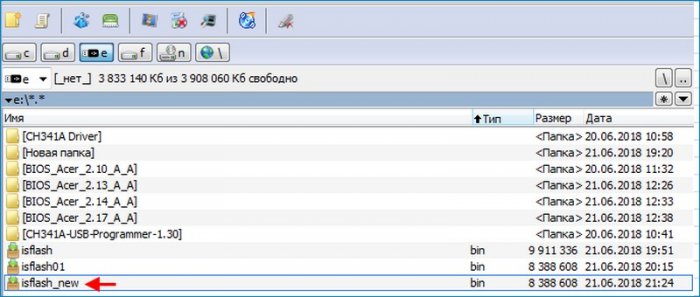
Следует обратить внимание на то, что файл isflash_new.bin весит столько же, сколько и файл isflash01.bin, который мы сохранили во второй части, а именно 8 MB.
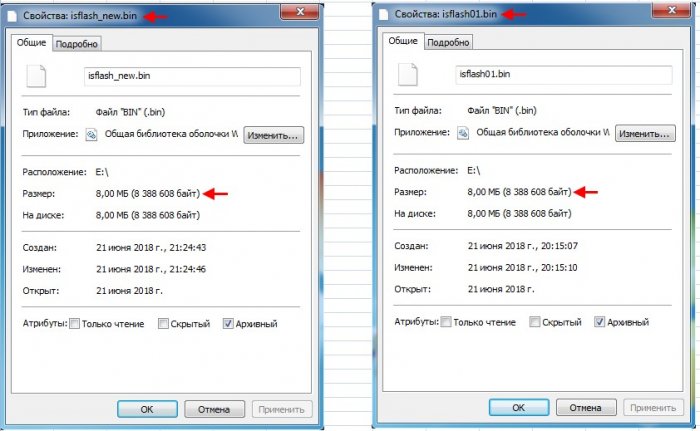
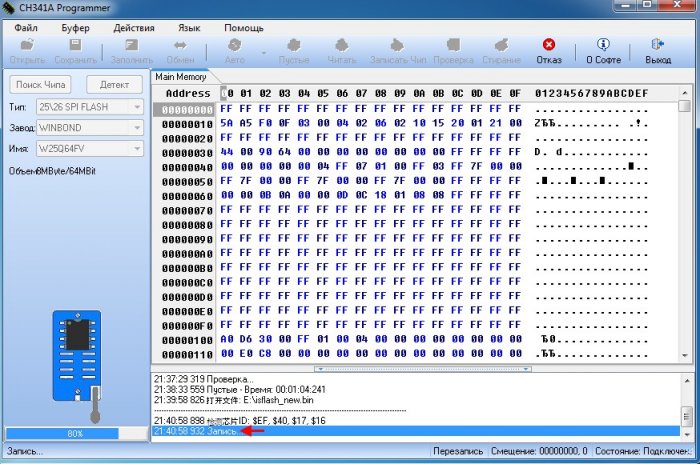
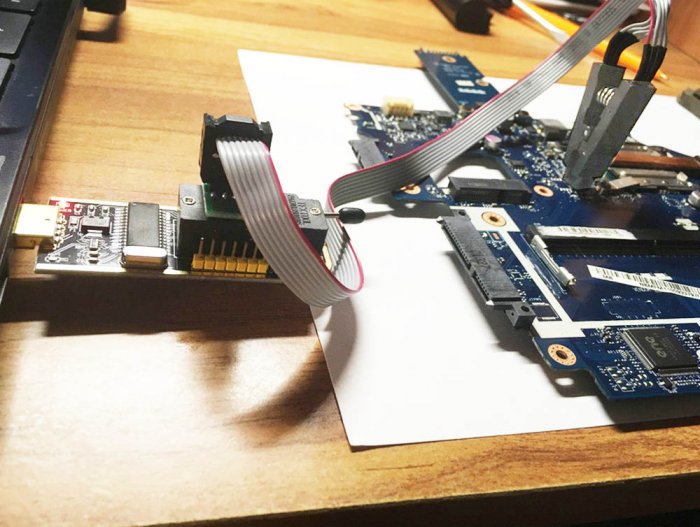
Так как микросхема W25Q64FV, как было сказано выше имеет объём 64 Mbit (или 8 MB), и наш редактированный файл прошивки isflash_new.bin весит 8 MB то мы можем приступать к перепрошивке. Подключаем программатор CH341A к микросхеме BIOS таким же образом, как это делали во второй части статьи.
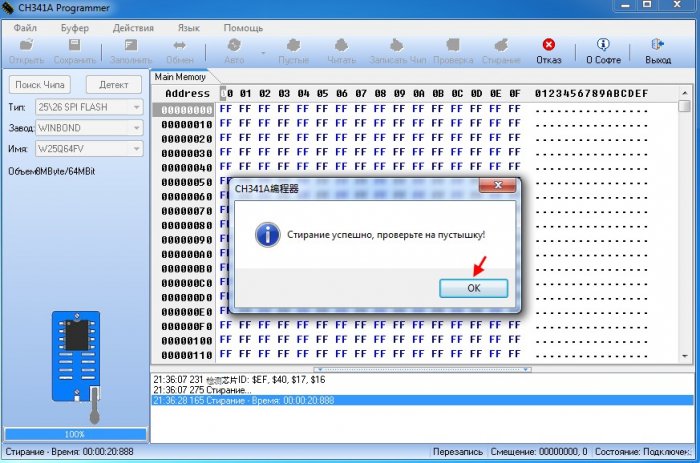
Запускаем программу CH341A-USB. Указываем производителя и модель микросхемы и удаляем старую прошивку BIOS, нажав «Стирание».

Стирание старой прошивки завершено. Жмём ОК.
Проверим, что микросхема Winbond W25Q64FV действительно пуста. Жмём кнопку «Пустые».
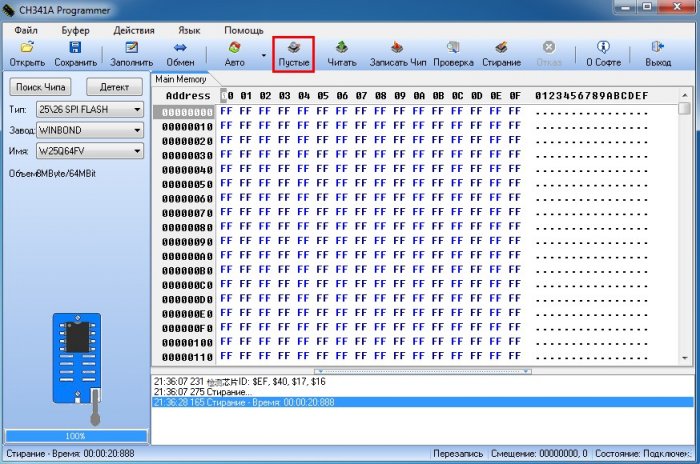
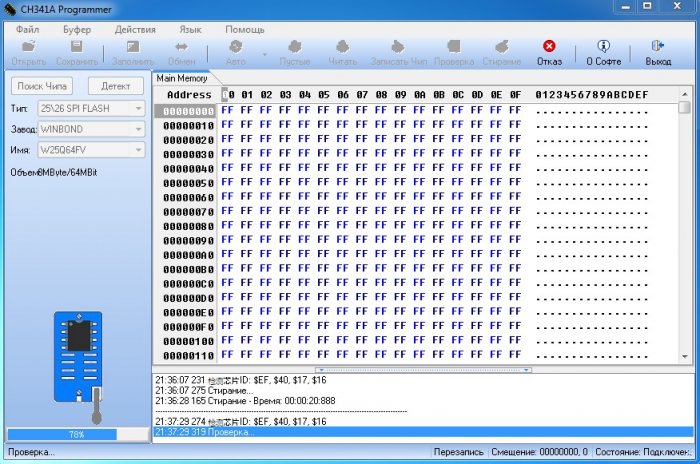
Видим, что микросхема пуста.

Запишем прошивку BIOS isflash_new.bin на микросхему Winbond W25Q64FV. Жмём «Открыть».
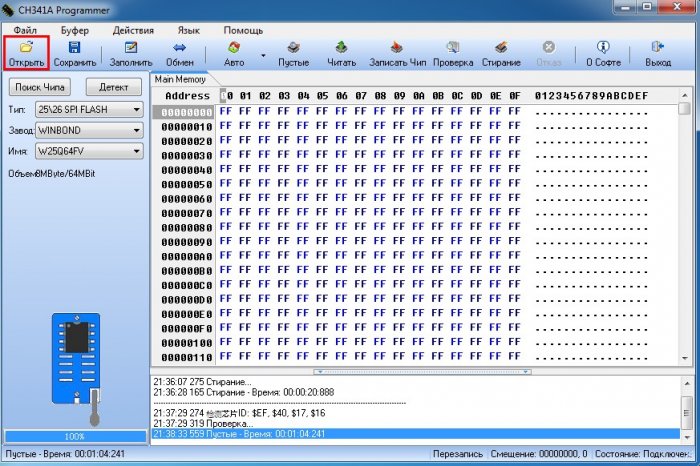
Выделяем файл isflash_new.bin и жмём «Открыть».
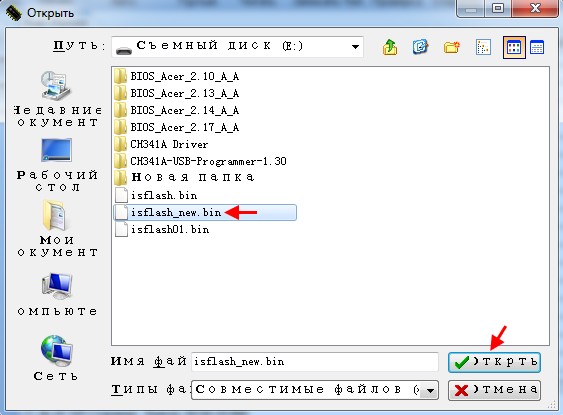
Для начала записи прошивки BIOS на микросхему жмём «Записать чип».
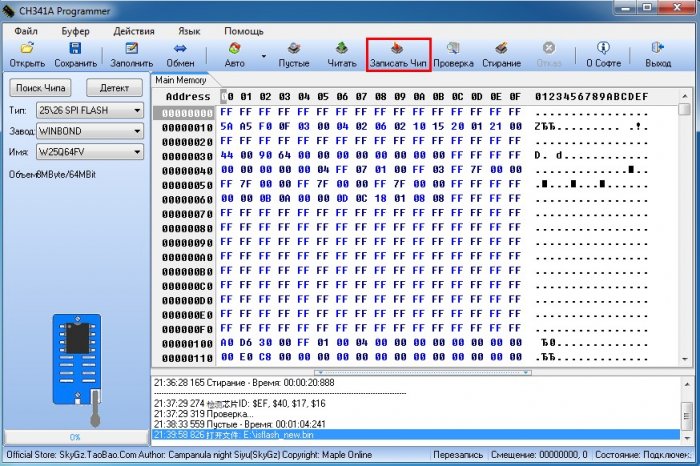
Процесс записи прошивки isflash_new.bin на микросхему Winbond W25Q64FV.