
Если текущая скорость перемещения указателя мыши или, иначе — чувствительность мыши в Windows отличается от удобной для вас, её можно настроить, используя встроенные параметры системы, а для некоторых устройств — сторонние программы.
В этой пошаговой инструкции для начинающих подробно о том, как настроить чувствительность мыши в Windows 11 и Windows 10 в Параметрах и Панели управления, а также кратко о фирменных утилитах от производителей, которые также позволяют уменьшить или увеличить её.
Как изменить чувствительность мыши в Параметрах
Первый способ настройки чувствительности мыши — использования интерфейса «Параметры». В Windows 11 шаги будут следующими:
- Откройте Параметры (можно нажать клавиши Win+I), а в них — раздел «Bluetooth и устройства».
- Откройте пункт «Мышь».

- Измените «Скорость указателя мыши», передвигая ползунок мышью. При желании ниже вы также можете изменить скорость прокрутки страниц колесиком.


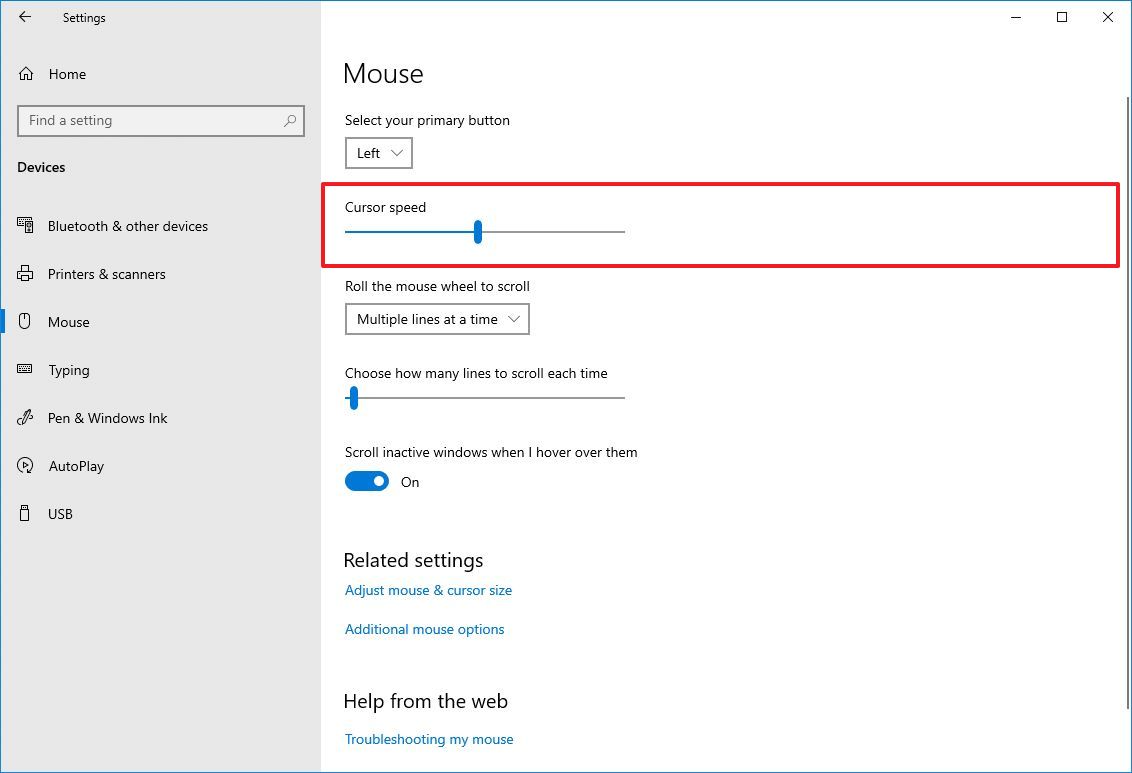
В Windows 10 действия очень похожи:
- Откройте «Параметры» и перейдите в раздел «Устройства».
- В списке слева выберите пункт «Мышь».
- Измените значение «Скорость курсора», передвигая его вправо для увеличения скорости или влево для её уменьшения.


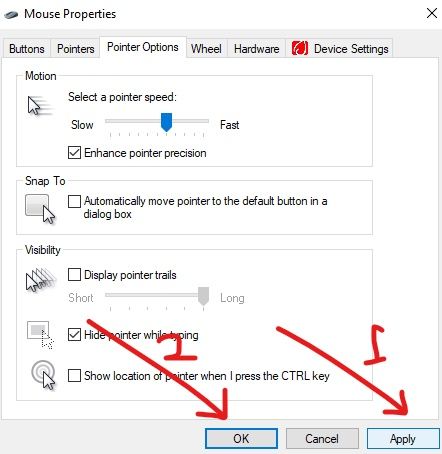
Настройка скорости указателя мыши в Панели управления
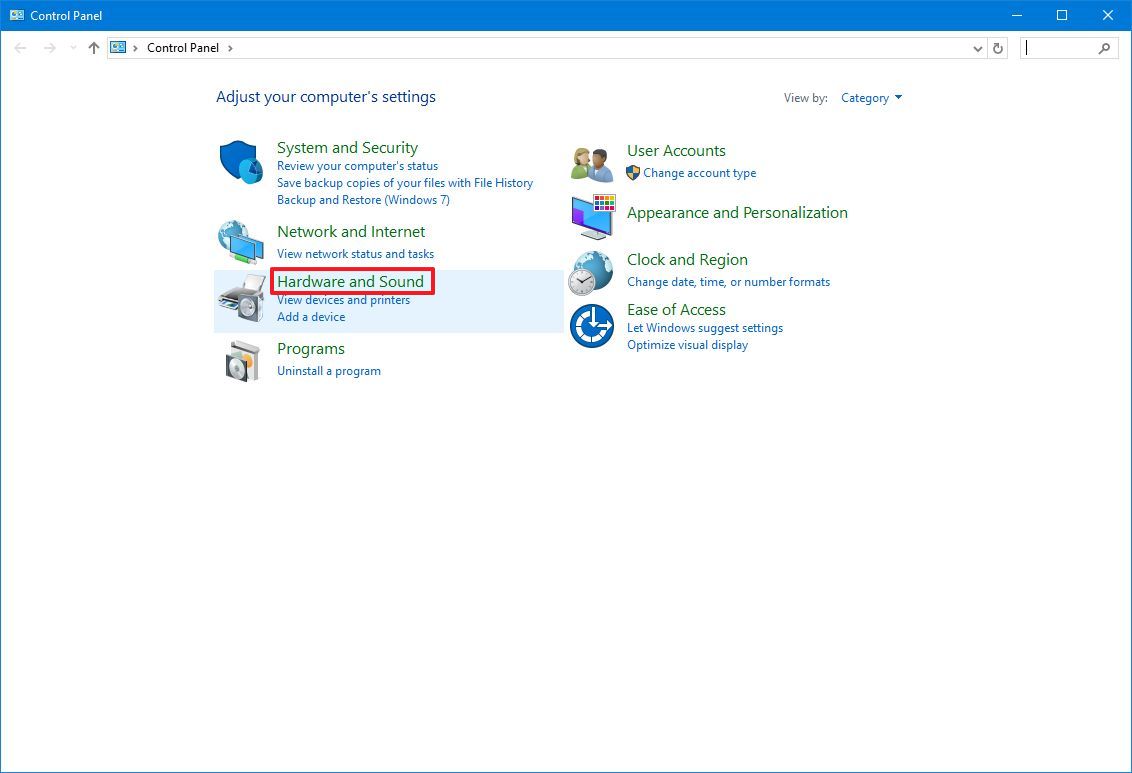
Второй способ — настройка чувствительности мыши в Панели управления:
- Откройте Панель управления. Для этого можно использовать поиск на панели задач. Подробнее: Как открыть панель управления Windows 11, Как открыть панель управления Windows 10.
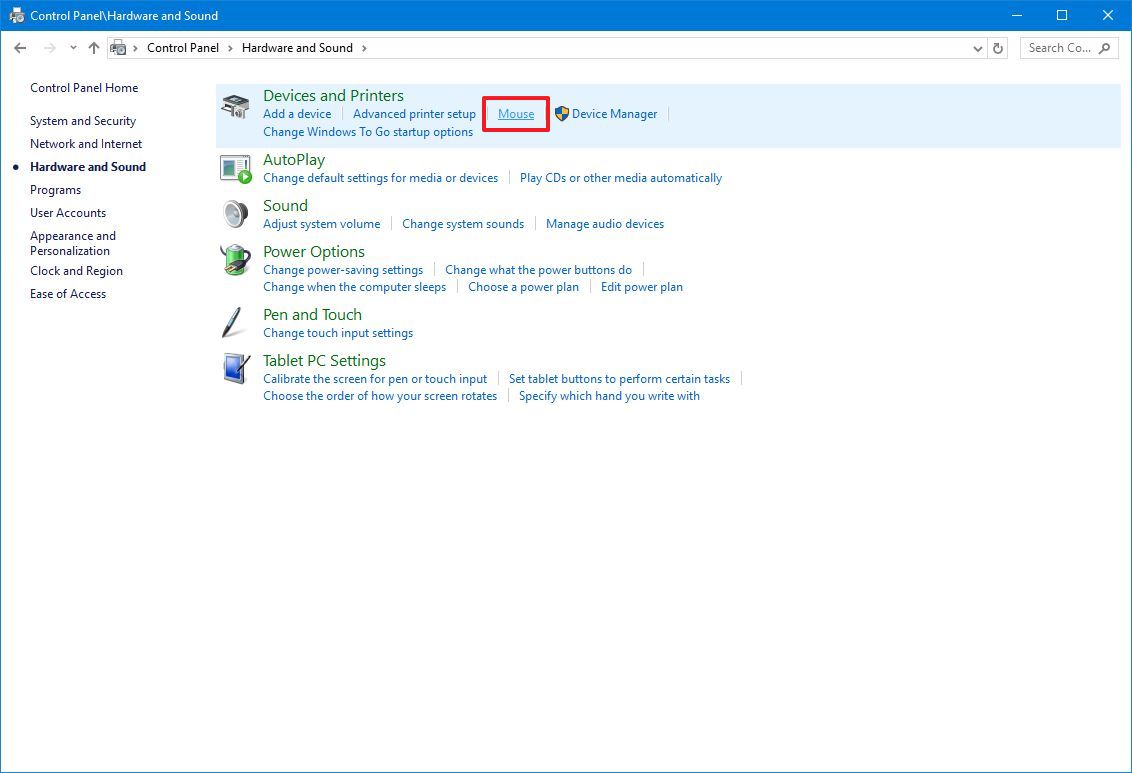
- Убедитесь, что в поле «Просмотр» панели управления установлено «Значки» и откройте пункт «Мышь».

- В следующем окне перейдите на вкладку «Параметры указателя» и задайте скорость движения указателя — ниже или выше.

- Примените настройки


Выполняемые изменения применяются сразу, то есть после каждого изменения чувствительности, ещё до их применения, вы можете проверить, подходят ли они вам.
Программы с возможностью изменения чувствительности мыши
Описанные выше методы изменения чувствительности мыши — это всё, что может предложить Windows 11 и Windows 10, если говорить о встроенных средствах системы.
Однако, для многих «продвинутых» мышей, особенно игровых, производители выпускают собственные бесплатные программы для настройки, позволяющие настраивать чувствительность и другие параметры мыши, например:
- Logitech G Hub для игровых мышей Logitech, или Logitech Options для «обычных» мышек
- Razer Synapse
- SteelSeries Engine
- Corsair iCUE
- Центр управления мышью и клавиатурой для устройств Microsoft
Обычно такое ПО доступно на официальном сайте производителя вашей мыши в разделе «Поддержка», а в некоторых случаях скачивается и устанавливается Windows автоматически.
If your work requires a lot of precision, like graphic design and gaming, then you might want to adjust how fast or slow your external mouse or keyboard is.
In this guide, I will show you how you can make your mouse more sensitive or less sensitive by changing its DPI.
What is DPI?
DPI stands for dots per inch. It is the measurement of mouse sensitivity and cursor speed.
The higher your mouse DPI, the faster your mouse responds to movement per inch and the farther it travels. The slower the DPI, the slower your mouse responds to movement.
You can change your mouse DPI through the Settings app.
Step 1: Click on Start or press the WIN (Windows) key on your keyboard and select Settings.
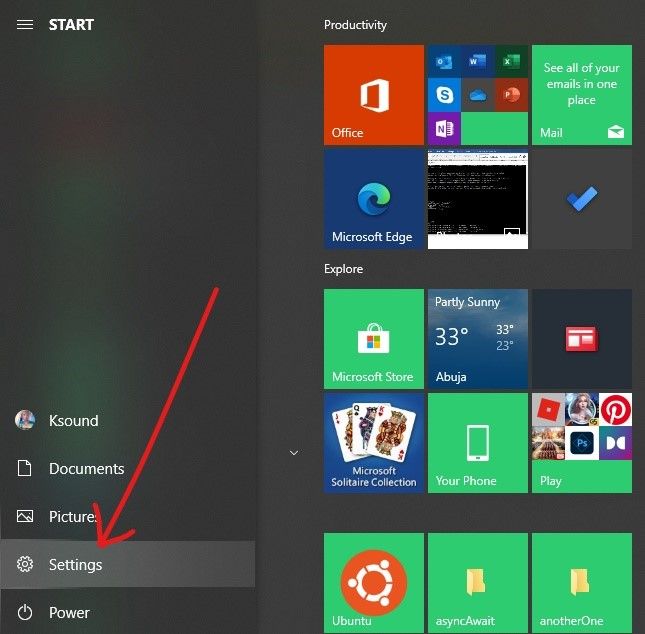
Step 2: Out of the menu items you see, select «Devices».
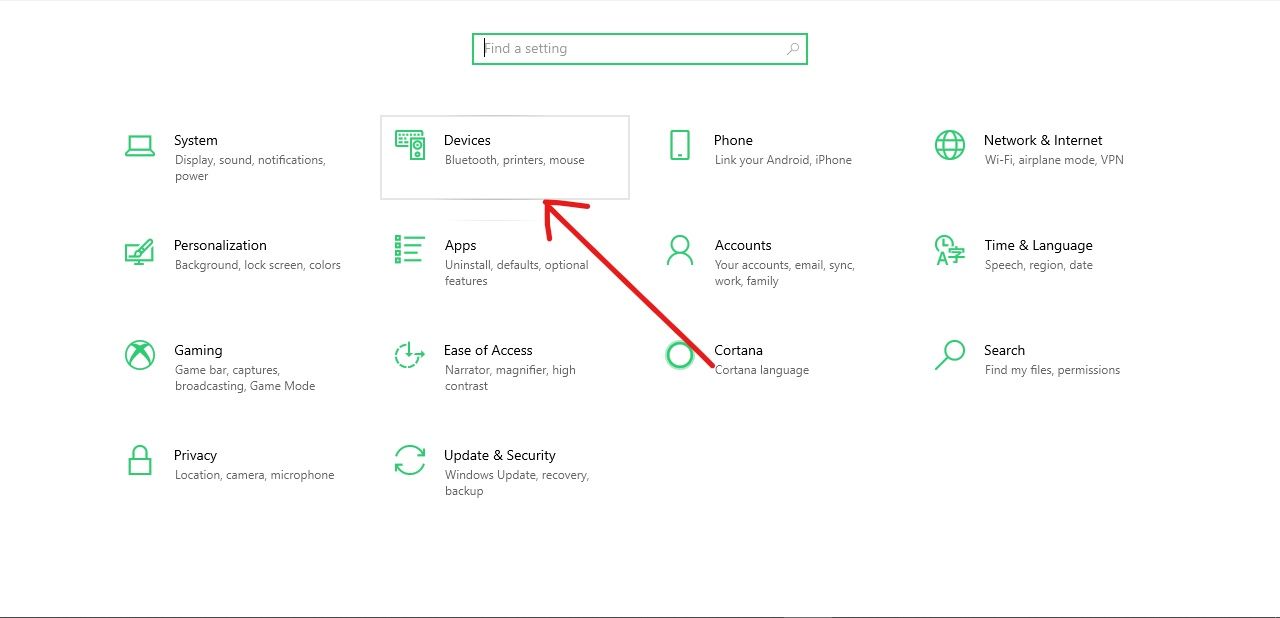
Step 3: Click on the Mouse tab on the Devices page, then select «Additional mouse options» under “Related settings”.
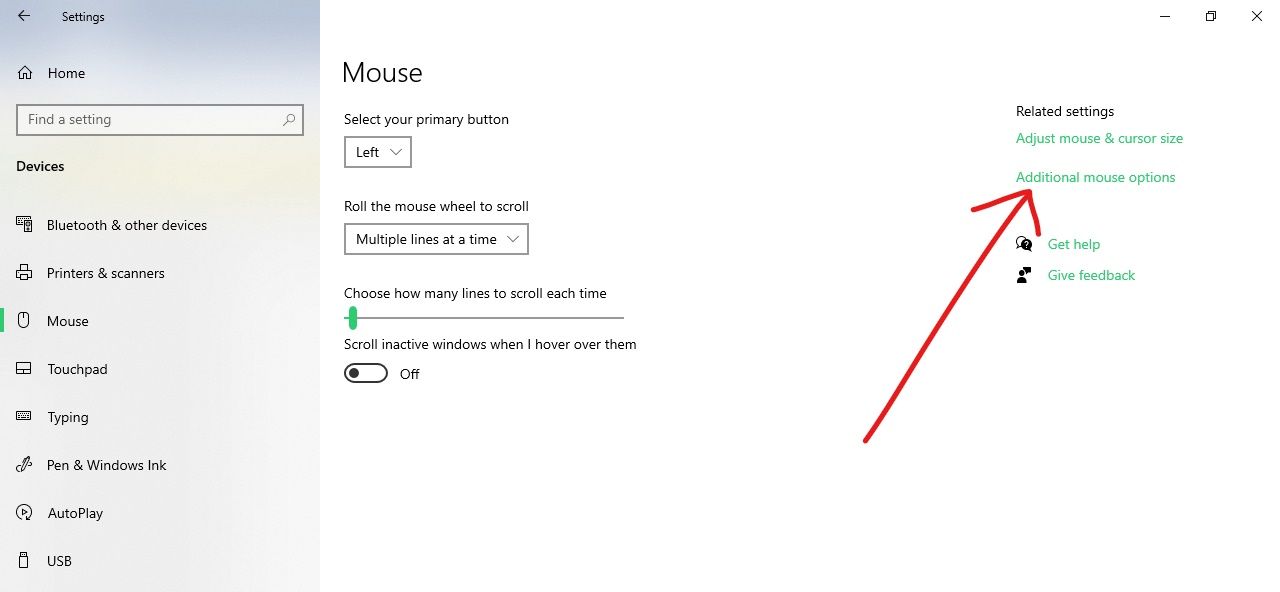
Step 4: A pop-up will appear. Click on the «Pointer options» tab.
Step 5: You will see a slider under «Select pointer speed» which you can use to adjust your mouse DPI. Move the slider to the left to reduce the DPI and to the right to increase it.

Step 6: Click the «Apply» button to save changes and click «Ok» to close the pop-up.
Advanced mice such as those used for gaming often have buttons or sliders for adjusting their DPI, so you can change the DPI of those mice without opening the Settings app.
Final Words
In this guide, you learned what DPI is and how to change it on your Windows 10 computer.
Changing the DPI is useful if what you do requires a lot of precision.
If you game on your PC, you probably need a faster DPI to beat intervals. And if you’re a designer, you might need the DPI slower for the sake of precision.
I hope this article helps you change your mouse DPI. If you find it useful, please share it with your friends and family.
Thank you for reading.
Learn to code for free. freeCodeCamp’s open source curriculum has helped more than 40,000 people get jobs as developers. Get started
Applies ToWindows 11 Windows 10
Мышь может быть настроена различными способами в Windows. Например, функции кнопок мыши можно переключить, сделать указатель мыши более видимым, а скорость прокрутки колесика мыши можно изменить.
Выберите нужную задачу для изменения функциональности мыши из следующего списка:
Чтобы задать основную кнопку мыши, выполните следующие действия:
-
В окне & Устройства Bluetooth > Мышь используйте раскрывающееся меню рядом с кнопкой Основной мыши , чтобы выбрать левое илиправое.
Чтобы изменить скорость указателя мыши, выполните следующие действия:
-
В окне Мыши & Устройства Bluetooth > мыши используйте ползунок рядом со значением Скорость указателя мыши, чтобы задать скорость указателя мыши.
Чтобы сделать указатель более точным при медленном движении мыши:
-
В окне Мыши & Устройства Bluetooth > убедитесь, что параметр Повысить точность указателявключен.
В дополнение к изменению скорости указателя мыши можно изменить и другие варианты поведения указателя мыши:
-
В окне Устройства & Bluetooth > мышь в разделе Связанные параметры выберите Дополнительные параметры мыши.
-
В открывшейся окне Свойства мыши выберите вкладку Параметры указателя :
-
Чтобы ускорить выбор при появлении диалогового окна, в разделе Привязать к выберите автоматически перемещать указатель мыши на кнопку по умолчанию в диалоговом окне проверка.
Примечание: Некоторые приложения могут не поддерживать эту функцию.
-
Чтобы упростить поиск указателя при его перемещении, в разделе Видимость выберите поле Отображение указателей проверка. При необходимости переместите ползунок в сторону Short или Long , чтобы уменьшить или увеличить длину следа указателя.
-
Чтобы убедиться, что указатель не блокирует ввод текста, в разделе Видимость установите флажок Скрыть указатель при вводе проверка.
После настройки поведения указателя мыши нажмите кнопку ОК .
-
Чтобы изменить скорость двойного щелчка мыши, выполните следующие действия:
-
В окне Устройства & Bluetooth > мышь в разделе Связанные параметры выберите Дополнительные параметры мыши.
-
В открывавшемся окне Свойства мыши :
-
Убедитесь, что выбрана вкладка Кнопки .
-
В разделе Скорость двойного щелчка используйте ползунок Скорость: для настройки скорости двойного щелчка.
-
После установки требуемой скорости двойного щелчка нажмите кнопку ОК .
-
-
В окне Мыши & Устройства Bluetooth > в разделе Прокрутка :
-
Используйте раскрывающееся меню рядом с элементом Переворачивать колесико мыши, чтобы прокрутитьнесколько строк за раз или по одному экрану.
-
Используйте ползунок рядом с полем Строки для прокрутки за раз , чтобы задать количество строк, прокручиваемых на экране для каждой вырезки перемещения колесика мыши.
-
Чтобы прокрутить окно, которое не активно, просто наведите на него указатель мыши, убедитесь, что при наведении указателя мыши на них включен параметр Прокрутка неактивных окон.
-
Используйте раскрывающееся меню рядом с пунктом Направление прокрутки , чтобы задать направление прокрутки вниз илиВниз.
-
Чтобы изменить способ горизонтальной прокрутки, выполните следующие действия:
-
В окне Устройства & Bluetooth > мышь в разделе Связанные параметры выберите Дополнительные параметры мыши.
-
В открывавшемся окне Свойства мыши :
-
Выберите вкладку Колесо .
-
В разделе Горизонтальная прокрутка введите количество символов для горизонтальной прокрутки при наклоне колесика влево или вправо.
Примечание: Для применения этого параметра мышь должна поддерживать горизонтальную прокрутку.
-
Нажмите кнопку ОК.
-
Windows позволяет быстро найти указатель мыши, кружа его при нажатии клавиши CTRL на клавиатуре. Чтобы включить этот параметр, выполните следующее:
-
На устройстве с Windows нажмите кнопку Пуск , а затем выберите Параметры > Устройства Bluetooth & > мышь .
Или
Выберите следующие устройства & Bluetooth > сочетания клавиш мыши :
Устройства Bluetooth & > мышь
-
В окне Устройства & Bluetooth > мышь в разделе Связанные параметры выберите Дополнительные параметры мыши.
-
В открывавшемся окне Свойства мыши :
-
Перейдите на вкладку Параметры указателей .
-
В разделе Видимость установите флажок Показывать расположение указателя при нажатии клавиши CTRL.
-
Нажмите кнопку ОК.
-
-
Чтобы увидеть его в действии, нажмите клавишу CTRL на клавиатуре.

ClickLock позволяет выделять или перетаскивать элементы без удерживания кнопки мыши. Чтобы включить ClickLock, выполните приведенные далее действия.
-
В окне Устройства & Bluetooth > мышь в разделе Связанные параметры выберите Дополнительные параметры мыши.
-
В открывавшемся окне Свойства мыши :
-
Убедитесь, что выбрана вкладка Кнопки .
-
В разделе ClickLock установите флажок Включить clickLock .
-
Нажмите кнопку ОК.
-
Чтобы изменить вид указателя мыши, выполните следующие действия:
-
В разделе Указатель мыши окна Специальные возможности > указатель мыши и сенсорное окно:
-
Измените вид указателя мыши в разделе Стиль указателя мыши.
-
Измените размер указателя с помощью слайда рядом с полем Размер.
-
Дополнительные параметры для изменения вида указателя мыши:
-
В окне Устройства & Bluetooth > мышь в разделе Связанные параметры выберите Дополнительные параметры мыши.
-
В открывшейся окне Свойства мыши выберите вкладку Указатели :
-
Чтобы придать всем указателям новый вид, выберите раскрывающийся список в разделе Схема, а затем выберите новую схему указателя мыши.
-
Чтобы изменить отдельный указатель, в разделе Настройка выберите указатель для изменения из списка, нажмите кнопку Обзор, выберите нужный указатель и нажмите кнопку Открыть.
После изменения указателя мыши нажмите кнопку ОК .
-
Нужна дополнительная помощь?
Нужны дополнительные параметры?
Изучите преимущества подписки, просмотрите учебные курсы, узнайте, как защитить свое устройство и т. д.
(Image credit: Mauro Huculak)
On Windows 10, the mouse is an essential component for navigating the desktop and apps efficiently. However, its effectiveness depends on configuring its settings to suit individual preferences. As a peripheral that processes analog inputs, user preferences can vary significantly.
For instance, some users may prefer a faster cursor speed, especially in multi-monitor setups, while others might opt for a slower speed to better track the pointer on the screen.
Regardless of your preference, Windows 10 offers at least three methods to adjust mouse speed sensitivity through the Settings app, the Control Panel, and Registry, enabling a more precise navigation experience.
In this how-to guide, I’ll explain the steps to adjust the mouse speed on your computer.
Recent updates
These instructions has been updated to ensure accuracy and reflect changes to the process in the operating system.
How to change mouse speed using Settings
To adjust the mouse speed on Windows 10, use these steps:
- Open Settings.
- Click on Devices.
- Click on Mouse.
- Use the Cursor speed slider and change the setting to the desired speed (slow or fast).
Once you complete the steps, the mouse speed will change to the level you specified.
How to change mouse speed using Control Panel
To change the mouse speed with Control Panel, use these steps:
All the latest news, reviews, and guides for Windows and Xbox diehards.
- Open Control Panel.
- Click on Hardware and Sound.
- Click the Mouse option under the «Devices and Printers» section.
- Click the Pointer Options tab.
- Under the «Motion» section, use the slider to adjust the speed sensitivity.
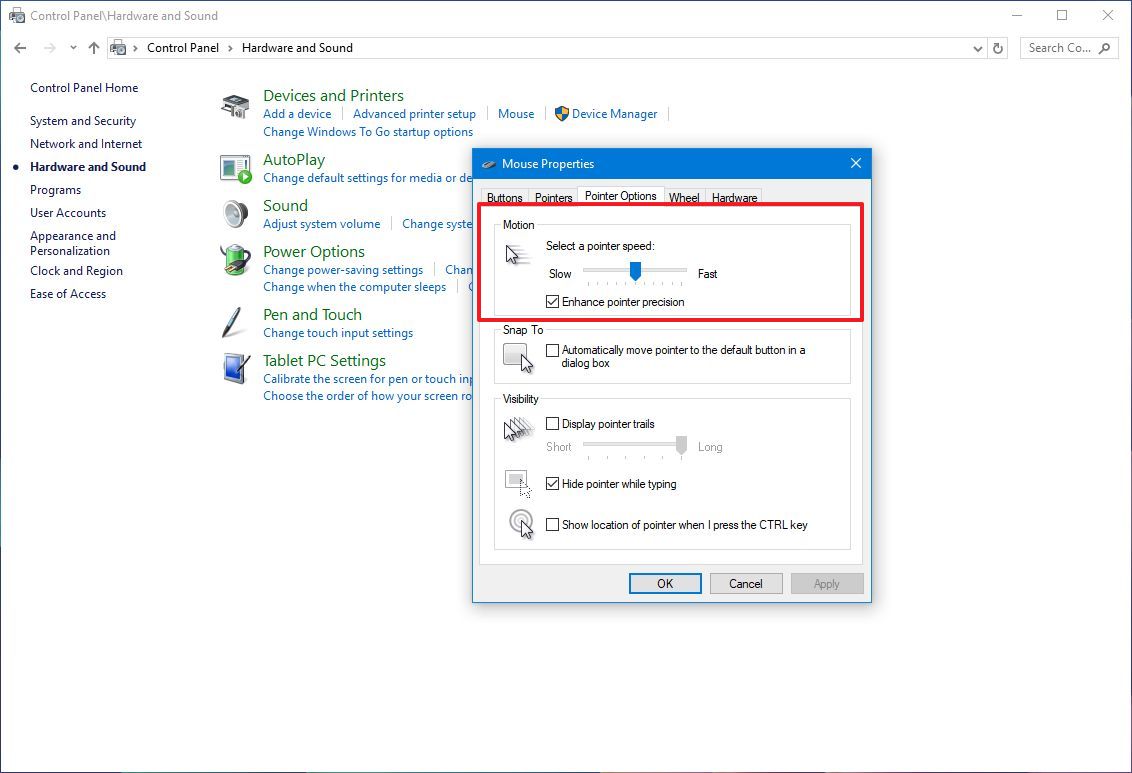
- Click the Apply button.
- Click the OK button.
After you complete the steps, you can start using the mouse pointer with the speed you specified.
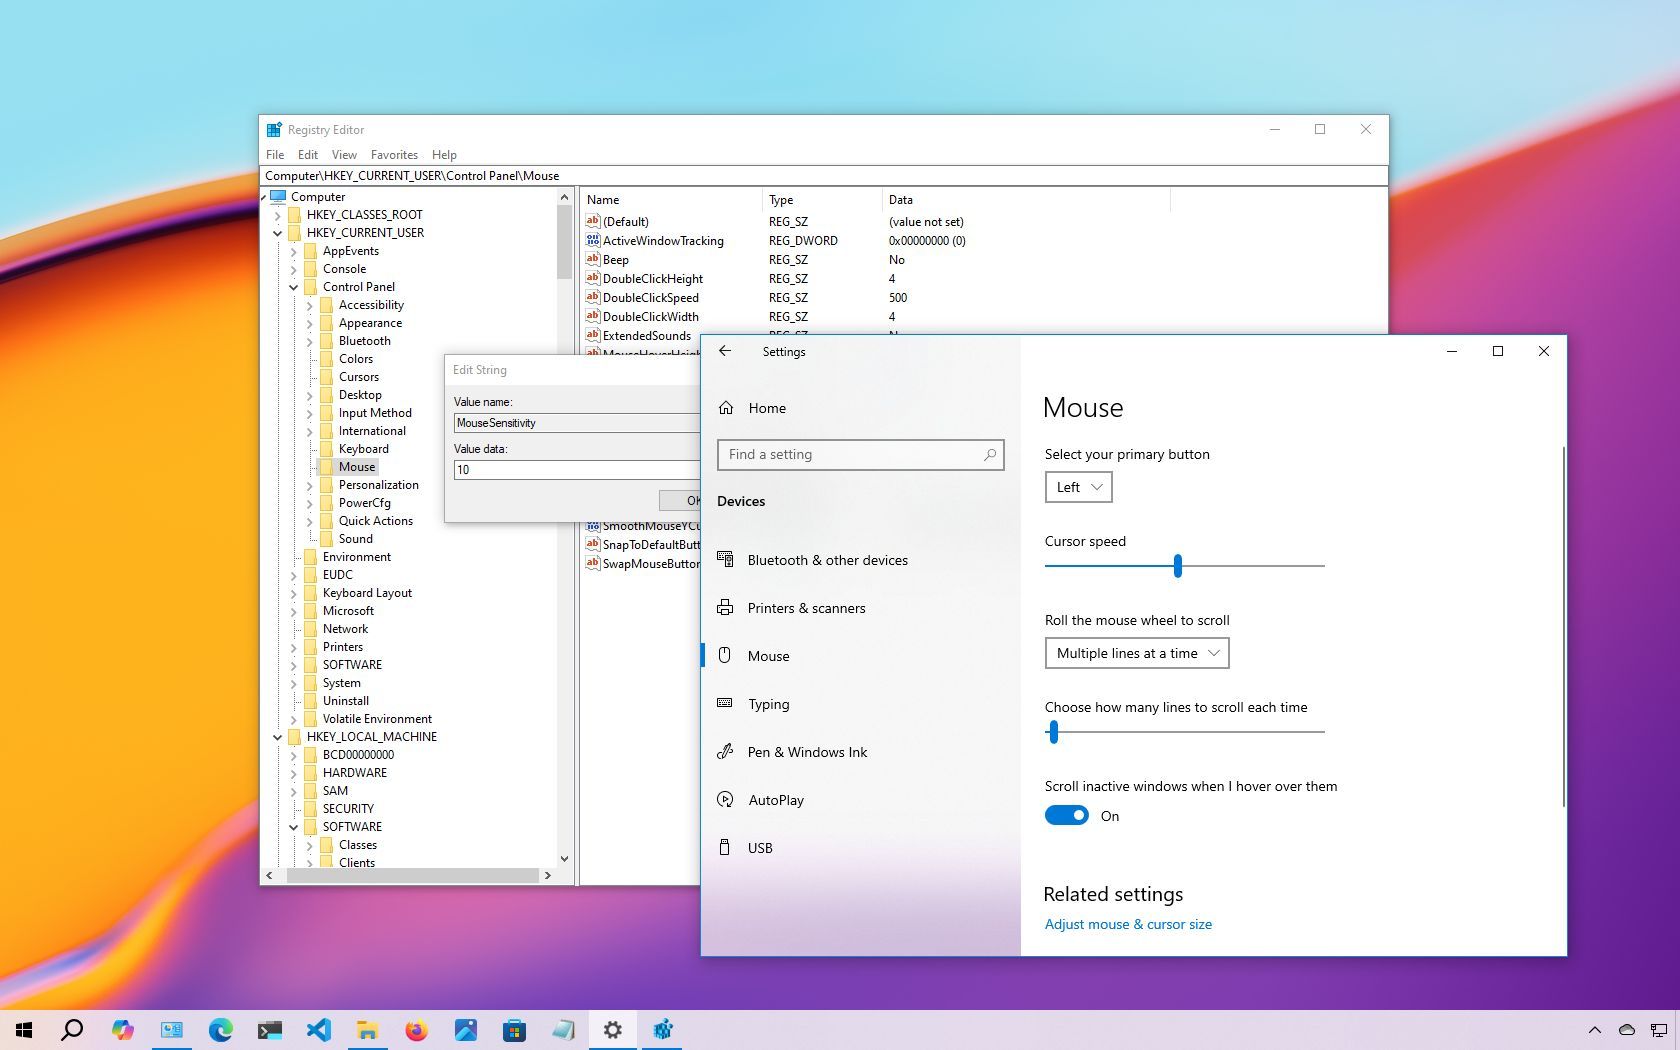
How to change mouse speed using Registry
Alternatively, you can adjust the mouse’s sensitivity by modifying the registry.
Warning: This is a friendly reminder that editing the Registry is risky and can cause irreversible damage to your installation if you don’t do it correctly. It’s recommended that you make a full backup of your PC before proceeding.
To change the mouse speed by modifying the Registry, use these steps:
- Open Start.
- Search for regedit and click the top result to open the Registry.
- Browse the following path: HKEY_CURRENT_USER\Control Panel\Mouse
- Quick tip: On Windows 10, you can now copy and paste the path in the Registry’s address bar to quickly jump to the key destination.
- Double-click the MouseSensitivity key and set the value to any number from 1 to 20 to set the desired speed.
- Quick tip: Usually, the default value is «10.» Anything below this number will make the mouse pointer slower, and anything higher will make it faster.
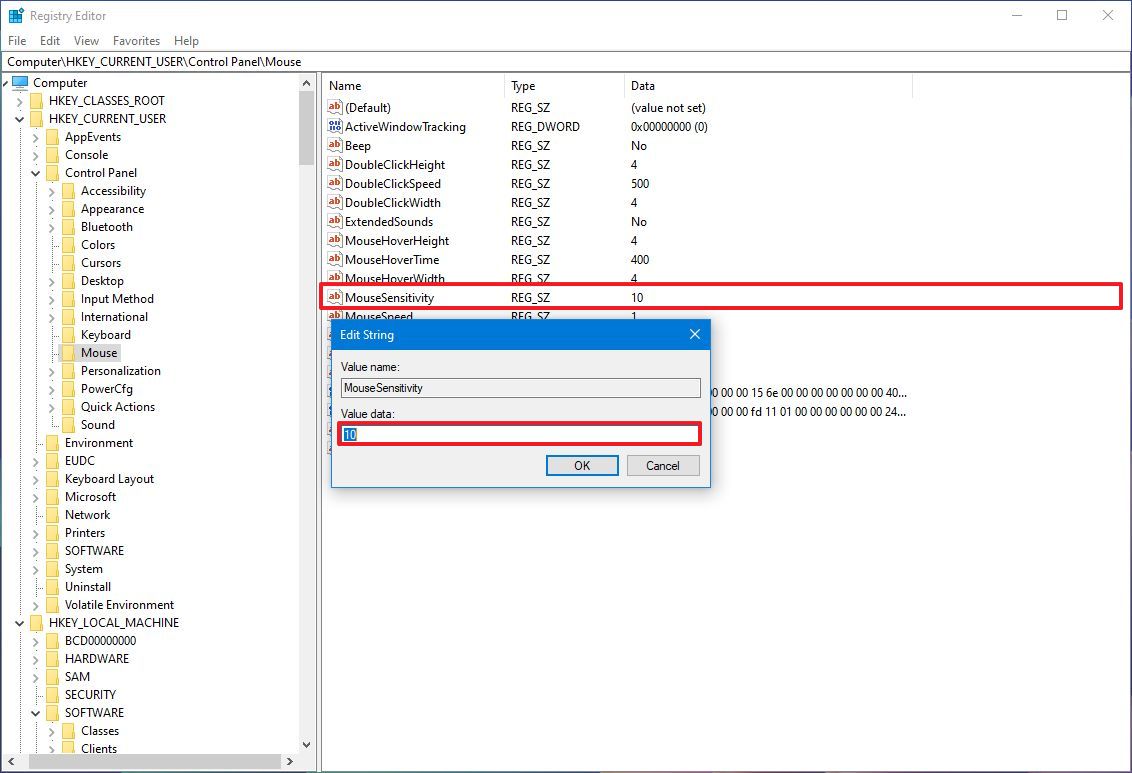
- Click the OK button.
- Restart your computer.
Once you complete the steps, the speed of the mouse should be reflected after restarting the device.
You can always revert the changes by using the same instructions, but on step 4, make sure to set the value to 10 or the previously configured value.
More resources
Find in-depth guides, troubleshooting tips, and the latest updates on Windows 11 and 10 here:
- Windows 11 on Windows Central — All you need to know
- Windows 10 on Windows Central — All you need to know
Mauro Huculak has been a Windows How-To Expert contributor for WindowsCentral.com for nearly a decade and has over 15 years of experience writing comprehensive guides. He also has an IT background and has achieved different professional certifications from Microsoft, Cisco, VMware, and CompTIA. He has been recognized as a Microsoft MVP for many years.
Some people are very much eager to Change Mouse Sensitivity in Windows 10 in order to make it smoother and faster. The mouse is a key peripheral of your computer and you use it to input something. It quickly responses to your actions and executes it in faster means. But out there are certain users who prefer to modify this sensitive nature of the device. So, here, we are going to show you some really effective ways that can help you in modifying the speed of this hardware.
Microsoft has released Windows 10 Version 1703 in June last year including a feature to Change Mouse Sensitivity in Windows 10. You can accomplish the task using the built-in Settings app. Meanwhile, we present you have some other ways to do the same. Here are the methods showing you how you can change mouse sensitivity.
How to Change Mouse Sensitivity in Windows 10
Here is How to Change Mouse Sensitivity in Windows 10 –
Way-1: Using Default Settings App
Step-1: Press Windows + I keys together in order to access default Settings program and click on Devices among other categories.
Step-2: Select Mouse section on the left pane of the Devices settings page. Shift to the corresponding right pane and click on Additional mouse options under Related settings (see screenshot).
Step-3: Once Mouse Properties pop-ups on the PC screen, switch to Pointer Options tab.
Step-4: In the Motion section, you can see an option and slider namely Select a pointer speed. Moving it to forward will increase the sensitivity while dragging it backward will decrease.
Step-5: When you have reached your desired sensitivity level, hit Apply then Ok from the bottom of this dialog.
In this regard, you may also like to read How to Turn On and Off Mouse Pointer Trail in Windows 10.
Mouse sensitivity will be changed to the speed you are waiting for. There are few more methods to Change Mouse Sensitivity in Windows 10, let us see them also.
Way-2: Adjusting Sensitivity with Software Tweak
Latest computers are coming up with the high configuration so that game freaks can play video games on PC. Super exciting games like 1st-degree shooting or strategy games need a super sensitive mouse. There is certain software available on the net which allows the users to configure sensitivity of the mouse. Moreover, the third-party tools also let you adjust macros, light settings and so on. Remember, all these things are not supported in all computers and merely with all mice.
Way-3: Change Mouse Sensitivity in Windows 10 with Appropriate Mouse Pad
Sensitivity and precision of a mouse sometimes vary for using a mouse pad. Some mouse pads are made with a variety of textures and the specially made ones enhance the sensitivity but those may be little expensive too. However, relatively affordable pads are also available in the market. You can buy them and experience super sensitive mouse moves.
Follow our related tutorial to Display Virtual Touchpad on Windows 10.
Way-4: Involving Registry Hack
Little modification in the registry key can also change the mouse sensitivity. This task is little complex and expert hands are preferable. The tweak might affect the default settings for other things in the computer. As a result, we prefer saving a backup. However, these given series of steps can also help you to succeed.
Learn How to Import and Export Registry Editor on Windows 10.
Step-1: Use Win + R hotkeys to invoke Run dialog. Upon opening, type regedit in the box and press Enter key. Registry Editor will open in the first place after you agree to the UAC prompt.
Step-2: Navigate to the following path in the left pane of the Registry Editor:
HKEY_CURRENT_USER\Control Panel\Mouse
Step-3: On the right side of the desired key path, put double-click on MouseSpeed. Upon opening a popup with name Edit String, reach out to Value data section and input 2. Press Ok in order to save the change.
Step-4: Now, change the value data for MouseThreshold1 and MouseThreshold2 to 0 putting double click on each at a time. This will set the mouse sensitivity to maximum.
If you find it uncomfortable, you can adjust the same by changing the Value data as per preference using the above steps.
Note – Keep it in mind that you need to put MouseThreshold1 value less or equal to MouseThreshold2.
As we said before, this process may damage the functioning of certain programs in case anything goes wrong. Therefore, if you think this one is invalid for you; you may proceed to another method.
Way-5: Changing Mouse DPI Settings
Changing DPI settings affects the mouse sensitivity. Gaming mice have a dedicated key to change DPI. These provide various levels of sensitivity. However, this modification is temporary as it will revert to the previous settings once you turn Off the device.
Nowadays, the modern mice have a DPI button and you can afford it quite easily as they offer different sensitivity levels.
Conclusion
A mouse may be a simple hardware tool but it has great uses when talking about accessibility. It makes the job faster than using a mouse pad. Additionally, gamers need mice to experience exciting gaming in computers. Manufacturers are also releasing mice with high configuration nowadays. However, the sensitivity of a mouse is very much important not only for gaming but also for other works. We have covered all possible ways to Change Mouse Sensitivity in Windows 10. Execute any of these to adjust your settings and enjoy the desired performance.