
- How do I open a qcow2 file in Windows?
- How do I mount a qcow2 file?
- How do I convert VMDK to qcow2 in Windows?
- Can virtualbox run qcow2?
- What is qcow2 file?
- How do I extract qcow2 files?
- How do I read qcow2 images?
- How do I edit an image in qcow2?
- How mount raw drive in Linux?
- How do you convert qcow2 to VHD?
- How do you convert ova to qcow2 in EVE?
- How do I convert raw files to ISO?
How do I open a qcow2 file in Windows?
You need a suitable software like QEMU from Fabrice Bellard to open a QCOW2 file. Without proper software you will receive a Windows message «How do you want to open this file?» (Windows 10) or «Windows cannot open this file» (Windows 7) or a similar Mac/iPhone/Android alert.
How do I mount a qcow2 file?
How to mount a qcow2 disk image
- Step 1 — Enable NBD on the Host modprobe nbd max_part=8.
- Step 2 — Connect the QCOW2 as network block device qemu-nbd —connect=/dev/nbd0 /var/lib/vz/images/100/vm-100-disk-1.qcow2.
- Step 3 — Find The Virtual Machine Partitions fdisk /dev/nbd0 -l.
- Step 4 — Mount the partition from the VM mount /dev/nbd0p1 /mnt/somepoint/
How do I convert VMDK to qcow2 in Windows?
- Run the following command to convert the image file format from VMDK to QCOW2: qemu-img convert -p -f vmdk -O qcow2 centos6.9.vmdk centos6.9.qcow2. The parameters are described as follows: …
- Run the following command to query details about the converted image file in QCOW2 format: qemu-img info centos6.9.qcow2.
Can virtualbox run qcow2?
3. Try to add the file through Virtualbox. In the step of creating a new running virtual server, there is a step where the image must be added and be selected in order to proceed.
What is qcow2 file?
qcow is a file format for disk image files used by QEMU, a hosted virtual machine monitor. It stands for «QEMU Copy On Write» and uses a disk storage optimization strategy that delays allocation of storage until it is actually needed.
How do I extract qcow2 files?
First step is to shut down the Virtual Machines. Once this is done, make a backup of the image files in case something goes awry. Then, run the following commands on the image file — the example will be to convert qcow2 to raw. Repeat for each disk image one wants to convert.
How do I read qcow2 images?
Mounting a qcow2 image is very simple on RHEL/Centos/Fedora:
- First install guestmount (comes as part of libguestfs-tools in Centos6) yum install libguestfs-tools libguestfs.
- Then you should be able to auto-magically mount your qcow2 image using the -i option guestmount -a path_to_image.qcow2 -i —ro /mount_point.
How do I edit an image in qcow2?
Resize an image
We create a new qcow2 image and use the virt-resize command to write a resized copy of the original into the new image: # qemu-img create -f qcow2 /data/images/win2012-50gb. qcow2 50G # virt-resize —expand /dev/sda2 /data/images/win2012. qcow2 \ /data/images/win2012-50gb.
How mount raw drive in Linux?
Mount Raw Partition in Linux step by step
- Step 1: Check Disk partitions. [root@myserver ~]# df -h. …
- Step 2: Make directory. …
- Step 3: Check Partition available. …
- Step 4: Select disk and Make filesystem & format disk: …
- Step 5: Mount Disk to Partition. …
- Step 6: Check partition is added. …
- Step 7: To make mount permanent make entries in fstab file.
How do you convert qcow2 to VHD?
Once you have the hard drive captured, you can then create a new blank VM in hyper-V then have it boot from USB/network and then restore the VM to the newly created VHD. In theory this should work. Agree with Chamele0n. Use an imaging tool to clone the machine on to a new disk.
How do you convert ova to qcow2 in EVE?
First extract the files from the ova file.
- ~]$ tar -xvf librenms-centos-7.6-x86_64.ova. …
- ~]$ qemu-img convert librenms-centos-7.6-x86_64-disk001.vmdk librenms-centos-7.6-x86_64-disk001.qcow2 -O qcow2.
How do I convert raw files to ISO?
Convert Image File to ISO
- Run PowerISO.
- Choose «Tools > Convert» Menu.
- PowerISO shows Image File to ISO Converter dialog.
- Choose the source image file you want to convert.
- Set the output file format to iso file.
- Choose the output iso file name.
- Click «OK» button to start converting.
Bitberry File Opener, a best-in-class file handling tool for Windows, enables you to extract content from QCOW2 files on your PC.
Supported .QCOW2 file format
QEMU Copy On Write v2 Disk Image File
For Windows 7, 8, 10, and 11
Step 1: Download and install
Download Bitberry File Opener
The first step is to download the setup program. It contains everything you need to handle QCOW2 files. There are no 3rd-party dependencies.
Run the setup program
Once downloaded, double-click the file (usually named BitberryFileOpenerSetup.exe) to start the installation process. This is a one-time thing.
Step 2: Select your QCOW2 file
Use the File menu
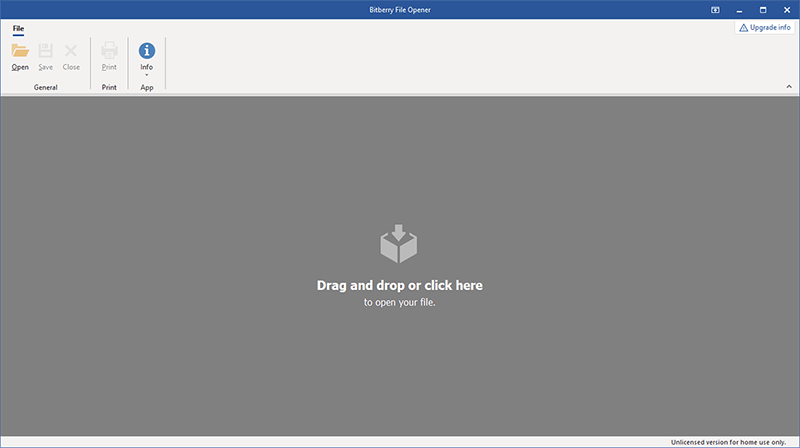
Run Bitberry File Opener and select Open from the File menu to select your file.
Use drag and drop
You can also drag your file and drop it on the Bitberry File Opener window to open it.
Double-click the file
You can associate Bitberry File Opener with any supported file type so they open when you double-click them.
Extract QEMU Copy On Write v2 Disk Image files
Browse the content of your .QCOW2 file
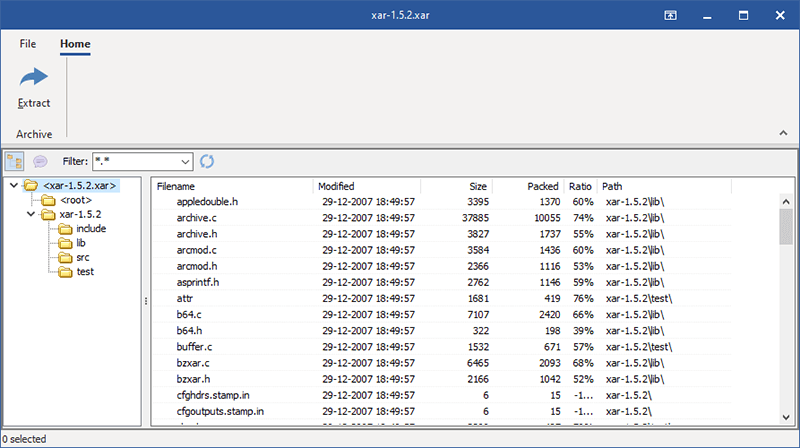
Browse files and folders of your QEMU Copy On Write v2 Disk Image files in Windows Explorer-style.
Extract files from .QCOW2 archives
Select everything, or individual files or folders, and extract them. This restores the files in the QCOW2 archive to their original uncompressed format, ready for you to use.
Feature overview
You are welcome to use the software without a license for as long as you like, for personal tasks at home. Any other use requires a license. The free version has certain limitations — a license is needed to unlock them.
| Feature | Free | Licensed |
|---|---|---|
| Any kind of use that is not personal and at home | ||
| View 8 document formats including Adobe PDF, and edit Microsoft Word documents | ||
| View and edit 127 kinds of image formats, including many legacy formats | ||
| View dozens of digital camera RAW picture formats | ||
| Play any audio format imaginable, including many legacy formats — 72 in total | ||
| Watch videos in 115 formats ranging from HD videos to obscure legacy formats | ||
| Open and browse content in 55 types of archive and compressed files | ||
| Open and browse content in 2 types of encoded files | ||
| Open and edit 3 types of spreadsheet files, including from Microsoft Excel | ||
| Open email attachments in winmail.dat format | ||
| Preview the style of 6 different types of font files | ||
| View the content of 17 text based file formats | ||
| Save files, including attachments from winmail.dat files, and edited images, spreadsheets, and documents | ||
| Extract content from archives, compressed- and encoded files | ||
| Print documents, images, and spreadsheets | ||
| Convert images to other formats like JPEG, PNG, TIFF, PSD, etc. | ||
| Copy text from documents, data from spreadsheets, and images to the clipboard | ||
| File viewing without license reminders |
The free version of Bitberry File Opener lets you open all supported file formats with no time limits. Free to use forever for personal tasks at home. There are several limitations in the free version, but all supported file types can be opened so you can try it on your files.
This is a quick guide to mounting a qcow2 disk images on your host server. This is useful to reset passwords,
edit files, or recover something without the virtual machine running.
Step 1 — Enable NBD on the Host
modprobe nbd max_part=8
Step 2 — Connect the QCOW2 as network block device
qemu-nbd --connect=/dev/nbd0 /var/lib/vz/images/100/vm-100-disk-1.qcow2
Step 3 — Find The Virtual Machine Partitions
fdisk /dev/nbd0 -l
Step 4 — Mount the partition from the VM
mount /dev/nbd0p1 /mnt/somepoint/
Step 5 — After you done, unmount and disconnect
umount /mnt/somepoint/
qemu-nbd --disconnect /dev/nbd0
rmmod nbd
Иногда возникает необходимость локально развернуть копию действующего VDS, например, для проведение тестов или обновлений. Данная статья поможет упростить этот процесс.
Итак, для работы нам потребуются:
- ПО для виртуализации.
- Утилита для работы с образами
- Загрузочный LiveCD-образ
В нашей статье используются:
- Oracle VM VirtualBox
- Qemu-img for Windows
- SystemRescue ISO-образ
Шаг 1. Создаем образ оригинального сервера
Откройте раздел VDS / Виртуальные машины в личном кабинете. Кликните на нужный сервер и нажмите “Создать образ” .

В зависимости от размера исходного диска процесс создания образа может потребовать длительное время. Вам остается лишь дождаться его окончания.
Винимание! Перед созданием образа виртуальная машина будет автоматически выключена. Проводите работы в то время, когда простой в работе сервера для вас не критичен. Вы так же можете обратиться в техническую поддержку с просьбой создать образ в желаемое время, например, ночное.
После создания образа он будет помещён в хранилище образов.
Шаг 2. Скачиваем образ виртуальной машины на свой компьютер
Откройте раздел VDS / Образы.

Воспользуйтесь выпадающим меню справа от нужного образа, если у вас их несколько.

По завершению скачивания образа вы можете его удалить, т.к. хранение образов платное
Шаг 3. Конвертируем образ
Для работы в Oracle VM VirtualBox используется VMDK-формат образа диска. Воспользуйтесь Qemu-img for Windows для конвертации скаченного QCOW2-образа.
Скачайте и распакуйте zip-архив “Qemu-img for Windows”

Переместите QCOW2-образ в каталог с распакованной программой

Затем в адресной строке, напишите команду cmd и нажимаем Enter:

У вас откроется окно командной строки Windows:

Введите команду qemu-img.exe convert XXXX.qcow2 -O vmdk YYYY.vmdk, где:
XXXX.qcow2 — это название файла вашего скаченного образа
vmdk — новый формат образа
YYYY.vmdk — новое имя образа после конвертации

Дождитесь завершения процесса, после чего в папке с программой будет создан новый образ в VMDK-формате.

Шаг 4. Создание ВМ в Oracle VM VirtualBox
Запустите Oracle VM VirtualBox.

Нажмите кнопку “Создать”, после чего выберите тип операционной системы, её версию. Укажите желаемое название виртуальной машины и выберите каталог для хранения ее образа

Нажмите кнопку “Далее” и установите объем оперативной памяти для создаваемой виртуальной машины

Далее откроется окно с выбором типа жесткого диска. Выберите “Использовать существующий виртуальный жёсткий диск” и нажмите на иконку папки

Нажмите кнопку “Добавить” и в файловом проводнике выбите ранее созданный VMDK-образ. Ваш образ отобразится в списке

Выделите его и нажмите “Выбрать”, после чего вы вернетесь обратно в окно выбора типа жёсткого диска

Завершите создание виртуальной машины кнопкой “Создать”

Шаг 5. Настройка и запуск ВМ в Oracle VM VirtualBox
Перейдите в настройки созданной виртуальной машины. Для этого выберите ее из списка и нажмите “Настроить”

В открывшемся окне с настройками выберите пункт “Система” и в порядке загрузки первым установите “Оптический диск”, вторым “Жесткий диск”

Перейдите в пункт “Носители”, выберите пустой диск

Нажмите на соседнюю иконку диска и выберите SystemRescue ISO-образ


Сохраните настройки и запустите виртуальную машину.
Т.к. первоначальная загрузка была установлена с оптического диска, то загрузится SystemRescue ISO-образ

Нажмите Enter и перейдите в командную строку. Выполните команду fdisk -l и проверьте подключенные диски к системе:

Обратите внимание на пункт “Device”, в нем написано название вашего жёсткого диска. В нашем случае диск называется /dev/sda1
Выполните по порядку следующие команды:
mkdir /mnt/chroot— создает директорую для монтирования дискаmount /dev/sda1 /mnt/chroot/— монтирует диск в созданную директориюfor i in /proc /sys /dev /run; do mount -o bind $i /mnt/chroot/$i; done— подключает системные каталоги в гостевую системуchroot /mnt/chroot /bin/bash— осуществляет переход вовнутрь гостевой системы

Далее требуется переконфигурировать загрузчик системы. Обратите внимание на вашу операционную систему.
Если у вас система “Debian\Ubuntu”, то используйте команду:
update-initramfs -u && grub-mkconfig -o /boot/grub/grub.cfg
Если у вас система “CentOS”:
dracut --regenerate-all -f && grub2-mkconfig -o /boot/grub2/grub.cfg

После выполнения команды выключите виртуальную машину и вновь перейдите в ее настройки, в пункте “Система” установите “Жёсткий диск” первым по порядку загрузки

Сохраните настройки и запустите виртуальную машину. Если вы все сделали по порядку и без ошибок, виртуальная машина будет запущена, а на экране отобразится привычное окно, где вы сможете ввести свой логин и пароль, чтобы авторизоваться в системе

09
Июл 2013
Образ виртуалки qcow2 можно примонтировать локально. Это может понадобиться чтобы выташить или изменить нужные файлы даже если виртуалка не может сама загрузиться.
Для монтирования нужно выполнить несколько команд
modprobe nbd max_part=8
qemu-nbd -c /dev/nbd0 название_образа.qcow2
mkdir /mnt/qemu
mount /dev/nbd0p1 /mnt/qemu
Диск монтируется в режиме чтения-записи. Чтобы отмонтировать диск и освободить ресурсы выполним обратную операцию:
umount /mnt/qemu
rm -R /mnt/qemu
qemu-nbd -d /dev/nbd0
modprobe -r nbd
В общем ничего сложного если конечно сам образ целый.