
В Windows 11 для различных элементов: значков «Этот компьютер» и «Корзина», папок, файлов, дисков и других элементов используются привычные и стандартные значки, слегка обновленные по сравнению с предыдущими версиями системы. При желании, эти значки (или иконки) можно поменять.
В этой пошаговой инструкции подробно о том, как изменить значки для различных элементов в Windows 11, а также кратко о том, где взять файлы для значков/иконок.
Изменение значков системных элементов рабочего стола: Этот компьютер, Корзина, Папка пользователя, Сеть
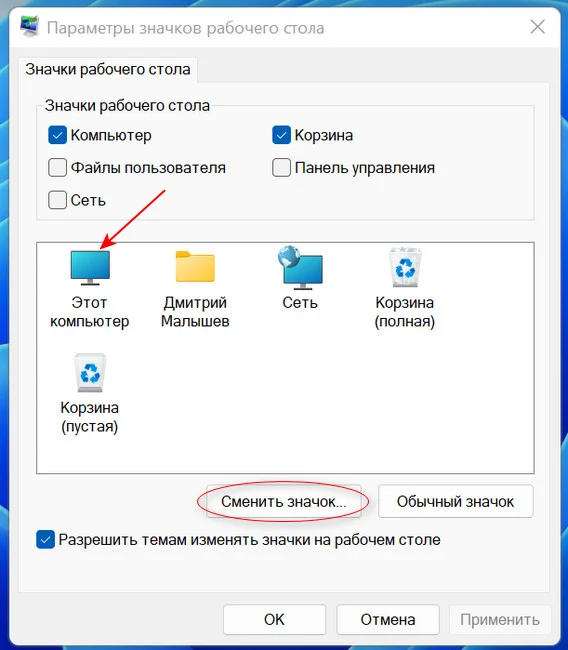
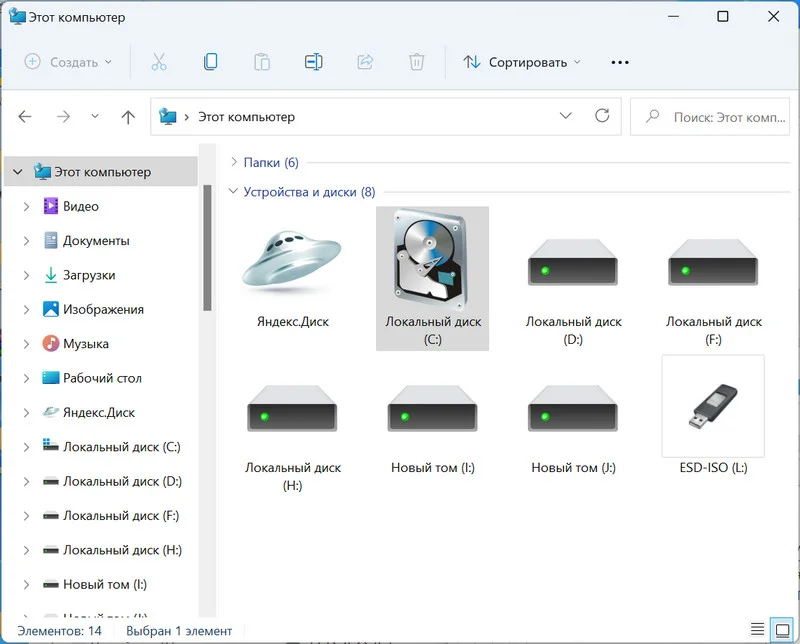
На рабочем столе Windows 11 могут размещаться системные значки, не являющиеся папками или ярлыками: самые часто используемые — Этот компьютер (Мой компьютер) и Корзина. Изменить иконки для них можно в параметрах значков рабочего стола.
Шаги будут следующими:
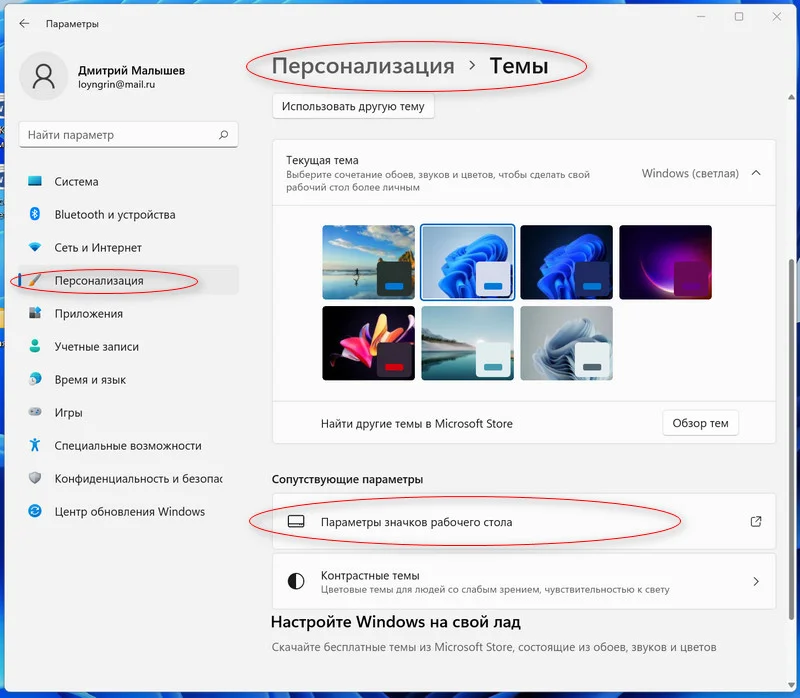
- Откройте параметры значков рабочего стола, для этого можно нажать правой кнопкой мыши по кнопке «Пуск», выбрать пункт «Выполнить» и ввести desk.cpl ,5 (пробел перед запятой обязателен) или перейти в Параметры — Персонализация — Темы — Параметры значков рабочего стола. Подробнее на тему: Как включить значок компьютера на рабочем столе Windows 11.
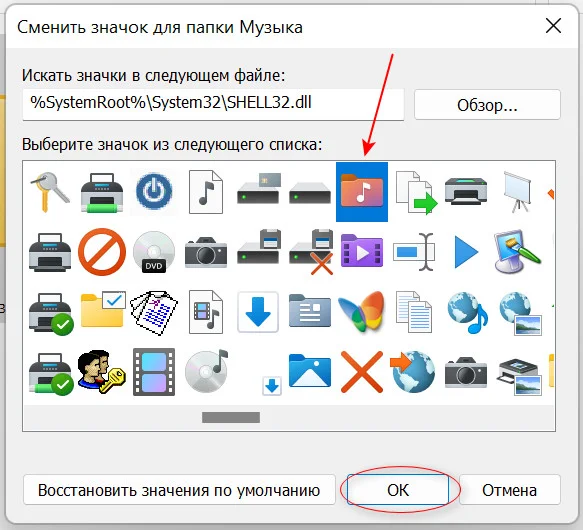
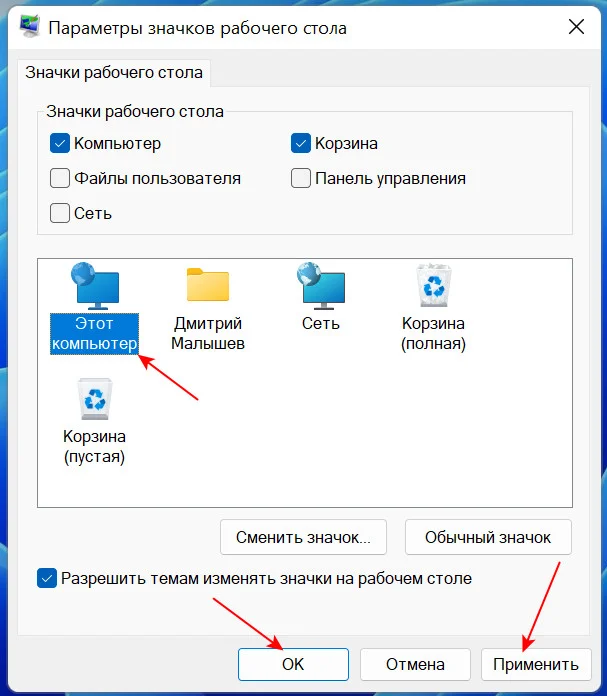
- Выберите нужный элемент, иконку которого вы хотите изменить и нажмите «Сменить значок».

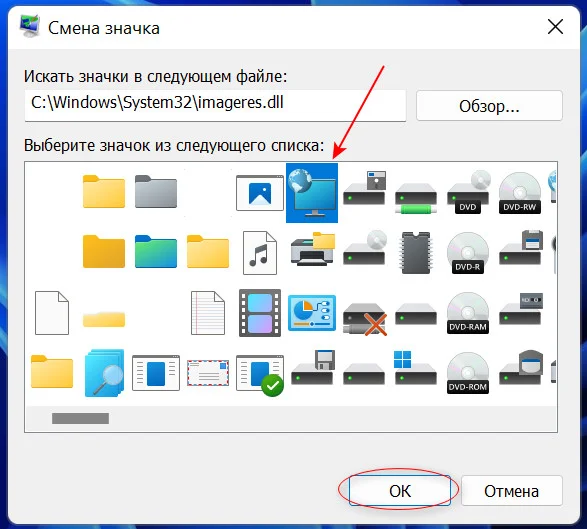
- Выберите нужный значок из файлов ICO, библиотек DLL или файлов EXE. Подробнее о том, где раздобыть значки — в конце инструкции.
- Примените сделанные настройки.
Аналогичным образом вы можете поменять другие системные значки, например, установить свои иконки полной и пустой корзины.
Как изменить значки папки или ярлыка
Изменение значков папок и ярлыков Windows 11 выполняется почти одинаково, необходимые шаги:
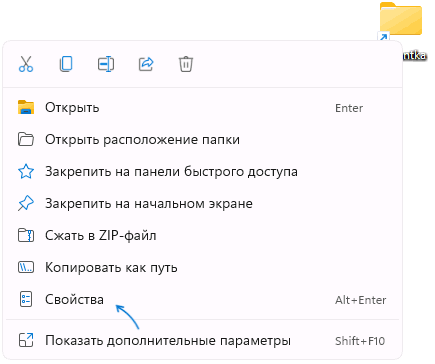
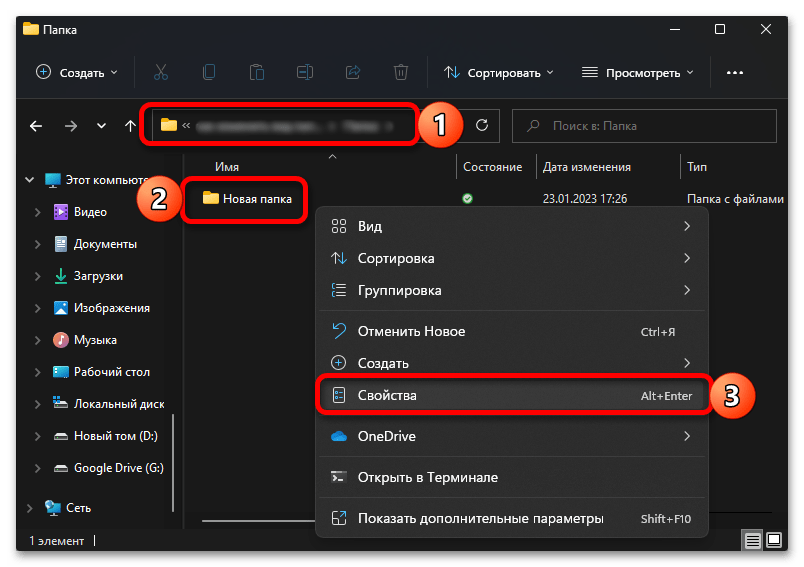
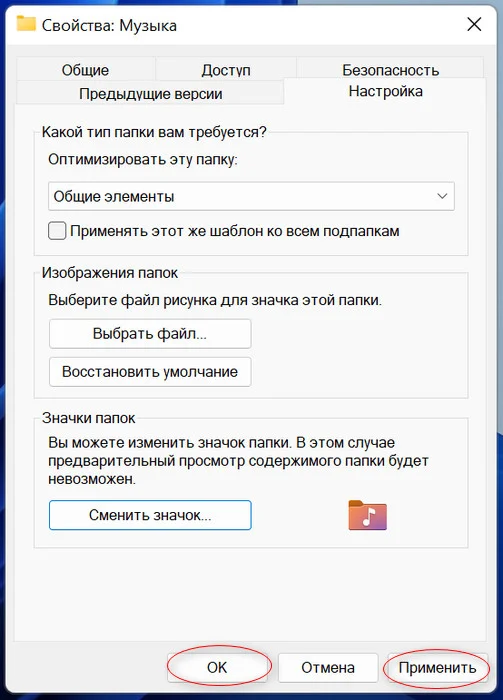
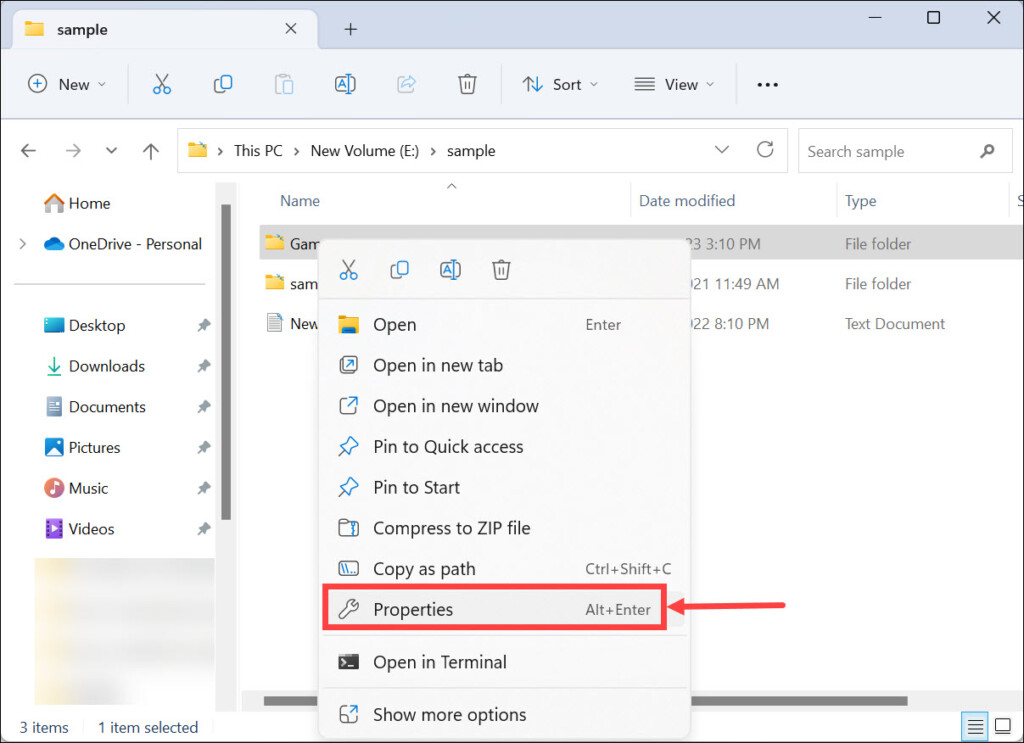
- Нажмите правой кнопкой мыши по папке или ярлыку и выберите пункт «Свойства» в контекстном меню.

- Если это папка, то перейдите на вкладку «Настройка» и нажмите кнопку «Сменить значок». Если это ярлык, то перейдите на вкладку «Ярлык» и нажмите кнопку «Сменить значок».

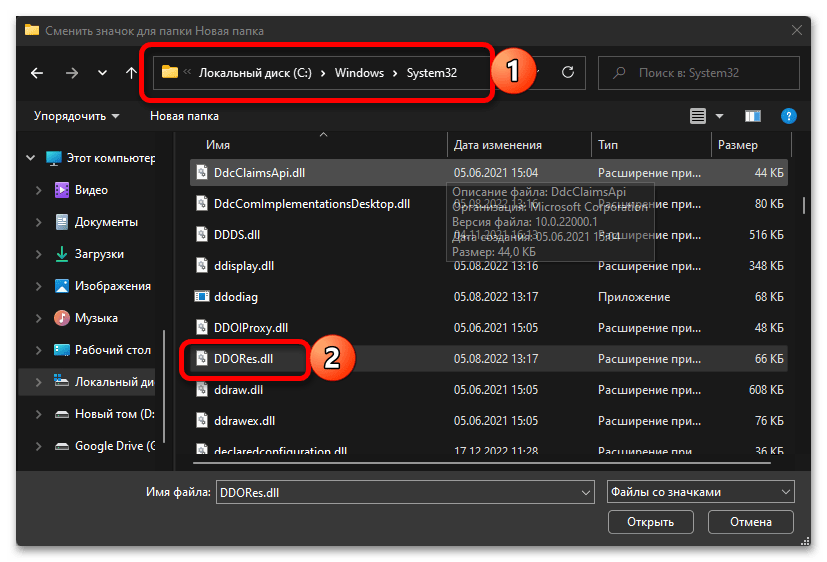
- Выберите нужный значок из файлов иконок (ICO) или содержащих значки библиотек DLL и файлов EXE, примените настройки.
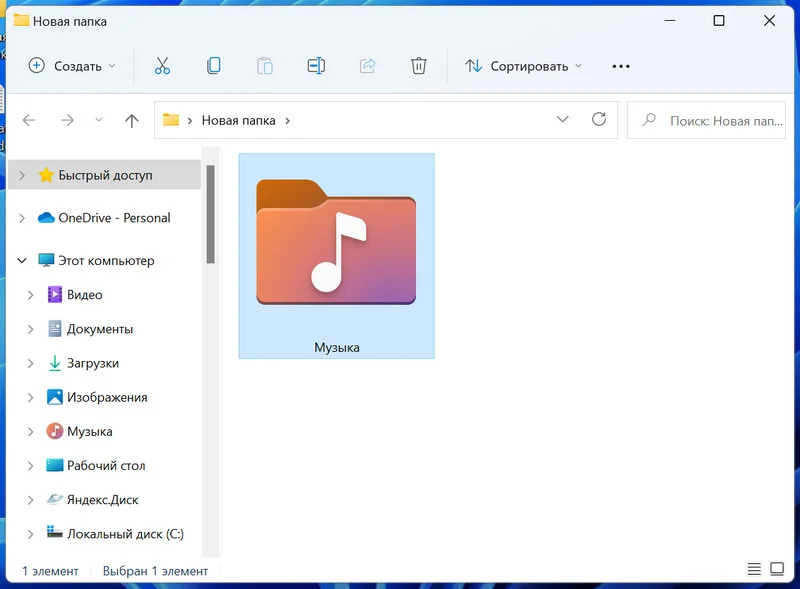
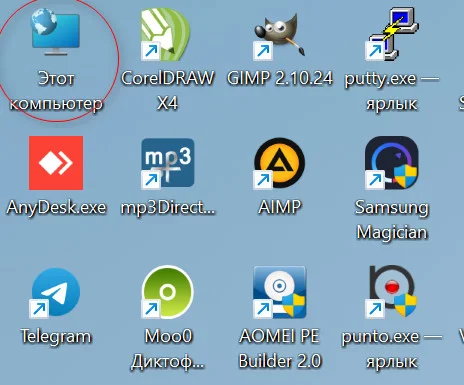
В результате значок выбранного элемента будет изменён. Если этого не произошло, нажмите клавишу F5 на рабочем столе (если значок располагается на нём) или в нужной папке, чтобы обновить отображаемые значки. В контексте темы может пригодиться: Как убрать стрелки с ярлыков Windows 11.
Изменение значков дисков Windows 11
В отличие от выше рассмотренных элементов, изменение значков дисков выполняется не столь очевидными методами. Для выполнения этой задачи придётся использовать редактор реестра:
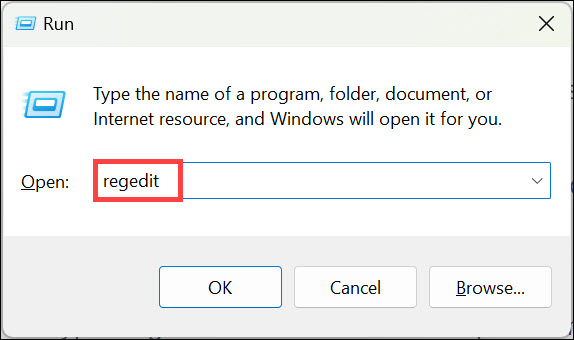
- Нажмите правой кнопкой мыши по кнопке «Пуск» и выберите пункт «Выполнить», введите regedit и нажмите Enter для открытия редактора реестра.
- Перейдите к разделу реестра
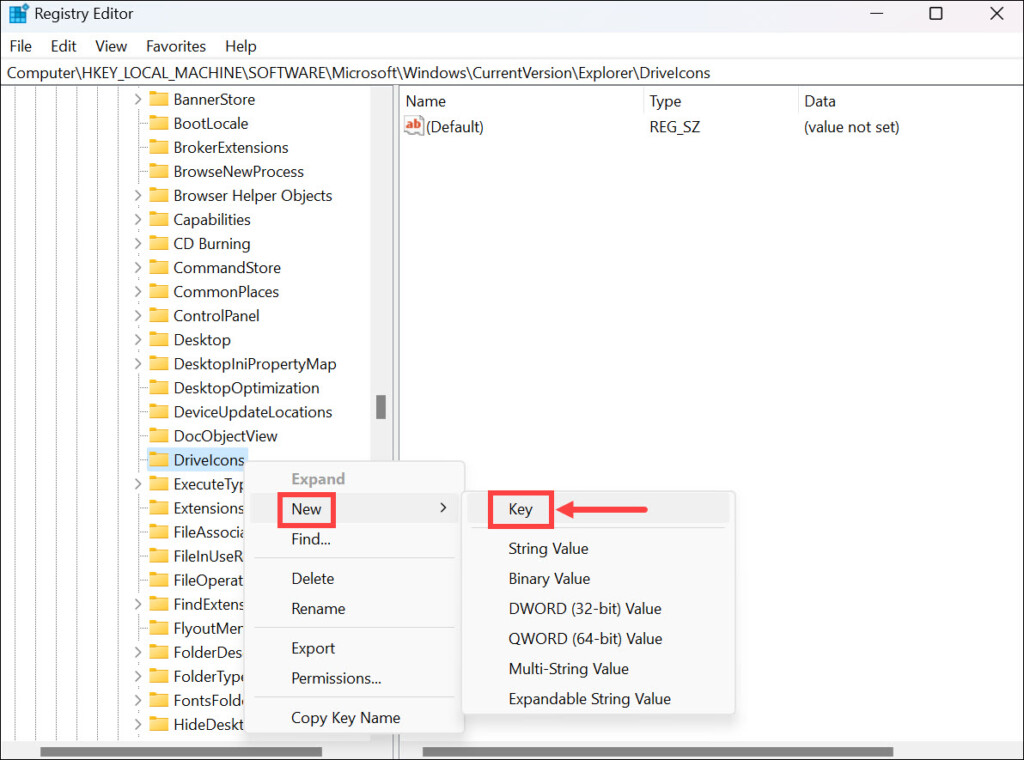
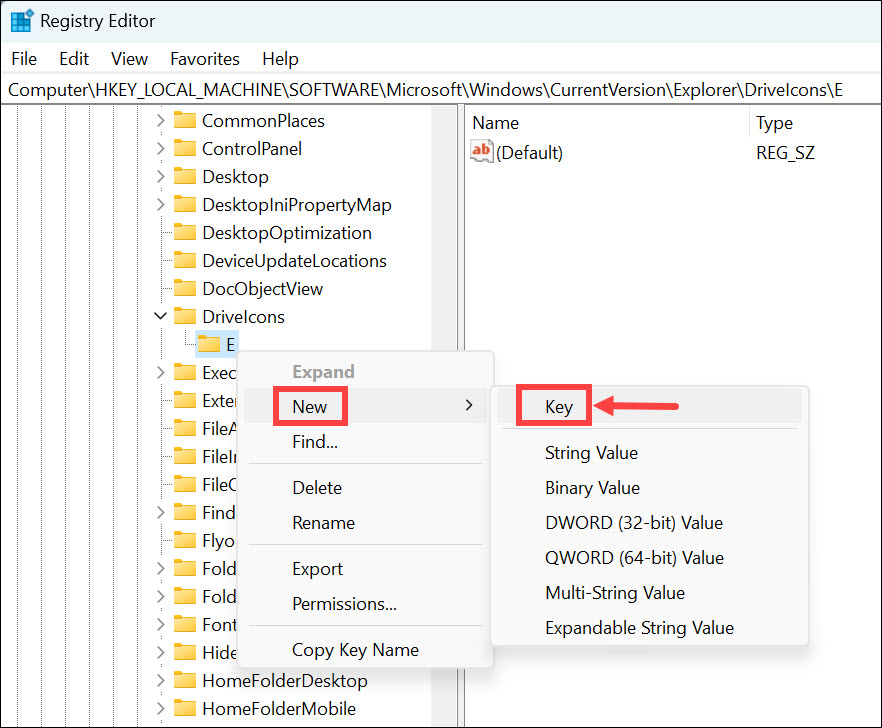
HKEY_LOCAL_MACHINE\SOFTWARE\Microsoft\Windows\CurrentVersion\Explorer\DriveIcons
- Нажмите правой кнопкой мыши по разделу DriveIcons, выберите «Создать» — «Раздел» и создайте раздел с именем, соответствующим букве диска, например, C.
- Внутри созданного подраздела создайте ещё один с именем DefaultIcon.
- Выберите созданный подраздел и в правой панели редактора реестра дважды нажмите по значению «По умолчанию».

- В поле «Значение» укажите путь к файлу иконки (ICO) в кавычках, либо к индексу иконки в файле DLL без кавычек (пример: C:\Windows\system32\imageres.dll,-55).
- Примените сделанные настройки. Может потребоваться перезапуск проводника.

В результате, когда вы повторно откроете проводник, вы увидите изменённый значок диска. Есть и другие способы сделать это, более подробно в инструкции Как изменить значок (иконку) диска или флешки в Windows.
Изменение значков для типов файлов
При необходимости вы можете изменить значки для типов файлов. Ранее это была сравнительно простая задача, которая выполнялась почти так же, как смена значков для дисков в реестре: путем замены значения по умолчанию DefaultIcon для типа файла. Сегодня, когда для стандартных типов файлов многие иконки берутся из приложений Microsoft Store, выполнение задачи в реестре возможно, но трудоёмко.
Я рекомендую использовать бесплатную утилиту NirSoft FileTypesMan — в ней достаточно будет дважды нажать по нужному типу файла и задать нужный значок в пункте «Default Icon», как на изображении ниже.
Останется лишь применить настройки, чтобы значок всех файлов с указанным расширением изменился на выбранный.
Где взять значки для Windows
Значки для Windows 11 можно найти как в системе, так и скачать из Интернета или даже сделать самостоятельно.
- В папке C:\Windows\System32 есть несколько библиотек DLL с хорошими наборами системных значков: imageres.dll, shell32.dll, ddores.dll. Для определения индекса иконок в DLL можно использовать утилиту NirSoft IconsExtract.
- Файлы значков с расширением .ico можно найти в Интернете.
- Файлы PNG с прозрачным фоном можно найти в Интернете, а при необходимости — нарисовать самостоятельно, после чего использовать любой онлайн-конвертер PNG в ICO
- Есть программы для создания и редактирования иконок, причем в одном файле ICO могут быть значки с разными разрешениями. Можно обойтись и без программ, а с помощью онлайн-сервисов, например, xiconeditor.com
Если у вас остаются вопросы, касающиеся изменения значков различных элементов в Windows 11 — задавайте их в комментариях, не исключено, что решение найдётся.
Have you ever wanted to customize your folder icons in Windows 11 with your own pictures? Well, good news! Windows 11 allows you to personalize your folder icons, making your file organization more visually appealing and intuitive. In this tutorial, we will guide you through the steps to make a picture your folder icon in Windows 11.
Step 1: Choose the picture you want to use as your folder icon. It can be any image file format, such as JPEG, PNG, or BMP. Make sure the picture is saved on your computer.
Step 2: Right-click on the folder you want to customize and select «Properties» from the context menu.
Step 3: In the folder properties window, click on the «Customize» tab.
Step 4: Under the «Folder icons» section, click on the «Change Icon» button.
Step 5: Another window will appear with a list of default icons. Ignore those and click on the «Browse» button.
Step 6: Now, navigate to the directory where your picture is saved and select it.
Step 7: After selecting your picture, click on «Open» to confirm your selection. You will be taken back to the previous window where you can see a preview of your new folder icon. Click «OK» to apply the changes.
| Pros | Cons |
|---|---|
| 1. Allows personalized folder icons to enhance visual organization. | 1. Custom icons may not be visible in certain file explorer views or when the folder is compressed into an archive. |
| 2. Helps in quickly identifying folders based on their unique icons. | 2. Changing folder icons individually can be time-consuming for a large number of folders. |
| 3. Provides a fun and creative way to customize your Windows 11 experience. | 3. On shared systems, other users may not see the custom icons if they haven’t made the same changes. |
Now you know how to make a picture your folder icon in Windows 11. Feel free to experiment with different images and organize your files with a more personalized touch. Enjoy the enhanced visual experience and make your folders stand out!
Video Tutorial: How do I change a PNG to an icon in Windows 11?
How do I create a folder thumbnail in Windows 11?
To create a folder thumbnail in Windows 11, follow these steps:
1. Locate the folder for which you want to create a custom thumbnail.
2. Right-click on the folder and select «Properties» from the context menu.
3. In the Properties window, go to the «Customize» tab.
4. Click on the «Change Icon» button.
5. A new window will open, displaying a list of icons to choose from. You can either select an icon from the predefined options or click on the «Browse» button to navigate to a custom icon file on your computer.
6. After choosing the desired icon, click on «OK» to apply the new icon and close the window.
7. Back in the Properties window, click on «Apply» and then «OK» to save the changes.
Once you have completed these steps, the folder will now display the selected icon as its thumbnail, making it easily identifiable and allowing for a personalized touch.
Note: Windows 11 offers a variety of icon options, including custom icons that you can create or download from the internet. Make sure to use compatible icon files (such as .ico or .dll) for a seamless experience.
How to make Windows 11 folders look like Windows 10 folders?
To make Windows 11 folders look like Windows 10 folders, you can follow these steps:
1. Step one is to change the folder icons. In Windows 11, the default folder icons have a new design. To revert to the Windows 10 style, you can either find and download Windows 10 folder icons online or locate the Windows 10 folder icons on a Windows 10 machine.
2. Once you have the Windows 10 folder icons, right-click on the Windows 11 folder that you want to change the appearance of, and select «Properties.«
3. In the «Properties» window, click on the «Customize» tab.
4. Next, click on the «Change Icon» button located at the bottom of the window.
5. In the «Change Icon» window, click on the «Browse» button to locate the Windows 10 folder icons you downloaded or copied from a Windows 10 machine.
6. Choose the Windows 10 folder icon that you want to use, and click «OK.«
7. Back in the «Properties» window, click «Apply» and then «OK» to save the changes.
8. Repeat these steps for any other folders you want to modify in Windows 11 to resemble the Windows 10 style.
By following these steps, you can customize the appearance of Windows 11 folders to resemble Windows 10 folders. This method allows you to maintain a consistent visual style if you prefer the look and feel of Windows 10.
How do I create a custom folder icon?
To create a custom folder icon on your device, you can follow these steps:
1. Find or create an image: Look for an image that you would like to use as your custom folder icon. You can either search for an image online or create one yourself using graphic design software.
2. Edit the image: If needed, edit the image to adjust its size, aspect ratio, or colors. You can use image editing tools like Adobe Photoshop, GIMP, or Canva for this purpose.
3. Prepare the icon: Once you have your image ready, convert it into an appropriate format for folder icons. The most commonly used format is the ICO (Icon) file format, but since you mentioned iOS, you may need to save it as a PNG file with transparent background, as iOS uses PNG for folders.
4. Resizing and formatting: Resize your image to the recommended dimensions for folder icons. On iOS, the standard size for folder icons is 180×180 pixels. To ensure a smooth appearance, use anti-aliasing while resizing.
5. Transfer the image to your device: There are several ways you can transfer the image file to your device. You can email it to yourself and save it to your device, use cloud storage services like Dropbox or Google Drive, or transfer it via a USB cable.
6. Use a file manager or custom launcher: Install a file manager app or a custom launcher on your device that supports the ability to change folder icons. Some launchers also offer built-in options for customizing folder icons. Explore the settings or preferences of the app to find the relevant customization options.
7. Change the folder icon: Open the file manager or launcher settings and locate the folder that you want to customize. Look for the option to change the folder icon and select the image file that you prepared earlier. Apply the changes, and your custom folder icon should now be visible.
Remember, the steps provided may vary depending on the device’s operating system or launcher you are using. Make sure to follow the specific instructions related to your device or software to achieve the desired custom folder icon.
How do I make an image an icon in Windows 11?
To make an image an icon in Windows 11, you can follow these steps:
1. Select the image: Find the image you want to convert into an icon. Ensure that the image is in a suitable format like PNG, JPEG, or BMP.
2. Resize the image: Icons in Windows typically have a square aspect ratio and come in various sizes. To create a professional-looking icon, it’s recommended to resize the image to the desired dimensions. You can use image editing software like Adobe Photoshop or an online image resizer for this purpose.
3. Convert the image to ICO format: Windows uses the ICO file format for icons. To convert your image into ICO format, you can utilize a dedicated icon conversion tool. Online sites like ConvertICO or desktop software such as IcoFX are commonly used for this purpose. Follow the respective tool’s instructions to convert your resized image into an ICO file.
4. Associate the ICO file with the desired shortcut: Once you have the ICO file, locate the shortcut or app for which you want to change the icon. Right-click on the shortcut and select «Properties» from the context menu.
5. Change the icon: In the properties window, navigate to the «Shortcut» tab and click on the «Change Icon» button. Then, select the option to browse for the icon file. Locate the ICO file you created earlier and select it.
6. Apply the changes: After selecting the icon file, click «OK» or «Apply» to save the changes. The icon for the shortcut or app should now be updated with the newly assigned image icon.
7. Verify the changes: Go back to the desktop or the folder where the shortcut is located, and you should see the new icon associated with it.
By following these steps, you can easily convert an image to an icon in Windows 11. Remember to ensure compatibility, resize the image appropriately, convert it to ICO format, and then associate it with the desired shortcut or application.
How do I make a folder icon from a JPEG?
To make a folder icon from a JPEG, you can follow these steps:
1. Find or create a suitable JPEG image: Look for an image that represents the content or purpose of the folder you want to create the icon for. Make sure it is in JPEG format and has a resolution that is suitable for an icon.
2. Resize and crop the image: Use photo editing software or online tools to resize and crop the JPEG image to a square shape. A common folder icon size is 256×256 pixels, but you can adjust it according to your preference.
3. Edit the image: Enhance the image if needed by adjusting brightness, contrast, and colors to make it visually appealing as an icon. Ensure that the details are clear and recognizable even when the image is scaled down to a smaller size.
4. Save the image as a PNG: Convert the edited JPEG image to a PNG file format. PNG is preferred for icons as it supports transparency, which might be useful if you want to have a distinctive shape or background for your folder icon.
5. Rename the PNG file: Choose a descriptive name for your icon file that represents the folder’s content or purpose. A relevant and identifiable name will help you locate and assign it to the folder.
6. Assign the icon to the folder: Now, you need to assign the created icon to your desired folder. On a Windows PC, you can do so by right-clicking on the folder, selecting «Properties,» and navigating to the «Customize» tab. Then, click on the «Change Icon» button and browse for your PNG icon file. On a Mac, you can change a folder’s icon by selecting the folder, pressing «Command + I» for Get Info, clicking on the folder icon at the top left, and dragging and dropping your PNG icon file onto the folder icon placeholder in the Get Info window.
These steps will help you create a custom folder icon from a JPEG image. Remember to choose an image that is relevant to the folder’s contents and make sure the icon is visually appealing and recognizable even at smaller sizes.
How do I change the thumbnail on Windows 11?
To change the thumbnail on Windows 11, you can follow these steps:
1. Locate the file or folder for which you want to change the thumbnail image.
2. Right-click on the file or folder, and select «Properties» from the context menu.
3. In the Properties window, navigate to the «Customize» tab.
4. Click on the «Choose File» or «Select Custom Picture» button, depending on the options available.
5. Browse your computer to select the image you want to set as the new thumbnail.
6. Once you have selected the image, click on the «Apply» or «OK» button to save the changes.
7. The thumbnail should now be updated with the new image you selected.
Please note that not all file types or folders support custom thumbnails. If the option is not available or grayed out in the Properties window, it means that the file or folder does not support changing its thumbnail.
It’s important to keep in mind that Windows 11 may have slight interface or feature differences compared to previous versions, so the steps provided here assume you are using Windows 11.
Все способы:
- Вариант 1: Значок папки
- Способ 1: Инструменты системы
- Способ 2: Сторонний софт
- Вариант 2: Атрибуты папки
- Вариант 3: Параметры отображения
- Вопросы и ответы: 0
Вариант 1: Значок папки
Чаще всего под изменением вида папки подразумевается именно смена ее значка. Ограниченный набор таковых доступен в ОС по умолчанию, но также они могут быть созданы самостоятельно или установлены с помощью стороннего ПО.
Обратите внимание! В Windows 11, как и в предыдущих версиях ОС от Microsoft, в качестве иконки папки или любого другого ярлыка можно использовать собственные изображения, но для этого их потребуется определенным образом подготовить. Обязательные условия – графический файл должен иметь формат *ICO и одно из следующих разрешений: 16×16, 24×24, 32×32, 48×48, 256×256. Как вариант, вы можете создать необходимые картинки с соответствующим размером в любом графическом редакторе, сохранить их в PNG, а затем конвертировать либо же выполнить данную процедуру онлайн.
Подробнее:
Как создать иконку в формате ICO онлайн
Способ 1: Инструменты системы
В Виндовс 11 есть три библиотеки с файлами иконок, которые можно применять в качестве основных изображений папок. Установка самостоятельно созданных значков будет выполняться аналогичным образом.
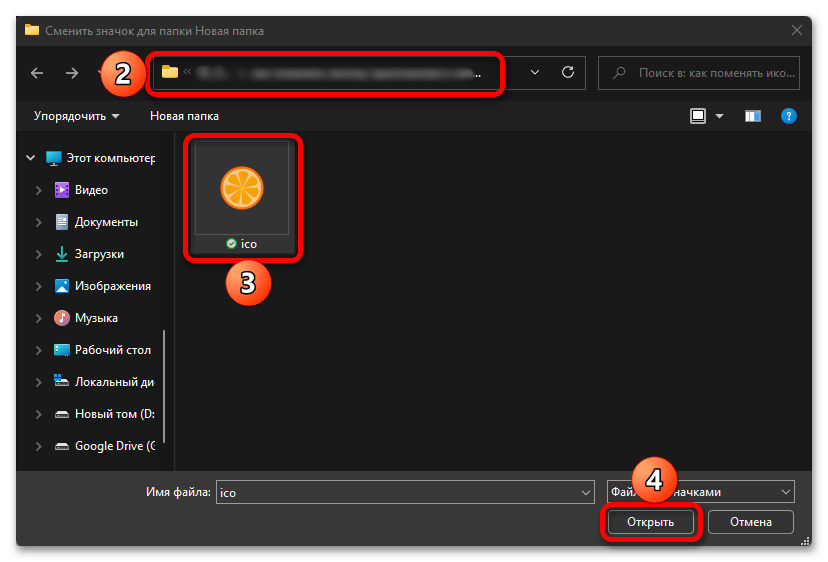
- Перейдите к расположению папки, иконку которой вы хотите изменить. Выделите ее и нажмите правую кнопку мышки (ПКМ) для вызова контекстного меню, после чего выберите в нем пункт «Свойства».
- В появившемся окне перейдите во вкладку «Настройка» и нажмите на кнопку «Сменить значок».
- Дальнейшие действия зависят от того, какое изображение вы хотите установить в качестве основного для папки – доступное в системной библиотеке или созданное самостоятельно:
- В первом случае достаточно будет выбрать подходящий значок из списка доступных, а затем нажать «ОК» для его применения.

Примечание: Под строкой «Искать значки в следующем файле» указан путь к одной из системных библиотек, но, как уже было сказано выше, таковых в Windows 11 три. Эти файлы находятся в каталоге C:\Windows\System32 и имеют следующие названия:
imageres.dll, shell32.dll, ddores.dll
Выбор любого из них изменит стандартные значки в списке.
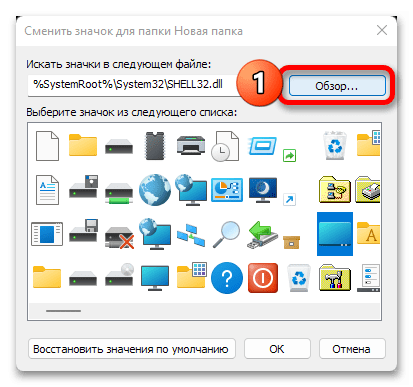
- Если же вы хотите установить собственное изображение в формате ICO, нажмите на кнопку «Обзор», перейдите к его расположению,
выделите и нажмите «Открыть»,

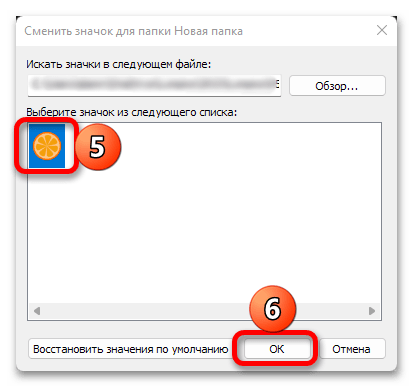
затем кликните по этому значку в следующем окне и воспользуйтесь кнопкой «ОК».

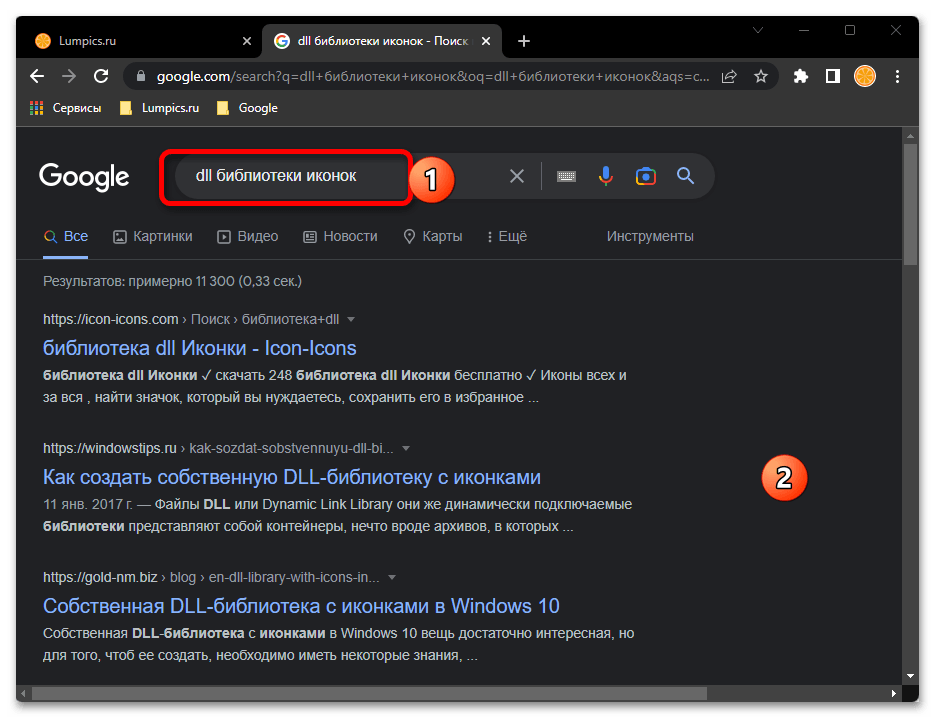
Примечание: На просторах интернета также можно найти dll-библиотеки, содержащие наборы иконок, которые были созданы энтузиастами. Для этого достаточно ввести соответствующий запрос в предпочтительной поисковой системе, последовательно ознакомиться с результатами выдачи, а затем скачать предпочтительный вариант(ы).
- В первом случае достаточно будет выбрать подходящий значок из списка доступных, а затем нажать «ОК» для его применения.
- Для того чтобы внесенные вами изменения вступили в силу, нажмите «Применить» и «ОК» в окне свойств папки.
-
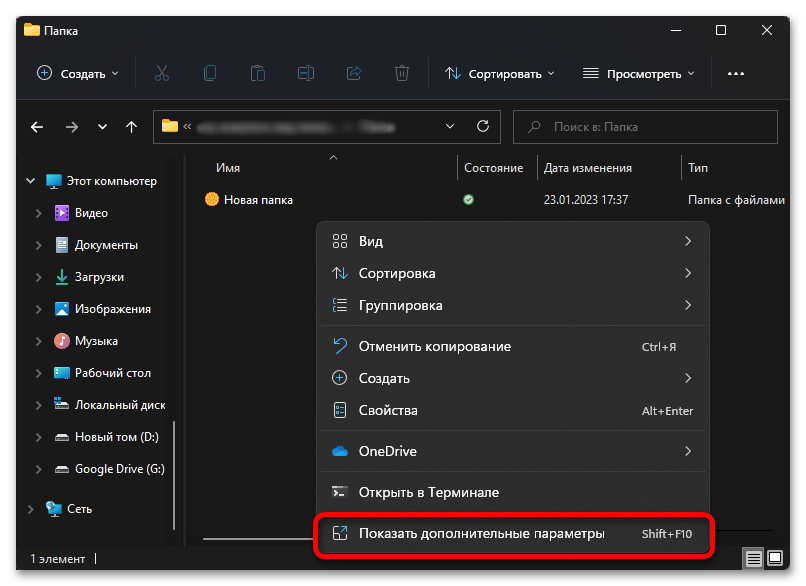
Если значок папки не изменится моментально, кликните по пустому месту в каталоге ПКМ, выберите пункт «Показать дополнительные параметры»,

а затем в появившемся старом интерфейсе контекстного меню воспользуйтесь опцией «Обновить».

Способ 2: Сторонний софт
Значительно упростить процедуру изменения внешнего вида папки можно с помощью специализированного программного обеспечения от сторонних разработчиков. Обычно подобные решения либо содержат собственные библиотеки значков, либо поддерживают установку таковых и их последующую интеграцию в операционную систему, либо же совмещают обе эти функции и предоставляют некоторые другие возможности. О том, как пользоваться подобным софтом, рассказывается в отдельной статье на нашем сайте, ссылка на которую дана ниже.
Подробнее: Установка новых иконок в Виндовс
Вариант 2: Атрибуты папки
Если же под изменением вида папки вы подразумеваете не визуальное оформление, а ее видимость в Windows 11, потребуется выполнить действия, частично схожие с тем, что предлагается в первой части настоящей статьи – изменить свойства объекта.
- Перейдите к нужной папке, вызовите ее контекстное меню и откройте «Свойства».
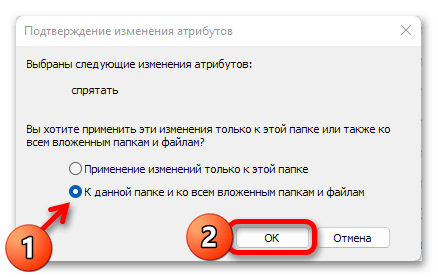
- В расположенном внизу открывшегося окна блоке «Атрибуты» (вкладка «Общие») установите галочку напротив опции «Скрытый». Нажмите «Применить» и «ОК», чтобы сохранить внесенные изменения.
- Определите, что будет скрыто — только выбранная папка или все ее содержимое, после чего кликните «ОК».
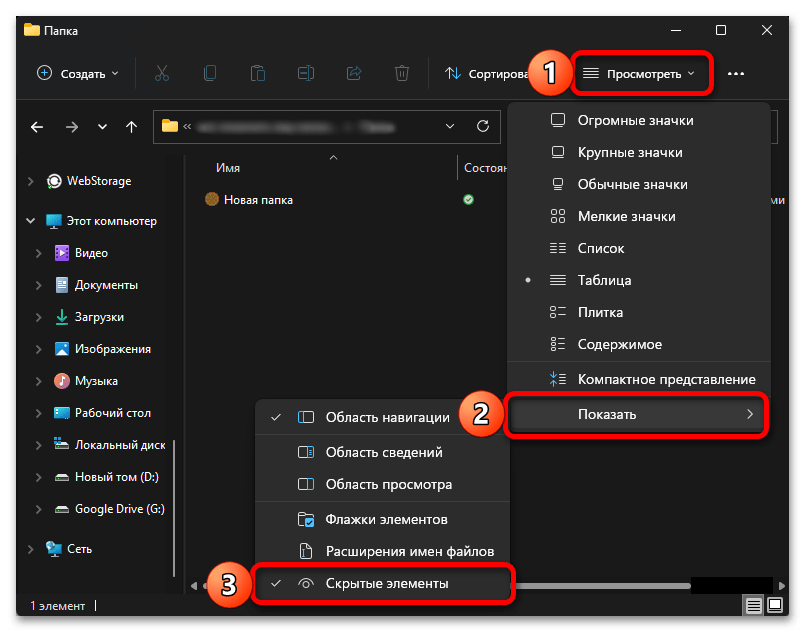
- Если в системе отключено отображение скрытых файлов, выбранная вами папка исчезнет. Для того чтобы отобразить ее повторно, разверните меню «Просмотреть» в системном «Проводнике», наведите курсор на пункт «Показать» и установите галочку напротив опции «Скрытые элементы» либо, если объект требуется спрятать, снимите ее.

Читайте также: Как включить отображение скрытых файлов в Виндовс 11
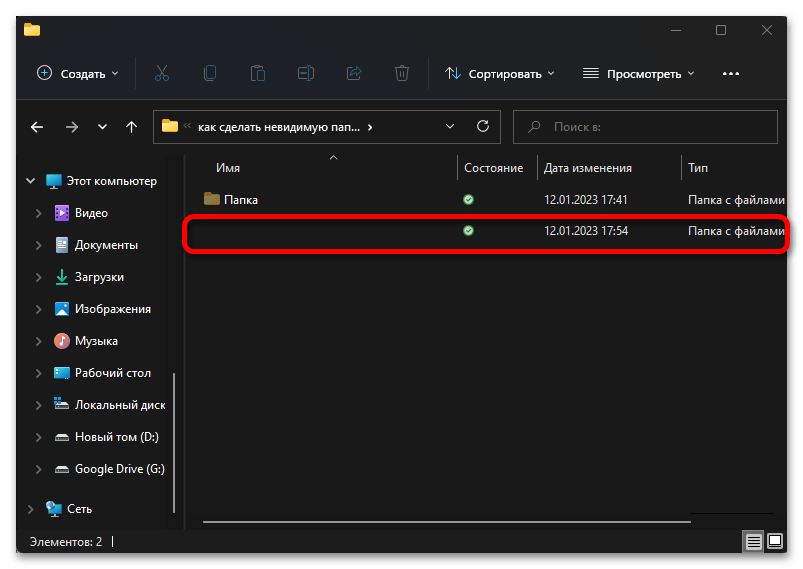
Таким образом можно сделать любую папку невидимой, правда, отобразить ее не составит труда даже для малоопытного пользователя ПК. Если вас интересует более эффективное решение задачи полного скрытия объекта, как вариант, можно установить для него прозрачную иконку и задать пустое имя. Более детально об этом мы ранее писали в отдельной инструкции.
Подробнее: Как сделать невидимую папку в Windows 11
Вариант 3: Параметры отображения
В случае если под вопросом «как изменить вид папки» вы подразумеваете буквально то, как она будет отображаться в системе, то есть размер и тип расположения значков в «Проводнике», выполните следующее:
Обратите внимание! Изменения, о которых пойдет речь далее, будут применены ко всему содержимому конкретного каталога, входящим в него файлам и папкам. При этом после очистки кэша «Проводника» (например, при помощи стороннего ПО) эти настройки будут сброшены к значениям по умолчанию.
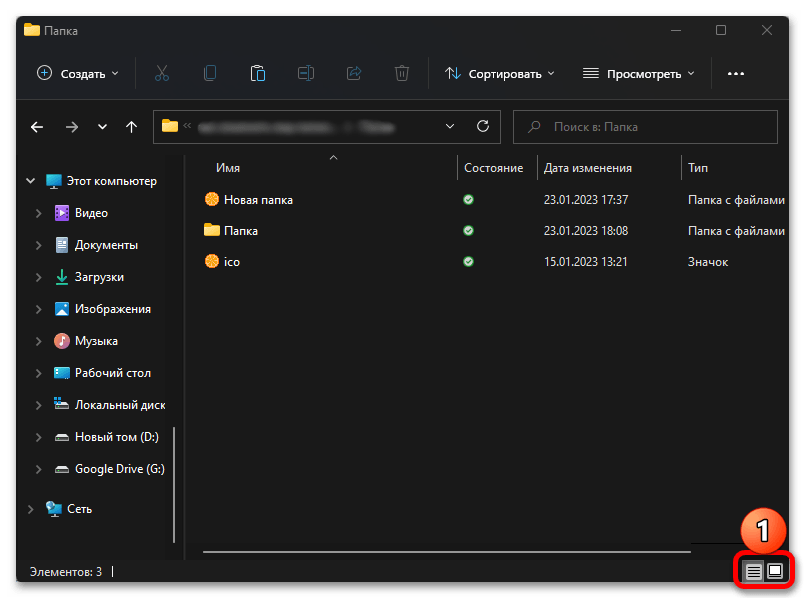
- Откройте расположение, вид объектов в котором требуется изменить.
- Выполните одно из следующих действий:
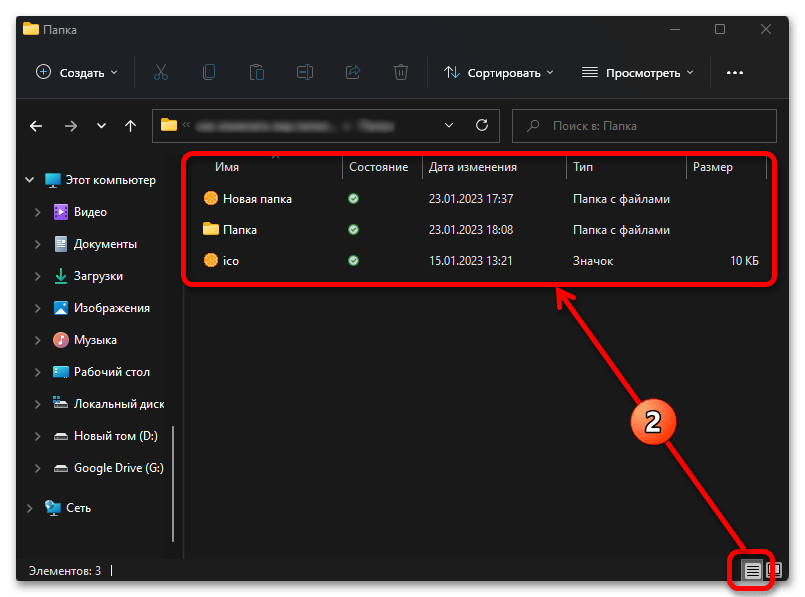
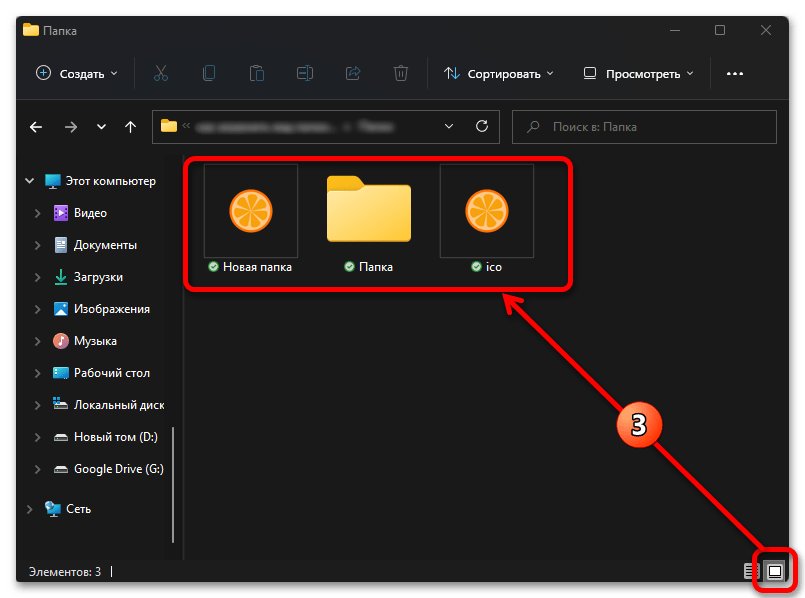
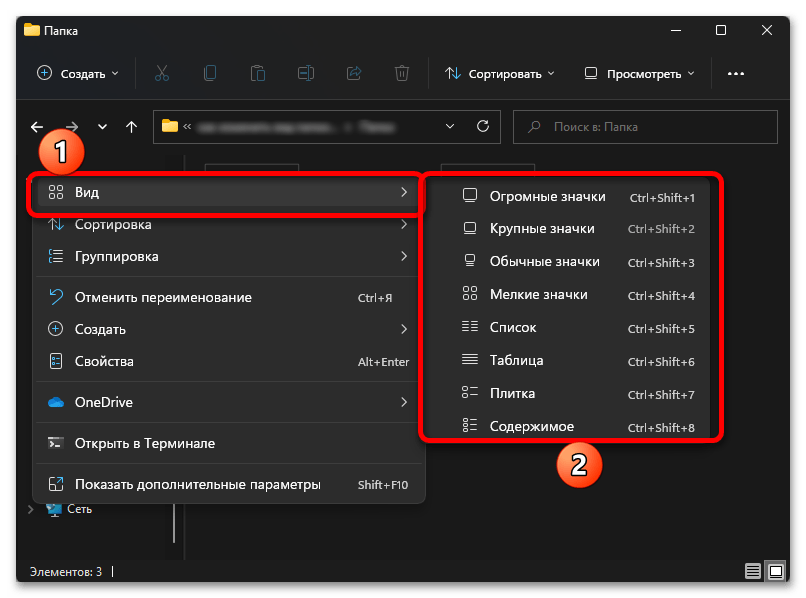
- Кликните по значку «Отображение элементов» в правом нижнем углу «Проводника».

Первый изменяет вид на таблицу с подробными сведениями (также для этого можно использовать клавиши «Ctrl+Shift+6») — в нашем примере это вид по умолчанию;

второй – на крупные значки («Ctrl+Shift+2»).
- Нажмите ПКМ в пустой области каталога, наведите курсор на пункт «Вид» и выберите в появившемся подменю предпочтительный вариант отображения (напротив каждого из них также будут указаны соответствующие сочетания клавиш).
- Разверните меню «Просмотреть» на верхней панели «Проводника» и выберите подходящий вариант вида файлов и папок в нем.
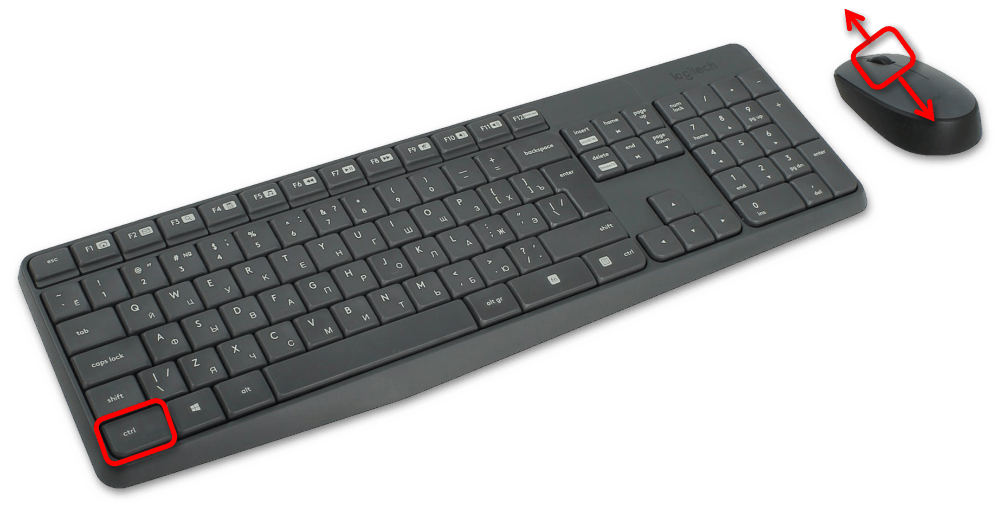
- Зажмите клавишу «Ctrl» и прокручивайте колесико мышки вперед или назад, переключаясь таким образом между разными вариантами отображения элементов, пока не будет установлен предпочтительный.


- Кликните по значку «Отображение элементов» в правом нижнем углу «Проводника».

В завершение отметим, что любое из указанных выше действий может быть выполнено как с любой произвольной папкой на диске ПК, так и в главном окне «Этот компьютер» либо на рабочем столе операционной системы.
Читайте также: Настройка значков рабочего стола в ОС Виндовс 11
Наша группа в TelegramПолезные советы и помощь
При повседневном использовании компьютера иногда не можешь быстро найти нужную папку, приложение или диск. Когда большое количество папок и все они одинаково выглядят, приходится вчитываться в названия. Чтобы это получалось быстрее и более интуитивно, можно изменить значки часто используемых папок, приложений и т.д. Ну или если вам просто не нравятся стандартные иконки Windows 11. Сейчас и разберёмся как это сделать.
С помощью этого способа можно поменять как значки обычных папок, так и ярлыки.
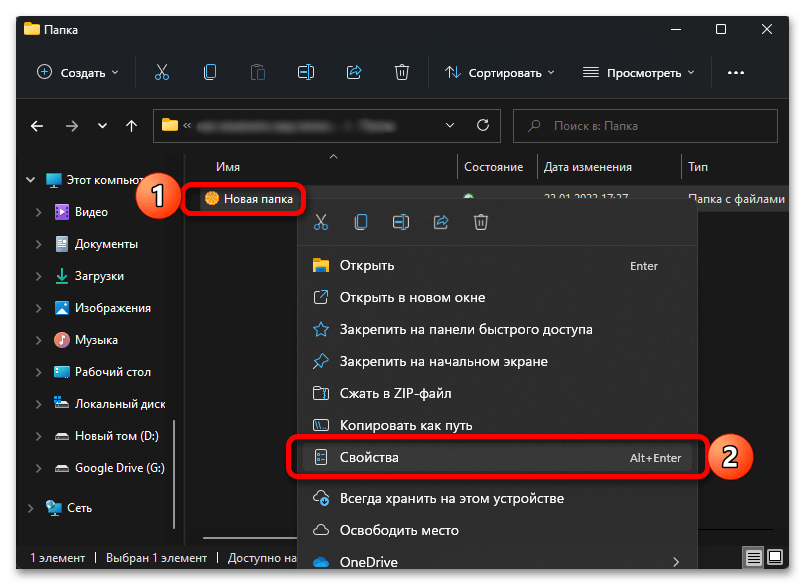
1. Первым делом выбираем папку, значок которой мы хотим поменять и щелкаем на неё ПКМ.
2. Далее кликаем по строке «Свойства». Также можно просто выделить папку и нажать сочетание «Alt+Enter».
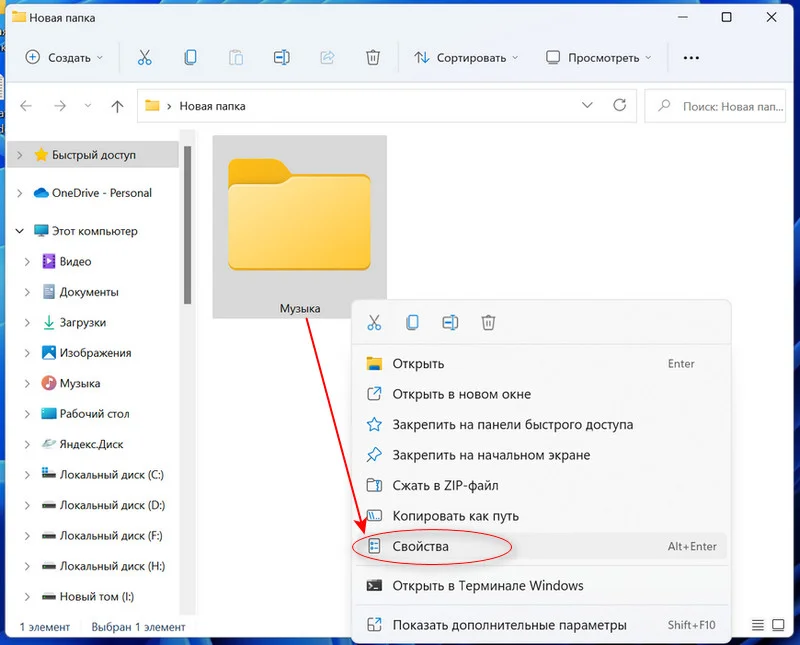
3. Заходим в «Настройки» и жмём «Сменить значок».
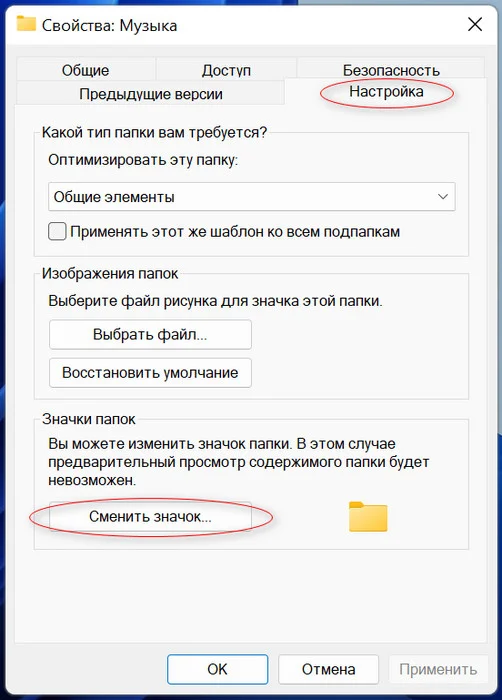
4. Теперь нужно выбрать иконку из стандартного пакета системы.
5. Жмём «Ок».
Тут же можно наблюдать пункт «Восстановить значения по умолчанию», который вернёт все иконки к первоначальному состоянию.
Если стандартные иконки вам не подходят, нужно скачать из интернета значок с форматом .ico или иконку с форматом PNG переконветировать в ICO.
Помимо обычных значков, которые меняются вышеописанным методом, есть иконки, которые таким способом не изменить, например, «Корзина», «Этот компьютер» и т.д. Они меняются в параметрах системы. Для этого нужно:
1. Вводим комбинацию «Win+I» или жмём Пуск и находим «Параметры».
2. Затем выбираем пункт «Персонализация».
3. После заходим в «Параметры значков рабочего стола».
4. Во всплывшем окне находим значок, который мы хотим изменить и кликаем на «Сменить значок».
5. Также откроется стандартная коллекция Windows, из которой можно выбрать необходимый понравившийся значок.
6. Жмём «Ок».
Значки HDD и SDD также возможно поменять, однако вышеприведёнными методами это сделать не выйдет. Тут уже придётся лезть в реестр.
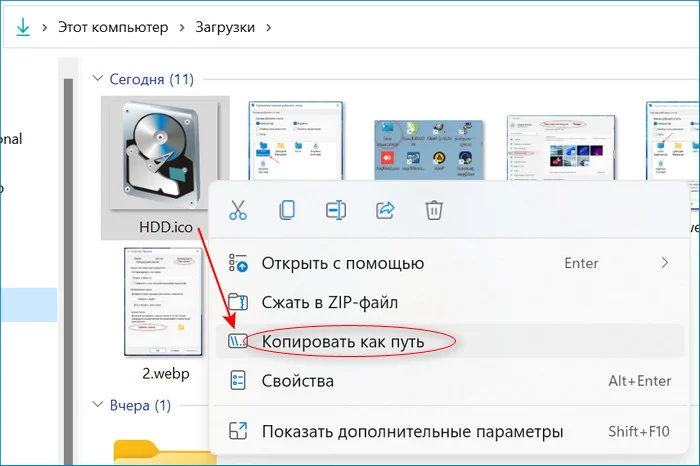
1. Первым делом при смене иконки винчестера нужно скачать любой понравившийся значок из сети в формате «.ICO».
2. Путь к этому значку копируем.
3. Затем кликаем на файл иконки ПКМ и выбираем строку «Копировать как путь».
4. Далее жмём «Win+R», вводим «regedit» и щелкаем на «Ок».
5. Здесь нас интересует ключ, находящийся в
Компьютер\HKEY_LOCAL_MACHINE\SOFTWARE\Microsoft\Windows\CurrentVersion\Explorer\DriveIcons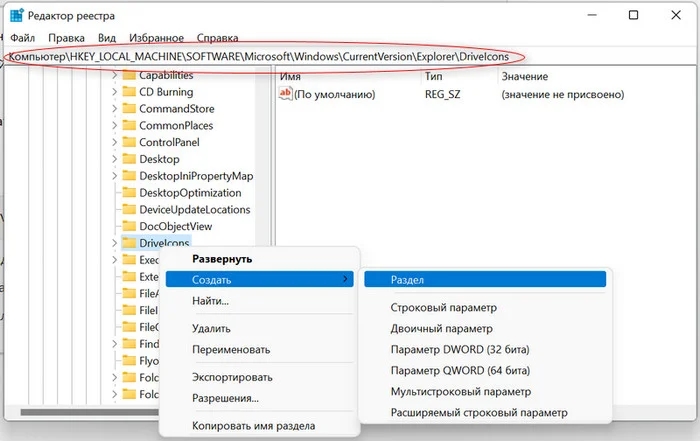
6. Жмём на «DriveIcons» ПКМ и нажимаем «Создать», после этого «Раздел».
7. В случае, когда значок нужно изменить на диске «C», то создаём раздел с таким же названием.
8. Теперь жмём на «DriveIcons» ПКМ, кликаем «Создать», далее «Раздел» и даём ему имя «DefaultIcon».
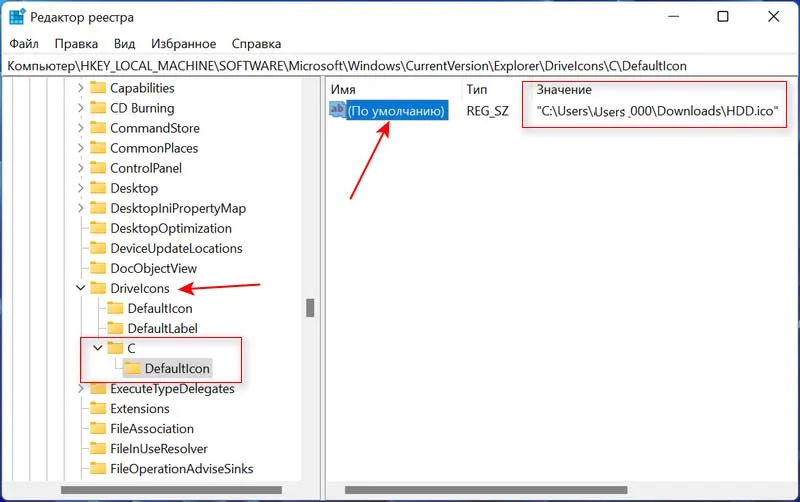
9. Щелкаем на него и кликаем на надпись «Изменить».
10. Должно всплыть окно «Изменение строкового параметра».
11. В пункт «Значение» вставляем маршрут до нашего значка.
12. Жмём «Ок».
В той ситуации если надо сменить все значки только нужного вида файлов, то это тоже реально провернуть в реестре.
1. Жмём сочетание «Win+R» и прописываем «regedit».
2. Проходим по маршруту
HKEY_CURRENT_USER\SOFTWARE\Microsoft\Windows\CurrentVersion\Explorer\FileExts3. В зависимости от формата, на котором надо поменять значок, жмём на папку, а затем «UserChoice».
4. В правой части окна задаём значение для «ProgId». Например, в случае когда вы хотите изменить тип файла txt, то «txtfile», если tif, то «tiffile».
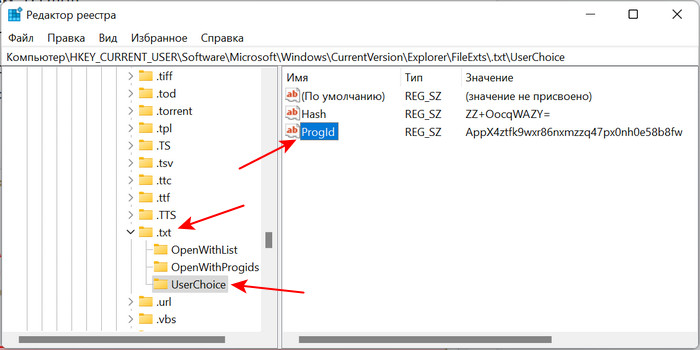
5. Затем переходим к ключу
HKEY_CLASSES_ROOT\txtfile\DefaultIconЕсли папки «DefaultIcon» в вашем случае не существует, то жмём ПКМ по txtfile (в зависимости от вашего типа файла), «Создать», затем «Раздел».
6. Справа два раза щелкаем «(По умолчанию)» и задаём путь к нашему значку.
Таким образом находить нужные программы, папки и файлы станет гораздо удобнее. Да и внешний вид системы будет соответствовать вашему вкусу.
Windows 11 offers a fresh and visually appealing interface, but you might still want to customize it further by changing the default icons. Whether you want to personalize your folders, desktop icons, app shortcut icons, or even drive icons, this guide will walk you through the step-by-step process.
By the end of this article, you’ll be able to give your Windows 11 system a unique touch that reflects your personal style.
How to Download Custom Icons for Windows 11
Custom icons can add a touch of personality and flair to your Windows 11 system. Before you change icons in Windows 11, you’ll need to find and download the best custom icons you want to use.
Follow these steps to download custom icons:
1. Open your web browser and visit a trusted website that offers custom icon packs. There are several websites available, such as IconArchive, DeviantArt, and WinCustomize, where you can find a wide range of icon collections.
2. Use the search function on the website to look for icon packs compatible with Windows 11. Remember, Windows OS supports the “.ico” format only. You can also browse through different categories to find the perfect icons for your customization needs.
3. Once you find an icon pack you like, click on the download button or link provided. Make sure to save the file to a location on your computer where you can easily access it later.
4. Extract the downloaded icon pack if it’s in a compressed format like ZIP or RAR. Most icon packs are already in a ready-to-use format, so extraction may not be necessary.
Congratulations! You now have a collection of custom icons ready to be applied to various elements in Windows 11.
How to Change Folder Icons in Windows 11
Changing folder icons in Windows 11 allows you to visually distinguish between folders and give them a more appealing look.
Follow these steps to change the icons of your folders in Windows 11:
1. Right-click on the folder you want to customize and select Properties from the context menu.
2. In the “Properties” window, navigate to the Customize tab.
3. Click on the Change Icon button located at the bottom of the window, under the “Folder icons” heading.
4. A new window will appear, showing a list of available icons. Select one of the available icons you like.
5. To use a custom icon, click the Browse button and locate the icon file you downloaded earlier.
5. Select the desired icon and click OK to confirm your selection.
6. Back in the “Properties” window, click Apply, and then OK to save the changes.
How to Customize Desktop Icons in Windows 11
Customizing your default desktop icons (This PC, Recycle Bin, etc.) can help you create a more visually pleasing and organized workspace.
To change the icons of shortcuts and files on your desktop, follow these steps:
1. Press Windows + I to launch Windows 11 Settings.
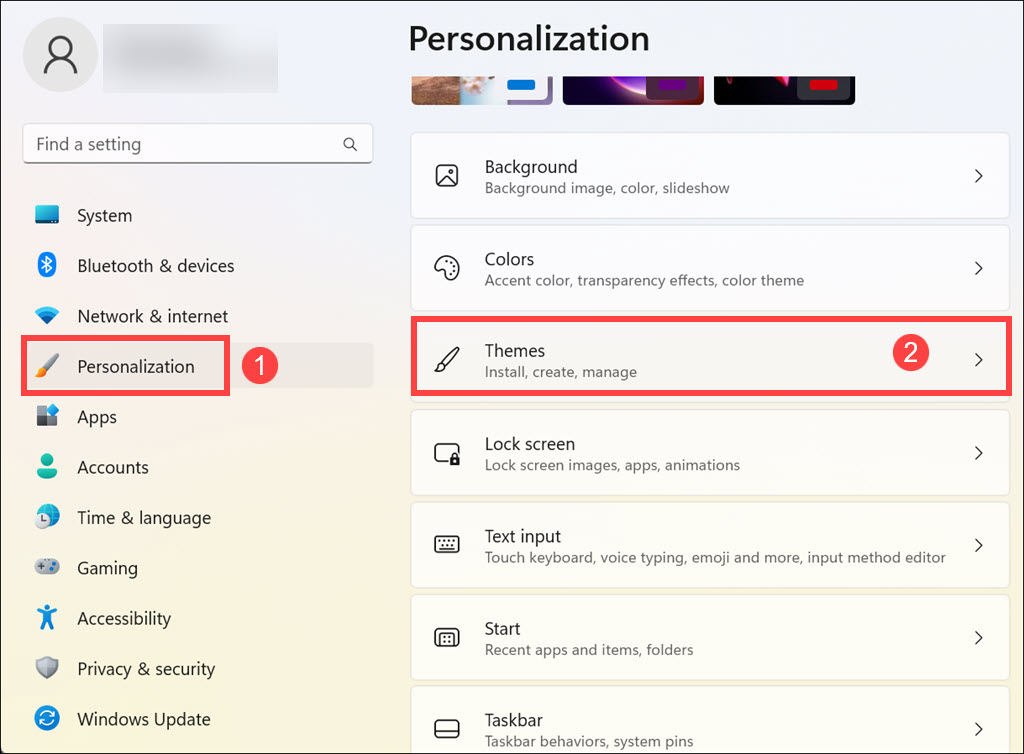
2. Scroll down and under “Related settings,” click the Desktop icon settings.
3. Select the icon you want to modify and click the Change Icon button.
4. Choose the new icon from the defaults or browse for the downloaded one. Click OK.
How to Change App Shortcut Icon in Windows 11
If you want to give your app shortcuts a unique appearance, for example, changing the Discord app icon, you can change their icons in Windows 11. Follow these steps to customize the icons of your app shortcuts:
1. Right-click on the shortcut whose icon you want to change.
2. From the context menu, select Properties.
3. In the “Properties” window, navigate to the Shortcut tab.
4. Click on the Change Icon button.
5. Similar to the previous method, a window with a list of available icons will appear. Either select one of the default icons or click the Browse button and locate the custom icon file you downloaded.
6. Choose the desired icon and click OK.
7. Finally, click Apply and then OK to save the changes.
How to Customize Drive Icon in Windows 11
You can change the icons of your drives in Windows 11 to help you easily identify and differentiate between different storage devices.
To give your drives a unique icon in Windows 11, follow these steps:
1. Copy and paste the icon you want to set as the drive icon at a specific location.
2. Navigate to that location, select the intended icon, click the three dots at the top bar to see more options, and select Copy path. Keep it safe somewhere.
3. Now, press Windows + R to launch Run Comand Box.
4. Type regedit in the command box and hit enter to launch the Registry Editor window.
5. Navigate to the following path: HKEY_LOCAL_MACHINE\SOFTWARE\Microsoft\Windows\CurrentVersion\Explorer\DriveIcons
6. Right-click on the DriveIcons folder and select New->Key. Name the key to the drive letter you are changing the icon for. For example, if you are changing the icon of drive E, name the key E.
7. Now, right-click on the newly created key and select New->Key. Name this key DefaultIcon.
8. Under the DefaultIcon key, double-click the (Default) registry string to launch its properties window.
9. Under “Value data,” paste the path of the icon you copied and click OK.
10. Close the Registry Editor window.
11. Launch the File Explorer, and you will notice that the drive icon has changed.
FAQs
Can I revert back to the default icons in Windows 11?
Yes, you can revert to the default icons by following the same steps as changing icons, but instead of selecting a custom icon, choose the original icon associated with the element.
Are there any risks involved in changing icons in Windows 11?
Changing icons in Windows 11 is a safe and reversible process. It doesn’t affect the functionality or stability of your system.
Can I create my own custom icons for Windows 11?
Yes, you can create your own custom icons using image editing software like Adobe Photoshop or free online icon editors. Just make sure to save the icon files in a compatible format, such as ICO or PNG.
Summing Up
Customizing icons in Windows 11 allows you to infuse your personality into the operating system’s appearance. By following the steps outlined in this guide, you now possess the knowledge to download custom icons, change folder icons, modify desktop shortcuts and app icons, and even give your drives a fresh look. Embrace your creativity and make Windows 11 truly your own!