
Загрузить PDF
Загрузить PDF
Некоторые люди регулярно используют командную строку Windows. Но проблемой является то, что при каждом запуске командной строки внешний вид ее интерфейса разный. Из этой статьи вы узнаете, как поменять внешний вид интерфейса командной строки, а также как добавить новые шрифты. Более того, мы расскажем вам, как изменить другие настройки командной строки.
-

Для этого щелкните по «Пуск» > «Выполнить», введите «cmd» и щелкните по «ОК».
-

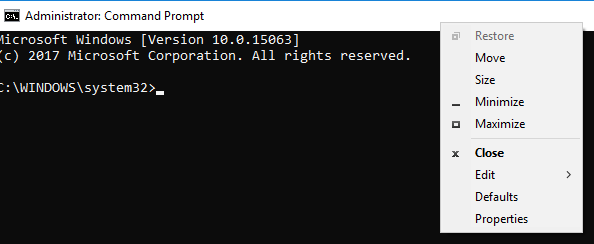
Правой кнопкой мыши щелкните по верхней части (заголовку) окна командной строки и в меню выберите «Свойства». Также можно нажать ALT+SPACE+P. В открывшемся окне вы найдете вкладки «Общие», «Шрифт», «Расположение» и «Цвета».
-
Перейдите на вкладку «Общие» и установите флажок у «Быстрая вставка». Теперь в командной строке можно пользоваться функцией «Скопировать и вставить».
- Также рекомендуем установить флажок у «Отбрасывать повторения».
-
Найдите там разделы «Размер буфера экрана» и «Размер окна».
- В разделе «Размер окна» можно задать размер активного окна.
- В разделе «Размер буфера экрана» можно задать размер буфера экрана (максимальным значением является 9999). Чтобы просмотреть буфер экрана, нужно воспользоваться полосой прокрутки.
-
Как правило, его ширина равна 80, а высота 300.

-
Сделайте это на вкладке «Цвета». В разделе «Выбранный цвет» можно задавать цвета с помощью чисел. Например, чтобы задать темно-зеленый цвет, в строке «Красный» введите 0, в строке «Зеленый» 100, в строке «Синий» 0.
-

На ней можно выбрать шрифт, а именно «Точечные шрифты» (выбран по умолчанию) или «Lucida Console». На данном этапе доступны только эти два шрифта, но в следующем разделе вы узнаете, как добавлять новые шрифты.
Реклама


-

Щелкните по «Пуск» > «Выполнить», введите «regedit» и щелкните по «OK». Откроется окно редактора реестра.
-

\HKEY_LOCAL_MACHINE\Sofware\Microsoft\Windows NT\CurrentVersion\Console\TrueTypeFont\
-
Правой кнопкой мыши щелкните по параметру «TrueTypeFont», а затем щелкните по «Создать» > «Строковый параметр».
-

Следующим параметрам присваивайте имена «000», «0000» и так далее с добавлением одного нуля. Именуйте параметры именно так — в противном случае ничего не получится.
-
В строке «Значение» введите имя шрифта, к примеру, «Courier New».
-
Запустите командную строку, откройте ее свойства и перейдите на вкладку «Шрифт» — на ней вы найдете новый шрифт.
-
Теперь сохраните внесенные изменения; для этого выберите одну из следующих опций:
- «Применить к активному окну». В этом случае внесенные изменения будут удалены, как только вы закроете текущее окно командной строки.
- «Сохранить для всех окон с тем же названием». В этом случае изменения будут применены ко всем окнам командной строки, которые вы откроется с помощью одного и того же ярлыка. То есть выберите эту опцию, чтобы изменить свойства конкретного ярлыка.
-
Правой кнопкой мыши щелкните по верхней части (заголовку) окна командной строки и в меню выберите «Умолчания». Окно, которое откроется, будет абсолютно таким же, как окно «Свойства», но любые изменения, сделанные в данном окне, будут применены ко всем окнам командной строки (вне зависимости от ярлыка).
Реклама


Советы
- Программистам, которым нужны дополнительные шрифты, рекомендуем перейти на этот сайт. На нем есть множество шрифтов (преимущественно бесплатных) для программирования.
- Для одной программы можно создать сразу несколько ярлыков и каждый настроить по-своему.
Реклама
Предупреждения
- Перед тем, как вносить изменения в реестр, сделайте его резервную копию. Так как вы будете менять только параметр «console», создайте копию только этого параметра. Для этого щелкните правой кнопкой мыши по параметру и нажмите «Экспорт», а затем сохраните копию на разделе, отличном от раздела с Windows. Таким образом, параметр можно восстановить, если что-то пойдет не так.
Реклама
Об этой статье
Эту страницу просматривали 53 242 раза.
Была ли эта статья полезной?
The Command Prompt, a powerful tool for executing commands in the Windows operating system, often appears with a standard font and size. However, customizing the font and font size can enhance readability and personalize the Command Prompt experience. In this gearupwindows guide, we’ll explore how to change the font and font size in the Command Prompt on Windows 11, allowing users to tailor their environment to their preferences.
Follow these steps to change the Font and Font Size in Windows 11 Command Prompt:-
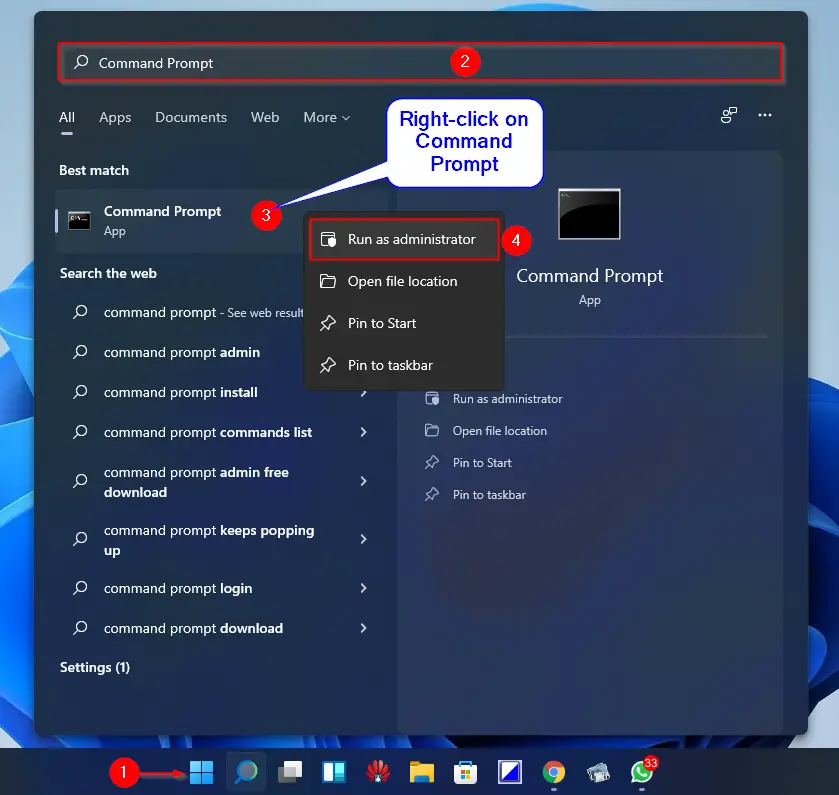
Step 1. To begin, you’ll need to open the Command Prompt as an administrator. You can do this by searching for “Command Prompt” in the Start menu, right-click on “Command Prompt” in the available options, and select “Run as administrator.”
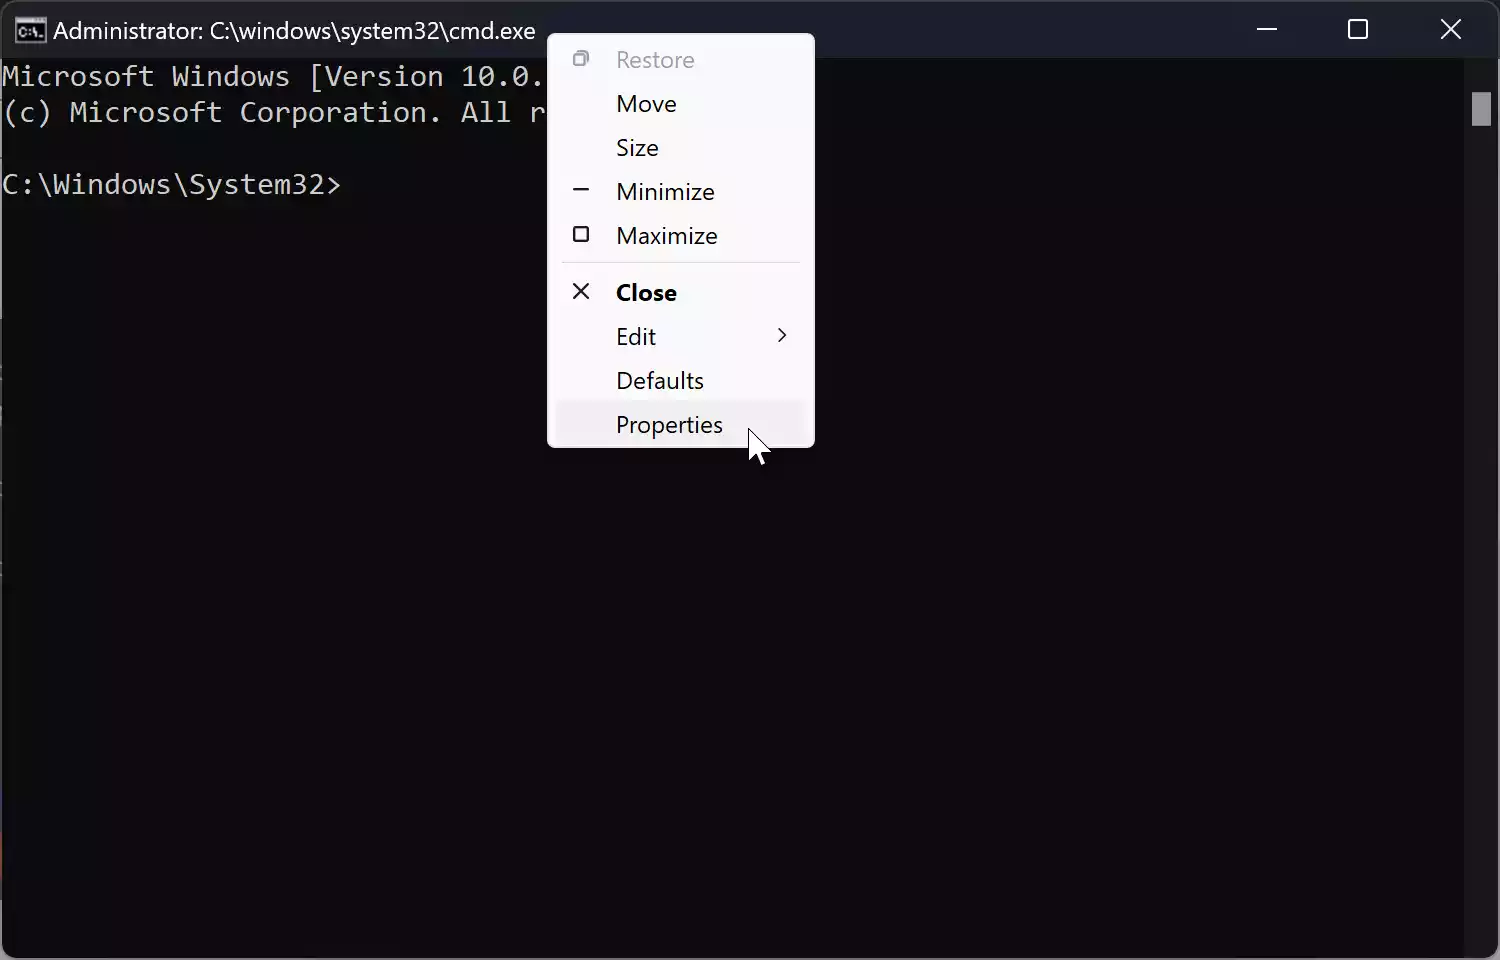
Step 2. Once the Command Prompt window is open, right-click on the title bar at the top of the window. From the context menu that appears, select “Properties.” This will open the Properties dialog box, where you can customize various aspects of the Command Prompt.
Step 3. In the Properties dialog box, navigate to the “Font” tab. This tab is where you can change the font and font size used in the Command Prompt.
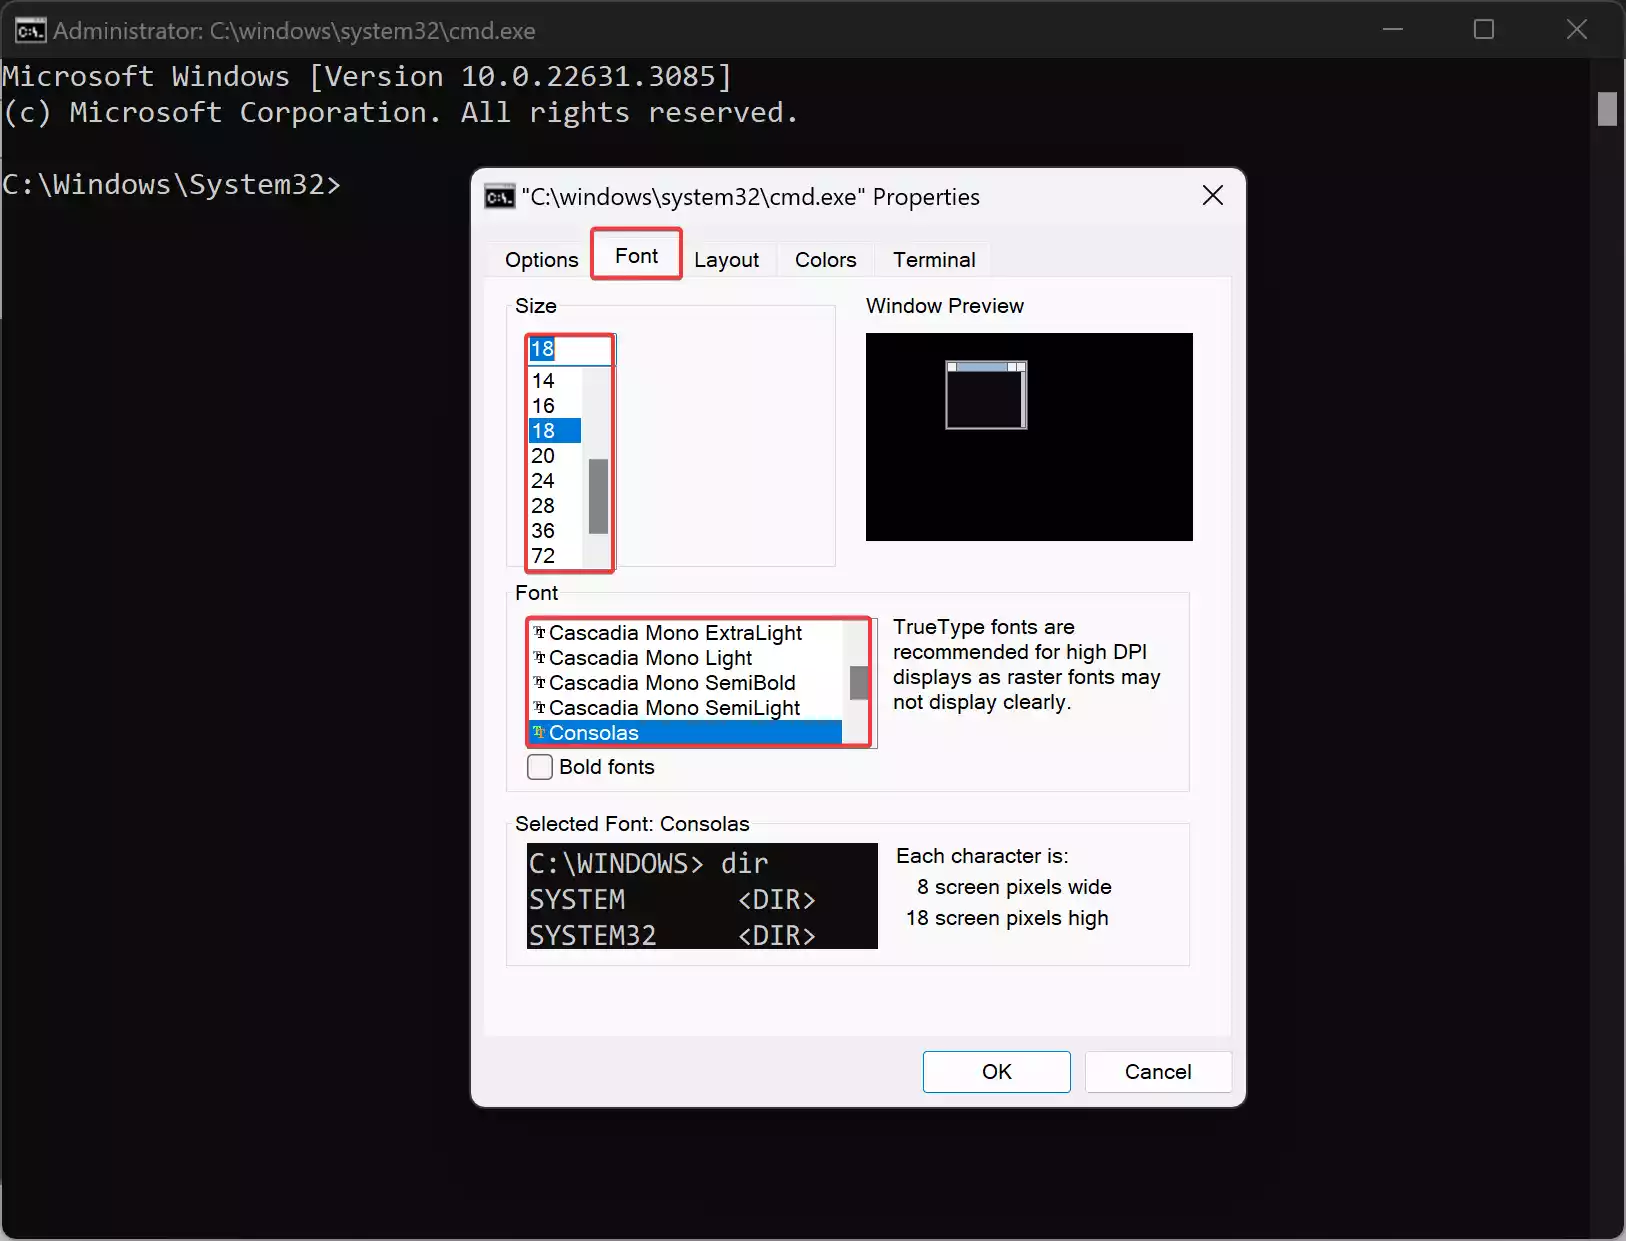
Step 4. In the Font tab, you’ll see options to select the font and font size. Click on the dropdown menu next to “Font” to see the list of available fonts. Windows provides a variety of fonts to choose from, so select the one that best suits your preference and improves readability.
Next, click on the dropdown menu next to “Size” to choose the font size. Windows offers a range of font sizes, allowing you to adjust the text to your desired scale. Experiment with different sizes to find the one that works best for you.
Step 5. Once you’ve selected your desired font and font size, click the “OK” button to apply the changes. The Command Prompt window will update immediately to reflect your chosen font and font size.
Step 6. Test and Adjust: With the changes applied, take a moment to test the new font and font size in the Command Prompt. Execute some commands and navigate through directories to ensure readability and comfort. If necessary, you can always return to the Properties dialog box to make further adjustments.
Conclusion
Customizing the font and font size in the Command Prompt on Windows 11 is a simple yet effective way to improve readability and personalize your computing experience. By following the steps outlined in this guide, you can easily change the font and font size to better suit your preferences. Whether you prefer a sleek modern font or a larger text size for enhanced visibility, Windows 11 provides the flexibility to tailor the Command Prompt to your liking.
We all use the Windows Command Prompt regularly to solve system issues, run batch files, and also perform advanced administrative functions. As you use the Command shell window frequently, you may find that the default font is not to your liking, and you may want to change the font in the command prompt for better readability.
However, the Windows command prompt has limited scope for customization. While it is possible to make a few customizations to the command prompt user interface, like, adding transparency, changing colors, etc., it still looks like the old DOS interface with the limited flexibility for customizing according to the user’s preference. Moreover, the command line interpreter application has very few choices for changing the font. The font selection is limited to a few choices from 2 to 7 depending on the Windows version.
While there is no direct provision to add custom fonts and change the fonts in the Windows Command Prompt, you can now add custom fonts to the Command Prompt by using the registry.
In this article, we explain how to add custom fonts to the command prompt in Windows 11/10. But before we start, it is important to note that the Windows command prompt can only support monospace fonts. Monospace fonts are fixed-width fonts where the spacings and letters occupy the same width in contrast to the variable-width fonts. It is worth mentioning that, monospace fonts are extremely useful for writing the computer program source code. The character’s fixed-width aids programmers to keep track of special character strings in the program code. Once you have found the suitable monospace font, users can enable the custom fonts in Command Prompt by tweaking the Registry. Follow the below steps to add the custom fonts to the command prompt.
Find & install a suitable monospace font
The Windows command prompt mostly has two font choices: Lucida or Raster. One must install a font on a system using web services like FontSquirrel, Google Fonts, and others to add custom fonts.
As mentioned earlier, the Command Prompt will recognize only monospace fonts. Additionally, Microsoft also specifies that the custom font you add to the command shell window must be FF_MODERN if it is a TrueType font and OEM_CHARSET if it is a font other than the TrueType font. Microsoft also adds the criteria that the fonts you choose for the command prompt cannot have a negative A or C space, and it cannot be an italic-style font.
To know if the font will work on the command prompt, users must first install the font and then try to enable it. While most monospaced fonts from third-party web services are recognized by the Windows Command prompt, you will not be able to predict in advance if the font works for your Windows version until and unless you try to install it.
Once you find the suitable monospace font, download it and install it on your Windows system.
Once the font is installed, the next step is to add it to the command prompt using the registry editor.
Add the custom font to the Registry
Windows OS does not allow users to add custom fonts to the command prompt directly through the user interface. To make the monospace font available in the Command prompt, you need to first add the information of the installed fonts to the registry.
Open the Run box, type regedit, and press Enter.
Next, navigate to the following path:
HKEY_LOCAL_MACHINE\SOFTWARE\Microsoft\Windows NT\CurrentVersion\Console\TrueTypeFont
On the right side of the registry panel, you will see the list of fonts that are used by the command prompt with the respective unique name values like 0, 00,01, etc.
To create a custom font, right-click on the right side of the registry panel and click on New.
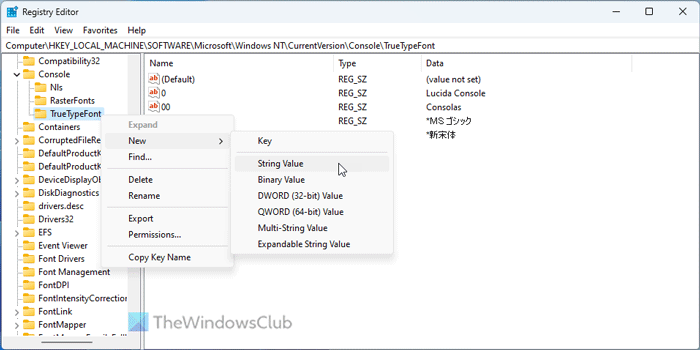
Now select the string value and name the string value with a unique number. If you already have a string value with 00, then name the new string value as 000. Just note that the value you enter should be some unique number.
Double-click on the newly created string value and give the name of the font in the value data field.
Click OK to apply the changes and restart your system.
Read: How to get Mac-like smooth fonts on Windows.
Add the custom font to the Command Prompt
Open Command Prompt, right-click on the title bar, and click on Properties from the drop-down menu.
Navigate to the Font tab in the Command Prompt Properties window.
Select the font you installed under the Font section and click on OK.
Once done you must be able to use the command prompt with your favorite installed font. One can also change the font size for good readability.
It is worth noting that if you cannot see the font in the font list of the Properties window in the Command prompt, it is likely that the font you have chosen is either not supported by your Windows version or you have added a font that is not a monospace font.
Read: How to change the Background and Foreground Color in Command Prompt
How do I add custom fonts to cmd?
To add custom fonts to CMD, you need to install the font first and note down the name. Then, open the REGEDIT. go to this path: HKEY_LOCAL_MACHINE\SOFTWARE\Microsoft\Windows NT\CurrentVersion\Console\TrueTypeFont and create a Sting Value named 000. Then, add the name as Value data. Finally, you can open the CMD to set the font.
How do I change the font in Windows 11 Command Prompt?
To change the font in Windows 11 Command Prompt, you need to right-click on the title bar and select Properties. Then, go to the Font tab and choose a font from the Font section. Finally, click the OK button to save the change.
Read: Use ColorTool to change Command Prompt color scheme & download more color schemes
Command prompt is a clear command line interpreter that comes with Windows operating system by default.
Though this Windows command prompt has always been in white font with a black background, people like me who have to work with a command prompt may not enjoy its black and white theme.
Windows has always been colorful in its themes, colorful icons, and backgrounds. So, you might want to change the font and colors used by the command prompt if you do not like a particular style or want to make it easier on your eyes for a long time.
In this article, I will guide you on how to change the font and colors in the command prompt.
Let’s get started.
Follow our guide on how to Install & Uninstall Fonts on Windows 11
Fortunately, for those who want to customize the command prompt, this is relatively easy to do and has a wide range of options.
There are two different ways to change the command prompt — one is using the command, and another is making changes in the properties. These two methods help you to change the command prompt font and colors in your Windows 8/9/10 or 11.
Here are the methods to change the command prompt fonts and colors:
1. Use Command
Using command is an easy way to change command prompt font and background colors. But remember, this method is temporary. It automatically switches to your default font and background whenever you close the operation.
Check out the easiest way to fix blue screen on Windows 11
Here are the steps to change the font and color in the Command Prompt:
You can not mess with it too much because the color command will not allow you to set both background and font in the same color, making it unreadable.
Also, check our exclusive tutorial on how to fix Stop Apps Running in Background Windows 11
2. Make changes in properties
This method is for you if you want to customize your command prompt without giving a command. Making changes also helps you to change your command prompt interface permanently.
Here are the steps to change the command prompt font and color through Properties:
Important Note: Customizations you make through the properties dialogs are saved and will be used whenever you open a command prompt. But any customizations you make with the color command are only for that session.
Related guides: How to Quickly Create a Sleep Timer in Windows 11, How to Create A Scheduled Task on Windows 11, How to Enable or Disable UAC on Windows 11
FAQs
How do I change the font color in CMD?
Go to your Windows search bar > type cmd > open cmd application > type command color > use the color command function alongside the background color code followed by the font color code.
Can you change the font in the command prompt?
Yes, you can. To change the font in the command prompt, go to the Windows search bar > type cmd > launch cmd application > click on the cmd icon from the top left side > select font tab > choose your font style and click ok to save the setting.
What is a command prompt tool?
Command prompt is a software-based program that helps you to execute commands on a Windows operating system.
How do I use the Windows command prompt?
Open your Windows search bar and type cmd. Right-click on the cmd application and select Run as administrator to use it.
How many commands are there in the command prompt?
Windows allows access to over 280 commands in the command prompt that are used for a particular operating system task from a command interpreter.
A Final Thought
Maybe, you want to give your color prompt a brighter look or make it stand out from everyone else; then the above settings are for you. Now you can customize the color prompts as you want.
If you have a Windows 10/11 operating system, you can change its opacity level to make your command prompt more unique and precise.
If you are still curious to know more about any topic, let us know in the comment below.
Steven Arends
Steven Arends is a computer science graduate and tech enthusiast with over 10 years of experience in the field. He has a vast collection of computer hardware and loves exploring the latest advancements. As a contributing author to 10Scopes, Steven shares his expertise to make the world of technology more accessible and easier to understand for all readers.
Command Prompt has been around for a long time, and while it’s a pretty darn useful tool, it’s always been plain and boring with the same black background and white text.
However, this is just the way the program looks by default. You can actually customize many aspects of the experience to make it more personal using different fonts, colors, and window layouts. In addition, if you’re using Windows 10, you can even make the console semi-transparent and use custom color schemes to quickly change the appearance. And you can apply the settings globally, or you can apply them independently for each shortcut that starts a new session or to use more suitable settings for different tasks.
In this Windows 10 guide, we walk you through the steps to personalize the Command Prompt experience to make it a little less boring.
- How to customize cursor on Command Prompt
- How to customize font size and family on Command Prompt
- How to customize layout on Command Prompt
- How to customize color and transparency of Command Prompt
- How to change color scheme on Command Prompt
How to customize cursor on Command Prompt
To customize the size of the blinking cursor on Command Prompt, use the following steps:
- Open Start.
- Search for Command Prompt, and click the top result to open the console.
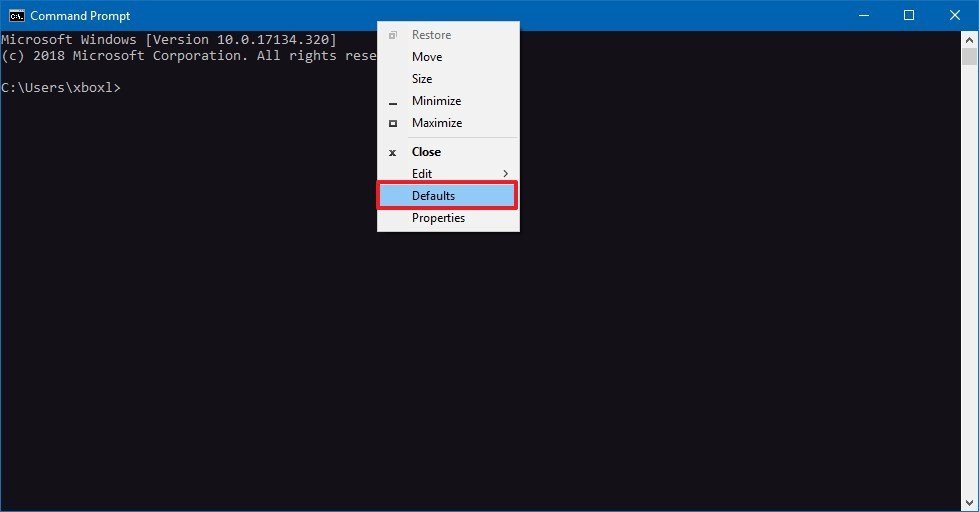
- Right-click the title bar, and select the Defaults option.
- Click on the Options tab.
- Select one of the available options:
- Small (default).
- Medium.
- Large.
- Click the OK button.
While we recommend using the «Defaults» option from the right-click context menu, you can access the Command Prompt settings in at least two different ways, and each way will affect the console appearance differently.
- Defaults: The changes you customize using this option will not affect the current session, but the new settings will apply when launching Command Prompt using any shortcut.
- Properties: The changes you make using this option will apply to the current session, and future sessions. However, these settings will only apply to the shortcut whose properties have been customized. (This option usually comes in handy when you’re trying to customize the appropriate settings for different tasks.)
How to customize font size and family on Command Prompt
Using the Command Prompt settings, you can specify the size of the font and the font family to fit your preferences using these steps:
- Open Start.
- Search for Command Prompt, and click the top result to open the console.
- Right-click the title bar, and select the Defaults option.
- Click on the Font tab.
- Under «Size,» select the size of the font you want to use. (The default option is 14 pixels, but you can go as large as 72 pixels.)
- If you don’t like the default «Consolas» font family, you can choose from a number of other families that are suitable to use with Command Prompt under the «Font» section.
- Click the OK button.
As you make a selection, at the bottom of the page, you’ll notice a preview of the new configuration.
All the latest news, reviews, and guides for Windows and Xbox diehards.
How to customize layout on Command Prompt
To use a custom layout on Command Prompt, use these steps:
- Open Start.
- Search for Command Prompt, and click the top result to open the console.
- Right-click the title bar, and select the Defaults option.
- Click on the Layout tab.
- Under the «Screen Buffer Size» section, you can specify how much content you can view and scroll while working with Command Prompt.Quick Tip: If you want to adjust the width parameter, make sure to clear the Wrap text output on resize option.The buffer size uses coordinate grid based for character cells, which means the width is the number of character cells that can fit on each line, and the height is the number of lines. The larger the width and height, the more content you can view, but these settings will not affect the size of the console. (Usually, you don’t want to modify these settings unless you have a reason.)
- Under the «Windows Size» section, you can make the window console larger or smaller by changing the width and height parameters, which are based on character cells (not pixels).
- If you want Command Prompt to launch in a particular position, clear the Let system position window option.
- Specify the new start position (in pixels) using the Left and Top settings.
- Click the OK button.
As you make changes, on the right side of the page, you’ll notice a preview of the new configuration.
How to customize color and transparency on Command Prompt
If you want to make the command-line experience a little less boring, you can also change the text and background colors, and on Windows 10, you can make the console window semi-transparent (just like in Linux) using these steps:
- Open Start.
- Search for Command Prompt, and click the top result to open the console.
- Right-click the title bar, and select the Defaults option.
- Click on the Colors tab.
- To change colors, select an element from the left side, and either select a color from the list or use the RGB settings on the right to specify a specific color.Quick Tip: If you don’t know the exact amount of red, green, and blue that make up the color you want, do a Google search for «RGB color picker» and use the search engine’s built-in tool to get the values.
- To make the console window semi-transparent, under the «Opacity» section, drag the slider left or right to set the amount of transparency (to a minimum of 30 percent).
- Click the OK button.
Alternatively, you can change the transparency for the current session without opening the settings using the Ctrl + Shift + mouse wheel up to decrease transparency level or Ctrl + Shift + mouse wheel down to increase transparency level.
How to change color scheme on Command Prompt
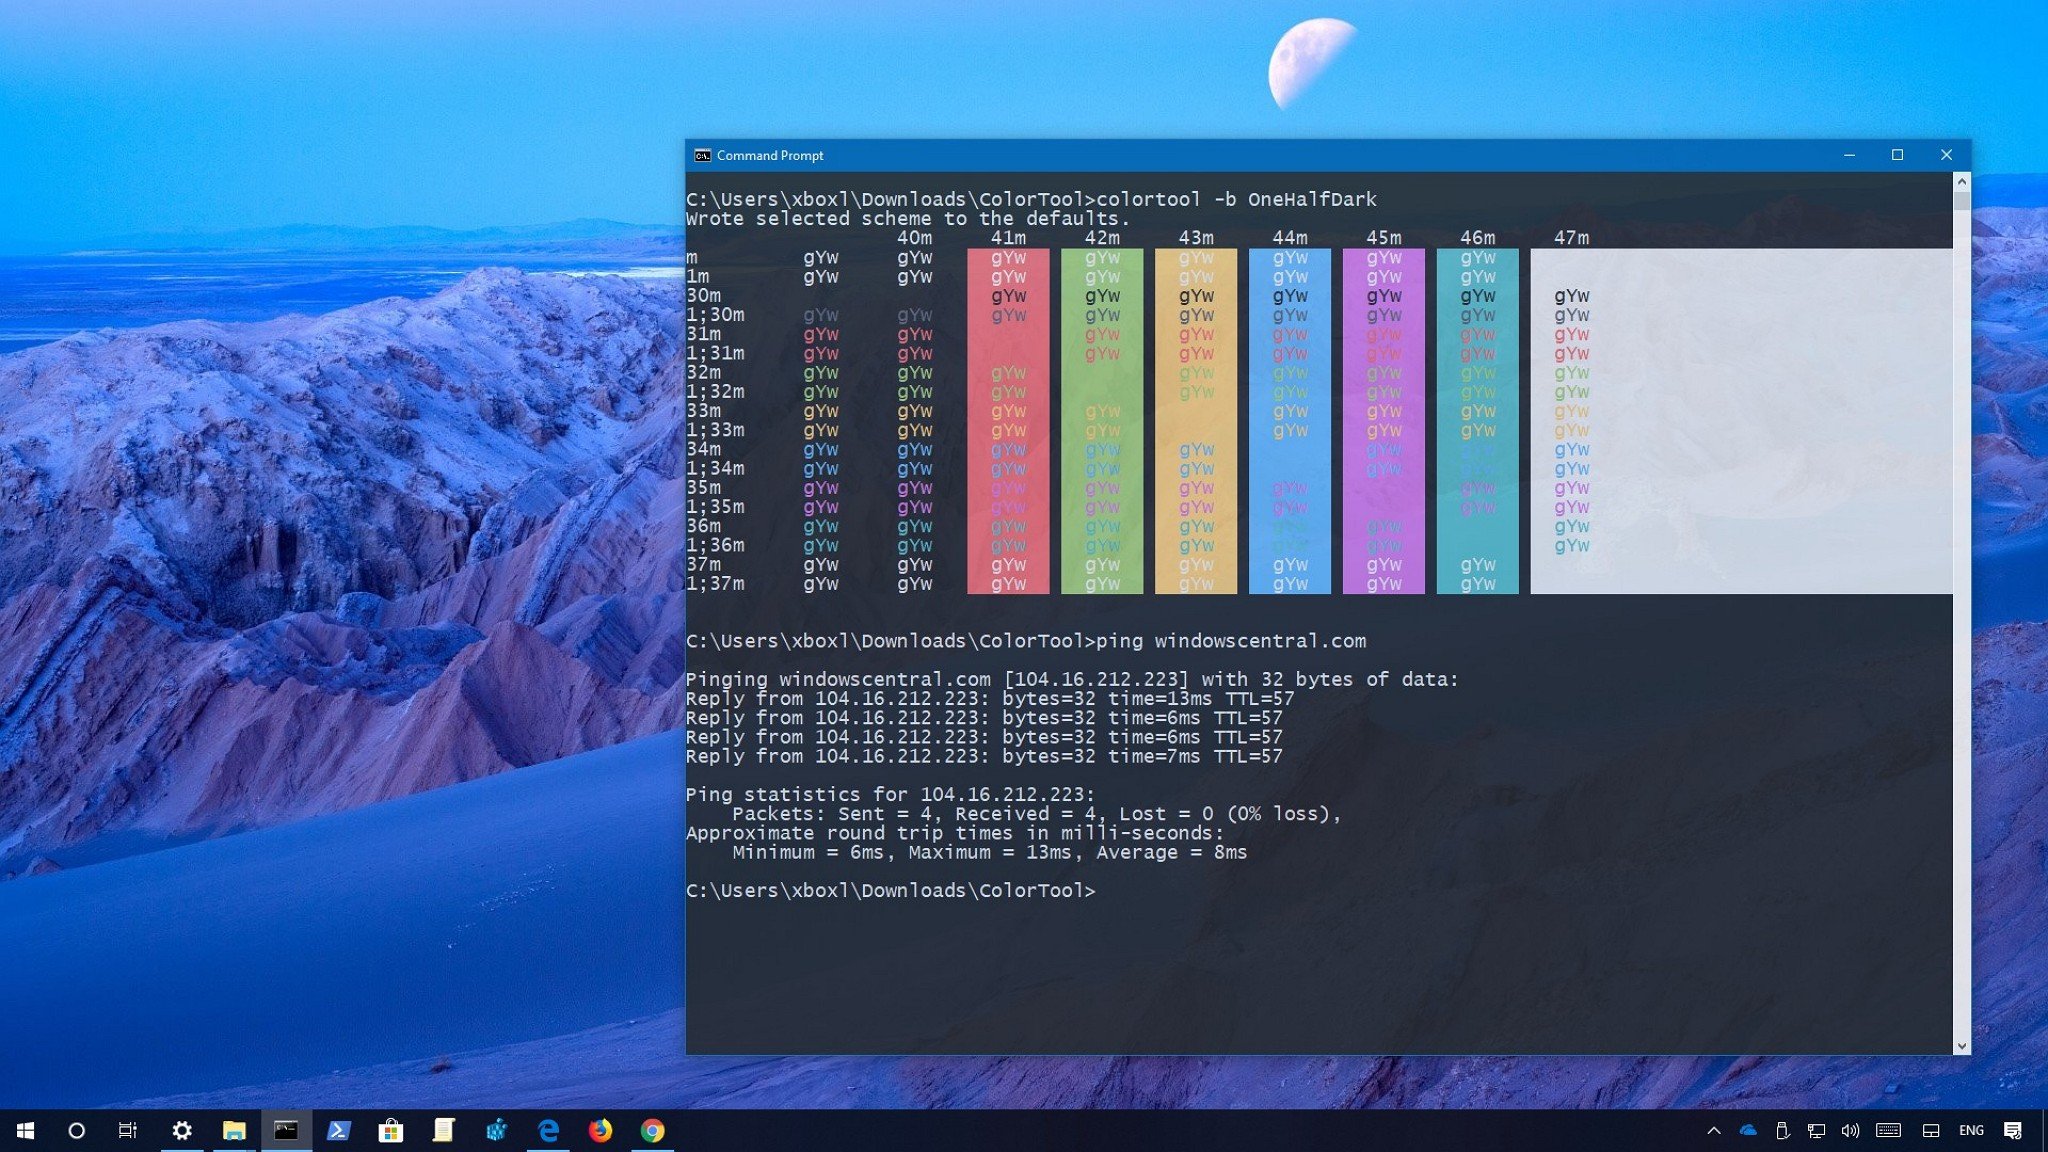
Starting with the Windows 10 Fall Creators Update (version 1709), it’s possible to customize the appearance of Command Prompt using custom color schemes.
If you want to use this feature, download the Microsoft CoolTool from GitHub, extract the contents of the ColorTool.zip file, and then use these steps:
- Open Start.
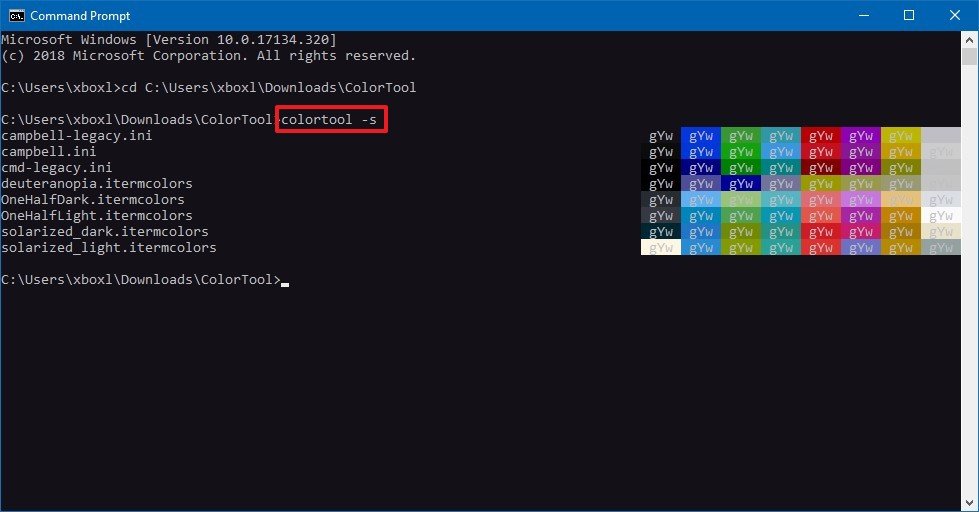
- Search for Command Prompt, right-click the result, and click Run as administrator.
- Type the following command to navigate to the folder that contains the ColorTool executable and press Enter:
cd C:\PATH\TO\ColorToolIn the above command, replace cd C:\PATH\TO\ColorTool with the path to the folder where you extracted the «ColorTool» folder. - Type the following command to list the available color schemes and press Enter:
colortool -s
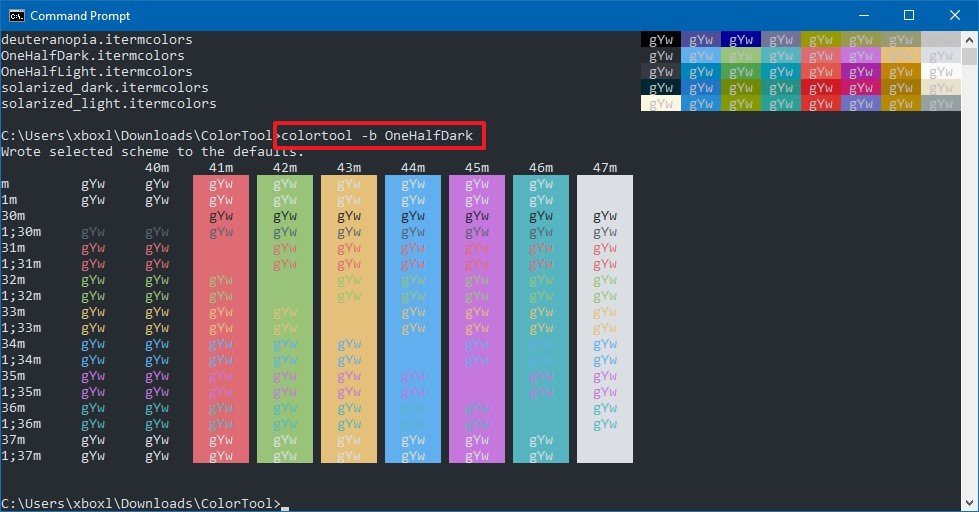
- Type the following command to change the Command Prompt color scheme and press Enter:
colortool -b SCHEME-NAMEIn the above command, replace SCHEME-NAME with the name of the color scheme you want to use. While typing the name, do not include the «.ini» or «.intercolors» extension. The -b switch is optional, and it makes the scheme the system default.
- Right-click the title bar, and select the Properties option.
- Click the OK button to apply the scheme changes.
Once you complete these steps, restart Command Prompt to start using the console with the new color scheme.
At any time, if you want to revert the original colors, you can use the same instructions, but on step No. 6, make sure to use the either the campbell or cmd-campbell scheme name.
More Windows 10 resources
For more helpful articles, coverage, and answers to common questions about Windows 10, visit the following resources:
- Windows 10 on Windows Central – All you need to know
- Windows 10 help, tips, and tricks
- Windows 10 forums on Windows Central
Mauro Huculak has been a Windows How-To Expert contributor for WindowsCentral.com for nearly a decade and has over 15 years of experience writing comprehensive guides. He also has an IT background and has achieved different professional certifications from Microsoft, Cisco, VMware, and CompTIA. He has been recognized as a Microsoft MVP for many years.