
Applies ToWindows 11 Windows 10
Поддержка Windows 10 прекратится в октябре 2025 г.
После 14 октября 2025 г. корпорация Майкрософт больше не будет предоставлять бесплатные обновления программного обеспечения из Центра обновления Windows, техническую помощь и исправления безопасности для Windows 10. Ваш компьютер по-прежнему будет работать, но мы рекомендуем перейти на Windows 11.
Подробнее
Заставки были основной функцией в Windows на протяжении десятилетий. Изначально предназначенные для предотвращения записи на CRT-мониторах, они превратились в настраиваемую функцию, которая добавляет личный контакт на ваше устройство с Windows. Тем не менее, с современными достижениями, теперь рекомендуется положить ваш дисплей в спящий режим, чтобы сэкономить энергию.
Что такое заставка?
Заставка — это анимированное изображение или шаблон, которое появляется на экране, когда компьютер простаивает в течение указанного периода. Хотя современные ЖК-мониторы и светодиодные мониторы менее подвержены прогоранию, заставки остаются популярным способом персонализации устройства и добавления дополнительного уровня безопасности.
Зачем использовать заставку?
Хотя заставки больше не требуются для предотвращения записи, они предлагают несколько преимуществ:
-
Персонализация. Настройка экрана с анимацией или фотографиями, отражающими ваш стиль
-
Безопасность: автоматическая блокировка компьютера, когда вы отсутствуете, защита данных
-
Эстетика: добавление визуально приятного элемента на экран бездействия
-
Предотвращение Burn-In на OLED-дисплеях: заставки могут помочь предотвратить запись на OLED-дисплеях, гарантируя, что статические изображения не отображаются в течение длительного времени
Совет: Чтобы сэкономить энергию и уменьшить износ дисплея, рекомендуется переводить компьютер в спящий режим, когда он простаивает. Спящий режим потребляет значительно меньше энергии, чем запуск заставки, и позволяет компьютеру быстро возобновить работу, где вы оставили. Дополнительные сведения см . в статье Настройка параметров питания и спящего режима в Windows.
Настройка заставки
-
В приложении «Настройки» на устройстве с Windows, откройте экран персонализации > блокировки или используйте следующий ярлык:
Экран блокировки
-
Выбор заставки
-
В окне Параметры заставки выберите заставку из раскрывающегося списка. Параметры включают трехмерный текст, пустое, пузырьки, mystify, фотографии и ленты
-
Настройка заставки: если она доступна, выберите Параметры… , чтобы настроить выбранную заставку. Например, можно создать пользовательское сообщение в заставке трехмерного текста или выбрать папку с изображениями для заставки «Фотографии».
-
Задание времени ожидания: используйте параметр Wait (Ожидание), чтобы указать количество минут бездействия перед активацией заставки
-
Включить безопасность: (необязательно) Установите флажок При возобновлении, отображение экрана входа , чтобы требовать пароль при возобновлении из заставки
Нужна дополнительная помощь?
Нужны дополнительные параметры?
Изучите преимущества подписки, просмотрите учебные курсы, узнайте, как защитить свое устройство и т. д.
Everyone knows how about the Windows «look», but what if you’re feeling a bit tired of seeing the same old thing each time you switch on your computer?
Windows 10 and the earlier Windows 7 each have good options for tweaking the login screen. Here’s how to access those options and configure the login screen to look just how you want.
Customize the Login Screen on Windows 10
You have two options for customizing the Windows 10 login screen: the message, and the background.
Change the Windows 10 Login Screen Message
Whether you use a desktop, laptop, or even a Surface-like tablet, it’s possible to set a custom login screen message. This has various uses, from delivering a corporate message, to making the end user smile. It might also be useful if your device goes missing, displaying your address to the finder.
Note that the actual login screen itself will remain unchanged. Rather, a new screen will be displayed, with an OK prompt, before the login screen.
Start by opening the Registry Editor by pressing WIN+R and typing regedit. Click OK, then browse the left-hand pane for HKEY_LOCAL_MACHINE. Expand this entry, following the path Software\Microsoft\Windows\Current Version\Policies\System.
Under System, in the right-hand pane, you should see a registry item, legalnoticecaption. Right-click this and select Modify, and under Value Data input a heading for your new message. Some sort of hail, or attention-grabbing phrase, should do.
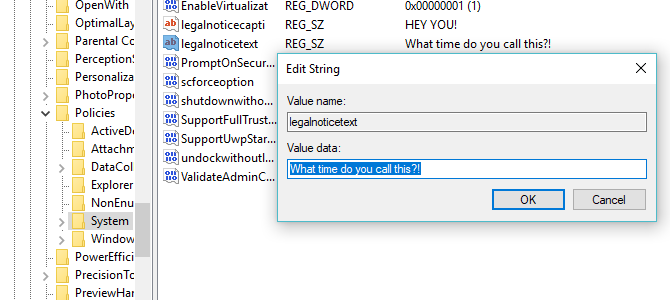
Next, find legalnoticetext. Again, right-click to Modify, this time entering into Value Data a more detailed message.
This might be something like «Log in to access the ACME Plc network» or «If found, please return to…» Ultimately, it needs to be a message that serves some sort of purpose, otherwise there’s not much point in changing anything!
With the message input, click OK to confirm, then exit the Windows Registry. Next, restart Windows to apply the registry tweak.
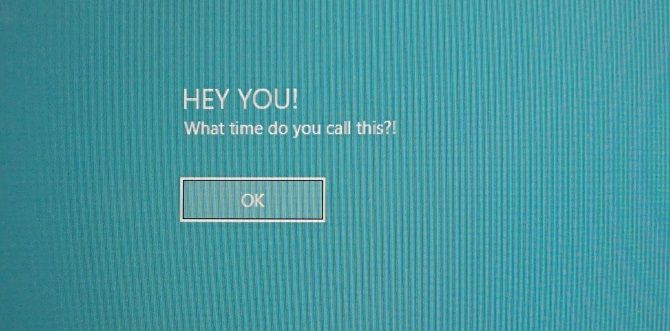
Your new Windows 10 login message should be displayed! You’ll need to click OK to reach the login screen.
It isn’t only this message you can tweak from the Windows Registry. Here are five more registry tweaks you can make in Windows 10.
Add a New Windows 10 Login Screen Background
In addition to the login screen message, you can also change the background.
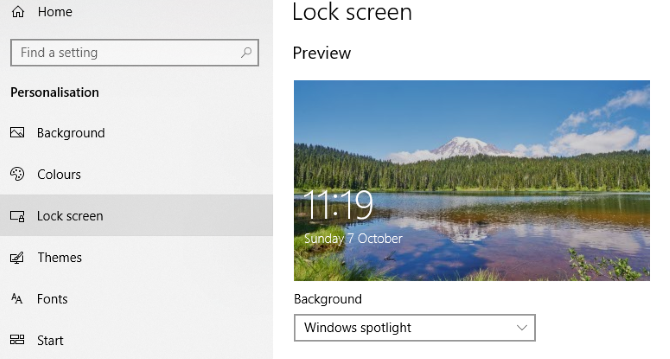
Hit WIN+I to open the Settings screen and select Personalization > Lock Screen. Find the Background drop-down menu and select between Windows spotlight (images from Microsoft), Picture, and Slideshow. The latter two options let you select images from your own library.
Now, as this new image is specifically for the lock screen at this stage, you’ll also need to ensure the Show lock screen background picture on the sign-on screen option is switched to On. Otherwise, the lock screen with display a different image, or remain blank. Once you’re done, close the Settings screen. (Check our full guide to the Windows 10 Settings menu for more.)
Again, you should sign out of Windows to check that the tweak has been applied. If all has gone to plan, you should have a new Windows 10 lock screen background and accompanying message!
Unfortunately, that’s as far as you can go in Windows 10. Tweaks are limited to the login screen message and background; you cannot change the font. However, other Windows 10 tweaks are available, such as switching the desktop wallpaper to an animated background.
Customize the Windows 7 Login Screen
While tweaks are limited on Windows 10, things are a bit more generous on Windows 7. Here, you can customize the login screen message, as well as the login screen font.
Change the Windows 7 Login Screen Message
Intended for Windows 7 32-bit or 64-bit computers with Service Pack 1 installed, the following can be done with or without User Account Control active. You will also need a copy of Resource Hacker, a free tool designed to enable you to modify, add, rename, delete and view resources in Windows EXE files.
While this is downloading, open C:\Windows\System32\en-US\ (note that non-English versions of Windows will have a different folder name, such as \es-ES\ for Spanish) and find winlogon.exe.mui.

Right-click this file and select Properties > Security > Advanced > Owner.
In this window, click Edit and then under Change owner to, select your own login name and click Apply. Click OK to proceed and select OK to exit these windows and the original Properties box.
Once done, return to Properties > Security and select Edit. In the following box, click Add and search for your login name; it should resolve as PCNAME\USERNAME.
Select this, click OK to add the login, and you will be returned to the Security tab. From here, click Advanced > Permissions > Change Permissions, and under Permission Entries select the newly added entry and click Edit.
Select the Full Control checkbox in the Allow column, then click OK, and then Apply to exit.
You should then copy the winlogon.exe.mui to a new location, preferably your desktop.
Next, install Resource Hacker and launch the software from the Windows Start menu by right-clicking and selecting Run as Administrator.
Agree to the UAC notice and when the application has loaded open File > Open.In the Files of type box select All files (*.*), browse to the desktop and load winlogon.exe.mui into Resource Hacker.
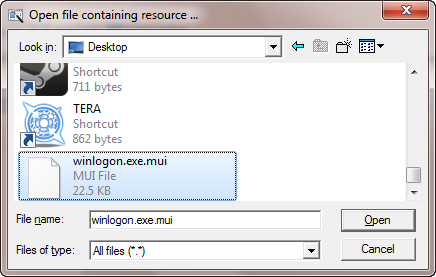
You will see that the tool has a similar interface to the Windows Registry Editor, so expand String Table > 63 > 1033 and in the right pane update the entries in quotes on lines 1002 and 1005—this will be your new Windows 7 login screen message!
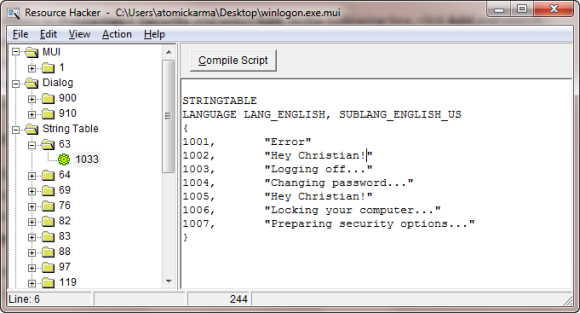
Ensure the quotes remain in place, and click Compile Script then File > Save to complete the process.
Close Resource Hacker and copy the winlogon.exe.mui file back to C:\Windows\System32\en-US\ (choosing Copy and Replace). Open Start and type CMD, right-clicking the resulting command prompt icon and selecting Run as administrator.
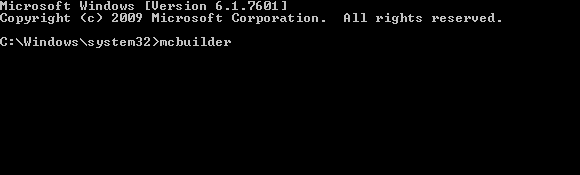
Type mcbuilder and tap Enter, then wait until the process is complete (the cursor will flash on a new line).
When done, type exit and tap Enter to close the command prompt.
You’ll need to restart Windows to complete the process and confirm your changes.
To undo this and restore the original message, simply start the process again, replacing your custom message with «Welcome».
Alternatively, delete winlogon.exe.mui and replace it with the winlogon.exe_original.mui file created by Resource Hacker, making sure to give it the old filename.
Select a New Windows 7 Login Screen Font
While changing the login screen message might take a while, changing the font is much quicker.
Open Start and type regedit, tapping Enter to launch the utility and agreeing to any UAC prompts (before proceeding use File > Export to make a backup of your Windows Registry—useful if an error is made).
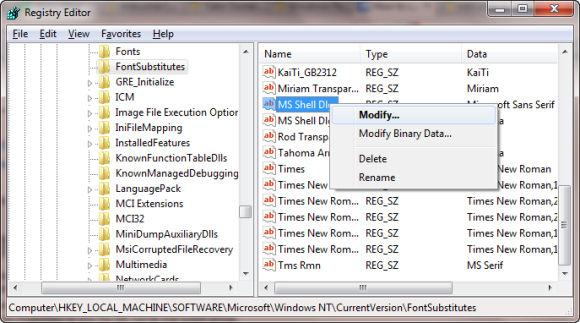
Expand the path HKEY_LOCAL_MACHINE\SOFTWARE\Microsoft\Windows NT\CurrentVersion\FontSubstitutes and find MS Shell Dlg in the right pane#
Right click on this and select Modify.
In the resulting box, input the name of the font you wish to use (check C:\Windows\Fonts for a list of currently installed choices), and repeat for the entry MS Shell Dlg 2 (note that the default option is Tahoma).
Once this is done, close the Windows registry and restart your computer to apply the changes. (While you can also logoff and login, locking your computer will not display the new font.)
The Login Text Is Too Light/Dark!
Changing the color of the Windows login screen font isn’t possible.
However, you can change the weight of the text—that is, how prominent it appears in front of your chosen background.
To do this, return to the Windows Registry Editor and expand the path HKLM\SOFTWARE\Microsoft\Windows\CurrentVersion\Authentication\LoginUI.

In the right-hand pane, right-click some empty space, and select New > DWORD, naming it ButtonSet.
Once this is done, double click to edit the value, clicking OK when you’re done. You have a choice of the following:
0: This gives lighter text shadows, darker buttons and is the default choice.
1: Suitable for lighter backgrounds, this option offers darker text shadows and lighter buttons.
2: Intended for a darker background, text shadows are removed, and buttons are opaque.
When your choice is made, close Registry Editor and restart Windows to check the results.
Change Your Windows Login Screen!
We’ve looked at login screen tweaks for two versions of Windows, those that are currently most popular: Windows 7, and Windows 10.
To recap, if you want to tweak the Windows 10 login screen, you must:
- Open the Windows Registry
- Expand HKEY_LOCAL_MACHINE. Expand this entry, following the path Software / Microsoft / Windows / Current Version / Policies / System
- Right-click legalnoticecaption, select Modify, and under Value Data input your new message.
For tweaks to the Windows 7 login screen, meanwhile, you can:
- Change the login screen message
- Change the login screen font
- Adjust the weight of the text, making it lighter or darker
Although third party software and changes to the Windows Registry are required to make these customizations, the results can be impressive, especially when combined with a custom login screen background.
Looking for more Windows tweaks? Here are six tools for tweaking the Windows 10 Start menu.
Ранее на сайте рассматривалось, как поменять язык интерфейса Windows последних версий, либо язык ввода по умолчанию. Однако, даже после выполнения этих действий язык на экране блокировки до входа в систему остаётся прежним. При желании его можно изменить.
В этой инструкции о том, как поменять язык отображения и ввода на экране блокировки в Windows 11 и Windows 10.
Изменение параметров языка экрана приветствия в настройках региональных стандартов
Выполнить необходимые действия по смене языка на экране блокировки можно, используя следующие шаги:
- Откройте Панель управления. В Windows 11 и 10 для этого можно использовать поиск в панели задач (если изначальная версия системы не русскоязычная, используйте Control Panel для поиска).
- Переключив пункт «Просмотр» в «Значки», откройте «Региональные стандарты», либо выберите пункт «Изменение форматов даты, времени и числе», если включен вид «Категория».

- Перейдите на вкладку «Дополнительно» (Administrative в англоязычной версии системы).
- В разделе «Экран приветствия и учетные записи новых пользователей» нажмите кнопку «Копировать параметры».

- В открывшемся окне отметьте пункт «Экран приветствия и системные учетные записи» в разделе «Копировать текущие параметры в» и нажмите «Ок».

- Если параметры языка интерфейса экрана блокировки были изменены по сравнению с текущими, Windows запросит перезагрузку — выполните её.


В результате параметры языка текущей учетной записи, включая язык интерфейса, язык ввода, формат и расположение будут применяться и для экрана блокировки.
Некоторые нюансы, которые следует учитывать и могут быть полезными при применении указанных настроек:
- Настройки языка берутся из текущей учетной записи: то есть скопированы будут именно они. Если для экрана блокировки требуются отличающиеся параметры, измените их нужным образом в системе, скопируйте как описано выше, а затем верните в исходное состояние.
- Для изменения настроек языка экрана блокировки требуются права администратора.
- С помощью того же окна настроек вы можете сделать так, чтобы те же языковые параметры автоматически для всех новых пользователей.
- Порядок выбора языков в системе можно настроить в Параметры — Время и язык — Язык и регион (в Windows 11) или Язык (в Windows 10) просто перетащив нужный язык на первое место. Например, вам требуется, чтобы на экране блокировки по умолчанию была включена английская раскладка для ввода пароля: делаем английский первым в Параметрах, после чего копируем параметры для экрана приветствия.


Если вас интересует изменение языка интерфейса в самой ОС, информация об этом в отдельных статьях: Как установить русский язык интерфейса Windows 11, Установка русского языка интерфейса Windows 10.
Download Windows Speedup Tool to fix errors and make PC run faster
I remember when using Windows in the early days, there were so many sounds everywhere. Even Windows Themes used to come with sounds from movies, nature, and so much more. Fast-forward to Windows 11/10, and access to most of these sound settings is not there anymore.
One of the primary reasons why Windows startup and shutdown sounds were removed because of the Fast Boot in Windows. Only when you hard reboot do you get to listen to them. So, in this post, we will share how you can add a startup sound or welcome message when you log in to Windows 11/10.
To make Windows computer greet you with a custom Welcome Voice Message & Sound at startup when you log in, you have two methods:
- Enable via Registry Settings and Theme Sounds
- Add Logon Sound using Task Scheduler
Make sure you have a WAV file of the audio you plan to add. It can be music or any welcome message you would love to have.
1] Enable via Registry Settings and Theme Sounds
When using this method, we must make changes in two places. The first step is to enable them through the registry, and then the theme settings.
Enable Windows Login Settings in Windows

Type Regedit in the Run prompt (Win + R) followed by pressing the Enter key to open Registry Editor
Navigate to:
Computer\HKEY_CURRENT_USER\AppEvents\EventLabels\
Locate the WindowsLogon key.
Inside that key, there is a DWORD with the name ExcludeFromCPL
Double-click to open it, and change the value from 1 to 0
Exit Registry.
Steps to change Windows Logon Sound

- Open Windows Settings (Win + I)
- Navigate to Personalization > Themes > Sounds
- Switch to Sounds tab and locate Windows logoff and logon
- For each of them, you can either choose from the sounds dropdown or browse, and select audio you like.
- Any sound setting you modify will be marked by a change in the icon of sound from white to yellow.
Read: Create a Logon message for Users using Group Policy.
2] Add Logon Sound using Task Scheduler (Welcome Message)

Task Scheduler is one of the most underrated features that can do many jobs. Right from creating a system restore to running applications all that at the precise time and event triggers.
- Type taskschd.msc in the Run prompt (Win + R) and then press the Enter key.
- Once the app launches, and select Task Schedule Library
- On the right pane, click on the Create Task link
- Switch to Triggers section, and then select “At Log on” from the “Begin the task” dropdown
- Here you can choose for all or any specific user if you are an admin. Click ok.
- Next, switch to the Actions tab and click on the new button
- Make sure Start a program is selected from the dropdown
- To add a sound that you want to play, click on browse and select the WAV file. Click ok
- Lastly switch to the General tab, and here you can name the program, make sure it runs with the highest privileges.
I hope the post was easy to follow, and you were able to add a startup sound or a welcome message when you log in to Windows 11/10.
Read next: Display custom legal notices & startup messages.
Ashish holds a Bachelor’s in Computer Engineering and is a veteran Windows. He has been a Microsoft MVP (2008-2010) and excels in writing tutorials to improve the day-to-day experience with your devices.