
Панель задач вместе с меню «Пуск» подверглась значительным изменениям в Windows 11. Привычные элементы кардинально переделали, поэтому, например, от живых плиток почти спустя 10 лет окончательно отказались, календарь и быстрые настройки полностью преобразились, а в панели задач поменялись значки и всё переместилось в центр. Кроме того, расположение панели задач на экране больше нельзя изменять — это смутило огромное количество пользователей Windows 10. Но, как оказалось, изменения не означают, что подобное теперь стало невозможным.
- В тему: Всё о Windows 11 — секреты, инструкции, лайфхаки и полезные статьи
Установить панель задач Windows 11 в верхнюю часть экрана получится с помощью редактора реестра (по крайней мере в текущей тестовой сборке 22000.51). Делается всё довольно легко.
Как переместить панель задач Windows 11 в верхнюю часть экрана
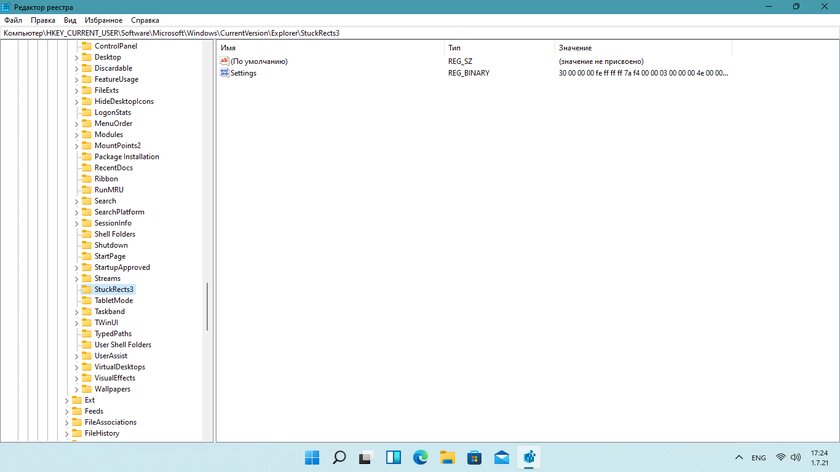
- Используйте сочетание клавиш Windows + R для открытия утилиты «Выполнить» и введите в поле запуска «regedit.exe», после чего нажмите «OK». Или найдите через поиск «Редактор реестра».
- Перейдите по следующему пути:
HKEY_CURRENT_USER\Software\Microsoft\Windows\CurrentVersion\Explorer\StuckRects3.
- Найдите параметр типа REG_BINARY под названием «Settings».
- Дважды нажмите на него — откроется окно изменения двоичного параметра.
- В столбце FE для параметра 00000008 (второй по списку) установите значение 01 — поместите на него курсор, удалите текущее значение и пропишите нужные цифры. По умолчанию он должен быть установлен на 03.
- Нажмите «OK» и перезапустите «Проводник» через «Диспетчер задач».
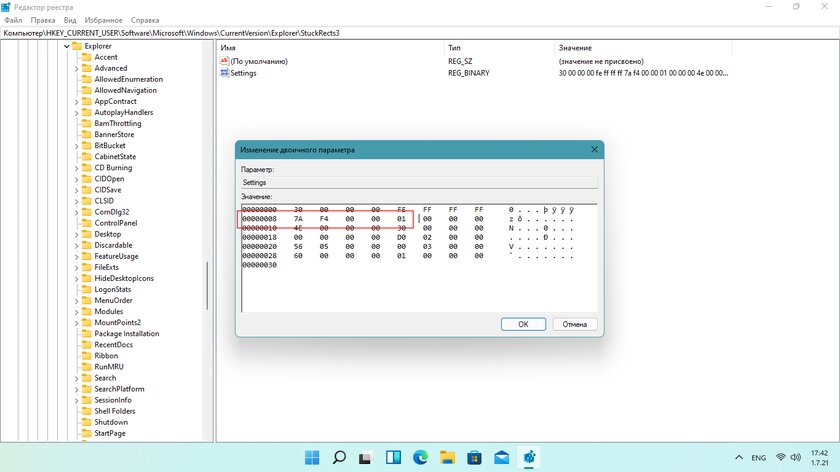
Чтобы отменить изменение, необходимо открыть тот же параметр в редакторе реестра и вернуть стандартное значение 01. Учтите, что другие значения (02 или 04) не работают, поэтому переместить панель задач на левую или правую сторону не выйдет.
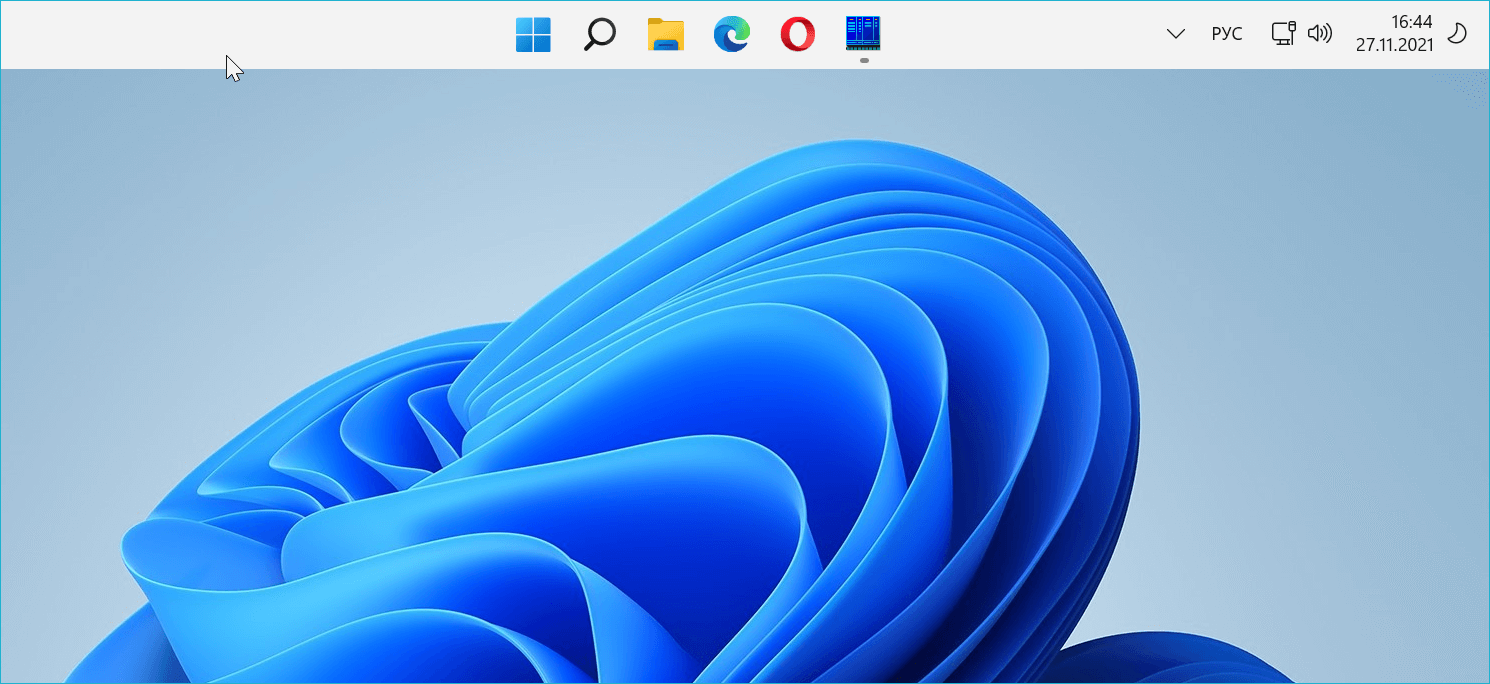
⚠️ Важно: следует знать, что при перемещении панели задач в верхнюю часть экрана меню «Пуск» станет автоматически открываться только с левой стороны.
If you haven’t activated, you have to edit the registry
Updated on March 16, 2023
What to Know
- Right-click taskbar > Taskbar settings > Taskbar behaviors > Left or Center.
- Otherwise, create and edit the TaskbarAl registry value if Windows isn’t activated.
- The only way to resize the taskbar is through the Windows Registry, but you can hide the taskbar.
This article describes how to change where the Windows 11 taskbar is positioned at the bottom of your screen.
How to Make Your Taskbar Centered (or Not) in Windows 11
Items on the Windows 11 taskbar can be aligned in the middle or left. If Windows isn’t activated, you have to use the Windows Registry; otherwise, there’s a handy taskbar setting that makes the switch really easy.
How to Customize Your Windows 11 Taskbar
If Windows Is Activated
Changing the Windows 11 taskbar alignment when Windows is activated with a valid product key is simple.
-
Right-click an empty space on the taskbar and choose Taskbar settings.
-
Expand the Taskbar behaviors section.
-
Next to Taskbar alignment, select the menu and choose either Left or Center. The taskbar will adjust accordingly immediately.
If Windows Isn’t Activated
Some personalization settings are inaccessible if Windows 11 isn’t activated. The workaround is to edit the registry.
-
Open Registry Editor by searching for it.
Using these steps to edit the registry won’t cause any damage to your computer. However, it’s remarkably easy to delete or edit something that shouldn’t be changed. Be sure to back up the registry before starting. If you need to undo an edit later, you can always restore the registry from the backup.
-
Navigate to this location using the folders on the left side:
HKEY_CURRENT_USER\Software\Microsoft\ Windows\CurrentVersion\Explorer\Advanced\ -
Right-click the Advanced key and go to New > DWORD (32-bit) Value.
-
Name the value TaskbarAl (that’s a lowercase L, not an uppercase i), and press Enter.
-
The taskbar will immediately align to the left since a 0 value is for left-alignment. To center the taskbar, double-click the value and change it to 1.
How Do I Resize the Taskbar in Windows 11?
Related to the taskbar’s alignment is its size. Changing the taskbar size is extremely easy to do in Windows 10, so you’d think it’d be an option in the taskbar settings in Windows 11. Instead, the only way to resize the taskbar in this version of Windows is through a Windows Registry tweak.
That said, there is a setting you can enable to auto-hide the taskbar, which essentially downsizes it automatically when your mouse isn’t focused on the taskbar. This can provide you with a little extra screen space. To do so, search Settings for Automatically hide the taskbar, and enable the setting.
Unlock the Secret to Resizing Your Windows 11 Taskbar the Easy Way
FAQ
-
Some Windows 10 users liked accessing the volume mixer via the taskbar to manage the sound for various apps. In Windows 11, there’s no longer a flyout for the volume mixer amid the sound, battery, and Wi-Fi icons. There’s still a way, however, to access the volume mixer. Right-click the audio icon on the bottom right of the taskbar, then select Open volume mixer. You’ll see the volume mixer amid the sound settings.
-
To pin your email application, or any application, to the taskbar in Windows 11, use the search function to find the program. Then, right-click on the application and select Pin to Taskbar.
-
Windows 11 began rolling out to eligible users in late 2021.
Thanks for letting us know!
Get the Latest Tech News Delivered Every Day
Subscribe
If you’re one of the many people who are finally using Windows 11, you’re probably playing around with all of the new features that are available.
One of the first features you may want to play around with is the ability to reposition the Windows 11 taskbar to the left or right, or how to further customize it in different ways. In this tutorial, you’ll learn how.

One of the things you’ve probably noticed the first time you launched the Windows 11 operating system is the fact that the main taskbar icons are centered in the middle of the taskbar at the bottom of the desktop.

Two positions are available in the taskbar settings for you to reposition where the start menu icon and app icons appear in the taskbar. You can place these to the left or to the right side of the screen (this is actually the center of the taskbar, since the time, date, and system icons are at the far right).
Do you prefer the standard left location for the Start menu and app icons? Setting this is simple.
- Right-click the taskbar and select Taskbar settings.

- In the Taskbar settings window, scroll down to the “Taskbar behaviors” section and change the selection to the right of Taskbar alignment from Center to Left.

- Close this menu.
When you changed the setting, you should have noticed that the Start menu and all taskbar icons are now aligned on the left side of the taskbar.

If this is good enough, you can stop reading this article now. But if you’d like to position these taskbar icons in other locations on the desktop or further customize it — read on.
Related: Missing that Windows 10 style? Learn how to make Windows 11 look more like Windows 10.
Move Windows 11 Taskbar to Top of the Desktop
If the left or center of the taskbar isn’t enough flexibility for you, you can also place the taskbar at other positions on the desktop as well.
You can do this with a simple registry hack.
- Select the Start menu, type Regedit, and select Registry Editor.
- Navigate to Computer\HKEY_CURRENT_USER\Software\Microsoft\Windows\CurrentVersion\Explorer\StuckRects3.
- Double-click the Settings registry key and then double-click the 5th column in the 2nd row.
Type any of the following values depending on which position you want to move the taskbar to.
- 00: Left side
- 01: Top of the screen
- 02: Right side
- 03: Bottom of the screen

- To move the taskbar to the top of the screen, type 01 and select OK.
- Close the registry editor, and open the Task Manager (Press Ctrl-Shift-Esc).
- On the Processes tab, scroll down to Windows Explorer, right-click on it, and select Restart.

- Once Windows Explorer restarts, this will re-launch the Taskbar and place it where you’ve configured it with the registry tweak; at the top of the Windows desktop.

As you can see, it’s pretty easy to move the taskbar position wherever you’d like to place it on the Windows 11 desktop. But there are a few additional ways you can customize the Windows 11 taskbar as well.
How to Customize the Windows 11 Taskbar
There are a few other ways you can customize the Windows 11 taskbar. You can do this in the Taskbar Personalization settings in Windows Settings.
To do this:
- Select the Start menu, type Settings, and select the Settings app.
- Select Personalization in the left menu.
- Scroll down and select Taskbar in the right pane.
- Use the Taskbar items section to toggle off or on whether you want any of the following items to appear in the taskbar: Windows search, Task view, Widgets, or Teams Chat.
- Scrolling a little further down, you’ll see the “Taskbar corner icons” section. This is where you can enable or disable the pen icon, the touch keyboard icon, or the virtual touchpad icon on the taskbar.

- The “Taskbar corner overflow” section is where you can configure the taskbar corner to display icons for items like Windows Explorer, Task Manager, or Windows Updates.
- Scroll down to “Taskbar behaviors” to set taskbar alignment, enable icons for unread messages, multiple display options, window sharing, and desktop display settings.

Once you customize the taskbar, just return to the desktop to start using it.
Of course, one last method you can use to customize what shows up on the dashboard is similar to what you could do in Windows 10 — pinning or unpinning app icons.
Just right-click any app that you want to remove and select Unpin from taskbar to remove that app icon from the taskbar permanently.
This is the easiest way to customize which app icons appear on the taskbar whenever you launch Windows 11.
Love it or hate it, Windows 11 gives us a new user interface that may not make everyone happy. However, at least there are some different options to choose from when it comes to the Windows 11 taskbar.
Related Posts
- How to Fix a “This file does not have an app associated with it” Error on Windows
- How to Add OneDrive to Windows File Explorer
- How to Fix an Update Error 0x800705b4 on Windows
- How to Resolve “A JavaScript error occured in the main process” Error on Windows
- How to Fix the Network Discovery Is Turned Off Error on Windows
Панель задач Windows 11 «зафиксирована» внизу. Опция перемещения панели в другое место не предусмотрена. Непривычно для пользователей Windows, которые привыкли видеть панель задач, например, в верхней части экрана. Не каждый готов отказаться от выработанных за годы предпочтений.
Когда задача не решается через штатный функционал ОС, на помощь приходят сторонние утилиты. Для управления расположением Панели задач предназначен программный инструмент Taskbar11.
Применение стороннего софта для настройки ОС — всегда определенный риск. Из-за того, что утилиту скачивают редко, фильтр SmartScreen порой блокирует ее загрузку. По данным VirusTotal программа опасности не представляет. В любом случае, каждому пользователю самому принимать решение об использовании как данной, так и других сторонних средств изменения свойств операционной системы.
Как поменять расположение, размер и выравнивание панели задач Windows 11 через Taskbar11
Загружаем программу, запускаем ее исполняемый файл и устанавливаем. Главный и единственный экран утилиты содержит комплекс настроек.
Taskbar Position. Выпадающий список позволяет выбрать между верхним (Top) и нижним (Bottom) расположением Панели задач.

Taskbar Size. Предусмотрены три размера панели:
- маленький (Small);
- средний (Medium);
- большой (Large).
Первый лучше вовсе не применять, поскольку часы видны не будут.

Taskbar Indentation. Позволяет вернуть кнопку «Пуск» на привычное пользователям Windows 10, 7, XP место — влево (Left). Предусмотрено и возвращение в центр (Center), как изначально и задумано разработчиками новой версии Windows.

Опции настройки панели задач Windows 11 в Taskbar11
Ниже трех выпадающих списков находятся опции, которые могут быть активированы дополнительно.
Taskbar Items. Дает возможность активировать и убрать значки Панели задач. В их числе:
- поиск (Search);
- просмотр задач (Task View);
- виджеты (Widgets);
- чат (Chat).
Taskbar Corner Icons. При необходимости активируйте опции отображения в системном трэе:
- рукописного ввода (Pen);
- тач-клавиатуры (Touch Keyboard);
- виртуального тачпада (Virtual Touchpad).
Taskbar Behavior. Данный блок содержит единственную опцию — установите «птичку» в квадрате слева от надписи «Automatically Hide Touchbar», чтобы Панель задач автоматически убиралась с экрана и не занимала места на дисплее.
Кнопка сохранения (Save) легко узнаваема по значку-«дискете». Кликните по ней, чтобы изменения были применены. По сути программа является графическим интерфейсом для внесения изменений в системный реестр Windows 11.

С перемещением Панели задач вверх программа справилась хорошо. Менять расположение «Пуска» с ее помощью лучше и не пробовать. Отмечена особенность: после возвращения кнопки главного меню в центр, само меню продолжает открываться слева. Внесенные изменения сохраняются далеко не всегда.

Программа может оказаться полезной для энтузиастов тонкой настройки интерфейса ОС под себя.
Читайте в «Блоге системного администратора», как скачать Windows 11. Рассмотрены четыре метода загрузки ОС. Windows 11 совместима далеко не со всеми компами. Но если очень постараться, то установить получится. Читайте подробную инструкцию по установке Windows 11 на ПК, который не поддерживает новую операционную систему.
Что не нравится вам в дизайне Windows 11? Напишите в комментариях.