
Все способы:
- Вариант 1: Системные приложения
- Вариант 2: Сторонние приложения
- Вариант 3: Универсальное решение
- Вопросы и ответы: 0
Обратите внимание! Если вы хотите установить в качестве иконки приложения собственное изображение, его потребуется специальным образом подготовить. Это должен быть графический файл в формате *ICO, имеющий одно из следующих разрешений: 16×16, 24×24, 32×32, 48×48, 256×256. Для этого можете воспользоваться программным обеспечением или онлайн-сервисами, о чем мы ранее рассказывали в отдельной статье.
Подробнее: Как создать иконку ICO онлайн
Вариант 1: Системные приложения
Если вы хотите изменить значок стандартных для Windows 11 приложений, ярлыки которых можно помещать на рабочем столе («Этот компьютер», «Корзина», «Сеть», «Панель управления» и пользовательская папка), потребуется обратиться к параметрам персонализации операционной системы.
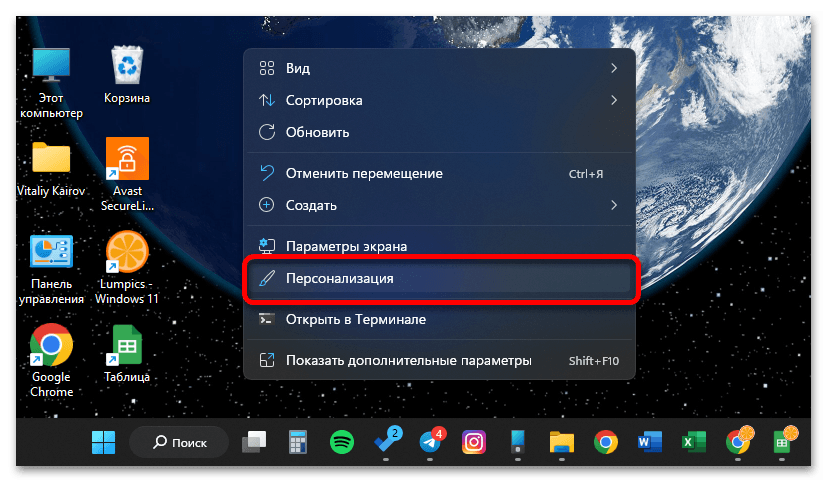
- Кликните правой кнопкой мышки (ПКМ) по пустому месту рабочего стола (РС) и выберите в контекстном меню пункт «Персонализация».
-
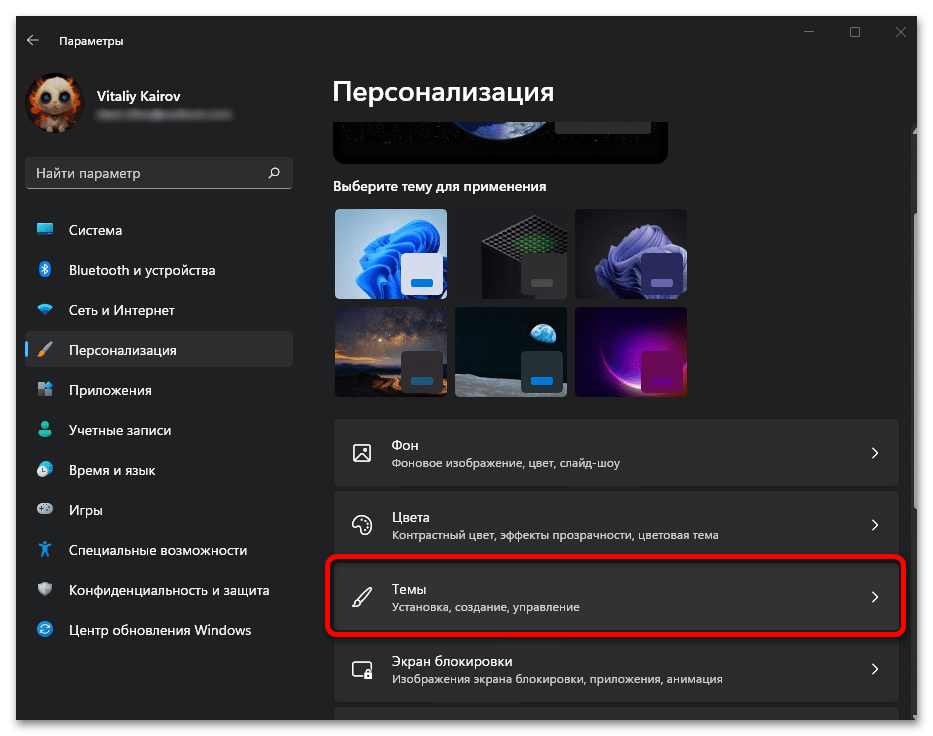
Перейдите к разделу «Темы».

Читайте также:
Как установить тему в ОС Виндовс 11
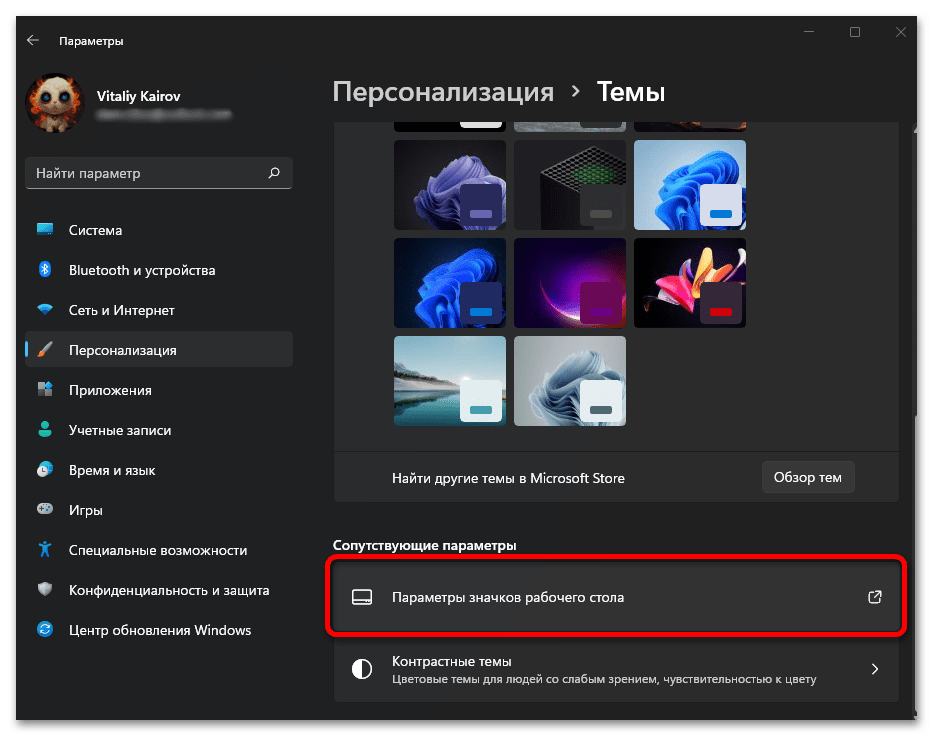
Как установить темную и автоматически сменяемую тему оформления в Виндовс 11 - Далее нажмите по подразделу «Параметры значков рабочего стола».
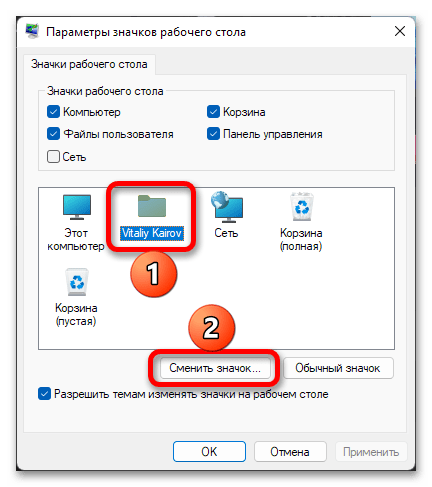
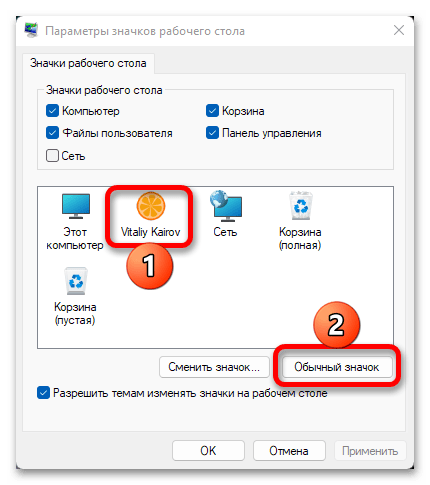
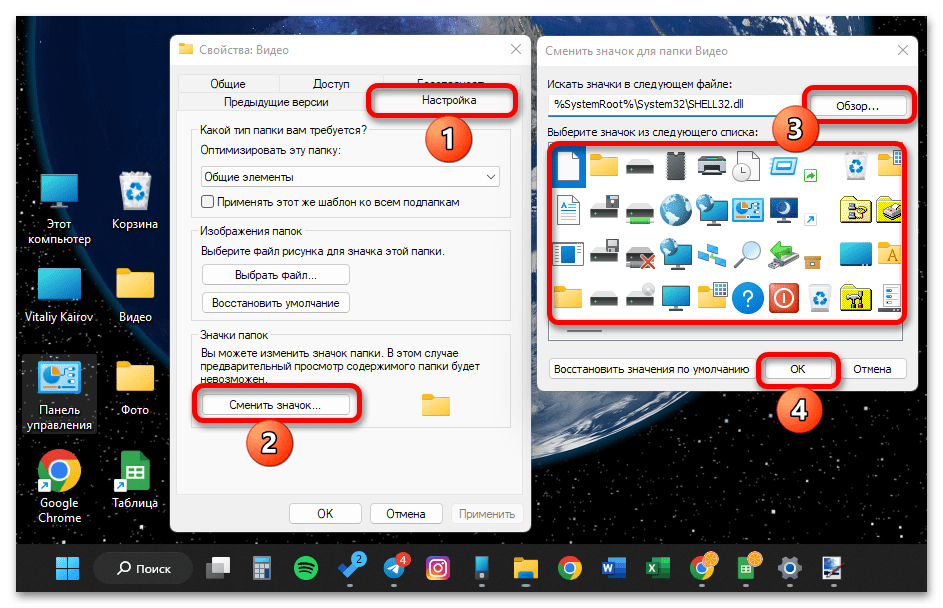
- В расположенном вверху блоке по необходимости отметьте галочками те приложения, ярлыки которых хотите видеть на РС, после чего выделите нужный и нажмите на кнопку «Сменить значок».
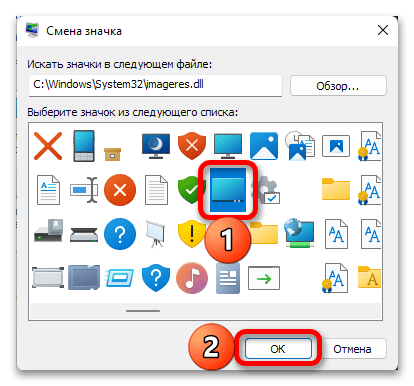
- Выберите ту картинку, которую хотите установить в качестве новой иконки, после чего нажмите «ОК».
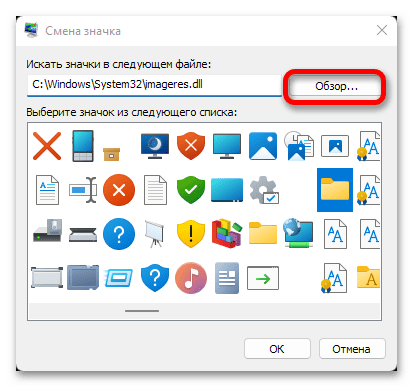
- Если вместо стандартных изображений, доступных в библиотеке операционной системы, вы хотите установить собственное, нажмите на кнопку «Обзор»,

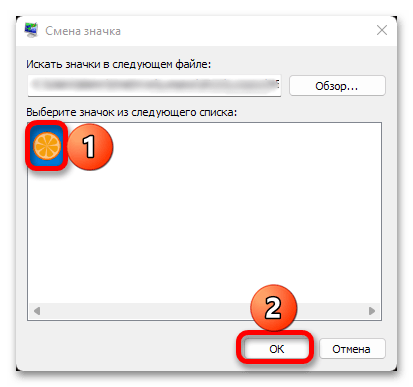
перейдите к расположению нужного графического файла в формате ICO, выделите его и нажмите «Открыть».

Выберите значок в списке и воспользуйтесь кнопкой «ОК».
- Для того чтобы внесенные вами изменения вступили в силу, кликните «Применить» и «ОК» в окне «Параметры значков рабочего стола».

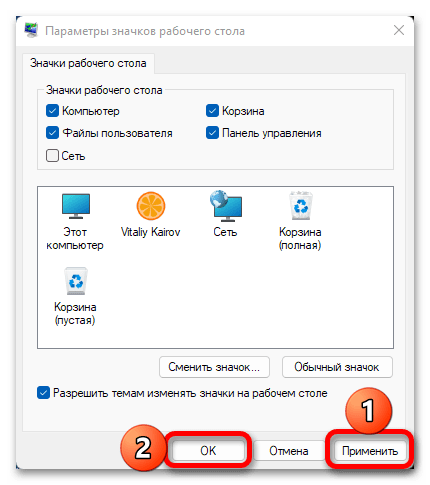
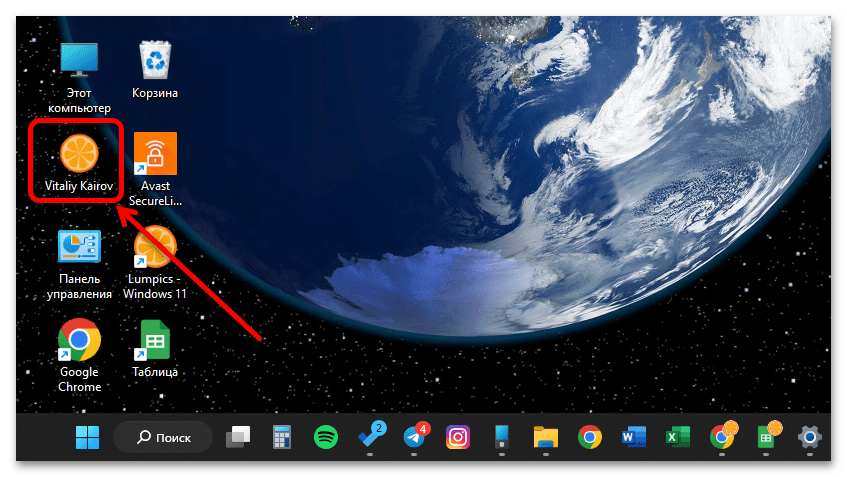
В результате выполнения вышеуказанных действий иконка системного приложения будет изменена.
Читайте также: Параметры значков рабочего стола в Windows 11
Если потребуется вернуть ярлыку прежнюю иконку, повторите действия из пунктов №1-4 инструкции выше, после чего выделите нужный объект в окне параметров и нажмите на кнопку «Обычный значок». Это же потребуется проделать перед тем, как поменять картинку на любую другую.
Обратите внимание! Системная библиотека, в которой хранятся стандартные для операционной системы Виндовс 11 иконки, находится по следующему пути:
C:\Windows\System32\imageres.dll

Читайте также: Как сделать невидимую папку в Windows 11
Вариант 2: Сторонние приложения
Изменение значков программного обеспечения от сторонних разработчиков осуществляется по несколько иному, при этом не менее простому алгоритму, чем рассмотренный выше. По умолчанию для такого ПО недоступны изображения из стандартной для Виндовс 11 библиотеки, зато нередко имеется возможность выбора персонализированных иконок.
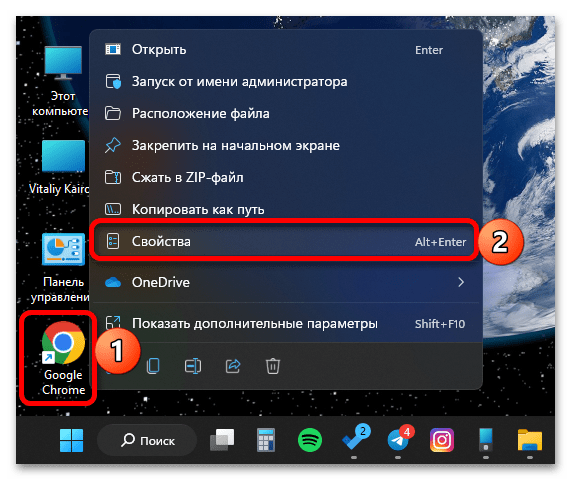
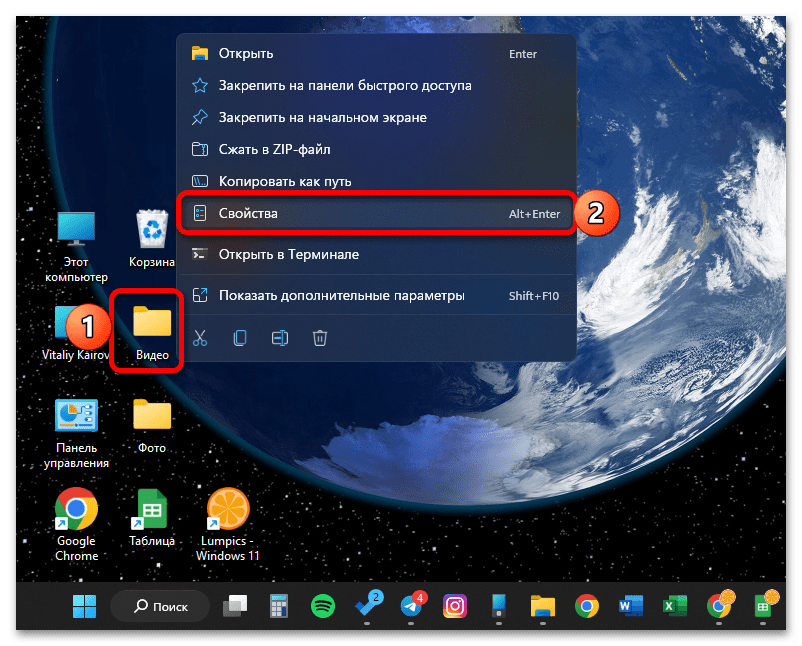
- Перейдите на рабочий стол и кликните ПКМ по ярлыку того приложения, значок которого хотите изменить. В контекстном меню выберите пункт «Свойства».

Читайте также: Как свернуть все окна в Windows 11
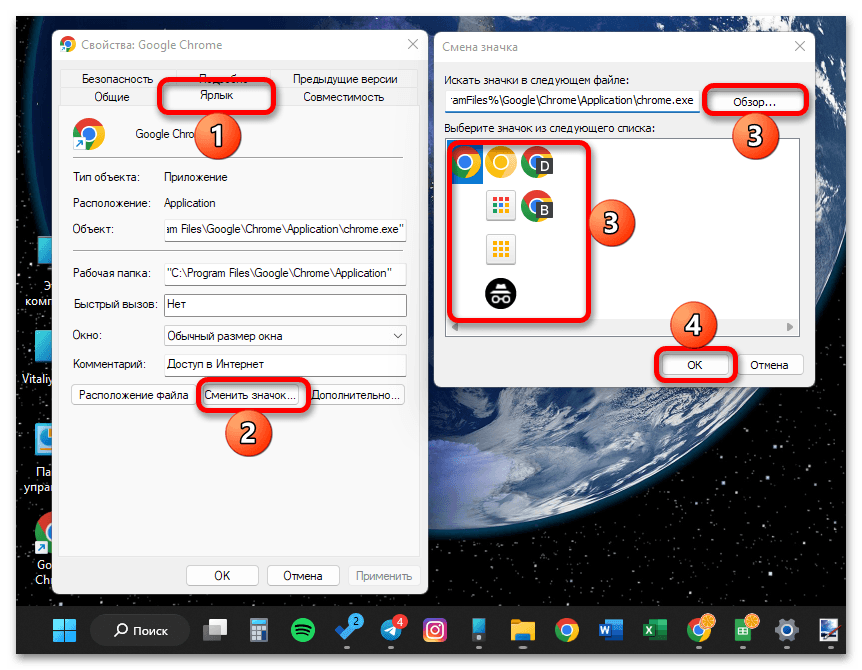
- Нажмите на кнопку «Сменить значок», которая находится во вкладке «Ярлык», после чего выполните уже знакомые по предыдущей инструкции действия – выберите одну из доступных иконок (если таковые имеются) либо добавьте собственный файл в формате ICO, воспользовавшись кнопкой «Обзор» и перейдя к его расположению. Вы также можете использовать значки из стандартной для ОС библиотеки, которая находится по следующему пути:
C:\Windows\System32\imageres.dll
Для применения внесенных изменений кликните «ОК».
-
Аналогичная возможность доступна и для папок,

с той лишь разницей, что в их «Свойствах» кнопка «Сменить значок» находится во вкладке «Настройка».
Читайте также: Настройка значков рабочего стола в Виндовс 11
Вариант 3: Универсальное решение
Очевидно, что стандартный набор иконок удовлетворит не всех пользователей, еще меньше найдется среди них тех, кто будет самостоятельно создавать графические файлы в формате ICO, чтобы затем установить их в качестве основных для системных и сторонних приложений. Значительно более простым и, что более важно, универсальным решением озвученной в заголовке статьи задачи будет использование специализированного программного обеспечения от сторонних разработчиков, содержащего собственные наборы иконок, а также позволяющего устанавливать и применять созданные энтузиастами библиотеки. Более детально об использовании такого рода ПО рассказывается в отдельной инструкции на нашем сайте.
Подробнее: Как изменить иконки на компьютере с Windows
Наша группа в TelegramПолезные советы и помощь
В Windows 11 для различных элементов: значков «Этот компьютер» и «Корзина», папок, файлов, дисков и других элементов используются привычные и стандартные значки, слегка обновленные по сравнению с предыдущими версиями системы. При желании, эти значки (или иконки) можно поменять.
В этой пошаговой инструкции подробно о том, как изменить значки для различных элементов в Windows 11, а также кратко о том, где взять файлы для значков/иконок.
Изменение значков системных элементов рабочего стола: Этот компьютер, Корзина, Папка пользователя, Сеть
На рабочем столе Windows 11 могут размещаться системные значки, не являющиеся папками или ярлыками: самые часто используемые — Этот компьютер (Мой компьютер) и Корзина. Изменить иконки для них можно в параметрах значков рабочего стола.
Шаги будут следующими:
- Откройте параметры значков рабочего стола, для этого можно нажать правой кнопкой мыши по кнопке «Пуск», выбрать пункт «Выполнить» и ввести desk.cpl ,5 (пробел перед запятой обязателен) или перейти в Параметры — Персонализация — Темы — Параметры значков рабочего стола. Подробнее на тему: Как включить значок компьютера на рабочем столе Windows 11.
- Выберите нужный элемент, иконку которого вы хотите изменить и нажмите «Сменить значок».

- Выберите нужный значок из файлов ICO, библиотек DLL или файлов EXE. Подробнее о том, где раздобыть значки — в конце инструкции.
- Примените сделанные настройки.
Аналогичным образом вы можете поменять другие системные значки, например, установить свои иконки полной и пустой корзины.
Как изменить значки папки или ярлыка
Изменение значков папок и ярлыков Windows 11 выполняется почти одинаково, необходимые шаги:
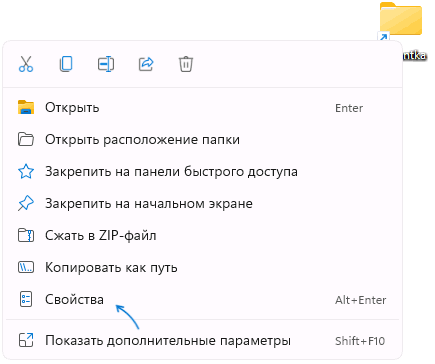
- Нажмите правой кнопкой мыши по папке или ярлыку и выберите пункт «Свойства» в контекстном меню.

- Если это папка, то перейдите на вкладку «Настройка» и нажмите кнопку «Сменить значок». Если это ярлык, то перейдите на вкладку «Ярлык» и нажмите кнопку «Сменить значок».

- Выберите нужный значок из файлов иконок (ICO) или содержащих значки библиотек DLL и файлов EXE, примените настройки.
В результате значок выбранного элемента будет изменён. Если этого не произошло, нажмите клавишу F5 на рабочем столе (если значок располагается на нём) или в нужной папке, чтобы обновить отображаемые значки. В контексте темы может пригодиться: Как убрать стрелки с ярлыков Windows 11.
Изменение значков дисков Windows 11
В отличие от выше рассмотренных элементов, изменение значков дисков выполняется не столь очевидными методами. Для выполнения этой задачи придётся использовать редактор реестра:
- Нажмите правой кнопкой мыши по кнопке «Пуск» и выберите пункт «Выполнить», введите regedit и нажмите Enter для открытия редактора реестра.
- Перейдите к разделу реестра
HKEY_LOCAL_MACHINE\SOFTWARE\Microsoft\Windows\CurrentVersion\Explorer\DriveIcons
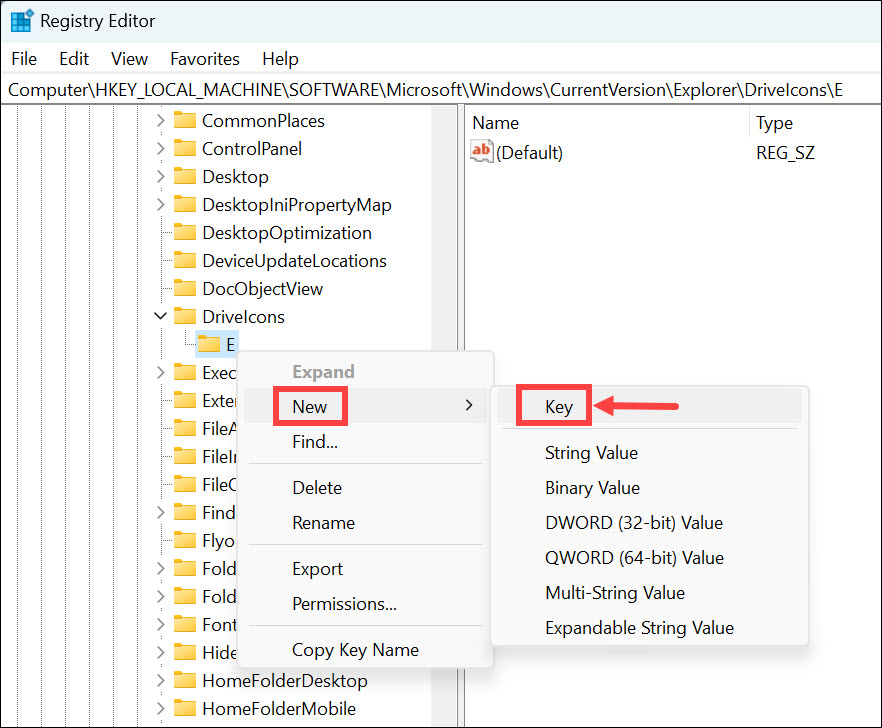
- Нажмите правой кнопкой мыши по разделу DriveIcons, выберите «Создать» — «Раздел» и создайте раздел с именем, соответствующим букве диска, например, C.
- Внутри созданного подраздела создайте ещё один с именем DefaultIcon.
- Выберите созданный подраздел и в правой панели редактора реестра дважды нажмите по значению «По умолчанию».

- В поле «Значение» укажите путь к файлу иконки (ICO) в кавычках, либо к индексу иконки в файле DLL без кавычек (пример: C:\Windows\system32\imageres.dll,-55).
- Примените сделанные настройки. Может потребоваться перезапуск проводника.

В результате, когда вы повторно откроете проводник, вы увидите изменённый значок диска. Есть и другие способы сделать это, более подробно в инструкции Как изменить значок (иконку) диска или флешки в Windows.
Изменение значков для типов файлов
При необходимости вы можете изменить значки для типов файлов. Ранее это была сравнительно простая задача, которая выполнялась почти так же, как смена значков для дисков в реестре: путем замены значения по умолчанию DefaultIcon для типа файла. Сегодня, когда для стандартных типов файлов многие иконки берутся из приложений Microsoft Store, выполнение задачи в реестре возможно, но трудоёмко.
Я рекомендую использовать бесплатную утилиту NirSoft FileTypesMan — в ней достаточно будет дважды нажать по нужному типу файла и задать нужный значок в пункте «Default Icon», как на изображении ниже.
Останется лишь применить настройки, чтобы значок всех файлов с указанным расширением изменился на выбранный.
Где взять значки для Windows
Значки для Windows 11 можно найти как в системе, так и скачать из Интернета или даже сделать самостоятельно.
- В папке C:\Windows\System32 есть несколько библиотек DLL с хорошими наборами системных значков: imageres.dll, shell32.dll, ddores.dll. Для определения индекса иконок в DLL можно использовать утилиту NirSoft IconsExtract.
- Файлы значков с расширением .ico можно найти в Интернете.
- Файлы PNG с прозрачным фоном можно найти в Интернете, а при необходимости — нарисовать самостоятельно, после чего использовать любой онлайн-конвертер PNG в ICO
- Есть программы для создания и редактирования иконок, причем в одном файле ICO могут быть значки с разными разрешениями. Можно обойтись и без программ, а с помощью онлайн-сервисов, например, xiconeditor.com
Если у вас остаются вопросы, касающиеся изменения значков различных элементов в Windows 11 — задавайте их в комментариях, не исключено, что решение найдётся.
When it comes to personalizing your Windows experience, changing icons can make a significant difference. Whether you’re tired of the default icons or simply want to add a personal touch to your desktop, Windows 11 provides a straightforward way to change icons. With a few simple steps, you can transform the look and feel of your computer, making it uniquely yours.
To change icons on Windows 11, you can start by selecting the folder or file whose icon you want to change. Right-click on it and choose «Properties» from the context menu. In the Properties window, navigate to the «Customize» tab where you will find an option to «Change Icon.» Click on it to browse through the available icon options or select a custom icon from your computer. Once you’ve chosen the desired icon, click «OK» and then «Apply» to see the changes take effect. Now you can enjoy a personalized look and feel to your Windows 11 desktop.
To change icons on Windows 11, follow these simple steps:
- Right-click on the icon you want to change and select «Properties.»
- In the «Shortcut» tab, click on «Change Icon.»
- Browse and select the desired icon from your computer or choose from the default icon options.
- Click «OK» to confirm the new icon selection.
- Finally, click «Apply» and then «OK» to save the changes.
With these steps, you can easily customize icons on Windows 11 to personalize your desktop and give it a new look.
Customize Your Windows 11 Experience with Custom Icons
Windows 11 offers a sleek and modern interface, but sometimes you might want to add a personal touch to your desktop. Changing icons on Windows 11 allows you to customize the look and feel of your desktop by replacing default icons with ones that suit your style and preferences. Whether you want to create a cohesive theme, give your desktop a fresh look, or simply personalize your computer, this guide will walk you through the steps of changing icons on Windows 11.
Method 1: Changing Icons for Individual Apps and Folders
If you want to change the icon of a specific app or folder, Windows 11 provides an easy way to do so. Follow these steps:
- Right-click on the app or folder whose icon you want to change and select «Properties» from the dropdown menu.
- In the Properties window, click on the «Shortcut» tab.
- Click on the «Change Icon» button. If this option is grayed out, it means that the app or folder does not have a custom icon available. You can proceed to the next method to change icons system-wide.
- In the «Change Icon» window, you can either select an icon from the provided list or click «Browse» to choose a custom icon from your computer.
Once you have selected a new icon, click «OK» to save the changes. The icon for the app or folder will update immediately. Keep in mind that these changes are only applied to the specific app or folder you selected.
Finding Custom Icons
If you want to use a custom icon that is not included in the predefined list, there are numerous websites that offer free icon packs. Some popular websites for finding custom icons include:
- Flaticon
- IconArchive
- Iconfinder
These websites offer a wide range of icons in various styles and formats. Once you have downloaded the desired icon pack, you can extract the individual icons and use them to customize your apps and folders.
Creating Your Own Icons
If you’re feeling creative, you can also create your own icons. There are several software tools available that allow you to design and create custom icons, such as Adobe Illustrator, Photoshop, or online tools like Canva. Once you have created your custom icon, save it as an image file (.ico) and follow the steps mentioned above to change the icon for the desired app or folder.
Restoring Default Icons
If you want to revert to the default icon for an app or folder, follow these steps:
- Right-click on the app or folder and select «Properties.»
- In the Properties window, click on the «Shortcut» tab.
- Click on the «Change Icon» button.
- In the «Change Icon» window, click «Restore Defaults.»
- Click «OK» to save the changes.
The original icon for the app or folder will be restored.
Method 2: Changing Icons System-Wide
If you want to change the icons for all apps and folders, Windows 11 provides a system-wide option. Follow these steps:
- Right-click on the desktop and select «Personalize» from the dropdown menu.
- In the Personalization settings window, click on the «Themes» tab in the left sidebar.
- Scroll down and click on the «Desktop icon settings» link.
- In the Desktop Icon Settings window, you can select the icons you want to change (such as This PC, Recycle Bin, etc.) and click on the «Change Icon» button.
- Choose an icon from the provided list or click «Browse» to select a custom icon.
After selecting the desired icons, click «OK» to save the changes. The icons for all apps and folders will update with the new ones you selected. Keep in mind that this change applies system-wide and affects all users on the computer.
Changing File Type Icons
If you want to change the icons associated with specific file types, follow these steps:
- In the «Desktop Icon Settings» window, click on the «Change Icon» button under the «Folder icons» section.
- In the «Change Icon» window, you can select an icon from the provided list or click «Browse» to choose a custom icon.
- Click «OK» to save the changes.
Now, the file type icons will be updated with the new ones you selected.
Method 3: Using Third-Party Icon Software
If you prefer a more advanced approach with additional customization options, you can use third-party icon software. These software tools offer a wide range of features to change icons, create icon libraries, and apply icons system-wide. Some popular third-party icon software includes:
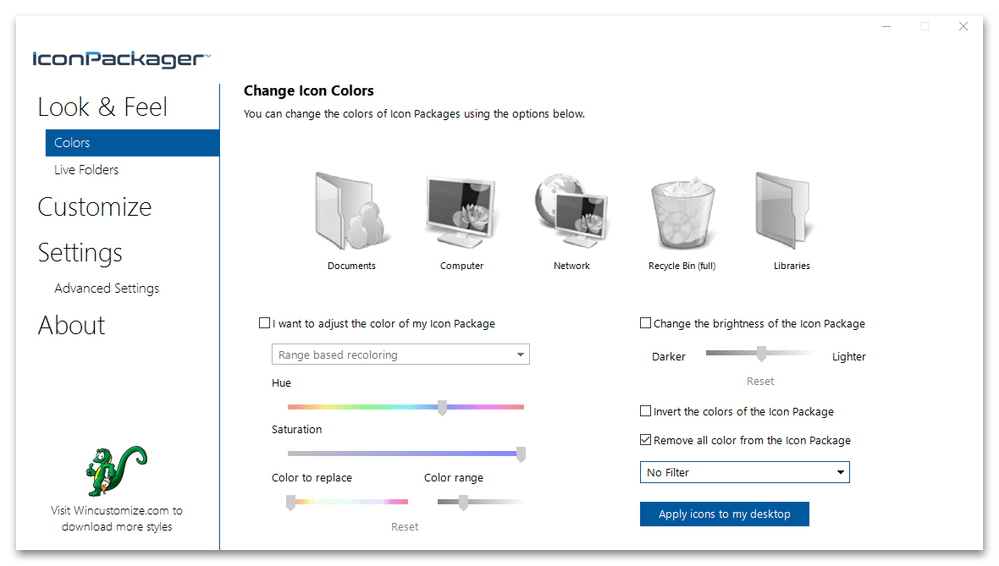
- IconPackager
- Axialis IconWorkshop
- IrfanView (for converting images to icons)
These software tools provide advanced options for managing and customizing icons, allowing you to create unique icon sets and apply them system-wide. Before using third-party software, make sure to download and install them from reputable sources.
Method 4: Using Registry Editor (Advanced Users)
The Registry Editor is a powerful tool that allows advanced customization of Windows settings. Changing icons through the Registry Editor should only be attempted by experienced users who are comfortable making changes to the system registry. Follow these steps:
- Press
Win + Rto open the Run dialog box. - Type
regeditand press Enter to open the Registry Editor. - Navigate to the following key:
HKEY_LOCAL_MACHINE\SOFTWARE\Microsoft\Windows\CurrentVersion\Explorer\Shell Icons - On the right side of the Registry Editor, you will find various values representing different system icons. To change an icon, double-click on the respective value and enter the path of the icon file. If the value does not exist, you can create a new string value by right-clicking and selecting «New» > «String Value.»
- Once you have entered the path of the new icon, click «OK» to save the changes.
- Restart your computer for the changes to take effect.
It is essential to exercise caution when using the Registry Editor, as making incorrect changes can lead to system instability or other issues. It is recommended to create a backup of your registry before making any modifications.
Changing icons on Windows 11 allows you to personalize your desktop and create a unique visual experience. Whether you want to change icons for individual apps and folders, customize icons system-wide, or utilize third-party software, Windows 11 offers various methods to make your desktop truly yours.
Changing Icons on Windows 11
Windows 11 offers various customization options, including the ability to change icons. Personalizing your desktop icons can enhance the overall look and feel of your computer. Here are two methods to change icons on Windows 11:
Method 1: Changing Individual Icons
1. Right-click on the desktop icon you wish to change.
2. Select «Properties» from the context menu.
3. In the properties window, click on the «Change Icon…» button.
4. Browse and choose a new icon from the available options or browse for a custom icon file on your computer.
5. Click «OK» and then «Apply» to save the changes.
Method 2: Using Third-Party Software
If you want to change multiple icons or have more customization options, you can use third-party software like IconPackager or Rainmeter. These tools provide a wide range of icon packs and customization options for your Windows 11 system.
Key Takeaways — How to Change Icon on Windows 11
- Changing icons on Windows 11 allows you to personalize your desktop.
- You can change icons individually or in bulk by selecting multiple items.
- To change an individual icon, right-click on the item, go to «Properties,» and click on «Change Icon.»
- You can choose from a variety of built-in icons or browse for custom icons.
- To change icons in bulk, select multiple items, right-click, go to «Properties,» click on «Customize,» and then click on «Change Icon.»
Frequently Asked Questions
In this section, we will answer some commonly asked questions about changing icons on Windows 11.
1. How can I change the icon of a file or folder on Windows 11?
To change the icon of a file or folder on Windows 11, follow these steps:
Step 1: Right-click on the file or folder you want to change the icon for.
Step 2: Select «Properties» from the context menu.
Step 3: In the Properties window, go to the «Customize» tab.
Step 4: Click on the «Change Icon» button.
Step 5: Choose the desired icon from the list or click «Browse» to select a custom icon.
Step 6: Click «OK» to save the changes.
2. Can I change the icon of an application on Windows 11?
No, you cannot directly change the icon of an application on Windows 11. The icon of an application is determined by the software developer and is embedded in the application itself. However, you can create a shortcut to the application and change the icon of the shortcut using the steps mentioned in the previous question.
3. Is it possible to restore the default icon for a file or folder?
Yes, you can restore the default icon for a file or folder on Windows 11 by following these steps:
Step 1: Right-click on the file or folder whose icon you want to restore.
Step 2: Select «Properties» from the context menu.
Step 3: In the Properties window, go to the «Customize» tab.
Step 4: Click on the «Restore Default» button.
Step 5: Click «OK» to save the changes.
4. Can I customize the icons of system files on Windows 11?
No, you cannot directly customize the icons of system files on Windows 11. System files have predefined icons that are protected by the operating system. Modifying system files can potentially cause instability or other issues with your computer.
5. Are there any third-party software available for changing icons on Windows 11?
Yes, there are several third-party software available that allow you to change icons on Windows 11. These software provide additional customization options and a wider range of icon choices. However, it is important to download and install such software from trusted sources to ensure the security of your system.
We hope these answers have provided you with the information you were looking for. If you have any further questions, feel free to ask.
To change the icon on Windows 11, follow these simple steps. First, right-click on the icon you want to change and select «Properties» from the drop-down menu. Then, click on the «Change Icon» button and browse for the new icon file you want to use. Select the icon and click «OK» to apply the change. Finally, click «Apply» and «OK» to save the changes. Remember, you can also customize icons for shortcuts by following similar steps.
Changing icons on Windows 11 is a quick and easy way to personalize your desktop and give it a fresh look. Whether you want to change the icon for a specific file or a shortcut, the process is straightforward and can be done in just a few clicks. By following these steps, you can easily change icons on your Windows 11 PC and make it reflect your unique style and preferences.
Windows 11 offers a fresh and visually appealing interface, but you might still want to customize it further by changing the default icons. Whether you want to personalize your folders, desktop icons, app shortcut icons, or even drive icons, this guide will walk you through the step-by-step process.
By the end of this article, you’ll be able to give your Windows 11 system a unique touch that reflects your personal style.
How to Download Custom Icons for Windows 11
Custom icons can add a touch of personality and flair to your Windows 11 system. Before you change icons in Windows 11, you’ll need to find and download the best custom icons you want to use.
Follow these steps to download custom icons:
1. Open your web browser and visit a trusted website that offers custom icon packs. There are several websites available, such as IconArchive, DeviantArt, and WinCustomize, where you can find a wide range of icon collections.
2. Use the search function on the website to look for icon packs compatible with Windows 11. Remember, Windows OS supports the “.ico” format only. You can also browse through different categories to find the perfect icons for your customization needs.
3. Once you find an icon pack you like, click on the download button or link provided. Make sure to save the file to a location on your computer where you can easily access it later.
4. Extract the downloaded icon pack if it’s in a compressed format like ZIP or RAR. Most icon packs are already in a ready-to-use format, so extraction may not be necessary.
Congratulations! You now have a collection of custom icons ready to be applied to various elements in Windows 11.
How to Change Folder Icons in Windows 11
Changing folder icons in Windows 11 allows you to visually distinguish between folders and give them a more appealing look.
Follow these steps to change the icons of your folders in Windows 11:
1. Right-click on the folder you want to customize and select Properties from the context menu.
2. In the “Properties” window, navigate to the Customize tab.
3. Click on the Change Icon button located at the bottom of the window, under the “Folder icons” heading.
4. A new window will appear, showing a list of available icons. Select one of the available icons you like.
5. To use a custom icon, click the Browse button and locate the icon file you downloaded earlier.
5. Select the desired icon and click OK to confirm your selection.
6. Back in the “Properties” window, click Apply, and then OK to save the changes.
How to Customize Desktop Icons in Windows 11
Customizing your default desktop icons (This PC, Recycle Bin, etc.) can help you create a more visually pleasing and organized workspace.
To change the icons of shortcuts and files on your desktop, follow these steps:
1. Press Windows + I to launch Windows 11 Settings.
2. Scroll down and under “Related settings,” click the Desktop icon settings.
3. Select the icon you want to modify and click the Change Icon button.
4. Choose the new icon from the defaults or browse for the downloaded one. Click OK.
How to Change App Shortcut Icon in Windows 11
If you want to give your app shortcuts a unique appearance, for example, changing the Discord app icon, you can change their icons in Windows 11. Follow these steps to customize the icons of your app shortcuts:
1. Right-click on the shortcut whose icon you want to change.
2. From the context menu, select Properties.
3. In the “Properties” window, navigate to the Shortcut tab.
4. Click on the Change Icon button.
5. Similar to the previous method, a window with a list of available icons will appear. Either select one of the default icons or click the Browse button and locate the custom icon file you downloaded.
6. Choose the desired icon and click OK.
7. Finally, click Apply and then OK to save the changes.
How to Customize Drive Icon in Windows 11
You can change the icons of your drives in Windows 11 to help you easily identify and differentiate between different storage devices.
To give your drives a unique icon in Windows 11, follow these steps:
1. Copy and paste the icon you want to set as the drive icon at a specific location.
2. Navigate to that location, select the intended icon, click the three dots at the top bar to see more options, and select Copy path. Keep it safe somewhere.
3. Now, press Windows + R to launch Run Comand Box.
4. Type regedit in the command box and hit enter to launch the Registry Editor window.
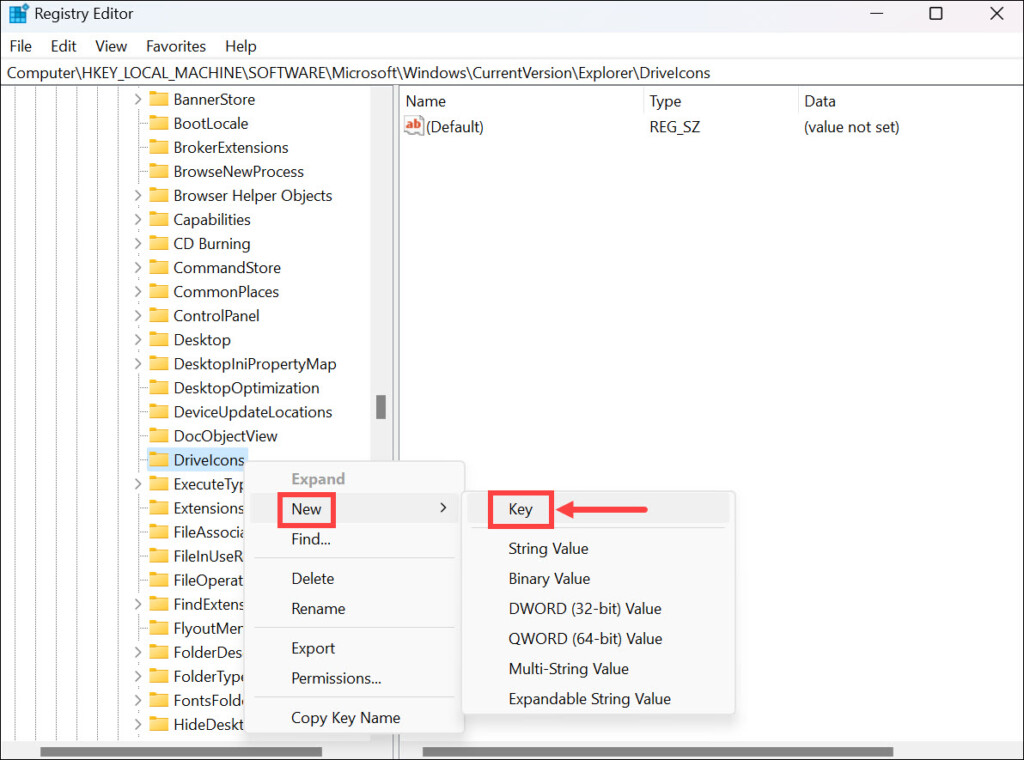
5. Navigate to the following path: HKEY_LOCAL_MACHINE\SOFTWARE\Microsoft\Windows\CurrentVersion\Explorer\DriveIcons
6. Right-click on the DriveIcons folder and select New->Key. Name the key to the drive letter you are changing the icon for. For example, if you are changing the icon of drive E, name the key E.
7. Now, right-click on the newly created key and select New->Key. Name this key DefaultIcon.
8. Under the DefaultIcon key, double-click the (Default) registry string to launch its properties window.
9. Under “Value data,” paste the path of the icon you copied and click OK.
10. Close the Registry Editor window.
11. Launch the File Explorer, and you will notice that the drive icon has changed.
FAQs
Can I revert back to the default icons in Windows 11?
Yes, you can revert to the default icons by following the same steps as changing icons, but instead of selecting a custom icon, choose the original icon associated with the element.
Are there any risks involved in changing icons in Windows 11?
Changing icons in Windows 11 is a safe and reversible process. It doesn’t affect the functionality or stability of your system.
Can I create my own custom icons for Windows 11?
Yes, you can create your own custom icons using image editing software like Adobe Photoshop or free online icon editors. Just make sure to save the icon files in a compatible format, such as ICO or PNG.
Summing Up
Customizing icons in Windows 11 allows you to infuse your personality into the operating system’s appearance. By following the steps outlined in this guide, you now possess the knowledge to download custom icons, change folder icons, modify desktop shortcuts and app icons, and even give your drives a fresh look. Embrace your creativity and make Windows 11 truly your own!
What to know
- Change icons from a file or a folder’s Properties > Customize tab > Change icon. You can also use custom or downloaded icons using the ‘Browse’ option.
- To change desktop icons, navigate to Settings > Personalization > Themes > Desktop icon settings.
- Various third-party apps, such as 7tsp, also let you customize and change icons.
Windows 11 brings along numerous UI changes that have been welcomed by users for the most part. However, you no longer get previews of the contents of a folder when viewing icons and some find the new quick access icons to be misaligned.
If you too are in the same boat and would like to change your icons then here’s all you need to know about it.
When changing your icons natively, some items allow you to change your icons, and then some items don’t allow you to change your icons.
Follow the different methods below to change icons on Windows 11.
Method 1: Changing icons for supported apps
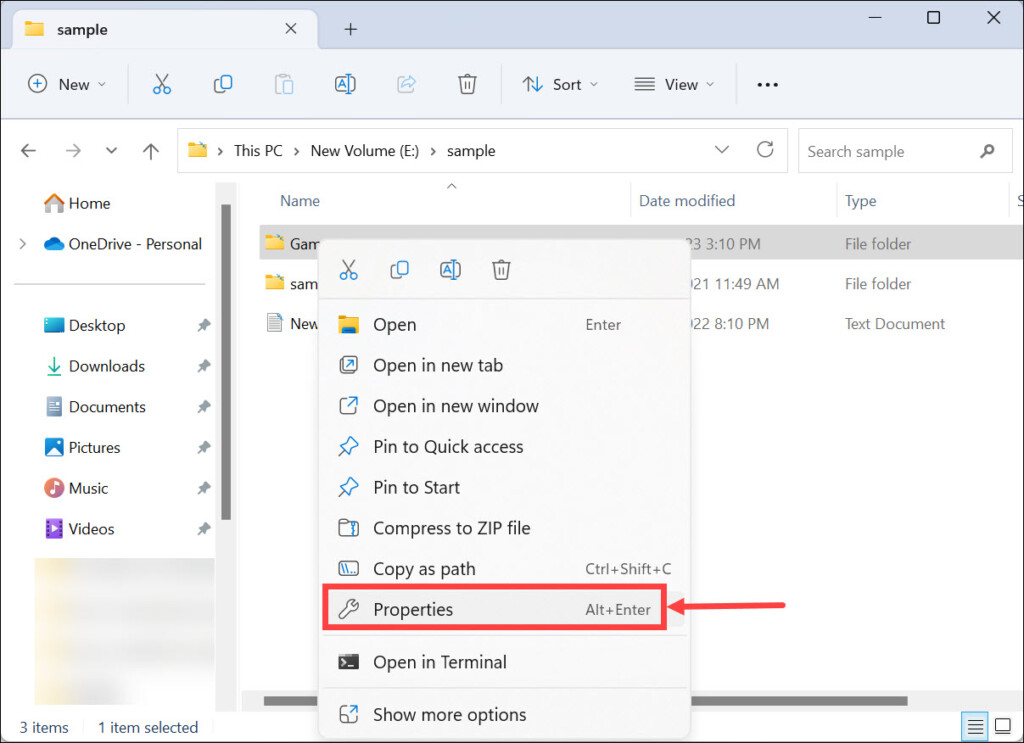
- Find the item whose icon you wish to change and right-click on the same. Select ‘Properties’ from the context menu. Alternatively, you can also select the item and hit
Alt + Enteron your keyboard.
- Switch to the ‘Customize’ tab.
- Now click on ‘Change icon…’.
- Select an icon from the selection on your screen. If you wish to use a custom icon, then you can click on ‘Browse…’ and select the same from your local storage.
Note: Windows File Explorer only supports .ico format for icon files for now.
- Click on ‘OK’ once you are done.
- Click on ‘OK’ again.
- And that’s it!

You will now have changed the icon for the selected item in File Explorer.
Note: You can only change the icon for such apps while they are in the File Explorer or added to your desktop. Pinning these items to your taskbar or Start menu will revert them to using their default icons.
Related: How to Create Start Menu Folders in Windows 11 and Rename Them
Method 2: Change system icons not supported natively
- Press
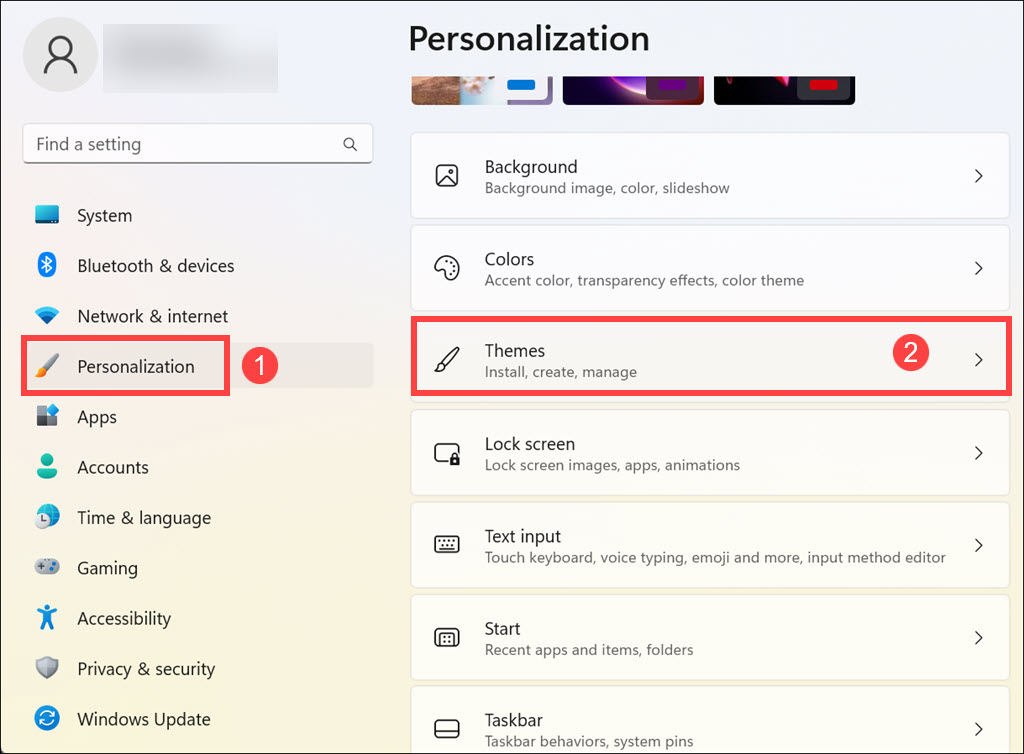
Windows + ion your keyboard and click on ‘Personalization’ on your left.
- Click on ‘Themes’.

- Scroll down and click on ‘Desktop icon settings’.

- Click and select the desired system icon from the list on your screen and click on ‘Change icon’.
Note: For system items unavailable in this panel, you can skip to the next section.
- Select an icon from the list on your screen. If you wish to use a custom icon then you can click on ‘Browse…’ and select the same from your local storage.
- Once selected, click on ‘OK’.
- Click on ‘OK’ and you will have now changed the selected system icons on your PC.

Related: How to Search in Windows 11 [4 Ways Explained]
Method 3: Change other icons not supported natively
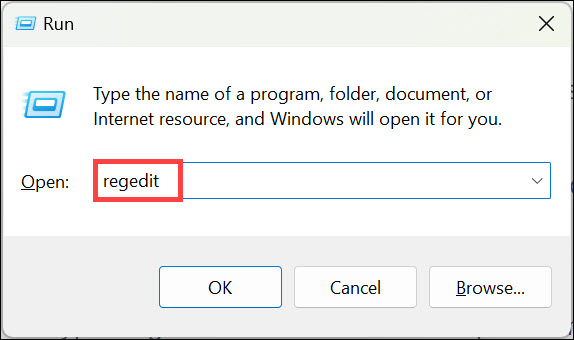
- Press
Windows + Ron your keyboard, type in the following, and pressEnteron your keyboard:shell:AppsFolder
- You will now have a list of most system icons as well as user-installed apps on your PC. Find the one you wish to change and right-click on the same.

- Select ‘Create shortcut’.

- You will now be notified that a shortcut cannot be created in the same, location. Click on ‘Yes’ to create the shortcut on your desktop instead.

- Close the folder and select the new icon on your desktop. Press
Alt+ Enteron your keyboard once selected.

- Now click on ‘Change Icon…’.
- Select the icon you wish to use from the list on your screen. You can click on ‘Browse…’ instead if you wish to use a custom icon.
- Now click on ‘OK’.
- Click on ‘OK’ again.
- The icon for the selected item should now have been changed.

Related: 6 Ways to Shutdown Windows 11 Without Updating [Works 100%]
Method 4: Using a third-party app called 7tsp
Third-party apps can help you change icons across your PC with a single click. Sadly most haven’t been updated in a while but 7tsp seems to work great on Windows 11. Follow the steps below to help you along with the process.
Warning: We highly recommend you backup sensitive data and close all running apps before following the guide below. Additionally, we highly recommend you create a system restore point on your PC in case anything goes wrong.
Note: You will need a DeviantArt account for this process. If you don’t already have one, you can use this link to sign up for one before proceeding with the steps below.
- 7tsp | Download Link
- Open the link above and click on the ‘Download icon’ to download 7tsp to your PC.

- Extract the archive to a convenient location and right-click on the file with the .ee extension.

- Rename the extension to ‘.exe’. You can select the icon from the context menu toolbar at the top.

- Once renamed launch the application and click on ‘Add a Custom Pack’.

- Now select the desired icon pack you wish to use. We will be using the icon pack from ‘Proma’ for this guide.

- Now click on ‘Start Patching’.

Note: While 7tsp does create a system restore point for you, it is known to not be available or readable in some cases. So make sure you create your own restore point beforehand.
- Let 7tsp create a restore point on your PC. This will help you revert to your original icons in case something goes wrong.
- Once your files are patched, you will be prompted to restart your system. We recommend you restart your system at the earliest.

- The icons in Windows 11 should now be changed as shown below.

Related: How to Stop Pop Ups on Windows 11
How to install updates after changing your icons
Updating Windows can be a bit finicky once you’ve changed your icons in File Explorer. Depending on your preferred method above, here’s how you can install updates after changing your icons in Windows 11.
Method 1: If you changed your icons natively
If you changed your icons natively then you do not need to worry about a thing.
Windows updates are always compatible with native icon changes. You can simply go ahead and update your Windows normally without facing any issues
Note: In some cases when receiving updates for Microsoft products or OEM apps that you have changed the icons for, the changes might be reset once the update is installed. In such cases, you will have to change the icons again for such items. This usually happens when the installation structure or the directories for a program get changed with an update.
Method 2: If you used a third-party app to change your icons
If you used a third-party app like 7tsp to change your icons in Windows 11 then it is highly recommended that you restore the default icon pack before applying a Windows update.
Windows stores its icons in .dll files instead of a .ico library. This forces 7tsp to patch these files to change icons across the File Explorer. However, these modified files can cause issues with future Windows updates that are yet to be configured. Thus when using such apps, it is highly recommended that you revert to default icons before updating Windows.
Once you have updated Windows, you can install the pack and patch your files again depending on the compatibility. Here’s how you can restore the default icon pack using 7tsp on your PC.
- Open 7tsp on your PC and the currently applied icon pack should already be listed on your left. Click on ‘Restore’ in the bottom right corner of your screen.

- Select ‘Restore modified system files to before 7tsp was used’.
- Now click on ‘Ok’.
- Click on ‘Yes’ to confirm your choice.
- Restart your PC once you are prompted.

- And that’s it! Changes should now be reverted on your PC.

You can now install a Windows update on your PC as usual. Once the update has been installed, then you can patch your files again to add your custom icon pack to Windows 11.
Related: Switch Out of S Mode Not Working? How to Fix
How to clear your icon cache and restart Windows Explorer
Clearing the icon cache can help you apply custom icons to icons that refuse to show the necessary change. Additionally, this can help solve graphical issues and glitches when used in conjunction with restarting Windows Explorer on Windows 11. Here’s how you can do both on your device.
1. Clear your icon cache
Here’s how you can clear your icon cache in Windows 11, follow the guide below to help you along with the process.
- Press
Windows + Ron your keyboard, type cmd and then pressCtrl + Shift + Enteron your keyboard.
- This will launch the command prompt as an administrator on your PC. Enter and execute the commands below one by one on your PC.
ie4uinit.exe -show
taskkill /IM explorer.exe /F
DEL /A /Q "%localappdata%\IconCache.db"
Your icons should be refreshed once restarted. And that’s how you can rebuild your icon cache in Windows 11.
2. Restart Windows File Explorer
Press Ctrl + Shift + Esc on your keyboard to open the task manager. Now find Windows Explorer in the list, select it, and click on ‘Restart task’ at the top.
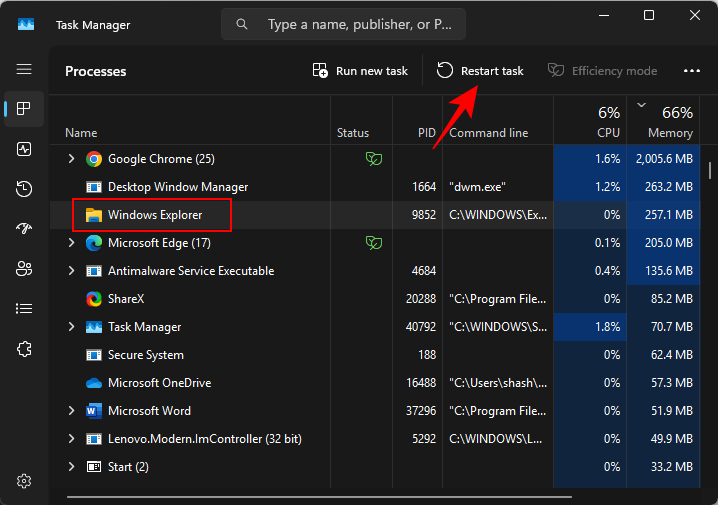
And that’s it! Windows File Explorer should now be automatically restarted on your PC.
Related: How to Check Windows 11 Version
Bonus: Change Folder icons on Windows 11
Here are our various guides to changing the folder icons on Windows 11 in different ways.
- Method 1: Change the icon of a regular folder
- Method 2: Change a Desktop icon
- Method 3: Change the icon of a Shortcut
- Method 4: Change drive or disk icon using Registry
- Method 5: Change the icon using a third-party app
FAQs
Changing icons can be quite intimidating at first. Thus here are a few commonly asked questions that should help you get up to speed. Let’s get started.
What happens if my icon cache is messed up?
If your icons seem to be messed up or you’re facing bugs that hinder your productivity, then you can easily revert your changes using the System Restore point that we had created earlier.
In case you used 7tsp, you can also use the same to restore your original icons. Once your original icons have been restored we recommend you try using another icon pack or the latest version of 7tsp to help fix this issue.
Is it safe to clear your icon cache?
Yes, it’s completely safe to clear your icon cache and rebuild the same. Windows will automatically rebuild the cache once it detects the old files no longer exists. This usually happens once your PC restarts itself.
Will changing icons impact performance?
Yes, changing icons will impact your performance but this will be negligible when changing your icons natively. However, if you used 7tsp then the performance impact can be noticeable depending on the icon pack you use.
If you face high CPU usage, we recommend you switch to an icon pack compatible with your OS version. In case you can’t find one, we recommend trying one that is at least compatible with Windows 10 1909 or higher.
We hope this post helped you easily change and customize icons on Windows 11. If you face any issues or have any more questions, feel free to reach out to us using the comments section below.
RELATED
- Windows 11 Update Not Showing? Reasons and Fixes Explained
- How to Remove the Evaluation Copy Watermark on Windows 11
- Where is ‘My Computer’ on Windows 11? How to Find ‘This PC’ Easily!
- How to Install and Use Git on Windows 11
- Microsoft Snipping Tool Download for Windows 11: How to Get It Working Back
- How to Check and Display CPU Temp on Windows 11
- If I Decline Windows 11 Upgrade, Can I Get It Later? [Explained]