
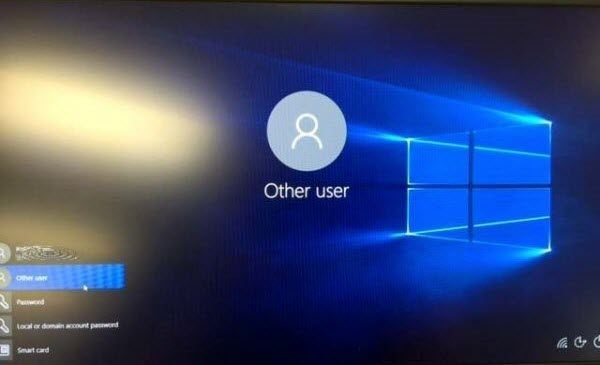
Все способы:
- Способ 1: «Свойства системы»
- Способ 2: Настройки учетной записи
- Способ 3: «Windows PowerShell»
- Вопросы и ответы: 0
Способ 1: «Свойства системы»
Наиболее простой способ выполнить подключение к домену в Windows 10 – это использовать классический метод, подразумевающий изменение некоторых параметров системы:
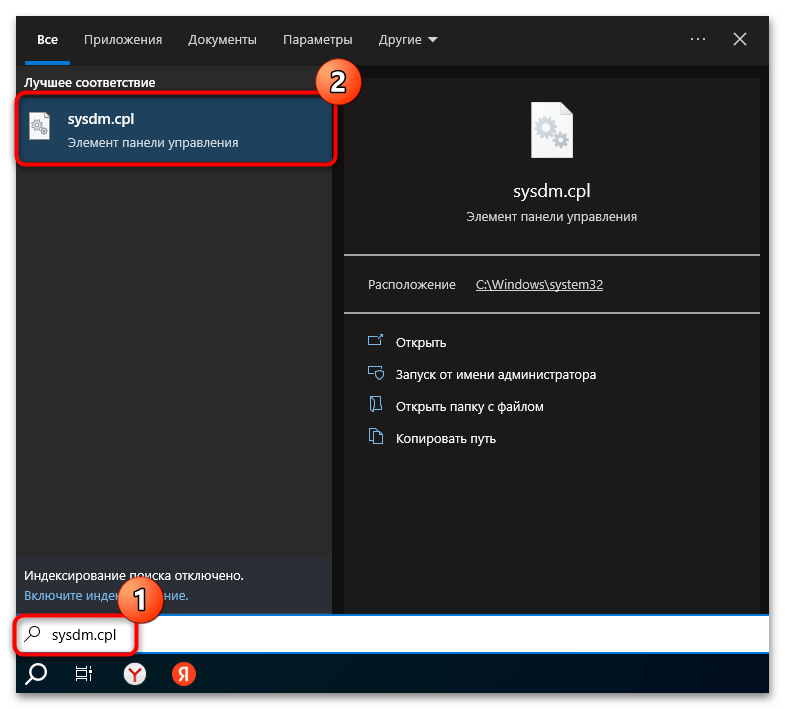
- С помощью строки системного поиска откройте окно «Свойства системы», введя запрос
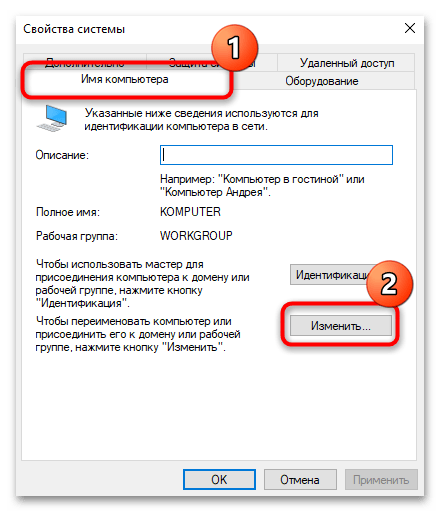
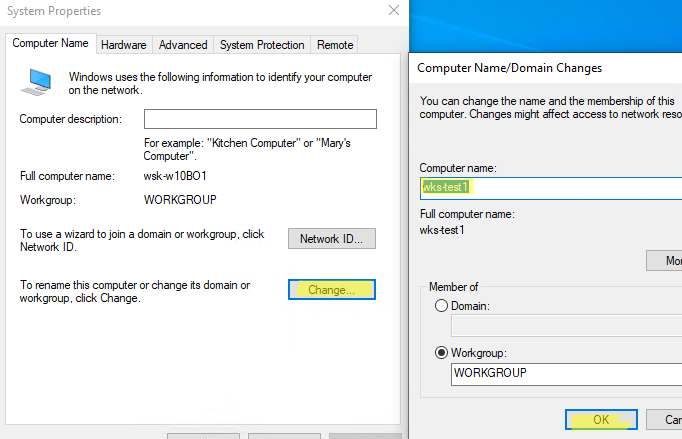
sysdm.cpl. - В открывшемся окне перейдите на вкладку «Имя компьютера» и воспользуйтесь опцией «Чтобы переименовать компьютер или присоединить его к домену или рабочей группе, нажмите кнопку «Изменить»».
- Далее отметьте пункт «домена» — текстовое поле для ввода домена станет активным. Пропишите нужное значение и кликните по кнопке «ОК». Если все сделано правильно, отобразится форма авторизации, где требуется указать логин и пароль учетной записи.
После успешного обращения к контроллеру домена и авторизации появится окно с соответствующим уведомлением. Останется перезагрузить компьютер, чтобы новые настройки вступили в силу.
Посмотреть, получилось ли присоединиться к домену, можно в разделе «Система» классической «Панели управления» («Система и безопасность» — «Система»).
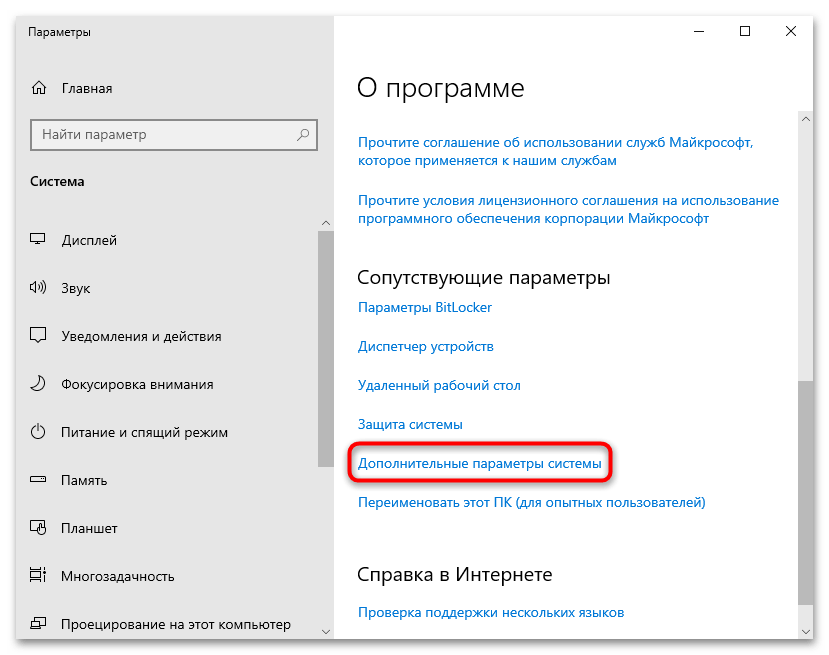
В окно «Свойства системы» можно попасть и другими способами, например вызвав «Параметры», нажав на плитку «Система» и через панель слева перейдя в «О системе». В центральной части окна пролистайте список функций до блока «Сопутствующие параметры» и кликните по строке «Дополнительные параметры системы».
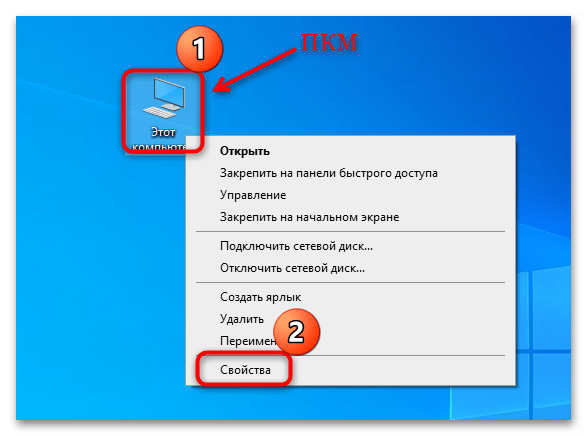
Во втором случае нужно кликнуть правой кнопкой мыши по иконке «Этот компьютер» на рабочем столе и из контекстного меню выбрать «Свойства».
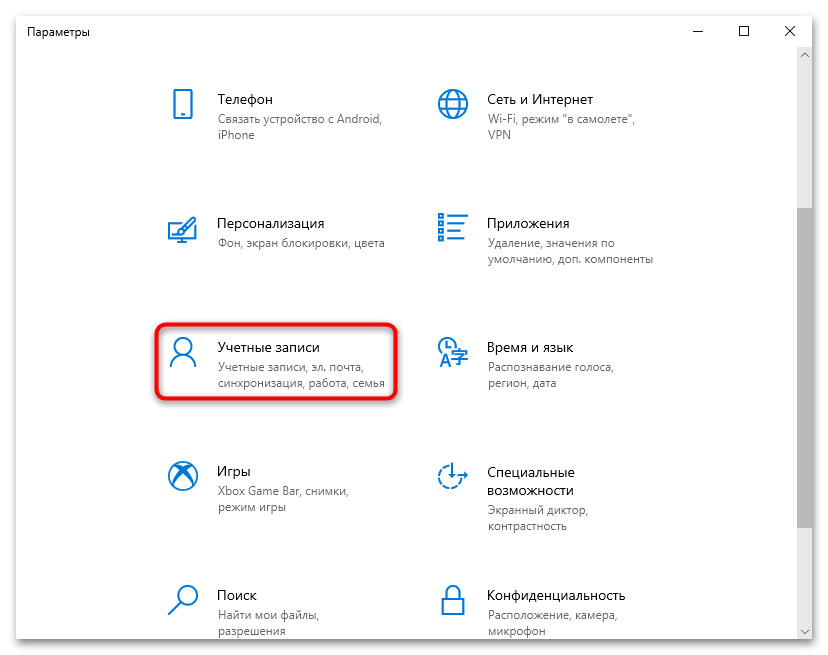
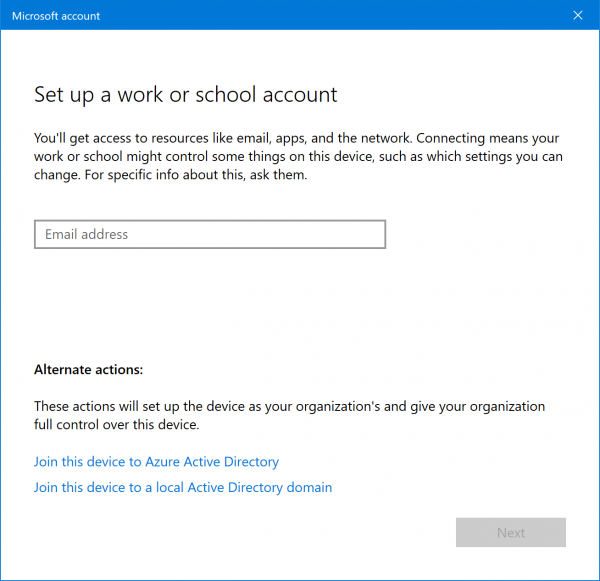
Способ 2: Настройки учетной записи
Подключиться к локальному домену можно и с помощью функций раздела с учетными записями Microsoft. В этих целях используется домен Active Directory — служба каталогов Microsoft для операционных систем семейства Windows Server, объединяющих различные сетевые объекты, например сервисы или принтеры. Это обеспечивает удобный поиск и использование данных в единой сети.
- Через штатные «Параметры» перейдите в раздел «Учетные записи».
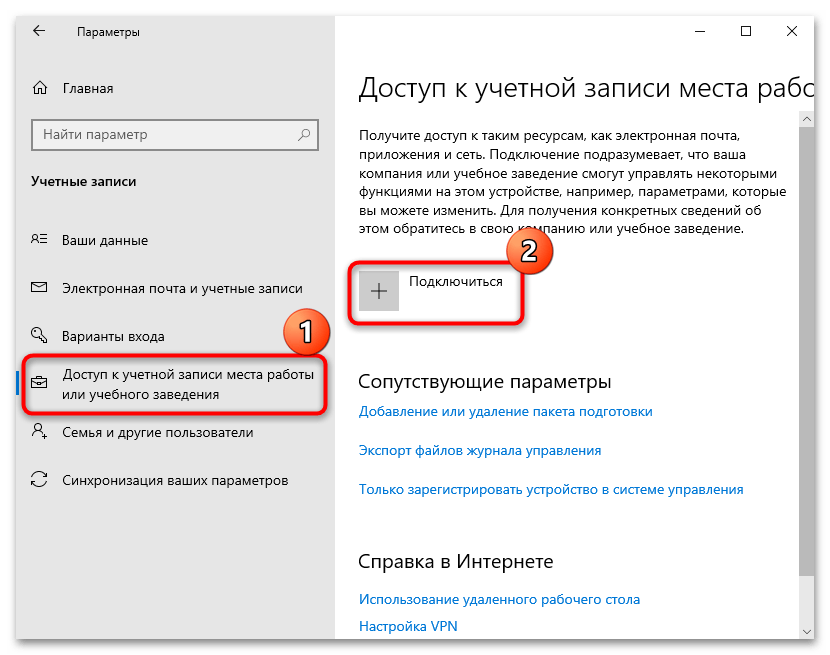
- На панели слева выберите вкладку «Доступ к учетной записи места работы или учебного заведения», а потом в центральной части окна кликните по пункту «Подключиться».
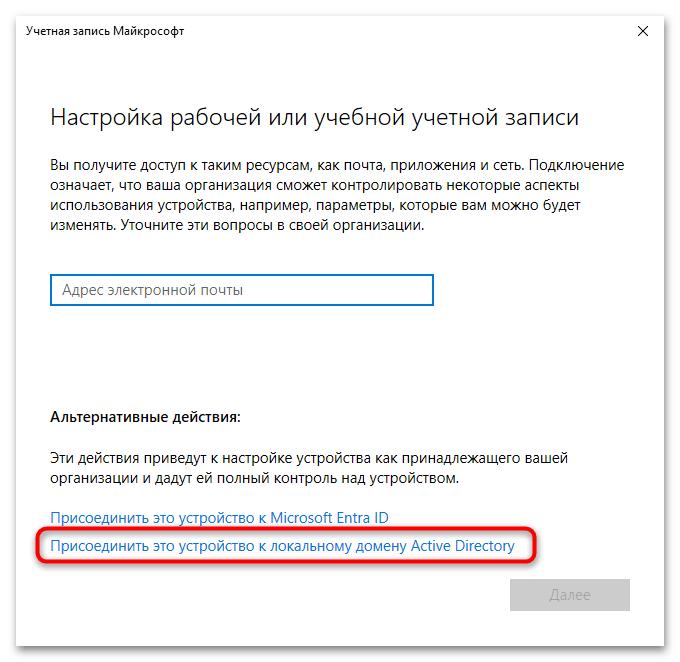
- В следующем окне нажмите на строку «Присоединить это устройство к локальному домену Active Directory».
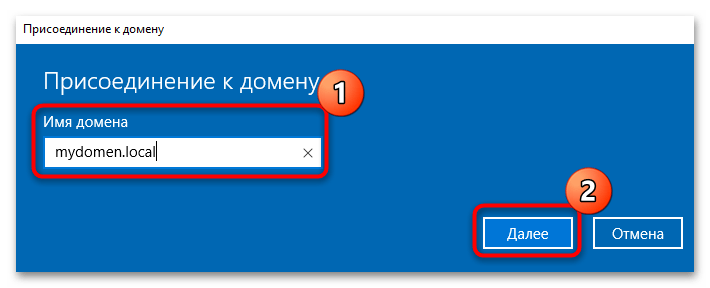
- На данном этапе нужно ввести имя домена, после чего нажать на кнопку «Далее» для продолжения. Для присоединения к рабочей станции останется ввести данные той учетной записи (логин и пароль), которую нужно подключить. Шаг, на котором нужно добавить учетную запись, можно пропустить – нажмите на соответствующую кнопку.
После выполнения всех шагов будет предложено перезагрузить компьютер – подтвердите это, после чего все настройки вступят в силу.
Способ 3: «Windows PowerShell»
Есть еще один метод подключения учетной записи Windows 10 к домену – это использование специальных консольных команд. Он один из самых быстрых при условии, что пользователь знает необходимый запрос:
- Запустите консоль «Windows PowerShell» с повышенными полномочиями – можете кликнуть правой кнопкой мыши по кнопке «Пуск» и выбрать пункт «Windows PowerShell (администратор)».
- Далее останется ввести следующую команду:
Add-Computer -DomainName имя_домена, где вместе «имя_домена» следует ввести свое значение. Нажмите клавишу «Enter», чтобы ее выполнить. В результате отобразится окно авторизации, где нужно ввести учетные данные от вашего профиля в системе.
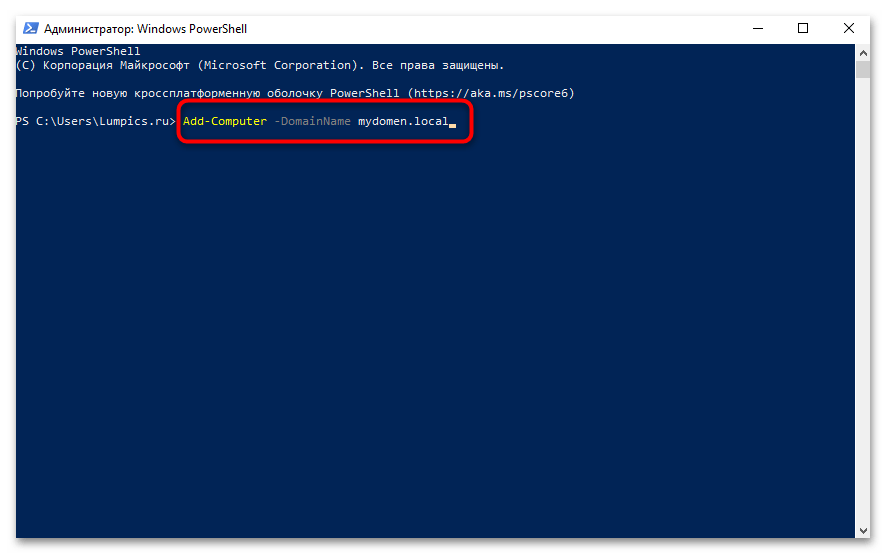
Если все сделано правильно, то в окне консоли появится сообщение о том, что для сохранения настроек в системе необходимо перезагрузить компьютер.
Наша группа в TelegramПолезные советы и помощь
Камрад! Вот тебе история о том, как за 3 минуты ввести компьютер на базе операционной системы Windows 10 в домен. Поехали!
Кстати, а если ты передумаешь, то у нас есть статья про вывод машины на базе Windows 10 из домена


Настройка
Первое, что необходимо сделать – открыть редактор «Свойств системы». Для этого, откройте меню Пуск и дайте команду:
sysdm.cpl

В открывшемся окне делаем, как показано на скриншоте:
- Нажимаем на кнопку Изменить;
- В открывшемся окне, переключаем селектор на «Является членом домена» и указываем ваш домен. Например,
mydomain.local; - Нажимаем OK;

Далее, инструмент попросит указать учетную запись, через которую мы будем подключаться к контроллеру домена. Укажите ее:

После ввода, нажмите ОК. Если все хорошо, то вы увидите следующее сообщение:

Отлично, теперь производим перезагрузку компьютера. После того, как система прогрузится, переходим в свойства компьютера. И наблюдаем прекрасную картину – появился домен:

Are you looking to change the domain on your Windows 10 device? You’re not alone. The process of changing domains can be a crucial step in ensuring your device is properly integrated into your organization’s network and security systems. Whether you’re migrating to a new domain or simply need to switch to a different one, understanding how to change domain on Windows 10 is essential for a smooth transition. Here’s a guide to help you navigate through the process.
Changing domains on Windows 10 involves a few key steps. First, you’ll need administrative access to your device and the necessary permissions to make changes. It’s important to backup your data before proceeding, just in case. Once you’re ready, you can access the System Properties window, where you’ll find the option to change the domain. After providing the required information, such as the new domain name and administrator credentials, the device will connect to the new domain and apply the necessary settings. This process ensures that your device is properly connected to the new domain, allowing you to access domain resources and services seamlessly.
To change the domain on Windows 10, follow these steps:
- Click on the Start Menu and choose «Settings».
- Select «Accounts» and then click on «Access work or school».
- Under the «Connect to a work or school» section, click on your current domain.
- Click on «Disconnect» to remove the current domain.
- Click on «Join this device to a local Active Directory domain» and follow the prompts to enter the new domain information.
By following these steps, you can easily change the domain on your Windows 10 system.

Understanding Domain and its Importance in Windows 10
In Windows 10, a domain refers to a network of computers that are managed and controlled by a centralized server. It allows administrators to manage user accounts, access permissions, and security policies across multiple computers. By joining a Windows 10 device to a domain, users can take advantage of centralized management, enhanced security features, and seamless access to shared resources. Changing the domain on Windows 10 may be necessary when organizations undergo rebranding, change their IT infrastructure, or go through mergers and acquisitions. In this article, we will explore the process of changing a domain on Windows 10, step by step.
Preparing for the Domain Change
Before proceeding with the domain change process, it is essential to take a few preparatory steps to ensure a smooth transition. Here are some tasks you should complete:
- Create a backup of all important files and data on the Windows 10 device. This ensures that no data is lost during the domain change process.
- Communicate with the system administrator or IT department to understand the domain change process and any specific requirements for your organization.
- Ensure that you have administrative privileges on the Windows 10 device to perform the necessary changes.
- Make a note of the current domain name, as well as the new domain name that you will be joining. This information will be required during the domain change process.
Understanding the Impact of Domain Change
Changing the domain on Windows 10 can have several implications for the user and the organization. Here are a few key areas to consider:
- User Accounts: User profiles and settings associated with the current domain may not transfer automatically to the new domain. Users may need to set up their profiles from scratch and migrate any necessary data between the domains.
- Shared Resources: Access permissions for shared drives, folders, and printers may require reconfiguration on the new domain.
- Group Policies: Group policies defined on the current domain may need to be recreated or modified on the new domain to ensure proper configuration and security settings.
- Applications and Services: Some applications and services may rely on the current domain for authentication and authorization. These configurations may need to be updated to work seamlessly with the new domain.
Changing Domain on Windows 10
Now that you have completed the necessary preparations, let’s dive into the step-by-step process of changing the domain on a Windows 10 device:
Step 1: Disconnect from the Current Domain
The first step in changing the domain is to disconnect the Windows 10 device from the current domain configuration. Here’s how to do it:
- Go to the «Control Panel» on your Windows 10 device.
- Click on «System and Security.»
- Select «System.»
- Under «Computer name, domain, and workgroup settings,» click on «Change settings.»
- In the «Computer Name» tab, click on «Change.»
- Click on «Workgroup» and enter a unique workgroup name.
- Click «OK» to save the changes and restart the computer when prompted.
Step 2: Connect to the New Domain
After disconnecting from the current domain, you can proceed with connecting the Windows 10 device to the new domain. Follow these steps:
- Go to the «Control Panel» on your Windows 10 device.
- Click on «System and Security.»
- Select «System.»
- Under «Computer name, domain, and workgroup settings,» click on «Change settings.»
- In the «Computer Name» tab, click on «Change.»
- Click on «Domain» and enter the name of the new domain.
- Click «OK» to save the changes.
- Enter the administrative credentials for the new domain when prompted, and click «OK.»
- Restart the computer to apply the changes and join the new domain.
Step 3: Configure User Accounts and Settings
Once the Windows 10 device is connected to the new domain, you will need to configure user accounts and settings. Here’s what you need to do:
- Log in to the computer using your domain credentials.
- If necessary, migrate user profiles and data from the previous domain to the new domain.
- Reconfigure access permissions for shared resources, such as drives, folders, and printers.
- Migrate any necessary group policies and configure new ones as needed.
Verifying the Domain Change
After completing the domain change process, it is important to verify that the Windows 10 device has successfully joined the new domain. Here are a few steps to follow:
Step 1: Check the Domain Information
Verify the new domain information on the Windows 10 device by following these steps:
- Go to the «Control Panel» on your Windows 10 device.
- Click on «System and Security.»
- Select «System.»
- Under «Computer name, domain, and workgroup settings,» you should see the name of the new domain instead of the previous domain.
Step 2: Test Network Connectivity
To ensure that the Windows 10 device is connected to the new domain and can access network resources, perform the following steps:
- Access shared drives, folders, and printers to verify that the necessary permissions and connections are in place.
- Check if network-based applications and services are functioning correctly with the new domain credentials.
Conclusion
Changing the domain on a Windows 10 device is a multi-step process that requires careful planning and execution. By following the steps outlined in this article, you can successfully transition your Windows 10 device from one domain to another. Remember to back up your data, communicate with the IT department, and verify the domain change to ensure a seamless experience on the new domain.

Changing the Domain on Windows 10
Changing the domain on Windows 10 is a straightforward process that allows you to connect your computer to a different network domain. Here’s how you can do it:
1. Open the Control Panel by searching for it in the Taskbar search box.
2. Go to «System and Security» and click on «System».
3. Click on «Advanced System Settings» on the left-hand side.
4. In the «System Properties» window, go to the «Computer Name» tab and click on «Change».
5. Select «Domain» and type in the name of the new domain you want to join. Click «OK» and enter the administrator credentials when prompted.
6. Restart your computer to apply the changes.
By following these steps, you can easily change the domain on your Windows 10 computer and connect it to a new network domain.
Key Takeaways: How to Change Domain on Windows 10
- Ensure your Windows 10 device is connected to the network.
- Open the «System» settings and click on «About.»
- Click on the «Join a domain» button and enter the domain name.
- Provide the necessary credentials to authenticate the domain change.
- Restart your computer to apply the domain change successfully.
Frequently Asked Questions
Here are some common questions about how to change domain on Windows 10:
1. Can I change the domain on Windows 10 without reinstalling the operating system?
Yes, you can change the domain on Windows 10 without reinstalling the operating system. You can do this by accessing the system settings and changing the domain affiliation within the network settings. It’s a straightforward process that doesn’t require reinstalling the entire operating system.
Keep in mind that you will need administrative privileges to make this change, and it’s recommended to back up your important files and data before proceeding.
2. What steps should I follow to change the domain on Windows 10?
To change the domain on Windows 10, follow these steps:
Step 1: Log in to Windows 10 with administrative privileges.
Step 2: Go to «Settings» by clicking on the Start menu and selecting the gear icon.
Step 3: In the Settings window, click on «Network & Internet».
Step 4: On the left sidebar, click on «Ethernet» or «Wi-Fi», depending on your network connection.
Step 5: Under «Related settings», click on «Change adapter options».
Step 6: Right-click on your network adapter and select «Properties».
Step 7: In the Properties window, select «Internet Protocol Version 4 (TCP/IPv4)» and click on «Properties».
Step 8: Under the «General» tab, select «Use the following DNS server addresses» and enter the DNS server details provided by the new domain.
Step 9: Click «OK» to save the changes.
These steps should help you change the domain on Windows 10 effectively.
3. Will changing the domain on Windows 10 affect my files and applications?
No, changing the domain on Windows 10 should not affect your files and applications. The domain change primarily affects network connectivity and domain-related settings. However, as a precautionary measure, it’s always recommended to back up your important files and ensure you have the necessary installation media or software licenses for your applications.
It’s also worth noting that some applications or services may need to be reconfigured to work with the new domain. It’s best to consult with your IT department or service provider for any specific application compatibility concerns.
4. Can I change the domain on Windows 10 if my computer is connected to a work network?
If your computer is connected to a work network, the ability to change the domain on Windows 10 may be restricted. Work networks often have specific domain settings and configurations managed by an IT department or network administrator.
In such cases, it’s advisable to reach out to your IT department or network administrator to request the domain change. They will have the necessary access rights and knowledge to perform the domain change without disrupting the network or compromising security.
5. What should I do if I encounter any issues while changing the domain on Windows 10?
If you encounter any issues while changing the domain on Windows 10, there are a few steps you can take:
1. Double-check the network settings: Make sure you have entered the correct DNS server addresses and that your network connection is stable.
2. Restart your computer: Sometimes, a simple restart can resolve temporary network issues or configuration conflicts.
3. Contact your IT department or network administrator:
Changing the domain on Windows 10 is a straightforward process that can be completed in just a few steps. By following the instructions provided in this article, you can successfully switch your computer’s domain and ensure a seamless transition. Remember to back up your important files and settings before making any changes to ensure that no data is lost in the process.
First, make sure you have administrative access to your Windows 10 computer. Then, navigate to the «System Properties» in the Control Panel and click on «Change…» next to the «To rename this computer or join a domain, click Change» option. Enter the new domain name, provide the necessary credentials, and follow the prompts to complete the domain change process. Finally, restart your computer to apply the new domain settings. Voila! You have successfully changed the domain on your Windows 10 computer.
В этой статье мы рассмотрим, как ввести компьютер с Windows 10/11 или Windows Server 2022/2019/2016 в домен Active Directory.
Содержание:
- Предварительные требования для присоединения Windows к домену
- Вводим компьютер Windows в домен через классический интерфейс System Properties
- Добавление Windows в домен через панель Settings
- Добавить Windows в домен с помощью PowerShell
- Предварительное создание учетной записи компьютера в домене
Предварительные требования для присоединения Windows к домену
Рассмотрим основные требования и подготовительные шаги, которые нужно выполнить на вашем компьютере для подключения его к домену Active Directory:
- В домен можно добавить только следующие редакции Windows 10/11: Pro, Education, Pro for Workstations и Enterprise. Редакции Home не поддерживают работу в домене Active Directory;
- Вы должны подключить ваш компьютер к локальной сети, из которой доступен хотя бы один контроллер домена AD. Предположим, что на вашем компьютере уже настроен IP адрес из локальной подсети, а в настройках DNS северов указаны IP адреса ближайших котроллеров домена (вы можете настроить параметры сетевого адаптера вручную или получить от DHCP сервера);
- Проверьте, что ваш компьютер может отрезолвить имя домена и с него доступны контроллеры домена:
ping contoso.com - Время на компьютере не должно сильно расходится со временем на контроллере домена (плюс-минус пять минут). Корректное время нужно для выполнения Kerberos аутентификации;
- Задайте имя вашего компьютера (hostname), под которым он будет добавлен в домен. По умолчанию Windows генерирует имя компьютера при установке, но лучше изменить его на что-то более осмысленное. Вы можете изменить имя компьютера
Через классическую панель
sysdm.cpl
. Нажмите кнопку Change, укажите новое имя компьютера и нажмите OK (как вы видите, сейчас компьютера находится в рабочей группе Workgroup);
Также Можно изменить имя компьютера с помощью PowerShell команды:
Rename-Computer -NewName "wks-test1"

После смены
hostname
нужно перезагрузить Windows.
Вводим компьютер Windows в домен через классический интерфейс System Properties
Вы можете добавить ваш компьютер в домен из классической панели управления Windows.
- Выполните команду
sysdm.cpl
и нажмите кнопку Change; - В поле Member of переключите опцию на Domain и укажите имя вашего домена;
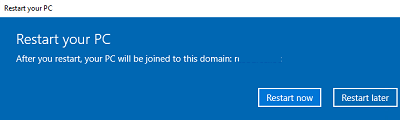
- Появится запрос имени и пароля пользователя, которому делегированы административные права на добавление компьютеров в домен. Это может быть обычный пользователь AD (по умолчанию любой пользователь домена может присоединить до 10 устройств) или учетная запись с правами Domain Admins;
- После этого должна появится надпись Welcome to the contoso.com domain;
- Перезагрузите компьютер.

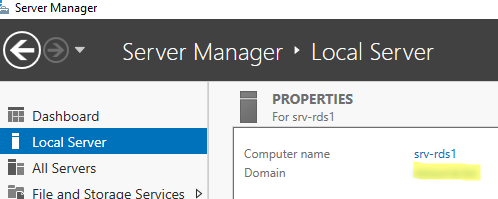
В Windows Server 2022/2019/2019 диалог System Properties для присоединения к домену AD можно открыть из Server Manager -> Local Server -> Domain.
После перезагрузки к компьютеру загрузить и применит доменные групповые политики, а вы может выполнить аутентификацию на компьютере с помощью учетной записи пользователя домена.
Добавление Windows в домен через панель Settings
В современных версиях Windows 10 и Windows 11 вы можете присоединить ваш компьютер в домен AD через панель Settings.
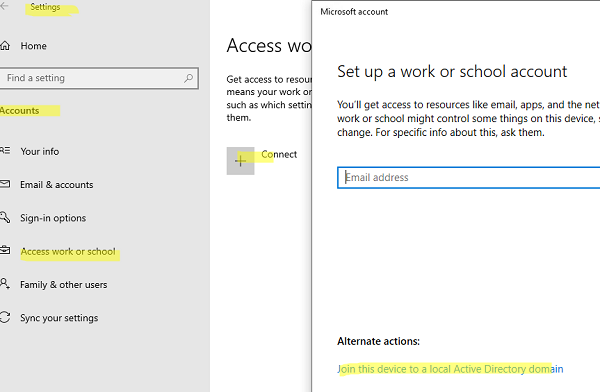
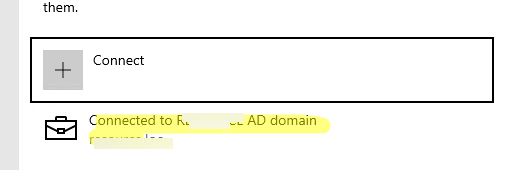
- Перейдите в раздел Settings -> Accounts -> Access work or school -> нажмите Connect (для быстрого перехода в этот раздел Setting можно использовать команду быстрого доступа: ms-settings:workplace);
- В открывшейся форме нажмите на ссылку Alternate actions: Join this device to a local Active Directory domain;
Если ваш компьютер уже добавлен в домен, здесь будет надпись Connected to CONTOSO AD domain.
- Укажите имя домена в форме Join a domain;
- Затем укажите имя доменного пользователя и пароль.
- Пропустите следующий шаг с добавлением пользователя в администраторы (вы можете добавить пользователя в локальные админы с помощью GPO);
- Осталось перезагрузить компьютер, чтобы завершить добавление в домен.
Добавить Windows в домен с помощью PowerShell
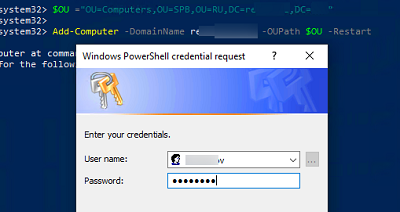
Для присоединения компьютеров к домену Active Directory можно использовать команду Powershell Add-Computer. Командлет позволяет ввести компьютер в домен с новым именем, а также позволяет сразу поместить учетную запись компьютера в определенный OU.
В самом простом случае для добавления в домен достаточно выполнить команду:
Add-Computer -DomainName contoso.com
Появится окно, в котором нужно указать свою учетную запись и пароль.
Вы можете сразу поместить ваш компьютер в нужную OU. Для этого имя OU в формате DN (distinguishedName) нужно указать в параметре OUPath:
$OU ="OU=Computers,OU=SPB,OU=RU,DC=contosoc,DC=loc"
Add-Computer -DomainName contoso.loc -OUPath $OU -Restart
Ключ -Restart означает, что вы хотите перезагрузить Windows сразу после завершения команды добавления в домен.
После перезагрузки вы можете проверить, что ваш компьютер теперь является членом домена Windows с помощью команды:
Get-WmiObject Win32_NTDomain
Команда вернули имя домена, сайта AD, IP адрес и имя контроллера домена, через который выполнен вход (Logon server)
Также можно получить имя вашего домена с помощью команды:
systeminfo | findstr /B "Domain"

Вы можете добавить удаленный компьютер в домен. Для этого нужно указать имя компьютера в параметре -ComputerName:
Add-Computer -ComputerName wks-pc22 -DomainName contoso.com -Credential contoso\Administrator -LocalCredential wks-pc22\Admin -Restart –Force
В новых версиях PowerShell Core 6.x и 7.x команда Add-Computer отсутствует в модуле Microsoft.PowerShell.Management.
Add-Computer: The term 'Add-Computer' is not recognized as a name of a cmdlet, function, script file, or executable program.
Check the spelling of the name, or if a path was included, verify that the path is correct and try again.
Suggestion [4,General]: The most similar commands are: Add-Computer, Stop-Computer, Get-ADComputer, New-ADComputer, Set-ADComputer, Add-Content, Rename-Computer, Add-Member.
Поэтому для добавления компьютера в домен, нужно запускать
powershell.exe
, а не pwsh.exe.
Также для добавления Windows в домен можно использовать утилиту netdom, но она требует установки пакета администрирования RSAT на клиентский компьютер и сейчас используется очень редко:
netdom join %computername% /domain:contoso.com /UserD:contoso\admin /PasswordD:pasS1234
Если вам нужно вывести компьютер из домена и вернуть его в рабочую группу, выполните команду PowerShell:
Remove-Computer
After you leave the domain, you will need to know the password of the local Administrator account to log onto this computer. Do you wish to continue?
[Y] Yes [N] No [S] Suspend [?] Help (default is "Y"): y

Предварительное создание учетной записи компьютера в домене
При добавлении в домен новые компьютеры по умолчанию помещаются в стандартный контейнер (Organizational Unit / OU) с именем Computers в корне домена. Вы можете вручную перенести учетную запись компьютера в новую OU с помощью пункта меню Move или простым перетягиванием (drag and drop).
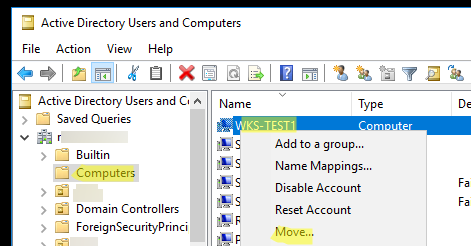
Администратор может предварительно создать учетную запись компьютера в Active Directory с помощью графической консоли Active Directory Users and Computers dsa.msc (New -> Computer) или с помощью командлета New-ADComputer из модуля ActiveDirectory PowerShell:
New-ADComputer -Name "wks-msk022" -SamAccountName "wks-msk022" -Path "OU=Computers,OU=MSK,OU=RU,DC=contoso,DC=loc"
Если вы создаёте учетную запись компьютера вручную, ее имя должно совпадать с именем компьютера (hostname), который вы добавляете в домен AD.
Сначала рекомендуем воспользоваться поиском в AD для поиска компьютеров с таким же именем. Если это имя уже занято, и вы хотите его использовать для другого компьютера, можно его сбросить. Щёлкните правой клавишей по компьютеру в AD и выберите Reset Account.
Также можно сбросить учетную запись компьютера в AD с помощью команды:
Get-ADComputer -Identity "computername" | % {dsmod computer $_.distinguishedName -reset}
Это сбросит пароль компьютера в домене который используется для установки доверительных отношений с AD.
Download Windows Speedup Tool to fix errors and make PC run faster
Domain-based networks are common in companies and organization, where the process requires multiple computers to be controlled through a single node called a server. The server administrator can set certain policies and restrictions on every system joined to the domain. In case you need to join your system to a domain, you’ll need the following information:
- A user account name registered in the active directory associated with the server,
- The domain name,
- Windows Enterprise, Pro, or education version.
There are two aspects of this guide. They are:
- Join a Windows computer to a Domain.
- Remove a Windows computer from a Domain.
1] Join a Windows computer to a Domain
Connect your system to the network associated with the server (i.e your system and the server need to be on the same network).
Click on the Start button and then on the gear-like symbol to open the Settings App.
Navigate to the following path: Accounts > Access work or school.
Select Connect. A new dialog box will pop.
Select Join this device to a local Active Directory domain.
You will now be asked to enter the Domain name in a new pop-up.

Then you will be asked to enter the Username and Password for your domain account.
Select your Account type.
And when you proceed, just reboot your computer to have your domain account created.
2] Remove a Windows computer from a Domain
Open the Windows Settings App.
Navigate to the following path: Accounts > Access work and school.
Select the account that you wish to remove from the DOMAIN. Click on Disconnect.
You will get a prompt that says-
Are you sure you want to remove this account? This will remove your access to resources like email, apps, network, and all content associated with it. Your organization might also remove some data stored on this device.
Select Yes.
It will now give you a Disconnect from the organization prompt.
Select Disconnect.
When prompted, select Restart now to reboot your computer and complete the domain removing process.
I hope this guide helped you.
Ayush has been a Windows enthusiast since the day he got his first PC with Windows 98SE. He is an active Windows Insider since Day 1 and has been a Windows Insider MVP.