
Если вы хотите отключить отображение иконки Защитника Microsoft в системном трее панели задач Windows 11 или Windows 10, это достаточно просто.
Начиная с Windows 10, значок «Защитника Windows» по умолчанию отображался на панели задач в области в системном трее или в углу переполнения панели задач. Значок Защитника Windows показывает состояние защиты ПК, с его помощью, вы можете открыть интерфейс приложения «Безопасность Windows», с помощью которого, вы можете выполнить сканирование, проверить наличие и удалить обнаруженные угрозы.
Иконка отображаемая на панели задач Windows 11 находится по следующему пути:
C:\Windows\System32\SecurityHealthSystray.exe
Защитник хорошее дополнение для безопасности вашего устройства, но если вы отключили антивирусную программу «Защитник Windows», вы можете захотеть избавится от иконки приложения защитника в системном трее на панели задач. Вот как это сделать:
Отключить отображение иконки Защитника Windows на панели задач в Windows 11 \ 10
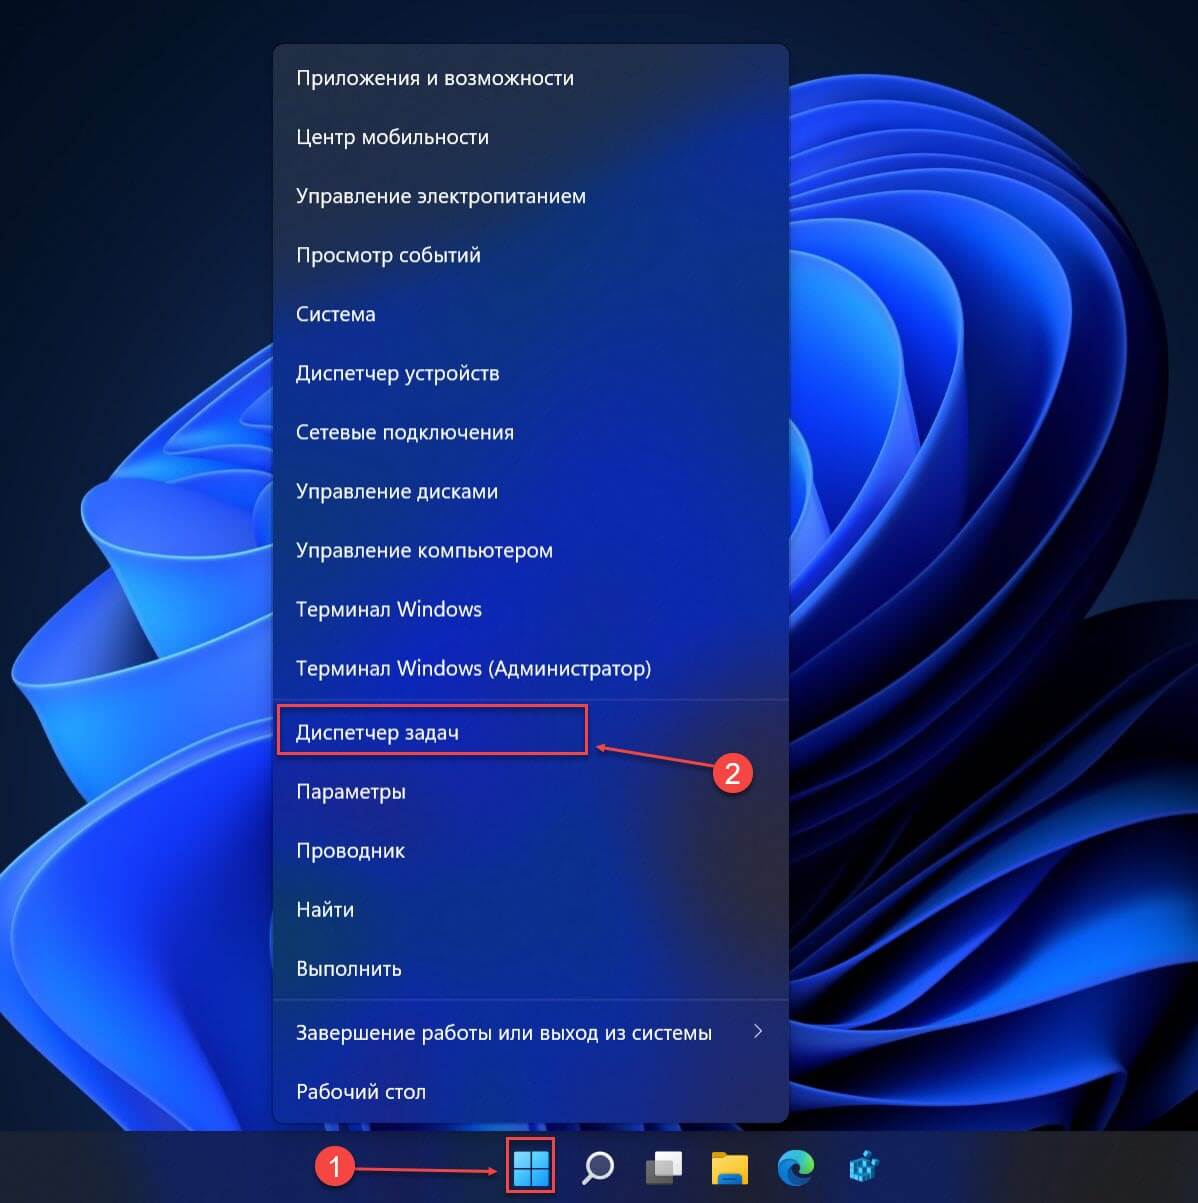
Шаг 1: С помощью меню Win X или любым удобным вам способом откройте «Диспетчер задач».
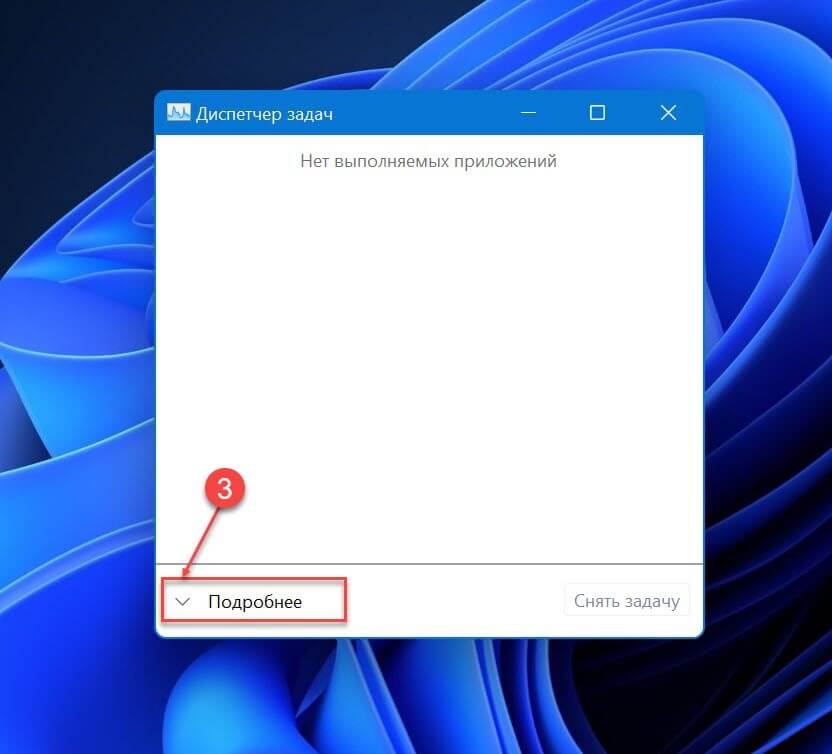
Шаг 2: В открывшемся окне, при необходимости нажмите кнопку «Подробнее».
Шаг 3: В «Диспетчер задач» перейдите на вкладку «Автозагрузка».
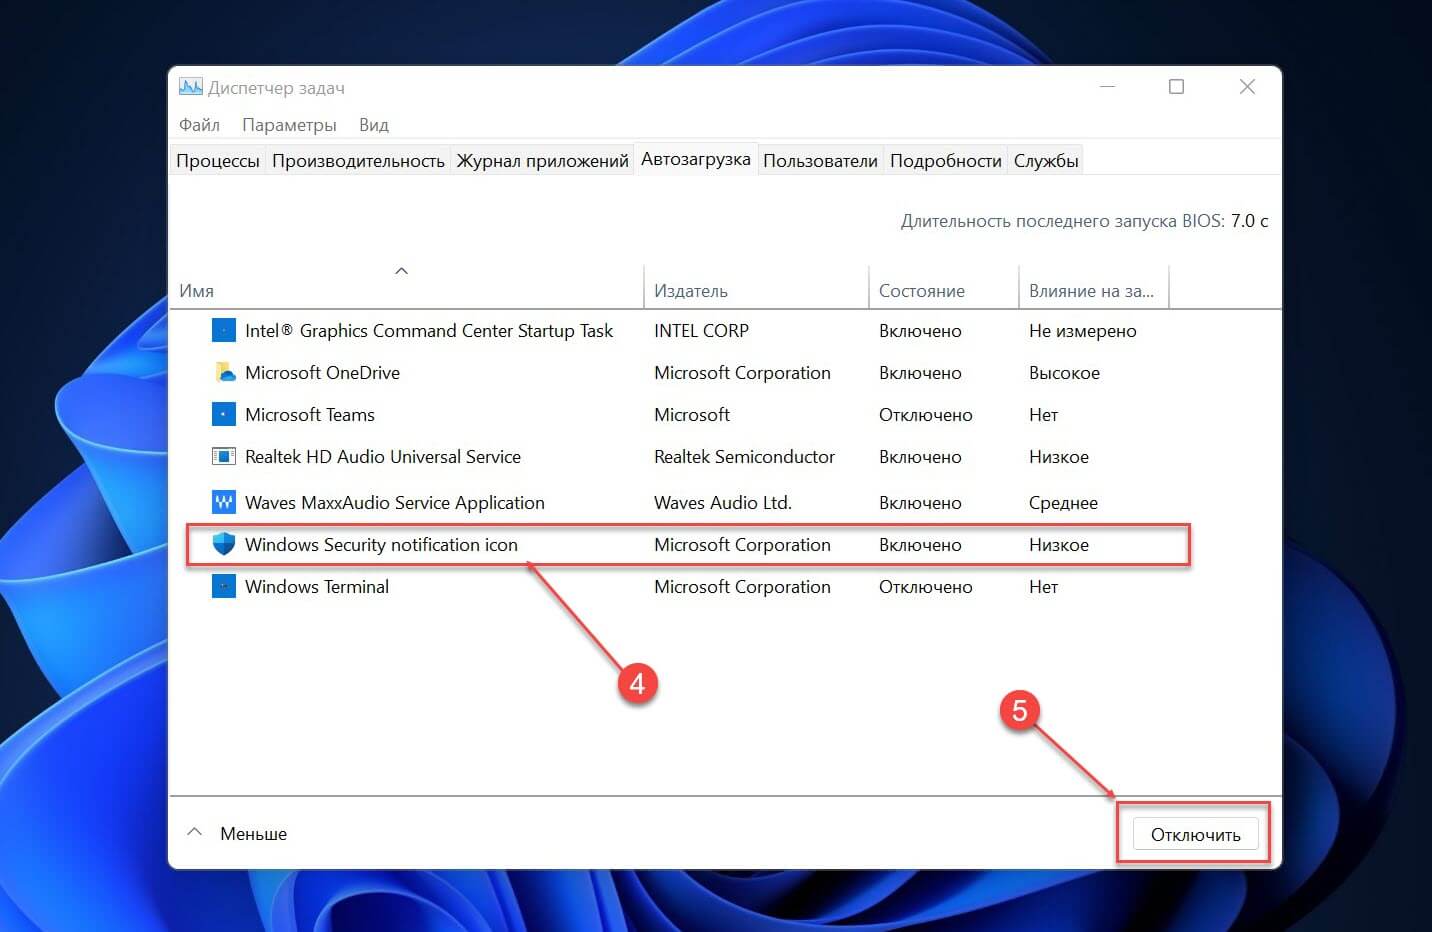
Шаг 4: Выберите приложений найдите запись «Windows Security notification icon» или «SecurityHealthSystray» (в зависимости от версии Windows), кликнув по ней и нажмите кнопку «Отключить». Также вы можете кликнуть на записи правой кнопкой мыши и выбрать в контекстном меню опцию «Отключить».
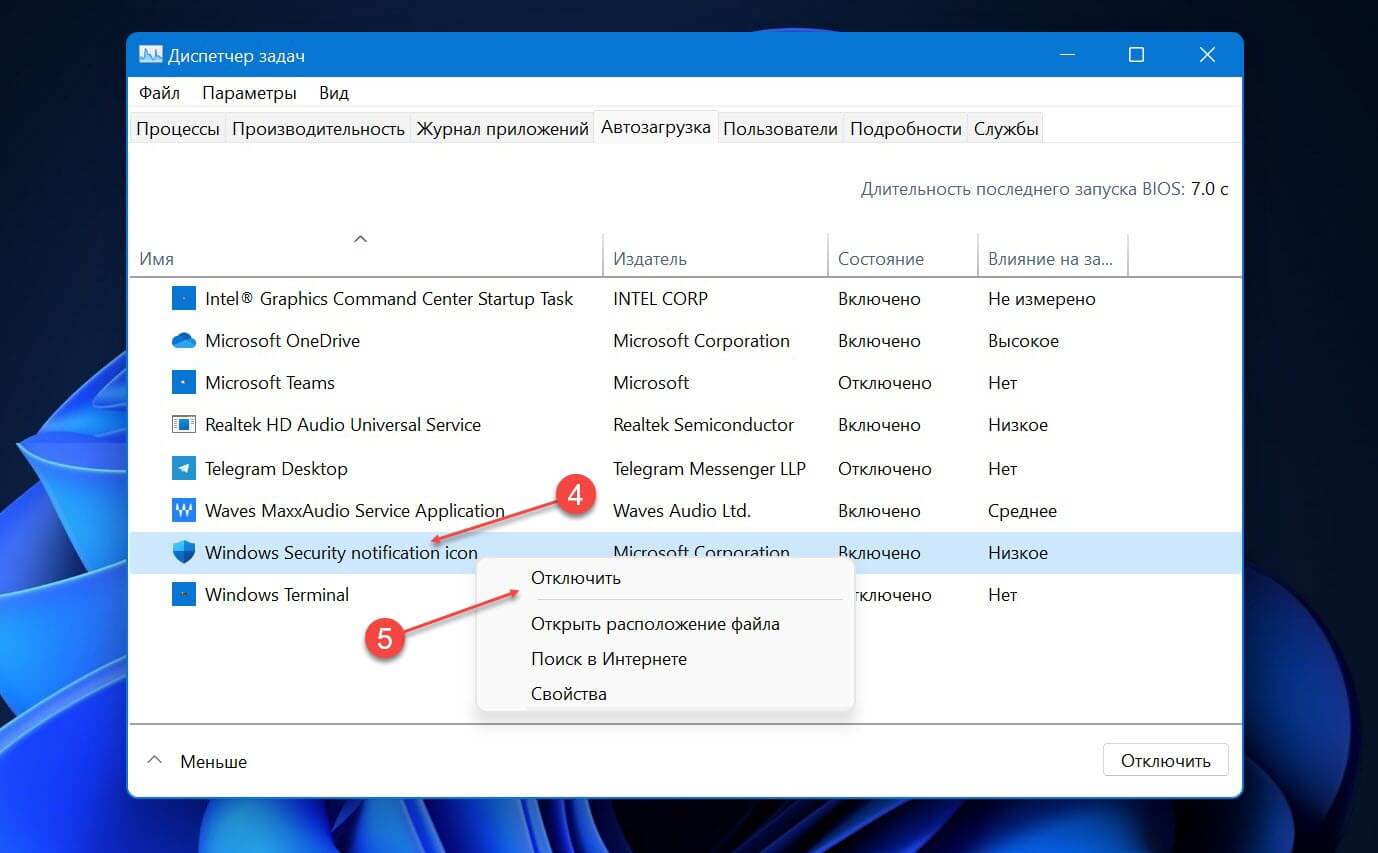
Шаг 5: Перезагрузите компьютер, чтобы изменения вступили в силу. После перезагрузки, или выхода из системы и входа вы избавитесь от значка Центра безопасности Защитника Windows на панели задач.

Если вы когда-нибудь снова увидите иконку Защитника Windows на панели задач в области переполнения, пожалуйста, следуйте данной инструкции снова.
Как скрыть значок Защитника Microsoft с помощью групповой политики
Начиная с Windows 10 версии 1809 существует специальный параметр групповой политики, который позволяет скрывать значок «Защитника Windows» на панели задач. Если вы используете версию Windows 11\10 Pro, Enterprise или Education, вы можете использовать приложение «Редактор групповых политик», чтобы настроить параметр с помощью графического интерфейса редактора следующим образом.
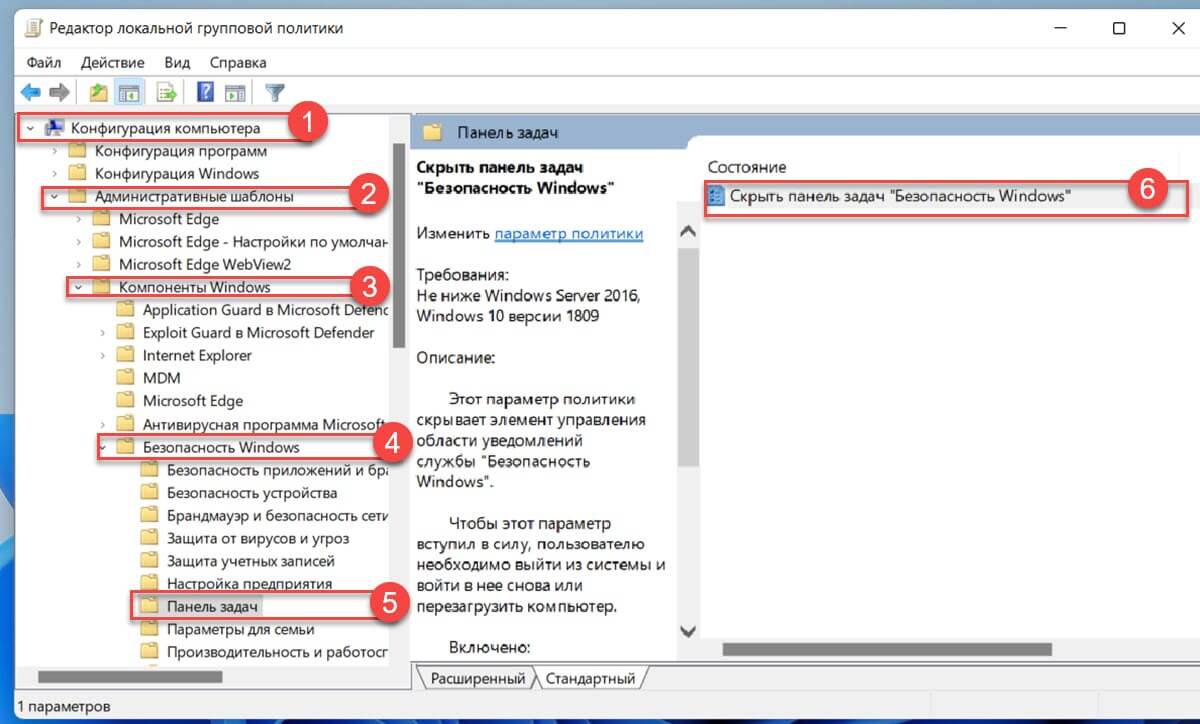
Шаг 1: Откройте Редактор групповых политик (см. как)
Шаг 2: В Редакторе перейдите по следующему пути:
Конфигурация компьютера → Административные шаблоны → Компоненты Windows → Безопасность Windows → Панель задач.
Шаг 5: Здесь найдите параметр политики «Скрыть панель задач «Безопасность Windows», как показано ниже и откройте его для редактирования.
Шаг 5: Измените параметр выбрав вариант «Включено» и нажмите кнопку «Применить» и «ОК».
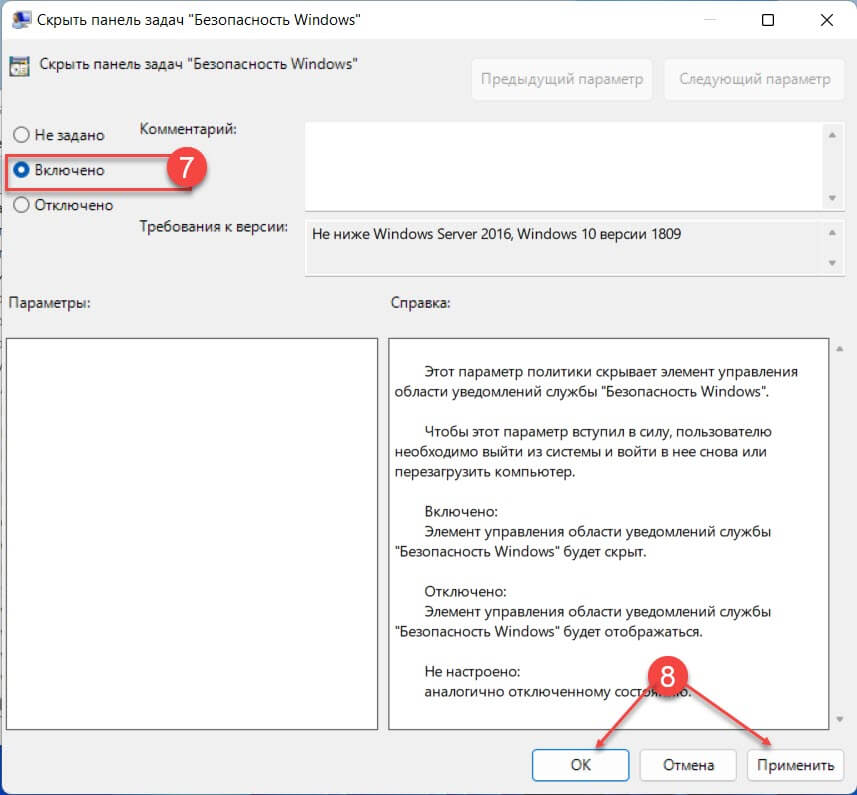
Шаг 6: Перезагрузите компьютер.
После перезагрузки, значок «Безопасность Windows» не будет отображаться на панели задач.
Если вы используете Windows 11\10 Home или другую версию, которая не включает редактор локальных групповых политик, вы можете применить твик реестра.
Скрыть значок защитника с помощью редактор реестра
Шаг 1: Откройте редактор реестра.
Шаг 2: Перейдите к следующему разделу:
HKEY_LOCAL_MACHINE\SOFTWARE\Policies\Microsoft\Windows Defender\Systray
Если такого раздела нет, просто создайте его.
Шаг 3: Здесь создайте новый параметр DWORD (32 бита) с именем «HideSystray».
Примечание: Даже если вы используете 64-битную Windows , вам все равно нужно использовать параметр DWORD (32 бита).
Шаг 4: Установите значение для параметра с именем «HideSystray»: «1», это позволит отключить отображение значка «Безопасности Windows» на панели задач.
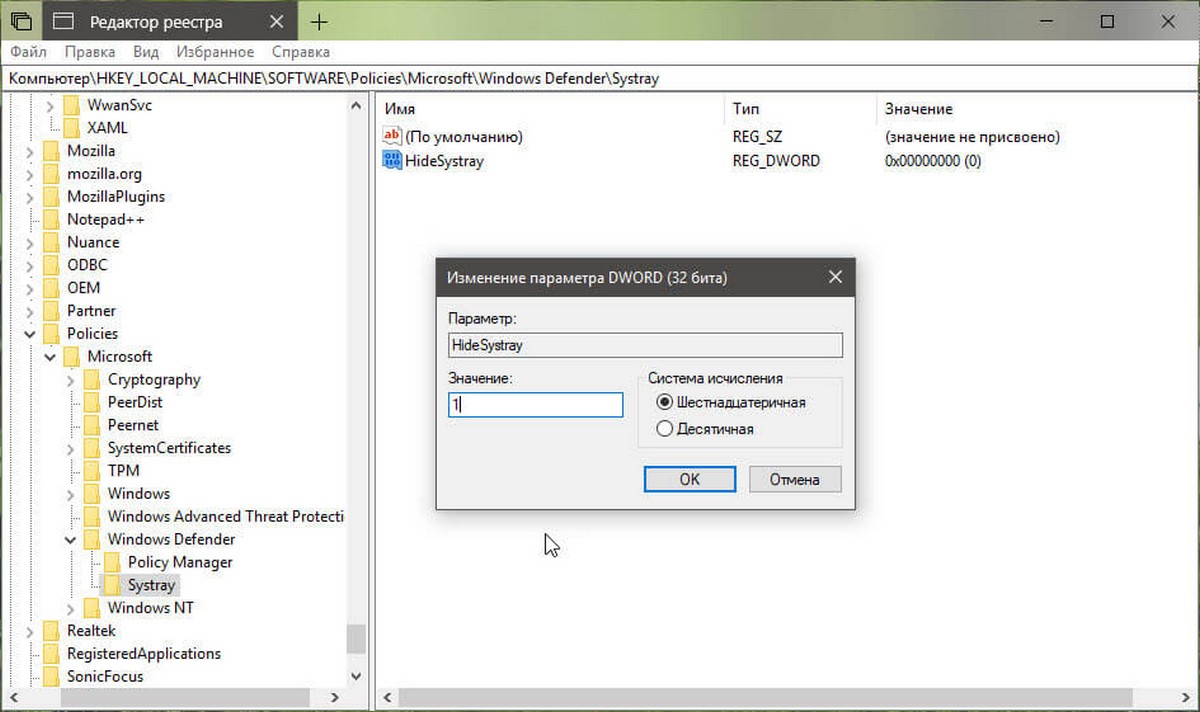
Шаг 5: Чтобы изменения, вступили в силу, необходимо перезагрузить Windows 11\10.
Позже вы можете удалить параметр «HideSystray», чтобы вернуть значок в системный трей.
Все! Если вам известны другие способы, Как отключить иконку Защитника Windows, пожалуйста поделитесь в комментариях ниже.
Вас может заинтересовать: Как в Windows 11 отключить антивирусную программу «Защитник Windows»
Как Отключить Защитник Windows в Windows 10
The Windows Defender icon is automatically displayed on the Taskbar or on the system tray since Windows 10 Anniversary Update. But do you know how to hide Windows Defender icon? This post shows you 5 different ways. Besides Windows Defender, you can also use MiniTool software to protect your PC.
Windows Defender is a built-in anti-malware program of Windows. It was first released in the Windows XP and later shipped with Windows Vista and Windows 7. The Windows Defender icon is automatically displayed on the Taskbar or on the system tray since Windows 10 Anniversary Update.
So, the Windows Defender notification icon will make it easier for users to access the built-in security suite. However, to some users, they say that the Windows Defender notification icon is totally useless for them. So they ask whether they can remove or hide Windows Defender icon.
Fortunately, you can dismiss the Windows Defender notification icon. You can remove Windows Defender icon from Taskbar without disabling its functionality.
And in the following section, we will show you how to hide Windows Defender icon.
Way 1. Hide Windows Defender Icon via Task Manager
The first way to hide Windows Defender icon is to hide it via Task Manager. Now, here is the tutorial.
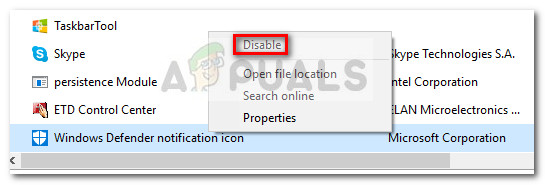
Step 1: Right-click on the Taskbar and choose Task Manager from the context menu to continue.
Step 2: In the pop-up window, go to the Startup tab. Then right-click Windows Defender notification icon and choose Disable to continue.
When you have finished all steps, the Windows Defender notification icon will be removed from the system tray at the next startup. So, you can reboot your computer to check whether you have successfully hidden Windows Defender icon.
Way 2. Hide Windows Defender Icon via Settings
Here, we will show you the second way for Windows 10 hide Windows Defender icon. You can remove Windows Defender icon from Settings.
Here is the tutorial.
Step 1: Press Windows key and I key together to open Settings.
Step 2: In the pop-up window, choose Personalization.
Step 3: Then choose Taskbar in the left panel and scroll down to find Notification area to continue. And click Select which icons appear on the taskbar.
Step 3: In the next window, select the Windows Defender notification icon and switch the toggle to Off.
When all steps are finished, you can check whether the Windows Defender icon has been removed from the Taskbar or the system tray.
Way 3. Hide Windows Defender Icon via Startup
Here, we will show you the third way to disable Windows Defender icon. You can hide Windows Defender icon in the Startup.
Here is the tutorial.
Step 1: Press Windows key and R key together to open Run dialog. They type the ms-settings:startupapps in the box and click OK to continue.
Step 2: In the pop-up window, find out Windows Defender notification icon and switch it toggle to Off.
After that, you can check whether you have successfully removed Windows Defender icon from Taskbar.
Way 4. Hide Windows Defender Icon in Registry Editor
The fourth way to hide Windows Defender icon is to remove it from the Registry Editor. Then we will show you how to hide Windows Defender icon registry with the step by step guide.
Note: Making some changes on Registry Editor is a risky thing, so please back up computer before proceeding.
Step 1: Press Windows key and R key together to open Run dialog. Then type regedit in the box and click OK to continue.
Step 2: In the Registry Editor window, please navigate to the specific folder according to the following path.
HKEY_LOCAL_MACHINE\SOFTWARE\Policies\Microsoft\Windows Defender Security Center\Systray
Step 3: The right-click the HideSystray on the right panel and change its value data from 0 to 1.
Tip: If the HidenSystray is not here, you can create a new one.
After you have finished all steps, reboot your computer and check whether you have successfully removed Windows Defender icon from Taskbar.
Way 5. Hide Windows Defender Icon via Group Policy
Apart from the ways listed above, there is another available way to hide Windows Defender icon. You can remove Windows Defender icon from Taskbar via Group Policy. But this method can only be used for Windows 10 1803 or advanced editions.
Now, we will show you how to remove Windows Defender icon Group Policy.
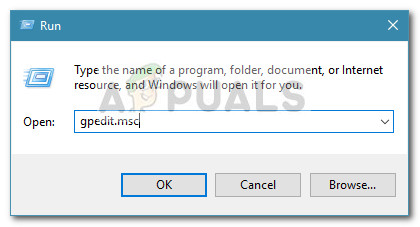
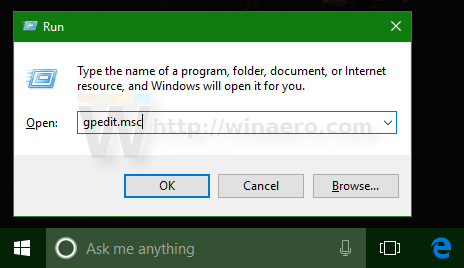
Step 1: Press Windows key and R key together to open Run dialog. Then type gpedit.msc in the box and click OK to continue.
Step 2: In the Local Group Policy Editor window, please navigate to the following location.
Computer Configuration \ Administrative Templates \ Windows Components \ Windows Security \ Systray
Step 3: On the right panel of Systray, double-click Hide Windows Security Systray and choose Enable. Then click OK to continue.
After all steps are finished, reboot your computer and check whether you have hidden Windows Defender icon.
Final Words
To sum up, this post has introduced 5 ways to hide Windows Defender icon. If you also want to remove Windows Defender icon from Taskbar or the system tray, try these ways.
Windows Defender is a long time component of Windows. But for many Windows iterations, Windows Defender wasn’t as obvious as it is on Windows 10. Starting with the Anniversary Update, Windows Defender got a permanent icon in the notification area of your taskbar.
Update: Starting with Windows 10 build 17661, Windows Defender was renamed to Windows Security.
While this new approach makes it easier for users to access the built-in security suite, a lot of users have reported that the icon is totally useless for them. But what really annoyed a lot of users is the fact that the Windows Defender icon appears even if you are using a 3rd-party antivirus to protect your system.
Luckily, you can dismiss the Windows Defender icon, but as you can expect, the procedure is not as straightforward as one would want. In fact, you can remove the Windows Defender icon without disabling its functionality. If you’re not using an external antivirus, Windows Defender will continue running in the background and will remain accessible via the classic path (Settings > System & Security > Windows Defender > Open Windows Defender).
How to Remove the Windows Defender Icon from Taskbar or Notification Tray
Since you can’t simply right-click on Windows Defender and close it to remove the notification, you’ll need to employ a different solution to hide or unhide the icon.
Below you have a collection of methods that will enable you to hide the Windows Defender icon from the Notification Tray. We will also provide instructions on how to re-enable the icon in case you want it to return on your taskbar. Please follow whichever method seems more convenable to your particular situation.
Method 1: Removing the Windows Defender Icon via Task Manager
The most popular way to remove the Windows Defender Icon from the Notification Tray is via Task Manager. Since the tray icon is actually produced by an additional program that automatically launches during the startup phase, you can disable the autostart associated with it via Task Manager.
Here’s a quick guide on how you can use Task Manager to remove the Windows Defender icon:
- Press Ctrl + Shift + Esc to open up Task Manager.
- Inside Task Manager, go to the Startup tab, right-click on Windows Defender notification icon and click on Disable.

- That’s it. Since the autorun key associated with the Windows Defender icon is disabled, you should notice that the icon will be removed from the notification tray at the next startup. Restart your computer to see if this method was effective
Restoring the icon is just as easy. Simply return to the Startup tab of Task Manager, right-click on Windows Defender notification icon again and choose Enable. Don’t forget to restart the computer to enforce the changes.
Method 2: Removing the Windows Defender icon via Taskbar Settings
Another way in which you can hide or show the Windows Defender Notification Area (Windows Security) icon is via the Taskbar settings menu. This is the equivalent of using Method 1, but the difference is the change is made via the Windows 10 Settings menu rather than from Task Manager.
Here’s a quick guide on how to remove the Windows Defender icon via Taskbar Settings:
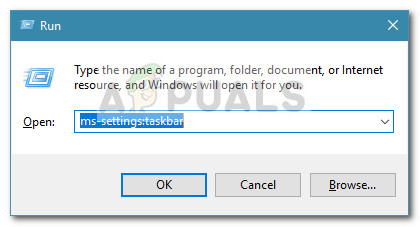
- Press Windows key + R to open up a run box. Then, type “ms-settings:taskbar” and hit Enter to open the Taskbar tab of the Settings menu.

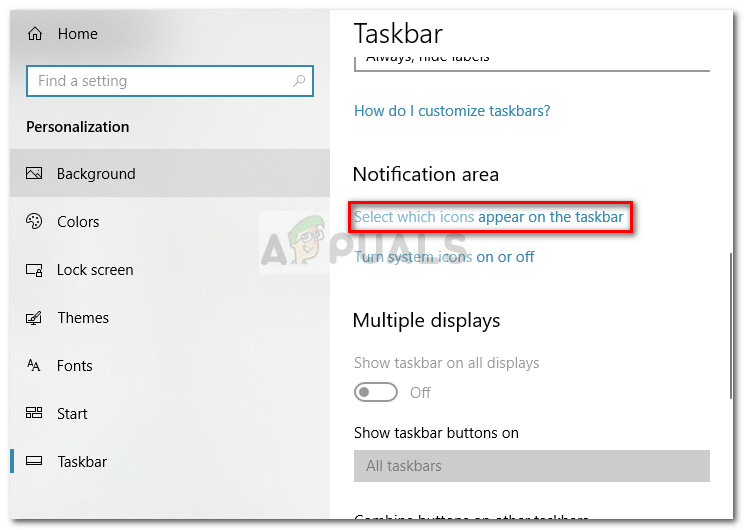
- In the Taskbar tab of the Settings app, scroll down to the Notification area and click on Select which icons appear on the taskbar.

- In the next screen, disable the toggle associated with Windows Defender notification icon.

- That’s it. The Windows Defender icon will disappear immediately from your taskbar. You can bring it back at any time by returning to the menu showcased at step 3 and re-enabling the Windows Defender notification icon toggle.

Method 3: Disabling Windows Defender Icon via Startup menu
Another intuitive way of disabling the Windows Defender Notification Area Icon is via the Windows 10 Startup Tab (inside the Settings app). This will accomplish the same thing as the first two methods, just from a different menu.
Here’s how you can disable the Windows Defender (Windows Security) icon via the Startup menu:
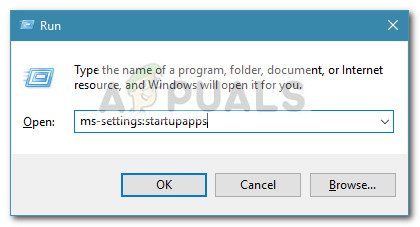
- Press Windows key + R to open up a new Run box. Then, type “ms-settings:startupapps” and hit Enter to open the Startup tab of the Settings app.
- In the Startup tab, scroll down and simply uncheck the toggle associated with Windows Defender notification icon.

- That’s it. Once the toggle is disabled, you should notice that the Windows Defender icon is removed from your taskbar or notification tray. You can re-enable it just as easily by returning to the same menu and re-enabling the Windows Defender notification icon toggle.
Method 4: Disabling the Windows Defender icon via Local Group Policy (if applicable)
Another way to go around dealing with the Windows Defender icon is to use the Local Group Policy Editor. But keep in mind that you’ll need to use an account with administrator privileges. Furthermore, this option is only available on Windows 10 build version 1803 and above. ,
Note: Only Enterprise, Education and Pro versions of Windows 10 will allow you to use the Local Group Policy Editor.
Here’s a quick guide on disabling the Windows Defender icon using the Local Group Policy editor:
- Press Windows key + R to open a Run box, then, type “gpedit.msc” and hit Enter to open Local Group Policy Editor.
- Use the left pane of the Local Group Policy Editor to navigate to the following location:
Computer Configuration \ Administrative Templates \ Windows Components \ Windows Security \ Systray
- Using the right pane of Systray, double-click on Hide Windows Security Systray policy to edit it. Then, set the policy to Enabled and click Ok.
Note: If you want to re-enable the icon, set the policy to Not Configured or Disabled.
Method 5: Disabling Windows Defender icon from Registry Editor
One final method of disabling the Windows Defender icon is to use the Registry Editor. However, keep in mind that you will need to use an administrator account. Furthermore, the option is only available if you have Windows 10 build 1803 or older.
Here’s a quick guide on how you can disable the Windows Defender icon from Registry Editor:
- Open a new Run box by pressing Windows key + R. Then, type “regedit” and hit Enter to open Registry Editor.
- Inside Registry Editor, use the left-hand pane to navigate to the following location:
HKEY_LOCAL_MACHINE\SOFTWARE\Policies\Microsoft\Windows Defender Security Center\Systray
- Next, using the right pane, double-click on HideSystray and change the Value Data from 0 to 1, then hit OK.
Note: If HideSystray is not present, right-click inside the right pane and click on New > Dword 32-bit and name it HideSystray. - Reboot your computer for the changes to take effect. If you ever want to re-enable the Windows Defender icon, return to HideSystray using the steps above and set the value to 0.
Kevin Arrows
Kevin Arrows is a highly experienced and knowledgeable technology specialist with over a decade of industry experience. He holds a Microsoft Certified Technology Specialist (MCTS) certification and has a deep passion for staying up-to-date on the latest tech developments. Kevin has written extensively on a wide range of tech-related topics, showcasing his expertise and knowledge in areas such as software development, cybersecurity, and cloud computing. His contributions to the tech field have been widely recognized and respected by his peers, and he is highly regarded for his ability to explain complex technical concepts in a clear and concise manner.
Recent versions of Windows 10 come with an app called Windows Security. The application, formerly known as «Windows Defender Security Center», has been renamed to Windows Security. It is intended to help the user control his security and privacy settings in a clear and useful way. The app has a tray icon, which is visible out of the box. If you are not happy to see it, here is number of ways to hide it.
You can launch Windows Security from the Start menu or with a special shortcut. Alternatively, you can access it using its tray icon. As of this writing, it looks as follows:
There is a helper tool which draws the icon. It is located here:
"C:\Program Files\Windows Defender\MSASCuiL.exe"
Update: Starting in Windows 10 version 1809, the helper tool has got renamed. Now it is
C:\Windows\System32\SecurityHealthSystray.exe
This file runs at startup when you sign in to your Windows 10 account and so the icon appears in the tray. To get rid of the icon, you can remove the helper tool from startup. This operation has no side effect and will disable the tray icon completely.
To remove MSASCuiL.exe/SecurityHealthSystray.exe from startup, we will use the methods described in the article How to add or remove startup apps in Windows 10.
To disable Windows Security tray icon, do the following.
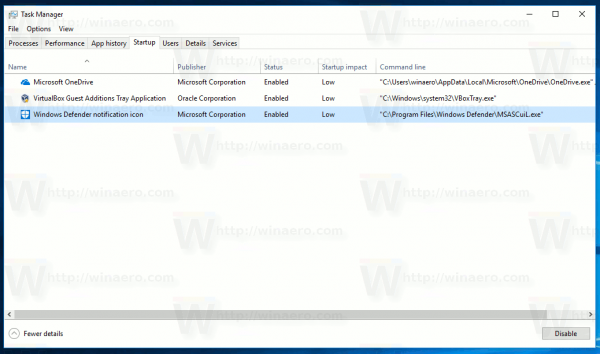
- Open Task Manager.
- Switch to the tab named Startup.
Tip: You can open the Startup tab of Task Manager directly in Windows 10 by running the following command:taskmgr /0 /startup
See how to create a shortcut to manage Startup apps in Windows 10.
- Find the line named «Windows Defender notification icon» as shown below:

- Right click it and select «Disable» in the context menu:

Tip: in the screenshot above, you can see an additional «Command line» column which is not visible by default. To enable it, see the article Get more details about Startup in Windows Task Manager.
Group Policy Option
Starting in Windows 10 version 1809 (Redstone 5), there is a special Group Policy option which allows hiding the tray icon of Windows Security. If you are running Windows 10 Pro, Enterprise, or Education edition, you can use the Local Group Policy Editor app to configure the option with a GUI, as follows.
- Press Win + R keys together on your keyboard and type:
gpedit.msc
Press Enter.

- Group Policy Editor will open. Go to Computer Configuration -> Administrative Templates _> Windows Components -> Windows Security -> Systray. Enable the policy option Hide Windows Security Systray as shown below.

- Reboot your computer.
If you are running Windows 10 Home or other edition of the OS which doesn’t include Local Group Policy Editor, you can apply a Registry tweak.
Registry Tweak
- Open Registry Editor.
- Go to the following Registry key:
HKEY_LOCAL_MACHINE\SOFTWARE\Policies\Microsoft\Windows Defender Security Center\Systray
Tip: See how to jump to the desired Registry key with one click.
If you do not have such a key, then just create it.
- Here, create a new 32-bit DWORD value HideSystray. Note: Even if you are running 64-bit Windows, you still need to use a 32-bit DWORD as the value type.
Set it to 1 to disable the tray icon. - To make the changes done by the Registry tweak take effect, you need to restart Windows 10.
Later, you can delete the HideSystray value to make the icon visible.
That’s it!
Related articles:
- Add Windows Defender to the Control Panel in Windows 10
- How to Enable Windows Defender Application Guard in Windows 10
- Disable Windows Defender in Windows 10
- How To Add Exclusions for Windows Defender in Windows 10
- How To Disable Windows Defender Security Center
Thanks to deskmodder.de for the tweak option.
Support us
Winaero greatly relies on your support. You can help the site keep bringing you interesting and useful content and software by using these options:
If you like this article, please share it using the buttons below. It won’t take a lot from you, but it will help us grow. Thanks for your support!

This tutorial will show you how to add or remove the Windows Security notification icon on the taskbar for your account or all users in Windows 11.
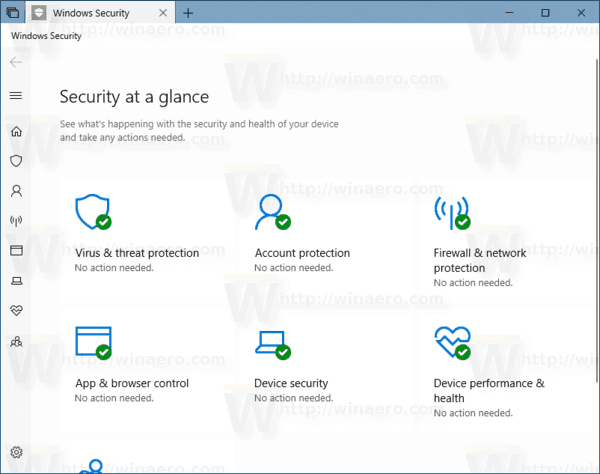
Windows Security is built-in to Windows 11 and includes an antivirus program called Microsoft Defender Antivirus. Your device will be actively protected from the moment you start Windows 11. Windows Security continually scans for malware (malicious software), viruses, and security threats. In addition to this real-time protection, updates are downloaded automatically to help keep your device safe and protect it from threats.
Windows Security is your home to view and manage the security and health of your device.
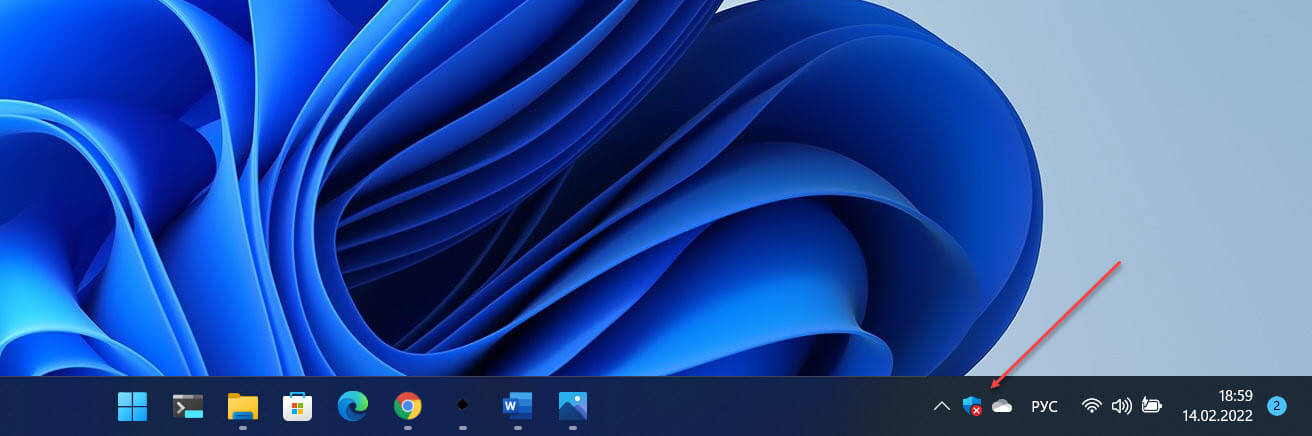
The Windows Security notification icon shows on the taskbar system tray by default.
Contents
- Option One: Hide or Show Windows Security Notification Icon for Current User in Settings
- Option Two: Add or Remove Windows Security Notification Icon for Current User in Startup Apps
- Option Three: Enable or Disable Windows Security Notification Icon for All Users in Local Group Policy Editor
- Option Four: Enable or Disable Windows Security Notification Icon for All Users using REG file
EXAMPLE: Windows Security notification icon on taskbar system tray


Option One
Hide or Show Windows Security Notification Icon for Current User in Settings
1 Open Settings (WIn+I).
2 Click/tap on Personalization on the left side, and click/tap on Taskbar on the right side. (see screenshot below)

3 Click/tap on Taskbar corner overflow or Other system tray icons (build 22572) on the right side to expand it open. (see screenshot below step 4)
4 Turn On (show — default) or Off (hide) Windows Security notification icon for what you want. (see screenshot below)

5 You can now close Settings if you like.
Option Two
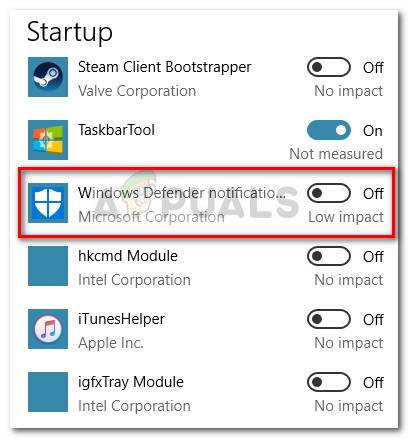
Add or Remove Windows Security Notification Icon for Current User in Startup Apps
1 Open Settings (WIn+I).
2 Click/tap on Apps on the left side, and click/tap on Startup on the right side. (see screenshot below)

3 Turn On (add — default) or Off (remove) Windows Security notification icon for what you want. (see screenshot below)
On = Allows Option One to work.
Off = Removes the Windows Security notification icon, and overrides Option One.

4 Close Settings.
5 Either sign out and sign in or restart the computer to apply.
Option Three
Enable or Disable Windows Security Notification Icon for All Users in Local Group Policy Editor
You must be signed in as an administrator to use this option.
The Local Group Policy Editor is only available in the Windows 11 Pro, Enterprise, and Education editions.
All editions can use Option Four to configure the same policy.
1 Open the Local Group Policy Editor (gpedit.msc).
2 Navigate to the policy location below in the left pane of the Local Group Policy Editor. (see screenshot below)
Computer Configuration > Administrative Templates > Windows Components > Windows Security > Systray

3 In the right pane of Systray in the Local Group Policy Editor, double click/tap on the Hide Windows Security Systray policy to edit it. (see screenshot above)
4 Do step 5 (enable) or step 6 (disable) below for what you want.
5 Enable Windows Security Notification Icon for All Users
This is the default setting to allow using Option One and Option Two.
A) Select (dot) Not Configured, click/tap on OK, and go to step 7. (see screenshot below)

6 Disable Windows Security Notification Icon for All Users
This will override Option One and Option Two.
A) Select (dot) Enabled, click/tap on OK, and go to step 7. (see screenshot below)
7 Close the Local Group Policy Editor.
8 Restart the computer to apply.
Option Four
Enable or Disable Windows Security Notification Icon for All Users using REG file
You must be signed in as an administrator to use this option.
1 Do step 2 (enable) or step 3 (disable) below for what you want.
2 Enable Windows Security Notification Icon for All Users
This is the default setting to allow using Option One and Option Two.
A) Click/tap on the Download button below to download the file below, and go to step 4 below.
Enable_Windows_Security_notification_icon_for_all_users.reg
(Contents of REG file for reference)
Code:
Windows Registry Editor Version 5.00

[HKEY_LOCAL_MACHINE\SOFTWARE\Policies\Microsoft\Windows Defender Security Center\Systray]
"HideSystray"=-

[HKEY_LOCAL_MACHINE\SOFTWARE\Microsoft\Windows\CurrentVersion\Explorer\StartupApproved\Run]
"SecurityHealth"=hex:06,00,00,00,00,00,00,00,00,00,00,00

[HKEY_LOCAL_MACHINE\SOFTWARE\Microsoft\Windows\CurrentVersion\Run]
"SecurityHealth"=hex(2):25,00,77,00,69,00,6e,00,64,00,69,00,72,00,25,00,5c,00,\
  73,00,79,00,73,00,74,00,65,00,6d,00,33,00,32,00,5c,00,53,00,65,00,63,00,75,\
  00,72,00,69,00,74,00,79,00,48,00,65,00,61,00,6c,00,74,00,68,00,53,00,79,00,\
  73,00,74,00,72,00,61,00,79,00,2e,00,65,00,78,00,65,00,00,00
3 Disable Windows Security Notification Icon for All Users
This will override Option One and Option Two.
A) Click/tap on the Download button below to download the file below, and go to step 4 below.
Disable_Windows_Security_notification_icon_for_all_users.reg
(Contents of REG file for reference)
Code:
Windows Registry Editor Version 5.00

[HKEY_LOCAL_MACHINE\SOFTWARE\Policies\Microsoft\Windows Defender Security Center\Systray]
"HideSystray"=dword:00000001
4 Save the REG file to your desktop.
5 Double click/tap on the downloaded REG file to merge it.
6 When prompted, click/tap on Run, Yes (UAC), Yes, and OK to approve the merge.
7 Restart the computer to apply.
8 You can now delete the downloaded REG file if you like.
That’s it,
Shawn Brink
Related Tutorials
- Hide or Show System Tray Icons in Taskbar Corner Overflow Menu in Windows 11
- Add Windows Security to Desktop Context Menu in Windows 11
- Enable or Disable Startup Apps in Windows 11
- Open Windows Security in Windows 11
- Enable or Disable All Windows Security Notifications in Windows 11