
Иногда после переустановки или обновления Windows 10, 8 или Windows 7 вы можете обнаружить новый раздел примерно на 10-30 Гб (или 500 с чем-то Мб) в проводнике. Это — либо раздел восстановления от производителя ноутбука или компьютера, либо раздел со средой восстановления, который по умолчанию должен быть скрыт. Также при обновлении или переносе Windows 10 на SSD или другой жесткий раздела вы можете увидеть раздел на 584 Мб или сходного размера с именем «Восстановить» в проводнике. Бывает, что раздел полностью занят данными (хотя у некоторых производителей может отображаться как пустой), Windows 10 может постоянно сигнализировать о том, что недостаточно места на диске, который вдруг стал виден.
В этой инструкции подробно о способах убрать этот диск из проводника (скрыть раздел восстановления) с тем, чтобы он не отображался, как это было и ранее, также в конце статьи — видео, где процесс показан наглядно. Примечание: этот раздел можно и удалить полностью, но я бы не рекомендовал делать это начинающим пользователям — иногда он может быть очень полезен для быстрого сброса ноутбука или компьютера к заводскому состоянию, даже когда Windows не загружается.
- Как удалить (скрыть) системный раздел восстановления «Восстановить» в Windows 10 (на 584 Мб или аналогичного объема, плюс видео инструкция)
- Как убрать раздел восстановления производителя ПК или ноутбука (на 10 и более ГБ, часто имеет имя RECOVERY)
Как удалить диск «Восстановить» в проводнике Windows 10 (скрытие системного раздела восстановления)

Если после обновления Windows 10, переноса системы на SSD или на другой жесткий диск в проводнике появился диск с именем «Восстановить», а иногда просто «Локальный диск» размером 584 Мб или рядом с этим числом — это диск со средой восстановления Windows 10. Если он находится на единственном системном диске, удалять его не нужно, но его можно скрыть:
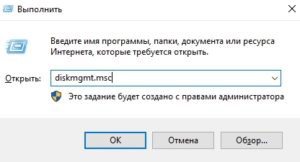
- Зайдите в «Управление дисками», для этого нажмите клавиши Win+R на клавиатуре и введите diskmgmt.msc
- В управление дисками посмотрите, на каком из дисков располагается раздел восстановления, нам нужен номер диска (например, Диск 0). Буква раздела восстановления в управлении дисками отображается не всегда, но его можно определить по размеру и надписи «Раздел восстановления».

- Запустите командную строку от имени администратора. В Windows 10 для этого можно набрать «Командная строка» в поиске на панели задач, затем нажат правой кнопкой мыши по результату и выбрать «Запустить от имени администратора».
- В командной строке по порядку введите команды, нажимая Enter после каждой:
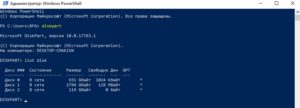
- diskpart
- select disk N (N замените на номер диска из 2-го шага)
- list partition (отобразится список разделов на диске, нам нужен номер раздела «Восстановление», далее — M).

- select partition M
- remove letter=Z (Z следует заменить на букву диска, который нужно скрыть из проводника).


На этом процедура будет завершена и раздел восстановления будет успешно скрыт.
Несколько примечаний по методу скрытия встроенного раздела восстановления:
- Если раздел восстановления появился в проводнике после переноса Windows 10 на другой диск или их появилось несколько, то возможно у вас также отображается раздел на диске, который больше не является системным и не нужен: при желании, вы можете его удалить, при условии, что знаете, что делаете.
- Теоретически, описанный метод можно упростить до diskpart — list volume, как описано в следующем способе, однако в последних версиях Windows 10 разделы восстановления могут не отображаться в списке томов (list volume), потому выше я описал метод, который содержит больше шагов, но гарантированно позволяет убрать ненужный диск из проводника.
Скрытие раздела восстановления Windows 10 — видео инструкция
Как убрать раздел восстановления производителя из проводника с помощью командной строки
Теперь о методах скрыть раздел восстановления от производителя — речь не о разделе на 584 Мб в Windows 10, а разделе с резервной копией системы на 10 и более Гб с резервной копией ОС, который присутствует на некоторых ноутбуках и компьютерах.
Первый способ скрыть раздел восстановления — использовать утилиту DISKPART в командной строке. Способ, наверное, сложнее чем второй описанный далее в статье, но он обычно более работоспособен и срабатывает почти во всех случаях.
Шаги по скрытию раздела восстановления будут одинаковыми в Windows 10, 8 и Windows 7.
- Запустите командную строку или PowerShell от имени администратора (см. Как запустить командную строку от имени администратора). В командной строке по порядку введите следующие команды.
- diskpart
- list volume (В результате выполнения этой команды будет отображен список всех разделов или томов на дисках. Обратите внимание на номер раздела, который нужно убрать и запомните его, далее этот номер буду указывать как N).

- select volume N
- remove letter=БУКВА (где буква — буква, под которой диск отображается в проводнике. Например, команда может иметь вид remove letter=F)

- exit
- После выполнения последней команды закройте командную строку.


На этом весь процесс будет завершен — диск исчезнет из проводника Windows, а вместе с ним и уведомления о том, что на диске недостаточно свободного места.
С помощью утилиты «Управление дисками»
Еще один способ — использовать встроенную в Windows утилиту «Управление дисками», однако он не всегда работает в рассматриваемой ситуации:
- Нажмите клавиши Win+R, введите diskmgmt.msc и нажмите Enter.
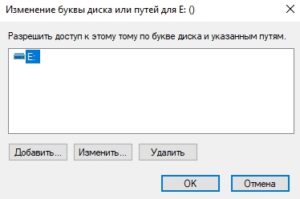
- Нажмите правой кнопкой мыши по разделу восстановления (у вас он, вероятнее всего, будет располагаться не в том же месте, что у меня на скриншоте, определите его по букве) и выберите в меню «Изменить букву диска или путь к диску».

- Выберите букву диска и нажмите «Удалить», затем — Ок и подтвердите удаление буквы диска.

После выполнения этих простых шагов, буква диска будет удалена, и он перестанет отображаться в проводнике Windows. В завершение — видео инструкция, где оба способа убрать раздел восстановления из проводника Windows показаны наглядно.
Надеюсь, инструкция была полезна. Если же что-то не получается, расскажите о ситуации в комментариях, постараюсь помочь.
Windows has several special partitions and Windows RE Tools is one such partition. It is sometimes also called Win RE Tools partition. Windows RE Tools is a recovery partition reserved for recovery and diagnostics tools. It is automatically created by Windows at the time of installation.
Typically, this partition is hidden from view in File Explorer because it’s not meant for regular access or use in day-to-day operations. However, if you are suddenly seeing this partition, it might be because you modified the system configuration or disk management settings such as resizing or modifying the recovery partition.

The recovery partition becoming visible is not harmful to your system, but you should not modify or delete the Windows RE Tool partition. If you prefer not to see this partition, you can hide it using the diskpart command. This tutorial shows you how. Let’s get started.
To remove or hide the Windows RE Tools partition from view in File Explorer, we will use the diskpart command line tool to remove the corresponding drive letter. Once you do that, the RE Tools partition will be hidden from view.
1. First, open the Start menu and search for Command Prompt.
2. Now, select the Run as Administrator option in the Start menu to open the Command Prompt with administrator rights.

3. In the command window, type diskpart and press Enter to launch the diskpart command-line utility.
4. Next, run the list volumes command to list all the partitions in your PC.

5. From the list, identify the Windows RE Tools partition and note down the volume number. In my case, the volume number is 3.
6. Once you have the volume number, type select volume X, replacing X with the number of your recovery volume and press Enter. This will select the volume so that you can remove the drive letter.

7. Type remove letter=W, replacing W with the actual letter currently assigned to the volume, and press Enter.

8. Close the Command Prompt window.
That’s it. From now on, the Windows RE Tools partition is hidden and you will not see it in the File Explorer.

If you have any questions, comment below and we’ll answer.
Чаще всего потребность в создании скрытого раздела на жестком диске возникает после инсталляции свежей операционной системы. В результате некорректного процесса самой установки случается так, что разделы, которые зарезервированы системой под восстановление и другие нужды, оказываются видимыми в проводнике (хотя видимыми они быть не должны). Ну, или если вам просто нужно скрыть раздел с важными данными от сторонних глаз.
Данная процедура довольно простая и выполняется с помощью встроенных в Windows инструментов, но требует от начинающего пользователя внимательности, поскольку ошибившись в командах можно скрыть не то, что требуется. Существует несколько способов, рассмотрим каждый из них.
С помощью командной строки
Для того, чтобы запустить командную строку вам потребуется кликнуть правой кнопкой мыши по меню “Пуск”, находящемуся в левой нижней части экрана и выбрать соответствующий пункт “Windows PowerShell (администратор)». Некоторые операции требуют запуска именно в режиме администратора, поэтому не ошибитесь.
В открывшемся окне необходимо ввести следующие команды:
- Diskpart — запуск консольной утилиты для управления разделами жесткого диска
- List volume — отображает все разделы на компьютере
- Select volume N – выбор определенного раздела, где N — порядковый номер раздела
- Remove letter=E — удаление присвоенной разделу буквы.
- Exit — выход из консольной утилиты.
После проделанных операций, окно можно закрывать и в проводнике больше не будет отображаться нужный раздел.
С помощью управления дисками
Если диск, который вы хотите скрыть, не является системным, то можно воспользоваться более простым способом – с помощью системной утилиты “управление дисками”. Для этого нажмите на клавиатуре комбинацию клавиш Win + R и в открывшемся окне введите команду diskmgmt.msc.
Далее кликаем правой кнопкой мыши по интересующему разделу и выбираем пункт “Изменить букву диска или путь к диску”. И просто удаляем букву.
С помощью редактора локальной групповой политики
Следующий способ несколько сложнее, чем предыдущие и подойдет тем, у кого возникли проблемы с первыми двумя. Для запуска редактора используем уже знакомую комбинацию клавиш Win + R и вводим команду gpedit.msc.
В левой колонке в открывшемся окне выбираем: Конфигурация пользователя – Административные шаблона – Компоненты Windows – Проводник.

Находим пункт «Скрыть выбранные диски из окна «Мой компьютер»» и кликаем по нему два раза левой клавишей мыши. Включаем параметр и выбираем нужную комбинацию дисков.

Применяем и закрываем все окна. Если диски так и не пропали из проводника, то перезагрузка компьютера должна это исправить.
С помощью редактора реестра
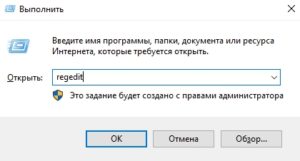
Всё та же комбинация клавиш Win + R, только команда теперь regedit.
Находим раздел в левой части окна, находящийся по адресу: HKEY_CURRENT_USER\ Software\ Microsoft\ Windows\ CurrentVersion\ Policies\ Explorer
Кликаем правой кнопкой мыши в свободном пространстве в правой части открывшегося окна и выбираем пункт «Создать«. И выбираем «Параметр DWORD (32 бита)».

Присваиваем ему имя NoDrives, открываем его и задаём одно из следующих значений соответствующих каждой букве диска.
| A | 1 |
| B | 2 |
| C | 4 |
| D | 8 |
| E | 16 |
| F | 32 |
| G | 64 |
| H | 128 |
| I | 256 |
| J | 512 |
| K | 1024 |
| L | 2048 |
| M | 4096 |
| N | 8192 |
| O | 16384 |
| P | 32768 |
| Q | 65536 |
| R | 131072 |
| S | 262144 |
| T | 524288 |
| U | 1048576 |
| V | 2097152 |
| W | 4194304 |
| X | 8388608 |
| Y | 16777216 |
| Z | 33554432 |
Например, если вам необходимо скрыть диск D, то созданному параметру в реестре мы задаём значение 8. Для диска E — 16, для F — 32, ну и так далее.
Читайте также:
- Что такое RAID массив, и почему он вам нужен
- Рейтинг жестких дисков 3,5 дюйма
Many users want to hide system reserved partition Windows 10, but some of them don’t know how to do that or encounter some issues. Don’t worry. This post of MiniTool shows you how to hide system reserved partition and provides some extra tips.
A lot of users find the system reserved partition in Windows File Explorer, but they don’t have to access the partition frequently. So, many of them want to hide that partition. However, some users don’t know how to hide system reserved partition Windows 10 or encounter issues after hiding it. Here is a true example from the superuser forum:
How do I hide the System Reserved partition from Windows Explorer? It’s annoying to see it as a partition on my computer. I will never need to access it from there, why would I need the entry then? PS: I just want to hide it, not delete it.https://superuser.com/questions/395634/how-do-i-hide-the-system-reserved-partition
What’s System Reserved Partition
System reserved partition is an important partition that contains the Boot Manager code, Startup files used for BitLocker Drive Encryption, and Boot configuration database. In Windows 10, the Recovery Environment data is also stored in the partition. This drive is usually located before the system partition (normally the C: drive) when you clean install Windows 10.
Windows usually doesn’t assign a drive letter to the system reserved partition, so you only can see it when opening Disk Management or other similar utility. Of course, if you assigned a drive letter to the system reserved partition accidentally, you will see it in Windows Explorer. That’s also why some people find the partition appeared in File Explorer and want to hide it.

How to Hide System Reserved Partition Windows 10
There are 3 simple ways to perform the Windows 10 hide system reserved partition operation. Let’s start trying.
# 1. Use Diskpart
Diskpart is a command-line partition management tool that can be used to manage partitions of hard disks and other storage devices like USB. Here you can use it to hide system reserved drive. To do so, follow the steps below:
Step 1. Type diskpart in the Search box, and then right-click the diskpart app from the top result and select Run as administrator. Click on Yes in the UAC confirmation window when you are prompted to grant the admin right.
Step 2. In the elevated command prompt window, type the following commands in order and hit Enter after each one.
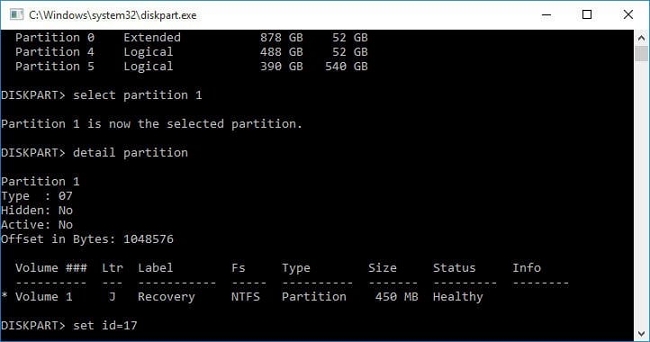
Note: Make sure you select the correct partition before you run the set id=17 command.
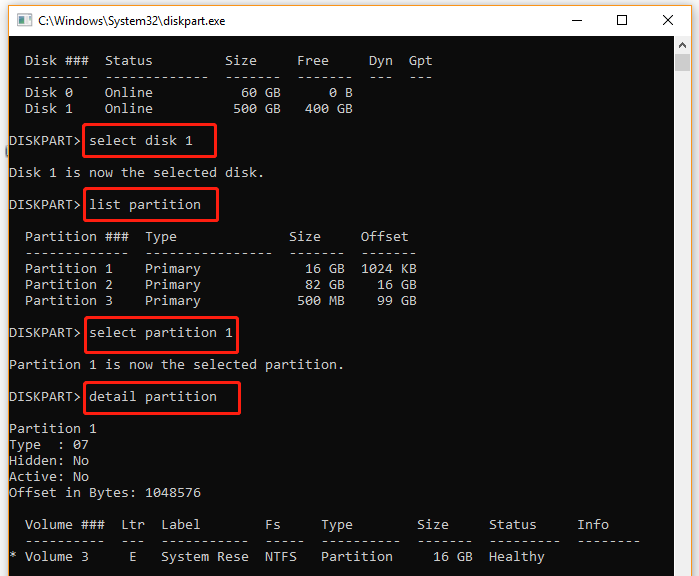
- list disk
- select disk * (replace the * with the disk number that contains the system reserved partition)
- list partition
- select partition *(replace the * with the drive letter of your system reserved partition)
- detail partition (if you select the correct partition, it should display as Type:07, Hidden: No, Active: No)
- set id=17 (this command will change your partition type from 07=Unhidden NTFS partition to 17=hidden NTFS partition)
- detail partition
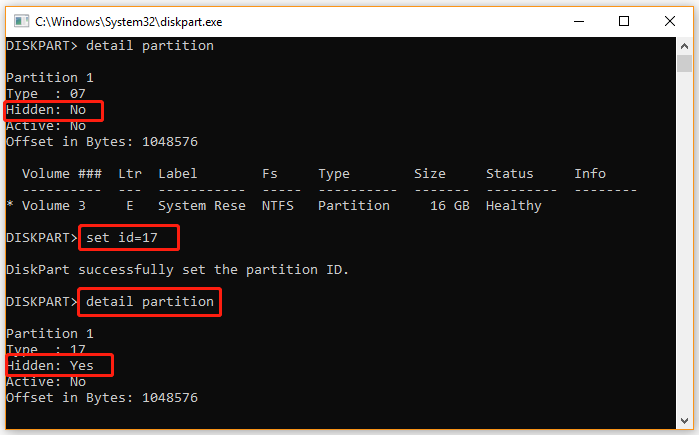
Now, you should find the system reserved partition status shows as Hidden: Yes. Also, you can press Win + E keys to open File Explorer and see if the partition still appears.
# 2. Use Disk Management
As pointed out above, the system reserved partition shows up in File Explorer mainly because you assigned a drive letter to it. So, another method on how to hide system reserved partition is to remove the drive letter. Let’s see how to remove a drive letter using Disk Management.
Step 1. Press Win + R keys to open the Run dialog box, and then type diskmgmt.msc and press Enter to open Disk Management.
Step 2. In the pop-up window, right-click the system reserved partition that you want to hide and select Change drive letter and paths from the context menu.
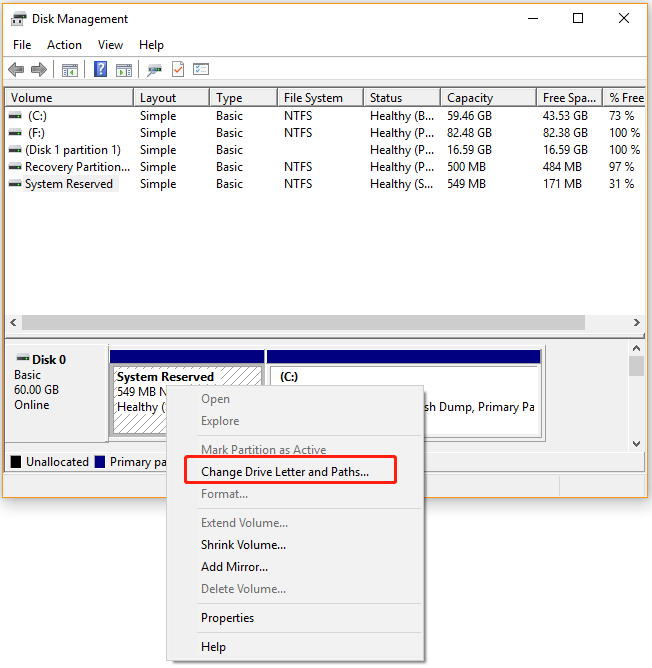
Step 3. Click on Remove in the pop-up dialog box to remove the assigned drive letter.
Step 4. Click on Yes in the warning window to confirm this operation.

Now, you can open the File Explorer and see if the system reserved partition has been hidden.
# 3. Use MiniTool Partition Wizard
Although the above Windows built-in tools can help you hide system reserved Windows 10, you need to either remove the drive letter or change the partition type ID. Moreover, you will receive the warning message that the drive might be in use or programs that rely on the drive letter might not run correctly, which makes you feel panic.
Is there a way to hide recovery partition Windows 10 directly? MiniTool Partition Wizard can help you do that easily. It is a multifunctional partition manager that can hide/unhide partition, extend/resize partition, convert NTFS to FAT without data loss, migrate OS, convert MBR to GPT, etc.
Let’s see how to hide system reserved Windows 10 using MiniTool Partition Wizard.
MiniTool Partition Wizard FreeClick to Download100%Clean & Safe
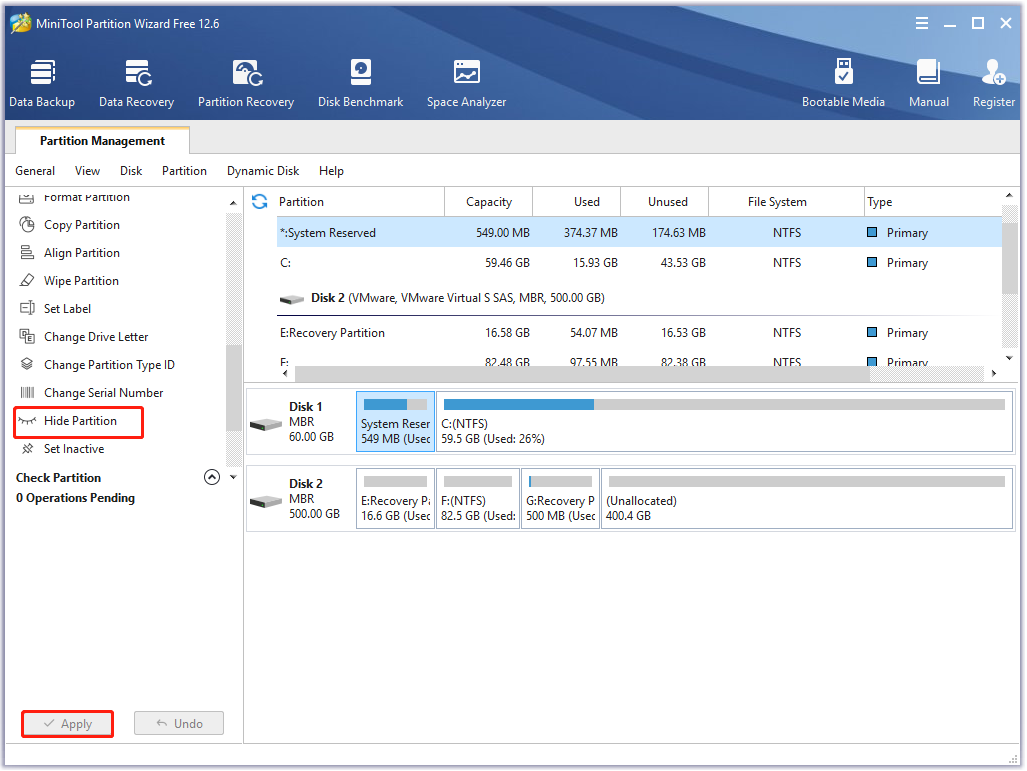
Step 1. Launch the MiniTool program to enter its main interface.
Step 2. Select the system reserved partition from the disk map and click on Hide Partition from the left action pane.
Step 3. Click on Apply to execute the pending operation. Once completed, you can check if the partition is hidden in File Explorer.
How to hide system reserved Windows 10? The 3 simple ways have been illustrated. You can choose one which works best for you.
Sometimes, however, you may encounter some issues after or when hiding the system reserved partition. After reading lots of user reports, we find there are 2 main issues with the Windows 10 hide system reserved partition. Don’t worry. We will provide corresponding solutions here.
Case 1. Hidden System Reserved Partition Still Shows in File Explorer
The first and most common issue is that no driver letter was assigned to the hidden system reserved partition but in Windows Explorer, it still has a drive letter. If you haven’t removed the drive letter successfully or you re-assign a drive letter to the hidden partition accidentally, you may encounter this situation.
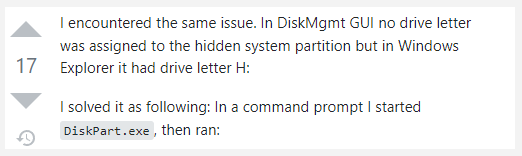
In this case, you can run Diskpart.exe to remove the drive letter of the system reserved partition again.
Step 1. Type diskpart in the Search box, and then right-click the diskpart app from the top result and select Run as administrator.
Step 2. Now, type the following commands in order and press Enter after each one. Here make sure you select the correct disk and partition.
- list disk
- select Disk 0
- list partition
- select partition 1 (1 represents the partition that you want to remove its driver letter)
- remove
Note: It’s worth noting that the “Remove” command just gets rid of the drive letter, instead of removing the partition.
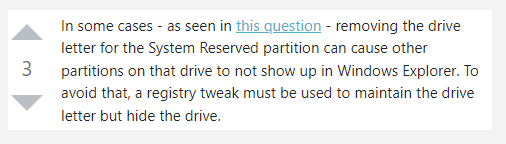
Case 2. Other Partitions Missing from File Explorer
Some other people reported that removing the drive letter for the system reserved partition can cause other partitions on that drive missing from Windows Explorer. This may occur when you remove the drive letter for the incorrect partition. To avoid this situation, you can tweak a registry value to maintain the drive letter but hide the drive. For that:
Tip: What can you do if a partition is missing or removed accidentally from your hard drive? Don’t worry. This post can help you find it back.
MiniTool Partition Wizard DemoClick to Download100%Clean & Safe
Step 1. Open the Run dialog box, and then type regedit in it and hit Enter. Click on Yes in the UAC window to access Registry Editor.
Step 2. Go to the following path via the left navigation bar. Or, you can press Ctrl + F key to open the Find what box, and then copy and paste the following path in the box.
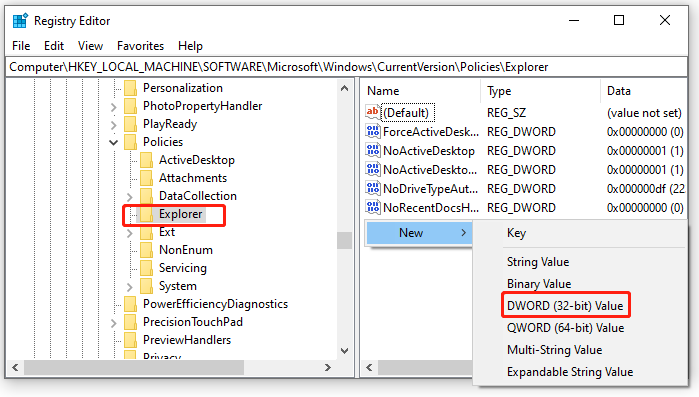
HKEY_LOCAL_MACHINESoftwareMicrosoftWindowsCurrentVersionPoliciesExplorer
Step 3. With the Explorer folder selected in the left panel, right-click any empty area on the right pane and select New > DWORD (32-bit) Value. Then name the newly created DWORD value NoDrives and hit Enter.
Step 4. Double click the NoDrives value to open it and select Decimal under the Base section.
Step 5. Enter the decimal number that represents the drive letter you want to hide into the Value data box. In my case, the drive letter of the system reserved partition is H and I should type 128 in it to hide the drive. If you want to hide more partitions, you need to enter the sum of the decimal numbers. For instance, if you want to hide drive E and drive F at the same time, you can enter 48.
Note: Here we list the decimal numbers of several commonly used drive letters for reference: A: 1, B: 2, C: 4, D: 8, E: 16, F: 32, G: 64, H: 128, I: 256, J: 512, K: 1024, L: 2048, M: 4096, N: 8192, O: 16384, P: 32768, Q: 65536, R: 131072, S: 262144, T: 524288, U: 1048576, V: 2097152, W: 4194304, X: 8388608, Y: 16777216, Z: 33554432, ALL: 67108863.
Step 6. Click on OK to save changes and close Registry Editor.
Now, you can open File Explorer and see if hide the partition successfully.
Do you want to hide system reserved partition Windows 10? If you are still trying to find a guide, this post is what you need. Click to Tweet
Have a Try Now
This post mainly focuses on how to hide system reserved partition Windows 10. To achieve that, you can remove the drive letter of the partition using Diskpart or Disk Management. Of course, we highly recommend you use MiniTool Partition Wizard which can hide a partition directly with just a few clicks.
If you have any better ideas on this subject, please write them down in the comment area. For any questions or difficulties in using the MiniTool software, you can contact us via [email protected].
Many users find the System Reserved partition in Windows File Explorer but don’t need to access it very often. So, many users want to hide that partition. This article shows you how to hide the System Reserved partition in detail. Please read on.
What Is a System Reserved Partition
The System Reserved partition is a critical partition that contains the Boot Manager code, boot files for BitLocker Drive Encryption, and the boot configuration database. Especially the recovery environment data is also stored on the partition in Windows 10. Therefore, on fresh installs of Windows 10, this drive is usually situated before the system partition (usually the C drive).

Since we don’t access the System Reserved partition, why do we hide it instead of deleting it? The two main reasons are as follows:
- The System Reserved partition stores the boot manager, boot configuration data, and startup files for Bitlocker drive encryption.
- Hiding the System Reserved partition can ensure its integrity, and the system can be successfully restored to factory settings after an accident.
However, how to hide the System Reserved partition safely and efficiently? Don’t worry. You can get three ways to hide it in the next part.
Hide System Reserved Partition Safely and Efficiently — 3 Ways
This part lists three ways to hide a System Reserved partition and gives detailed guides on each, containing three utilities. You can choose a suitable way based on your needs. The three ways are as follows:
Hide System Reserved Partition via EaseUS Partition Master — Easy
Hide System Reserved Partition via Disk Management — Medium
Hide System Reserved Partition via Diskpart — Difficult
Among these ways, it is obvious that EaseUS Partition Master is the easiest way and doesn’t require much computing knowledge. Now, let’s see how to hide a System Reserved partition via EaseUS Partition Master.
Hide System Reserved Partition via EaseUS Partition Master — Easy
EaseUS Partition Master is easy to use and allows you to hide the System Reserved partition with simple clicks. Its prompts will guide you when you act. It supports Windows 11/10, Windows 8/7, and Windows XP/Vista. Download it and follow the steps below to hide your System Reserved partition.
Option 1 — Hide Partition
- Right-click the partition, and choose «Advanced». Select «Hide» from the drop-down menu.
- Then you will see a window showing the notification. Read the instructions and click «Yes» to continue.
- Click the «Execute 1 Task(s)» button in the top-left corner. Then, click «Apply» to hide your partition.
Option 2 — Unhide Partition
- Right-click the partition you want to view and access. choose «Advanced» and select «Unhide» from the drop-down menu.
- Read the instructions and click «Yes» to continue.
- Click the «Execute 1 Task(s)» button in the top-left corner. Check the pending operations, then click «Apply» to unhide the partition on Windows 11/10/8/7.
;
Besides hiding the reserved partition, it has a lot of other features as a professional disk partition manager:
- Resize encrypted partition
- Resize/create/delete partitions
- Move System Reserved partition
- Unhide/hide drive in Windows 10
- Remove the SSD System Reserved partition
Download EaseUS Partition Master to help with your issues.
Hide System Reserved Partition via Disk Management — Medium
If you don’t want to turn to a third-party tool, you can use Disk Management to hide the System Reserved partition. What is Disk Management? It is a built-in tool with Windows to help extend, shrink, or hide a partition. Here are the steps for hiding the System Reserved partition:
Step 1. Press W + R to bring up the run window. Type diskmgmt.msc and press Enter, which will open Disk Management.
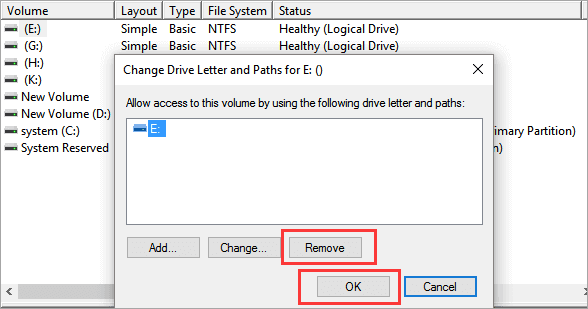
Step 2. Right-click on the target System Reserved partition and choose the «Change drive letter and paths» button.
Step 3. Click on Remove in order to remove the assigned drive letter, and then click Yes as the warning window appears. This picture below sets E drive as an example.
Now, you can click open File Explorer and check if the System Reserved partition has been hidden.
Hide System Reserved Partition via Diskpart — Difficult
If you are an experienced user, you can use Diskpart commands to hide the System Reserved partition. Be careful when you type the commands to avoid data loss.
Step 1. Right-click the Windows icon and choose «Run.»
Step 2. Type cmd in the run window to launch Command Prompt.
Step 3. Type diskpart and open the Diskpart window.
Step 4. Hit «Enter» each time you type one of the following commands:
- select disk 0
- list partition
- select partition 1
- detail partition
- set id=17 (this will change the partition type from 07=Unhidden NTFS partition to 17=hidden NTFS partition)
- detail partition (Check that the partition is now 17 and hidden. Other volume details and the partition’s label appear.)
Here are some links related to the System Reserved partition. Click them if you are facing similar problems:
Conclusion
With these three methods, you can easily and safely hide the System Reserved Partition. However, if you are not familiar with Disk Management and Diskpart, it is recommended that you use EaseUS Partition Master. This is a trusted third-party tool that allows you to hide the System Reserved partition in three steps. It can also delete/create/remove any partitions.
Don’t hesitate to download it to help. You will enjoy what it brings to you.
Hide System Reserved Partition FAQs
There are some other questions related to hiding the System Reserved partition. If you get similar problems, continue to read.
1. Is it okay to hide the System Reserved drive?
Yes, hiding the System Reserved drive doesn’t delete any data stored on the drive. You can unhide it when necessary.
2. How do I hide the System Reserved partition in Windows 11?
Follow the steps below to hide the System Reserved partition:
Step 1. Open Disk Management and right-click on the System Reserved partition in the Disk Management window.
Step 2. Select and click the «Change drive letter and paths» option and choose «Remove.»
Step 3. Click «Yes» when you get a warning message.
3. Should I delete the System Reserved partition?
Actually, the answer is «No.» The System Reserved partition is essential since it stores the boot manager code, boot files for BitLocker drive encryption, and the boot configuration database.