
Все способы:
- Способ 1: Утилита «Управление дисками»
- Способ 2: Командная консоль
- Способ 3: Редактирование реестра
- Способ 4: «Редактор локальной групповой политики»
- Вопросы и ответы: 1
Способ 1: Утилита «Управление дисками»
В операционную систему встроена утилита для работы с локальными дисками, с помощью которой можно создавать новые разделы, форматировать их, удалять и скрывать:
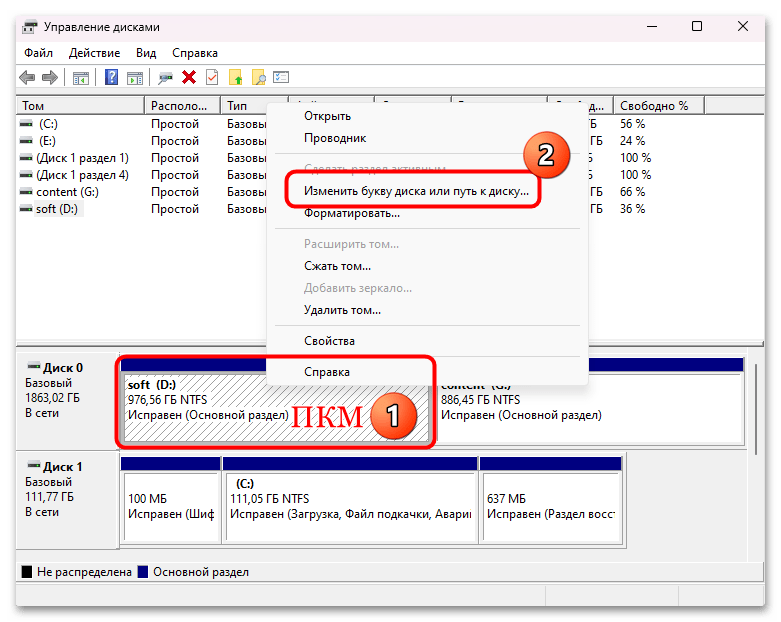
- Кликните правой кнопкой мыши по кнопке «Пуск» и выберите запуск оснастки «Управление дисками».
- Отобразится список всех используемых разделов на компьютере. Найдите тот, который нужно переименовать, затем щелкните по нему правой кнопкой мыши и из контекстного меню выберите пункт «Изменить букву диска или путь к диску».
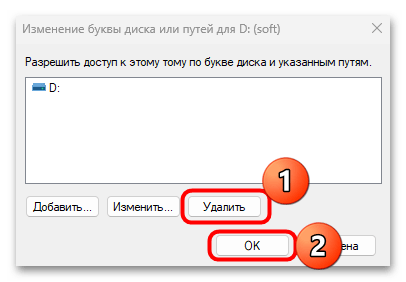
- В новом окне останется удалить букву диска – нажмите на соответствующую кнопку внизу.
Диск будет скрыт, но все данные, хранящиеся на нем, останутся в целостности.
Чтобы вернуть отображение раздела, проделайте то же самое, что в инструкции выше, только на Шаге 3 нужно нажать на кнопку «Добавить» и задать букву. Вся информация снова станет доступна.
Способ 2: Командная консоль
То же самое можно проделать альтернативным способом – использовать консольную команду для удаления буквы диска. В результате сам раздел также окажется скрыт от посторонних глаз.
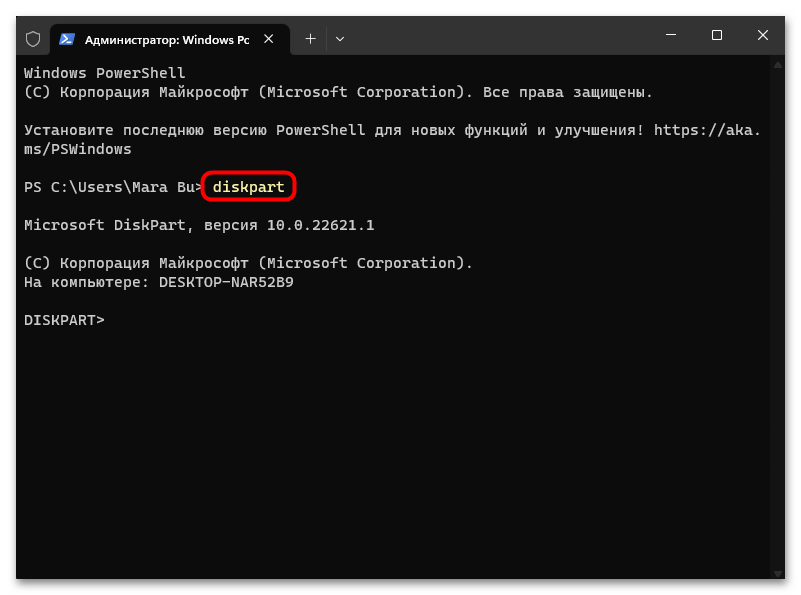
- Запустите «Терминал» с расширенными правами: кликните правой кнопкой мыши по «Пуску» и в меню нажмите на строку «Терминал (Администратор)».
- Запустите утилиту для управления дисками, выполнив команду
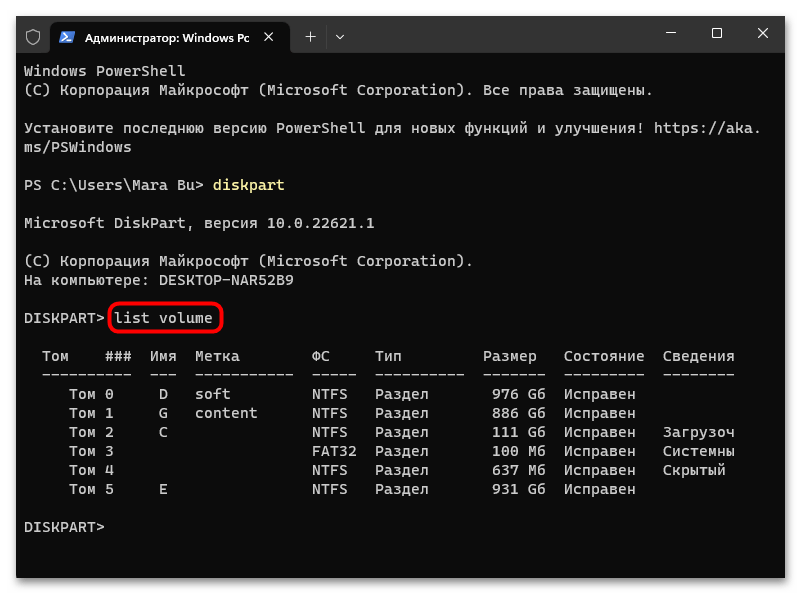
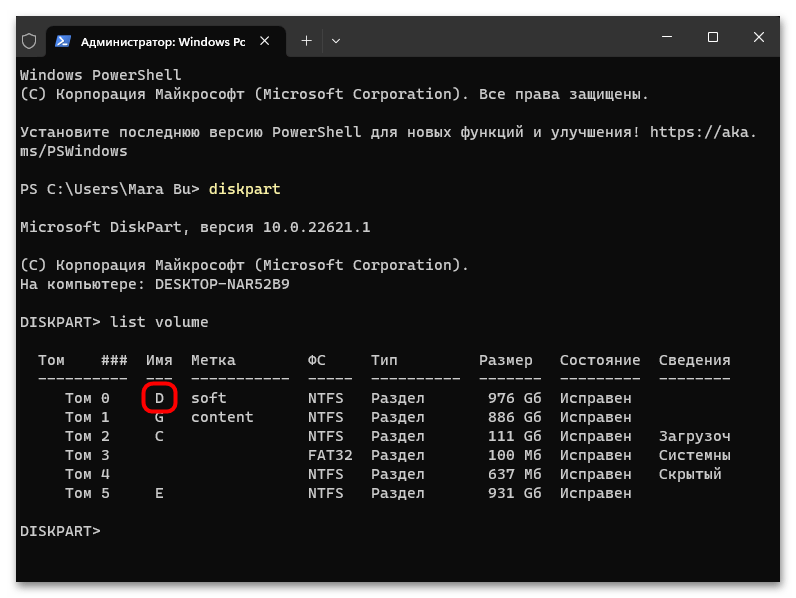
diskpartи нажав после нее на клавишу «Enter». - Для отображения списков разделов введите
list volumeи нажмите на клавишу ввода. - Вы увидите перечень всех доступных разделов. Найдите в нем тот диск, который нужно скрыть, и запомните его значение в столбце «Имя».
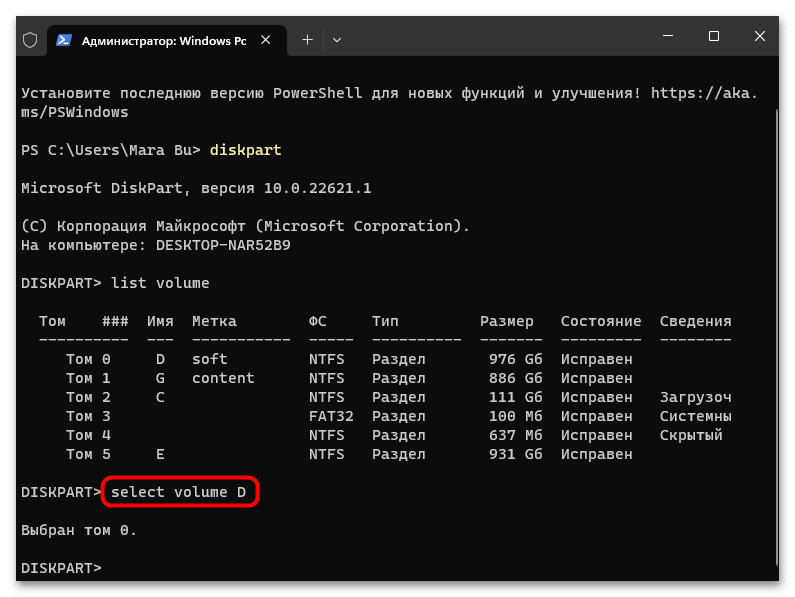
- Далее нужно выполнить команду
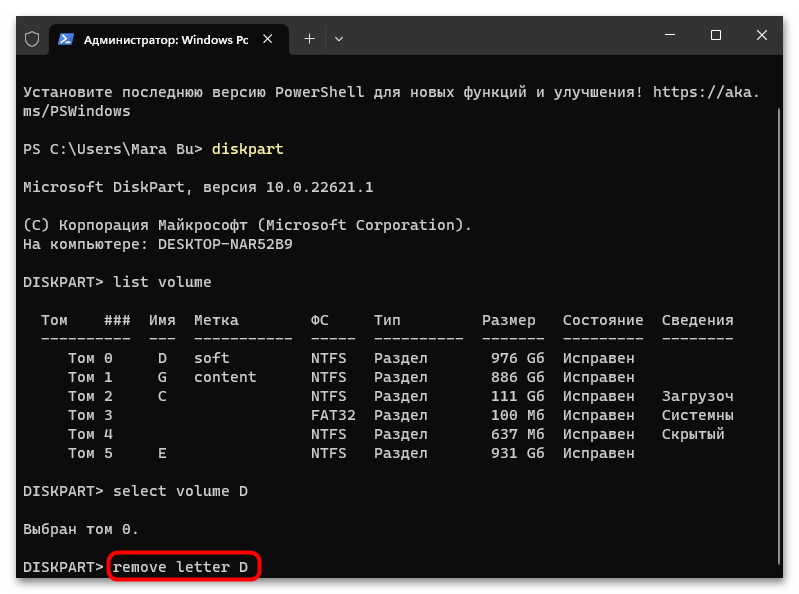
select volume D, где D – это имя вашего раздела. Таким образом, вы выберете букву раздела. - Теперь удалите букву диска: вставьте
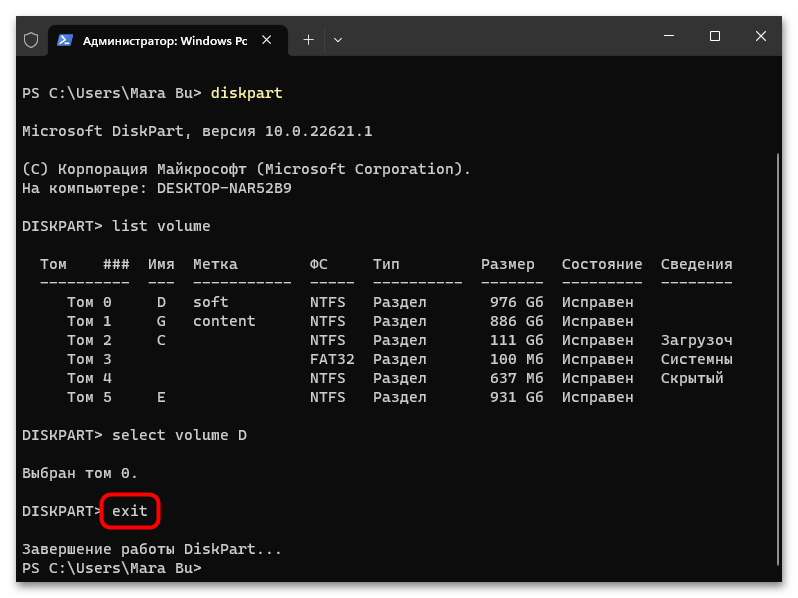
remove letter D(D, опять же, замените на определенную букву) и нажмите на клавишу «Enter». - Чтобы выйти из утилиты «DiskPart», используйте запрос
exit.
После этого раздел будет скрыт, но вернуть его можно также через консоль – достаточно использовать команду assign letter=любая свободная буква, которая присвоит разделу новую литера.
Способ 3: Редактирование реестра
Изменение реестра — еще один универсальный метод скрытия диска в Windows 11, который подойдет для всех редакций операционной системы. Скрывается диск с помощью создания специального реестрового ключа со значением в десятичной системе исчисления, при котором каждый номер соответствует определенной букве.
Таблица с литерами располагается после инструкции.
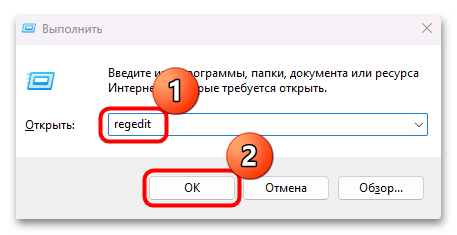
- Одновременно нажмите на клавиши «Win + R», в поле окна «Выполнить» введите
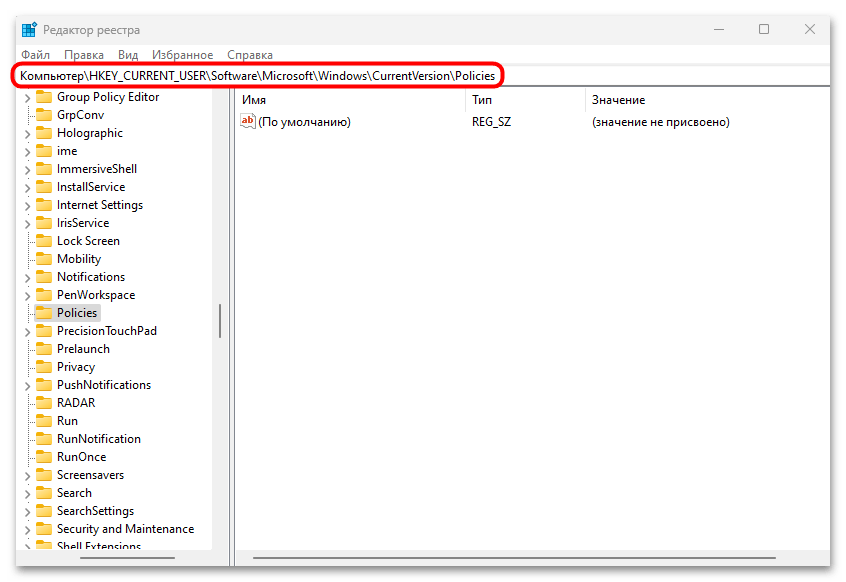
regeditи нажмите на кнопку «ОК» для перехода к «Редактору реестра». - Разверните раздел
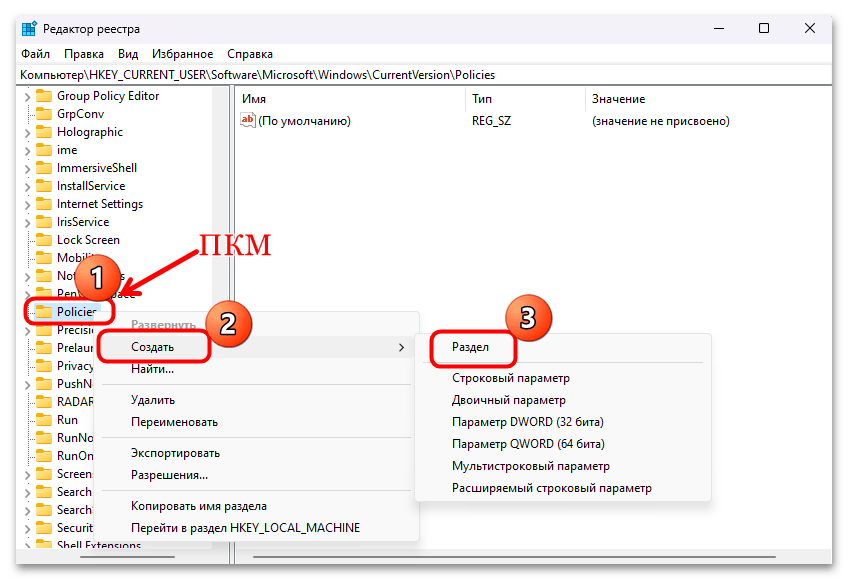
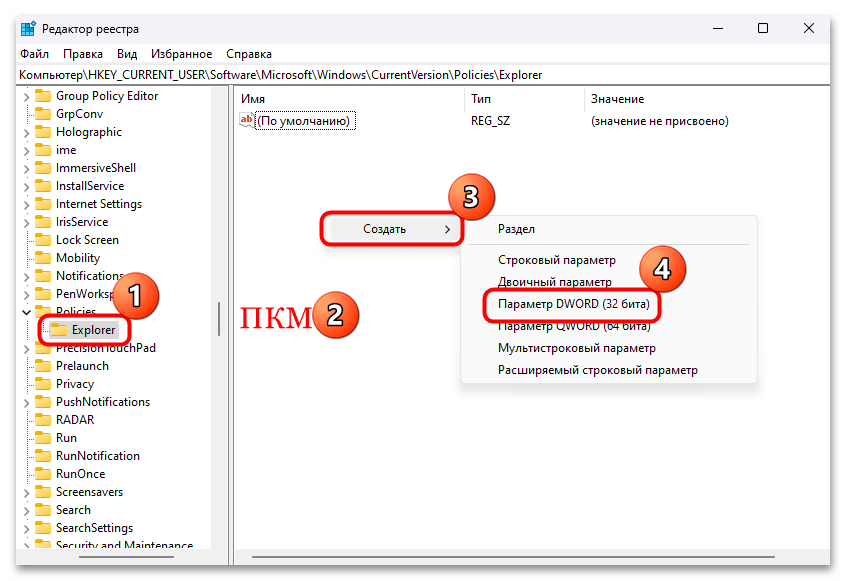
HKEY_CURRENT_USER\SOFTWARE\Microsoft\Windows\CurrentVersion\Policiesили вставьте путь в адресную строку сверху. - Посмотрите, если ли подраздел «Explorer». Если есть, то перейдите в него, а если нет, нажмите правой кнопкой мыши по каталогу «Policies», наведите курсор на пункт «Создать» и создайте новый подраздел, соответствующе назвав его.
- В нем нужно создать параметр. Кликните ПКМ по свободной области в центральной части окна, выберите «Создать», затем — «Параметр DWORD (32 бита)».
- Задайте ему имя «NoDrives» и дважды кликните по нему.
- В открывшемся окне с параметрами ключа введите в текстовое поле нужное значение, которое соответствует букве, систему исчисления смените на «Десятичную» и нажмите на кнопку «ОК».
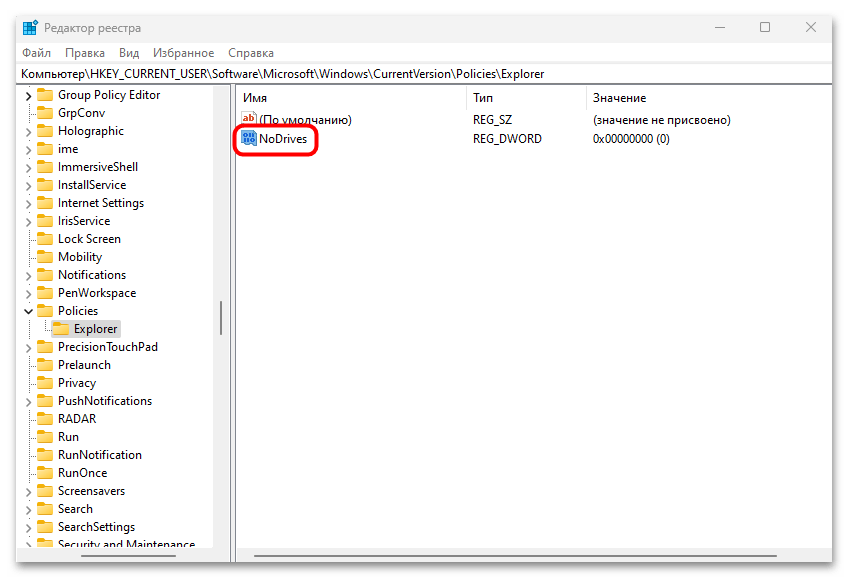
Например, если вы хотите скрыть в Windows 11 диск под буквой D, то в строке «Значение» созданного параметра «NoDrives» вам потребуется прописать цифру «8». После перезагрузите компьютер, чтобы настройки вступили в силу.
| Буква | Значение |
|---|---|
| A | 1 |
| B | 2 |
| C | 4 |
| D | 8 |
| E | 16 |
| F | 32 |
| G | 64 |
| H | 128 |
| I | 256 |
| J | 512 |
| K | 1024 |
| L | 2048 |
| M | 4096 |
| N | 8192 |
| O | 16384 |
| P | 32768 |
| Q | 65536 |
| R | 131072 |
| S | 262144 |
| T | 5224288 |
| U | 1048576 |
| V | 2097152 |
| W | 4194304 |
| X | 8388608 |
| Y | 16777216 |
| Z | 33554432 |
Способ 4: «Редактор локальной групповой политики»
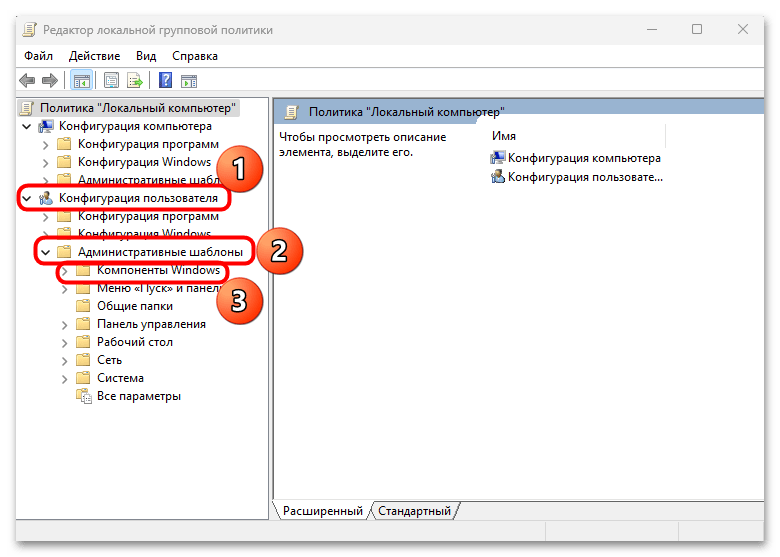
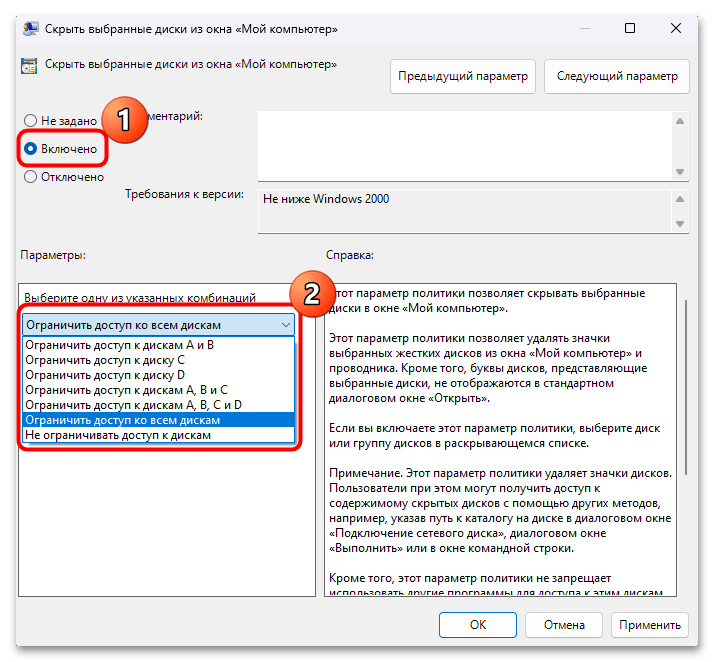
Отключение отображения дисков возможно и через «Редактор локальной групповой политики», но этот вариант подойдет для пользователей Windows 11 редакций Pro и Enterprise. С его помощью вы сможете также ограничить доступ ко всем разделам, которые можно найти в окне «Мой компьютер».
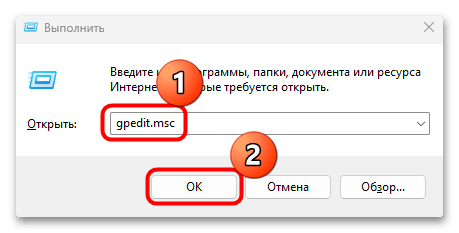
- Через утилиту «Выполнить» вызовите нужное средство, введя запрос
gpedit.msc. - В открывшемся окне «Редактора локальной групповой политики» разверните меню слева «Конфигурация пользователя» > «Административные шаблоны» > «Компоненты Windows».
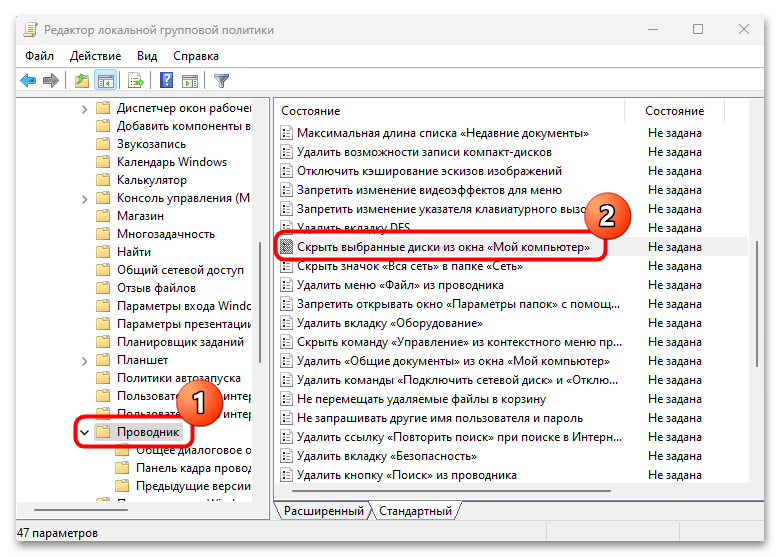
- Раскройте подпапку «Проводник». В основной части окна дважды кликните по параметру «Скрыть выбранные диски из окна «Мой компьютер»».
- Включите конфигурацию, отметив соответствующий пункт, а ниже из выпадающего меню «Параметры» выберите диск, который нужно скрыть.
- Для сохранения настроек нажмите на кнопки «Применить» и «ОК».
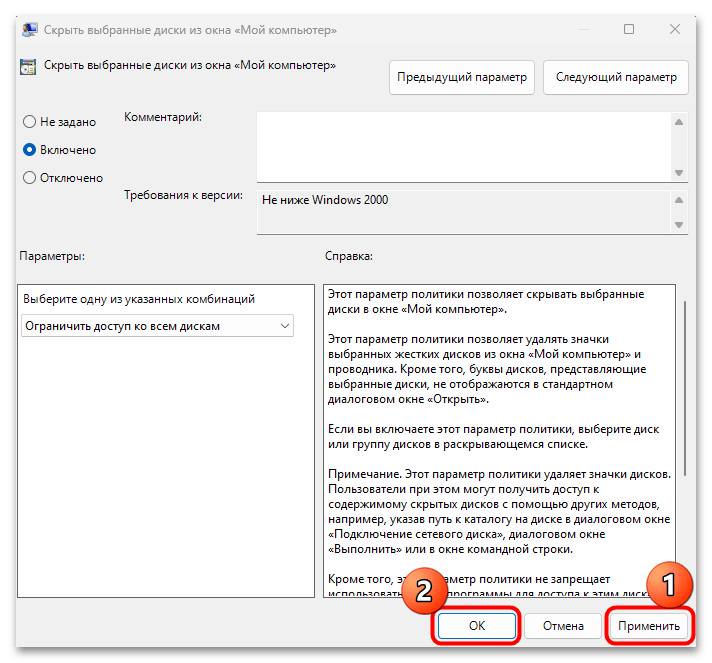
На этом скрытие диска в Windows 11 завершено. Включается его отображение аналогичным образом – через окно свойств параметра выключите ее.
Наша группа в TelegramПолезные советы и помощь
В проводнике Windows вы можете скрыть от пользователей определенный диск (раздел диска) и запретить к нему доступ.
Содержание:
- Скрываем диски в проводнике Windows через GPO или реестр
- Удалить букву диска, назначенную разделу
Скрываем диски в проводнике Windows через GPO или реестр
В параметрах групповых политик Windows есть две опции, который позволяют скрыть локальные диски от пользователей.
- Откройте редактор локальной GPO (
gpedit.msc
) - Перейдите в раздел User Configuration -> Administrative Templates -> Windows Components -> File Explorer
- Откройте настройки параметра Hide these specified drives in My Computer
- Если включить этот параметр GPO, в его настройках можно скрыть определенные диски (A, B, C, D) или сразу все диски. Например, я выбрал скрыть только диск C: Выбрать другие буквы дисков для скрытия нельзя.

- Сохраните настройки. Настройки политики применятся немедленно, без необходимости перезагрузки. Диск C: будет скрыт из навигации в проводнике File Explorer.
- Однако пользователь все еще может открыть этот диск, набрав вручную его адрес (букву диска) в адресной строке проводника.


В этом же разделе GPO есть еще один параметр – Prevent Access to drives from My Computer. Если включить его и выбрать в настройках диск, это запретит пользователю доступ к диску (просмотр содержимого в проводнике).

При попытке открыть любой путь на скрытом диске появится ошибка:
This operation has been cancelled due to restrictions in effect on this computer. Please contact your system administrator.

Однако, скрытые таким образом диски будут видны в интерфейсе сторонних программ (файловые менеджеры, архиваторы и прочие). Диски скрываются только в оболочке проводника File Explorer.
Указанные выше политики позволяют скрывать только предопределенные диски в проводнике. Скрыть произвольную букву и запретить доступ к диску можно через реестр. Используются такие команды:
reg add "HKCU\Software\Microsoft\Windows\CurrentVersion\Policies\Explorer" /v "NoDrives" /t REG_DWORD /d XXXX /f
reg add "HKCU\Software\Microsoft\Windows\CurrentVersion\Policies\Explorer" /v "NoViewOnDrive" /t REG_DWORD /d XXXX /f
Вместо
XXXX
нужно указать десятичное значение диска (из таблицы ниже), который нужно скрыть. Если нужно скрыть несколько дисков, нужно сложить значения для них.
Например, я хочу скрыть диски F и L. Сумма значений для них, согласно таблице:
32 + 2048 = 2080
Указываем это значение в следующих командах:
reg add "HKCU\Software\Microsoft\Windows\CurrentVersion\Policies\Explorer" /v "NoDrives" /t REG_DWORD /d 2080 /f
reg add "HKCU\Software\Microsoft\Windows\CurrentVersion\Policies\Explorer" /v "NoViewOnDrive" /t REG_DWORD /d 2080 /f
Если вы правите значения этих параметров в реестре, убедитесь, что описанные выше параметры политик не заданы.

Проверьте, что выбранные вами диски скрыты в проводнике.
Таблица с десятичными кодами для букв дисков:
| A | 1 |
| B | 2 |
| C | 4 |
| D | 8 |
| E | 16 |
| F | 32 |
| G | 64 |
| H | 128 |
| I | 256 |
| J | 512 |
| K | 1024 |
| L | 2048 |
| M | 4096 |
| N | 8192 |
| O | 16384 |
| P | 32768 |
| Q | 65536 |
| R | 131072 |
| S | 262144 |
| T | 524288 |
| U | 1048576 |
| V | 2097152 |
| W | 4194304 |
| X | 8388608 |
| Y | 16777216 |
| Z | 33554432 |
| Все диски | 67108863 |
Скрытие локальных дисков сервера от пользователей часто используют на терминальных RDS серверах. Если вы хотите сильнее ограничить доступ пользователя к RDS серверу, запретив пользователю запускать проводник или любые другие программы, используйте опубликованные приложения RemoteApp.
Удалить букву диска, назначенную разделу
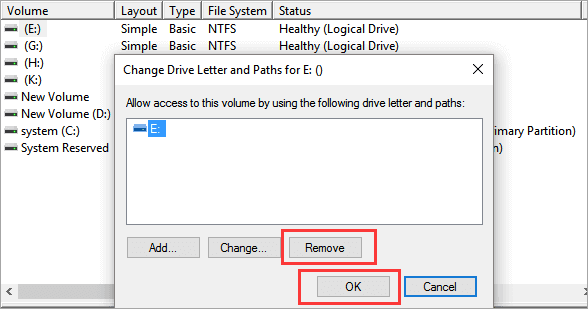
В некоторых случаях вместо скрытия буквы диска в проводнике имеет смысл просто удалить назначенную букву диска у неиспользуемых вами разделов. Например, в моем случае разделу восстановления WinRE назначена буква диска E:. Я хочу убрать этот диск из проводника.
Удалить букву диска можно из консоли управления дисками (Disk Management)
- Откройте консоль
diskmgmt.msc - Щелкните правой кнопкой по разделу, букву диска которого вы хотите удалить и выберите Change Drive Letter and Paths.

- Появится окно, в котором будет указана назначенная разделу буква диска.
- Нажмите Remove -> OK.

Для системных разделов (таких как recovery partition) назначенная буква не отображается в графической оснастке Disk Management. Букву у такого диска можно удалить из командной строки.
- Откройте cmd с правами администратора и выполните команду
diskpart - Выведите список томов в Windows:
list vol
- Я хочу удалить букву диска у скрытого системного раздела Volume 3. Выберите его:
sel vol 3 - Удалите назначенную букву диска:
remove letter=E - Завершите сессию diskpart:
exit

В результате этот раздел больше не будет показываться в проводнике под отдельной буквой диска.
As a web app developer working on multiple online apps and websites , my drives are filled with project files and future ideas. Recently, my PC’s graphics card malfunctioned , requiring me to visit the MSI service center for repairs. However, they requested my login password to address the graphics driver issue , which made me uncomfortable as it could grant access to my project files. I decided not to proceed with the repair at that moment.
After doing some research, I found that Windows 11 offers a method to hide drives without deleting or losing data. I tried this feature, and it worked well! I successfully hid the drive containing all my important project data.
In this tutorial, I’ll share my experience and provide step by step instructions on how to hide drives in Windows 11. This is a great way to secure sensitive information without needing to share access.
Method 1a: Hide Drive Using Disk Management:
- Firstly, you need to use the keyboard shortcut to launch the quick menu.
- Winkey + X
- Then in the menu, you need to choose the Disk Management option.
Choose Disk management from the Quick Menu option
- It will display all the available drives on your device.

Disk Management displays the list of Drives available on the PC.
- Now, you need to right-click the drive that you want to hide and choose the Change Drive Letter and Paths option.

Choose the drive to hide
- Now in the pop-up window, you need to click the Remove button to hide the drive.
- Click the Yes button if it prompted to complete the action.

Using Disk Management to hide the drive without losing its data!
Note: This method will not delete or remove any data while hiding it. Your data will be protected while doing the process.

Drive has been hidden from the File Explorer
Method 1b: Unhide Drive using Disk Management:
To unhide the drives that has been hidden using disk management tool. Follow the below steps.
- Choose the hidden drive ( The drives without having any Letter assigned ).
- Once you found the hidden drive and then you need to Right-click the hidden drive and choose the Change Drive Letter and Paths option.

Unhiding the Drive using Disk Management tool
- Now, choose the Add button will launch the Add Drive Letter or Path window will be appear on your screen.
- Choose the Drive Letter from the Drop down box or if you add it with other drive choose the “Mount in the following NTFS Folder” option.
- Finally, Click the Okay button to confirm the changes.

Unhiding & Assigning Drive Letter to the hidden Drive
In this way, you unhide the drive using the Disk management tool. You can find the drive in the File Explorer, Based on the alphabetical order of the Drive Letter you chose will be appear.
Method 2a: Hide Drive keeping its Data Using Command Prompt:
- Click the Start Menu and search for Command Prompt
- You need to choose the “ Run as Administrator ” option to launch the command prompt in admin mode.

Open Command Prompt using Run as Administrator
- Now you need to enter the following command:
diskpart
- The command will launch the diskpart.exe application in the console as shown in the below image.

Diskpart application launched inside the console.
- Enter the following command which will list all the drives available in your device:
list volume

Listing all drives using diskpart.exe
- You need to identify which drive you want to hide and execute following command:
select volume N
Note: I’m going to hide my N:\ Drive and so i’m using the letter D in the above command, Replace N:\ with the number of the volume you wish to hide.

Identifying and choosing the drive using diskpart.exe
- Now the drive that need to hidden is chosen, Execute the following command to hide it without losing its data from the file explorer.
remove letter=N

Command Executed to hide the chosen drive
- Once you execute the above command, you will get the message saying “ DiskPart successfully removed the drive letter or mount point.”
- In simple words, the drive is hidden from the file explorer without losing its data. You can find the drive has been hidden in the File Explorer.
Drive has been hidden from the File Explorer
Method 2b: Unhide Drive using DiskPart.exe tool:
To unhide the drive that has been hidden in your device:
- Open the command prompt with Admin Privileges
- Now you need to enter the following command:
diskpart
Diskpart application launched inside the console.
- Enter the following command which will list all the drives available in your device:
list volume
- Now, the list of volumes will be displayed including the hidden drives. Identify the volume that you want to unhide back again.

Listing all drives including Hidden volumes
- To select the hidden drive, you need to execute the below command:
select volume 1

Selecting the Hidden Volume using DiskPart.exe command
- Now, you need to execute the following command to assign the Path or Letter to the hidden volume:
assign letter=N
- You will receive the following message “ DiskPart successfully assigned the drive letter or mount point. “
- The drive will be visible back again without losing its data and can be found in the File Explorer.
Method 3a: Hide Drive or Volume using PowerShell:
- Click the Start Menu and search for PowerShell
- You need to choose the “ Run as Administrator ” option to launch the powershell in admin mode.

Opening PowerShell as Admin Mode
- To list all the available drives or volume in your device, use the following command:
Get-Volume

List of volumes available in your device using PowerShell
- Once you identified the drive, you need to execute the following command:
Set-Partition -DriveLetter N -IsHidden $true

Hide Volumes or Drives using PowerShell Command
- That’s it, This is the quickest way to hide the drives using the PowerShell command.
Method 3a: Unhide Drives or Volumes using PowerShell:
- You cannot simply reverse the hidden process, you need to do some extra steps to unhide the hidden drives or volumes.
- Open the PowerShell with admin privileges and execute the following list of commands.
diskpartlist volume

Identifying the Hidden Volumes using the diskpart.exe in PowerShell command
- You need to choose the hidden volume before unhiding it.
select volume 1

selecting the Hidden Volume using DiskPart.exe in PowerShell
- Now, you need to assign the Drive Letter to the hidden drive using the following command:
assign letter=N

Assigning Drive Letter to the Hidden Drive using the Diskpart.exe in PowerShell
- Enter the
exitcommand to exit the diskpart.exe console from the PowerShell.

Exiting the Diskpart.exe application
- To unhide the drive or volumes, executing the following command:
Set-Partition -DriveLetter N -IsHidden $false

Executing the PowerShell command to unhide the volume or drives.
Method 4a: Hiding Drives using Group Policy Editor:

gpedit.msc is missing
This method required Group Policy Editor enabled in your device, if your device says “gpedit.msc Not Found“, download the gpedit.msc.bat file and execute it to enable the group policy editor on your device.
- You can launch the Group Policy Editor application using the Run Command, to launch the Run window use the following keyboard shortcut:
- Winkey + R
- Once the Run window is launched, use the Run Command to launch the Group Policy Editor:
gpedit.msc

Launching GP Editor from Run Window
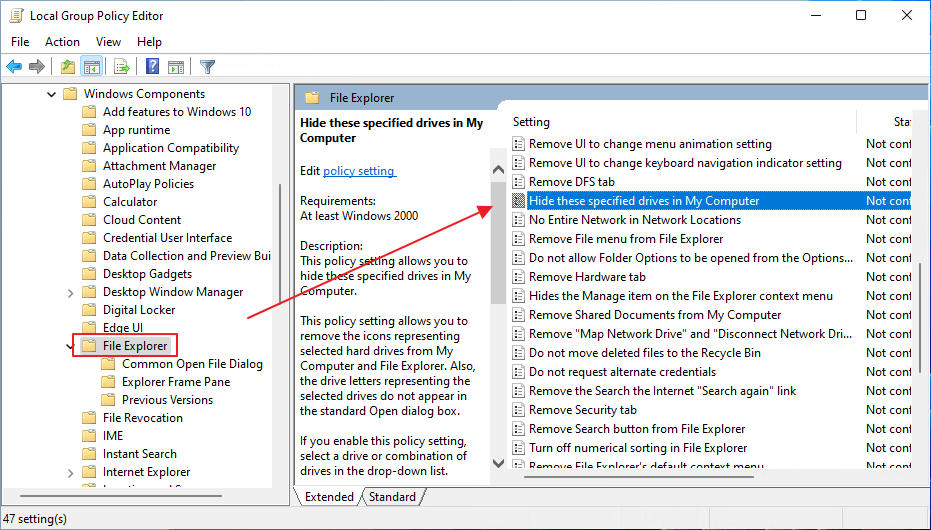
- Go to User Configuration > Administrative Templates > Windows Components > File Explorer.

Navigating into Group Policy Editor
- You need to double-click Hide these specified drives in My Computer option.

Double Clicking Hide these specified drives in My Computer.
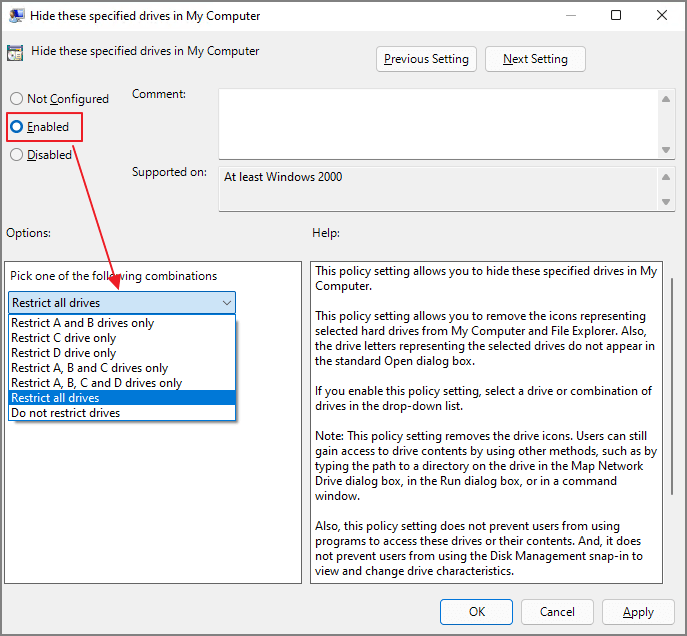
- Now, you need to choose the Enabled option and choose the drive that you need to hide from the drop down.

Choosing the drive to hide from the file explorer.
- Finally, click the Ok button to confirm the changes.
Note: The Group Policy Editor in Windows provides only a limited set of predefined options for hiding drives (such as restricting drives A, B, C, or D), which unfortunately does not allow you to directly select other drive letters like N or X.
Method 4b: Unhide Drives or Volumes using GP Editor:
- You can launch the Group Policy Editor application using the Run Command, to launch the Run window use the following keyboard shortcut:
- Winkey + R
- Once the Run window is launched, use the Run Command to launch the Group Policy Editor:
gpedit.msc
Launching GP Editor from Run Window
- Go to User Configuration > Administrative Templates > Windows Components > File Explorer.
Navigating into Group Policy Editor
- You need to double-click Hide these specified drives in My Computer option.
- Now, click the Not Configured option and click the OK button to confirm the changes.

Unhide Drives using GP Editor
Method 5a: Hide Volumes or Drives using Registry Editor:
- You can launch the registry editor from Run Window but before that you can use the keyboard shortcut to launch the Run Window:
- Winkey + R
- Once the Run window is launched, use the Run Command to launch the Registry Editor:
regedit

Launching Registry Editor using Run Window
- In the registry editor, navigate to the following path:
HKEY_CURRENT_USER\Software\Microsoft\Windows\CurrentVersion\Policies\Explorer

Navigating to the Explorer Directory in Registry Editor
- Ignore the existing values and right click on the empty pane choose New > DWORD (32-bit) Value, and name it NoDrives.
- Once the key file has been created, double click on it and set its value to hide specific drives.
- For example, setting the value to
4hides drive D or (Use the binary sum if you need to hide multiple drives, e.g.,4+8for drives C and D.)
| Drive Letter | Decimal Value |
|---|---|
| A | 1 |
| B | 2 |
| C | 4 |
| D | 8 |
| E | 16 |
| F | 32 |
| G | 64 |
| H | 128 |
| I | 256 |
| J | 512 |
| K | 1024 |
| L | 2048 |
| M | 4096 |
| N | 8192 |
| O | 16384 |
| P | 32768 |
| Q | 65536 |
| R | 131072 |
| S | 262144 |
| T | 524288 |
| U | 1048576 |
| V | 2097152 |
| W | 4194304 |
| X | 8388608 |
| Y | 16777216 |
| Z | 33554432 |
- Click the OK button and restart your system for changes to take effect. This will hide your drive or volume.
Method 5b: Unhide Volumes or Drives using Registry Editor:
- You can launch the registry editor from Run Window but before that you can use the keyboard shortcut to launch the Run Window:
- Winkey + R
- Once the Run window is launched, use the Run Command to launch the Registry Editor:
regedit
Launching Registry Editor using Run Window
- In the registry editor, navigate to the following path:
HKEY_CURRENT_USER\Software\Microsoft\Windows\CurrentVersion\Policies\Explorer
Navigating to the Explorer Directory in Registry Editor
- Delete the DWORD file named as “ NoDrives ” if exist or else create the New DWORD File and name it as NoDrives.
- Once the NoDrives DWORD file has been created, double click and set the value to 0 to unhide all drives and volumes on your pc.
- Click the Ok button and restart your pc to take effect.
Conclusion:
By following these steps, you can effectively hide drives in Windows 11 to protect sensitive files from unauthorized access. Whether you’re concerned about privacy during repairs or simply want to keep personal files hidden, this method allows you to secure your data without deleting or moving anything.
I hope this tutorial has been helpful in enhancing your privacy and security on Windows 11. Feel free to revisit this tutorial whenever you need to hide or unhide drives on your system. Stay safe, and keep your important project files protected! Find more informational tutorial on our Home Page: WinSides.
Want to hide the local disk and let the internal disk drive turns invisible to another user? In this article, you can get four reliable ways to hide internal disk drives.
How to Hide Local Disk with Disk Management
One of the easiest ways to hide a disk drives is to use Disk Management. Follow the steps to see how to hide the internal drives.
Step 1. Press Windows + X and select Disk Management from the pop-up list.
Step 2. Right-click the local disk you want to hide and click on Change Drive Letter and Paths from the list.
Step 3. Select drive and Click the Remove button. The warning windows will pop up, click Yes.
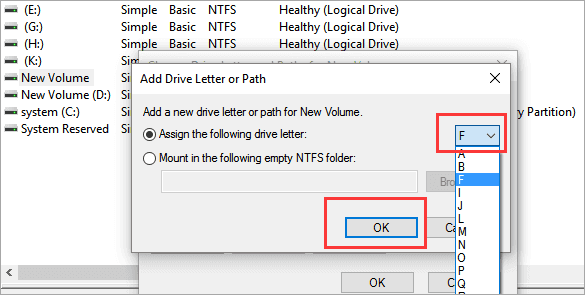
Step 4. Right-click drive without drive letter > Click Change Drive Letter and Paths > Click Add button.
Step 5. On the «Add Drive Letter or Path» window, tick Mount in the following empty NTFS folder. Click the Browse button next to the box.
Step 6. Go to the location you want to create the mount point > Click the New Folder button > Name the folder as you like and click OK.
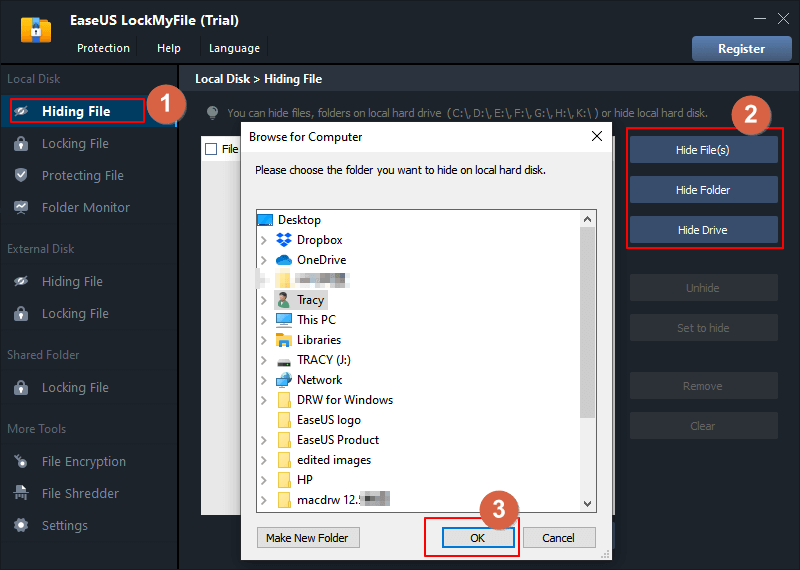
Hide Local Drive with EaseUS LockMyFile
Hide internal hard drive is an easy task by EaseUS LockMyFile to hide lock disk in several clicks. The hide function is one of the salient features to make your storage device completely invisible to other users. It also works to hide external hard drives. Download the software and use it on Windows 11, 10, 8, 7.
Check more features to encrypt, lock, protect, or monitor data:
- Password protects your important files, folder, or drives. Another user can read the write-protected file, but nobody can delete, modify, or rename it.
- Lock your files, folders, or drives on a local disk, external hard drive, or USB flash drive.
- Set passwords for your LAN shared folder.
- Monitor a folder or a disk when another user tries to change or modify your data.
How to Hide Local Disk with EaseUS LockMyFile:
Step 1. Run EaseUS LockMyFile, and select «Hiding File» under the module of «Local Disk «.
Step 2. Click on the «Hide File(s)», «Hide Folder», «Hide Drive» button to select the file/folder/drive you want to hide. Then they will be add to the list. You can add files as many as you want.
Step 3. Click «OK» to start the hiding process.
Using Local Group Policy Editor to Hide Local Disk Drive
Local Group Policy Editor can hide all internal disks or specific drives in Windows 11, 10, 8, 7. But it does not support all Windows versions, such as Local Group Policy Editor is disabled on Windows 10 Home Edition. Follow the steps to hide your local drive.
Step 1. Press Windows + R to open the dialog box. Type gpedit.msc and click OK to open the Local Group Policy Editor.
Step 2. Expand Administrative Templates > Windows Components > File Explorer
Step 3. Click on File Explorer and you can scroll down to find «Hide these specified drives in My Computer» on the right panel. Click it.
Step 4. On the «Hide these specified drives in My Computer» window, tick Enable option. And then move to the «Options» part, pick which drive you want to hide (Restrict all drives or Restrict * drive only).
Step 5. Click Apply and then click OK.
Hide Entire Disk Drive with CMD
You can use the Command Prompt to hide the drive. But the command line is much complex than the above method. If you are a beginner, skip this method and get back to the above three solutions.
Step 1. Type Command Prompt in the search box and run the command prompt as administrator.
Step 2. Type diskpart and press Enter.
Step 3. Input each command line and hit Enter.
- List volume
- Select volume *
- Remove Letter *
Step 4. You can see a message like “Diskpart successfully removed the drive letter or mount point”.
Additional Information: Unhide Disk Drive
1. Use Disk Management
Step 1. Open Disk Management, right-click the drive without a drive letter. Click Change Drive Letter and Paths.
Step 2. Click the Add button. Check to Assign the following drive letter from the pop-up window.
Step 3. Select a drive letter and click OK.
2. Unhide Disk Drive with software
If you have used this third-party software to hide your disk drives, you can reuse this tool to get your drive back. Launch EaseUS LockMyFile on the computer. Select the drive and click Unhide on the right side.
Wrap It Up
Are you successfully hide your files, folder, or drives on your computer? We get 4 quick fixes to hide the disk drive in few clicks. Some tutorials may also tell you to use Registry Editor, don’t take that solution due to the high failure rate. Try quick methods first!

This tutorial will show you how to hide specific drive(s) from showing in File Explorer for all users in Windows 10 and Windows 11.
You can hide one or more drives to prevent them from showing in File Explorer < This PC and navigation pane, and still be able to open and access the hidden drive.
Hidden drives do not lose their assigned drive letter.
You will still be able to manually open and access hidden drives using any of the usual methods like below:
- Typing the drive letter (ex: «F:») into the address bar of File Explorer, and press Enter.
- Right click on the drive in Disk Management (diskmgmt.msc), and click/tap on Open.
- Windows Terminal, Command Prompt, or PowerShell
You must be signed in as an administrator to hide and unhide drives.
EXAMPLE: «F» drive not hidden and hidden in File Explorer > This PC and navigation pane

Here’s How:
1 Open Registry Editor (regedit.exe).
2 Navigate to the key below in the left pane of Registry Editor. (see screenshot below)
HKEY_LOCAL_MACHINE\SOFTWARE\Microsoft\Windows\CurrentVersion\Policies\Explorer

3 Do step 4 (unhide all drives) or step 5 (hide specific drives) below for what you want.
4 Unhide All Hidden Drives in File Explorer > This PC and Navigation Pane
A) In the right pane of the Explorer key, right click or press and hold on the NoDrives DWORD (if there), and click/tap on Delete. (see screenshot below step 2)
B) Click/tap on Yes to confirm, and go to step 6 below. (see screenshot below)

5 Hide Specific Drive(s) in File Explorer > This PC and Navigation Pane
A) In the right pane of the Explorer key, double click/tap on the NoDrives DWORD to modify it. (see screenshot below step 2)
If you do not have a NoDrives DWORD, then right click or press and hold on a blank space in the right pane of the Explorer key, click/tap on New, click/tap on DWORD (32-bit) Value, type NoDrives for the name, and press Enter.
B) Select (dot) Decimal, enter the Value data from the table below you want for a single drive or combination of drives to hide, click/tap on OK, and go to step 6 below. (see screenshot below)
To hide a single drive, enter the value data (ex: «32») from the table below for the drive letter (ex: «F») of the drive you want to hide.
To hide a combination of drives, enter the added value data from the table below for the drive letters of each drive you want to hide. For example: To hide both the E (16) and F (32) drives, I would add 16 and 32 together from the table below, and enter 48.

|
Driver Letter |
Decimal Value Data |
|---|---|
| Show all drives | 0 |
| A | 1 |
| B | 2 |
| C | 4 |
| D | 8 |
| E | 16 |
| F | 32 |
| G | 64 |
| H | 128 |
| I | 256 |
| J | 512 |
| K | 1024 |
| L | 2048 |
| M | 4096 |
| N | 8192 |
| O | 16384 |
| P | 32768 |
| Q | 65536 |
| R | 131072 |
| S | 262144 |
| T | 524288 |
| U | 1048576 |
| V | 2097152 |
| W | 4194304 |
| X | 8388608 |
| Y | 16777216 |
| Z | 33554432 |
| Hide all drives | 67108863 |
6 Close Registry Editor.
7 Either restart explorer process, sign out and sign in, or restart the computer to apply.
That’s it,
Shawn Brink