
-
How to Cut, Copy and Paste on Windows
If you use regularly use a Windows PC, laptop, or any other device, you probably know how essential it is to cut, copy, and paste content. These actions are some of the most basic and time-saving tools to handle text, files, and images on your computer. In this guide, you will learn some of the quic
7 min read -
How to Install Deepin on VirtualBox?
Deepin is a Debian-based distribution that aims to provide a user-friendly, user-friendly and reliable operating system. It does not only include the best open source world has to offer, but also it has created its own desktop environment called DDE which is based on the Qt 5 toolkit. It focuses muc
3 min read -
How to Copy Paste in Vim Editor
Copying and pasting in Vim Editor is an essential operation for efficient text editing. Vim offers several methods to copy and paste content, including visual mode selection, yanking, and putting. Understanding these techniques can significantly enhance your productivity when working with Vim. In th
3 min read -
How to Copy & Paste in Android?
Quick Solution!Here is a quick solution for our active and speedy learners. Follow these steps to Copy and Paste on Android devices. Hold down the text that you want to copy.You will get a few options. Click on the Copy option.On the page where you want to paste, hold it down.Click on the Paste opti
5 min read -
How to install Metasploitable 2 in VirtualBox
Let’s first discuss what Metasploitable is, it is a testing environment that is very useful for beginner who wants to practice and test their penetration testing skills and security research. It is a target machine that is used to discover and penetrate vulnerabilities so that the user gets an idea
6 min read -
How to Install RHEL 8 on VirtualBox ?
Red Hat Enterprise Linux (RHEL) is a Linux-based operating system from Red Hat designed for businesses. RHEL can work on desktops, on servers, in hypervisors, or in the cloud. Red Hat and its community-supported counterpart, Fedora, are among the most widely used Linux distributions in the world. Th
4 min read -
How to Install Arch Linux in VirtualBox?
Installing Arch Linux on a virtual machine is an excellent way to experience this powerful and flexible Linux distribution without affecting your main system. If you’re looking to install Arch Linux in VirtualBox, this guide will take you through the process step-by-step. Arch Linux is known for its
7 min read -
How to Fix Copy and Paste Not Working in Windows 10?
Experiencing issues with copy and paste not working in Windows 10 can be frustrating, especially when you rely on these basic functions for daily tasks. This problem can arise due to various reasons, including Windows 10 clipboard problems or system bugs. In this guide, we’ll explore different ways
5 min read -
How to Install Garuda Linux on VirtualBox?
Garuda Linux is a rolling distribution that is based on the Arch Linux operating system, except, like Arch Linux, Garuda Linux comes with a graphical installer which is useful for easy installation, and also has other advanced graphical tools for managing one’s system. It is a performance-oriented L
3 min read -
How to install CSI Linux in VirtualBox?
What if there is a multi-purpose operating system designed especially for cyber investigators, yes you read it right and the answer to that question is, yes there is one such operating system known as CSI Linux. It is an open-source ‘theme park’ for the cyber security industry enthusiast. It has ton
3 min read
Virtual Box, Виртуализация, Программное обеспечение
- 05.10.2016
- 170 524
- 20
- 30.08.2020
- 169
- 152
- 17
- Содержание статьи
- Установка гостевых дополнений
- Включаем общий буфер обмена
- Включаем Drag & Drop
- Комментарии к статье ( 20 шт )
- Добавить комментарий
Установка гостевых дополнений
Для включения возможности обмена буфером обмена между хостом (компьютером на котором установлен VirtualBox,) и виртуальной машиной (компьютером, запущенным в виртуальной машине), необходимо установить «Гостевые дополнения», которые находятся на виртуальном образе, примонтировать который можно через меню VirtualBox «Устройства — Подключить образ диска Дополнений гостевой ОС».
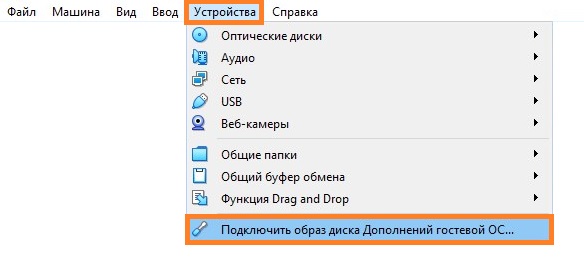
После этого в виртуальной машине появится привод с диском, на котором находятся нужные для установленной операционной системе дополнения, которые следует установить. Во время установки достаточно просто нажимать «Далее» («Next»), после чего потребуется перезагрузка.
Подробнее про установку гостевых дополнений можно прочитать в отдельной статье.
Включаем общий буфер обмена
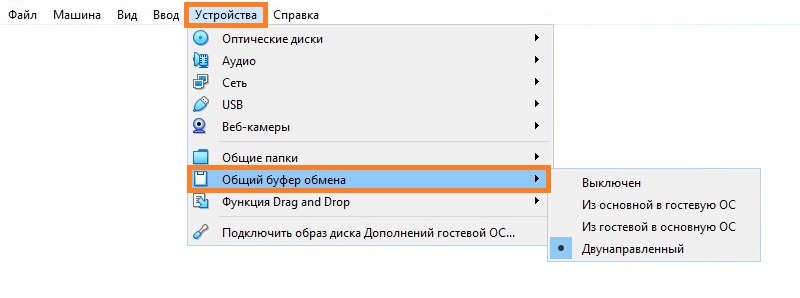
В том же пункте меню «Устройства» необходимо открыть подменю «Общий буфер обмена» в котором необходимо выбрать один из четырех вариантов:
Общий буфер обмена предназначен только для копирования и вставки текста!
Для передачи файлов используйте функцию Drag & Drop (см. ниже).
- Выключен — в данном случае возможность что-либо скопировать или вставить из реального компьютера в виртуальный, или наоборот, будет отсутствовать;
- Из основной ОС в гостевую ОС — обмен «буфером обмена» будет возможен только в одну сторону — с реального компьютера, в виртуальный;
- Из гостевой ОС в основную ОС — будет возможность копирования с виртуального компьютера на хост, с хоста в виртуальную машину не будет;
- Двухнаправленный — буфер обмена будет работать в обе стороны;
Изменения функции обмена буфером обмена между основным компьютером и виртуальным будут применены сразу после изменения настроек.
Включаем Drag & Drop
Drag’n’Drop называют действие, которое можно перевести на русский язык как «перетаскивание». Конкретно в VirtualBox оно позволяет перетащить файл с виртуальной машины в реальную, и наоборот. Для этого нужно включить в настройках виртуальной машины поддержку этой функции. Делается это следующим образом:
- В верхнем меню VirtualBox находим пункт «Устройства». В нем будет находится подпункт «Функция Drag & Drop».

- Выбираем подходящий параметр:
- Выключен — функция Drag & Drop выключена;
- Из основной ОС в гостевую ОС — возможность перетаскивать файлы и папки только в виртуальную машину, но не из неё;
- Из гостевой ОС в основную ОС — возможность перетаскивать файлы и папки только из виртуальной машины, но не в неё;
- Двухнаправленный — возможность перетаскивать файлы и папки как с виртуальной машины, так и в неё;
- Настройки применяются сразу, а значит после включения функции Drag & Drop можно сразу ей воспользоваться.

Sign in to your How-To Geek account

Summary
- There’s no need for Guest Additions to copy text between host and guest machines in VirtualBox.
- To enable copying and pasting, power off the virtual machine, then go to Settings > General > Advanced. Set Shared Clipboard to «Bidirectional» and save your changes.
- Enable Drag’n’Drop, too, if you want to make transferring files between machines easier.
If you use VirtualBox to run different operating systems on your computer, you may be wondering how to copy text from your host machine into the guest machine and vice versa. The feature might appear hidden, but we’ll show you where to find it.
Does Clipboard Sharing Require VirtualBox Guest Additions?
No, you don’t need Guest Additions just to copy and paste between guest and host machines. VirtualBox Guest Additions does provide several useful features, such as shared folders and improved performance, and we do recommend installing the Guest Additions. However, to enable copying text between the host machine and guest machine, you must change a setting in VirtualBox for the virtual machine.
How to Enable Copying and Pasting Between Machines in VirtualBox
To enable copying text between the host and guest machines, first make sure the virtual machine for which you want to enable the setting is powered off. It must be fully powered off and not in a saved state or you’ll get an error message when trying to do this. If your virtual machine is in a saved state, open it up and power down properly to make sure your data is saved.
Then, select the virtual machine in the list in the VirtualBox Manager (if it’s not already selected) and click «Settings» with a yellow cog icon on the toolbar.
In the Settings dialog box, make sure «General» is selected in the left pane. On the right, select the «Advanced» tab.
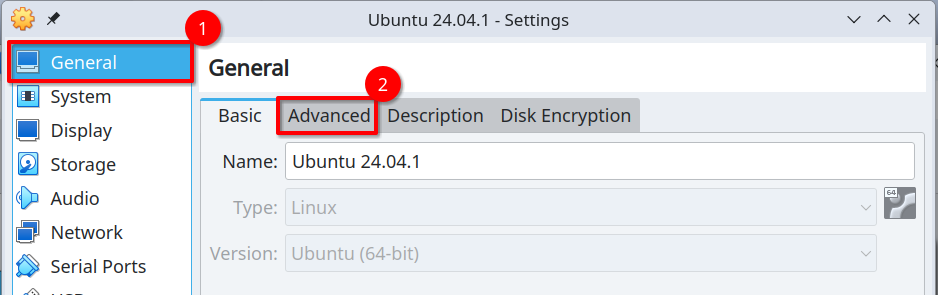
Click the Shared Clipboard drop-down list and select «Bidirectional.» This will allow you to copy text in both directions, from the host to the guest and vice versa.
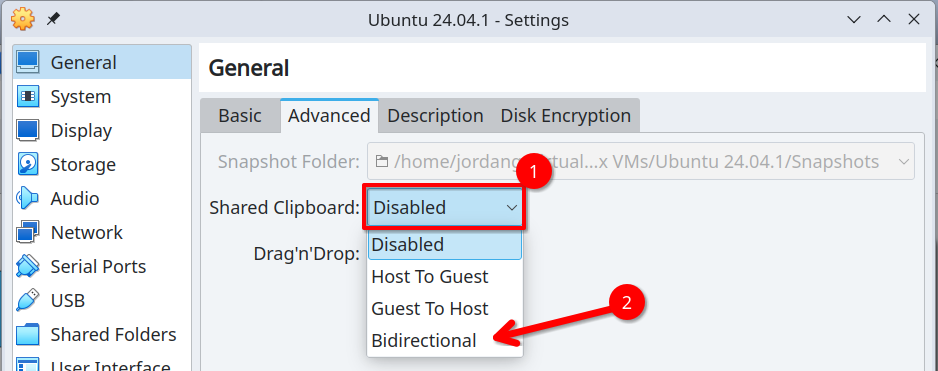
If you want to make sure nothing ever gets accidentally pasted from the guest into the host machine, you can instead select «Host to Guest» or, for vice versa, «Guest to Host.»
Click OK to accept the change and close the dialog box.
You can also select Bidirectional from the Drag’n’Drop drop-down list. This allows you to drag and drop files between the host and guest machines. If you frequently copy files between machines, this will make the process simpler.
0 comments
10K views
In this article, we will be learning how to perform copy paste in VirtualBox from Host Operating System to Guest Operating System. We will be discussing two simplest approach to copy paste files in VirtualBox.
Background: Why to use Virtual Box?
If you are Developer, Software Tester or Software Engineer who like to Taste latest flavor of Software, you must be familiar with Virtual Box. Virtual Box is one of the most popular virtualization software. VirtualBox is also used mostly due to software compatibility issues. Suppose, your organization uses some software that is available only on Windows, but you use Mac or Linux as your primary Operating System. You can install Windows on VirtualBox and can access that app from your Mac or Linux machine.
Similarly, if you are student, you have projects related to Linux or your semester has subject on Linux, You can download any of preferred Linux Distributions and install it inside VirtualBox on your Mac or Windows. This way, you wont need to know the complicated process of formatting and installing Operating system in Physical Machine and meanwhile your data is safe and you can use your preferred and licensed Operating system as usual.
One more reason why VirtualBox is popular because of its GPL License and supported by Oracle Corporation.
What is the environment we will be using in this guide?
We expect you already have installed VirtualBox Manager in your Computer and installed any Guest Operating System. Below is the environment we will be using to demonstrate this tutorial. This guide will be pretty similar on different Host Operating systems. Only Native Operating System based process at the setup will be different respective of OS.
Host Operating System: Windows 10 Insider Preview Build 21382
Guest Operating System: Windows 7 Ultimate 32 bit
Virtual Box Version: Virtual Box 6.1.22
You can check the complete list of operating system which we have compiled few years ago.
1. Copy Paste VirtualBox Feature – Shared Clipboard
VirtualBox offers Copy/Paste feature between Guest and Host OS but we have very hard time making it work. Most of people has similar complaint on community. Lets see how you can enable this feature, but We are not including this in our working solution.
What is Clipboard?
As we know, the temporary place in Computer Memory (RAM) where all copied text, files, media and any other type of data is stored to transfer between supported applications is called Clipboard.
What is Shared Clipboard?
When Clipboard is shared across devices, it is called Shared Clipboard. In this process, data is stored in Network/Internet/Cloud in most of applications. However, as VirtualBox is a device that resides inside Host Operating system, so we do not need to save Clipboard somewhere else. We can simply Copy in Host OS and can Paste in Guest OS or vise-versa in VirtualBox.

How to enable Shared Clipboard in VirtualBox?
To enable copy paste in VirtualBox, we can simple enable Shared Clipboard feature. Follow below steps to enable Shared Clipboard.
- When Machine is powered off, Click on Settings button of Virtual Machine from VirtualBox Application.
- In the General section of Settings, click on Advanced tab of settings.
- Click on Shared Clipboard dropdown and change it’s setting to Bidirectional.
At lease, let’s say, it is the idle process supposed to happen if we enable this setting. But most of the time, this doesn’t work and we will share a different guide on how to make Bidirectional Clipboard sharing work at sometimes later.
Note: Using this method, we can copy paste clipboard text but not files or folders. For Example, if you took screenshot inside Guest OS, you can paste the same in Host OS.
2. Drag’n’Drop – Copy Paste Files between VirtualBox & Host OS using Drag and Drop Feature.
This is another native feature provided by VirtualBox. It is as simple as enabling Shared Clipboard and option is available just next to Shared Clipboard.
How to Enable Drag and Drop feature in VirtualBox?
We can enable Drag’n’Drop feature in VirtualBox by following simple steps below.
- When Machine is powered off, Click on Settings button of Virtual Machine from VirtualBox Application.
- In the General section of Settings, click on Advanced tab of settings.
- Click on Drag’n’Drop dropdown and change it’s setting to Bidirectional.

How to Copy Paste Files between Host and Guest OS using Drag’n’Drop feature?
If you are using Machine with single display (Only one Monitor), you have do some workaround for this process to work.
- If you are using Multiple Monitors, you can just Click File and Drag it to required place. It will be just like Drag and Drop process in different Folders and process like Drag & Drop support on Modern File Uploaders in different applications that work on Browsers.
- If you are using single Monitor/Display, you have to resize the VirtualBox and Exit Full Screen mode. You can simply click the Restore button when you are on Full Screen mode of VirtualBox. You can use the alternative Keyboard short-cut for this Operation also. This is Host+F (
Right Ctrl + F) if you have not modified default Host Key. To learn about mapping Key to different functionality on Windows, refer to this article. - Simply Drag and Drop Files from Host to Guest or Guest to Host OS.

Working Example of Drag & Drop – Copy Paste Files between VirtualBox

3. Shared Folder concept – Copy Paste in VirtualBox
Another approach that works just fine is Shared Folder concept.
What are Shared Folders in VirtualBox?
Shared Folders are those folders which are mounted as Drives in Guest OS. These are basically Folders or Drives on Host Operating System. We can simply mount them on Guest OS and all the content of these folders will be available to Guest OS as well. You can copy/paste files there. Even you can work on these files and save. These will be saved on Host OS and you can work on them from Host Operating System as well. This gives flexibility to install software and tools Guest OS and also saves space.
How to Enable/Use Shared Folders in VirtualBox?
Lets understand this on step by step procedure as below.
- Open VirtualBox Manager and Click on the setting of Machine you want to share Folders with.
- Click on Shared Folder section in the left panel.
- Click on the Add New Shared Folder icon on the right side.
- Select your Folder from Host OS, check Auto Mount so it is automatically available When Guest OS boots in Virtual Machine.
Let’s have a look at below screenshots.
-

Setting – VirtualBox – Shared Folders -

Add New Shared Folder – VirtualBox – Shared Folders -

Add New Shared Folder – VirtualBox – Shared Folders -

Shared Folders in Guest OS – VirtualBox – Shared Folders


Once you are inside Guest OS and can see the Shared Folders as Mounted Drives, you can perform copy/paste actions in those folders as normal OS procedure.
Earlier, this process has to be done manually by sharing Folder from Host Operating System and then adding that Shared Folder location as Network Location using Add Shortcut option in Guest OS. But, in current version it is quite easy and anyone can simply follow the steps to achieve the purpose.
In this guide, we have shared 3 different methods by which we can copy and paste files between Host Operating System and Guest Operating System or vice-versa on VirtualBox Machines. If you have other workaround for copy paste in VirtualBox or have difficulty enabling this, let us know via comments.
Бесплатные курсы. Жми!
Загрузка…