
Загрузить PDF
Загрузить PDF
Из этой статьи вы узнаете, как в Windows копировать отдельные файлы и файлы из папки с помощью командной строки.
-

Необходимо выяснить, в каком каталоге хранится файл, чтобы указать его в командной строке.
- Чтобы найти каталог, в Проводнике перейдите в папку с файлом, а затем щелкните по адресной строке в верхней части окна Проводника.
- Большинство файлов находится в следующем каталоге: [буква диска]:\Пользователи\[имя пользователя] (например, «C:\Пользователи\Иван»). В этом каталоге хранятся практически все файлы, созданные пользователем.
- Например, файл на рабочем столе находится в следующем каталоге: «C:\Пользователи\Иван\Рабочий стол», а файл в папке «Документы» в каталоге «C:\Пользователи\Иван\Документы».
-
Это необходимо, чтобы скопировать файл. Имейте в виду, что командная строка учитывает регистр букв, поэтому правильно запишите имя файла.
-
Нажмите на логотип Windows в нижнем левом углу экрана.
-
Начнется поиск утилиты «Командная строка».
-
Вы найдете этот значок в верхней части меню «Пуск». Откроется окно командной строки.
- Имейте в виду, что на общедоступном компьютере (например, в школе) вы не сможете открыть командную строку.
Реклама


-
Введите cd, а затем нажмите Пробел; клавишу ↵ Enter не нажимайте.
-
-
В командной строке вы перейдете в указанный каталог.
-
Введите copy, а затем нажмите Пробел; клавишу ↵ Enter не нажимайте.
-
Введите имя файла, а затем нажмите Пробел. Имя файла введите с расширением файла (например, .txt в случае текстового файла). Клавишу ↵ Enter не нажимайте.
- Если в имени файла есть пробелы, заключите их в кавычки. Например, имя файла «Pickles are Good.txt» в командной строке нужно ввести так: Pickles" "are" "Good.txt.
-
Введите каталог (например, C:\Пользователи\[ваше имя пользователя]\Рабочий стол, в который будет скопирован файл.
- Если не ввести конечный каталог, файл будет скопирован в ваш персональный каталог (например, «C:\Пользователи\[ваше имя пользователя]»).
-
Файл будет скопирован в указанный каталог. Чтобы открыть скопированный файл, перейдите в соответствующий каталог в окне Проводника.
Реклама


-
Введите cd, нажмите Пробел, введите каталог с папкой и нажмите ↵ Enter.
- Например, чтобы скопировать файлы из папки «Example», которая находится на рабочем столе, введите каталог C:\Пользователи\Иван\Рабочий стол.
-
Введите robocopy, а затем нажмите Пробел; клавишу ↵ Enter не нажимайте.
-
Введите имя папки, файлы из которой вы хотите скопировать, а затем нажмите Пробел. Клавишу ↵ Enter не нажимайте.
- Если в имени папки есть пробелы, заключите их в кавычки.
-
Введите каталог, в который вы хотите скопировать файлы из папки.
- Если в исходной и конечной папках много файлов, они перемешаются, потому что сама исходная папка скопирована не будет.
-
Файл из исходной папки будут скопированы в конечную папку.
Реклама


Советы
- Чтобы скопировать все файлы, которые находятся в каталоге, введите команду copy *[тип файла] (например, copy *.txt).
- Чтобы создать конечную папку и скопировать в нее сразу несколько файлов, введите каталог конечной папки (включая саму конечную папку) в сочетании с командой «robocopy».[1]
- Если скопировать файлы, которые находятся на рабочем столе, в новую папку, она будет переименована в «Рабочий стол».
Реклама
Предупреждения
- Копировать файлы и папки через командную строку довольно рискованно, если вы не знаете, что делаете. Не трогайте папки и файлы, назначение которых вам неизвестно.
Реклама
Об этой статье
Эту страницу просматривали 224 742 раза.
Была ли эта статья полезной?
The copy Command Prompt command duplicates a file, storing the second version in a different location of your choosing.
Use the command to copy a file using its specific name and file extension or use a wildcard to copy groups of files at once, regardless of the file names or extensions. Some other command options include verification that the files were copied correctly and suppression of prompts to overwrite files of the same name.
Copy Command Availability
Copy Command Options (Windows 11 Command Prompt).
The copy command is available from within the Command Prompt in Windows 11, Windows 10, Windows 8, Windows 7, Windows Vista, and Windows XP, as well as from the Advanced Startup Options and System Recovery Options repair/recovery menus.
The availability of certain copy command switches and other command syntax might differ from operating system to operating system.
Copy Command Syntax
The command accepts the following general form:
copy [/d] [/v] [/n] [/y | /-y] [/z] [/l] [/a | /b] source [/a | /b] [+ source [/a | /b] [+ …]] [destination [/a | /b]] [/?]
See How to Read Command Syntax if you’re not sure how to interpret the copy command syntax as it’s described above or in the table below.
| Copy Command Options | |
|---|---|
| Item | Explanation |
| /d | Allows the destination file to be created decrypted. |
| /v | Verifies that new files are written correctly. |
| /n | Uses short file name, if available, when copying a file with a non-8dot3 name. |
| /y | Suppresses confirmation prompts to overwrite the destination file if it’s the same name as the source file. |
| /-y | Shows confirmation prompts to overwrite a file if the source file name is identical to the destination file name. |
| /z | Copies networked files in restartable mode. |
| /l | Copies the link to source instead of the actual file that source points to. This is only relevant if source is a symbolic link. |
| /a | Indicates an ASCII text file. |
| /b | Indicates a binary file. |
| source | This is the location and name of the file you want to copy. The source may not be a folder and you may not use wildcard characters (the asterisk). |
| destination | This is the location and/or file name that the file specified in source should be copied to. |
| /? | Use the help switch with the copy command to show detailed help about the command’s several options. |
Append files by choosing several source files but just one destination file.
Copy Command Examples
Below are several examples of how to use the copy command:
Copy to a Different Folder
copy Z:\Software\program.iso C:\Users\Jon\Downloads\Programs\
The copies program.iso from the Z: drive to the user’s Programs folder.
Take note of the space between these two commands. It’s not obvious at first, but the only spaces in this example of the copy command are after copy and between the source and destination files.
Copy and Rename
copy Y:\install\j93n.exe Y:\more\m1284.msi
You can use the copy command to rename a file and even change its file extension. In this example, the j93n.exe file copies to a new folder on the Y: drive as m1284.msi.
This isn’t a file conversion technique (i.e., the EXE file isn’t really being converted to MSI) but instead a way to make an identical copy but with the destination file saved under a different name and inside a different folder.
copy D:\i386\atapi.sy_ C:\Windows\atapi.sys
In the above example, the atapi.sy_ file, located in the i386 folder on the Windows XP installation CD, is copied to the C:\Windows directory as atapi.sys.
Unlike the Y: drive example above, this one is a bit more realistic, since copying files like that from a disc is a common practice when fixing some specific Windows problems.
Copy to Current Path
copy D:\readme.htm
In this example, the copy command has no destination specified, so the readme.htm file is copied to whatever directory you typed the copy command from.
For example, if you type copy d:\readme.htm from the C:\Windows> prompt, that HTM file will be copied to C:\Windows.
Copy Only Certain File Types
copy /y /v C:\Users\Jon\Downloads\*.mp3 C:\Users\Jon\Music\DownloadedMusic\
This command copies all MP3s (*.mp3) from the Downloads folder to the Music\DownloadedMusic\ folder, but we want to make sure that every file is copied, even if there’s already one in DownloadedMusic with the same name (/y). We’ll verify the copy (/v) to make sure Command Prompt tells us whether the files were actually copied or if an error happened in the process.
A folder has to already exist in the destination location before the copy command will copy files to it. Make new folders in Command Prompt with the mkdir command.
Merge Files Into One
copy Z:\file1.txt+Z:\file2.txt+Z:\file3.txt Z:\combined.txt
This will merge three TXT files into a new one called combined.txt. As you can see, each file that should be part of the merge needs to be separated by +, but no spaces.
You can also use the asterisk to append multiple files. So, in our example, we could replace all those .txt instances with Z:\*.txt, but only if we want to merge every single TXT file from the Z: drive.
Copy Related Commands
This command is similar to the xcopy command, but unlike copy, xcopy works on folders, too.
Of course, a command isn’t necessary if you’d rather copy a file in Windows using File Explorer.
Thanks for letting us know!
Get the Latest Tech News Delivered Every Day
Subscribe
Last Updated :
23 Sep, 2024
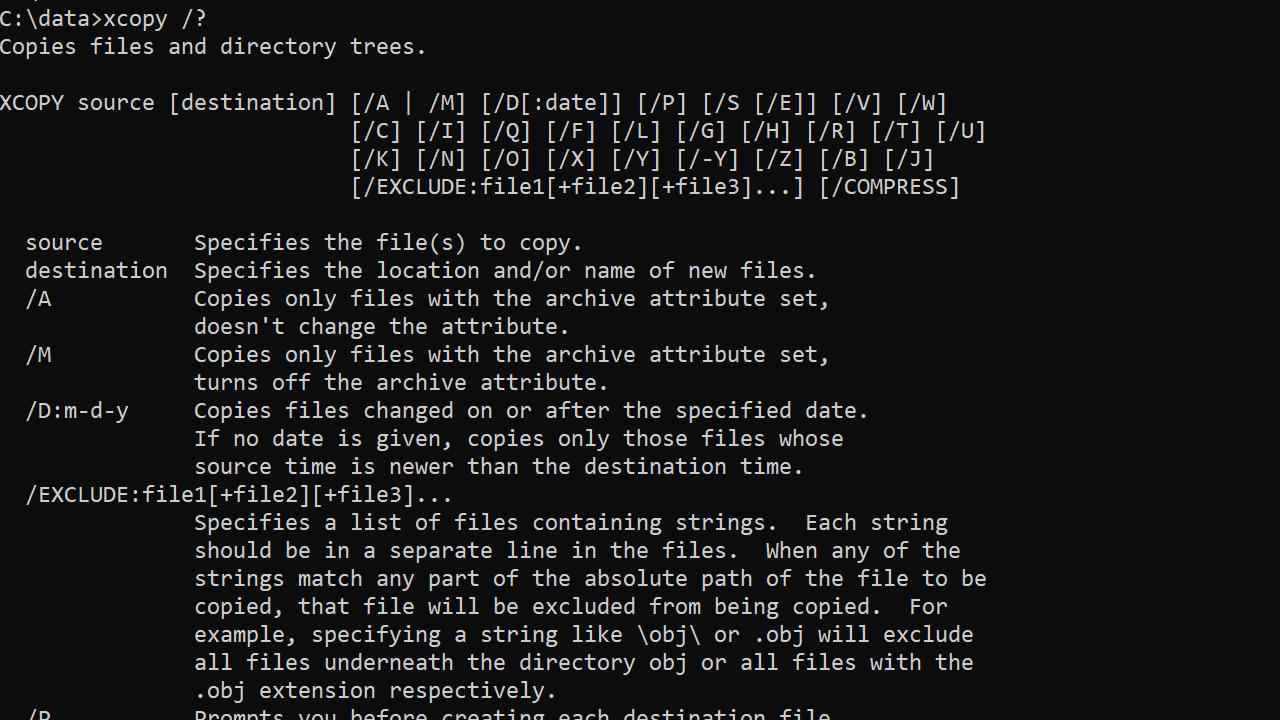
The xcopy command in Windows is a powerful tool for copying files and directories. It extends the functionality of the standard copy command by allowing the copy of entire directories along with their subdirectories and files all at once. This makes xcopy highly useful for tasks such as backing up files, migrating data, or automating file management tasks. In this article, we will cover what the xcopy command is how to use it, and provide some common use cases with examples.
Table of Content
- What is the Xcopy Command?
- How to Use the xcopy Command?
- 1. Copy Files
- 2. Copy Entire Directory
- 3. Copy Directory Including Empty Folders
- 4. Copy and Overwrite Files
- 5. Copy Files Based on Date
- 6. Copy Files in Quiet Mode
- 7. Copy Files with Attributes
- 8. Copy Files and Verify
- 9. Copy Files Without Prompting for Destination Confirmation
- Common xcopy Options
- How to Use the Xcopy Command in Windows — FAQs
What is the Xcopy Command?
The xcopy (extended copy) command is used to copy files and directories including the subdirectories and files within them. Unlike the basic copy command, xcopy can handle large-scale directory copying making it perfect for backups, migrations, and file replication.
Basic Syntax:
xcopy [source] [destination] [options]
- [source]: The path to the file or directory we want to copy.
- [destination]: The path to where we want to copy the files.
- [options]: The Various flags that control how the xcopy command behaves.
How to Use the xcopy Command?
1. Copy Files
To copy a file from one location to another using xcopy the basic syntax is:
xcopy C:\source\file.txt D:\destination\
This command copies file.txt from the C:\source directory to the D:\destination directory.
Example:

2. Copy Entire Directory
To copy an entire directory including all its subdirectories and files we can use the /s switch:
xcopy C:\source\ D:\destination\ /s
The /s option copies all directories and subdirectories except empty ones.
Example:
3. Copy Directory Including Empty Folders
If we also want to include the empty directories in the copy use the /e switch:
xcopy C:\source\ D:\destination\ /e
The /e switch copies all subdirectories including the empty ones.
Example:
4. Copy and Overwrite Files
If files in the destination already exist and we want to overwrite them we can use the /y option:
xcopy C:\source\ D:\destination\ /y
The /y option suppresses the prompt that asks if we want to overwrite the file.
Example:
5. Copy Files Based on Date
We can use the /d option to only copy files that have changed after a specific date or if they are newer than the destination files.
xcopy C:\source\ D:\destination\ /d
This ensures that only new or modified files are copied saving time and disk space.
Example:
6. Copy Files in Quiet Mode
To suppress output and avoid unnecessary prompts use the /q option:
xcopy C:\source\ D:\destination\ /q
This copies files quietly without listing each file.
Example:
7. Copy Files with Attributes
To copy system or hidden files we can use the /h option:
xcopy C:\source\ D:\destination\ /h
Normally, hidden and system files are not copied. The /h switch forces the xcopy command to the include them.
Example:
8. Copy Files and Verify
To ensure that files are copied correctly we can use the /v option which verifies each file after copying:
xcopy C:\source\ D:\destination\ /v
Example:
9. Copy Files Without Prompting for Destination Confirmation
Sometimes, xcopy will prompt to confirm whether the destination is a directory or a file. To avoid this we can add the /i option:
xcopy C:\source\ D:\destination\ /i
The /i option assumes the destination is a directory and automatically continues.
Example:
Common xcopy Options
Here are some commonly used xcopy options:
|
Option |
Description |
|---|---|
|
/s |
The Copies directories and subdirectories except empty ones. |
|
/e |
The Copies of all subdirectories including the empty ones. |
|
/y |
Overwrites files without prompting for confirmation. |
|
/d |
Copies files that have changed since the last copy. |
|
/v |
The Verifies each file after copying to ensure accuracy. |
|
/h |
The Copies hid and system files. |
|
/q |
The Copies files in quiet mode suppressing output. |
|
/i |
Assumes the destination is a directory if it’s unclear. |
|
/f |
It displays the full source and destination of each file copied. |
Conclusion
The xcopy command is a versatile and powerful tool in Windows allowing you to perform advanced file-copying tasks with ease. Whether we’re backing up directories copying only newer files or handling large sets of files across different drives, xcopy offers a range of options to suit your needs. By mastering this command we can save time streamline your file management tasks and ensure that data is efficiently copied with accuracy and precision.
If you are looking for how to copy files using command prompt, then keep reading further. This article also mentions other ways of copying files.
| 🎯Goal: | Copy files using the command prompt (CMD) |
| 🧰Tools: |
|
| Duration: | 3-5 minutes |
If you are experiencing a similar case as the Reddit post shown here, stay chill and follow the specific guide here to grab an efficient tutorial to copy files using command prompt:
How do I copy a folder to another folder using cmd? I’m sorry, but I just can’t find a direct response to this. I have a .bat file that compiles some stuff, and in the end, I want to copy a folder to another folder… I want to copy «myFolder» with its contents as well as the folder itself to «finalFolder». from Reddit
Note that if you are a non-technical user, unable to achieve the ability to utilize CMD command lines, turn to reliable PC file transfer software as recommended in method 2 for help.
When compared to the usual method of file copying, copying or moving files using CMD has some advantages. It saves time by eliminating the need to copy and paste manually. It also allows you to copy when unattended. That is to say, after entering specific commands, you can leave the computer alone and take a rest. The task will run on its own.
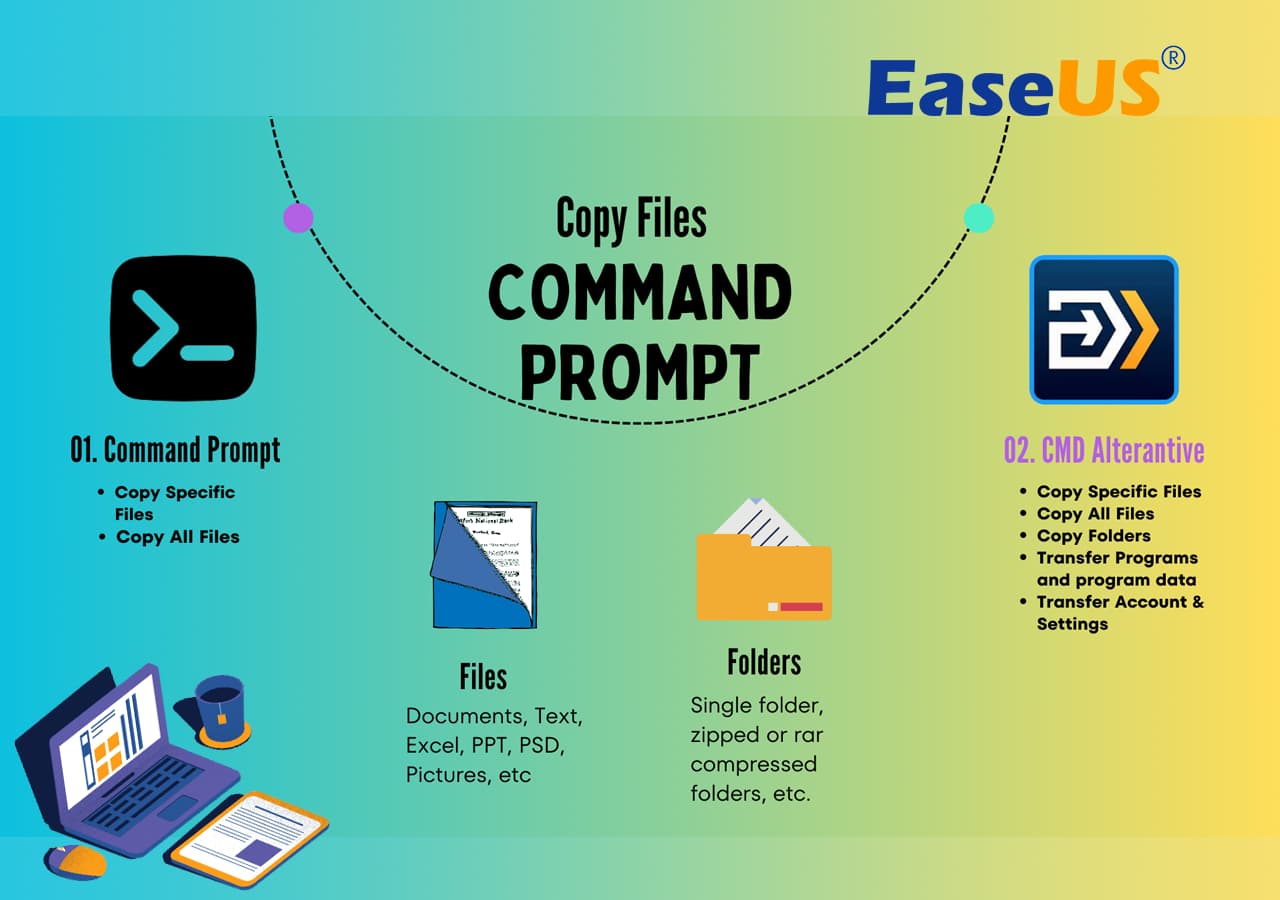
You can use the Copy and Xcopy command lines to copy files on your computer efficiently.
1. Use the Copy Command to Transfer Specific Files
Right-click the Start button and choose «Command Prompt (Admin)» to open CMD.
To copy files, use the copy command from the command line.
copy c:\myfile.txt e:
The command above will copy «myfile.txt» from the C: drive to the E: drive.
copy *.txt e:
The above command copies all text files in the current directory to the E: drive using a wildcard.
copy d:\example.xls
The command above copies the «example.xls» file from the D: drive to the current directory. We didn’t indicate a destination; by default, the current directory is utilized if the goal isn’t supplied.
2. Using the Xcopy Command to Copy All Files
Xcopy is a command that copies files or groups of files between directories. It’s convenient for copying data to and from a fixed drive.
Step 1. To find cmd, go to Start and type cmd into the search box. From the list, right-click Command Prompt and choose «Run as administrator».
Step 2. Now, in the command prompt, type the Xcopy command to copy folders and subfolders, including their contents, as shown below.
If you want to copy the «test» folder and its subfolders from the C drive to the D disc, use the Xcopy command as follows:
Xcopy C:\test D:\test /E /H /C /I
- /E — Copies all subdirectories, including any that are empty.
- /H – Copies files that are hidden or have system file attributes.
- /C – Even if an error occurs, keep copying.
- /I – Always presume the destination is a folder if in question.
A command-line interface differs from a graphical user interface, considering that it is text-only. A high learning curve, more space for error, a vast number of instructions, and the inability to figure anything out by research are all downsides of the command line interface.
Using Command Prompt Alternative to Copy Files
Unlike Command Prompt, turning to a reliable PC file transfer software won’t require a technical background of utilizing and inputting correct command lines for copying files. EaseUS Todo PCTrans Free enables you to transfer an unlimited number of files, programs, and settings between two PCs in a user-friendly manner.
It does not necessitate extensive computer skills or the acquisition of any additional equipment. With a lifetime license, you can get free upgrades for the rest of your life.
Now, download this PC data transfer software to transfer files from one computer to another in simple clicks.
Step 1. Set Up the Old PC
- First, install and launch EaseUS Todo PCTrans and select Data Transfer on the left panel of the main interface.
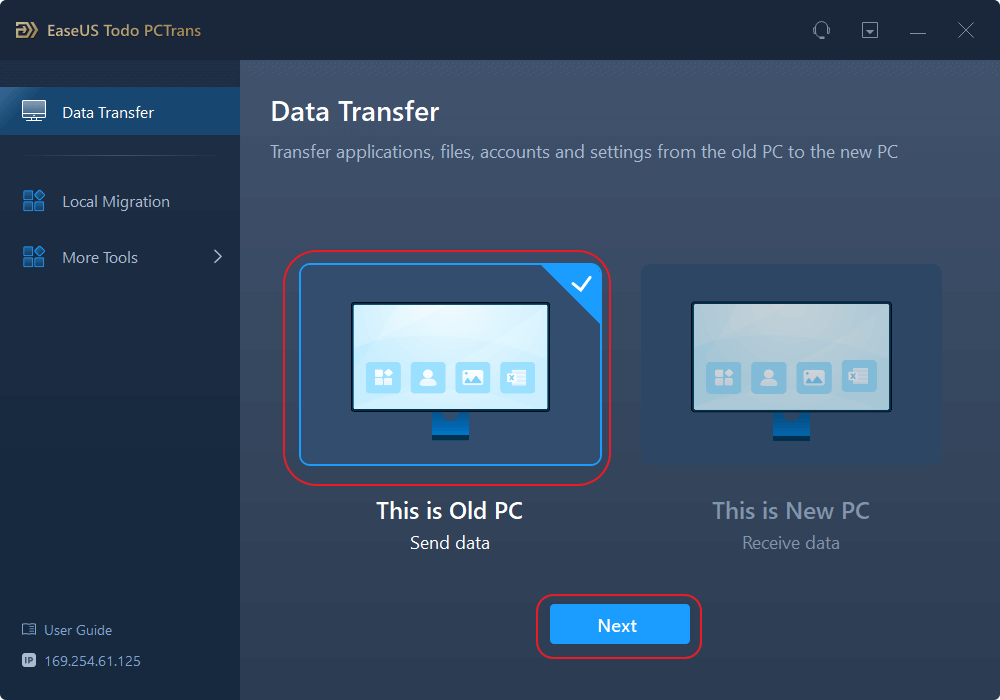
- Select «Transfer Directly» and click «Next» to continue.
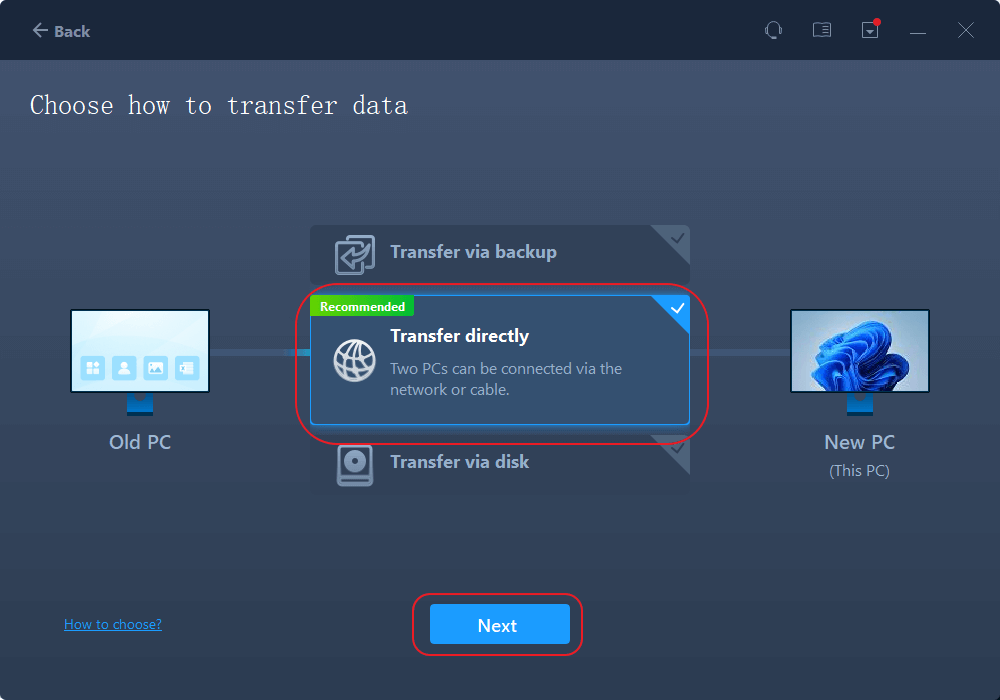
Step 2. Set Up the New PC
- Download and launch EaseUS Todo PCTrans on the new computer; select «This is New PC» and click «Next».
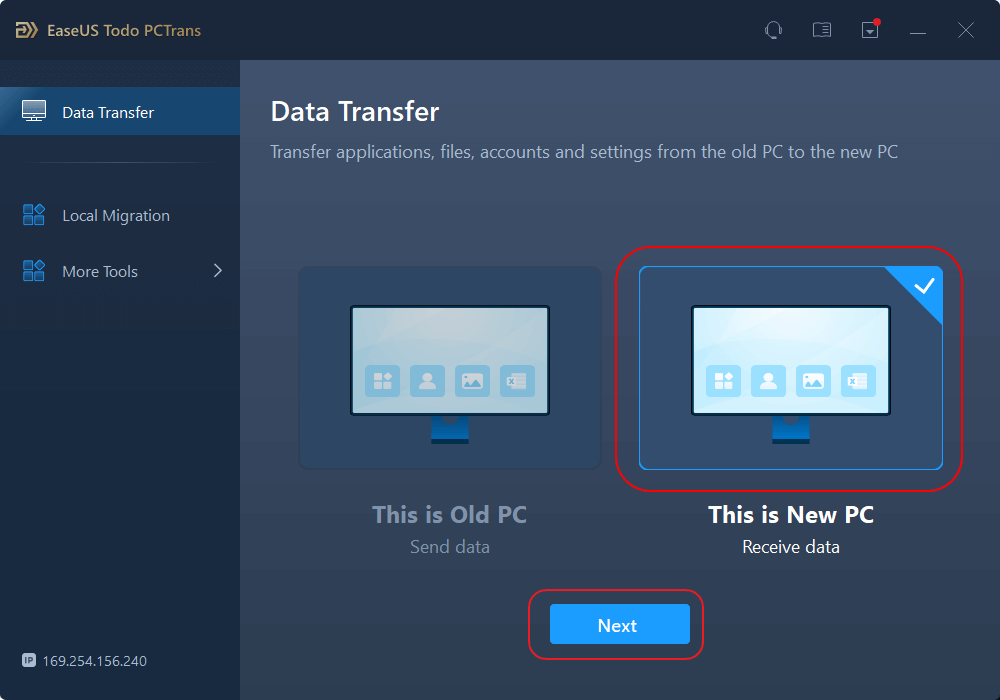
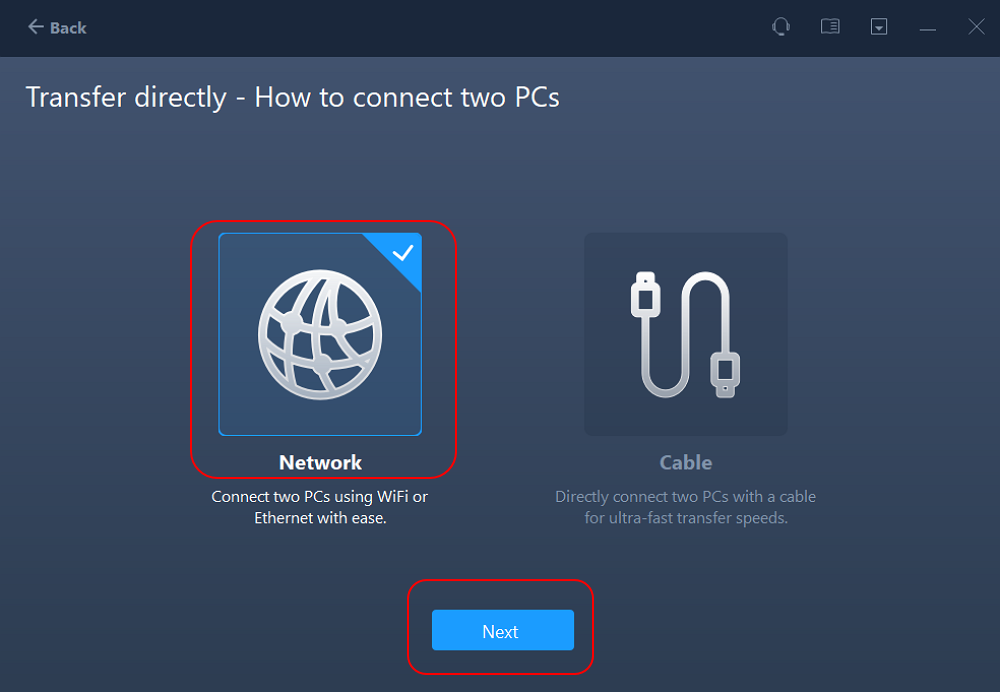
- Select «Transfer directly» and click «Next» to continue.
- Select «Network» and click Next to continue. This will automatically scan the old PC. (Make sure the two PCs are connected to the same LAN.)
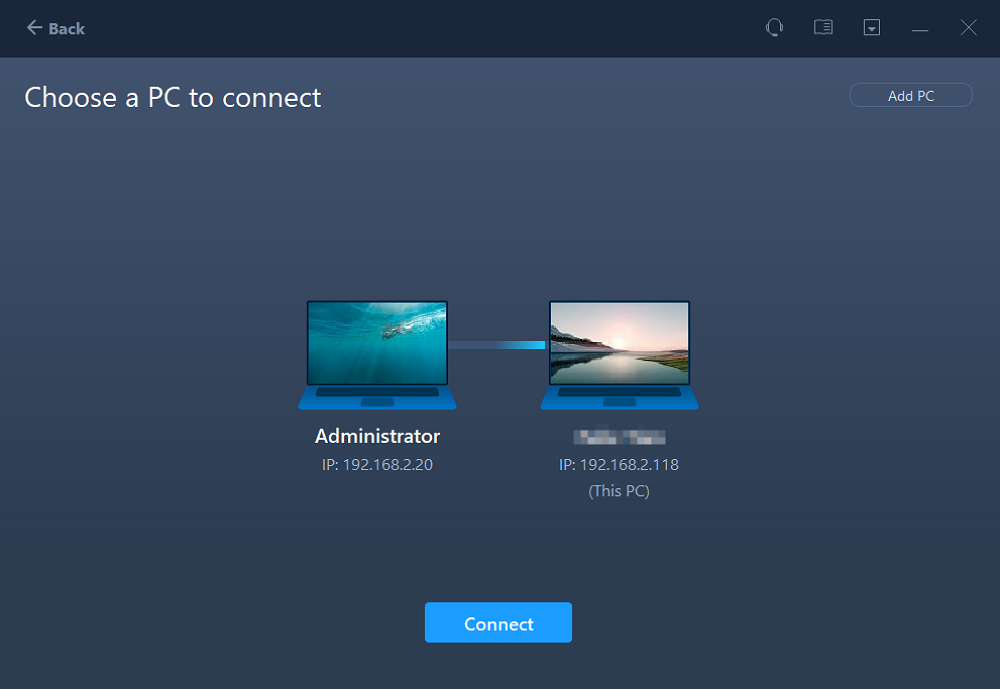
- Select the target PC and click Connect. Then, it will take some time to scan and analyze the data in old PC.
Step 3. Select the Files to Transfer
- Finally, on the new PC, select the Files tab, select the files you need to transfer. Then, click «Transfer» to start.

Feel free to share this amazing tool to help more of your friends efficiently transfer files between computers like an expert:
Other Easier GUI (Graphical User Interface) Methods to Copy Files
Here are three easier ways to transfer and copy files from one drive or one computer to another. Check the detailed content.
1. Use a USB Flash Drive
Depending on the drive’s capacity, USB flash memory devices, also known as memory keys and memory sticks, can replicate a few files or a large quantity of data.
Step 1. Place the flash drive in one of your computer’s USB ports.
Step 2. Open the File Explorer window and look for the flash drive’s entry in the left pane.
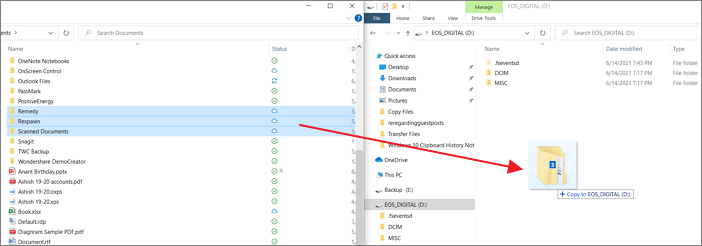
Step 3. Drag and drop the files you want to copy into the drive’s folder.
Step 4. Remove the flash drive and place it in a USB slot on the other PC after you finish.
Step 5. By picking and dragging the files into another folder in a File Explorer window, you can copy them to the new PC.
Share this article and let more users know how to copy files using a USB drive.
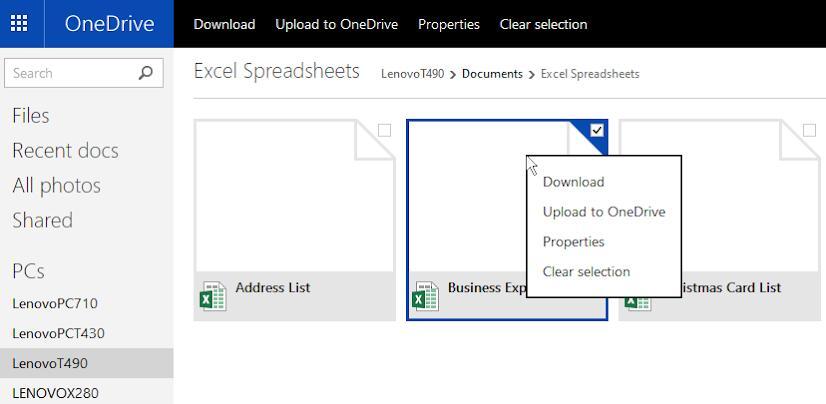
2. Use OneDrive
The cloud drive is another option for transferring files across your Windows devices. It can be accomplished by sharing the file with any Windows app that supports cloud storage services such as OneDrive. The storage space, upload time, and potential expense of this technology are its drawbacks. The method could be a terrific choice for you if you need to move smaller files more frequently.
Step 1. Drag and drop files into OneDrive.
Go to OneDrive and sign in. Add the file to your OneDrive cloud account and simply click «Add» when the app opens. Your OneDrive account will receive the file.
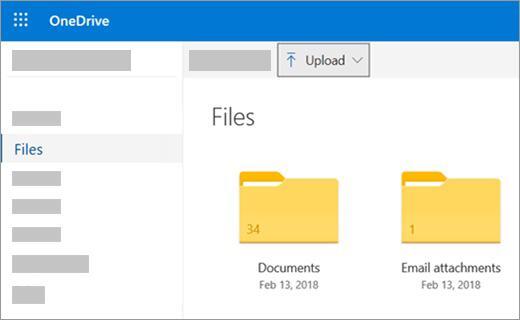
Step 2. Get the files you need.
Open the OneDrive software on the other laptop, right-click the file, and select «Download». The Files It will complete the file transfer from your laptop or computer to the other computer on your network.
Conclusion
There are many ways of copying files from one drive/computer to another. However, all the methods mentioned have their advantages, but they also come with many disadvantages. That’s why it is recommended that you should use EaseUS Todo PCTrans to copy files. This software poses no security threats and is easy to use.
It’s also a data and application backup software that can keep your files safe as long as you perform regular backups. It’s more than just PC migration software that can transfer files between local disks/drives or between two computers for free. For example, you can transfer programs from C drive to D drive securely.
In this tutorial, we will learn how to copy files and folders in the Windows Command prompt.
We are going to look at two cmd commands: Copy and Xcopy.
Note that the copy command has some limitations compared to the xcopy. For example, to copy directories or hidden files, you have to use the xcopy command.
Copy Command
On Windows, we can use the copy command to copy one or more files from one location to another:
copy C:\data\sales.doc C:\backupThe preceding command will copy sales.doc from C:\data\ to C:\backup.
Use the /y switch to overwrite duplicate files without confirmation:
copy /y C:\data\sales.doc C:\backupWe can also save a file to a different name. For example, the following command saves file1.txt as file2.txt in the same directory:
copy file1.txt file2.txtYou can also use wildcards to copy multiple files:
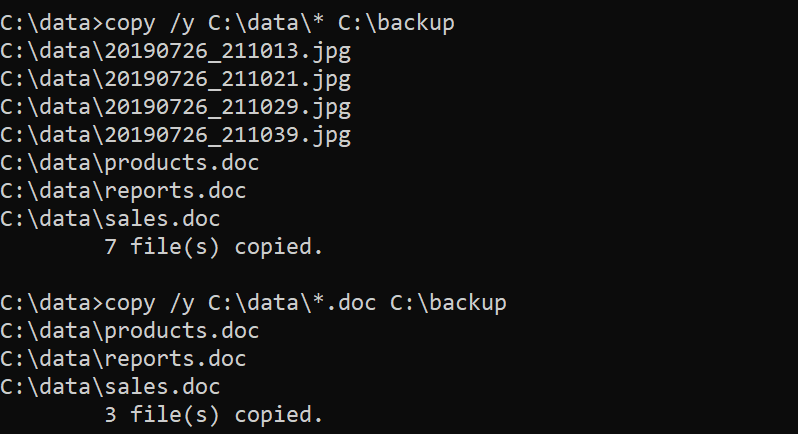
copy /y C:\data\* C:\backup
copy /y C:\data\*.doc C:\backup
The first command copies all files in the C:\data\ directory to C:\backup. The second command copies all files with a .doc extension to the C:\backup.
We can also combine several files into one:
copy file1+file2 file3
copy error* C:\backup\report.txt
In the first line, file1 and file2 are combined to make one file named file3. In the second line, all files whose names start with «error» are copied to the C:\backup, as a single file called report.txt.
You can get a list of all available options with the copy /? command.
Xcopy Command
The xcopy command offers more features. For example, with xcopy, we can copy directories and subdirectories, as well as hidden files.
Command Options
| /Y | Prompt before overwriting an existing file. |
| /H | Copy hidden files/system files. |
| /S | Copy directories and subdirectories. Empty directories are not included by default (use /e for that). |
| /E | Include empty directories. |
| /I | Create the destination folder if it does not exist. Use this option when you want to copy the parent folder itself. |
| /T | Copy directory tree without files. Empty directories are not included by default. Use /e option to include empty folders. |
| /P | Prompt for confirmation before creating each file. |
| /Q | Quiet mode. |
| /exclude | Specify a text file that contains a list of files to exclude. See the examples. |
| /Z | Resume mode. Use this option when copying files over a network. |
| /D:m-d-y | Copies files changed on or after the specified date. |
Examples of Using the Xcopy Command
Copy sales.doc from the current directory to C:\backup:
xcopy sales.doc C:\backupCopy C:\data\accounts (all files including subdirectories) to C:\backup:
xcopy /s /e /h /i /y C:\data\accounts C:\backup\accounts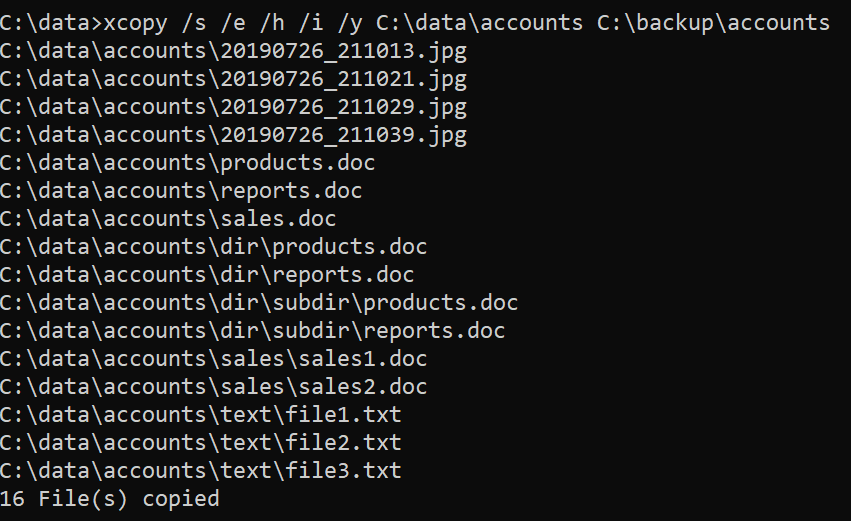
In the following example (without /I switch), the contents of the folder are copied but not the folder itself:
xcopy /s /e /h /y C:\data\accounts C:\backup\Copy the directory structure of C:\OneDrive to the backup directory:
xcopy /s /e /t /y C:\OneDrive C:\backup\You can use wildcard characters to match patterns. The following command copies all files with a .jpg extension:
xcopy /s /h /y C:\data\*.jpg C:\backupUsing for loop to copy multiple files:
for %i in (sales.doc, products.doc) do xcopy /y %i C:\backupExcluding files with xcopy
With the /exclude, we can provide a text file that contains items we want to exclude.
xcopy /s /e /h /y /exclude:C:\Users\user1\files-to-exclude.txt C:\data\ C:\backup\The files-to-exclude.txt may look like the following:
.doc
sales*
In this example, we exclude items with the .doc extension and files whose name starts with sales.
You can get a list of all available options with the xcopy /? command.