
Если вам по той или иной причине потребовалась загрузочная флешка Windows 10 (или другой версии ОС), при этом на имеющемся компьютере в наличии только Linux (Ubuntu, Mint, другие дистрибутивы), вы сравнительно легко можете записать её.
В этой инструкции пошагово о двух способах создать загрузочную флешку Windows 10 из Linux, которые подойдут как для установки на UEFI-системе, так и для того, чтобы установить ОС в Legacy режиме. Также могут пригодиться материалы: Лучшие программы для создания загрузочной флешки, Загрузочная флешка Windows 10.
Загрузочная флешка Windows 10 с помощью WoeUSB
Первый способ создания загрузочной флешки Windows 10 в Linux — использование бесплатной программы WoeUSB. Созданный с её помощью накопитель работает и в UEFI и в Legacy режиме.
Для установки программы используйте следующие команды в терминале
sudo add-apt-repository ppa:nilarimogard/webupd8
sudo apt update
sudo apt install woeusb
Если эти команды не сработали, попробуйте такой вариант:
wget mirrors.kernel.org/ubuntu/pool/universe/w/wxwidgets3.0/libwxgtk3.0-0v5_3.0.4+dfsg-3_amd64.deb
sudo dpkg -i libwxgtk*_amd64.deb
sudo apt update
sudo apt --fix-broken install
sudo apt install woeusb
После установки порядок действий будет следующим:
- Запустите программу.
- Выберите ISO образ диска в разделе «From a disk image» (также, при желании, можно сделать загрузочную флешку с оптического диска или смонтированного образа).
- В разделе «Target device» укажите флешку, на которую будет записан образ (данные с неё будут удалены).
- Нажмите кнопку Install и дождитесь завершения записи загрузочной флешки.
- При появлении ошибки с кодом 256 «Source media is currently mounted», размонтируйте образ ISO с Windows 10.
- При ошибке «Target device is currently busy», размонтируйте и отключите флешку, затем снова подключите её, обычно помогает. Если не сработало, попробуйте предварительно отформатировать её.
На этом процесс записи завершен, можно использовать созданный USB накопитель для установки системы.
Создание загрузочной флешки Windows 10 в Linux без программ
Этот способ, пожалуй, ещё проще, но подойдет только в том случае, если вы планируете загружаться с созданного накопителя на UEFI-системе и устанавливать Windows 10 на GPT диск.
- Отформатируйте флешку в FAT32, например, в приложении «Диски» в Ubuntu.

- Смонтируйте образ ISO с Windows 10 и просто скопируйте всё его содержимое на отформатированную флешку.


Загрузочная флешка Windows 10 для UEFI готова и с неё можно без проблем загрузиться в EFI-режиме.
Hello everyone. In this article, I am going to show you how to create a Windows 11 bootable USB on Ubuntu using the GParted project.
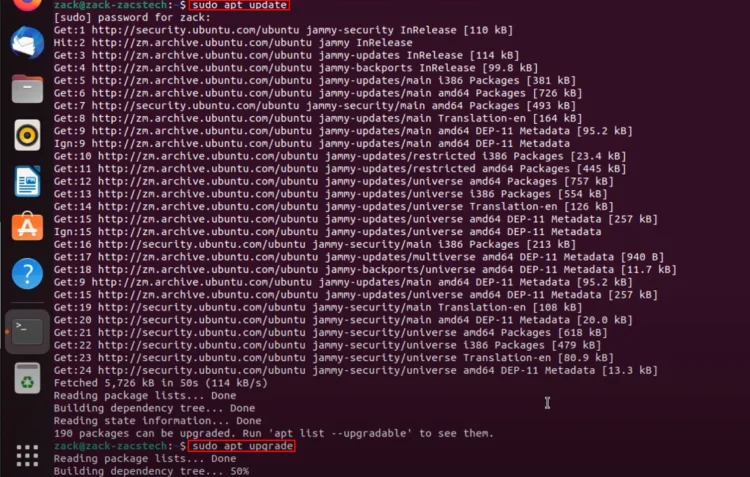
Updating Your System
Before we begin, if you’re using Ubuntu, it’s a good practice to update your system. I will show you how to create a Windows 10 or 11 bootable USB in Ubuntu. You can start by updating your system by typing “sudo apt update” in Terminal. If there are any packages that need to be upgraded, you can upgrade them by typing “sudo apt update“.
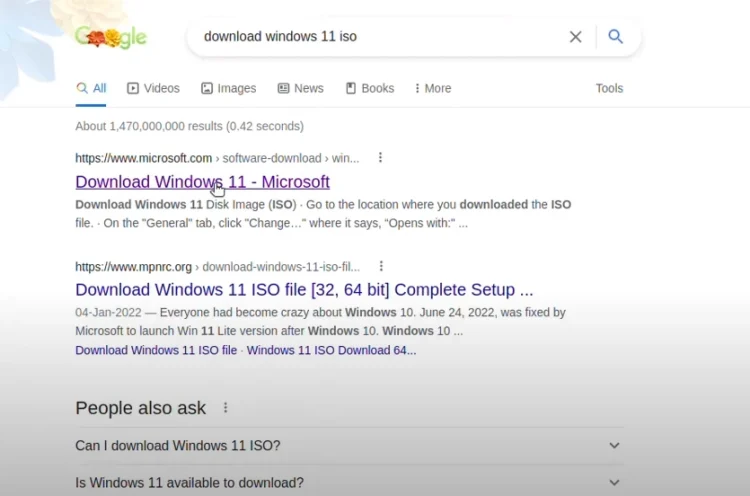
Downloading the Windows 10/11 ISO
So, the first step is to download the Windows 11 ISO image. Open your favorite browser or simply use the default browser that comes with Ubuntu. Simply search for “download Windows 11 ISO” and you’ll get the Windows 11 ISO image from Microsoft’s official website.
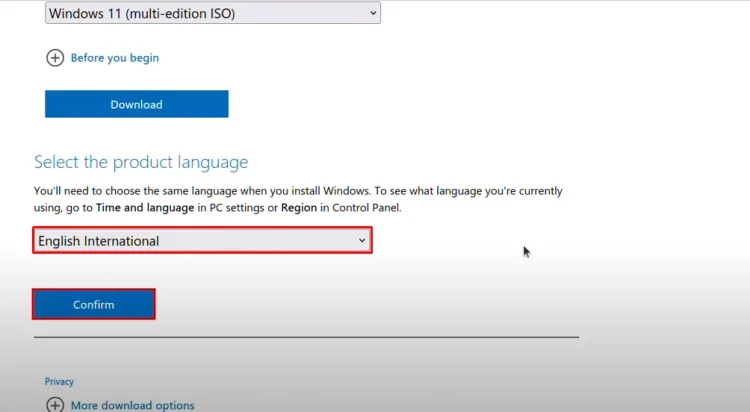
After that, you have to select the Windows 11 ISO image edition and click Download.
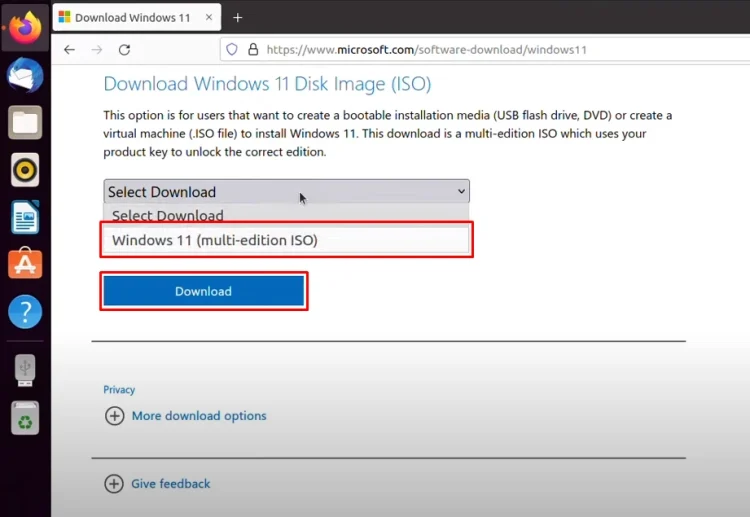
Choose a language and click Confirm.
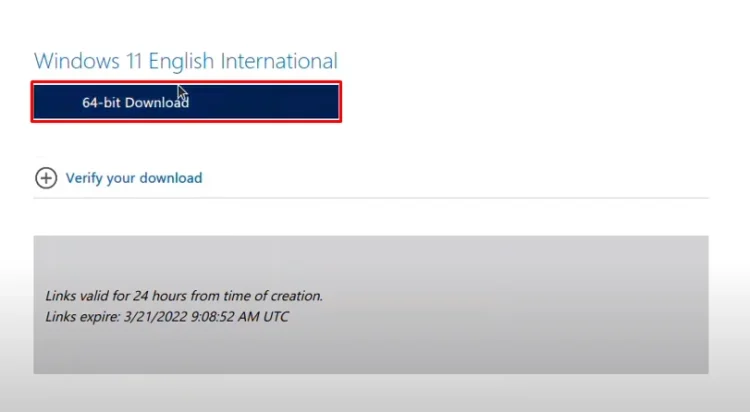
Then click 64-bit Download and save it. It will save the file to your computer.
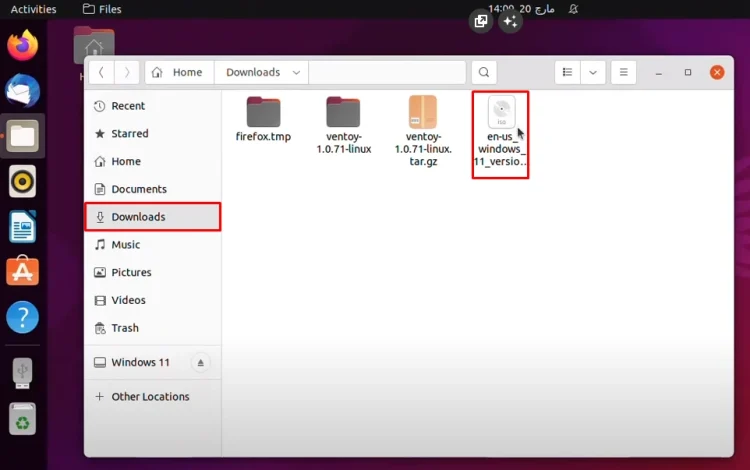
Now, I’m going to insert it because I already have it. If I have to show you, it’s in the Downloads directory, which I have simply imported from my main PC. The size is around 4 GB.
Preparing the USB Flash Drive
The second step is to attach the USB flash drive to your computer. I’ve already done that, so there’s no need for me to attach it.
The third step is to install GParted onto your computer.
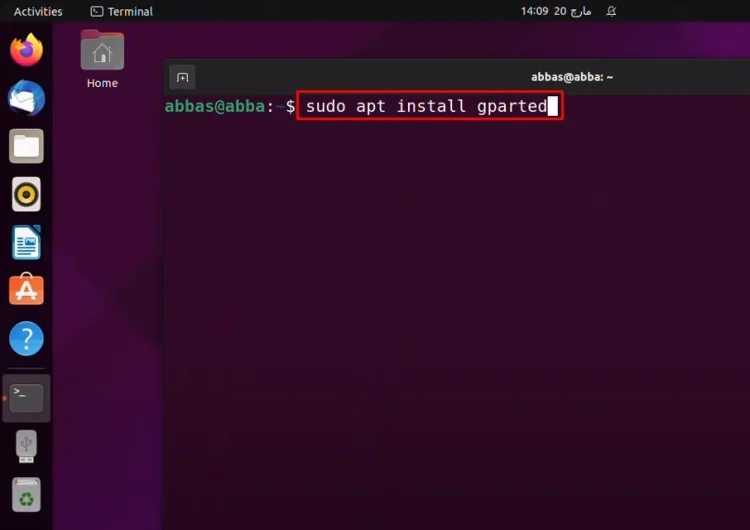
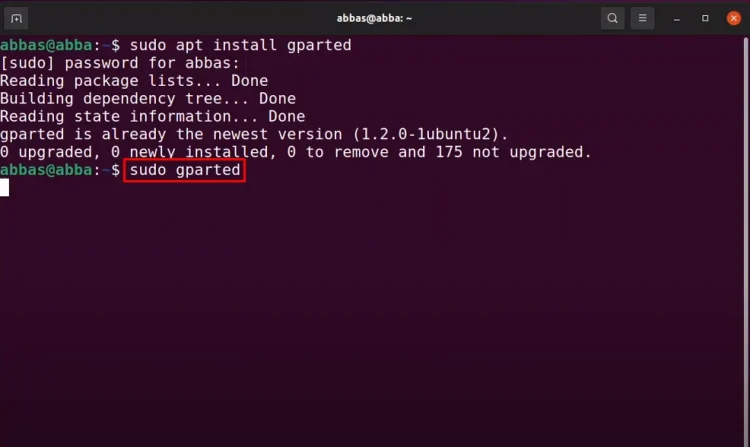
You can use the Ubuntu Software or the Terminal. I prefer the terminal because it’s faster. Once it’s launched, simply type “sudo apt install gparted“.
The next step is to launch GParted, typing “sudo gparted” in Terminal.
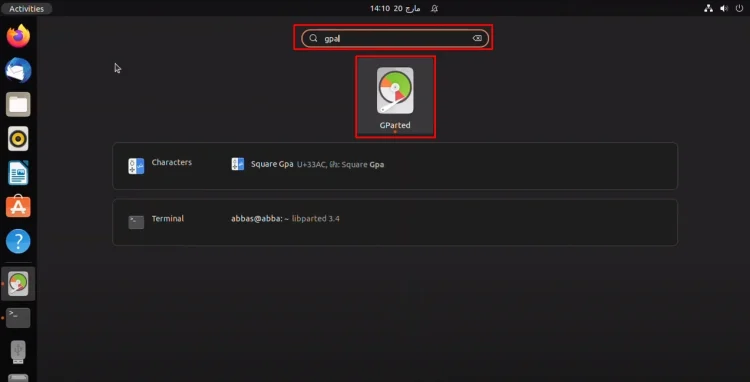
You can also launch GParted from Launchpad. Just simply search for GParted and launch it.
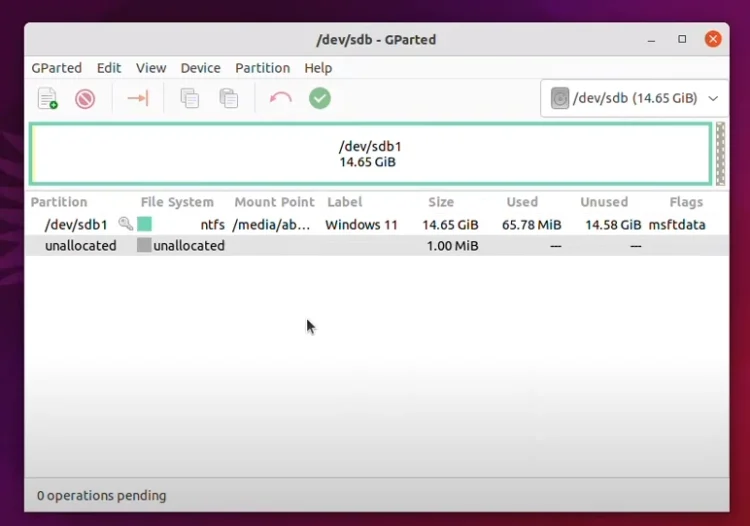
Once it’s launched, select the USB flash drive.

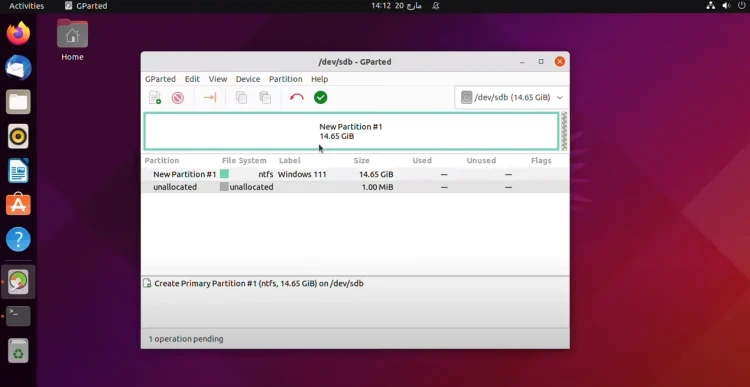
Partitioning the USB Flash Drive
By default, you can see that it’s a bootable USB flash drive of Windows 11.
For now, I have to delete all of them and then I’ll show you how to create them again from the beginning.
Let me delete it first. You have to unmount it, then delete it. Sorry for that. Now delete.
Okay, it is deleted.
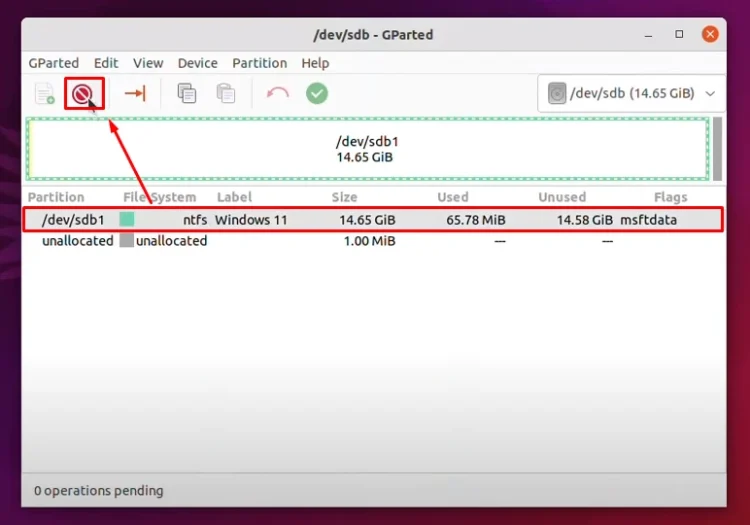
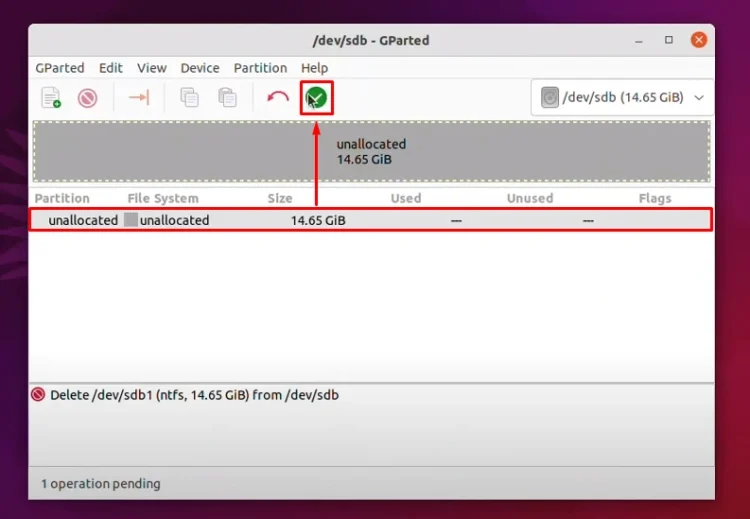
Now click Apply.
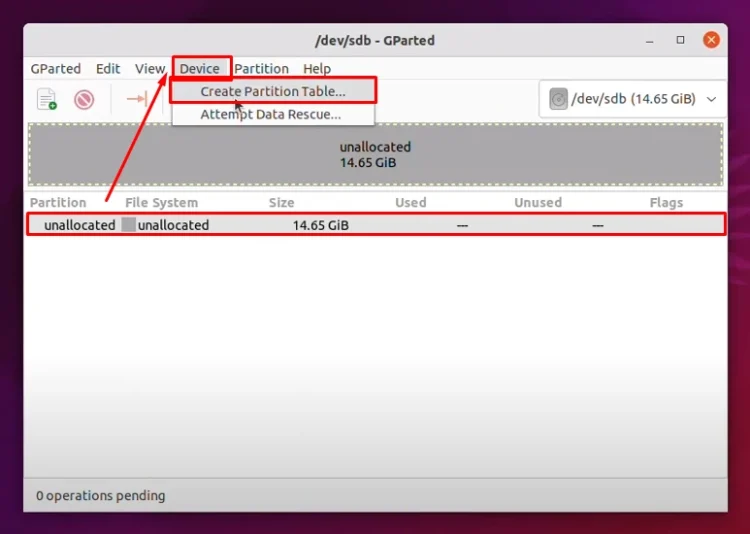
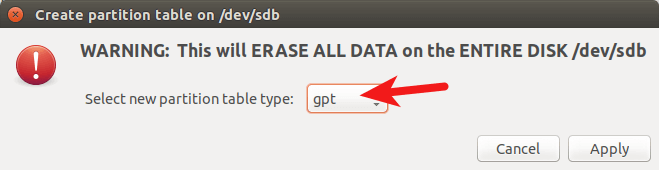
Once it’s removed, we need to create a partition for it. Go to Device and click Create partition table.
From here, select a partition style for Windows. We are going to choose gpt. Click Apply.
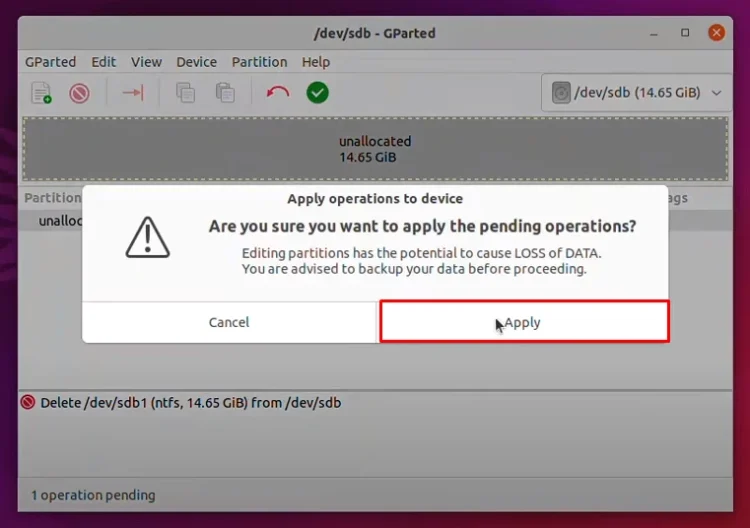
Remember, it’s going to remove everything from your USB flash drive, so back up your files.

Formatting and Copying Files
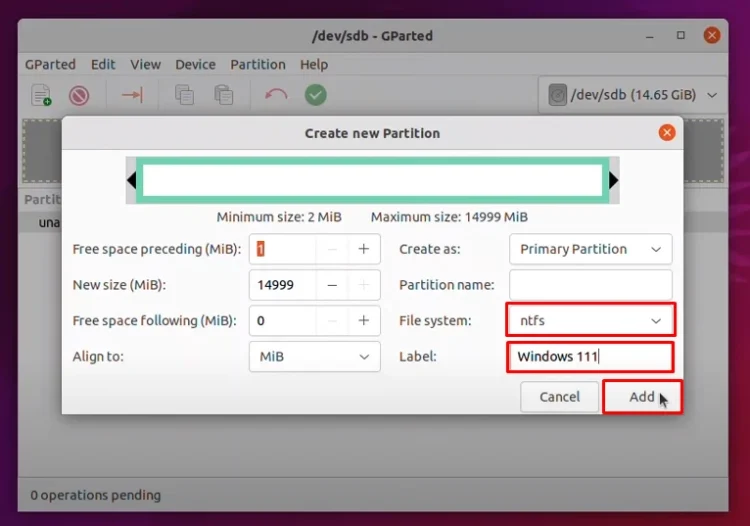
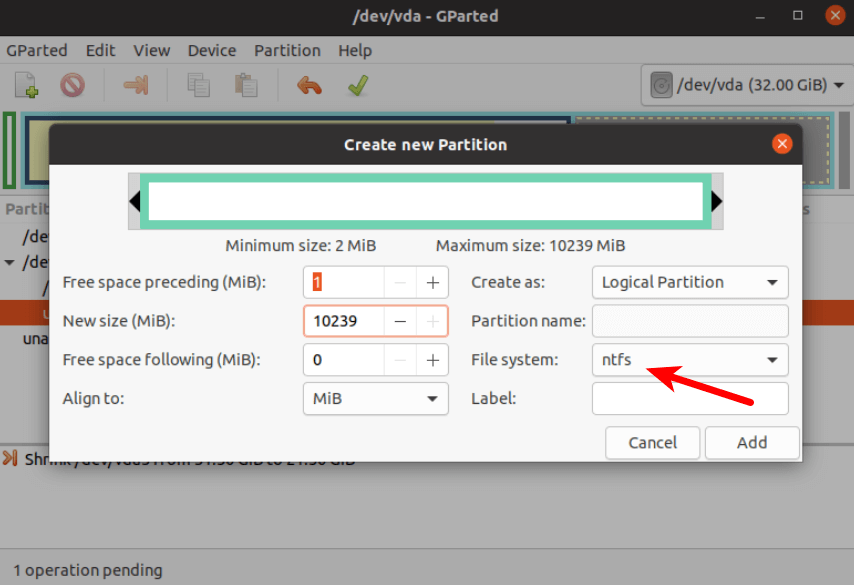
The next step is to create a file system for it.

By default, Linux personal file system is ext4. Windows is using NTFS. We’re going to choose NTFS. We can also label the USB flash drive. I’m going to name it “Windows 111“. Click Add.
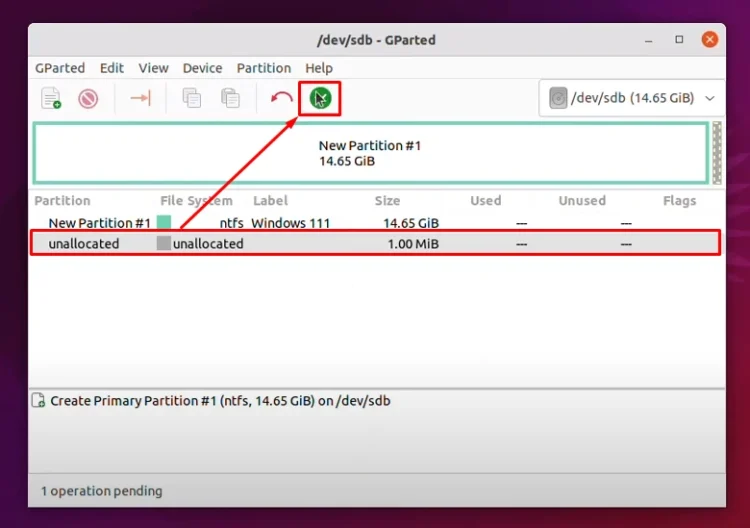
Now you can see that it’s done, but the changes have not applied. Click Apply and wait for it.
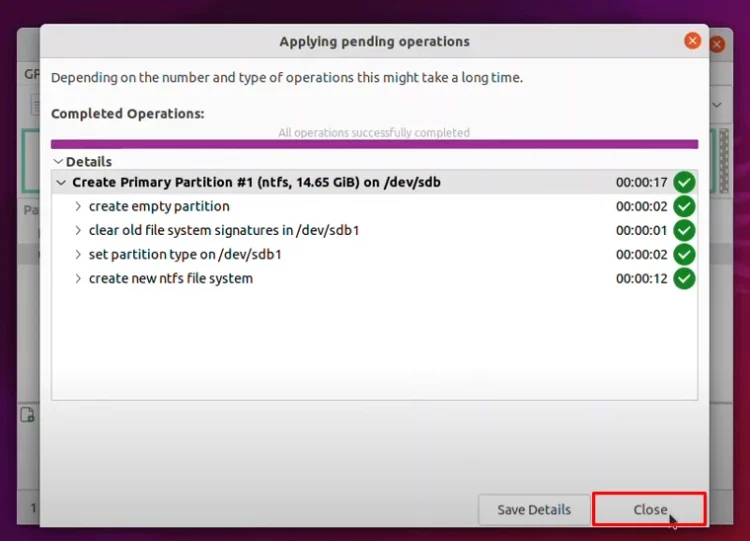
Once it’s done, you can close it.
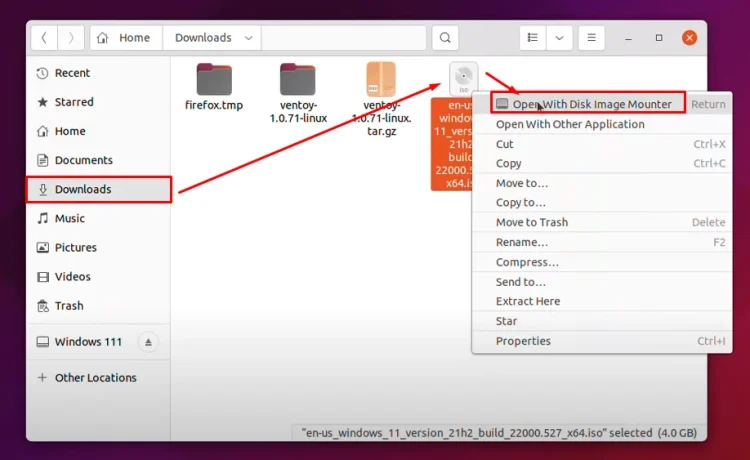
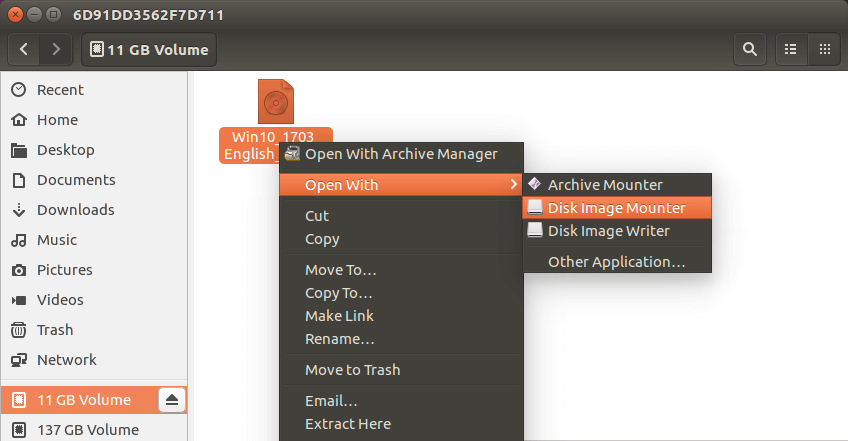
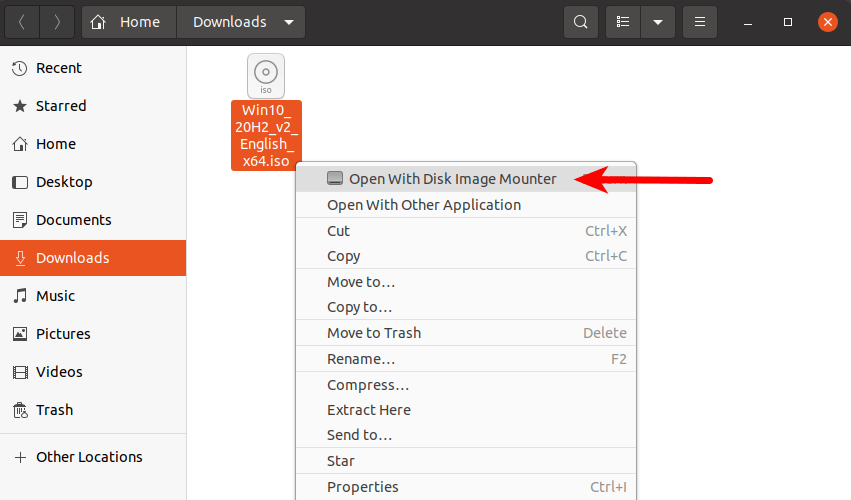
The next step is to open files and go to the Downloads folder where Windows 11 is located. Right-click on it and choose Open With Disk Image Mounter.
Finalizing the Bootable USB
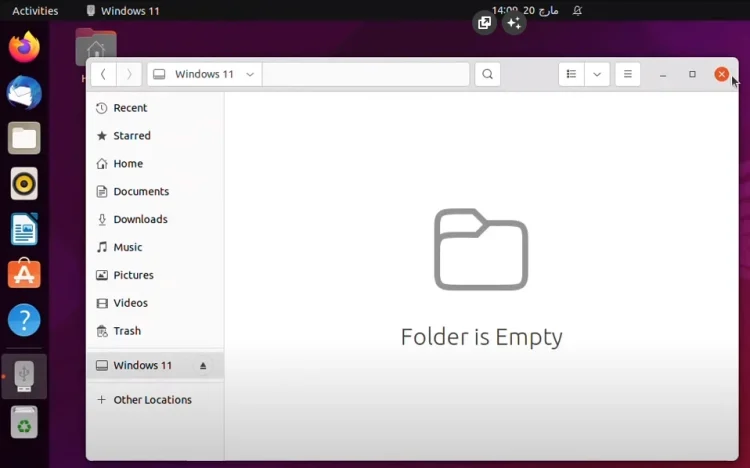
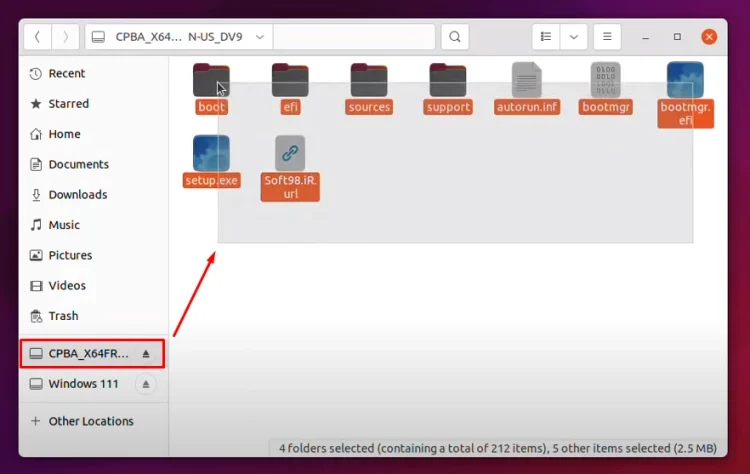
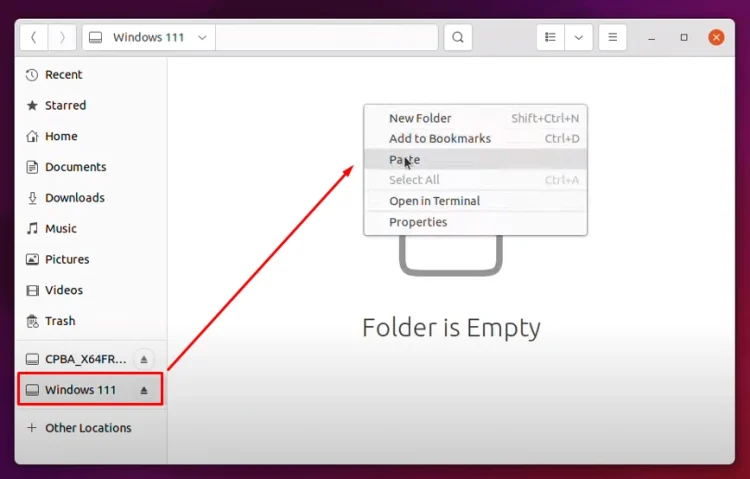
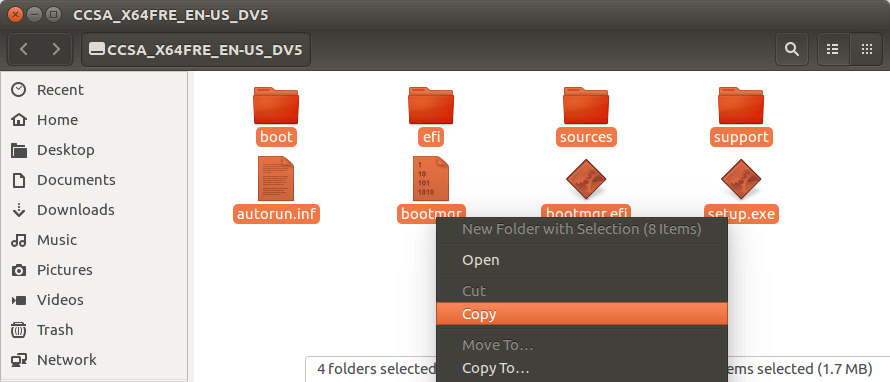
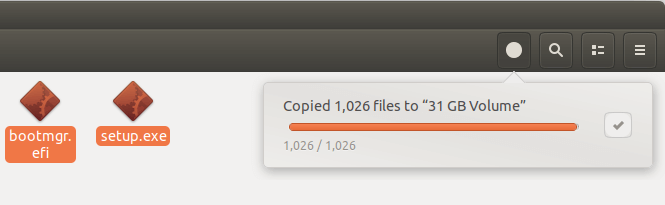
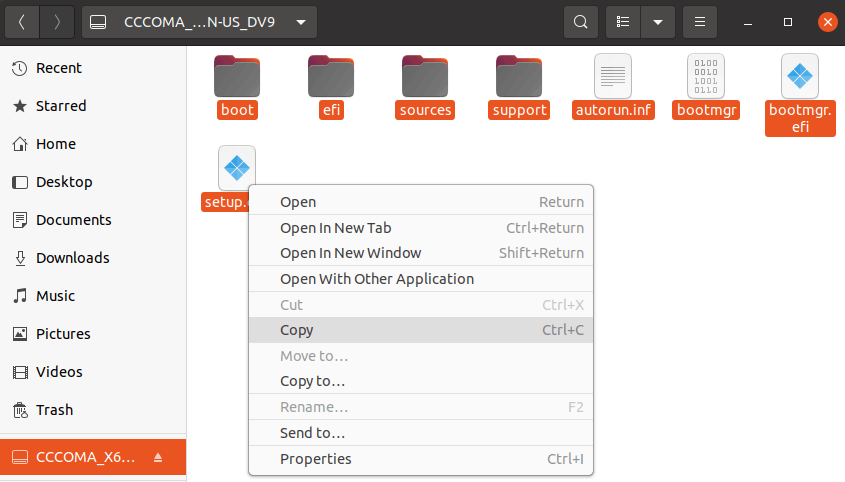
Here you can see that Windows 11 is mounted. Right-click, copy, and now go to the USB flash drive and paste them here.
During the copy of the files, you will not face any type of error. If you face any type of error, it means the Windows 11 ISO that you downloaded from the internet has been corrupted. Maybe the speed of your internet connection was not fast and somehow it got corrupted.
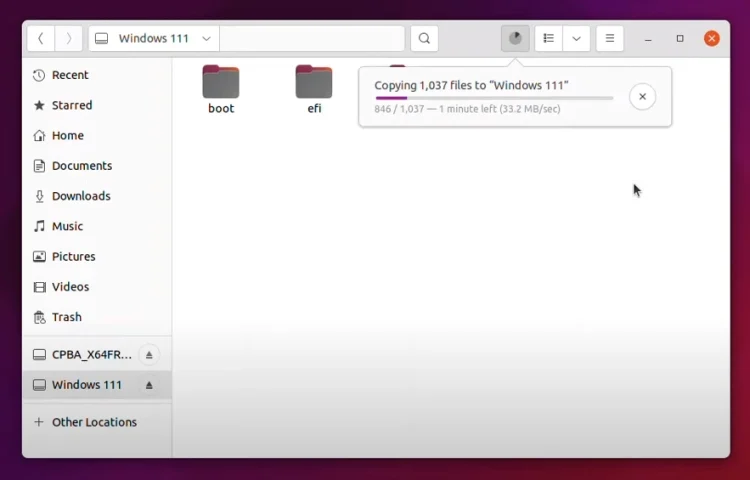
So basically, this is how you can create a Windows 11 bootable USB. For now, I am going to wait until the files are copied from the ISO inside the USB flash drive.
Post Views: 4,628
This tutorial is going to show you an easy way to create a Windows 10 bootable USB on Linux. I use Ubuntu 20.04 as an example. The method applies to any Linux distribution. I use Windows to do online banking because my bank doesn’t support Linux and sometimes play games that can’t run on Linux.
What you need
- A computer running Linux
- A USB flash drive at least 8GB
- Windows 10 ISO
Download Windows 10 ISO
First, you should download Windows 10 ISO from Microsoft official download link. Note that you might not be able to download the ISO from this link on a Windows computer. This download link is visible to users on Linux computer. Once downloaded, follow the instructions below.
Note: It’s recommended to download the Windows 10 April 2018 update ISO, because the October Update ISO contains a file that is larger than 4GB, which can not be copied to a FAT32 partition.

Update: Microsoft doesn’t allow you to download the Windows 10 April 2018 Update ISO from their website anymore. You can download the ISO via this link: Win10 1803 English x64 ISO
Creating a Windows 10 Bootable USB for UEFI Firmware
This method works for UEFI firmware and is very simple. You create a GUID partition table on your USB stick, create a FAT32 file system on it, and then mount Windows 10 ISO image and copy those Windows 10 files to your USB stick and you are done. The following is a step-by-step guide.
First, install GParted partition editor on your Linux distribution. Ubuntu users run the following command.
sudo apt install gparted
Then insert your USB stick to your computer. Make sure you back up important files in your USB stick if there’s any. Next, launch Gparted. You will need to enter your password in order to use GParted.
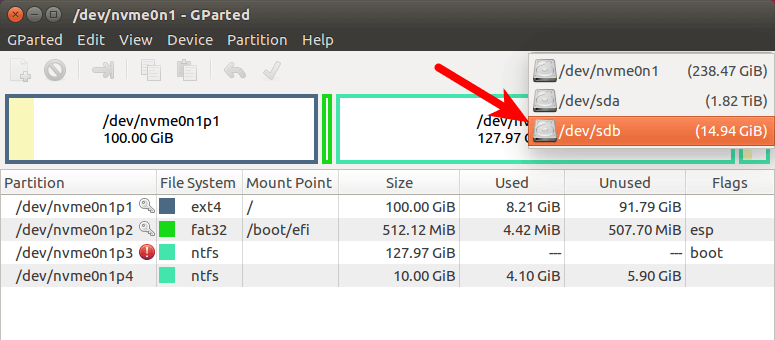
Select your USB stick from the drop-down menu on the upper-right corner. My USB stick is /dev/sdb. Yours may be different.
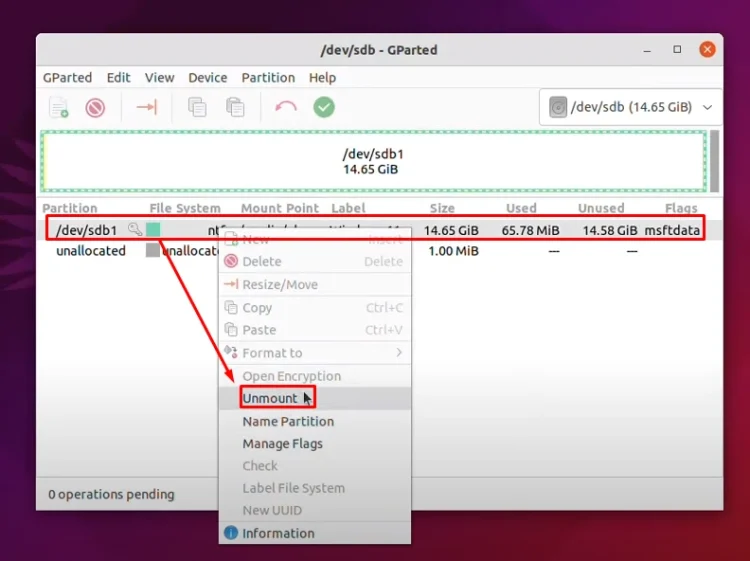
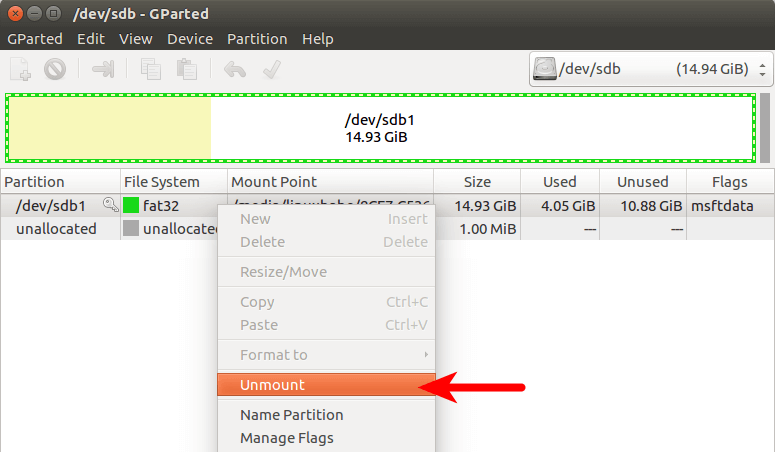
If there’s a key icon after the partition name, that means the partition is mounted. Make sure all partitions on your USB stick are unmounted. To unmount a partition, simply right-click on it and select unmount.
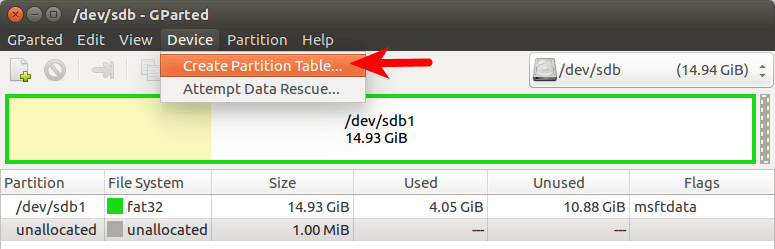
Next, on the menu bar, select Device > Create partition table.
Choose GPT as the partition table type and click Apply.
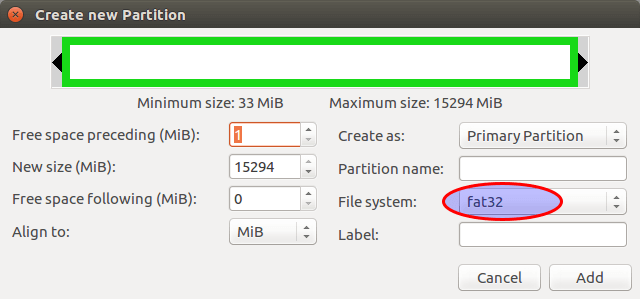
Then right-click on the unallocated space and select New to create a new partition.

Change file system type from ext4 to fat32 and click Add.
Note: The install.wim file in Windows 10 October 2018 update ISO is 4.1G, so if you downloaded this ISO image, you need to change ext4 to ntfs. If you downloaded Windows 10 April 2018 Update ISO, which contains a 3.9G size install.wim file, you can change ext4 to fat32
Update: It is my observation that my NTFS formatted USB stick isn’t bootable on my old laptop, which was bought in 2012. However, it is bootable on my desktop computer, which was bought in 2017. It has a graphical UEFI firware (I can use my mouse to configure firmware settings).
Next, click the green check button on the toolbar to apply this operation. Once that’s done, close GParted (This is important), then find your Windows 10 ISO in file manager. Open it with disk image mounter.
Open the mounted file system. Select all files and folders and copy them to your USB stick.
Sometimes the file manager on Ubuntu hangs and it seems that the copy operation has stopped. Actually it’s working, just be patient. When you see a check mark, it means the copy operation has finished.
If your file manager doesn’t have the Disk image mounter in the context menu, then you can use the following commands to mount. The first command will create a mount point for Windows 10 ISO and the second command will mount Windows 10 ISO under that mount point.
sudo mkdir /mnt/windows10/

sudo mount -t auto -o loop /path/to/window-10-iso /mnt/windows10/
Now in your file manager, go to /mnt/windows10/ and copy all files and folders to your USB stick.
Once the file and folders are copied, your windows 10 bootable USB is created! You can shut down your computer, boot it from this USB stick and install Windows 10 in UEFI mode. Keep in mind that you may need to disable compatibility support module (CSM) in the firmware in order to boot in UEFI mode. You may also need to remove USB stick from your computer and insert it back in order for the firmware to detect the boot loader on your USB stick.
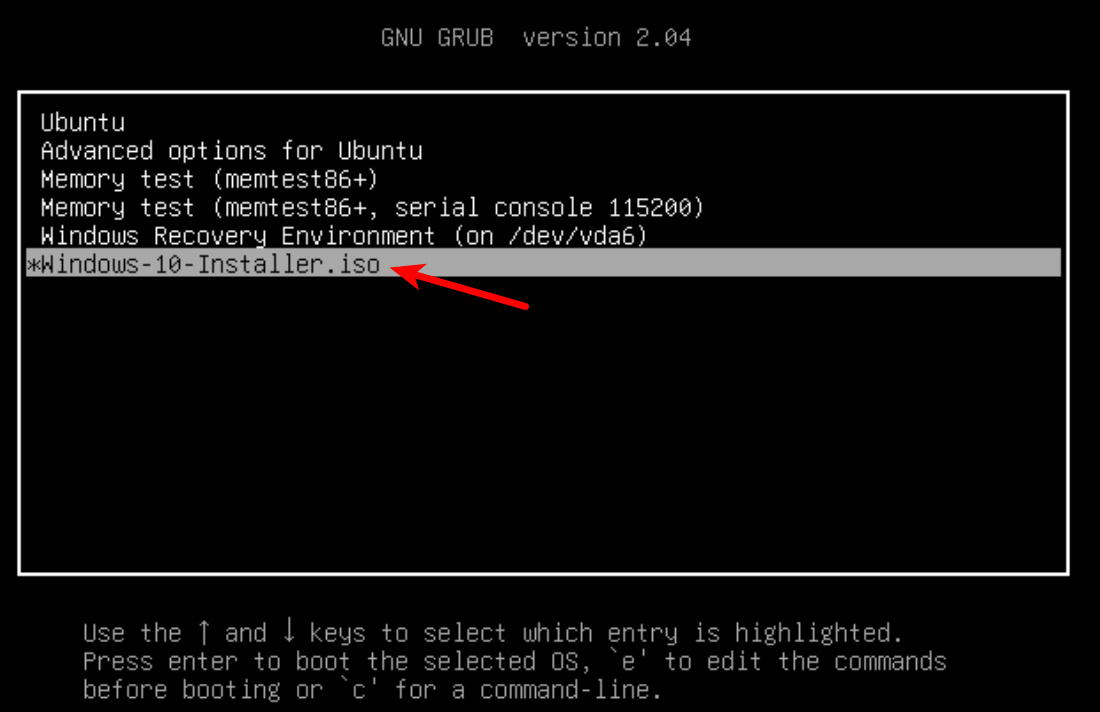
Boot Windows 10 ISO Installer without USB (BIOS & UEFI)
Ever wondered if you can boot Windows 10 ISO installer without a USB flash drive? Yes, you can do it with GRUB2, which is the standard boot loader on Linux.
GRUB2 can not boot Windows 10 ISO directly. You need to create a separate NTFS partition on your hard disk or SSD with a partition editor like GParted and extract the Windows 10 ISO to that partition. Download the Windows 10 ISO file. The latest Windows 10 ISO file is 5.8G. The new NTFS partition should be at least 7G and it should not be used to store any other files.
Then find your Windows 10 ISO in file manager. Open it with disk image mounter.
Open the mounted file system. Select all files and folders and copy them to the NTFS partition.
Sometimes the file manager on Ubuntu hangs and it seems that the copy operation has stopped. Actually, it’s working. Just be patient. When you see a checkmark, it means the copy operation has finished.
Next, open up a terminal window and edit the /etc/grub.d/40_custom file with a text editor such as Nano.
sudo nano /etc/grub.d/40_custom
In this file, we can add custom entries to the GRUB boot menu. In this case, we want to add an entry to boot the Windows 10 installer. If your computer still uses the traditional BIOS firmware, then add the following lines in this file.
menuentry "Windows-10-Installer.iso" {
  set root=(hd0,6)
  insmod part_msdos
  insmod ntfs
  insmod ntldr
  #uncomment the following line if your computer has multiple hard drives.
  #drivemap -s (hd0) ${root}
  ntldr /bootmgr
}
My NTFS partition is the 6th partition on my first disk, so I use (hd0,6) as the root. You can run sudo parted -l command to check your NTFS partition number. If your computer has multiple hard drives, use the drivemap command to set the partition (hd0,6) as the first hard disk, so Windows will be able to boot.
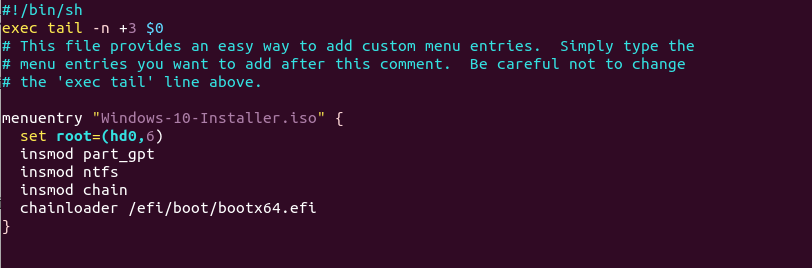
If your computer uses UEFI firmware, then add the following text in this file.
menuentry "Windows-10-Installer.iso" {
  set root=(hd0,6)
  insmod part_gpt
  insmod ntfs
  insmod chain
  chainloader /efi/boot/bootx64.efi
}
Save and close the file. (Press Ctrl+O, then press Enter to save a file in Nano text editor. Press Ctrl+X to exit.)
Then update GRUB boot menu.
sudo grub-mkconfig -o /boot/grub/grub.cfg
or
sudo grub2-mkconfig -o /boot/grub2/grub.cfg
Next, set GRUB to boot the Windows 10 installer for the next boot with the following command.
sudo grub-reboot Windows-10-Installer.iso
or
sudo grub2-reboot Windows-10-Installer.iso
Unplug all your external USB storage devices, then reboot your computer. GRUB will choose the Windows 10 installer.
GRUB2 can also boot Linux ISO files stored on the hard drive, so you don’t need to create Linux live USB.
- How to Boot ISO Files From GRUB2 Boot Loader
Creating a Windows 10 Bootable USB for Legacy BIOS Using WoeUSB
WoeUSB is a fork of WinUSB. Both of them are open-source software (licensed in GPL) for making Windows bootable USB sticks on Linux platform, but the latter hasn’t been updated since 2012. You may be wondering why it’s named WoeUSB. The author said it’s a GNU convention to abbreviate software that support Windows to “woe”.
To install WoeUSB on Ubuntu 14.04/16.04/17.04, you can use the following PPA. Simply open up a terminal window and run the following commands one by one. Other Linux distro users can compile this software by following the instructions on the Github project page.
sudo add-apt-repository ppa:nilarimogard/webupd8

sudo apt update

sudo apt install woeusb
This PPA contains many other software. If you don’t need them, you can now remove this PPA from your system.
sudo add-apt-repository --remove ppa:nilarimogard/webupd8

sudo apt update
You can launch WoeUSB from Unity Dash or your application menu.
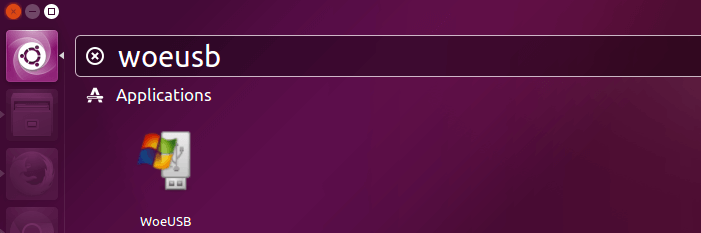
You can also start it from command line with:
woeusbgui
It’s very easy to use the WoeUSB GUI. Select Windows ISO image and your target USB device. Make sure your data on the USB device is backed up before hitting the Install button.
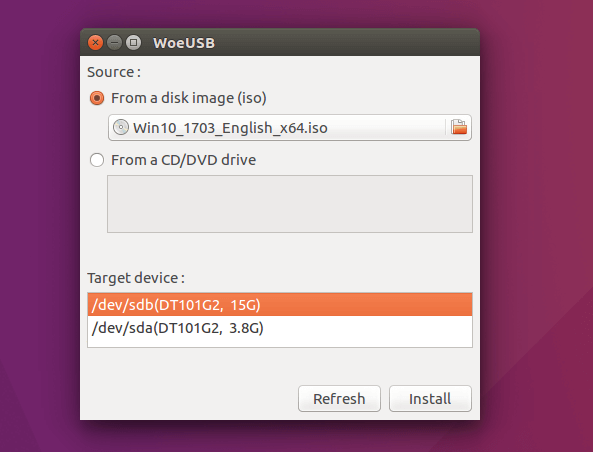
Then wait for the installation to complete.
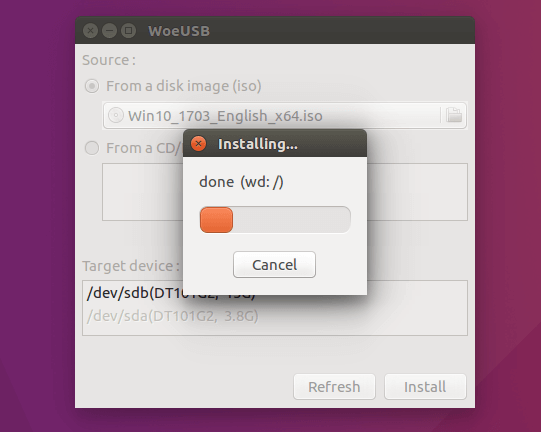
Once done, you can use the bootable USB to install Windows 10 on your computer.
How to Use WoeUSB From the Command Line
First, find the device name of your USB stick using the following command.
lsblk
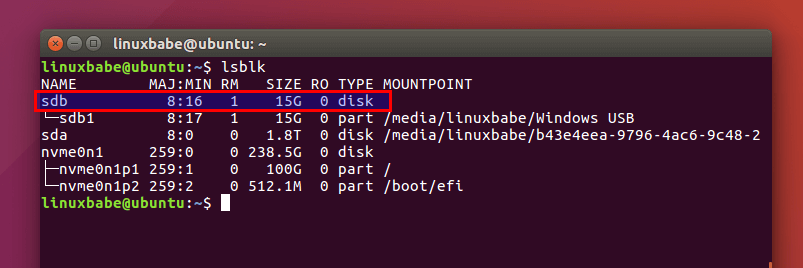
Mine is /dev/sdb. Make sure your USB is unmounted with the following command. Replace /dev/sdb1 with your own partition name.
sudo umount /dev/sdb1
Then create a bootable Windows 10 USB like below. Red texts shoudl be adapted to your own ISO file name and USB device name. The -v (--verbose) option will give more detailed output.
sudo woeusb -v --device windows-10.iso /dev/sdb
In my test, the Windows 10 USB created with WoeUSB can boot in both legacy and UEFI mode on my old computer. On my new computer, it can boot in legacy mode but failed in UEFI mode. I don’t know the exact reason, but it’s probably because of bug in this software.
That’s it! I hope this tutorial helped you create windows 10 bootable USB on Ubuntu or any Linux distribution. As always, if you found this post useful, then subscribe to our free newsletter to get new tutorials.
Rate this tutorial
[Total: 116 Average: 4.3]

Want to create a bootable Windows USB on Linux? Ventoy is a pretty good option.
But before Ventoy, WoeUSB used to be the go-to tool for this purpose. The original WoeUSB project got discontinued around 2014.
Owing to its popularity, a new developer took the task of bringing the project back from the dead. And hence WoeUSB-ng was born. “ng” here stands for “new generation”. In other words, WoeUSB-ng is the new generation WoeUSB. But since the original tool doesn’t exist anymore, I’ll be referring WoeUSB-ng as WoeUSB.
In this tutorial, I’ll show you how to install WoeUSB on Ubuntu Linux. I’ll also share the steps for creating bootable Windows USBs with WoeUSB.
But before that, let’s quickly look at the features of this awesome tool.
WoeUSB

WoeUSB is a simple tool that has the sole purpose of creating bootable Windows USB on Linux.
The original WoeUSB is a shell script. This same WoeUSB is rewritten as WoeUSB-ng in python, which can be installed on your system and provides both a command-line and GUI interface.
Features:
- Support Legacy PC/UEFI booting
- Support FAT32 and NTFS filesystems
- Support using physical installation disc or disk image as source
- It can be used for Windows Vista and later with any language or edition variants
- Legacy/MBR-style/IBM PC compatible boot mode
- Native UEFI booting is supported for Windows 7 and later images (limited to the FAT filesystem as the target)
Installing WoeUSB on Ubuntu and other Linux distros
Arch Linux users can install WoeUSB-ng from AUR.
For other distros, WoeUSB can be installed using PIP. It’s a Python application, after all. I am going to provide commands for Ubuntu/Debian here.
To install WoeUSB-ng, you need to install PIP and other necessary dependencies first.
sudo apt install git p7zip-full python3-pip python3-wxgtk4.0 grub2-common grub-pc-binAfter this, you can install WoeUSB-ng by running:
sudo pip3 install WoeUSB-ngFor all other installations, you can refer to their instructions.
Prerequisite: Get Windows ISO and a compatible USB
This one goes without saying. You need to have the ISO file of the Windows version you want to install.
From the Microsoft website, you should be able to get the ISO for Windows 10 and 11.
If you have ISOs for older Windows versions, they can also be used.
Apart from that, you need to have a USB key/pen drive of at least 8 GB in size. You should format it in NTFS filesystem.
Method 1: Using WoeUSB to create a bootable Windows USB graphically (recommended)
Open woeusb-gui from the activity overview or menu.

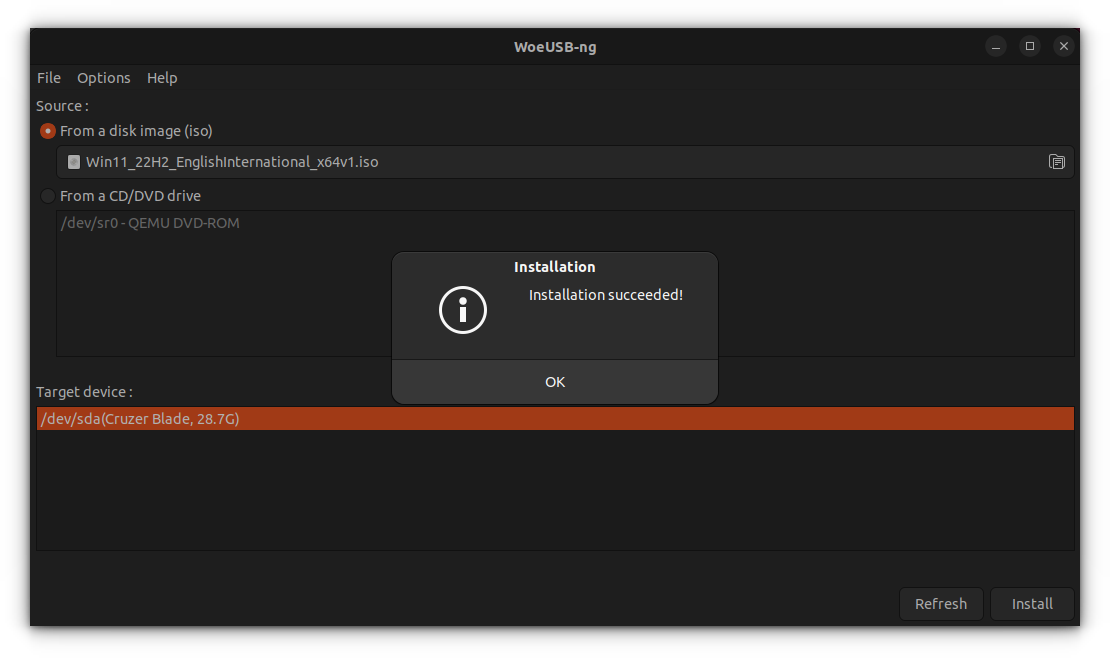
In the application window, select the downloaded Windows ISO and the desired USB drive as shown in the screenshot and press Install.
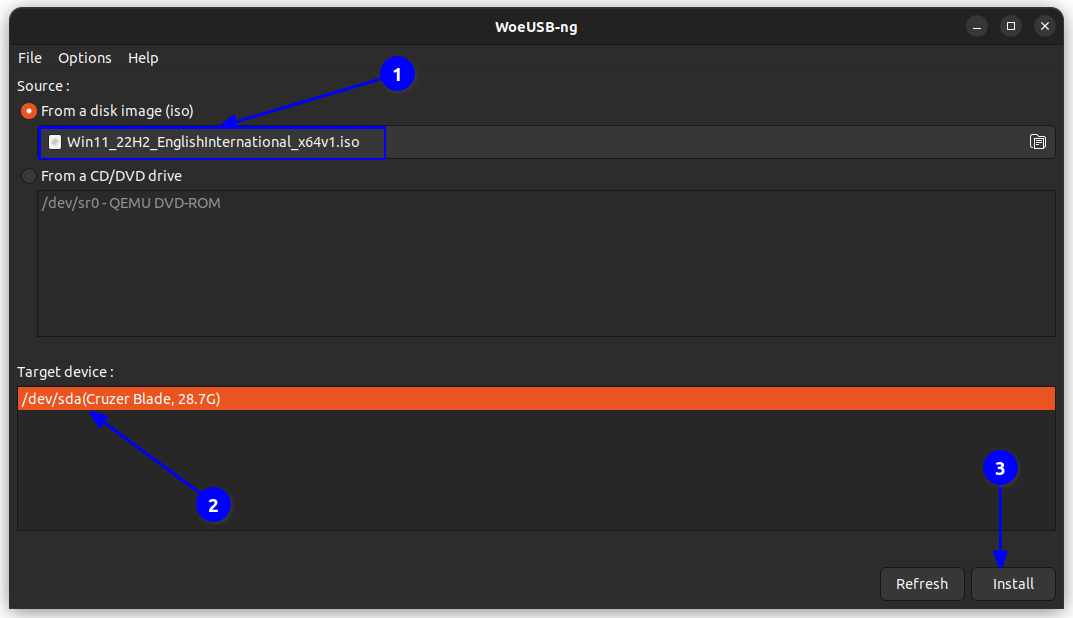
There are also other tweaks available within the app, which can be accessed by the top menu bar.
After pressing install, the woeUSB will start formatting and copying files. You need to wait for some time because there are approximately 6 GB of files to be copied.
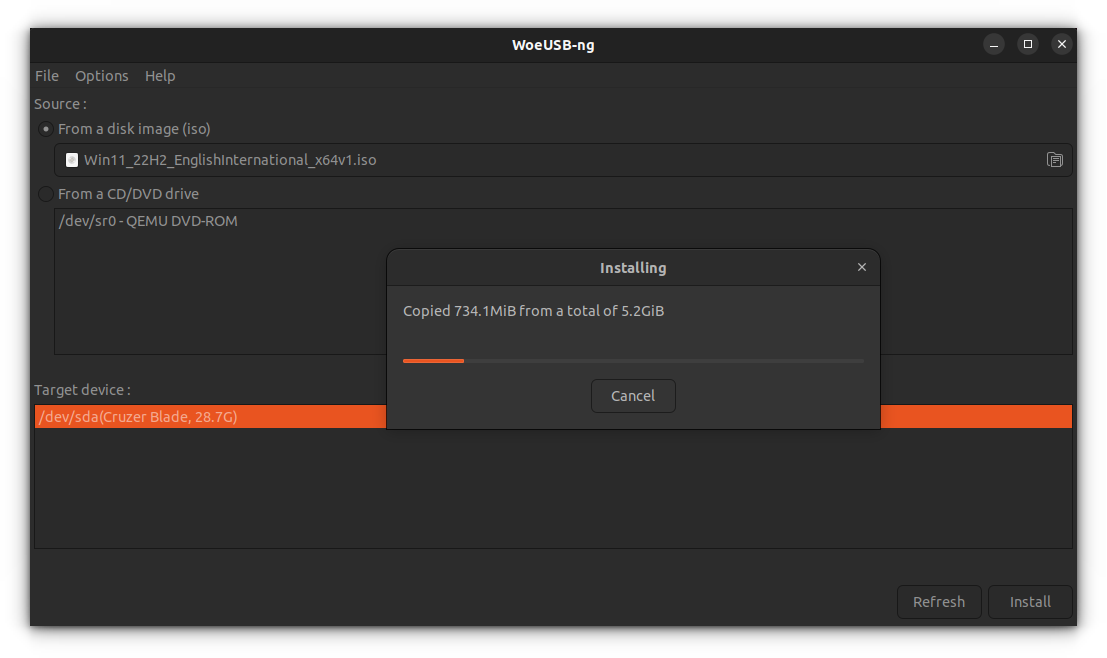
Once copying completes, WoeUSB will prompt a success dialog. You can now safely eject the USB and use it as a bootable USB.
Method 2: Using WoeUSB from the terminal (for experts)
WoeUSB-ng package also provides a command-line utility called woeusb.
To create the bootable Windows USB using WoeUSb, you need to run the following command:
sudo woeusb --device <path/to/Windows/ISO> <name/of/the/USB/device> --target-filesystem ntfsHere, the --device flag is used to wipe the USB and create a bootable from scratch completely. Also, the –target-filesystem flag is set to NTFS, to avoid problems of copying files more than the size limits of the FAT system.
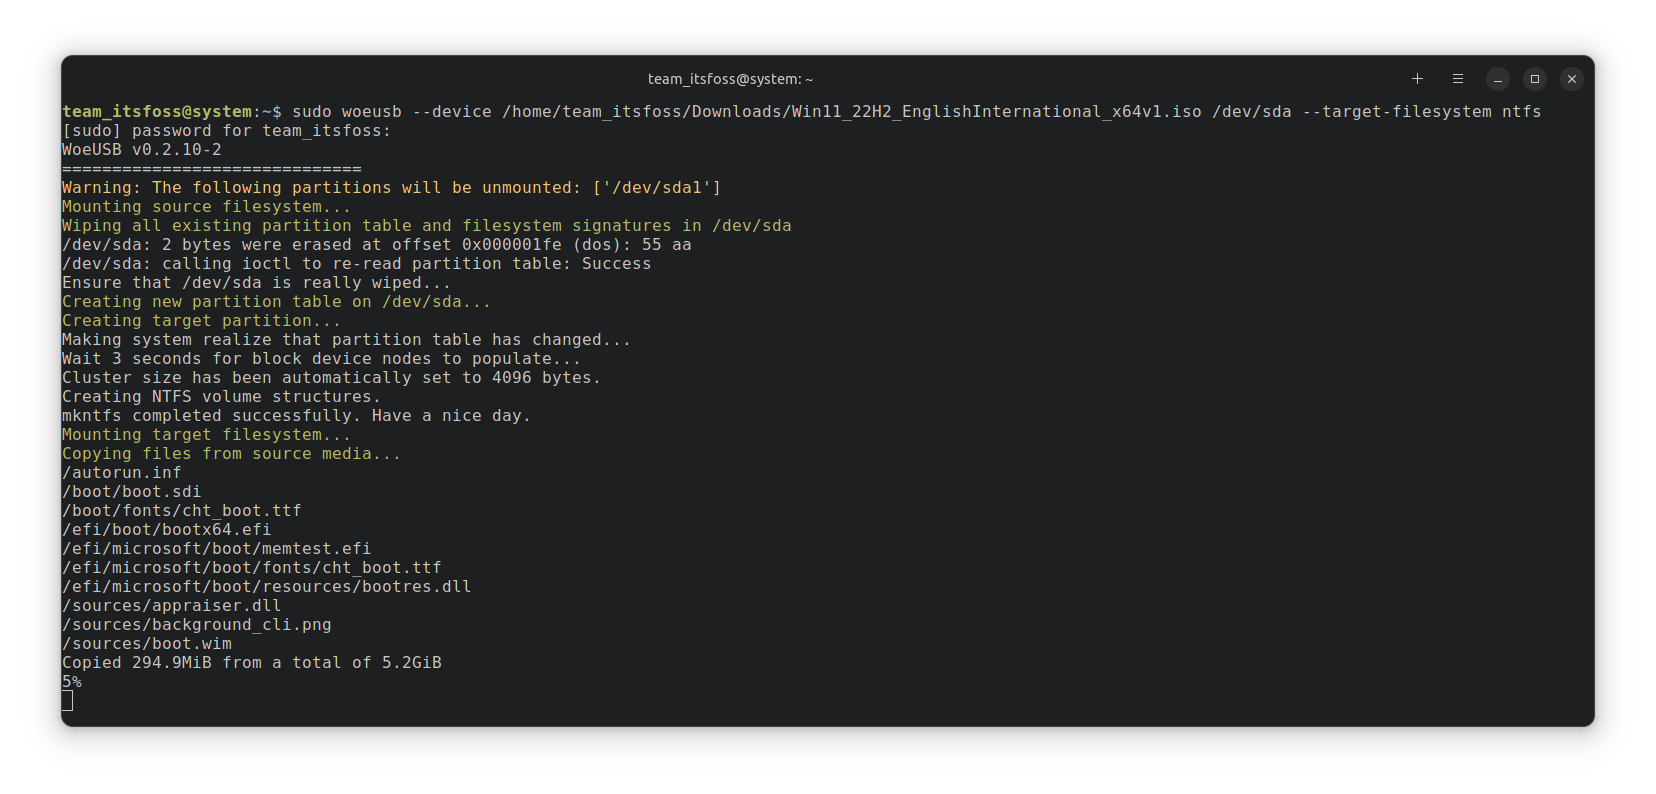
The process will take some time to complete copying. Once completed, it will display a success message.
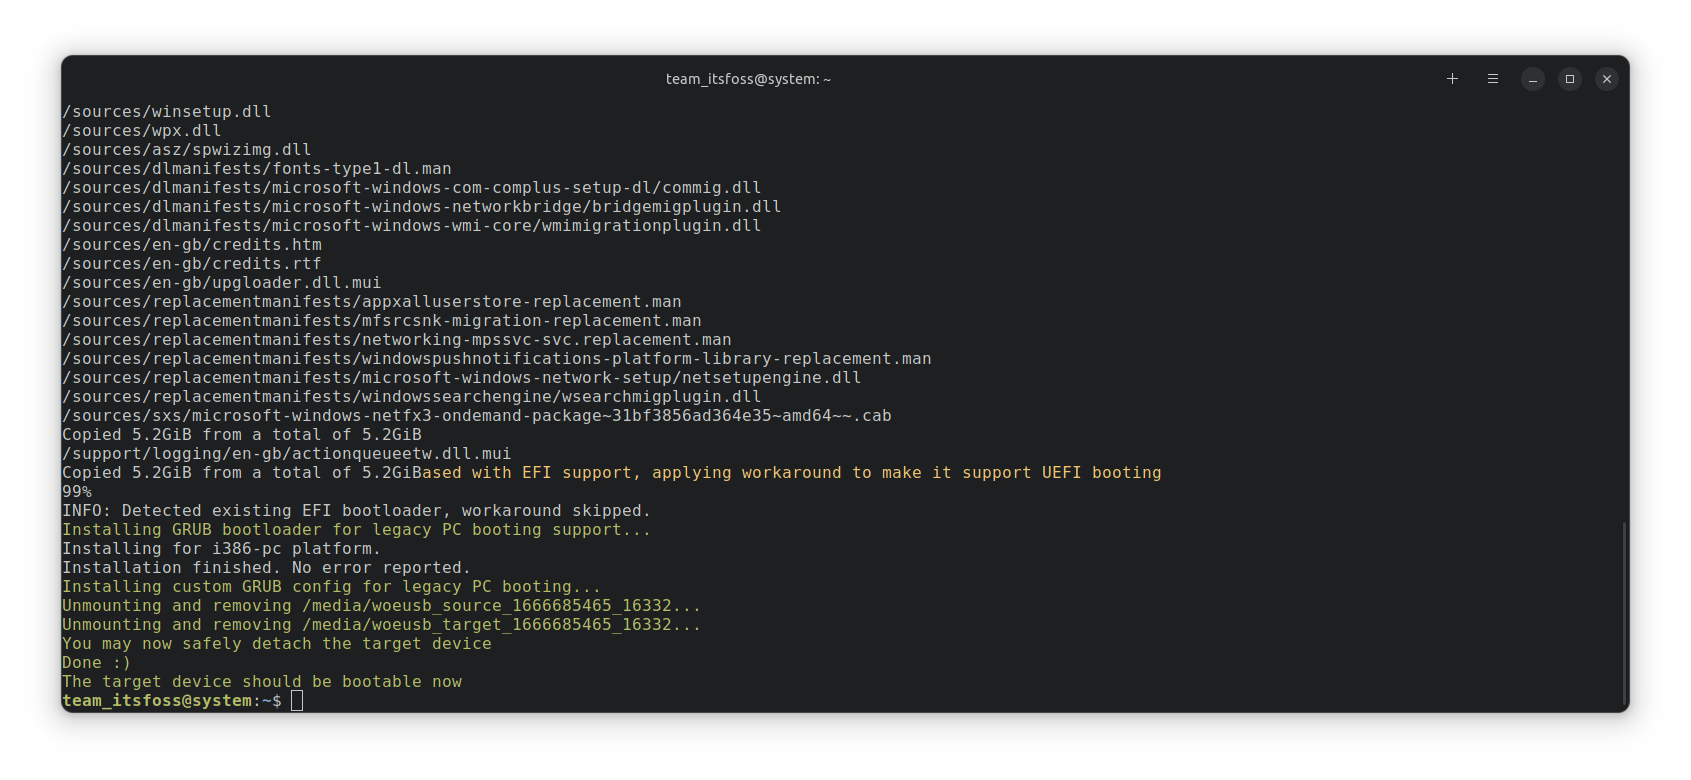
At this point, you can eject the USB safely and use it as a Windows bootable USB on other PCs.
Bonus: Using WoeUSB Bash shell script (for experts)
WoeUSB is also available as a bash shell script, which can be used without installing anything on your system.
First, you want to download the shell script from the releases page of the project.
Before executing the shell file, you need to get the required dependencies. To install, run:
sudo apt install wimtoolsNow make it executable either through file manager or through command-line.
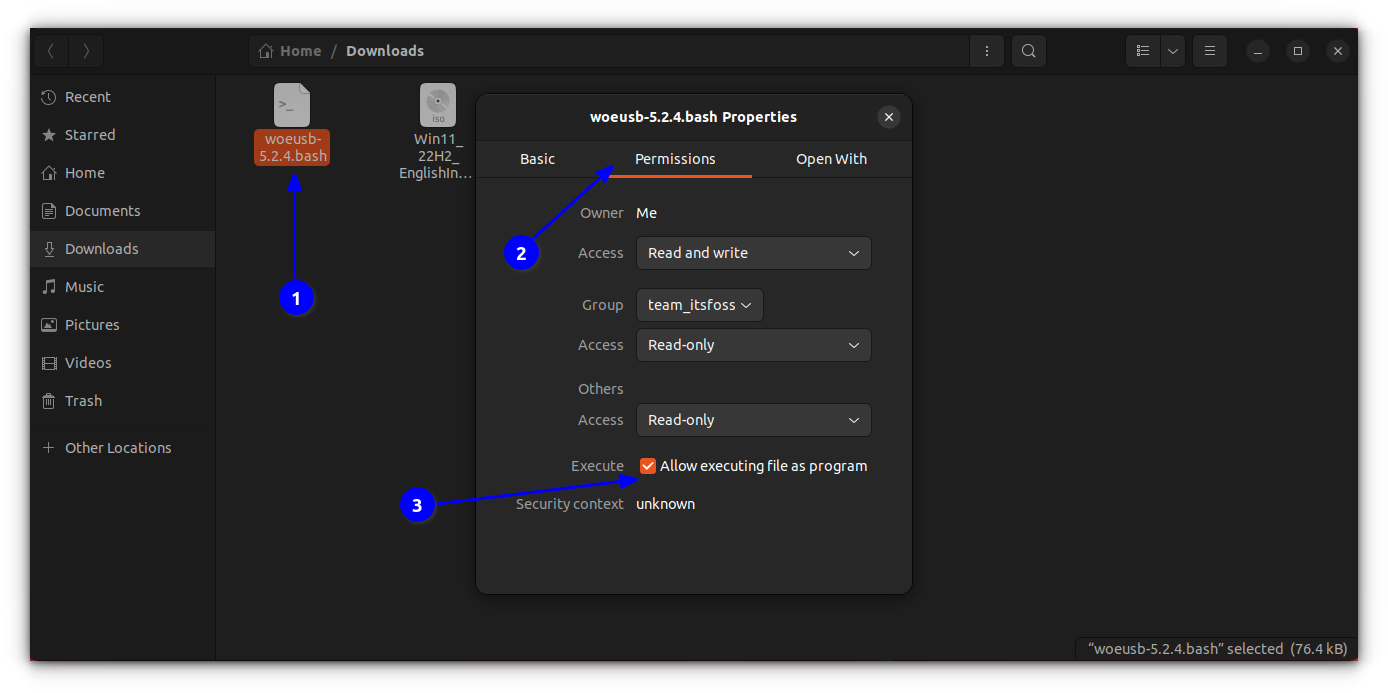
Or you can run chmod +x <path/to/script> to make it executable. Now, run ./woeusb-5.2.4.bash -h inside the downloaded directory to get help.
In order to create a live USB, the process is same as the command-line part of woeusb-ng, except, you are not installing anything.
So, in a terminal, run:
sudo <path/to/downloaded/script/file> --device <path/to/windows/ISO> <name-of-USB-device> --target-filesystem ntfsThis will start writing the ISO to USB drive, as shown in the screenshot below:
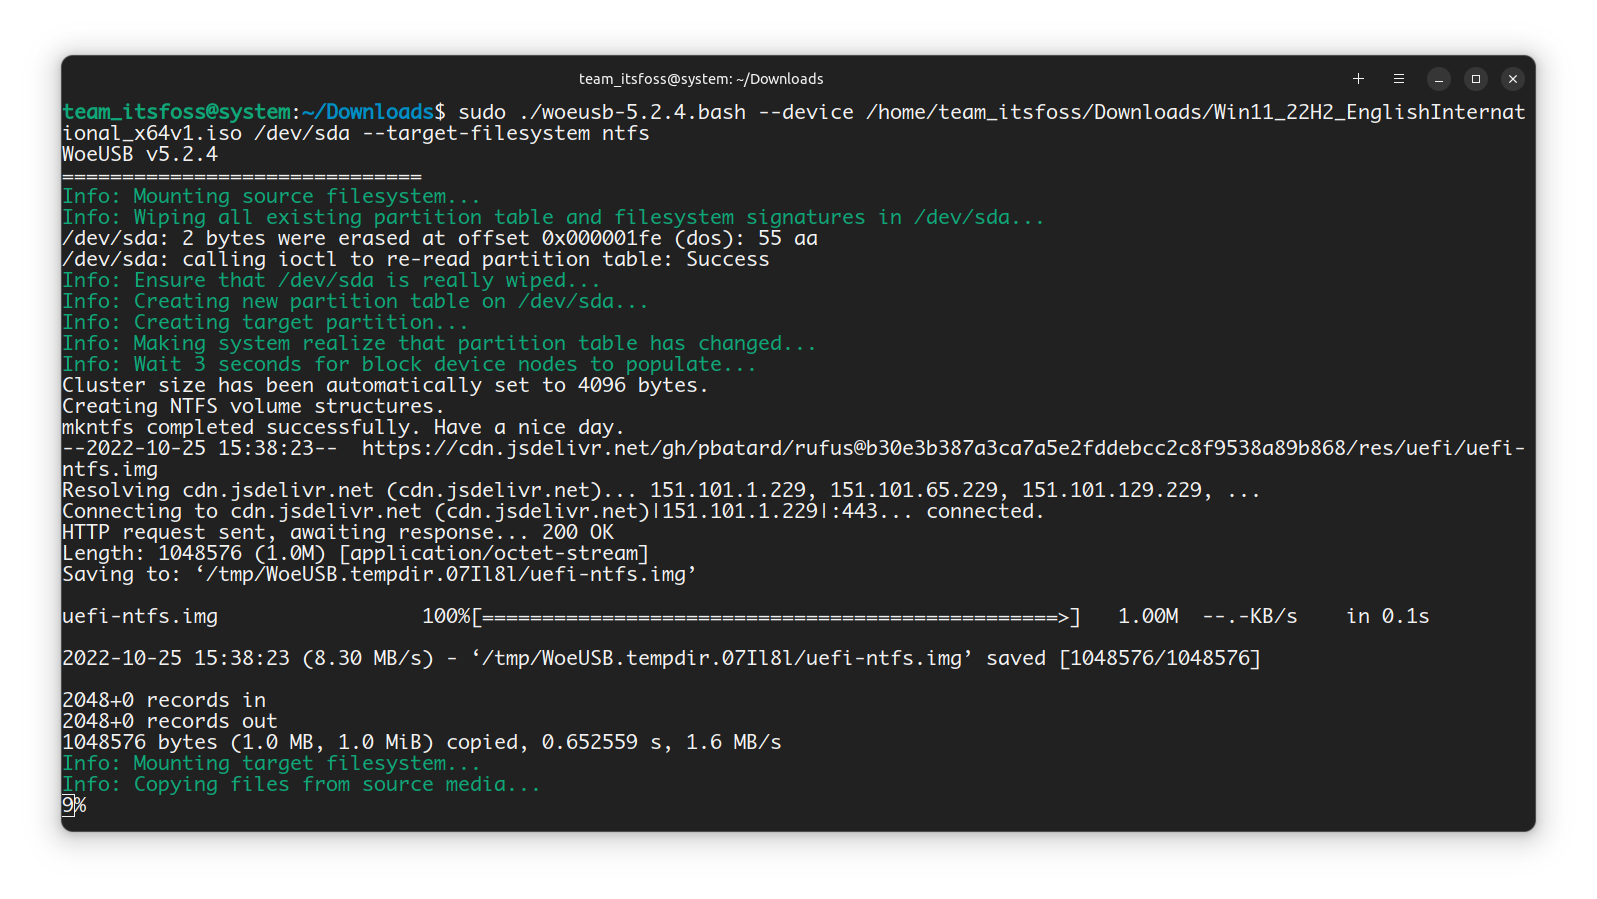
Once completed, you can safely eject the USB and use it as bootable USB.
Removing WoeUSB
If you installed WoeUSB using PIP, you can also remove it similarly:
pip3 uninstall WoeUSB-ngYou can keep the installed dependencies on your system or remove them. That’s entirely up to you. I would suggest keeping them.
Wrapping Up
WoeUSB was an immensely popular tool around ten years ago. It’s good that someone else has continued in another form. That’s the beauty of open source.
There are other ways of creating bootable Windows USB. If interested, check them out 👇
How to Create a Bootable Windows 10 USB in Linux
Brief: This tutorial shows you how to create a bootable Windows 10 USB in Linux with and without a GUI tool called Ventoy. I have talked a lot about creating bootable USB of Linux in Windows. How about the other way round? How about creating a bootable Windows 10 USB
It’s FOSSAbhishek Prakash
I hope this tutorial helped you. If somehow the Windows USB created by WoeUSB doesn’t work as expected, you may try using Ventoy. Enjoy it.
Ubuntu is a free and open source operating system that is popular among many computer users. Many people choose to use Ubuntu as their primary operating system, and as a result, it is not uncommon to need to create a bootable USB drive for Windows 10 on Ubuntu.
Luckily, doing this is not as difficult as it may seem. In fact, there are only a few steps that you need to follow in order to create a bootable Windows 10 USB drive on Ubuntu.
A bootable USB is a USB drive that has been configured to contain a bootable operating system. This can be useful for a variety of purposes, such as installing an operating system on a computer that does not have a CD/DVD drive, or for troubleshooting a computer that is having problems booting from the hard drive.
Method 1: Create bootable Windows 10 USB on Ubuntu using dd Command
What you need:
- A computer running Linux
- A USB flash drive at least 8GB
- Windows 10 ISO
It is possible to create a Windows 10 bootable USB on Linux without any third-party software. The process is a bit more complicated than using a GUI tool, but it is still very easy. I will use Ubuntu 20.04 as an example. The process is similar on other Linux distributions.
Step 1. First, you need to download the Windows 10 ISO from Microsoft. You can do this from within Windows or from a Linux system. If you are downloading the ISO from within Windows, you can use the Media Creation Tool. If you are downloading the ISO from a Linux system, you can use wget or curl.
Step 2. Next, you need to create a bootable USB drive. I will use the dd command for this. If you are not familiar with dd, it is a low-level utility for copying data. It is very important that you use the dd command correctly, as it can overwrite data on your hard drive if used incorrectly.
Step 3. Once you have dd installed, you need to find out the name of your USB drive. You can do this by running the lsblk command. This will list all of the block devices on your system. The USB drive will likely be /dev/sdb or /dev/sdc.
Step 4. Once you have the name of your USB drive, you can use dd to copy the Windows 10 ISO to the drive. Be very careful when using dd, as you can easily overwrite the wrong drive and lose data.
Open the Terminal and type the following command to install the required packages:
sudo apt install wimtools libwim-dev
Step 5. Type the following command to change to the directory where your Windows 10 ISO file is located:
cd /path/to/windows10/iso/file
Step 6. Type the following command to create a bootable Windows 10 USB on Ubuntu:
wimlib-imagex-cli apply windows10.iso /dev/sdb1 –index 1
Step 7. Replace «/dev/sdb1» with the location of your USB drive.
This will copy the Windows 10 ISO to the USB drive. It will take a few minutes to complete. Once the dd command has finished, you can boot from the USB drive and install Windows 10.
Method 2: Create bootable Windows 10 USB using WoeUSB
WoeUSB is a simple Linux program to create a bootable Windows USB storage device from either an existing Windows ISO file or a real Windows DVD. It can be used to create bootable USB sticks for Windows 10 and old Windows edtions.
The program can be run from either a graphical user interface or the command line. To use the graphical user interface, simply launch the program and select the ISO file or DVD you wish to use. Then, select the USB device you wish to use and click the «Create USB» button. The WoeUSB application can be used to create a Windows 10 bootable USB on Ubuntu.
This can be done by running the following commands in a terminal:
sudo add-apt-repository ppa:nilarimogard/webupd8
sudo apt update
sudo apt install woeusb
Once WoeUSB is installed, the following command can be used to create the bootable USB:
woeusb –device /path/to/windows.iso /dev/sdb
Replace /path/to/windows.iso with the path to the Windows ISO file and /dev/sdb with the device name of the USB drive.
Method 3: Create bootable Windows 10 USB on Ubuntu using Ventoy
Ventoy is an open source tool that allows you to create a bootable USB with multiple operating systems. You can use Ventoy to create a multi-boot USB, a persistent Linux live USB, or a bootable Windows USB.
Here are the steps to create a bootable Windows 10 USB using Ventoy:
1. Download Ventoy from https://www.ventoy.net/en/download.html and extract the files to a folder on your computer.
2. Connect your USB drive to your computer and open the Ventoy folder.
3. Copy all the files from the Ventoy folder to your USB drive.
4. Download the Windows 10 ISO from Microsoft and copy it to the Ventoy folder on your USB drive.
5. Rename the Windows 10 ISO to «ventoy.iso«.
6. Boot from your USB drive and select the «Ventoy» option. Ventoy will detect the Windows 10 ISO and allow you to install it on your computer.
In Conclusion
Installing Windows 10 on your Linux computer doesn‘t have to be complicated. You can create a bootable Windows 10 USB and install it without any difficulties. But if you want to avoid any complexities, a bootable Windows 10 USB is what you‘re looking for.