
Все способы:
- Шаг 1: Загрузка и установка Extension Pack
- Шаг 2: Запуск виртуальной машины
- Шаг 3: Установка дополнений гостевой ОС
- Шаг 4: Активация полноэкранного режима
- Вопросы и ответы: 0
Шаг 1: Загрузка и установка Extension Pack
Для того чтобы добавить в VirtualBox возможность запускать операционные системы на весь экран, потребуется предварительно скачать и установить специальное расширение для приложения под названием Extension Pack. Делать это следует исключительно с официального сайта разработчика, чтобы получить корректно работающее программное обеспечение, не зараженное вирусами.
Скачать Oracle VM VirtualBox Extension Pack
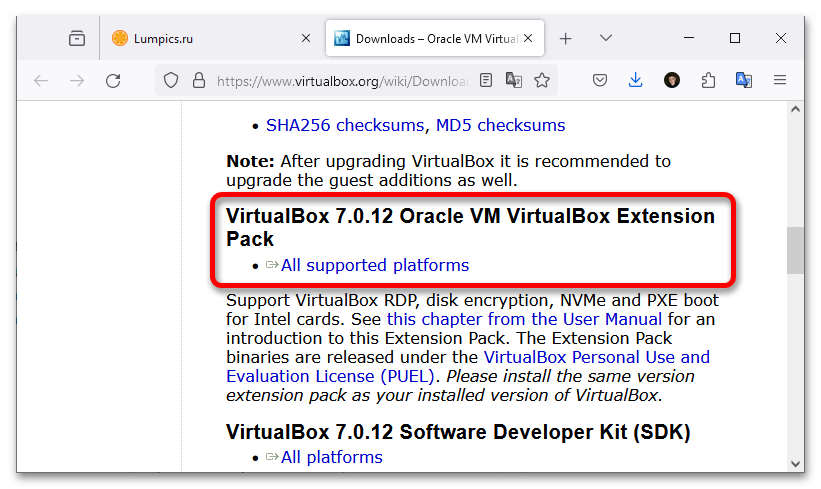
- Перейдя на страницу загрузки, спуститесь до заголовка «VirtualBox <версия_программы> Oracle VM VirtualBox Extension Pack» и кликните по ссылке «All supported platforms».
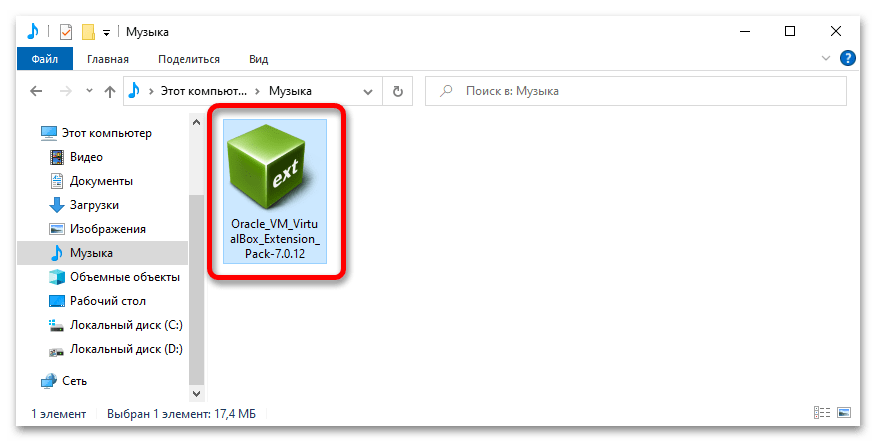
- Сразу после этого начнется загрузка файла расширения на компьютер. Дождитесь завершения процедуры, после чего кликните по нему дважды кнопкой мыши, чтобы запустить.
- В появившемся диалоговом окне приложения VirtualBox запустите процесс инсталляции расширения, щелкнув по кнопке «Установить».
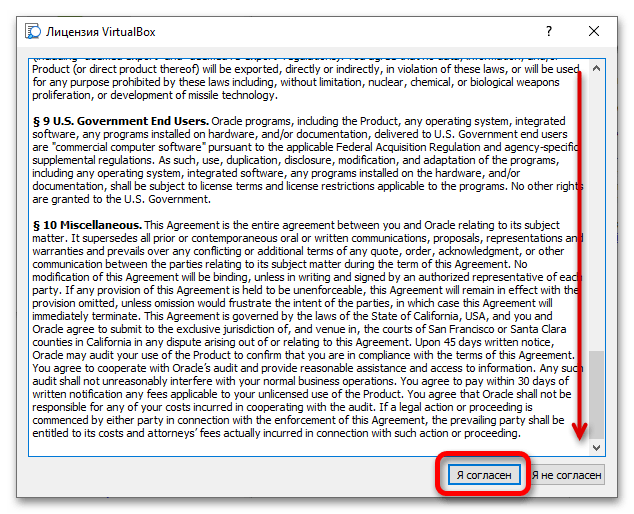
- Примите условия лицензионного соглашения, чтобы продолжить процедуру. Для этого сначала активируйте соответствующую кнопку, пролистав текст документа до самого низа, а затем кликните «Я согласен».
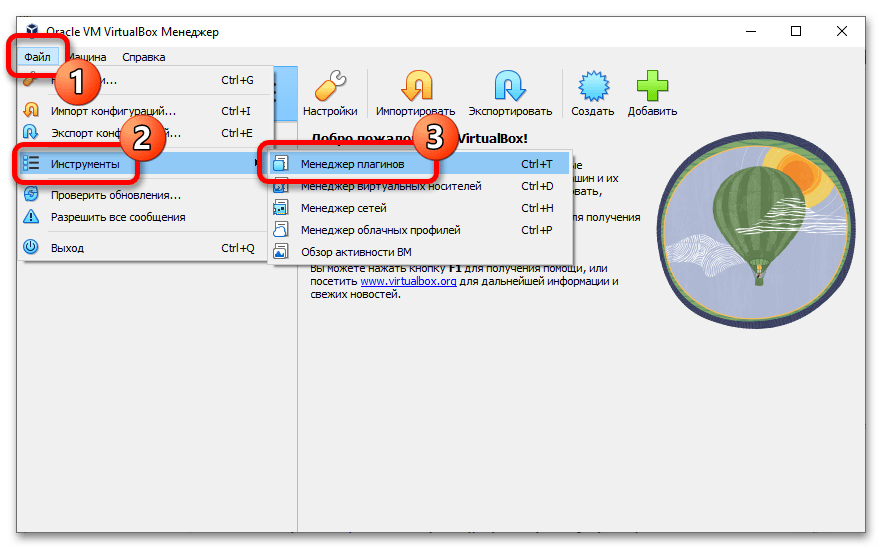
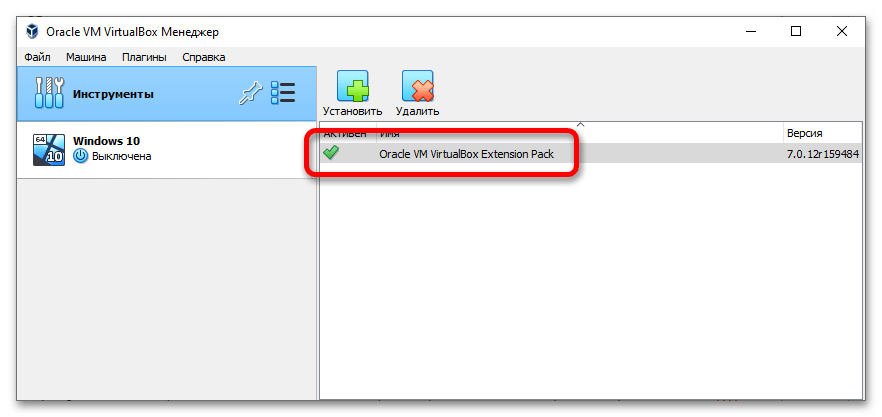
- Буквально через несколько секунд установка завершится. Чтобы убедиться в этом, откройте список всех инсталлированных расширений. Для этого разверните меню «Файл» в верхнем левом углу окна и выберите пункт «Инструменты» → «Менеджер плагинов». Также для этого вы можете воспользоваться горячей клавишей Ctrl + T.
- В результате на экране появится список всех расширений. Если напротив строки «Oracle VM VirtualBox Extension Pack» стоит зеленая галочка, значит, вы все сделали правильно и можете переходить к следующему шагу этой статьи.

Обратите внимание! Если при выполнении описанных действия вы столкнулись с ошибкой, есть вероятность, что это связано с устаревшей версией VirtualBox. Обновите программу и попробуйте выполнить инструкцию еще раз. Если сделать это штатными инструментами приложения не получается, тогда загрузите инсталляционный файл с официального сайта разработчика и совершите переустановку.
Шаг 2: Запуск виртуальной машины
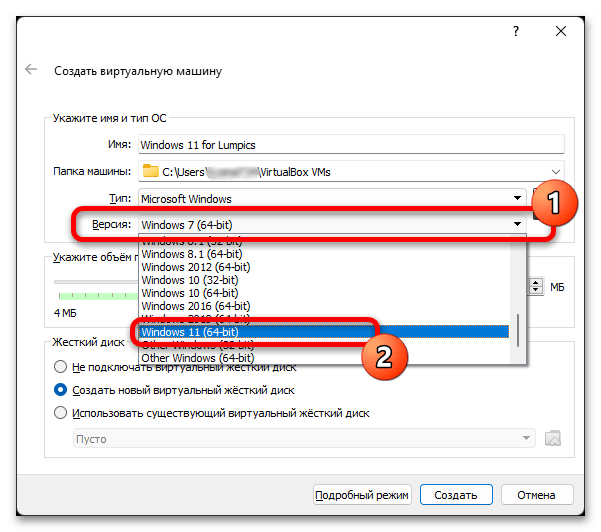
После того как расширение для VirtualBox было установлено, необходимо запустить непосредственно саму операционную систему, которую требуется открыть на весь экран. Если она уже у вас установлена, тогда просто кликните по ее названию дважды левой кнопкой мыши, в противном случае необходимо будет предварительно произвести ее инсталляцию. На нашем сайте есть отдельные статьи, в которых об этом рассказывается детальнее.
Подробнее: Как в VirtualBox установить Windows 11 / 10 / 7 / XP / Linux
Шаг 3: Установка дополнений гостевой ОС
Чтобы активировать возможность раскрытия операционной системы в VirtualBox на весь экран, необходимо установить еще несколько дополнений. Все они поставляются отдельно в виде подготовленного заранее образа. Его потребуется подключить к гостевой системе и выполнить стандартную процедуру по инсталляции. Этой теме посвящена другая статья на нашем сайте. В ней вы также найдете альтернативный способ, которым рекомендуется пользоваться в том случае, если основной не помог в решении поставленной задачи.
Подробнее: Установка VirtualBox Guest Additions
Важно! После установки дополнений гостевой операционной системы не забудьте перезапустить VirtualBox, чтобы все изменения сохранились. В противном случае сделать полный экран в приложении не получится.
Шаг 4: Активация полноэкранного режима
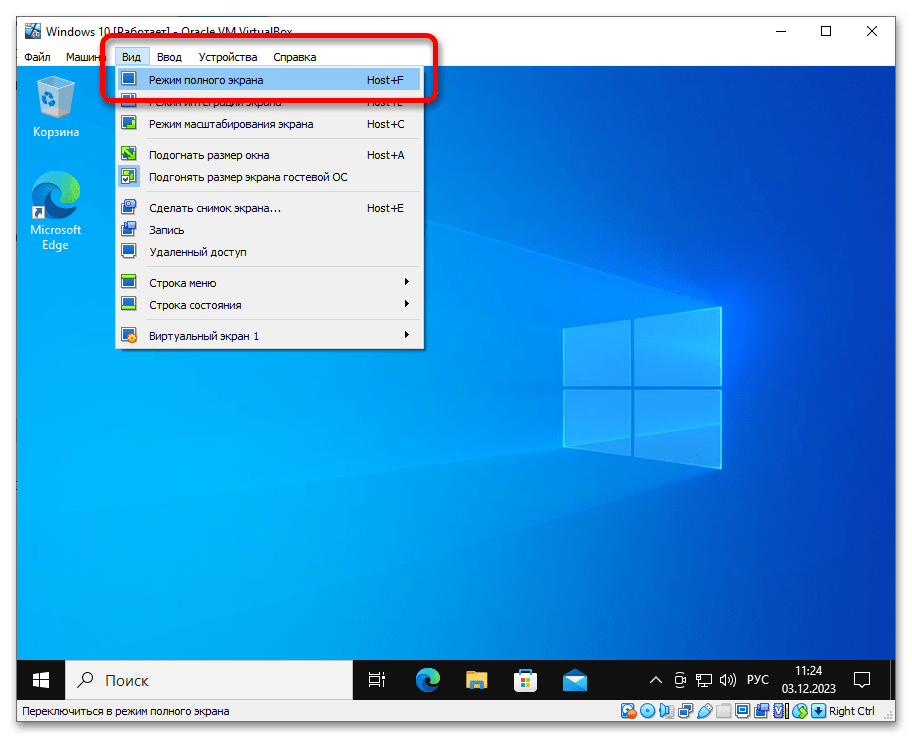
Когда операционная система будет запущена снова, ее получится открыть на весь экран. Делается это посредством комбинации клавиш Ctrl + F. Также вы можете воспользоваться опцией в меню «Вид»: раскройте его в верхней части интерфейса и выберите пункт «Режим полного экрана».
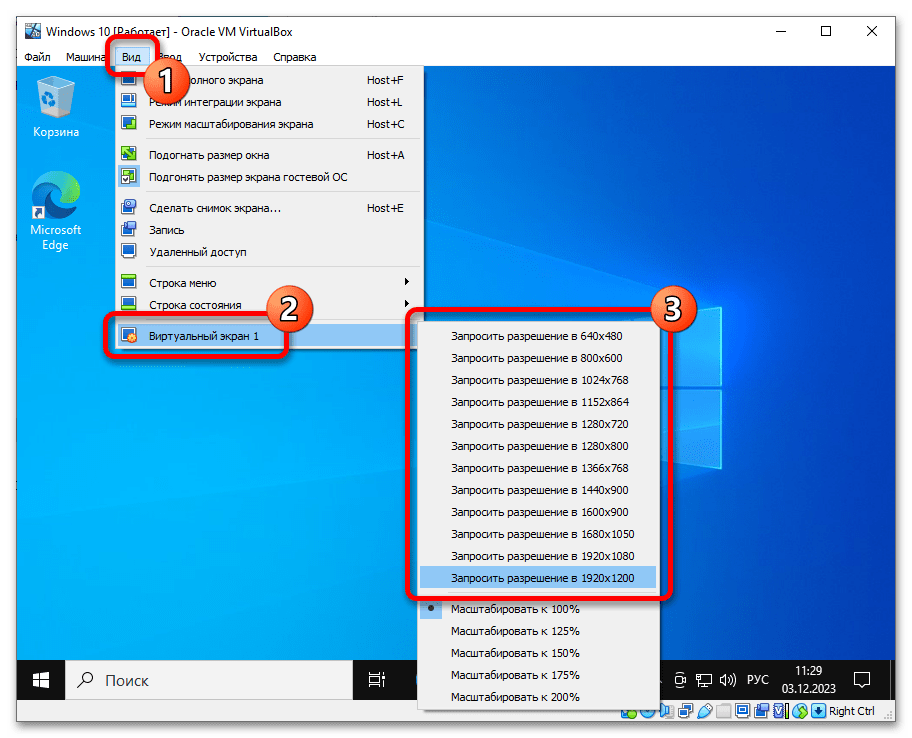
Если вы делаете это с современной операционной системой, например Windows 10 или 11, тогда через мгновение вы увидите успешное выполнение поставленной задачи — VirtualBox будет раскрыт на весь экран и все его пространство заполнится интерфейсом системы. Если по итогу размер гостевой ОС останется неизменным, тогда вручную запросите нужное разрешение, которое будет соответствовать вашему монитору. Для этого перейдите в меню «Вид», наведите курсор на пункт «Виртуальный экран 1» и кликните во всплывающем списке по нужному значению.
Читайте также: Как узнать разрешение на ноутбуке / в Windows 10
После этого снова войдите в полноэкранный режим посредством клавиш Ctrl + F или через меню «Вид», как это было описано ранее. В будущем вы сможете выйти из этого режима с помощью все того же сочетания клавиш.
Наша группа в TelegramПолезные советы и помощь
After installing a guest operating system (OS) on VirtualBox, the interface of the guest OS is displayed in a windowed mode by default. Moreover, the size of that window is usually not big, and if you maximize the window’s size, the resolution of the guest OS user interface is left the same.
In the majority of cases, working in a guest OS with low resolution is not comfortable. Don’t worry, as it is possible for you to increase the screen resolution of the guest OS user interface as well as run a guest OS in the full screen mode for macOS, Linux and Windows guest OSs.
How to Make VirtualBox Full Screen for Windows 10 Guests
If security is a concern for you, running Windows 10 as a virtual machine (VM) on VirtualBox is a good idea. You can disable the internet connection or set up a virtual network adapter for a VM in the Host Only mode to allow network communication only between host and guest systems, and deny connecting the Windows 10 guest to external networks, including the internet. As you recall, VirtualBox is installed on the host OS running on a host machine (a physical machine) and the guest OS is the operating system running on a VM.
If you try to maximize the VirtualBox VM window right after installing Windows 10 on a VirtualBox VM, the size of the guest OS user interface is not increased (see the screenshot below).

Check the amount of video memory you have in the virtual machine settings. It is recommended that you set 128 MB of video memory, as when a video mode with higher resolution is used, more video memory is needed. You can also enable 2D and 3D acceleration.

If you go to Windows 10 display settings (right click the desktop and select Display settings in the context menu), you can increase the guest OS resolution, but you still have no ability to switch the full screen mode on. For example, in our case the resolution of the monitor is 1920×1080 and the maximum resolution in the Windows 10 guest settings is 1600×1200 (available resolution settings of the guest OS are not for widescreen displays, as you can see). If you try to enter the full screen mode by clicking View > Full screen mode in the VM window or by pressing the combination of the VirtualBox host key and F (Right Ctrl + F in this case), the guest OS screen will not be stretched to the size of your display and resolution will not be increased.

In order to fix this issue and make VirtualBox full screen, you should install VirtualBox Guest Additions on the guest OS.
In the VM window, go to Devices > Insert Guest Additions CD image to insert the ISO disk into the virtual CD drive of the VM.

In the guest Windows system open Windows Explorer, go to the virtual CD drive (disk D: in this case) and run VBoxWindowsAdditions-amd64.exe file to install VirtualBox Guest Additions on the Windows 10 guest.

The process of installing Guest Additions is quite straightforward. After finishing the installation, reboot the VM.
Once VirtualBox Guest Additions are installed, you can see a different set of resolution settings in the Windows 10 guest. In the VM Window menu, go to View and make sure that the Auto-resize Guest Display option is enabled.
Move the mouse pointer over the corner of the VM window, push the left mouse button and change the size of the VM window. The resolution of the user interface of guest Windows 10 is automatically changed. Now you can maximize the VM window size of the Windows 10 guest.

We are now close to answering the “how to make VirtualBox full screen Windows 10” question. After making the configuration explained above, you can enable the full screen mode for your Windows 10 VM by clicking View > Full Screen mode in the VM window. As an alternative, you can press the combination of the VirtualBox Host key and F. Right Control is the default host key in VirtualBox, hence, you should press Right Ctrl + F to enter full screen mode for a Windows 10 VM.
How to Make VirtualBox Full Screen for Mac OS X Guests
After installing macOS on VirtualBox, the default screen resolution of the guest OS is 1024×768. Display Settings of macOS can be found in System preferences > Display. You cannot increase the screen resolution in the display options. Only the 1024×768 resolution is available in these settings.

Before you can increase the display resolution for your macOS running on a VM, go to VM settings > Display, and make sure that the amount of video memory is 128 MB and the Enable 3D acceleration checkbox is ticked (similarly to the process explained above for the Windows VM).
Let’s now go to configuring the display resolution of the macOS guest.
- Power off your macOS VM.
- Open the console in your host machine. In our example, Windows 10 is used as a host machine, hence, we have to run CMD as Administrator.
- Go to the VirtualBox directory; the default installation path of VirtualBox is C:\Program Files\oracle\virtualbox
cd "c:\Program Files\oracle\virtualbox"
Set the necessary resolution with VBoxManage which is a command line configuration tool of VirtualBox. The defined resolution can be less than or equal to the resolution of your physical monitor connected to your physical (host) machine. In our case, the monitor has the FullHD resolution (1920×1080).
Let’s run the command in the host OS to set the necessary resolution.
VBoxManage setextradata "macOSMojave10-14" VBoxInternal2/EfiGraphicsResolution 1920x1080If you use Linux or macOS on a host machine, the configuration principle is similar – run VBoxManage with the similar parameters.
- Power on the VM.
Now you should notice that the VM display resolution in the VM window is higher right after powering on the VM (during VM boot). When a VM boots, you will see your resolution in the display settings of the macOS guest. There is still only one resolution parameter in the list, but it is 1920×1080 now instead of 1024×768 seen previously.

Press the combination of the host key and F. In this case, this is the Right Ctrl + F key combination. As an alternative to the key combination, you can click View in the VM window and hit the Full-screen Mode option.
Now your guest macOS running on VirtualBox is running in the full screen mode.
Advantages of this method: Ease of use.
Disadvantages of this method: You need to shut down a VM to change screen resolution in the VirtualBox VM window.
Since VirtualBox v.6.0.0 was released, VirtualBox Guest Additions have been provided for macOS guest OSs, while earlier versions of VirtualBox did not include Guest Additions for macOS. Unfortunately, the current version of macOS Guest Additions does not contain macOS graphic drivers to change the VM display resolution automatically when stretching or maximizing the guest VM window. Only the basic functionality is available right now, which means that you cannot use the same method of changing screen resolution as for Windows and Linux guest OSs running on VirtualBox after installing Guest Additions.
How to Make VirtualBox Full Screen for Linux Guests
First of all, make sure that in the virtual machine display settings (Machine > Display), the amount of video memory is 128 MB (as was the case for the previous two examples).
Install VirtualBox Guest Additions on your Linux guest.
Let’s explore how to make VirtualBox full screen for Linux guests on an example of using Ubuntu. You can install VirtualBox Guest Additions on Linux, as was shown in the first section for Windows by inserting the ISO disk image into a virtual CD/DVD drive of a VM and running the installer for the appropriate platform. We considered this method in the blog post about installing Ubuntu on VirtualBox. Installing Guest additions from online package repositories with your package manager is possible, but at this time there remain some disadvantages caused by package dependencies. Hence, it is recommended to install Guest Additions from a virtual ISO disk at present.
In order to install Guest Additions and make VirtualBox full screen for Linux guests, do the following:
- In the VM window hit Devices > Insert Guest Additions CD image.
- If autorun is enabled, you will see the autorun window. Hit Run and enter your password to confirm running the installer.
- Type y and press Enter in the appeared console window.
- After finishing installation reboot the Linux VM.
Now you can change the size of the VM window, and the resolution of your guest Linux will fit the size of the VM window automatically. Go to View > Full screen mode or press the Host+F combination to make VirtualBox full screen for your Linux guest.
Note: If for some reason, you cannot install VirtualBox Guest Additions on your guest OS, you can manually and statically increase the resolution of the guest OS display by using VBoxManage (a VirtualBox command line configuration tool) on a host OS as explained above in the macOS configuration section:
VBoxManage setextradata "VM_name" VBoxInternal2/EfiGraphicsResolution 1920x1080
Conclusion
Using a full-screen mode for a virtual machine is convenient and allows you to appreciate the advantages of hardware virtualization. This feature allows you to use the guest OS on the VM much as it would be used on a host machine for high resolution applications, large workspace, etc.
The first method is using VBoxManage, the command line VirtualBox management tool, for changing resolution manually. This method can be used for all available OSs – Windows, macOS and Linux. The disadvantage of this method is that you have to shut down the VM to change the guest OS display resolution. Use this method only if it is impossible to install VirtualBox Guest Additions on a guest OS.
Automatic changing resolution in real time when resizing a VM window or entering a full-screen mode is possible for Windows and Linux guests after installing Guest Additions. This is the second method that is available. Unfortunately, the current version of VirtualBox Guest Additions for macOS (v.6.0.8) does not contain special display drivers for changing resolution and entering a full-screen mode in macOS guests automatically.
Virtualbox is a popular virtualization software that allows users to run multiple operating systems on a single machine. Many users prefer using Virtualbox to create virtual machines for various purposes, including software testing, development, and running legacy applications. However, one common challenge that users face is making Windows 10 full screen on Virtualbox. In this blog post, we will explore the different methods to overcome this challenge and ensure a seamless full-screen experience on your Windows 10 virtual machine.
Video Tutorial:
The Challenge of Making Windows 10 Full Screen on Virtualbox
When running a Windows 10 virtual machine on Virtualbox, you may notice that the display does not automatically adjust to match the full screen of your host computer. This can result in a limited viewing area, which may hinder productivity and user experience. The challenge lies in configuring the virtual machine settings and making the necessary adjustments to enable full-screen mode. Thankfully, there are several methods you can employ to overcome this challenge and make Windows 10 full screen on Virtualbox.
Things You Should Prepare for
Before proceeding with the methods mentioned in this article, there are a few things you should prepare for. Firstly, ensure that you have the latest version of Virtualbox installed on your host machine. Upgrading to the latest version can help resolve any compatibility issues and ensure optimal performance. Additionally, make sure that you have a valid license for the Windows 10 operating system, as you will need it to install and activate the virtual machine.
Method 1: Adjusting Display Settings via Virtualbox
To make Windows 10 full screen on Virtualbox, you can start by adjusting the display settings within Virtualbox itself. Here’s how:
1. Start Virtualbox and select your Windows 10 virtual machine.
2. Click on the “Settings” button.
3. In the Settings window, navigate to the “Display” tab.
4. Under the “Screen” section, increase the value for “Video Memory” to a higher value for better performance.
5. Check the box next to “Enable 3D Acceleration” to enhance graphics performance.
6. Under the “Display” section, choose “Auto-resize Guest Display” and “Scale Factor” as per your preference.
7. Click “OK” to save the changes.
Pros:
– Allows you to adjust display settings specific to the virtual machine.
– Provides options for improving graphics performance.
– Auto-resize feature enables dynamic adjustment of the guest display.
Cons:
– Requires manual adjustment of the display settings within Virtualbox.
– Limited control over the scaling factor in some cases.
Method 2: Installing Virtualbox Guest Additions
Another method to make Windows 10 full screen on Virtualbox is by installing Virtualbox Guest Additions. This software package provides additional features and capabilities, including enhanced graphics performance and seamless mouse integration. Here’s how to install Virtualbox Guest Additions:
1. Start your Windows 10 virtual machine.
2. In the Virtualbox menu, go to “Devices” and select “Insert Guest Additions CD image”.
3. Double-click the CD drive in Windows Explorer to start the installation.
4. Follow the on-screen instructions to complete the installation.
5. Restart the virtual machine after the installation is complete.
Pros:
– Provides enhanced graphics performance and mouse integration.
– Enables automatic adjustment of the guest display for full-screen mode.
– Offers additional features and capabilities for a better virtual machine experience.
Cons:
– Requires additional software installation within the virtual machine.
– May need to update Virtualbox Guest Additions when upgrading Virtualbox.
Method 3: Adjusting Windows 10 Display Settings
In addition to Virtualbox settings, you can also adjust the display settings within the Windows 10 operating system itself. This method allows you to customize the display resolution and scaling options to suit your preferences. Here’s how to adjust the Windows 10 display settings:
1. Start your Windows 10 virtual machine.
2. Right-click on the desktop and select “Display settings”.
3. Under the “Resolution” section, choose a higher resolution for a larger display area.
4. Use the “Scale and layout” option to adjust the scaling factor as per your preference.
5. Click “Apply” to save the changes and check if the display adjusts to full screen.
Pros:
– Provides control over the display resolution and scaling options.
– Allows customization according to individual preferences.
– Adjustments apply directly within the Windows 10 operating system.
Cons:
– Display settings may need to be reconfigured each time the virtual machine is started.
– Limited to the display settings available within the Windows 10 operating system.
Method 4: Using the Host + G Key Combination
An alternative method to make Windows 10 full screen on Virtualbox is by utilizing a key combination within the virtual machine. This method allows you to quickly switch between full-screen and windowed mode. Here’s how to use the Host + G key combination:
1. Start your Windows 10 virtual machine.
2. Press the right Ctrl key on your keyboard (the default “Host” key) and hold it down.
3. While holding the Host key, press the G key.
4. Release both keys and check if the virtual machine transitions to full-screen mode.
Pros:
– Offers a quick and convenient way to switch between full-screen and windowed mode.
– Does not require any additional settings or configurations.
– Provides a seamless transition between display modes.
Cons:
– Limited to toggling between full-screen and windowed mode.
– Requires manual key combinations each time the display mode needs to be changed.
Pros and Cons:
Pros:
1. Allows quick switching between full-screen and windowed mode.
2. No need for additional settings or configurations.
Cons:
1. Limited to toggling between full-screen and windowed mode.
2. Requires manual key combinations each time the display mode needs to be changed.
Method 5: Using the View Menu
Another method to make Windows 10 full screen on Virtualbox is by using the “View” menu. This method allows you to access various display options and switch to full-screen mode. Here’s how:
1. Start your Windows 10 virtual machine.
2. In the Virtualbox menu, go to “View”.
3. Choose the “Full-screen” option to switch to full-screen mode.
Pros:
– Provides a direct and accessible option within the Virtualbox menu.
– Offers an easy way to switch to full-screen mode.
Cons:
– Limited to invoking full-screen mode through the Virtualbox menu.
– Requires manual selection each time the display mode needs to be changed.
1. Incompatible version of Virtualbox: Ensure that you have the latest version of Virtualbox installed on your host machine. Older versions may not support the full-screen feature for Windows 10 virtual machines.
2. Incorrect display settings: Double-check the display settings within the virtual machine and ensure that they are configured correctly. Incorrect settings may prevent the display from adjusting to full-screen mode.
3. Incomplete installation of Virtualbox Guest Additions: If you have not installed Virtualbox Guest Additions or have an outdated version, it may limit the display options and prevent full-screen mode.
4. Lack of sufficient video memory: Insufficient video memory allocation can impact the performance and display capabilities of the virtual machine. Increase the video memory allocation for better results.
Additional Tips
1. Update Virtualbox regularly to ensure compatibility and access to the latest features.
2. Allocate sufficient resources to the virtual machine, including CPU, RAM, and video memory, for optimal performance.
3. Consider adjusting the host computer’s display resolution to match the desired resolution within the virtual machine for a more seamless experience.
5 FAQs about Making Windows 10 Full Screen on Virtualbox
Q1: I have installed Virtualbox Guest Additions, but I still can’t make Windows 10 full screen. What could be the issue?
A: It is possible that you have an outdated version of Virtualbox Guest Additions installed. Try uninstalling the current version and installing the latest version compatible with your Virtualbox version.
Q2: Will adjusting the display settings in Windows 10 affect the host computer’s display settings?
A: No, adjusting the display settings within the Windows 10 virtual machine will not affect the host computer’s display settings. The changes are specific to the virtual machine.
Q3: After switching to full-screen mode, the display is distorted or blurry. How can I fix this?
A: Adjust the display settings within the virtual machine and ensure that the resolution and scaling options are set correctly. Additionally, make sure that the guest additions are installed and updated.
Q4: Can I run multiple virtual machines in full-screen mode simultaneously?
A: Yes, you can run multiple virtual machines in full-screen mode simultaneously by adjusting the Virtualbox settings for each virtual machine individually.
Q5: Can I make Windows 10 full screen on Virtualbox without installing Virtualbox Guest Additions?
A: While installing Virtualbox Guest Additions is not mandatory, it is highly recommended as it enhances the performance and display capabilities of the virtual machine, including full-screen mode.
In Conclusion
Making Windows 10 full screen on Virtualbox is a common challenge that can be overcome with the right settings and configurations. By following the methods outlined in this blog post, you can ensure a seamless and immersive full-screen experience for your Windows 10 virtual machine. Whether through adjusting Virtualbox settings, installing guest additions, or customizing display settings within Windows 10, these methods provide a range of options to suit individual preferences and requirements. Remember to keep Virtualbox and its components up to date for optimal performance and compatibility.{“@context”:”https://schema.org”,”@type”:”FAQPage”,”mainEntity”:[{“@type”:”Question”,”name”:” I have installed Virtualbox Guest Additions, but I still can’t make Windows 10 full screen. What could be the issue?”,”acceptedAnswer”:{“@type”:”Answer”,”text”:” It is possible that you have an outdated version of Virtualbox Guest Additions installed. Try uninstalling the current version and installing the latest version compatible with your Virtualbox version.”}},{“@type”:”Question”,”name”:” Will adjusting the display settings in Windows 10 affect the host computer’s display settings?”,”acceptedAnswer”:{“@type”:”Answer”,”text”:” No, adjusting the display settings within the Windows 10 virtual machine will not affect the host computer’s display settings. The changes are specific to the virtual machine.”}},{“@type”:”Question”,”name”:” After switching to full-screen mode, the display is distorted or blurry. How can I fix this?”,”acceptedAnswer”:{“@type”:”Answer”,”text”:” Adjust the display settings within the virtual machine and ensure that the resolution and scaling options are set correctly. Additionally, make sure that the guest additions are installed and updated.”}},{“@type”:”Question”,”name”:” Can I run multiple virtual machines in full-screen mode simultaneously?”,”acceptedAnswer”:{“@type”:”Answer”,”text”:” Yes, you can run multiple virtual machines in full-screen mode simultaneously by adjusting the Virtualbox settings for each virtual machine individually.”}},{“@type”:”Question”,”name”:” Can I make Windows 10 full screen on Virtualbox without installing Virtualbox Guest Additions?”,”acceptedAnswer”:{“@type”:”Answer”,”text”:” While installing Virtualbox Guest Additions is not mandatory, it is highly recommended as it enhances the performance and display capabilities of the virtual machine, including full-screen mode.”}}]}
By default, the Virtual Machine (VM) screen on the Oracle VirtualBox does not occupy the entire screen. So, operating the system can be quite uncomfortable, especially if you need to read some texts.
VirtualBox includes a full-screen option, which increases the windows size. Nevertheless, it does not change the VM display unless a certain option is enabled.
How to Select Full-Screen Option on VirtualBox?
The Maximize button on the Virtual Machine’s window extends the window to the whole screen. However, if you want to open the VM without its menu or the Taskbar, you need to select Full-screen Mode. To do so,
- Click on View on the menu.
- Select Full-screen Mode.


You can also use the Host Key + F shortcut to enable/disable this mode.
- The Host key is the Right Ctrl by default and you can see the current host key on the bottom-right of the VM window.
- If you want to change this key or the shortcut, you need to go to File > Preferences > Input > Virtual Machine.


How to Make VirtualBox Actually Full Screen
While the above option is called Full Screen Mode, it doesn’t actually change the size of the Virtual Machine display. The Window goes to full-screen mode but the display remains the same and occupies the central position.
If you want this display to fill up the entire screen, you need to execute additional tasks. Here’s a step-by-step explanation of these processes.
Install Guest Additions
The first thing you should do is install Guest Additions on the VM. You can only access the option you need to enable true full-screen if this package is present.
On Windows VM
Installing Guest Additions is very easy on a Windows Virtual Machine and you shouldn’t encounter any issues. Here’s how you can install it:
- Power up the Virtual Machine.
- From the menu, select Devices > Install Guest Additions.

- Open the File Explorer and go to the mounted CD drive.
- Run
VBoxWindowsAdditions.exeand follow the on-screen instructions.


On Linux VM
A similar method works on most Linux OS. However, you may get the E_FAIL (0x80004005) error in some cases. Here, you can mount the Guest Additions ISO file and use the Terminal to install guest additions.
- Open the Terminal.
- Enter the following commands to install build essentials on the system:
sudo apt-get updatesudo apt-install build-essentialssudo reboot
- After the reboot, go to Devices > Optical Disks > Choose a disk file.
- Navigate to
C:\Program Files\Oracle\VirtualBox - Click on
VBoxGuestAdditions.isoand select Open.
- Open the Terminal and enter the commands below to install Linux Guest Additions:
sudo mkdir /mnt/cdromsudo mount /dev/cdrom /mnt/cdromcd /mnt/cdromsudo sh ./VBoxLinuxAdditions.run --nox11sudo restart


On Mac VM
Similar to Windows, first try selecting Devices > Install Guest Additions and following the instructions on a Mac VM. If it fails, follow the instructions below. However, keep in mind that some versions of Mac may need different commands.
- Open the Terminal and enter the following command to boot in recovery mode.
sudo nvram "recovery-boot-mode=unused"sudo reboot
- On the Recovery mode, run the Terminal and enter the commands below to disable System Integrity Protection (SIP):
- On the Normal boot mode, open the Terminal again and enter these commands to give permissions to modify some system files:
sudo mount -uw /sudo chown :admin /System/Library/Extensions/sudo chmod 775 /System/Library/Extensions/
- Now, go to Devices > Install Guest Additions and follow the given instructions.
- After installing Guest Additions, open the Terminal and enter the following to reset the permissions and boot into recovery mode:
sudo chown :wheel /System/Library/Extensions/sudo chmod 755 /System/Library/Extensions/sudo nvram "recovery-boot-mode=unused"sudo reboot
- On the Recovery mode, run the Terminal and enter the commands below to re-enable SIP:
csrutil enablenvram -d recovery-boot-modereboot

Check Virtual Machine Settings
Before enabling the option to expand your VM display over the entire screen, you need to change its display setting.
- Power off the Virtual Machine.
- On VirtualBox, select the VM and click on Settings.
- Go to Display > Screen.
- Set the Video Memory to a higher value (the best is 128 MB).

- You can also enable 2D and 3D acceleration to have better graphics.
- Click OK to save the VM Settings.

Enable Auto-resize Guest Display
Now you can finally adjust the VM screen size to fill up the whole screen. To do so,
- Boot into the Virtual Machine.
- Select View from the menu and click on Auto-resize Guest Display to enable it. Its icon shows a tick mark if it’s enabled.


Then, you can maximize the screen to have it expand over the whole screen. Or you can go to full-screen mode using the steps we have mentioned earlier.
If the full screen shows pixelated images, your current settings have low resolution. You need to change it to the maximum resolution supported by the video memory to get a smooth screen image.
Сразу после установки операционной системы на виртуальную машину VirtualBox, она доступна пользователю в небольшом окне. Данное окно можно увеличить, изменив разрешение экрана, но этого не всегда достаточно. Для полноценной работы часто требуется открыть виртуальную машину VirtualBox весь экран.
Именно этому вопросу и посвящена эта статья. Здесь вы узнаете, как сделать VirtualBox на весь экран в случае операционных систем Windows и Linux.
Содержание
Как сделать VirtualBox на весь экран в случае Windows
Если вы хотите открыть виртуальную машину VirtualBox на весь экран, то сначала вам необходимо установить дополнения для гостевой системы. Без этого полноэкранный режим не сможет подстраиваться под разрешение вашего экрана и пользоваться им будет неудобно. Кроме этого, без дополнений для гостевой системы не будут работать многие другие функции программы VirtualBox, могут не работать.
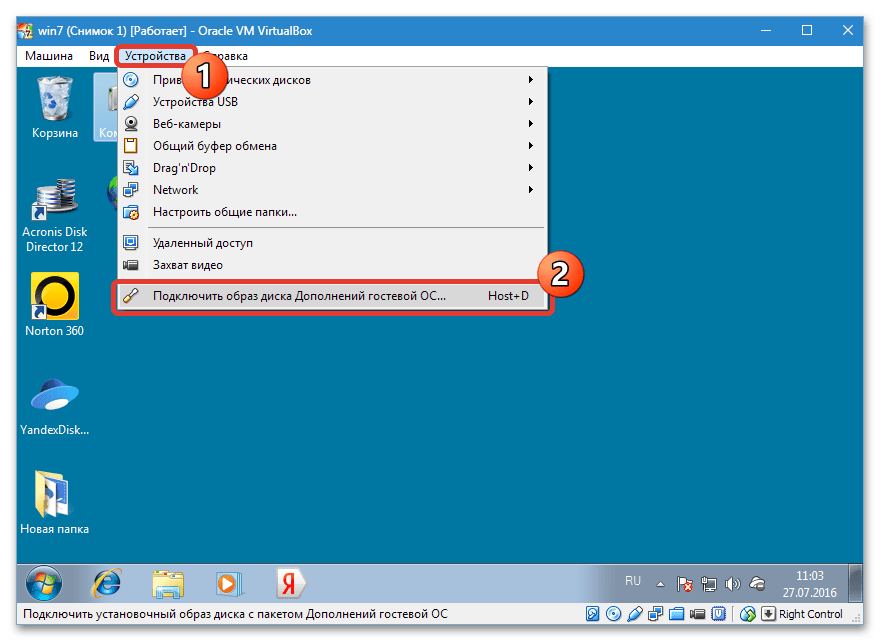
Для того чтобы установить дополнения запустите вашу виртуальную машину с Windows, откройте меню «Устройства» и выберите опцию «Подключить образ диска Дополнений гостевой ОС».

После этого в вашей виртуальной системе появится CD-дисковод с программным обеспечением от VirtualBox.

Откройте данный диск и запустите программу «VBoxWindowsAdditions». Это установщик, с помощью которого вы сможете установить дополнения для гостевой системы (в случае Windows).

Дальше начнется установка дополнений для гостевой системы. На этом этапе нет ничего сложного, устанавливаем дополнения, как и любую другую программу. После завершения установки соглашаемся на перезагрузку виртуальной машины.

На этом все, после следующего запуска виртуальная машина VirtualBox будет готова к разворачиванию на весь экран. Для этого достаточно открыть меню «Вид» и выбрать вариант «Режим полного экрана».

После этого появится предупреждение с информацией о комбинациях клавиш. Это сообщение лучше внимательно прочесть, для того чтобы у вас не возникло проблем с выходом из полноэкранного режима виртуальной машины VirtualBox. После прочтения нажимаем на кнопку «Переключить» и виртуальная машина открывается на весь экран.
По умолчанию в VirtualBox используются следующие комбинации клавиш:
- Right Ctrl-F – открыть виртуальную машину на весь экран.
- Right Ctrl-L – открыть режим интеграции экрана.
- Right Ctrl-F – открыть режим масштабирования экрана.
Как открыть VirtualBox на весь экран в случае Linux
Как и в случае с Windows, для того чтобы открыть виртуальную машину VirtualBox на весь экран, сначала нужно установить дополнения для гостевой системы. На Linux это можно сделать с помощью графического интерфейса или командной строки.
Установка из графического интерфейса
Установку дополнений для гостевой системы из графического интерфейса мы рассмотрим на примере Lubuntu. Но в других дистрибутивах Linux (например, в Ubuntu или Kali Linux) процедура схожая.
Для начала запустите виртуальную машину, откройте меню «Устройства» и выберите «Подключить образ диска Дополнений гостевой ОС».

После этого диск с программным обеспечением VirtualBox должен автоматически примонтироваться и на экране появится предложение открыть его в диспетчере файлов.
Открываем диск в диспетчере файлов и смотрим каталог, в который он был примонтирован. В нашем случае это «/media/user/VBox_Gas_6.1.4». В данном каталоге должен быть файл «VBoxLinuxAdditins.run», он отвечает за установку дополнения гостевой системы.
Чтобы запустить установку, файл «VBoxLinuxAdditins.run» нужно запустить через терминал с Root-правами. Для этого открываем терминал Linux и выполняем следующую команду:
sudo /media/user/VBox_Gas_6.1.4/VBoxLinuxAdditions.run
Обратите внимание, на вашей системе путь к файлу «VBoxLinuxAdditins.run» может отличаться.

После завершения установки перезагружаем виртуальную машину.

После перезагрузки вы сможете открывать виртуальную машину VirtualBox на весь экран. Это можно делать с помощью меню «Вид – Режим полного экрана» или с помощью комбинаций клавиш.
Установка из командной строки
Также на Linux дополнения для гостевой системы можно установить из командной строки. Ниже мы рассмотрим примерный алгоритм действий.
- Скачиваем iso-файл с дополнениями для гостевой системы в папку /tmp.
wget https://download.virtualbox.org/virtualbox/6.1.30/VBoxGuestAdditions_6.1.30.iso -P /tmp
Найти ссылку на последнюю версию iso-файла можно здесь: https://download.virtualbox.org/virtualbox/.
- Монтируем скачанный диск в папку /mnt.
sudo mount -o loop /tmp/VBoxGuestAdditions_5.0.20.iso /mnt
- Запускаем установку дополнений для гостевой системы.
sudo sh /mnt/VBoxLinuxAdditions.run
- Перезагружаем виртуальную машину.
sudo shutdown -r now
После перезагрузки нужно открыть меню «Вид» в окне VirtualBox и попробовать включить «Режим полного экрана». Если все было сделано правильно, виртуальная машина VirtualBox должна открыться на весь экран.
Удаление из командной строки
Если с дополнениями для гостевой системы возникли проблемы, то их можно удалить запустив сценарий удаления, который расположенн в каталоге /opt. Ниже мы рассмотрим примерный алгоритм действий.
- Переходим в папку с дополнениями для гостевой системы:
cd /opt/<VirtualBoxAdditions-x.x.xx>/
Где «x.x.xx» — это установленная версия дополнений.
- Запускаем сценарий удаления:
sudo ./uninstall.sh
- Перезагружаем виртуальную машину.
sudo shutdown -r now
После перезагрузки можно попробовать повторить установку дополнений.
Посмотрите также:
- Как установить Windows 7 или 10 на виртуальную машину
- Как сделать общую папку в VirtualBox
- Как подключиться к виртуальной машине VirtualBox по SSH
- Как запустить виртуальную машину VirtualBox из командной строки
- Как подключить флешку к виртуальной машине VirtualBox
Автор
Александр Степушин
Создатель сайта comp-security.net, автор более 2000 статей о ремонте компьютеров, работе с программами, настройке операционных систем.
Остались вопросы?
Задайте вопрос в комментариях под статьей или на странице
«Задать вопрос»
и вы обязательно получите ответ.