
Как сделать Windows похожей на MacOS

На фото: рабочий стол компьютера с операционной системой Windows 11, стилизованный под операционную систему MacOS от Apple.
Точка восстановления
Перед любыми серьезными изменениями в вашем устройстве мы всегда рекомендуем создавать резервную копию ваших данных
На Windows это называется «Точка восстановления»
После создания резервной точки можем переходить к установке темы
Как установить?

Скачиваем тему MacOS
2. Нажимаем кнопку «Скачать» (Стрелка вниз под фотографией)
3. Сайт попросит вас авторизоваться, вводим свою почту или выбираем удобный способ авторизации (Apple, Google и т.д.)
4. Проходим процесс регистрации и выбираем режим использования и ваши интересы (занимает 15 секунд)
5. Нажимаем кнопку «Скачать» (Стрелка вниз под фотографией)
6. Файл скачивается
Скачиваем Blur-эффект для окон
2. Не пугаемся сложного интерфейса
3. Кликаем на зеленую кнопку Code
4. Нажимаем Download Zip
Скачиваем панель Doc
2. Листаем ниже и выбираем скачать New Version
Теперь вам осталось все это установить и настроить, в этом вам поможет пошаговый видеогайд:
а если оно оказалось для вас непонятным, мы нашли рускоязычного блогера, который довольно понятно рассказал про процесс установки

Macified Windows
This repository contains information and tools that I use to make my Windows 11 desktop look like macOS. I will share the steps and resources that I followed to achieve this transformation, as well as some screenshots of the final result. Lets begin macifying your Windows 11 desktop  .
.
Table of Contents
- Final Look
- Themes
- Wallpapers
- Rainmeter widgets
- Dock and menu bar
- Stage manager
- System & dock icons
- File Explorer
- Cursors
- Extra customisations
- Credits
- Feedback
Final Look
So this is how the final look on your windows desktop will come out. Its always subject to the amount of customisations you do. If you follow instructions as given below in every segment, you will accomplish the same as in screenshots below:

Themes
Step 1: extract the zip file and you will find a file called ThemePatcher. Open it, give permissions and patch the «Themeui» and «uxinit» by clicking on install button. Let it do its work. when its done, it will ask to reboot your pc which you gotta do.
Step 2: After rebooting, go to same folder and find the Themes zip file. Extract it, and go to following path: Themes_MacifiedWindows\macOS for Windows 11 22H2 — Mar 12 2023. In this folder you will find a folder called «Windows 11 22H2 Themes». Copy all files inside it and paste it to C:\Windows\Resources\Themes folder.
Step 3: Go to settings>personalisation>themes and select the 2nd dark theme of MacOS (MacOS-dark solid, 6 images) as first one has some bugs. Apply and with this, you will notice some changes in UI elements.
Lets move ahead to wallpapers now
Wallpapers
Setting the MacOS Wallpaper in beginning will start giving you a vibe of it so you dont get lazy and bored while doing all steps. So go download the zip file of wallpapers or if you have downloaded the full package, you can simply find wallpapers zip inside it. extract it and choose any wallpaper which suits your taste.
i added around 50+ high quality wallpapers originally extracted from MacOS. These are my favs so you dont have to look out for more.
still incase you dont like them or dont wanna spend 200mb on walpaper alone, you can get individual files here
Rainmeter widgets
Firstly you have to setup rainmeter app. Download it from here and install it.
open the Macified Windows folder and look for widgets file (rmskin extension) . Double click on it and simply install the widgets.
These widgets are already set according to the values i have filled (size and position) . Incase they dont load on their own after installing, open rainmeter app, select Macified windows from sidebar, expand it and load individual widgets seprately as per your choice.
Note: These widgets belong to different rainmeter skins i found from various sources. i combined all of them into one and removed those which arent useful. There might be some bugs in it related to settings. But you can easily change their shape by right clicking on widget and choosing «alternative» option. You can change their position too by dragging them (double click + hold + drag).
Note: This is my first rainmeter project so this package include some basic skins only. i will update this widgets package with more skins as i learn more. You can also suggest rainmeter widgets of macOS style you want to add in this skin (do provide link of that existing skin you wish to add it in this widget pack)
Dock and menu bar
This is the most demanded thing.So yes, lets get started.
Step 1: Extract the dock_MacifiedWindows.rar file. There will be «dock_macifiedwindows» folder which you gotta open. Again same folder (same name) will appear and open it again. (sorry for this duplication, i forgot to fix)
Step 2: Inside that folder, there will be many folders and files. Find the dock_64.exe file or dock.exe and open it.
Step 3: Boom, thats it. Dock and menu bar will appear.
You will notice taskbar overlaying on dock or menu bar not appeared. So you have to change some settings
Step 4: Bring your mouse over dock and right click on some empty space. Select «preferences» from the list that appears which will open a settings page.
Step 5: Open advanced settings on sidebar (leftside) and scroll to last where you will find an option called «dock layout backup». Open the drop down list there and select «Macified Windows». It will ask to restore that backup and then the app will restart itself. Thats all, your dock is now fully setup
Note: You might notice that some applications on dock dont open. This is because they arent installed in your PC/laptop. You can remove that icon and add your favourite ones. Menubar doesnt need much changes. you can customise it as per your likings.
Stage Manager
Open preferences option as you did in step 4 of Dock and menu bar. Keep the same settings as shown in screenshot below

System & dock icons
Lets change system icons first, to that of macOS.
Step 1: You extracted themes_macifiedwindows.zip in #Themes segment. Open the extracted folder which will open folder «macOS for Windows 11 22H2 — Mar 12 2023» . open this folder too and then open folder called «7tsp for Control Panel and Winver Colors» . Inside it rename the file «7tsp macOS Day & Dark EXTRAS.7z.remove» by deleting «.remove» so its extension changes to 7z
Step 2: Go back one step and open folder called «7tsp icon themes» . Do the same thing here by deleting .remove so its extension changes to 7z.
Step 3: Go back to main folder and extract «7tsp_MacifiedWindows.zip». Extract it, rename the 7tsp.ee file to 7tsp.exe (add x in between the extension «ee» ) . Now its an exe file and open it, give permissions and wait a sec for it to open.
Step 4: When its launched, you will see a button called «add a custom pack» . click it and select the 7z file you got in step 1. Patch it and reboot pc. Do the same process again with 7z file in step 2. With this, you will have MacOS icon pack installed in your pc.
Now time for dock icons. This is a tough job as you gotta download icon for every app (you want to have on dock) and then apply it manually.
Step 1: To do this, download icon (png or jpg) from google search. Make sure they are with transparent background or you can remove background using edit feature of photos app.
Step 2: Right click on app icon on dock whose icon you wanna edit. Choose «edit this icon» and a windows will pop-up.
Step 3: click on existing icon which will take you to file explorer to choose new icon. CHoose the downloaded icon file and select ok.
Step 4: Now its applied but wait, dont close the windows. You will see an option «scale icon to macOS standards» which will be already ticked. untick and tick it back. Now click ok on top right corner.
Step 5: All done, your new icon is applied.
File Explorer
You can achieve blurry macOS look in file explorer using ExplorerBlurMica shared in releases tab. Extract the zip file and follow this guide . choose effects as blur (put value as 0) . More instructions in Extra customisations shared in the end.
Cursors
Step 1: Extract cursors zip file and open the folder which appears. You will see a file called «install.inf». Right click on it and choose install option. Now the cursor pack is installed
Step 2: Go to settings>personalisation>Themes>Mouse cursors which will open a new window called «mouse properties» . open the drop-down list in scheme under «pointers» category. Select «mac :)» from there and apply. click ok and now its done.
Extra customisations
Coming soon
Credits
This repo is all written and maintained by me aka Sahil
Aqua and blueboy for testing some tools.
Unknown for project name.
Samcux on youtube for guides.
and respective app/softwares developers whose products i used in this project.
Feedback
If you find any broken or wrong text or link Please report me or if you want to add suggestions, open a new issue or text me in Telegram @MaybeSahil
You can join our support channel where i will post beta updates to test new versions. here is the link
Do star this repo to show your support and share as well, means a lot. Thanks, see yaa 💝
Many Windows users are fascinated by the macOS but might not be able to switch to Mac devices for various reasons like work dependency on Windows OS and more. But what if I tell you that you can enjoy the feel of macOS on your Windows 11 device itself.
If you’re looking to change the look of your PC and want to give it a look at the Macbook, we have just the right things for you should. There are several Mac themes that you can download and install on your computer.
To fix various Windows 10/11 problems, we recommend Outbyte PC Repair:
This software will repair common computer errors, protect you from file loss, malware damage, hardware failure, and optimise your computer for peak performance. In three simple steps, you can resolve PC issues and remove virus damage:
- Download Outbyte PC Repair Software
- Click Start Scan to detect Windows 10/11 issues that may be causing PC issues.
- Click Repair All to fix issues with your computer’s security and performance.
This month, Outbyte has been downloaded by 23,167 readers.
In this blog post, we will discuss the 5 best Mac themes for Windows 11. These themes will make your computer look like a MacBook, and they are really easy to install. So, if you’re ready to give your PC a new look, keep reading!
How to install third-party themes on Windows 11?
Many of the third-party themes come with their own installer so that users do not have to do anything other than run the installer to apply the custom themes on Windows 11. However, many free themes, including a few Mac themes listed in this post, do not come with an installer and you have to manually prepare your system to accept the third-party themes.
Luckily there is an application named UltraUXThemePatcher that would modify your system files so that you can use third-party Windows themes on your PC.
With this program, you can download, install, and activate a number of themes on your computer. The tool backs up the original files and lets you undo changes with a simple uninstallation process.
Here are the steps to install and use UltraUXThemePatcher on Windows 11:
- Backup your images and create a restore point
- Download and install a third party them from a site like UltraUXThemePatcher

- During installation, you will realize that the UltraUXThemePatcher modifies the system files so that it can accept the third party themes. The theme installer back creates a restore point enabling you to roll back changes through uninstalling.

- You can look for themes found within the new platform.
- Copy the theme files into the folder C:/Windows/Resources/Themes
- Now apply the copied them from the Windows Personalize settings.


Here is the list of best Mac themes for Windows 11 that you can apply to get a feel and look of macOS.
macOS Monterey Skin Pack

If you are looking for an all-in-one solution to make your Windows 11 look like a Mac, then the macOS Monterey Skin Pack is the best option for you. This theme pack comes with various types of skins and icons that you can use to change the complete look of your computer.
The pack also includes a dock, which gives your PC the look of a Macbook. The theme is very easy to install and use, and it does not require any third-party tools like UltraUXThemePatcher. You just need to download it, extract its contents, run the installer, and follow the setup wizard instructions to install it completely on your system.
After installing the pack, you will get a Mac-like dock, icons, and skins that will change the look of your computer.
macOS Catalina SkinPack

If you want to make your Windows 11 PC look like a MacBook, then you should definitely check out the macOS Catalina SkinPack. This theme pack includes a variety of different skins and icons that are inspired by the Catalina version of macOS. You’ll also get a custom dock with this theme pack, which is perfect for making your PC look like a MacBook.
Apart from that, the macOS Catalina SkinPack also includes a number of other features such as a custom login screen, a custom wallpaper pack, and more. The basic version of the theme is free, but if you want a theme with icons and extra features it will cost you $4.99.
macOS Transformation Pack
macOS transformation pack transforms your Windows 11 to the macOS user interface. It includes MacOS themes, Login screen, wallpapers, sounds, fonts, dashboard, dock, Finderbar, Launchpad, and more.
Besides, its Metro UI design is easy to configure and use. It’s also easy to install or uninstall the theme that makes it best for beginner theme users. The genuine OS system resources and smart system files updates make this theme a must-have for Windows 11 users.
macOS UX Pack 5.0

macOS UX pack gives windows 11 users an iOS feature such as new themes, wallpapers, and more packages. Users will also access the beautiful iOS Yosemite user experience without any harm or risk to their systems. The package encompasses a beautiful MacOS experience with seamless install/uninstall as well as easily configurable settings.
The theme also features the latest iOS pictures, themes, logon screen, and an OS X Dock emulation with optimized pre-configured dockets for better performance. Other notable features include desktop Launchpad access and configured dashboard shortcut keys.
macOS Big Sur

If you’re looking for a macOS theme that will make your PC look like a MacBook, then the Big Sur theme is perfect. It’s one of the most popular macOS themes on Windows and it comes with all the features you would expect, including transparency effects, shadows, and window animations. Other than that, it also supports Rainmeter and Fences. The installation of macOS Big Sur is a bit trickier than others on the list. You need to modify each component separately from the Windows settings. For example, change the theme manually, change the cursor icons, folder icons manually, and more.
Conclusion
These are some of the best macOS themes for Windows 11 that you can use to make your computer look like a MacBook. While none of these themes are officially supported by Apple, they do a great job of replicating the look and feel of macOS. Moreover, almost all of them are free or come with a free version. You can try all of them and keep the one that you like the best.
Now that we have seen some of the best macOS themes for Windows 11, what are you waiting for? Go ahead and try them out!
Does Windows 11 allow the installation of custom themes?
YES. Like previous Windows OS versions, you can easily download, install, and apply the Microsoft and third-party themes on Windows 11 OS,
Are third-party themes safe to install on Windows 11?
The third-party macOS themes listed in this post are completely safe to install as they are listed on the trusted sources. However, you should be careful while downloading the custom themes for unknown sources as they might carry malware in the name of themes.
Peter is an Electrical Engineer whose primary interest is tinkering with his computer. He is passionate about Windows 10 Platform and enjoys writing tips and tutorials about it.
Are you one of those guys who loves to work on the Windows platform but loves the MacOS look? You are at the right place, my friend. In this guide, we are going to show you step-by-step how you can make your windows 11 look like macOS. Let’s hop on to this exciting customization now!

How to convert your Windows 11 PC into a Mac
In order to achieve a proper Mac look, we will need obviously, need some software. Below are the names of the software that we would need to make our windows look like macOS. We have also provided you with the links to download the software. Along with the link we are going to show how you can use this software to make your Windows look like macOS. Let’s get started.
1. MyDockFinder: To get the macOS Dock
MyDockFinder is a good-to-go software for getting the macOS desktop look along with the famous dock and the finder on the top.
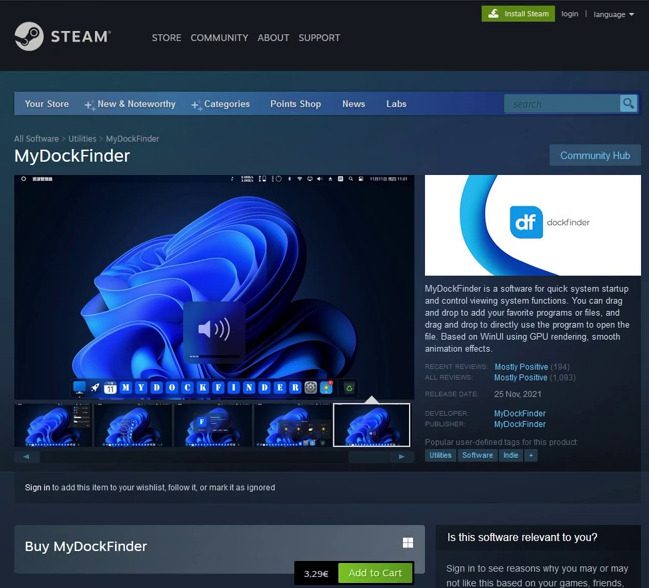
Although this software is paid for now. It used to be free. I manage to get my hands on that free software release. I have provided you with the link from where you can download this software for free. Let’s start with how you can download and customize our desktop:
Step 1: Click on this link to download MyDockFinder. Just clicking on this link will download MyDockFinder.
Step 2: Once downloaded, hop on to the location where you have downloaded it and extract it.
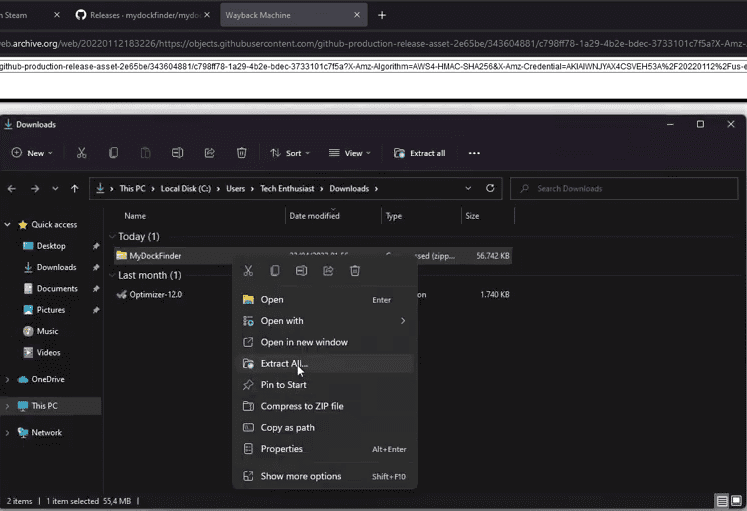
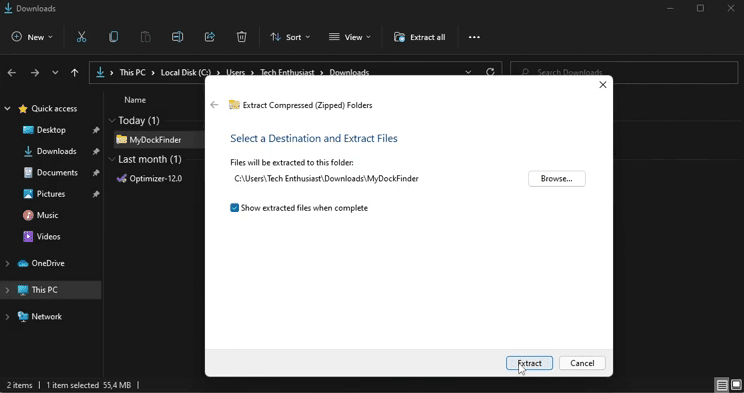
Step 3: Select a Destination and Extract Files pop-up appears. Click on Extract.
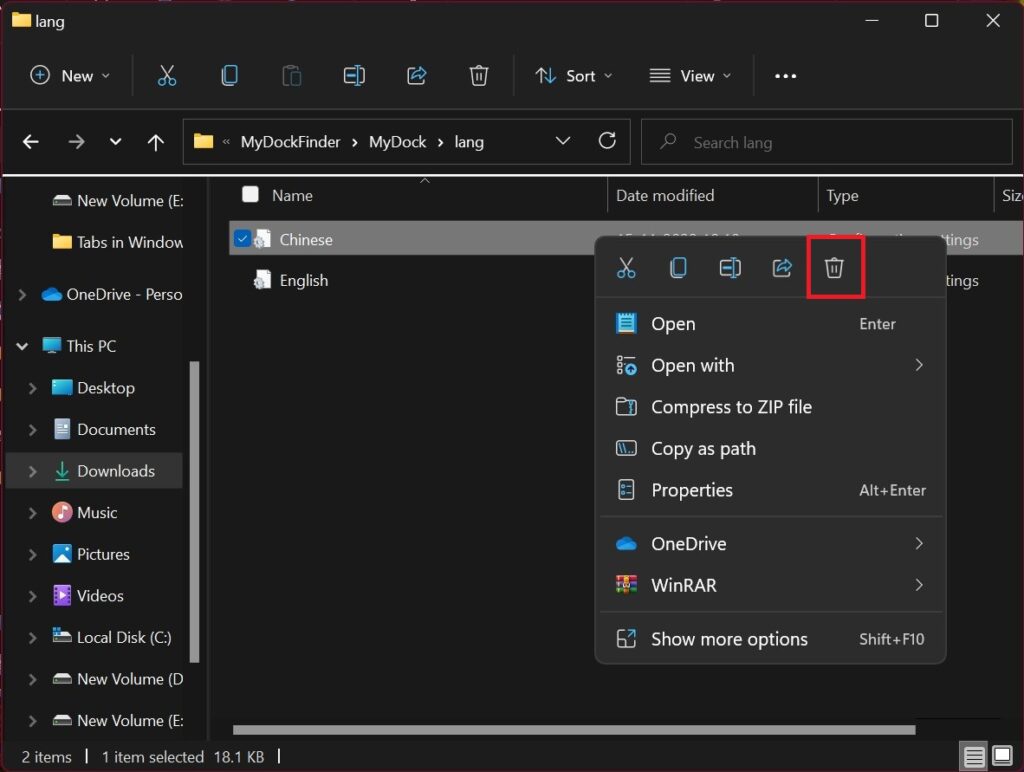
Step 4: After the file is successfully extracted, open it and got yo the lang folder there.
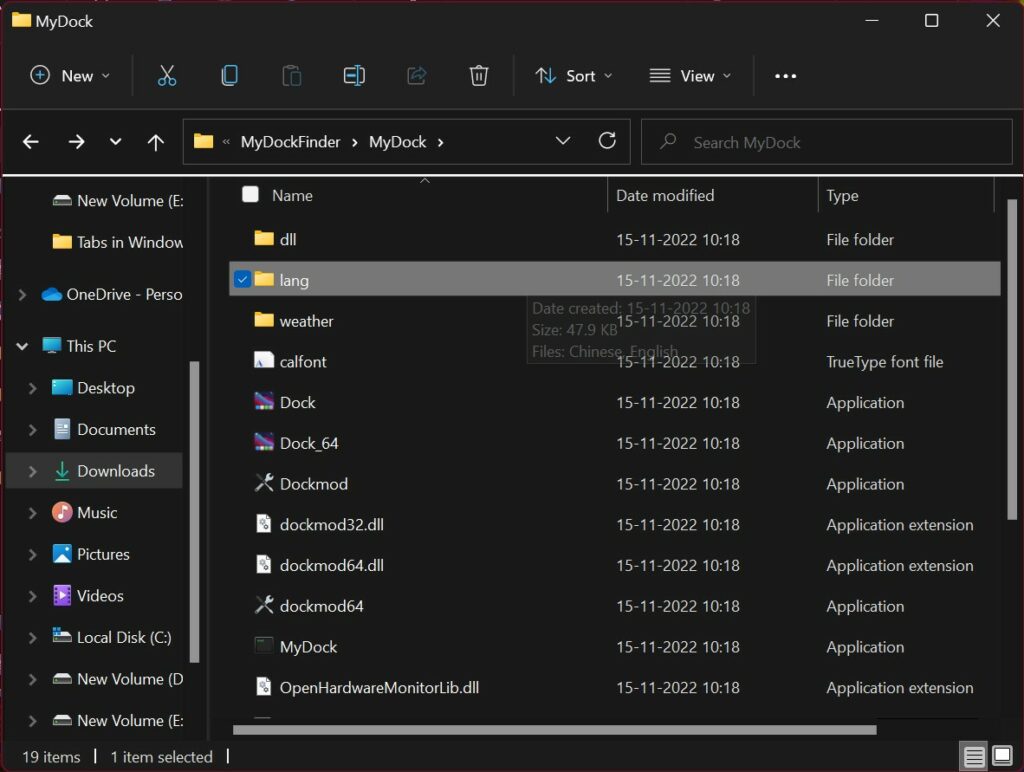
Step 5: Here, select and delete the file by the name Chinese to remove the Chinese language from the app.
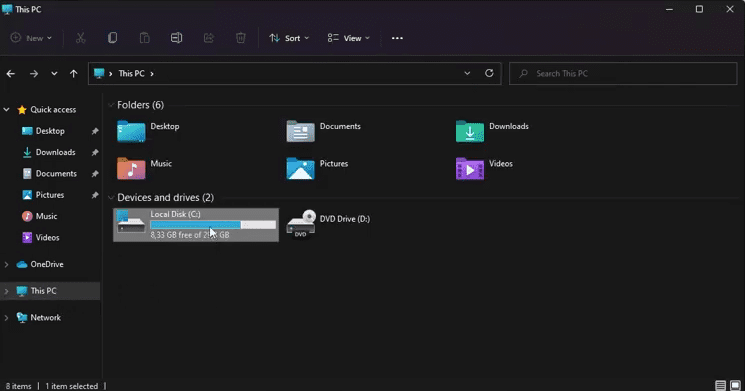
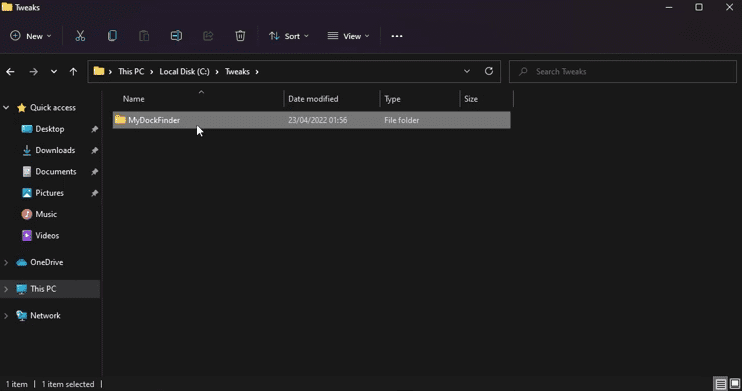
Step 6: One thing we need to do here for our convenience is to make a Folder in the Local Disk C so that we don’t have to put all the customization files at different locations. We will place all the customization software here just to organize our work.
Double Click on Local Disk C.
Step 7: Make a new folder named “Tweaks“(You can name it as per your choice).
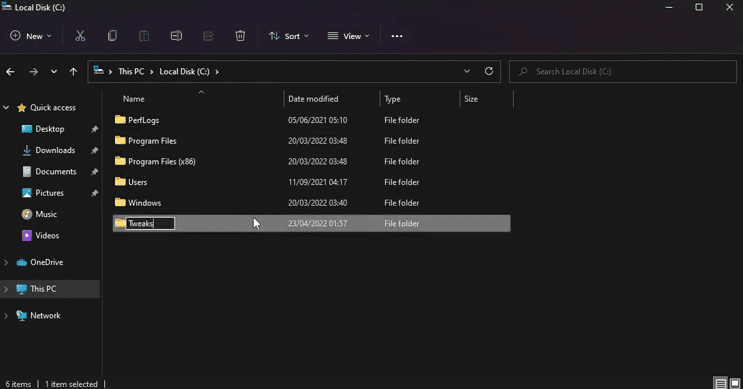
Step 8: Now, move the MyDockFinder folder that we just extracted to the Tweaks folder.
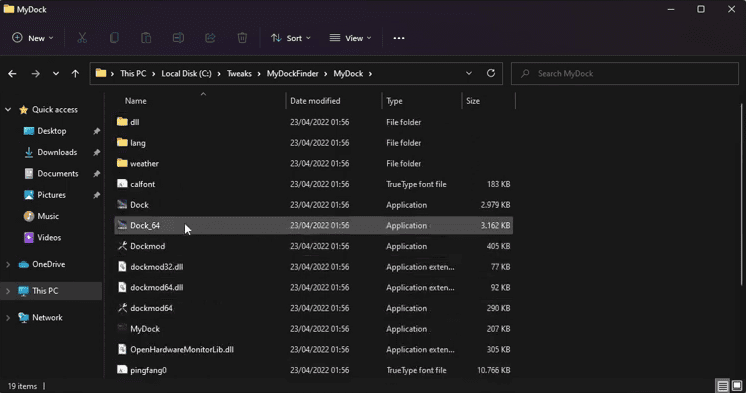
Step 9: Now, open the MyDockFinder folder and click on Dock_64 to run MyDockFinder app.
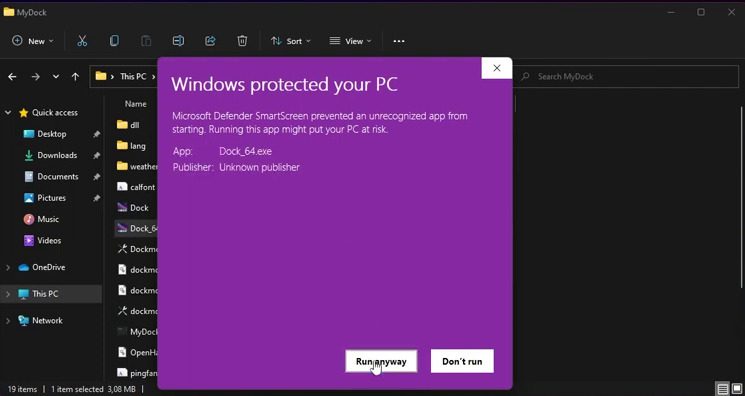
Step 10: Upon running the Dock_64 file, the Windows Defender prompt will open. Here, click on More info and select Run anyway. Do this as many times as it appears without worrying that it will do any harm to your PC.
Step 11: Immediately after running the MyDockFinder app, you’ll see the macOS Application lock at the bottom of your desktop.
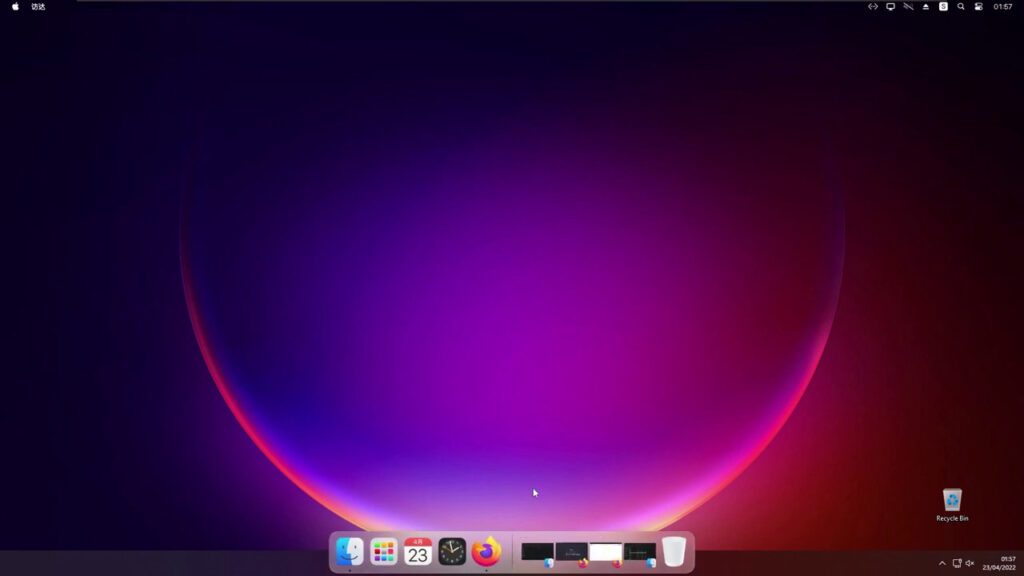
Step 12: But the problem is that the Windows Taskbar is still there. To solve this, right-click on the dock and click on the Hide taskbar option. Doing so will hide the Windows default Taskbar.

At the top right corner, you see what you see.
Also this status bar.
Step 13: Right-click on the dock and then click on Preferences.
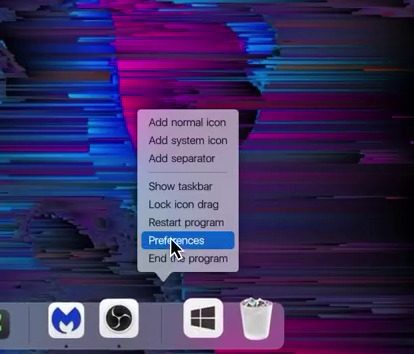
Step 14: On the MyDockFinder Preferences pop-up. In the Global Settings tab check the box Auto start at boot so that it will become part of the system and will start automatically.
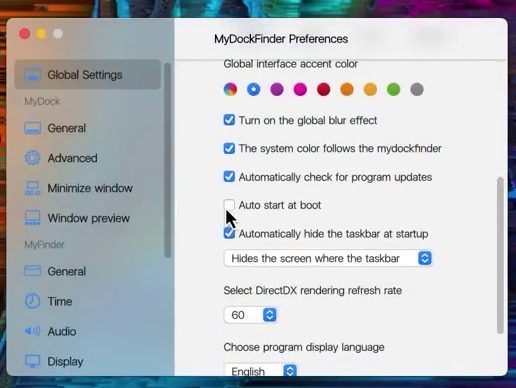
There is so much customization available in MyDockFinder that it is impossible for me to show all of them in this article. So try clicking on another option and start customizing your Dock to your liking.
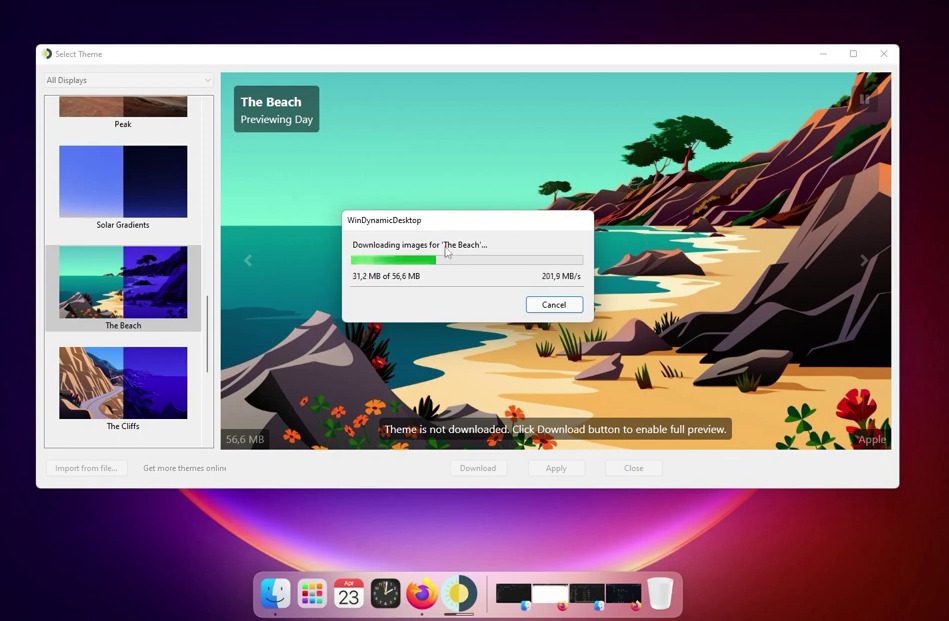
2. Dynamic Dekstop: To get the macOS Dynamic Wallpapers
Another thing we need to set up here is the cool feature of dynamic wallpaper which changes its appearance as per the time of the day. Do the following to apply the same:
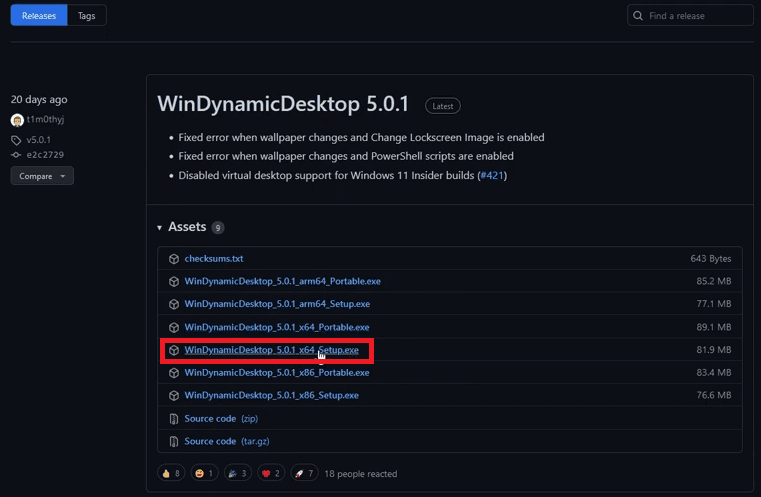
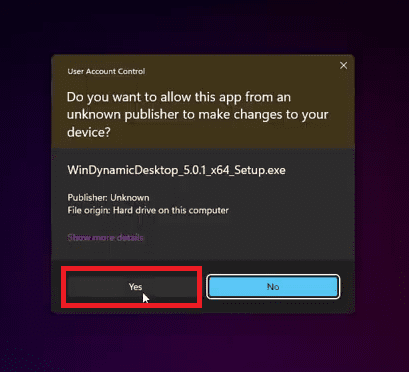
Step 1: Click on this link and download an appropiate WinDynamicDesktop app version for your PC from Github.
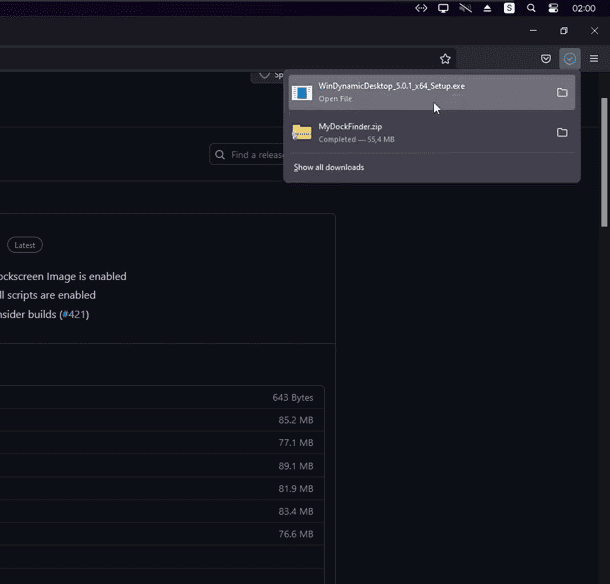
Step 2: Once WinDynamicDesktop is downloaded open it.
Step 3: In the Select Setup Install Mode prompt click on Install for all users option.
Step 4: In the User Account Control Prompt click on Yes to allow the installation.
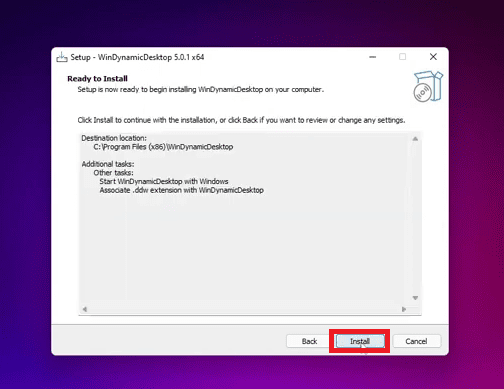
Step 5: In the Setup Wizard Follow the on-screen steps and install it.
Step 6: After getting installed it will automatically launch. Select the language and click on OK.
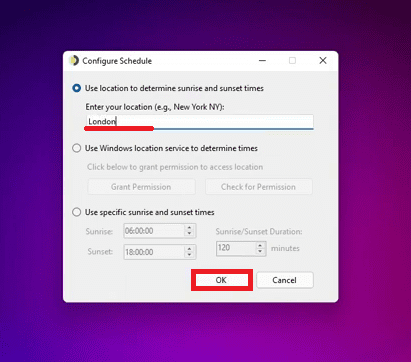
Step 7: You’ll now see the Configure Schedule windows on your screen. Here, enter your location so that it can determine sunrise and sunset time automatically, and press OK. You can also set your own sunrise and sunset time manually.
Step 6: In the select theme wizard select the dynamic wallpaper that you want to apply and click on the Apply button.
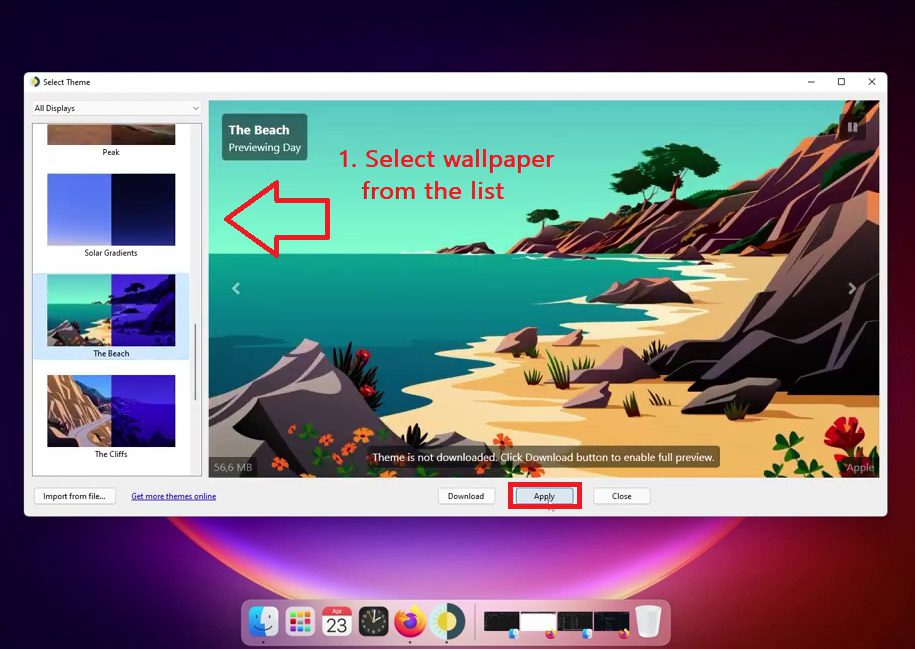
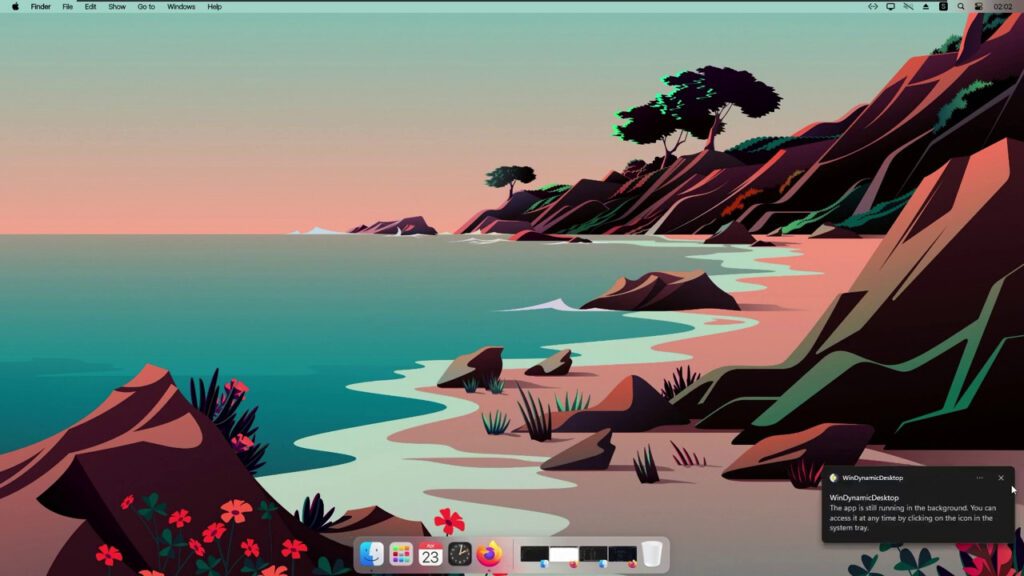
Step 7: The wallpaper will be downloaded and applied on your Windows 11 PC.
Isn’t it beautiful! This is the dynamic wallpaper that has been applied. You can download any wallpaper you like from the list.
3. macOS Cursor: To get the iconic macOS black cursor
Another important thing to change is the cursor. Unlike white macOS has a black cursor and rainbow-colored loading things instead of a blue ring. Follow the below steps to do the same:
Step 1: Click on this link to download the macOS cursor app from GitHub.
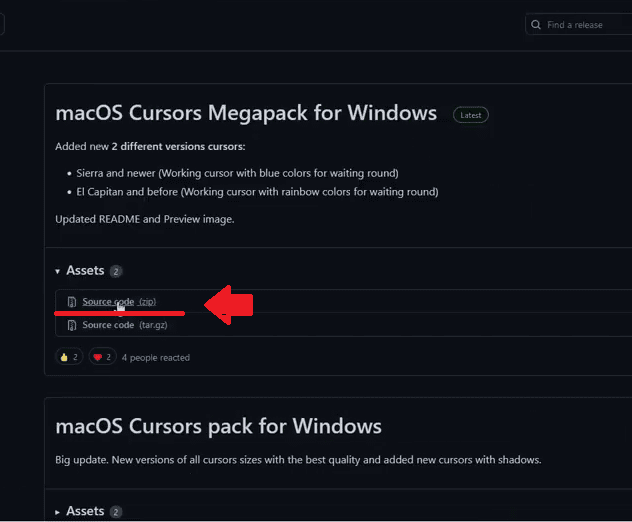
Step 2: Once downloaded, navigate to the location where you have downloaded it. Right-click on it and select Extract All to extract the contents of the downloaded ZIP file.
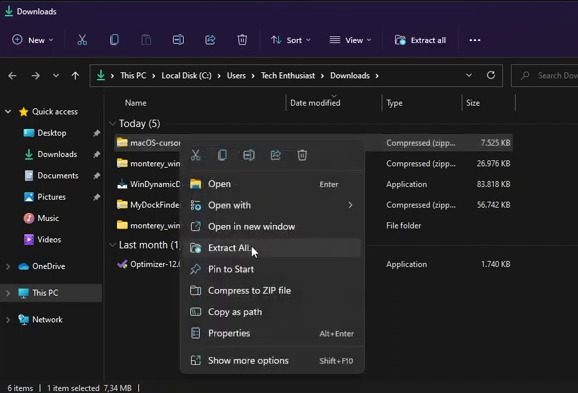
Step 3: Open the Extracted macOS cursor folder and then click on the Dierra and newer folder to get the cursor of macOS High Sierra or later.
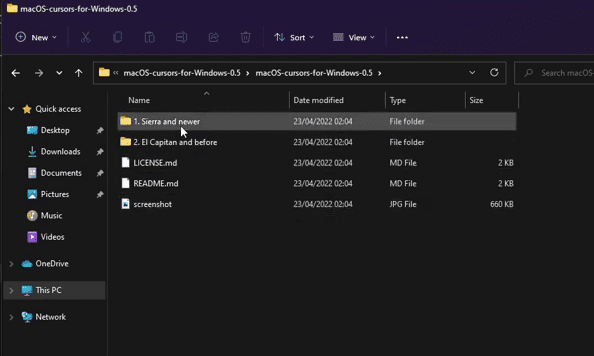
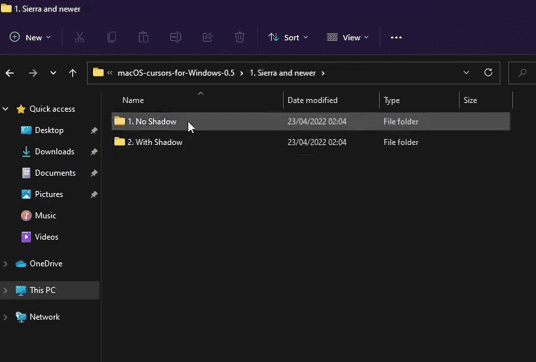
Step 4: Navigate to the No Shadow folder. You can also open With Shadow folder if you want to apply the macOS cursor with shadow.
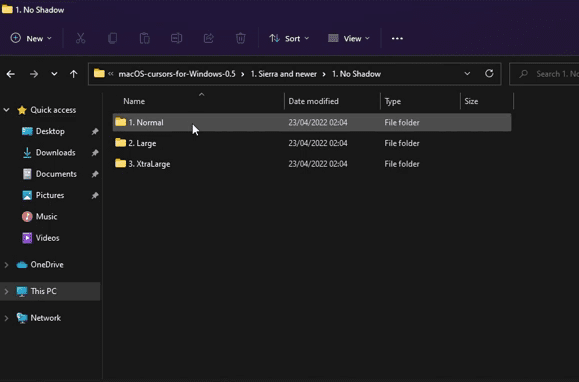
Step 5: Now open the Normal folder. You can also open the Large or XtraLarge folders if you want to use a large or extra large cursor.
Step 6: In the normal folder look for the install file. Right-click on it, select Show more options, and select the Install option.
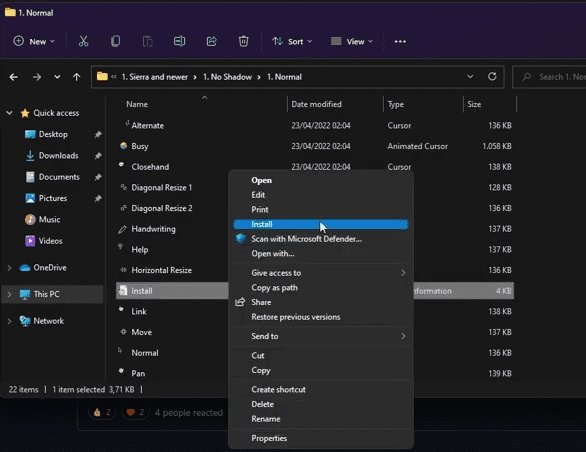
Step 7: As you click on install Open File – Security Warning prompt appears. Here without any doubt click on Open.
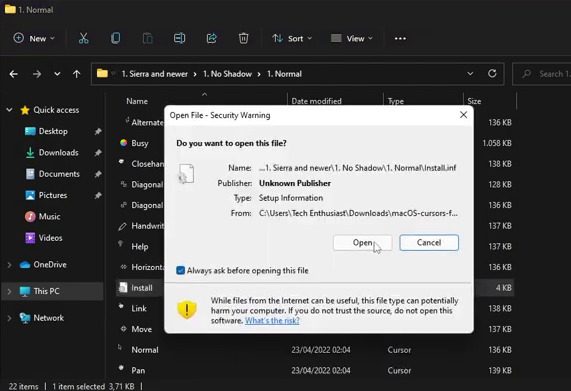
Step 8: Proceed with Yes on the User Account Control prompt.
Step 9: Once installation is done, it’s time to apply the cursor. Search for mouse settings in the search bar of the start menu and click on Open.
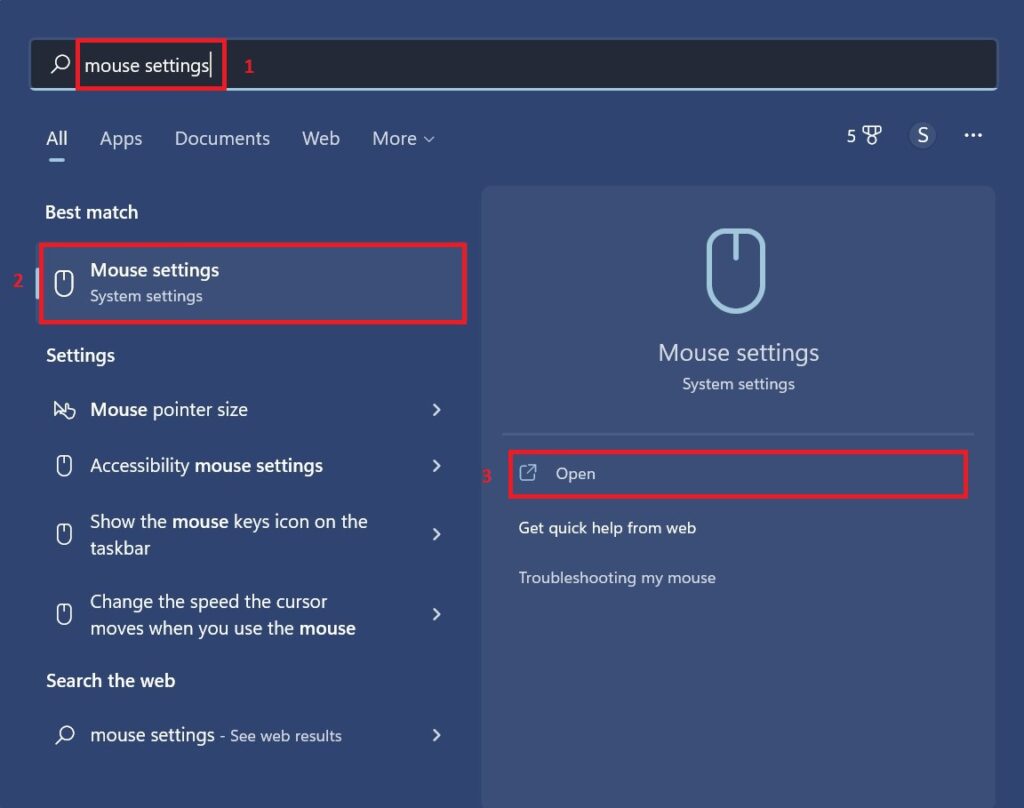
Step 10: Under the Related settings section, click on the Additional mouse settings option.
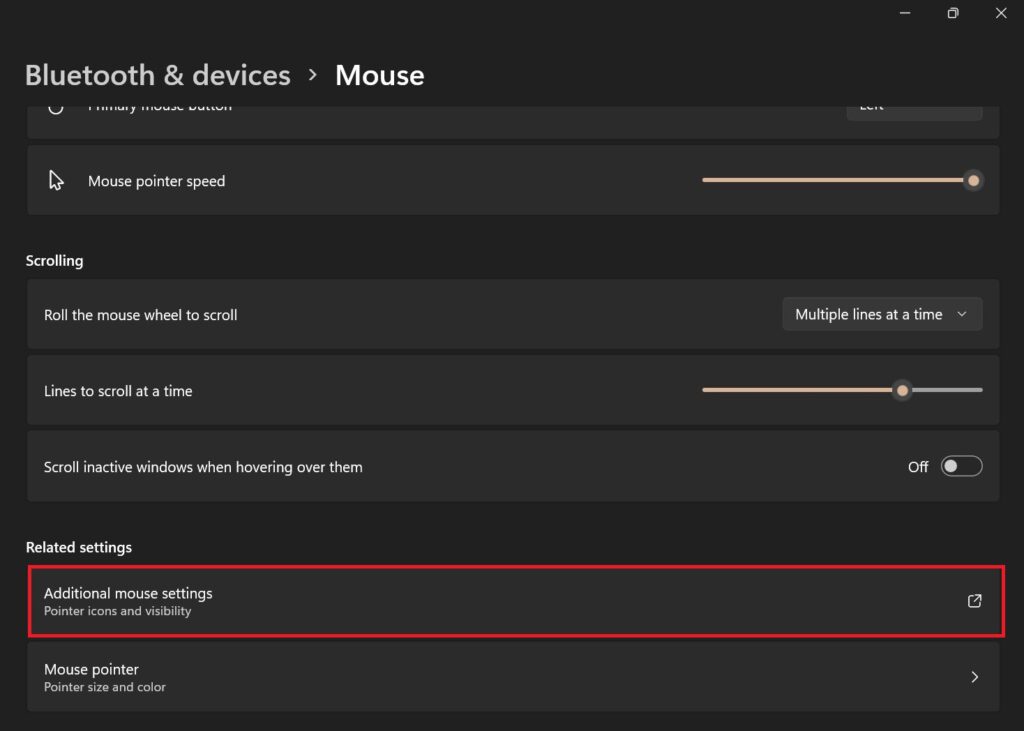
Step 11: On the Mouse Properties window that appears, switch to the Pointers tab and select the macOS Cursor – No Shadow Newer in the Scheme drop-down list. Click on OK to save the changes.
And there you go. After successfully executing the above steps, you’ll see that your Windows 11 cursor has been transformed into the one that macOS offers.
4. ThemeTool: To get the macOS theme
Now your whole desktop will look like macOS. But if you open any other window then it will give you the feel of Windows 11. So in our next customization, we are going to change our theme which will make all the windows look like macOS along with layout, font, and window buttons (minimize, maximize & close).
Step 1: Click on this link to download the ThemeTool from GitHub.
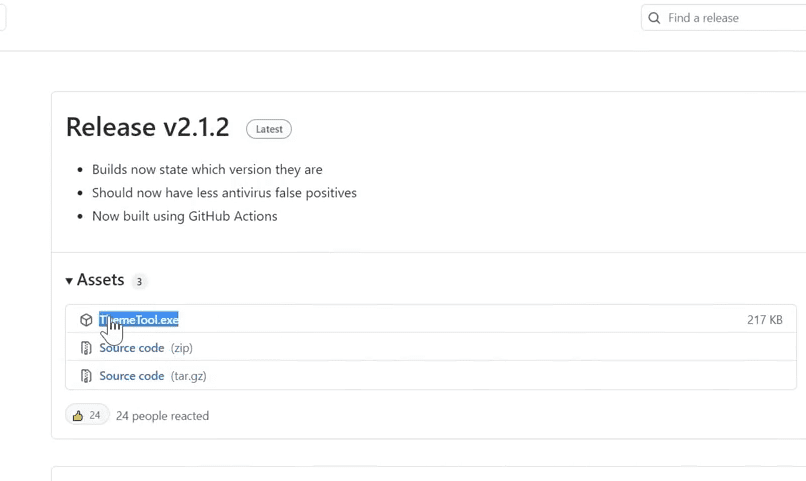
Step 2: After downloading, navigate to the download location and move it from there to Local Disk C.

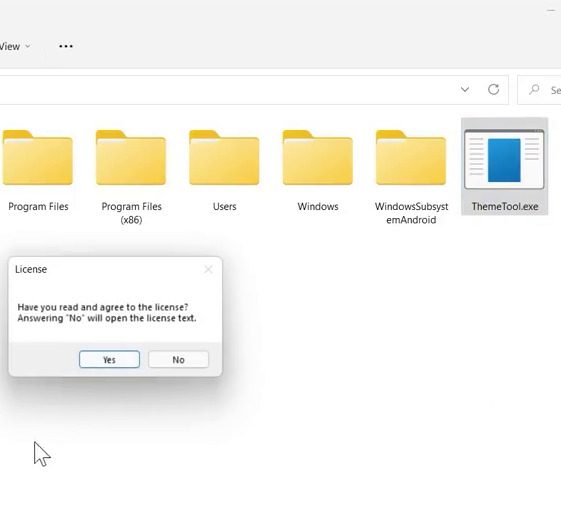
Step 3: Once the ThemeTool is placed in Local Disk C, right-click on it and run it as administrator.
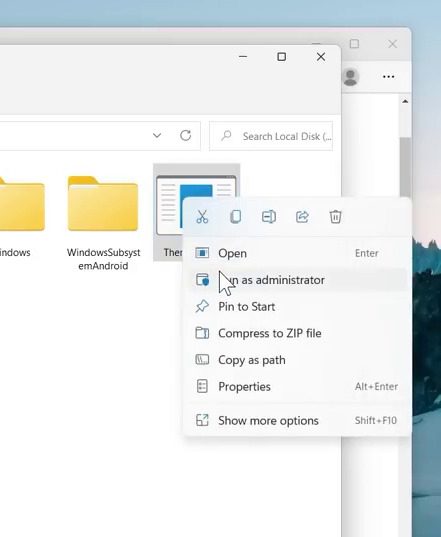
Step 4: Click on Yes to agree to the ThemeTool license.
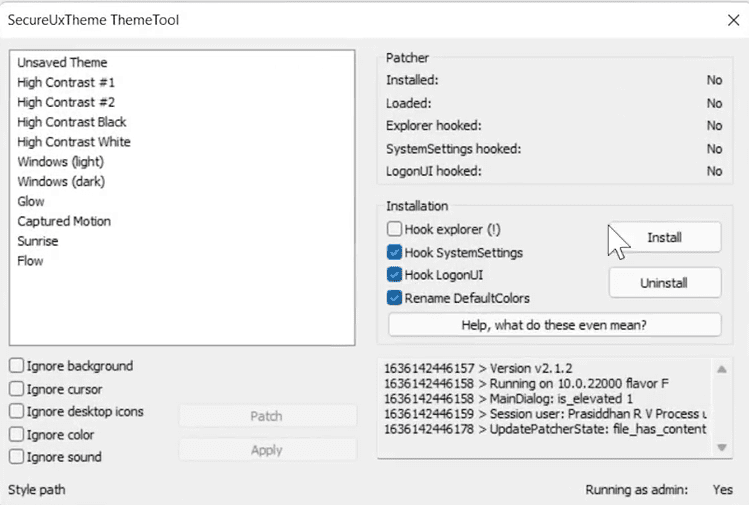
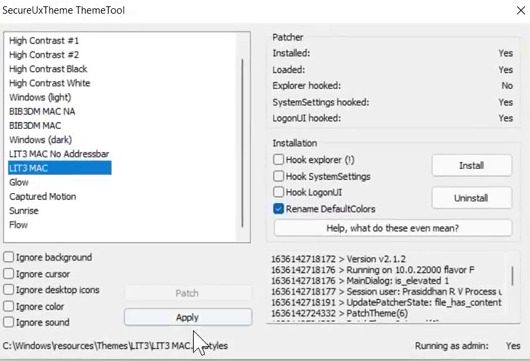
Step 5: You’ll now see the SecureUxTheme ThemeTool dialog box. Here, checkmark the following boxes
- Hook systemSettings
- Hook LogonUI
and then click on the Install button.
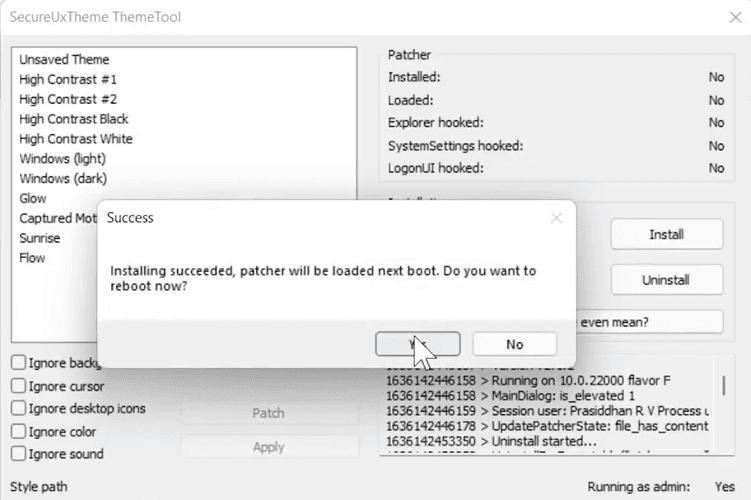
After the successful installation, you’ll be asked to reboot the system. Click on Yes to do so.
Step 6: Now it’s time to download light and dark macOS themes to patch in the Secure theme tool.
- Lite Theme
- Dark Theme
Step 7: Navigate to the place where you have downloaded the themes and extract them.
Step 8: Once extracted, open the LIT3 for Windows folder, navigate to Windows Themes and look for the LIT3 MAC NA.theme & LIT3 MAC.theme files.
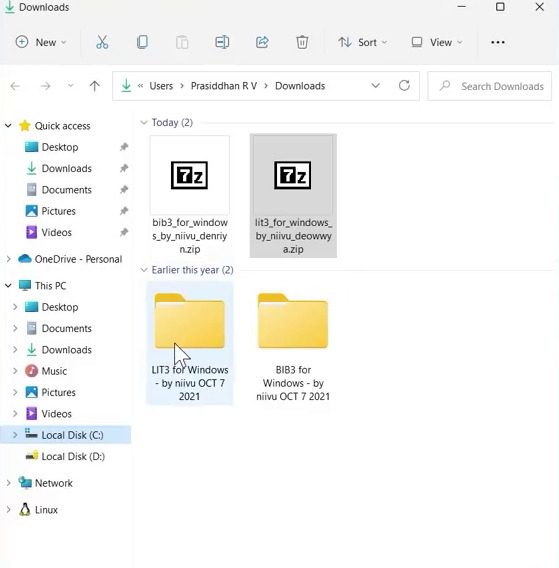
Step 9: Move both these files to Local Disk C > Windows > Resources > Themes.
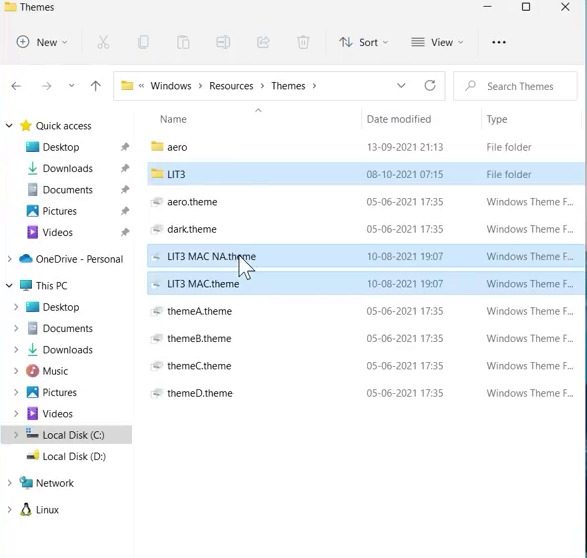
Step 10: Similarly, move the BIB3DM MAC NA.theme & BIB3DM MAC.theme files from the BIB3 for Windows > Windows Themes folder to Local Disk C > Windows > Resources > Themes.
Step 11: Once the theme files from both folders are moved to the Themes folder of Windows, Open the ThemeTool app.
Step 12: Select the LIT3 MAC option from the top left list of themes and then click on the Patch button. Do the same for the BIB 3DM MAC, BIB3DM MAC, LIT3 MAC No Addressbar options and Patch it.
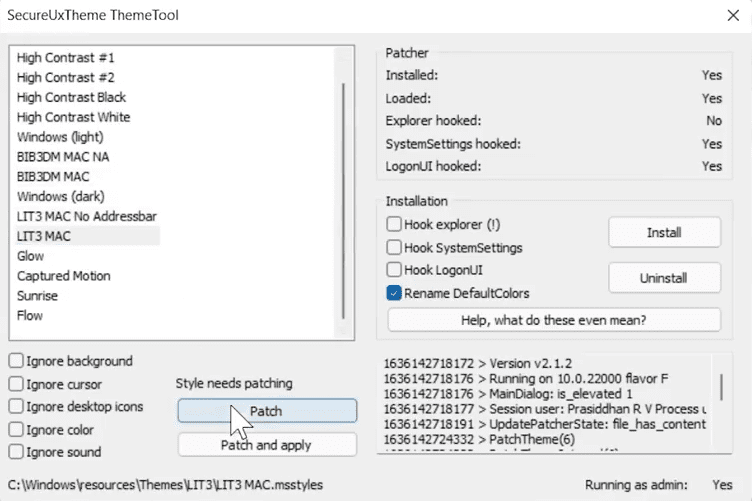
Step 13: Let’s try the light theme first. Click on LIT3 MAC and then on Apply.
See for yourself. Now your Whole window has started to look like Mac. See those three colored buttons in the top right corner. The whole look is now like macOS except for the icons and three buttons(minimize, maximize & close) on the left side of the title bar.
Additional customizations
By now, you should have Windows 11 whose interface looks a lot like macOS. But if you want to make your windows completely look like macOS then you can carry forward this customization even further.
This customization includes all the icons and the shifting of minimize, maximize and close buttons on the left side just like in the macOS.
Download the zip file (Make windows 11 look like macOS) from here to customize other things.
1. To change all icons like MacOS
To make you feel more that you are using change all the system icons to that of macOS as follows:
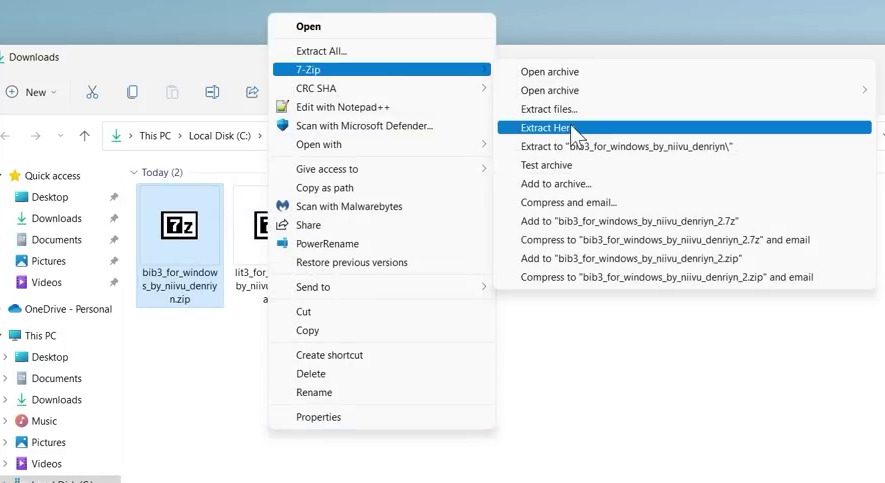
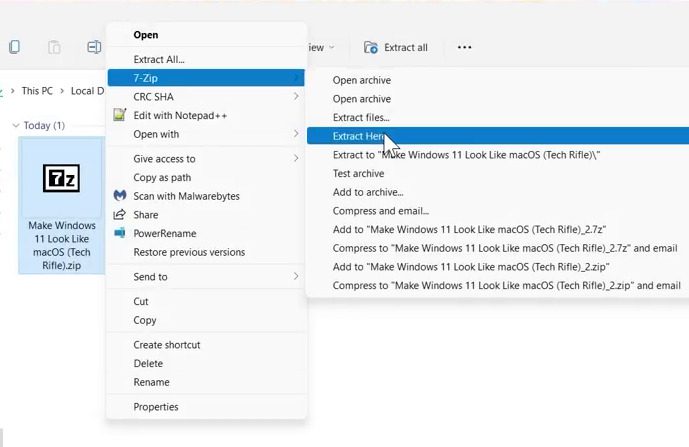
Step 1: Extract the zip file that you downloaded by right-clicking on Show more options > 7zip > Extract here.
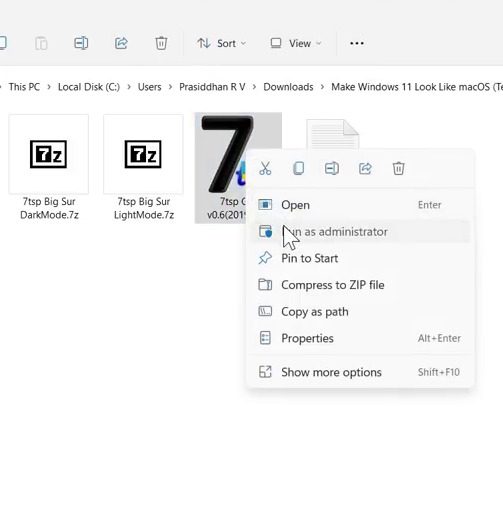
Step 2: Go to the 7TSP Icon Theme folder from the extracted folder.

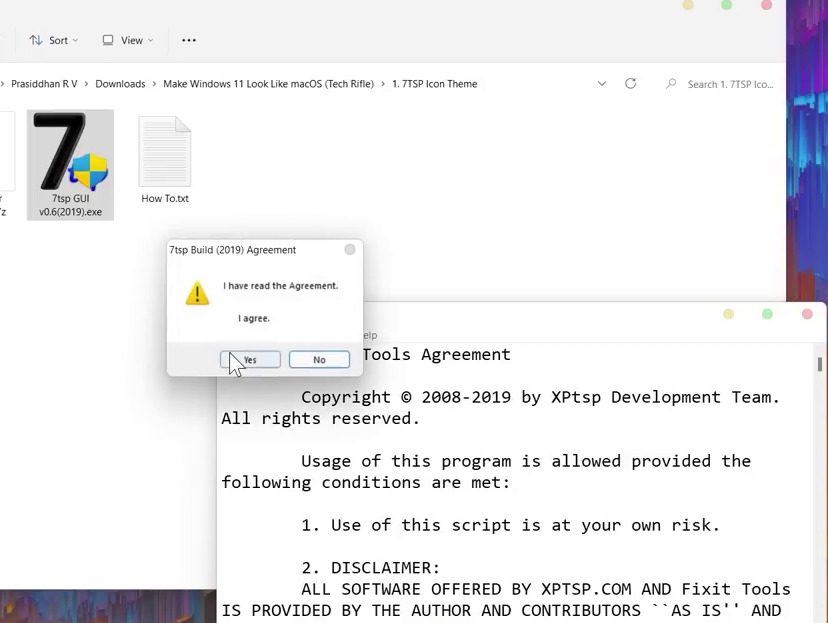
Step 3: Here, right-click on the 7tsp.exe file and select Run as administrator.
Step 4: Click on Yes on the 7tsp Build Agreement.
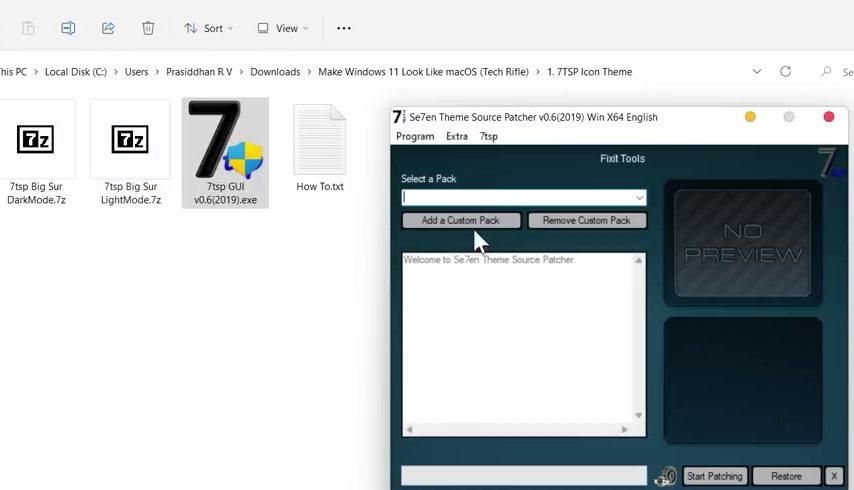
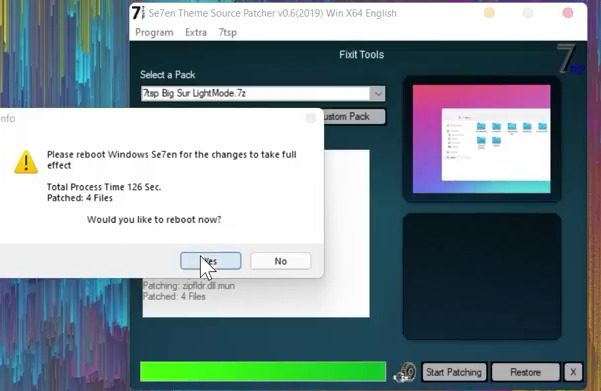
Step 5: Seven Theme Source Pather dialog box appear. Click on Add a Custom Pack.
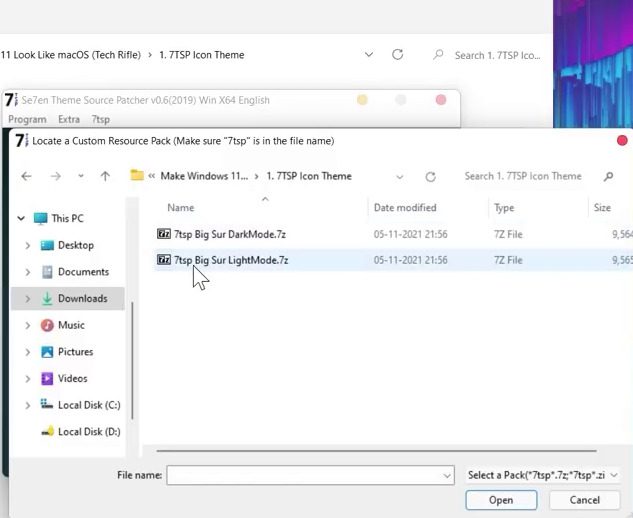
Step 6: Then select the 7tsp Big Sur LightMode.7z file from the same folder you just extracted.
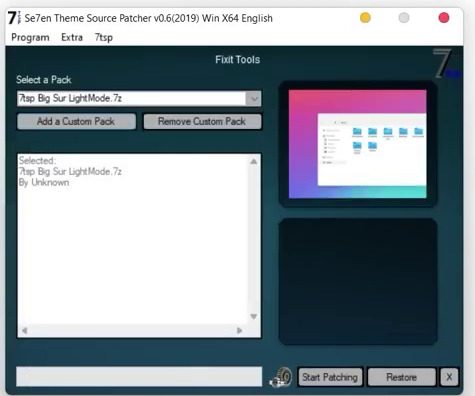
Step 7: Now click on Start Patching.
Step 8: On the patch system prompt click on Yes.

Step 9: Once done, reboot your PC by clicking on Yes.
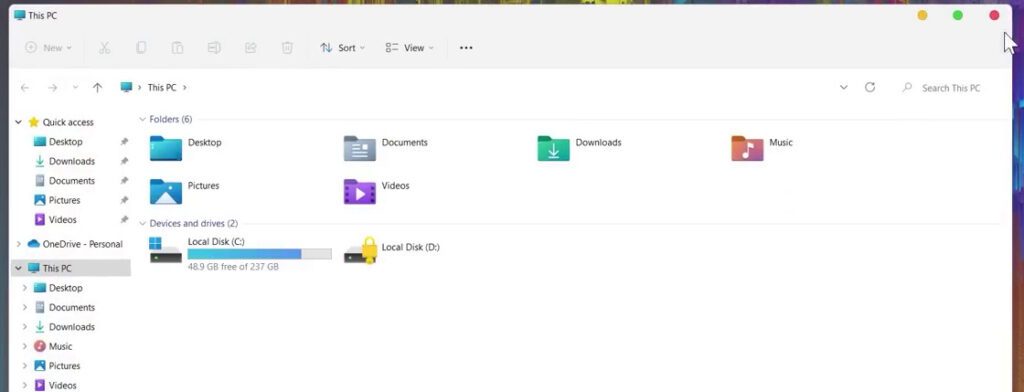
Open This PC and see all the icons that have been converted to macOS icons.
2. To shift the minimize, maximize and close buttons on the left
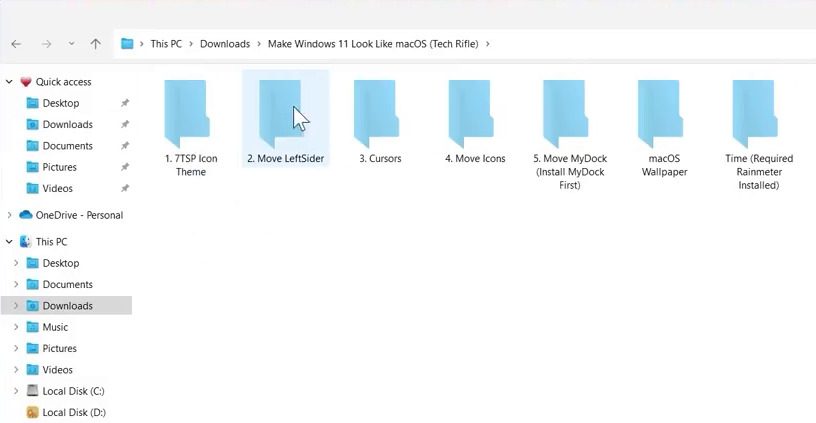
This is the last customization we need to do to get a complete feel of macOS. We will not transfer minimize, maximize & close buttons from the top right side to the top left side. Follow the below-mentioned steps to do the same:
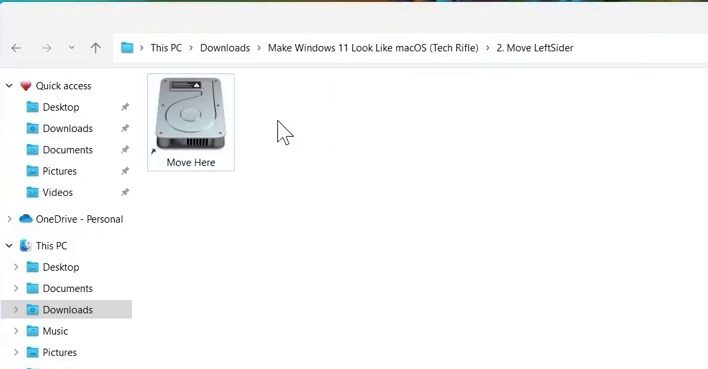
Step 1: Open the extracted folder Make Windows 11 Look like macOS and go to Move LeftSider folder.
Step 2: When the Leftsider folder opens. Drag the Leftsider folder to the Move Here file with the drive icon located alongside.
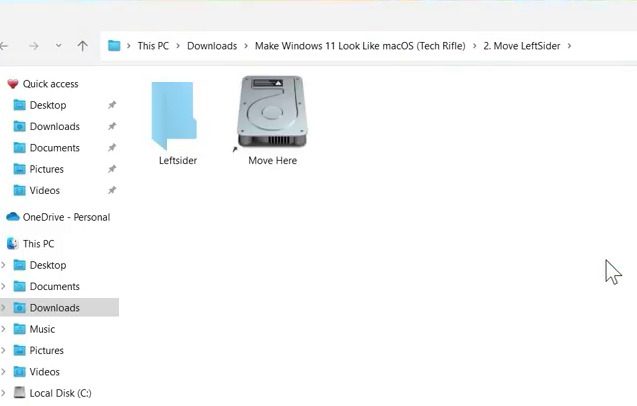
Step 3: Now double-click on the Move Here file to open it.
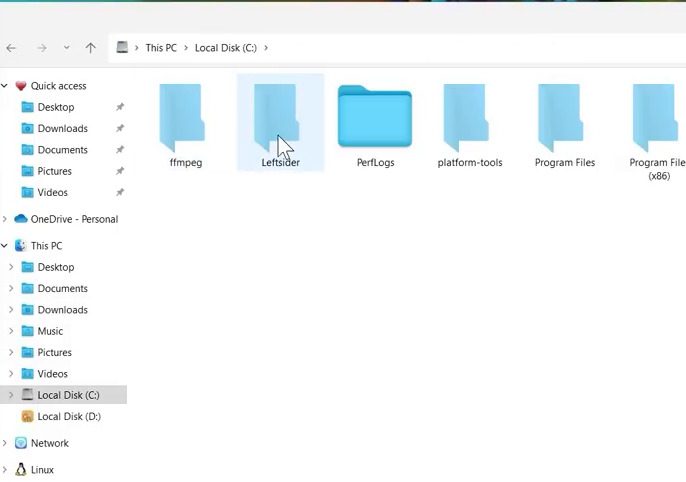
Step 4: You’ll now find yourself in the Local Disk C of your PC. Here, open the LeftSider folder.
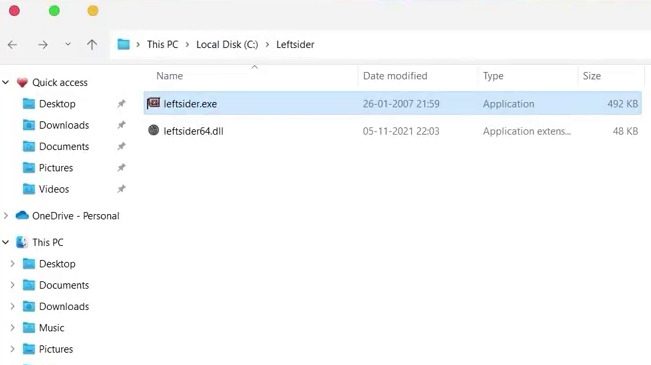
Step 5: Launch the leftsider.exe file by double-clicking on it. As soon as you do that the three buttons will move on to the left side.
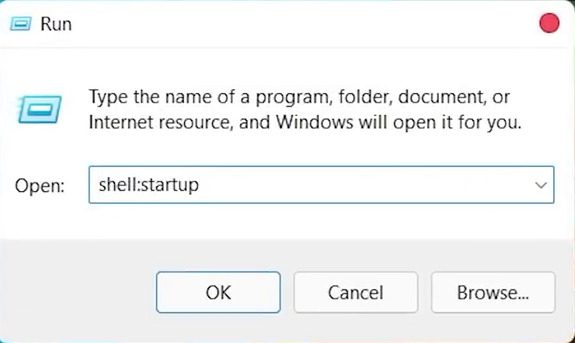
Step 6: It’s time to move the leftsider.exe to the startup folder so that it can start automatically every time you open your PC.
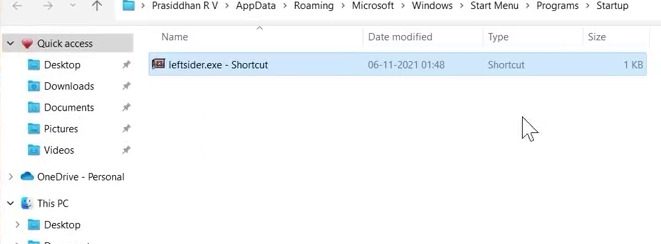
For this press Windows + R keys on the keyboard. A Run dialog box appears. Type shell:startup command and hit Enter.
Step 7: The startup folder appears here Paste the shortcut of the Leftsider.exe
It’s done. Your Windows 11 PC is now fully converted into macOS. Enjoy!
Note: Do create a backup of your device before proceeding to the customizations. In case you wish to go back to your default Windows appearance or in case things go south.
Bottom Line
That was pretty simple, right? I hope I was able to explain all the steps to you as easily as possible. I hope you enjoyed converting your Windows into MacOS (look-wise). Please let us know if you have any difficulty following any steps or if any broken links we will fix that as soon as possible. See you soon!
Want to give your Windows 11 PC a sleek macOS look? Transforming your Windows interface to resemble Apple’s iconic design can be done with a few simple tweaks. By changing themes, installing a dock, and adjusting system icons, you can enjoy a macOS-like user experience without switching operating systems. Follow these simple steps to achieve the aesthetic appeal of macOS right on your Windows 11 machine.
The steps below will guide you in modifying the appearance of your Windows 11 computer to mimic the clean and modern look of macOS. This includes altering the taskbar, icons, and overall theme to create a seamless and visually appealing experience.
Step 1: Install a macOS Theme
Download and install a macOS theme for Windows 11.
To start, you’ll need a theme that mirrors macOS’s aesthetic. Websites like DeviantArt offer a variety of theme packs that replicate Apple’s design. After downloading, follow the instructions to apply the theme to your system. This will change the overall look, including colors and window styles, to resemble macOS.
Step 2: Use a macOS Dock
Install a third-party dock software like RocketDock.
The dock is a signature feature of macOS, and you can achieve this on Windows 11 using third-party software. RocketDock or Nexus are popular choices that allow you to add a customizable dock at the bottom of your screen. You can configure it to include your favorite apps, simulating the real macOS experience.
Step 3: Change Icons to macOS Style
Download an icon pack and replace default icons on Windows.
Icons play a crucial role in the overall look, so downloading a macOS icon pack is essential. These packs can be applied using tools such as IconPackager, which will let you replace Windows icons with sleek, rounded macOS icons. This step brings a cohesive look to your desktop environment.
Step 4: Adjust System Fonts
Change the system fonts to match those used in macOS.
macOS uses San Francisco Font, which you can install on Windows 11 for a more authentic appearance. Head over to your system settings and replace the default font with the one you downloaded. This minor tweak can make a significant difference in achieving that macOS vibe.
Step 5: Customize the Taskbar
Make the taskbar translucent and move it to the top of the screen.
To mimic macOS’s top menu bar, you need to adjust the taskbar settings. Use tools like TaskbarX to make the taskbar transparent and reposition it to the top of the screen. This will complete the transformation, giving you a Windows 11 desktop that feels like macOS.
Once you’ve completed these steps, your Windows 11 should resemble macOS. You’ll have a beautifully designed interface that captures the elegance of Apple’s operating system, without changing your PC’s core functionality.
Tips for Making Windows 11 Look Like macOS
- Be cautious when downloading themes and software from third-party websites to avoid malware.
- Backup your system before making any significant changes to easily revert if needed.
- Explore different macOS themes to find one that suits your personal style.
- Consider using a virtual desktop to test changes before applying them permanently.
- Keep your system updated to ensure compatibility with third-party tools and themes.
Frequently Asked Questions
Can I undo these changes if I don’t like them?
Yes, you can revert to the default Windows 11 settings by uninstalling the themes and software.
Will making these changes affect my PC’s performance?
Generally, no. However, running additional software like docks may use more system resources.
Is it legal to make Windows look like macOS?
Yes, as long as you use themes and tools legally available for Windows without infringing on Apple’s copyrights.
Can I get macOS-specific apps working on Windows 11?
These visual changes won’t allow you to run macOS apps, but you can look for Windows alternatives.
Do I need technical skills to do this?
Basic computer skills are sufficient, but following a step-by-step guide carefully will help.
Summary
- Install a macOS theme.
- Use a macOS dock.
- Change icons to macOS style.
- Adjust system fonts.
- Customize the taskbar.
Conclusion
Transforming your Windows 11 interface to mirror macOS is an exciting project that lets you enjoy the aesthetics of Apple’s design without leaving the comfort of Windows. It’s like dressing your favorite book in a new cover—same story, different vibe. The steps outlined here are straightforward, but they can have a dramatic impact on your computing experience. Whether you’re a longtime Windows user looking for a visual change or a macOS admirer wanting the best of both worlds, these tweaks offer a refreshing way to personalize your desktop.
Before you dive in, remember to proceed with caution, especially when downloading themes and software. Always ensure you have backups in place to safeguard your system. By paying attention to these details, you can achieve a seamless transformation that feels both fresh and familiar.
If you crave more customization ideas or need further assistance, consider exploring forums and communities focused on desktop customization. They’re treasure troves of tips and tricks that can further enhance your setup. So, what are you waiting for? Give your Windows 11 a macOS makeover and enjoy a new look today!
Matthew Burleigh has been writing tech tutorials since 2008. His writing has appeared on dozens of different websites and been read over 50 million times.
After receiving his Bachelor’s and Master’s degrees in Computer Science he spent several years working in IT management for small businesses. However, he now works full time writing content online and creating websites.
His main writing topics include iPhones, Microsoft Office, Google Apps, Android, and Photoshop, but he has also written about many other tech topics as well.
Read his full bio here.