
Windows 10, Windows 11, Windows 7, Windows 8, Windows Server, Windows Vista, Windows XP
- 23.10.2021
- 25 914
- 5
- 24.12.2023
- 60
- 58
- 2
- Содержание статьи
- Создание архива tar.gz в 7-Zip
- Создание архива tar.gz средствами Windows
- Комментарии к статье ( 5 шт )
- Добавить комментарий
Популярный в среде UNIX-подобных операционных систем формат архива tar.gz, появился в далеком 1992 году вместе с утилитой gzip. Тем не менее, не смотря за столь большой промежуток времени, в среде операционных систем Windows данный формат не получил особого распространения, и как итог, его поддержка стандартными средствами Windows отсутствует. К счастью, большинство архиваторов без проблем работают с данным форматом, к примеру бесплатный 7-Zip, о работе с которым мы сейчас и поговорим.
Создание архива tar.gz в 7-Zip
Скачать архиватор 7-Zip можно с его официального сайта.
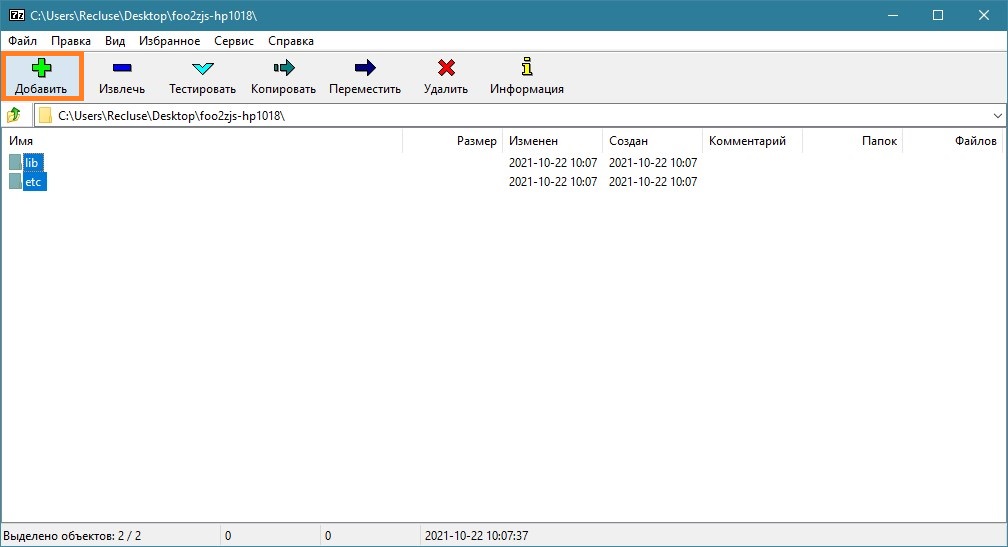
- Открываем 7-Zip, и выбираем файлы, которые планируем заархивировать, после чего нажимаем на кнопку «Добавить«.

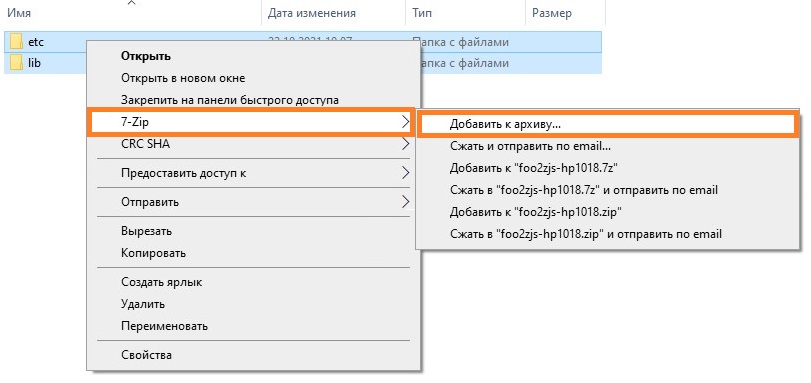
Альтернативный вариант — в Проводнике находите нужные файлы или папки, выделяете их, и вызываете контекстное меню, в котором выбираете пункт «7-Zip — Добавить к архиву…«.

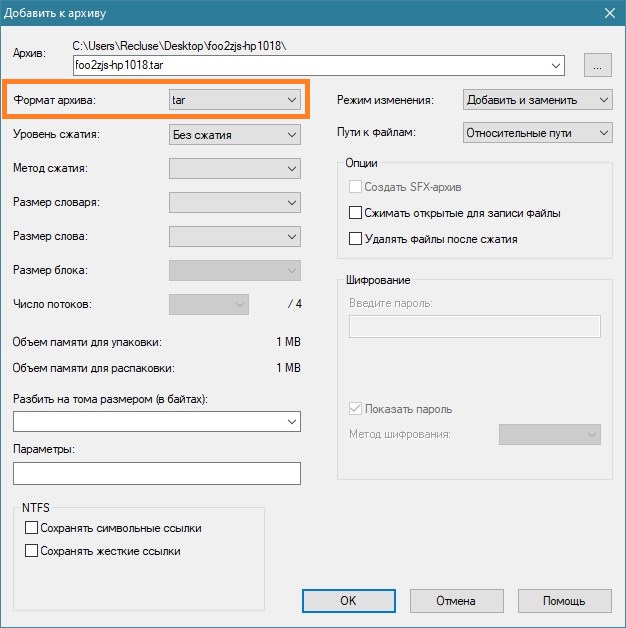
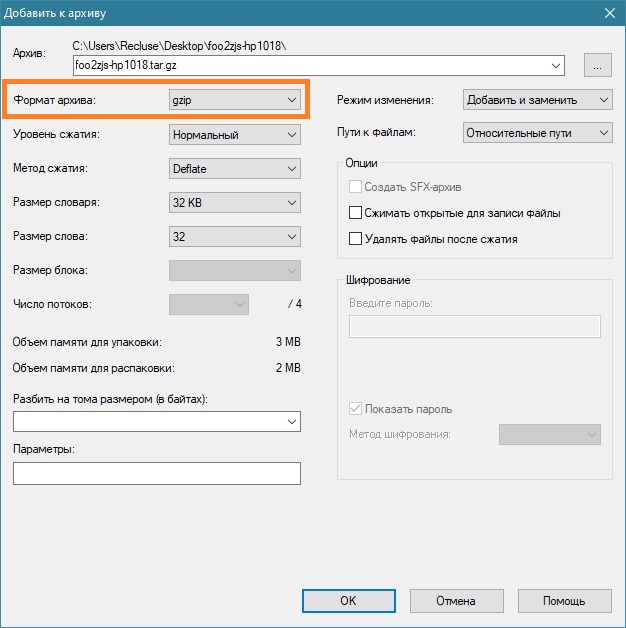
- В окне создания архива выбираем формат архива tar. Сейчас уровень сжатия установить не получиться, поскольку формат tar его не поддерживает, но мы сможем сжать архив на следующем этапе.

- Теперь, нужно заархивировать ранее полученный архив формата tar. Проделываем те же действия, что и ранее, с только что сделанным архивом, только на этот раз выбираем формат архива gzip. Так же можно установить желаемый уровень сжатия.
- После этого, на выходе получится архив формата tar.gz.
Создание архива tar.gz средствами Windows
Начиная с Windows 10, появилась возможность создавать архивы данного формата встроенной в систему утилитой tar. Для этого, используется стандартный синтаксис этой утилиты:
tar -cvzf [ИМЯ АРХИВА].tar.gz [ПУТЬ К ДИРЕКТОРИИ]То есть, если вы хотите запаковать директорию C:\Test, для этого нужно выполнить следующую команду:
tar -cvzf test.tar.gz C:\TestЕсли нужно задать место сохранения архива, то его следует написать спереди имени архива:
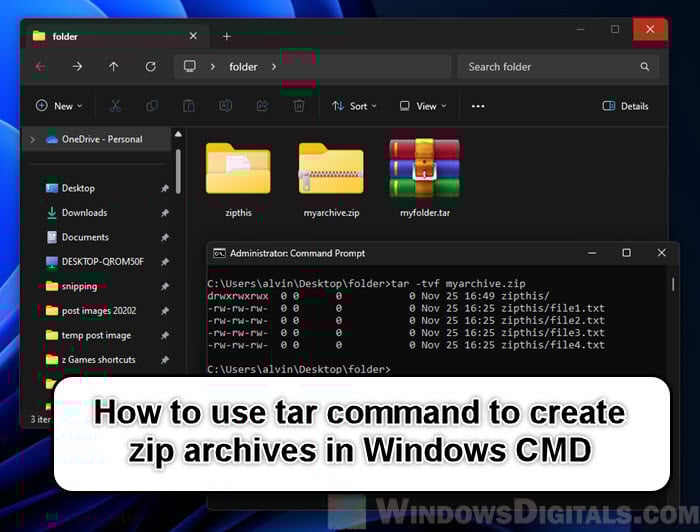
tar -cvzf C:\Temp\test.tar.gz C:\TestThe tar command, which is very common in Unix and Linux systems for archiving and compressing files (also known as zipping), is also available in Windows 11 and Windows 10. It mainly helps you pack many files and folders into one file, called a tarball. In this guide, we’ll show you how to use the tar command in Windows to make ZIP archives.
Also see: How to Open or Extract .Gz, Tar.gz or .Tar File in Windows 11/10
Check if you have tar installed in Windows 11
Before we start making ZIP files with the tar command, make sure you have all the needed tools on your Windows 11 or Windows 10 PC. Starting with Windows 10’s Fall Creators Update and also in Windows 11, the tar command is built-in and you can use it from Command Prompt or PowerShell. Below is how you can check if tar is on your computer and install it if it’s not.
- Open Command Prompt or PowerShell.
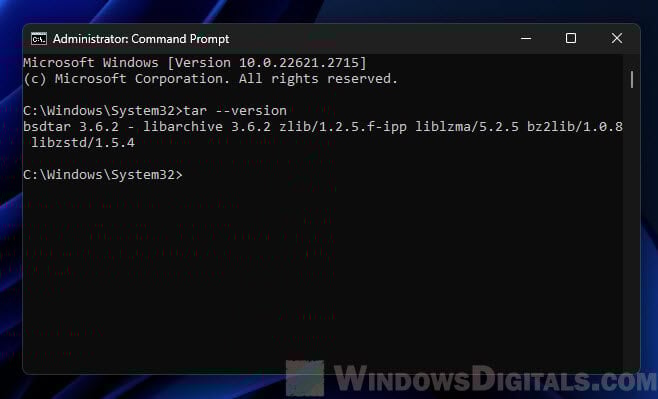
- Type
tar --versionand press Enter. - If you see a version number, tar is already on your computer. If you get an error or the command doesn’t work, you need to install it.

- If tar is not on your computer, the simplest way to install it is by turning on the Windows Subsystem for Linux (WSL).
- Go to the Windows search bar, type “Turn Windows features on or off”, and click on it.
- In the Windows Features window, tick the box for “Windows Subsystem for Linux” and click OK.
- Restart your computer when asked.
- After restarting, you can install the Linux version you like from the Microsoft Store, like Ubuntu.

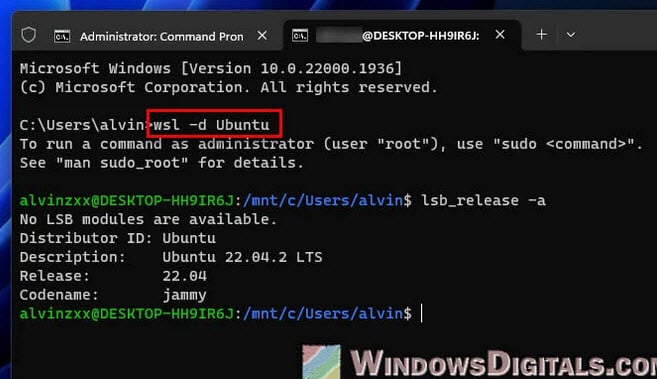
- Once you have WSL with your chosen Linux version installed, you can use tar by starting the Linux app from the Start menu.
- You can also use tar directly in Windows Command Prompt or PowerShell.
With tar ready to use on your Windows machine, you can now start making ZIP archive files. In the next part, we’ll go through the basic commands and how to use them.
Suggested read: How to Zip Files and Folders in Windows 11/10 Without Any Software
Create ZIP archives with tar command
Now that you have tar ready on your Windows computer, let’s see how to use it to make ZIP archive files. It’s quite simple and uses basic command line steps.
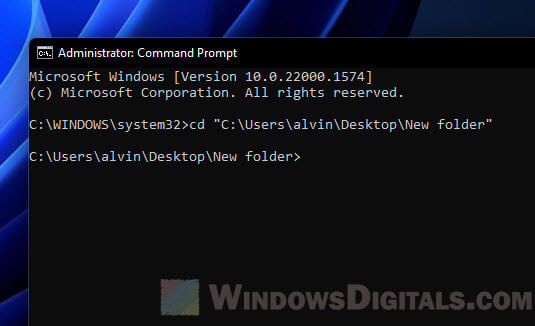
- Start Command Prompt or PowerShell, whichever you like more.
- Move to the folder where your files are by using the
cdcommand. For instance,cd C:\Users\Username\Desktop\.
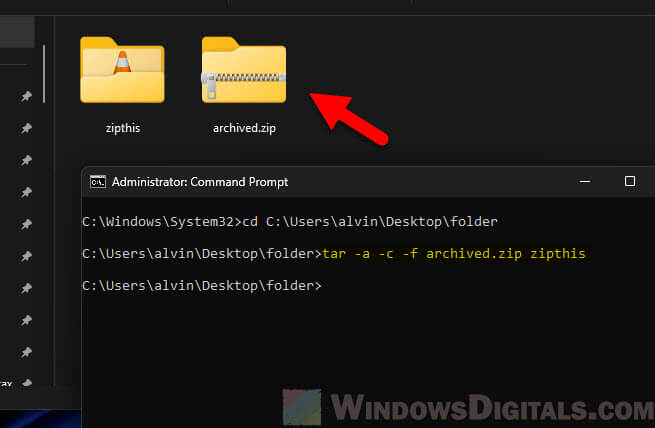
- The basic way to make a ZIP file with
taris like this:tar -a -c -f archive_name.zip file_or_directory_to_compress
- Here,
-apicks the ZIP format automatically,-cmeans create, and-fnames the archive. - To make a ZIP archive of a folder called MyFolder, the command would be:
tar -a -c -f myarchive.zip MyFolder

- This command makes a ZIP file named myarchive.zip with MyFolder inside.
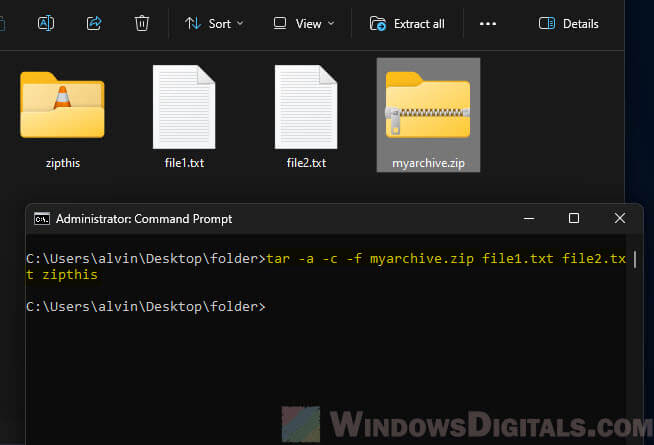
- You can also pack several files or folders in one go:
tar -a -c -f myarchive.zip file1.txt file2.txt MyFolder

- This makes a ZIP file with file1.txt, file2.txt, and the MyFolder folder inside.
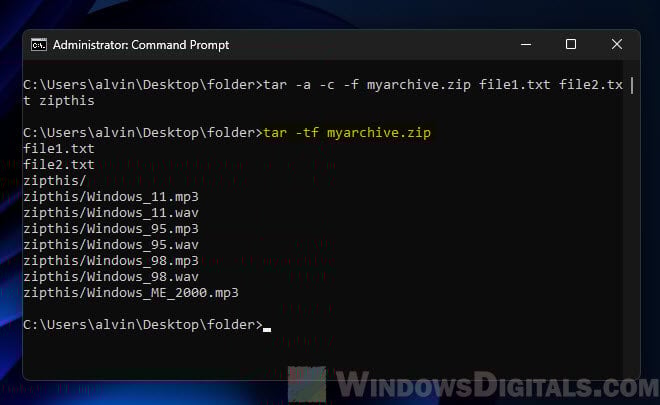
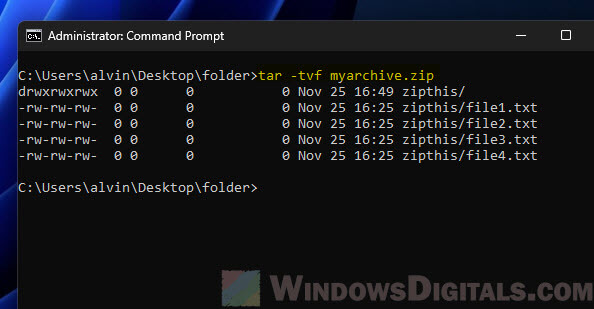
- To check if your files are correctly packed, you can list what’s in the ZIP file:
tar -tf myarchive.zip

- This shows the files in myarchive.zip.
Pro tip: How to Split a File Into Multiple Files in Windows 11
In the next part, we’ll share some extra tips to make your ZIP archiving with tar even better.
Some tips for more efficient ZIP archiving with tar command
The basic tar command for making ZIP files is simple, but there are more options and tricks that can help you archive better and fit your needs.
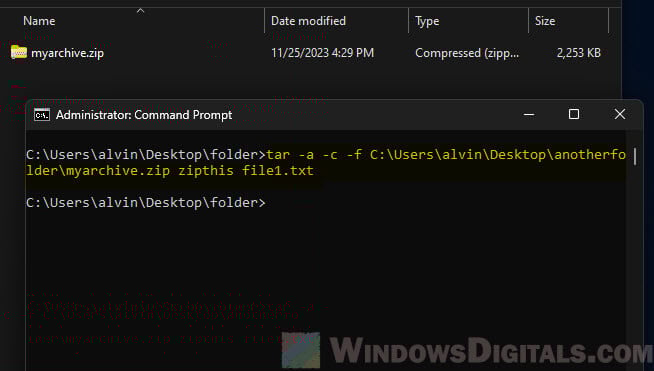
- Usually,
tarmakes the ZIP file right where you are. To make the archive in a different place, add the path to the archive name. For example:tar -a -c -f C:\Archives\myarchive.zip MyFolder

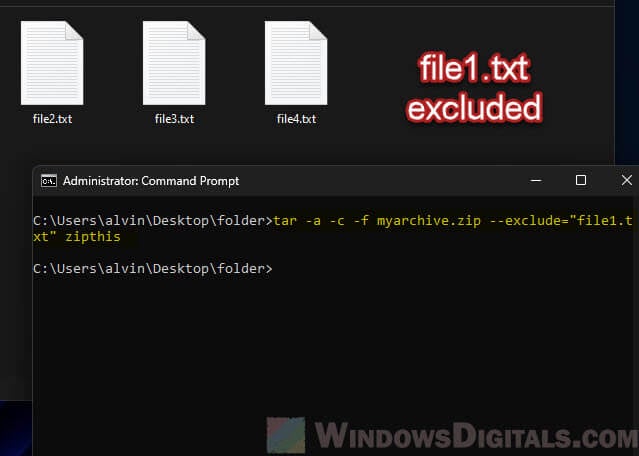
- Sometimes, you might not want to include certain files or folders in the archive. Use the
--excludeoption for this:tar -a -c -f myarchive.zip --exclude="file1.txt" MyFolder

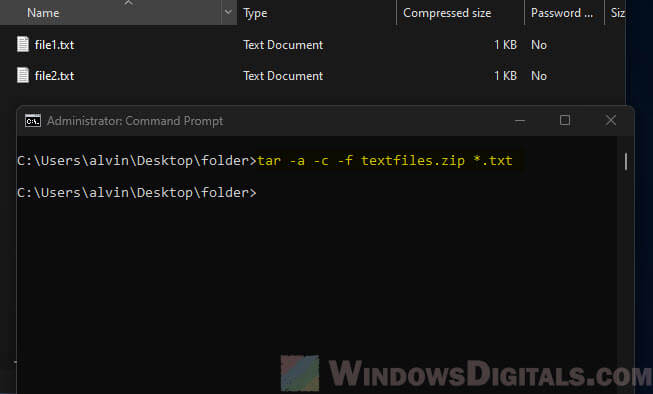
- You can use wildcards (*) to pack files that match a certain pattern. For example, to pack all
.txtfiles:tar -a -c -f textfiles.zip *.txt

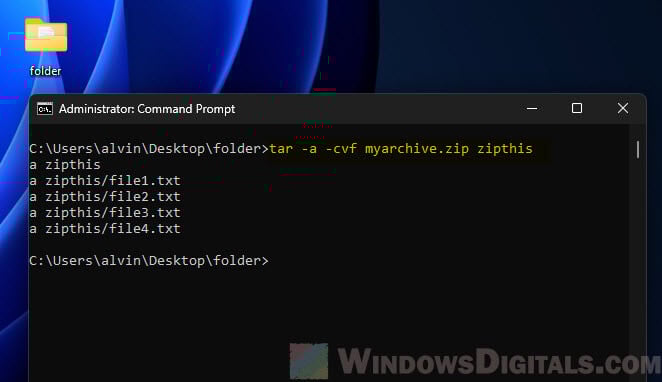
- If you want to see the files being packed, add the
-v(verbose) option:tar -a -cvf myarchive.zip MyFolder

- This will show each file as it’s added to the archive.
- After making an archive, it’s good to check if it’s all okay. Do this by:
tar -tvf myarchive.zip

- This not only shows the contents but also checks if the files are fine.
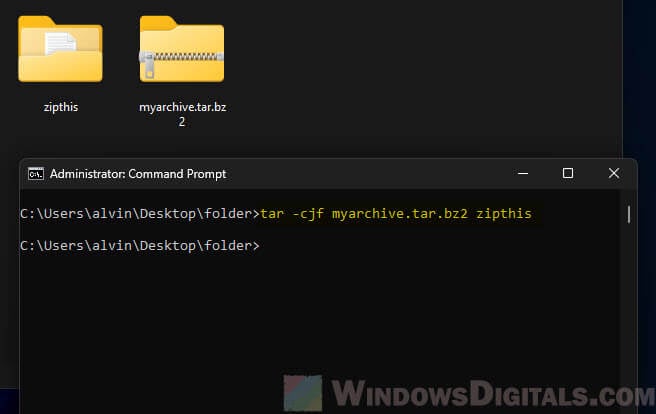
- While
-apicks ZIP compression by itself, you can choose other compression methods like gzip or bzip2 with-zor-j:tar -czf myarchive.tar.gz MyFolder tar -cjf myarchive.tar.bz2 MyFolder

- Note that these commands make
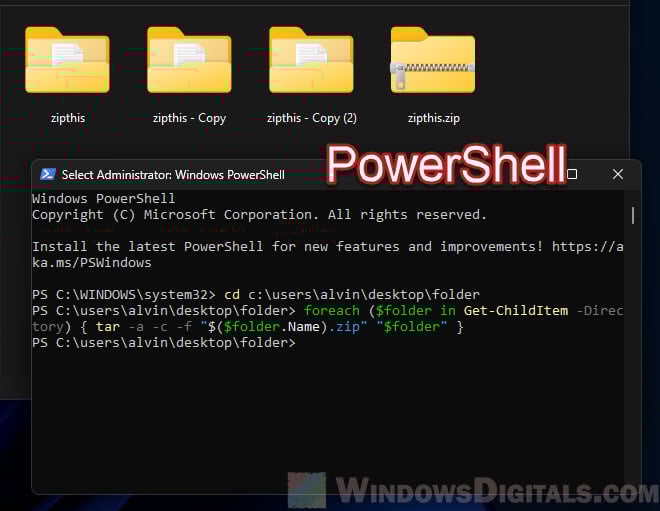
.tar.gzor.tar.bz2files, not ZIP. - For batch archiving multiple directories into separate archives, you can use a simple script or loop in the command line. For example, in PowerShell:
foreach ($folder in Get-ChildItem -Directory) {
tar -a -c -f "$($folder.Name).zip" "$folder"
}
Useful guide: Move All Files from Subfolders to Main Folder (Windows)
Create tar.gz and tar archives with tar command in Windows 11
Besides making ZIP files, the tar command in Windows can also make .tar.gz (tarball compressed with gzip) and .tar (uncompressed tarball) archives. These types are very common in Unix and Linux systems and are useful for many things, like backing up and sharing software.
Create a tar.gz archive
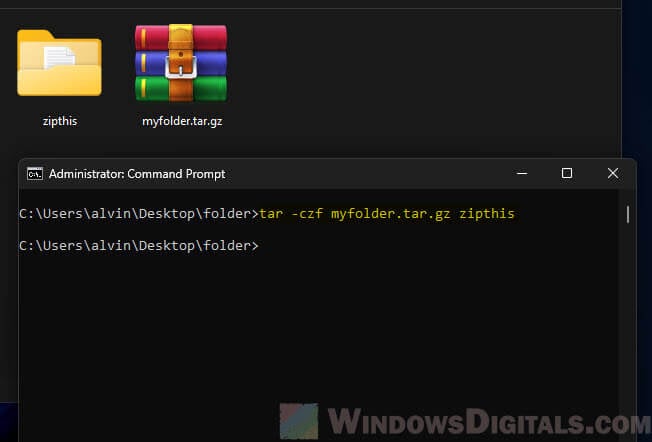
- To make a .tar.gz archive, use the
-zoption for gzip compression. The basic command looks like this:tar -czf archive_name.tar.gz file_or_directory_to_compress
- Here,
-cmeans create,-zapplies gzip compression, and-fnames the archive file. - To compress a folder called MyFolder into a .tar.gz archive, the command is:
tar -czf myfolder.tar.gz MyFolder

Create a tar archive
- Making an uncompressed tar archive is simple. Just leave out the compression option (
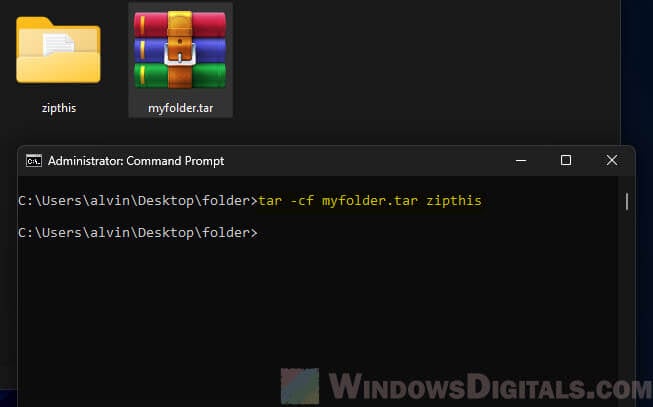
-zfor gzip or-jfor bzip2). The command goes like this:tar -cf archive_name.tar file_or_directory_to_compress
- To pack MyFolder into a .tar file, use:
tar -cf myfolder.tar MyFolder

Some other options
- Just like with ZIP archiving, you can use the
-v(verbose) option to see the files being added to the archive. - The
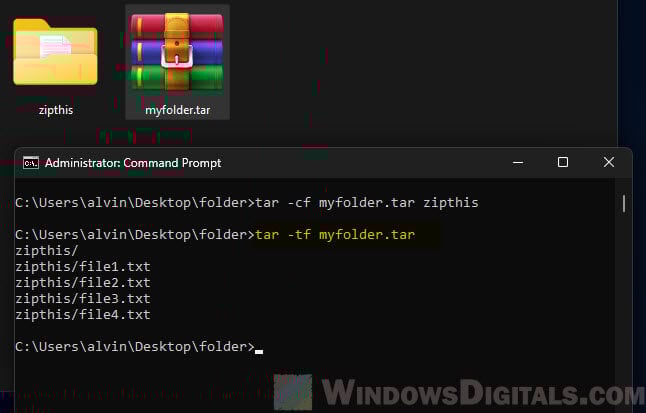
--excludeoption works the same way as with ZIP files, letting you leave out specific files or folders. - Use
tar -tf archive_name.tar.gzortar -tf archive_name.tarto list what’s in your .tar.gz or .tar archive.
В этой статье рассмотрим несколько способов создания архивов gzip (tar.gz) на операционной системе Windows.
Прежде всего, вспомним, что такое формат gzip и как он применяется на практике, из Wikipedia:
❝
gzip (сокращение от GNU Zip) — утилита сжатия и восстановления (декомпрессии) файлов, использующая алгоритм Deflate. Применяется в основном в UNIX-системах, в ряде которых является стандартом де-факто для сжатия данных. Была создана Жан-Лу Гайи (фр. Jean Loup Gailly) и Марком Адлером (Mark Adler). Версия 0.1 была выпущена 31 октября 1992 года, а версия 1.0 — в феврале 1993 года.
В соответствии с традициями UNIX-программирования, gzip выполняет только две функции: сжатие и распаковку одного файла; упаковка нескольких файлов в один архив невозможна. При сжатии к оригинальному расширению файла добавляется суффикс .gz. Для упаковки нескольких файлов обычно их сначала архивируют (объединяют) в один файл утилитой tar, а потом этот файл сжимают с помощью gzip. Таким образом, сжатые архивы обычно имеют двойное расширение .tar.gz, либо сокращённое .tgz.
- Установите Cygwin, который предоставляет среду Linux на Windows.
- В процессе установки выберите пакеты tar и gzip.
- Откройте терминал Cygwin и используйте команды для создания архива и упаковки его в
tar.gz:
tar -czvf archive.tar.gz your_folder_or_file
Здесь archive.tar.gz — это имя вашего архива, а your_folder_or_file — это файлы и папки, которые вы хотите упаковать.
- Установите GNUWin32, который предоставляет набор утилит GNU для Windows.
- В процессе установки выберите пакеты tar и gzip.
- Откройте командную строку Windows и используйте аналогичную команду для создания архива tar.gz:
tar -czvf archive.tar.gz your_folder_or_file
- Установите 7-Zip — бесплатный архиватор с поддержкой множества форматов.
- Выделите файлы и папки, которые вы хотите упаковать.
- Нажмите правой кнопкой мыши и выберите «Добавить в архив».
- В окне архивации выберите формат архива «tar» и метод сжатия «gzip».
Альтернативно, можно воспользоваться командой:
7z -ttar a dummy "D:\your_folder\*" -so | 7z -si -tgzip a "D:\archive.tar.gz"
Примечание: чтобы команда 7z работала на Windows, выполняемый файл 7z.exe должен присутствовать в переменных средах: C:\Program Files\7-Zip
Установите WSL, чтобы иметь доступ к среде Linux на Windows.
Откройте терминал WSL и используйте команды для создания архива и упаковки его в tar.gz, так же, как в случае с обычной средой Linux:
tar -czvf archive.tar.gz your_folder_or_file

Windows does not have built-in support for TAR/GZip files.
Files with a «.tgz» or «.tar.gz» extension are compressed archives that users of Unix-based operating systems use to more easily transfer or back up multiple files at once. TGZ files are created by a two-step process that first combines multiple files into a single one («tar») and then compresses this single file so that it takes up less space («gzip»).
TGZ files perform a similar role as ZIP files that are more familiar to Windows users, but unlike ZIP, Windows does not contain any built-in support for working with TGZ files. If you are transferring files between Windows and Unix computers, however, you may need the ability to create TGZ archives from within Windows.
Step 1
Download the free and open-source application «7-Zip» by going to their website (see Resources) and clicking the «Download» link for the «.exe» file (if you are running 32-bit Windows) or the «.msi» file (if you are running 64-bit Windows).
Step 2
Install 7-Zip by double-clicking on the file that you downloaded and following the directions in the wizard that appears.
Step 3
Select the files in Windows Explorer that you want to add to a TGZ archive.
Step 4
Right-click on one of the files that you have selected, select «7-Zip» from the menu and then select «Add to archive…»
Step 5
Enter a new name for the archive in the field labeled «Archive» and then select «Tar» from the «Archive format» drop-down list. Leave the other options set to their default values and click «OK.» A file with the extension «.tar» will be created in the current directory.
Step 6
Right-click on the new «.tar» file, select «7-Zip» from the menu, and then select «Add to archive…»
Step 7
Select «GZip» from the «Archive format» drop-down list. Leave the other options set to their default values and click «OK.» A file with the extension «.tar.gz» will be created in the current directory. This file is the complete TGZ archive.
As a seasoned full-stack developer well-versed in building and distributing applications across platforms, I often need to package projects into portable, efficient archives for storage and transport.
Tarballs (.tar.gz files) are my go-to choice for handling large sets of developers files in Windows, Linux and OSX environments seamlessly. Whether deploying web apps, delivering client sources or preparing backends for containers – a solid archival workflow is absolutely vital.
In this comprehensive 3500+ word guide, I‘ll equip you with everything needed to professionally generate compressed .tar.gz files natively on Windows machines using CLI tools for maximum flexibility.
Understanding tar.gz Archives In-Depth
Before jumping into the nitty-gritty of actually creating production-grade tarballs in Windows, it‘s important to level set on what makes the tar.gz (or tar.gzip) format so indispensable for developers like myself handling lots of codebases across projects.
Tar – Standing for Tape ARchive, tar is an extensively used data bundling format for collating multiple directories and files into a single transportable container without compression. It concatenates the byte streams of included files and folders, storing important metadata like permissions, timestamps and directory structures in a header block upfront.
This metadata preserves vital context and the all-important relative pathways between the archived resources. Some core tar capabilities:
1. Concatenation – Appends files & folder byte streams sequentially
2. Preserves File Information – Retains timestamps, Linux permissions, ownership etc.
3. Stores Folder Hierarchy – Maintains structure by embedding relative paths
gzip – Based on LZ77 and Huffman coding algorithms, gzip offers lossless data reduction by identifying duplicate strings within the input byte stream and replacing them with small placeholders mapped to a dictionary. It is a single-file/stream compression format without any file bundling capabilities itself.
Some properties that make gzip a top choice:
1. High Compression Ratios – Size reductions between 50% to 70% typically.
2. Universally Supported – gzip/gunzip available by default in Linux and OSX.
3. Extremely Portable – Used over HTTP, FTP along with tar for files.
Tarball -.tar.gz files effectively combine both the archiving strengths of the Tar format and the compression efficiency of gzip into a portable standard. The .tar bit aggregates all the target content streams into one sequence and the .gz part compacts it further for efficent storage and transmission.
No wonder tarballs (.tar.gz) are a mainstay for handling code and binary assets across compute platforms!
Why Use tar.gz Archives as a Developer
As someone who churns out software across operating systems and endpoints including clouds, containers and mobile – my cross-environment workflow would grind to a halt without leveraging tar.gz capabilities to seamlessly package and distribute project artifacts.
Here‘s specifically how I utilize compressed tar archives in my process:
1. Bundling Codebases & Resources
I develop applications using dozens of interacting scripts, build files, binaries and media assets. Tarballs neatly consolidate entire codebases, libraries, SDKs etc. into a single .tar.gz file for portability.
2. Delivering Release Artifacts
Shipping software to clients as simple self-contained tarballs encapsulating all dependencies like interpreters, fonts, libraries etc. avoids environment compatibility issues.
3. Optimizing Git Operations
Git repos bloat up quickly with multiple commits on binary artifacts. I maintain media assets externally and track only tarball references instead for lean repo size.
4. Archival & Build Caches
I archive old projects as compressed tarballs for quickly accessing a consistent snapshot when needed instead of cloned repos. Shared build caches across pipeline runs also reside in .tar.gz form over object storage.
5. Docker Layer Optimization
In Docker images, using tarballs as readonly base layers containing shared build artifacts and dependencies leads to huge caching improvements and disk savings.
6. Transferring VM State
To migrate live VM instances across clouds, I utilize tunneled block-level copies of tarball VM images rather than slow full bit transfers.
This list goes on! Tarball workflows form the nuts-and-bolts foundation for how us developers effectively build, ship and run cross-platform applications. Knowing how to create portable .tar.gz archives natively on even Windows systems is thus mandatory knowledge.
So let‘s deep dive into the most optimized tooling and procedures for reliably generating production-ready tar.gz files within Windows machines.
Why Tarballs Need Third-Party Tools on Windows
You may ask, given my primary development environment is based on Windows workstations why not just use native capabilities like gzip or PowerShell instead for archival tasks?
The first hard limitation – Gzip (.gz) standalone only offers single-file compression without any bundling or recursive folder storage. The integrated Compressed Folders feature in Windows Explorer also relies on the plain .zip format without cross-platform metadata preservation.
This rules out direct application of intrinsic Windows tooling. Even Window Subsystem Linux (WSL) has some filesystem incompatibilities when directly accessing Windows folders.
Hence I lean on specialized third-party programs like 7-Zip or WinRAR that ship with their own TAR+GZIP implementations for reliable tarball generation using the standard CLIs provided. They build multiplatform readiness right in avoiding common compatibility pitfalls.
Let‘s assess popular archiving solutions worth considering for .tar.gz preparation.
Comparison of Top Archiving Solutions for Windows
While open-source console apps like BSDTAR or Cygwin support Windows disk access – they require cumbersome installations or runtime environments for straightforward usage.
I prefer to stick to these four feature-rich mainstream archiving apps with direct EXE access designed for idiomatic Windows interaction:
| Archiver | Compression | Encryption | CLI Access | Price |
|---|---|---|---|---|
| 7-Zip | All major formats | AES-256 | Plugin via 7z.EXE | Free |
| WinRAR | RAR, Zip | AES-128 | WinRAR.exe | Free (Nag-OnStart) |
| WinZip | Zip, Tar | AES-256 | No | $30 |
| PeaZip | 200+ formats | AES-256 | Cross-platform CLI | Free |
Based on widespread adoption, ease of use and top notch multi-format capabilities – 7-Zip emerges as my winner for archival tasks across endpoints. The core reasons why I standardize on 7-Zip:
1. Universally Recognized Formats – Creates tar, gzip and 100+ other common formats for interoperability.
2. Optimized Compression – Efficient LZMA2 algorithm results in greater size reductions.
3. Resilient Encryption – Uses the AES-256 gold standard for air-tight security.
4. Lightweight Installation – Under 3 MB installer without bloatware or ads. Stays out of the way.
5. Command Line Support – Programmatically integrates into my Windows batch scripts via 7z.exe.
Let‘s tar-gzip away using this stellar open-source tool!
Step-by-Step Guide to Create tar.gz in Windows 10
I‘ll be demonstrating a play-by-play workflow tailored to Windows 10 for constructing optimized tar.gz archives using just the built-in CLI capabilities of 7-Zip.
The high level progression we‘ll follow:
Stage 1: Set up Folder → Stage 2: Produce Uncompressed TAR → Stage 3: GZIP Compress TAR → Stage 4: Verify Outputs
Preparation Stage
We kick things off by establishing the source content and installing the archiving tool if not already available.
Step 0 – Install 7-Zip
Head over to the official 7-Zip site https://www.7-zip.org/download.html and grab the appropriate 32/64-bit Windows executable installer.
Complete the wizard opting for default settings, letting it install into Program Files. This makes the command line binary directly accessible.
Step 1 – Create Source Directory
Now we setup a root folder say C:\Users\MyUser\targz-source containing all the files and sub-directories intended to be archived via gzipped tar.
I typically structure my source directories to closely reflect actual project layouts for realistic testing.
Here‘s an example folder hierarchy containing assorted files:
With placeholder files populating sub-folders at different nesting levels – we have representative content resembling real codebase composition ready for archival.
This source folder forms the input workload for our upcoming .tar.gz compression routine.
Compression Stage
We leverage 7-Zip‘s command line interface to first tarball the target directory before further gzipping the resulting .tar to create the final compressed archive.
Step 2 – Generate Plain TAR Archive
Open up Command Prompt in Admin mode and enter into the parent folder holding our source directory using cd switches. We invoke 7z.exe located in Program Files to initiate archival via:
"C:\Program Files\7-Zip\7z.exe" a -ttar source-folder.tar targz-sourceThe breakdown of this critical command:
-
"C:\Program Files...– Full path to 7z.exe binary -
a– Add/create archive switch -
-ttar– Format selection as tar -
source-folder.tar– Output .tar filename -
targz-source– Input source directory
This shells out an ordinary uncompressed tar named source-folder.tar capturing our entire set of sample files ready for compaction.
Step 3 – Compress TAR with GZIP
To further condense the generated .tar by applying gzip coding sequences, we pipeline 7z invocation using stdin/stdout:
"C:\Program Files\7-Zip\7z.exe" a -tgzip -so source-folder.tar | "C:\Program Files\7-Zip\7z.exe" a -si source-folder.tar.gzThe key components of this compound command:
-
Initial 7z call
-tgzip– Filter through gzip codec-so– Output to pipe instead of file
-
|– Pipe symbol feeds .tar stream into stdin of next 7z -
Final 7z execution
-si– Input from prior stdoutsource-folder.tar.gz– Final .tar.gz filename
This grabs uncompressed bytes from source .tar, applies gzip compression and outputs final tarball source-folder.tar.gz
Verification Stage
With the heavy lifting of archiving and compressing our source directory into a distributable .tar.gz format done – we wrap up by running some checks to validate expected outputs were generated properly.
Step 4 – Validate Tarball Contents
I test integrity by extracting the finals archive using 7-Zip GUI into a separate folder:
"C:\Program Files\7-Zip\7z.exe" e source-folder.tar.gz -oextractedand verify all original filenames, timestamps and folder structures matched the origin source content set.
You should see substantially reduced aggregate size of .tar.gz over unarchived total as an indicator of efficient compression.
Additionally, scanning through the archive visually confirms recognizing the standard Tar format.
This concludes a smooth start-to-finish workflow for creating compact cross-platform .tar.gz files using native Windows tooling – no WSL or Cygwin required!
Agile teams can further automate the process by directly integrating 7z calls within CI pipelines for on-demand artifact bundling.
Now that you have a firm grip over professional-grade tarball generation workflows – let‘s tackle some bonus topics to truly round out your .tar.gz mastery!
Bonus: Advanced Tarball Tips and Tricks
As a lead developer continually shipping applications over the wire, my core tarballing skills have been amplified vastly through additional auxiliary techniques for optimization, security and restoration.
Let me share further professional tips to become a gzipped tar wizard!
Split Archives for Fat Pipes
By segmenting extra-large tarballs into smaller blocks fitting within on-the-wire constraints like email attachment limits – transmission over poor connections becomes way more reliable.
7z a -v2m -ms=50m source-folder.tar

7z a -v2m -ms=50m splitted.tar *.001 *.002 ...
This cuts source-folder.tar into 50MB chunks named *.001, *.002 etc. ready for reassembly on the other end.
Protect Sensitive Archives
Maintaining end-to-end security is critical when delivering custom binaries or proprietary dependencies via tarballs.
Encrypt using AES-256 via parameter:
7z a -pSecretPwd@1234 -mem=AES256 source-folder.tarFor public repositories, utilize SSH keys or SSL while downloading archives for integrity.
Boost Compression Ratios
When transferring archives over slow connections – maximize compression ratios to reduce transmission payload size.
7z a -mx=9 -mfb=273 -mtc=on -mtm=- -mts=2G source-folder.tarHere -mx=9 sets maximum level, -mtc multithreads utilizing upto 2GB RAM via -mtm flag.
Automate Periodic Archiving
Schedule cronjobs for automatically tarballing your active work directory into dated periodic backups rotating weekly.
@weekly 7z a ~/backups/Projects-$(date +%d-%m-%Y).tar.gz ~/projectsThis hands-free archive lifecycle management avoids manual intervention.
Summing Up
That wraps up this extensive guide detailing my specialized approach for creating, managing and moving tar.gz files like an expert Windows developer!
Here‘s a quick recap of all that we covered:
- Deep technical dive into tar/gzip formats
-evaluator the pros/cons of mainstream archival apps - Step-by-step directions for generating tarballs using 7-Zip
- Best practices for testing, encryption and automation
- Bonus tips on specialized operations like splitting & compression tuning
You now have an expansive blueprint for integrating compressed tar archives into cross-platform shipping – taking your Windows workflow to the next level!
Let me know if any areas need further clarification. I‘m happy to respond to usual queries or challenges faced when employing these professional techniques for your projects.
Hope you found this guide helpful. Happy archiving away!