
- Home
- Windows Tips
- Install custom keyboard windows 10
Windows 10 has a long list of keyboard layouts that a user can add to their system. These layouts cater to multiple languages including Mandarin and Arabic, and they are available for all types of keyboards.
Installing a keyboard layout on Windows 10 is easy; all you have to do is select one from a list and it will be added. Users can switch between keyboard layouts on the fly with a keyboard shortcut (Ctrl+Shift).
Note that Windows 10 keyboard layouts are all preset and they cannot be edited. In order to get a custom keyboard layout, you either have to download it or create one yourself.
Creating a keyboard layout is easy but time-consuming since every single key has to be mapped and assigned individually. Try to find a ready-made keyboard layout if you can. If a ready-made keyboard layout isn’t available, you’ll have to make the layout yourself.
See our video tutorial on how create a custom keyboard layout on Windows 10 or follow the step-by-step guide below:
Video Tutorial
Step-by-Step Guide
- Download the Microsoft Keyboard Layout Creator.
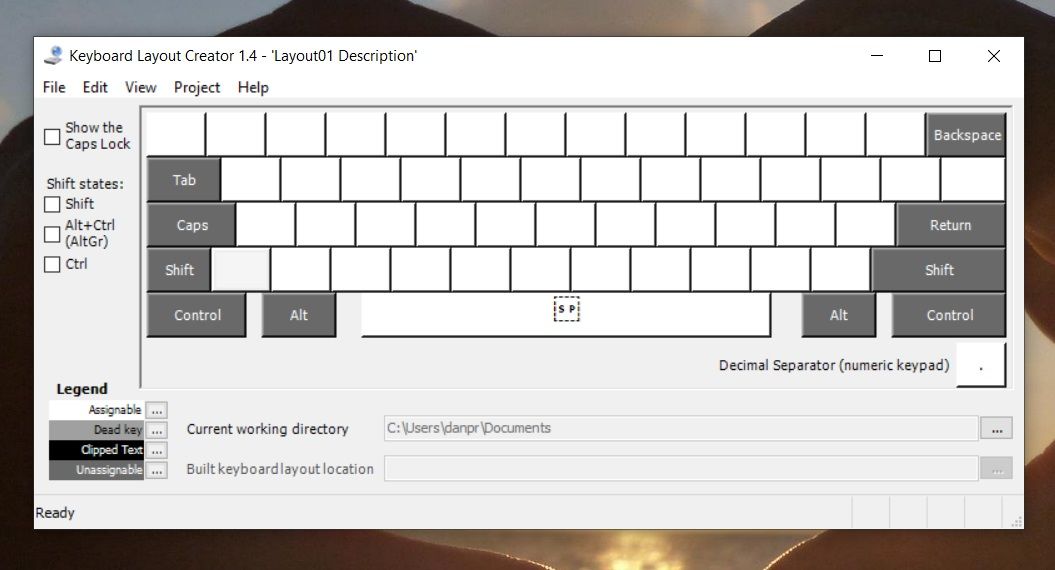
- Open the app and notice the blank visual keyboard.
You’ll get a basic keyboard layout without a dedicated numpad. The keys are color coded. All white keys can be assigned whereas the dark grey ones cannot. The dark grey keys represent keys like Tab, Shift, Caps, etc.
- Tap a key on the visual keyboard and select the character / key you want to assign to it, one-by-one.
Click inside an assignable key, and in the box that opens, enter what key/character you want to enter when that particular key is pressed. This will enter the default character for that key. If you want to record the shift state character for a key, click the All button on this same box.Recording a Shift key is just as easy as recording the default state key but it isn’t compulsory. You can skip it if you want. You can also couple keys with Ctrl and Alt keys.
- Map the entire keyboard.
- Go to Project>Build DLL and Setup Package.
When you’re done, go to Project>Build DLL and Setup Package. You’ll see a prompt asking if you want to check the properties of the keyboard layout you’re creating and you definitely should. That’s where you can give the keyboard layout a proper name and description.It will create an MSI file and an EXE, either one of which you can run to install your custom keyboard layout. I created a basic one that types in all Caps and named it angry. Once installed, it allowed me to type in all Caps without holding down the Shift key. For more complicated keyboard layouts, it’s going to take more time to create but the tool is still just as easy to use!
- Save the layout.
Install custom keyboard layout
A keyboard layout, whether it’s custom made with the Microsoft Keyboard Layout Creator or if you’ve downloaded it yourself, is going to be an executable file or an installer file. Installing it is as easy as installing any app.
- Open File Explorer and navigate to the EXE or MSI file for the keyboard layout.
- Run the file.
- Grant the app admin permission to install (The keyboard is installed for the current language).
- Open the Settings app.
- Go to Time & Language.
- Select the Language tab.
- Select the current language.
- Click the keyboard button under it.
- The current and new keyboard layout will be listed. Remove the one you do not want to use.
Conclusion
Keyboard layouts for commonly spoken languages like English are more common. If you need to type in a language that doesn’t have many layouts available, or you need to set the keys up in a layout that you can’t find in any configuration, a custom layout is the best alternative.
It’s worth mentioning that if you only need to change one or two keys, you can do with remapping them instead of creating a custom layout. Remapping tools like AutoHotKey and PowerToys are good options. If you remove the layout at any point, you can still use the MSI or the EXE file for it to install it again.

Fatima Wahab
Fatima has been writing for AddictiveTips for six years. She began as a junior writer and has been working as the Editor in Chief since 2014.
Fatima gets an adrenaline rush from figuring out how technology works, and how to manipulate it. A well-designed app, something that solves a common everyday problem and looks
Copilot is your AI companion
Always by your side, ready to support you whenever and wherever you need it.

The Microsoft Keyboard Layout Creator allows users to create or modify keyboard layouts.
Important! Selecting a language below will dynamically change the complete page content to that language.
-
Ever wanted to quickly and easily define your own keyboard layout for a language Microsoft doesn’t support? Or define your own keyboard layout so you can quickly and easily enter your favorite symbols with a simple keystroke? Well, want no more: the Microsoft Keyboard Layout Creator is here!
The Microsoft Keyboard Layout Creator extends the international functionality of Windows 10, Windows 2000, Windows XP and Windows Server 2003 systems by allowing users to:
- Create new keyboard layouts from scratch
- Base a new layout on an existing one
- Modify an existing keyboard layout (.KLC) file and build a new layout from it
- Package the resulting keyboard layouts for subsequent deployment and installation.
This minor update to MSKLC fixes several customer-reported bugs in diverse areas such as support for the Tibetan Tsek character on the spacebar and support for ligatures in the AltGr shift state.
-
Supported Operating Systems
Windows 10, Windows XP, Windows 2000, Windows 2000 Service Pack 2, Windows 2000 Service Pack 3, Windows Server 2003
To install and use the Microsoft Keyboard Layout Creator tool, your system must meet the following requirements:
- Windows 10, Windows 2000, Windows XP, or Windows Server 2003 (MSKLC will not run on Windows NT 4.0, Windows 95, Windows 98, or Windows Me).
- Microsoft .NET Framework v1.0 or v1.1 must be installed
-
- Click the Download button on this page to start the download.
- Do one of the following:
- To start the installation immediately, click Open or Run this program from its current location.
- To copy the download to your computer for installation at a later time, click Save or Save this program to disk.
Readers help support Windows Report. We may get a commission if you buy through our links.
Read our disclosure page to find out how can you help Windows Report sustain the editorial team. Read more
Are you interested in customizing your own keyboard layouts or starting the layouts from scratch for any kind of reason, like setting the keyboard to a language Microsoft systems don’t have support for or including a symbol of your liking just by pressing a keyboard button?
In the tutorial below, we will see exactly how we can set an input method, remove an input method from our keyboard layouts and use the Microsoft Keyboard Layout Creator to customize the keyboard on Windows Windows 10 to our preferences.
How can I create a custom keyboard layout in Windows 10?
- Add a new keyboard layout
- Change keyboard input methods
- Use Microsoft Keyboard Layout Creator
1. Add a new keyboard layout
This tutorial shows how to add or remove keyboard input from Control Panel.
- Move the mouse cursor to the right side of the screen.
- In the search box type Control Panel.
- Click (left click) on the Control Panel icon that shows after the search is completed.
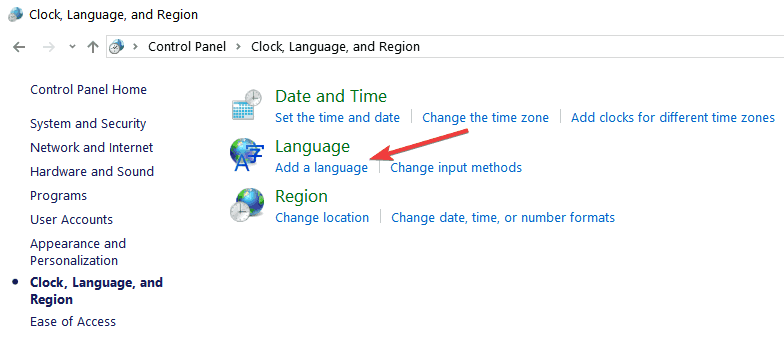
- After the Control Panel window opens click (left click) on the Language icon.
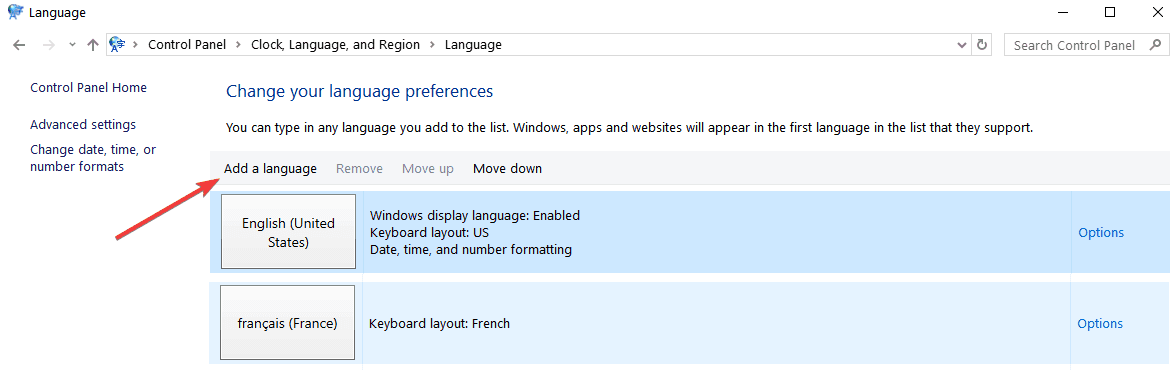
- Double click (left click) on Add a language situated in the middle side of the window you opened.

- Under the Input Method field click (left click) on Add an input method.
- Double click (left click) on an input method you prefer to add or just choose an input method and click on Add.

- You can repeat the two steps above to add another input language if you want.
- When you are finished you just need to click (left click) on Save on the lower side of the window.
- After you add an input method you will just need to switch the methods from the lower right side of the screen where it says what language is your keyboard set to operate.
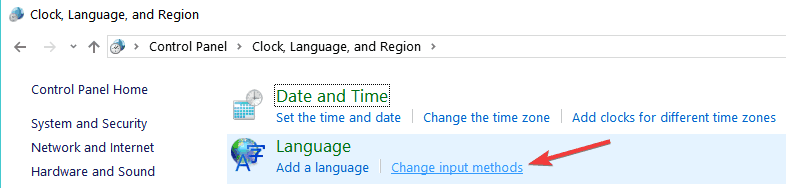
2. Change keyboard input methods
You can also add or remove input methods using the PC settings feature in Windows 10, 8.1 as shown below:
- Open PC Settings by going with the mouse on the charms bar.
- Click (left click) on Settings.
- Or another way to open PC settings is by pressing and holding Windows and I buttons.
- Click (left click) on General situated on the left of the screen.
- Click (left click) on the Language Preferences link situated under the Language section on the right side of the screen.
- From here you can follow the steps presented in the first tutorial.
- How to Change the Keyboard Layout on Windows 10
- How to change keyboard layouts in Windows 11
- Top Keyboards to Buy for Your Windows 10/11 PC
- Best mechanical keyboards for Windows 10/11 PCs [2022 Guide]
- 6 best PC keyboards to buy [2022 Guide]
3. Use Microsoft Keyboard Layout Creator
-
1. Download Microsoft Keyboard Layout Creator from the official website.
-
2. Install the app on your Windows 10 device.
-
3. Open the app.
-
4. Go to File > Load Existing Keyboard.
-
5. Choose the layout that you want to customize from the list.
-
6. Customize your keyboard layout by navigating to Project > Properties. From there, you can choose whichever options you want: a keyboard name, description, and language, as well as custom hotkeys.
If you’re looking to create a custom keyboard layout on Windows 10, look no further than the Microsoft Keyboard Layout Creator app.
All you need to do is download Microsoft Keyboard Layout Creator and then you can create your own keyboard layouts from scratch using it.
- Microsoft Office Lens: A Powerful Tool for Capturing and Organizing Information
- Swap Left/Right Speaker in Realtek Audio Console [How to]
- How to Get DirectX 12 End-User Runtime and Fix Installation Issues
- Overclocking in OMEN Gaming Hub: How to Use it
- How to Disable Overlay in Razer Cortex: Hide in-game Overlay
In the past, this application used to say that it did not support Windows 10, but nevertheless it worked just fine if you installed it. Now, it is fully optimized for Windows 10 and is perfectly safe to use.
Speaking of keyboards, there are various technical issues that you may encounter after connecting your keyboard to your computer or after enabling certain settings. We have various guides on our website that you can check out.
The three ways above showed you how you can customize the keyboard input in Windows 10. All you have to do now is go and try it for yourself.
Please write us below for any new ideas on how to customize your keyboard.
Ivan Jenic
Windows Hardware Expert
Passionate about all elements related to Windows and combined with his innate curiosity, Ivan has delved deep into understanding this operating system, with a specialization in drivers and driver troubleshooting.
When he’s not tackling diverse driver-related problems, Ivan enjoys watching good movies and spending time hiking with his family and friends.
Sign in to your MUO account

Windows users have a few different options when it comes to creating customized keyboard layouts.
Here’s how to make a custom keyboard layout.
Custom Keyboard Options in Windows
You could use the ever-popular Portable Keyboard Layout software. Despite its age, it still works well. The app is open-source and lets you keep different keyboard layouts on a USB stick so you can easily use them on any machine.
Of course, Windows also offers a native way to jump between different keyboard layouts.
You can also try using keyboard remapping software. There are lots of free options available, but one of the most overlooked apps is the official Microsoft Keyboard Layout Creator.
How to Create a Custom Keyboard Layout on Windows
Before we start, a word of warning: the Microsoft Keyboard Layout Creator app is nearly a decade old. It still works perfectly and runs on Windows 10, but occasionally you might encounter a bug.
First, you need to download and install the app from the official site. When it’s installed, follow the instructions below to create your own keyboard layout:
- Open the Microsoft Keyboard Layout Creator app.
- Head to File > Load Existing Keyboard.
- Pick the layout you want to customize. You should make sure you pick the layout that matches your current keyboard setup, for example, QWERTY (U.S.).
- Go to File > Save Source File As so you have a backup before you start making changes.
- Set your new keyboard’s parameters in Project > Properties. You can pick a language and give the keyboard a name and description.
- Click on a key and follow the on-screen prompt to remap it to a character of your choosing.
If you want to add hotkeys for accented letters or other obscure characters that you frequently use, the easiest way is to program them to Ctrl + Alt + [Number]. You cannot overwrite existing shortcuts like Ctrl + S (Save) or Ctrl + A (Select All).
The Key to Remapping Your Keyboard
If you dislike the tools you’ve been given, you can always create a custom keyboard layout in Windows 10. It takes a little work, and the tools are beginning to show their age, but it works!
If you’re interested in this topic because one of your keys has just died, don’t worry. There are plenty of ways to remap a keyboard around a dead key while you work on getting a new one.
Если вам потребовалось добавить новый язык ввода с клавиатуры в Windows в дополнение к уже имеющимся, это легко сделать в Параметрах системы.
В этой простой инструкции для начинающих подробно о том, как добавить язык раскладки клавиатуры в Windows 11 и Windows 10. Также может быть полезным: Как удалить лишнюю раскладку клавиатуры Windows 11 и 10.
Добавление языка в раскладки клавиатуры в Параметрах
Основной способ добавить новую раскладку клавиатуры в Windows 11 и 10 — использовать соответствующий раздел в Параметрах. Шаги будут следующими:
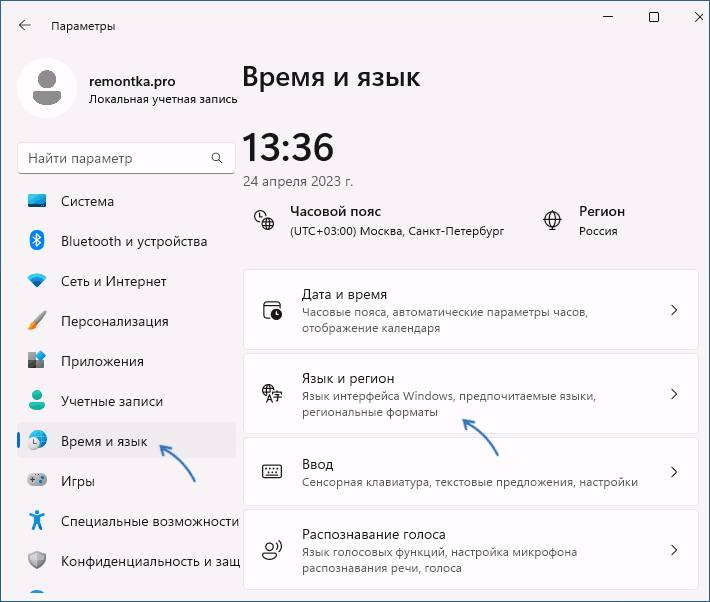
- Откройте «Параметры» и перейдите в раздел «Время и язык». В Windows 11 откройте пункт «Язык и регион» в этом разделе».

- В Windows 10 в том же разделе откройте подраздел «Язык».

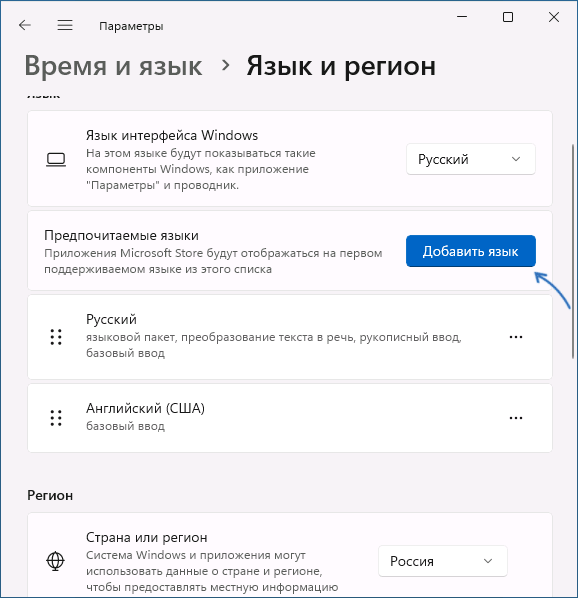
- Нажмите по кнопке добавления языка.

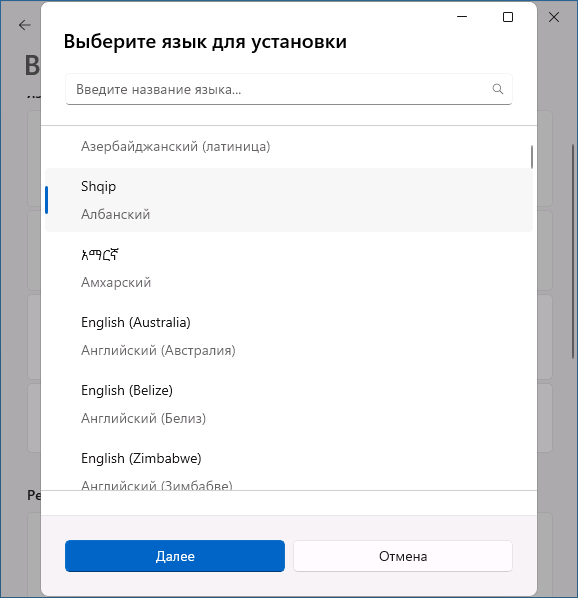
- Выберите язык, который нужно добавить в раскладки, и нажмите «Далее».
- Если вам будет предложено выбрать языковые компоненты для выбранного языка, включать все не обязательно: для ввода с клавиатуры достаточно оставить включенным лишь пункт «Базовый ввод», но при необходимости вы можете изменить и язык интерфейса Windows.
- Нажмите кнопку «Установить» и дождитесь, когда язык будет установлен: в результате он появится в списке языков в «Параметрах» и будет доступен для ввода.


Переключение языка стандартно можно выполнить сочетанием клавиш Windows + Пробел или Alt+Shift, но можно и поменять комбинацию, подробнее: Как изменить сочетание клавиш для смены языка ввода в Windows 11 (в 10 выполняется аналогичным образом).
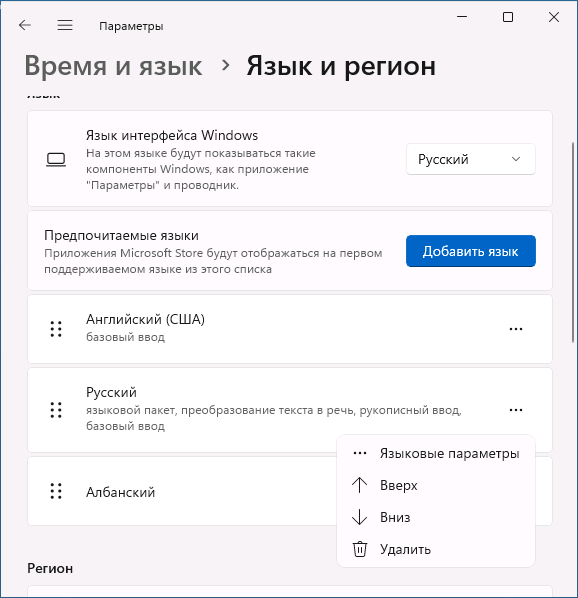
Учитывайте, что порядок языков ввода при переключении раскладки клавиатуры будет соответствовать тому порядку, в котором языки располагаются в рассмотренном разделе Параметров. При желании вы можете перетащить языки ввода выше или ниже или использовать опцию перемещения в меню:
Добавление языка ввода в Windows PowerShell
В последних версиях Windows есть возможность добавить язык ввода или раскладку клавиатуры с помощью команд PowerShell, выполненных от имени администратора. Для этого потребуется знать обозначение этого языка. Например, следующие команды добавят язык «Английский (Великобритания)» с кодом en-GB, который используется в третьей команде:
ipmo international
$OldList = Get-WinUserLanguageList
$OldList.Add("en-GB")
Set-WinUserLanguageList $OldList
После выполнения команд и подтверждения выполнения операции, язык будет добавлен в список языков ввода на компьютере.
Дополнительная информация
Если вам требуется добавление не языка ввода с клавиатуры, а именно раскладки: например, для использования раскладки MacOS в Windows, как правило при скачивании таких раскладок из Интернета вы получаете и файл установщика .exe или .msi, который установит всё что необходимо на вашем компьютере.
Также при необходимости вы можете создать собственные раскладки в Microsoft Keyboard Layout Creator.