
Недавно мне понадобилось создать гаджет для Windows Sidebar. Навыков в этом у меня не было, поэтому, немного погуглив и почитав документацию, приступаем.
Сразу покажу то, что получилось в итоге
Гаджет будет получать информацию с сайта в виде xml, парсить и, собственно, отображать. Также гаджет будет проверять наличие новых версий, и в случае их присутствия, отказываться работать 
Изначально, ради получения опыта, хотел написать гаджет полностью на VBScript (так как с ним еще не имел дела), но в конечном итоге пришлось делать вставки на JavaScript.
Перейдем непосредственно к коду. Весь код здесь я рассматривать не буду, покажу лишь основные моменты. Ссылка на готовый гаджет – в конце статьи.
Главный файл гаджета – его манифест – файл Gadget.xml. Он должен называться именно так и располагаться в корне нашего архива (гаджет есть ни что иное, как архив ZIP с расширением .gadget).
<?xml version="1.0" encoding="utf-8" ?>
<gadget>
 <name>Weather from Info.Denms.Ru</name>
 <version>1.0.1232</version>
 <hosts>
  <host name="wdenms">
   <base type="HTML" apiVersion="1.0.0" src="main.html" />
   <permissions>Full</permissions>
   <platform minPlatformVersion="1.0" />
  </host>
 </hosts>
  <icons>
    <icon width="64" height="64" src="icon.png" />
  </icons>
 <author name="cvs">
  <info url="http://info.denms.ru" />
 </author>
 <description>Weather Widget (Info.Denms.Ru)</description>
</gadget>
Рассмотрим его более подробно.
Элемент <base> должен содержать apiVersion, равный 1.0.0 (на данный момент), а также атрибут src, в котором указан главный файл нашего гаджета;
<permissions> — разрешения для гаджета. Устанавливаем равным full;
<platform> — минимальная версия Widows Sidebar. На данный момент – 1.0;
Параметры <name> — имя гаджета, <version> — версия, <author> — информация об авторе, <info> — ссылка на страницу с гаджетом, <icon> — иконка гаджета и <descrtiption> будут отображаться на панели установленных гаджетов.
Файл main.html – обычный html файл, приводить его полностью не буду, остановлюсь лишь на некоторых моментах.
С помощью элемента g:background задается фон гаджета. Сделаем его прозрачным.
<g:background id="background" style="position:absolute; z-index:-1; top:0; left:0;" opacity="0"></g:background>Гаджет может находиться в двух состояниях – docked (слева на скрине выше), и undocked (справа). Будем хранить текущее состояние гаджета в переменной JavaScript docked.
<SCRIPT Language="VBScript">
'Вызов функции JavaScript из области VBS
function isDocked
    isDocked = isDockedJS()
End Function
</script>
<script src="main.vbs" type="text/vbscript"></script>

<SCRIPT Language="JavaScript">
    docked = 0;
    function isDockedJS() {
      return docked;
    }
</SCRIPT>
<script type="text/javascript" src="main.js"></script>
Функция-обертка isDocked потребуется нам в дальнейшем, чтобы из VBScript узнать текущее состояние гаджета (как я не старался, но реализовать это на чистом VBScript не смог). Еще одно замечание – скрипты корректно работают именно в этом порядке, т.е. сначала описываем скрипты VBScript, потом JavaScript.
Остальные элементы в main.html представлены элементами DIV с абсолютным позицированием. Впоследствии из скриптов мы будем обращаться к ним по их id.
<div id="small_needupdate"></div>С помощью JavaScript зададим состояния docked и undocked для гаджета, а так же укажем файл настроек (main.js)
System.Gadget.onDock = resize;
System.Gadget.onUndock = resize;
System.Gadget.settingsUI = "settings.html";
System.Gadget.onSettingsClosed = SettingsClosed;

docked=0; //начальное состояние гаджета
resize(); //инициализация
Как видно из листинга выше, при смене состояний гаджета будет вызываться функция resize().
function resize() {

 bd = document.body.style;
 System.Gadget.beginTransition();

 if (System.Gadget.docked) {
   // small state
    bd.width=148;  //устанавливаем размеры гаджета
    bd.height=201;
    docked = 1;
    bd.background='url(images/gadget.png) no-repeat'; //устанавливаем фон
   //далее следует перенос значений из состояния undocked в docked и обнуление элементов для состояния undocked
    document.getElementById("small_needupdate").innerHTML = document.getElementById("big_needupdate").innerHTML;
   document.getElementById("big_needupdate").innerHTML = "";
   //...
} else {
    // big state
    bd.width=230;
    bd.height=160;
    bd.background='url(images/gadgeth.png) no-repeat';
    docked=0;
    //перенос значений из состояния docked в undocked и обнуление элементов для состояния docked
   document.getElementById("big_needupdate").innerHTML = document.getElementById("small_needupdate").innerHTML;
   document.getElementById("small_needupdate").innerHTML = "";
   //...
}
System.Gadget.endTransition(System.Gadget.TransitionType.morph,1);
}
Также можно описать функцию сохранения настроек. В моем гаджете их нет, но для примера покажу как это делается
function SettingsClosed(event) {
 if (event.closeAction == event.Action.commit) {
  //alert System.Gadget.Settings.readString('test');
 }
}
readString – читает ранее сохраненную строку, writeString, соответственно, записывает.
Методы System.Gadget.beginTransition(); и System.Gadget.endTransition(); нужны для “плавного» изменения размера гаджета. В Windows Seven они игнорируются, но я все же оставил их для обратной совместимости.
Как уже говорилось выше, сервер предоставляет нам информацию о погоде в формате xml.
<?xml version="1.0"?>
<all>
  <day id="today">
  <temp>1.7</temp>
  <cloudyim>41</cloudyim>
  <cloudy>пасмурно</cloudy>
  <air>снег</air>
  <humidity>87</humidity>
  <wind_direction>Ю-З</wind_direction>
  <wind_speed>5</wind_speed>
  <min>-3</min>
  <max>-1</max>
</day>
<day id="ПТ">
  <min>-1</min>
  <cloudyim>26</cloudyim>
  <max>1</max>
</day>
  <day id="СБ">
  <min>-9</min>
  <cloudyim>41</cloudyim>
  <max>0</max>
</day>
…
</all>
Скачивать и парсить xml будем на VBScript.
Sub DownloadXML2
    Set objXML = CreateObject("Microsoft.XmlHttp")
    objXML.Open "GET", "http://info.kovonet.ru/weather.xml", True
    objXML.OnReadyStateChange = GetRef("objXML_onreadystatechange")
    objXML.setRequestHeader "If-Modified-Since", "Sat, 1 Jan 2000 00:00:00 GMT"
    objXML.Send
    iTimeoutID = window.SetTimeout("mySleep", 1000)
End Sub
Функция mySleep будет проверять наше соединение на таймаут.
Sub mySleep
  if bRespReceived = "false" then 'ответ еще не получен
    iTimeout = iTimeout + 1
    if (iTimeout > 30) then  'таймаут
       timerFirstRun = window.SetTimeout("Update", 60000) 'попытка повторного обновления через минуту
    else 'таймаут еще не достигнут, продолжаем считать секунды
      iTimeoutID = window.SetTimeout("mySleep", 1000)
    end if
   end if
End Sub
В случае успешного скачивания objXML.readyState будет равен четырем, а статус (objXML.status) вернет значение 200.
Function objXML_onreadystatechange()
  If (objXML.readyState = 4) Then
    'msgbox objXML.statusText
    If (objXML.status = 200) Then
      bRespReceived=true
      SaveFile(objXML.responseText)
    else
      timerFirstRun = window.SetTimeout("Update", 60000) 'попытка повторного обновления через минуту
    End If
  End If
End Function
В этом случае сохраняем файл во временную папку Windows
Function SaveFile(what)
  Set fso = CreateObject("Scripting.FileSystemObject")
  tempFolder = fso.GetSpecialFolder(2)
  filepath = tempFolder+"\weather.xml"
  Dim fso1, tf
  Set fso1 = CreateObject("Scripting.FileSystemObject")
  Set tf = fso1.CreateTextFile(filepath, True, True)  'rewrite, unicode
  tf.Write(what)
  tf.Close
  ParseXML
End Function
и начинаем парсить файл.
Sub ParseXML
  Set fso = CreateObject("Scripting.FileSystemObject")
  tempFolder = fso.GetSpecialFolder(2)
  filepath = tempFolder+"\weather.xml"
  Set xmlDoc = CreateObject("Msxml2.DOMDocument")
  xmlDoc.async="false"
  xmlDoc.load(filepath)
  'главная нода – в нашем случае <all>
  Set currNode = xmlDoc.documentElement
  'дни недели – <day>
  Set dayNode = currNode.firstChild
  While Not dayNode Is Nothing
    Set currNode = dayNode.firstChild
    While Not currNode Is Nothing
      if currNode.parentNode.getAttribute("id") = "today" then 'сегодняшний день
      if currNode.nodeName = "temp" then document.getElementById(prefix+"maintemp").innerHTML = currNode.childNodes(0).text+Chr(176)
      'отображаем остальные элементы
    Else 'не сегодняшний день, отображаем более мелко
      '...
    end If
    Set currNode = currNode.nextSibling
    Wend
  Set dayNode = dayNode.nextSibling
Wend
End Sub
Проверка на новые версии производится точно таким же способом.
Не забываем создать файл настроек — settings.html, о существовании которого мы объявили выше.
<html>
 <head>
  <title>Настройки</title>
  <style type="text/css">
  body { width:220px; height:120px; }
  </style>
 </head>
 <body>
  <div style="text-align:center">
   <strong>Weather from Info.Denms.Ru<br/><script type="text/javascript">document.write(System.Gadget.version);</script></strong><br/>
   © cvs, 2011<br/>
   <a href="http://info.denms.ru">http://info.kovonet.ru</a><br/><br/>
  </div>
 </body>
</html>
Вот, собственно, и все. Буду рад, если моя (первая :)) статья оказалась кому-то полезной.
Использованные источники:
http://www.script-coding.com/XMLDOMscripts.html;
http://msdn.microsoft.com/en-us/library/bb508511%28v=VS.85%29.aspx;
VBScript Programmers Reference, 3rd Edition;
ну, и, конечно, http://google.com.
Ссылка на гаджет – http://info.kovonet.ru/test.gadget.
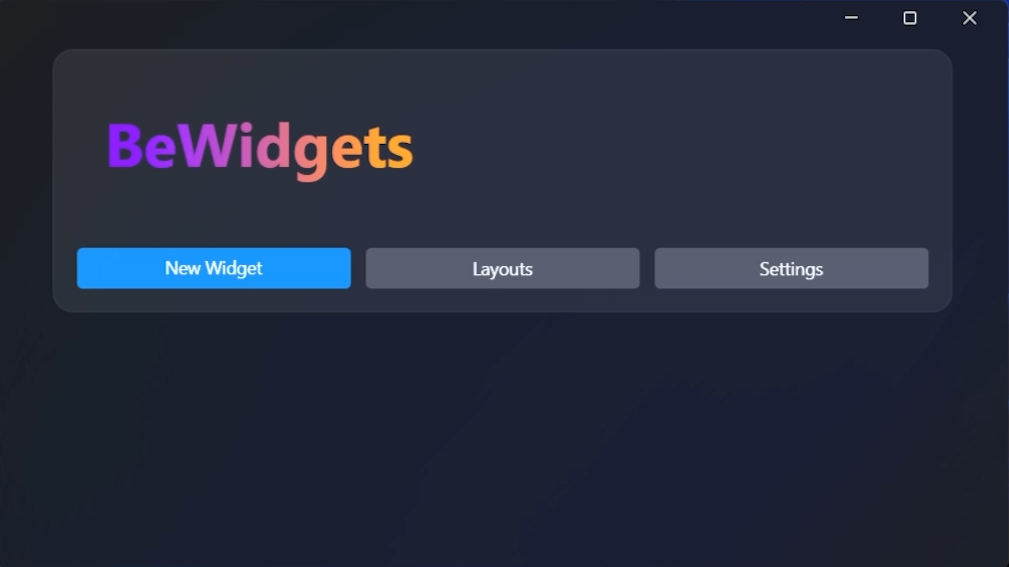
In this article, I will show you how to create custom Widgets in Windows 11. For the purpose of this guide, we will use an application named BeWidgets, available on the Microsoft Store.
We all know the new Widgets section in Windows 11, but few of us actually use it. The main reason for that is because that section is really limited and has very few options regarding creating custom or personalized widgets. The program we will install today will help us create custom Widgets in Windows 11.
Download BeWidgets from the Microsoft Store
The interface of the app is really simple, but don’t worry, you’ll have a lot of settings to choose from when creating your custom widget.
By clicking on the New Widget button, you will be able to create a fully customizable widget, starting from a certain preset, or even from nothing.
In the Layouts section, you will be able to save multiple layouts of widgets to which you will be able to come back later on.
In the Settings section, you have some general settings of the app and also some appearance settings that you can choose from, including Dark Mode which I will be using throughout this article.
When creating a new widget, you can select a certain preset, and then on the Customize button, you have unlimited options of personalizing the created widget.
You can fully customize the position, size, appearance, and style of the widget. The only limitation is your own imagination.
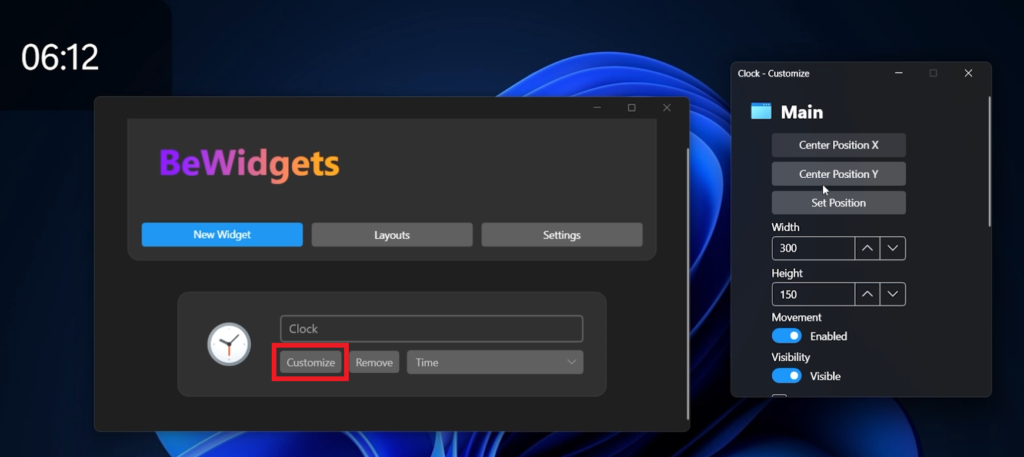
And of course, you can move the widget freely wherever you want, on your screen.
By enabling the Always on top option, you can even have your widgets always on top, regardless of the windows that you currently have opened on your computer.

For a more in-depth explanation, and tutorial you can watch the video below from the youtube channel.
Introduction
In this article, I have described the steps to
create a Windows Gadget. I have demonstrated the article with an example of a
digital clock gadget.
Gadgets
Gadgets are small applications that are hosted on the Windows Sidebar. Windows
Gadgets are simply made up of HTML and JavaScript code. User-created gadgets are stored in the following folder:
C:\Users\<current
user>\AppData\Local\Microsoft\Windows Sidebar\Gadgets
Every gadget is stored in its own folder under the above-mentioned folder. The
folder name should be the same as the gadget name followed by the .gadget
extension. Every gadget has two files associated with it. One is an HTML file
with embedded JavaScript code to provide the functionality of the gadget. The
other file is an XML file called gadget.xml and is also known as the gadget
manifest.
Example Code
In the HTML file, the style element is used to
specify the layout and format of the gadget. The script element is used to
specify the content and working of the gadget. Finally, a span element is used to
display the gadget.
Following is the HTML/JavaScript code for
our digital clock gadget (DigitalClock.html)
- <html>
- <head>
- <title>Digital Clock</title>
- <style>
- body
- {
- margin: 0;
- width: 130px;
- height: 65px;
- }
- #gadgetContent
- {
- width: 130px;
- top: 24px;
- text-align: center;
- position: absolute;
- font-family: Verdana;
- font-size: 10pt;
- }
- </style>
- <script language=«javascript»>
- function showtime()
- {
- var now=new Date(); // Find current date
- var h=now.getHours(); // Find current hour
- var m=now.getMinutes(); // Find current minute
- var s=now.getSeconds(); // Find current second
- h=(h<10)?»0″+h:h; // Convert hour to 2 digits
- m=(m<10)?»0″+m:m; // Convert minute to 2 digits
- s=(s<10)?»0″+s:s; // Convert second to 2 digits
- gadgetContent.innerHTML=«<h2><font color=’red’>»+h+»:</font>
- <font color=‘lime’>«+m+»:</font><font color=‘cyan’>«+s+»</font></h2>«;
- // Set time on the span element
- setTimeout(«showtime()»,1000); // Display time after every one second
- }
- </script>
- </head>
- <body onload=«showtime()» bgcolor=«black»>
- <span id=«gadgetContent»></span>
- </body>
- </html>
The gadget manifest file is an XML file which
describes the properties of the gadget.
Following is the code of the gadget.xml file:
- <?xml version=«1.0» encoding=«utf-8» ?>
- <gadget>
- <name>DigitalClock</name>
- <namespace>Example.Azim</namespace>
- <version>1.0.0.0</version>
- <author name=«Azim»>
- <info url=«www.example.com» />
- </author>
- <copyright>Azim</copyright>
- <description>Digital Clock</description>
- <hosts>
- <host name=«sidebar»>
- <base type=«HTML» apiVersion=«1.0.0» src=«DigitalClock.html» />
- <platform minPlatformVersion=«1.0» />
- <permissions>Full</permissions>
- </host>
- </hosts>
- </gadget>
Perform the following steps to add the gadget to
the sidebar.
-
Create a folder called DigitalClock. gadget in
the following folder:
C:\Users\<current user>\AppData\Local\Microsoft\Windows
Sidebar\Gadgets
-
Copy the files DigitalClock.html and
gadget.xml into the DigitalClock.gadget folder. -
Right-click on the sidebar and select Add
Gadgets option. - Select DigitalClockgadget.
Note
I have attached the DigitalClock.html and
gadget.xml files along with this project.
The following figures show how to add the gadget to the sidebar.
Summary
In this article, we learned about creating window gadgets.
Windows 11 is here and one of the first things that an avid Windows user would appreciate is the look and overall design of the Windows shell experience. Everything is centralized and beckons the user even with its minimalist design.
Designers and app creators are using the base design of Windows 11 to explore further customization possibilities, and one of the recent apps to come out is ‘Live Tiles Anywhere’ app. Let’s see what it has to offer and how you can create live tiles (like those on Windows 10) and widgets using ‘Live Tiles Anywhere’ on Windows 11.
What is ‘Live Tiles Anywhere’ app?
Most of us remember ‘Live Tiles’ as that Windows 10 Start Menu feature that never really took off. It’s understandable then that Microsoft didn’t implement it in Windows 11. But the idea behind Live Tiles was not all out of whack.
Live Tiles were square-shaped tiles that contained a picture or a number and showed notifications previews from apps. They also rotated sometimes and had links to starts programs. But their application (no pun intended) was never quite done right and they tended to stay within the Start Menu only.
However, one developer has created a modified version of it – Live Tiles Anywhere – which, as the name suggests, can be used anywhere you like, be it in the Start Menu or as desktop widgets. Let’s see ‘Live Tiles Anywhere’ in action and see how you can create them on Windows 11.
How to install Live Tiles Anywhere on Windows 11
Live Tiles Anywhere is available as an app from the Microsoft Store.
Download: Live Tiles Anywhere on Microsoft Store
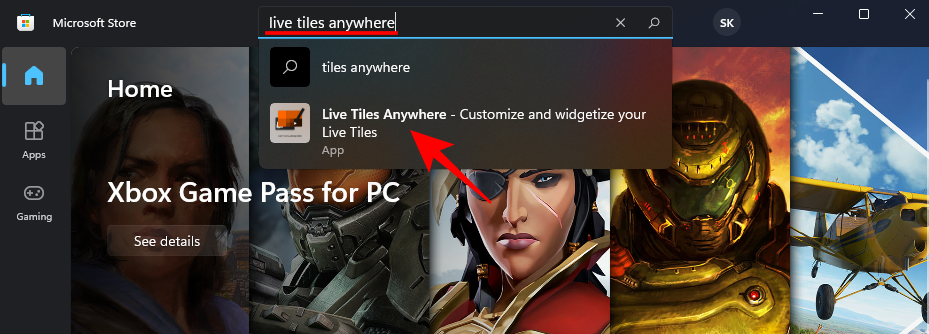
Click on the link above to get Live Tiles Anywhere from your browser. Alternatively, press Start, type ‘store’, and open the Microsoft Store.
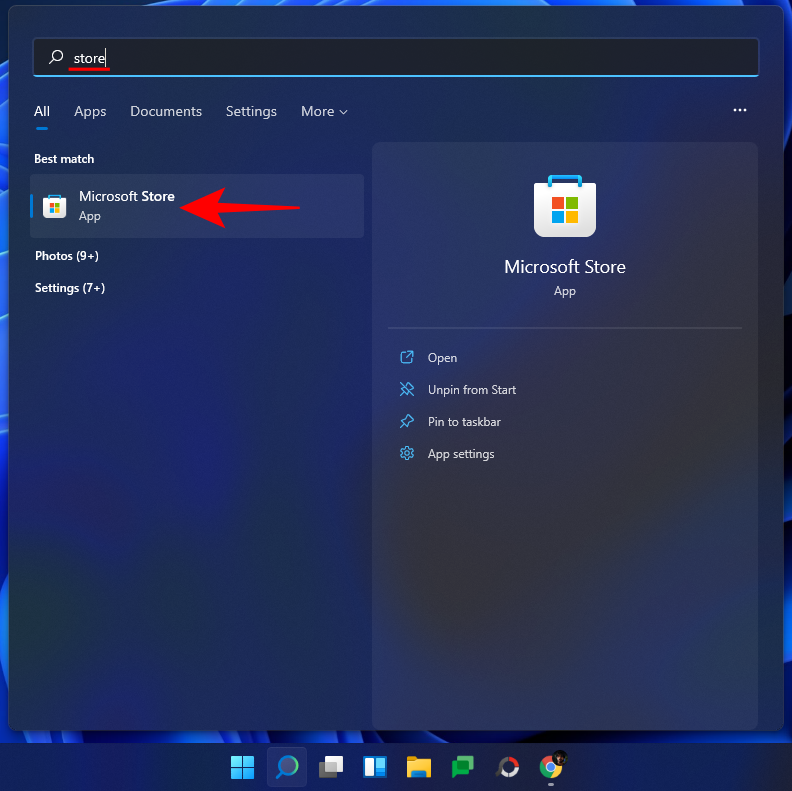
Here, search for Live Tiles Anywhere and select it from the list of available options.
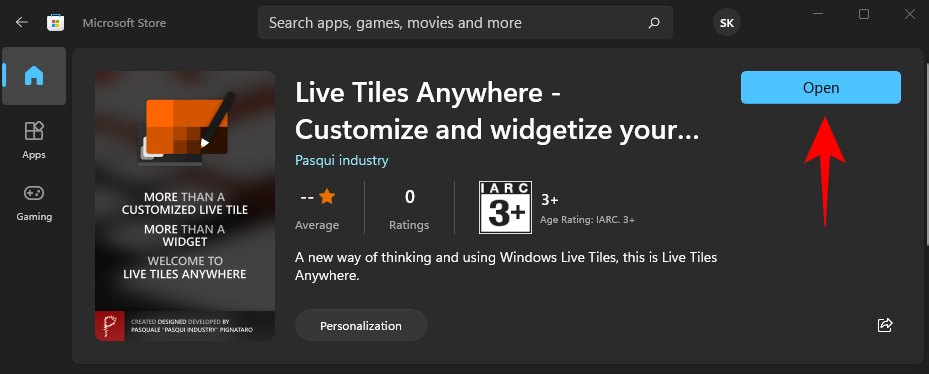
Then click on Get.

Once it’s downloaded and installed, click on Open.
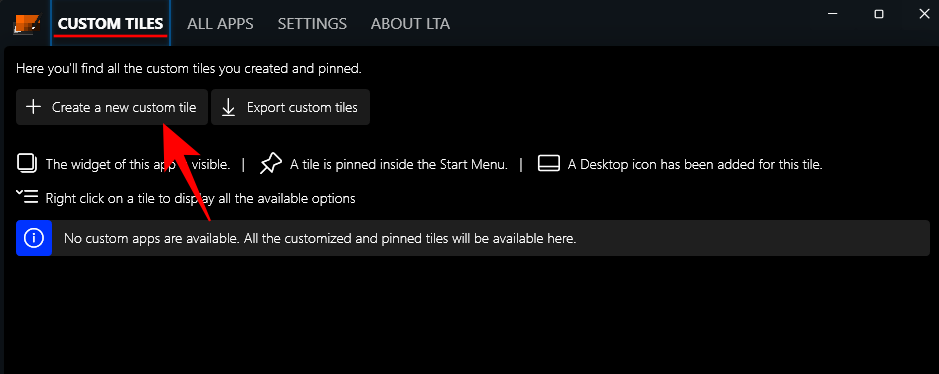
Once Live Tiles Anywhere opens up, you will be under the ‘Custom Tiles’ tab by default. Here, click on Create a new custom tile.
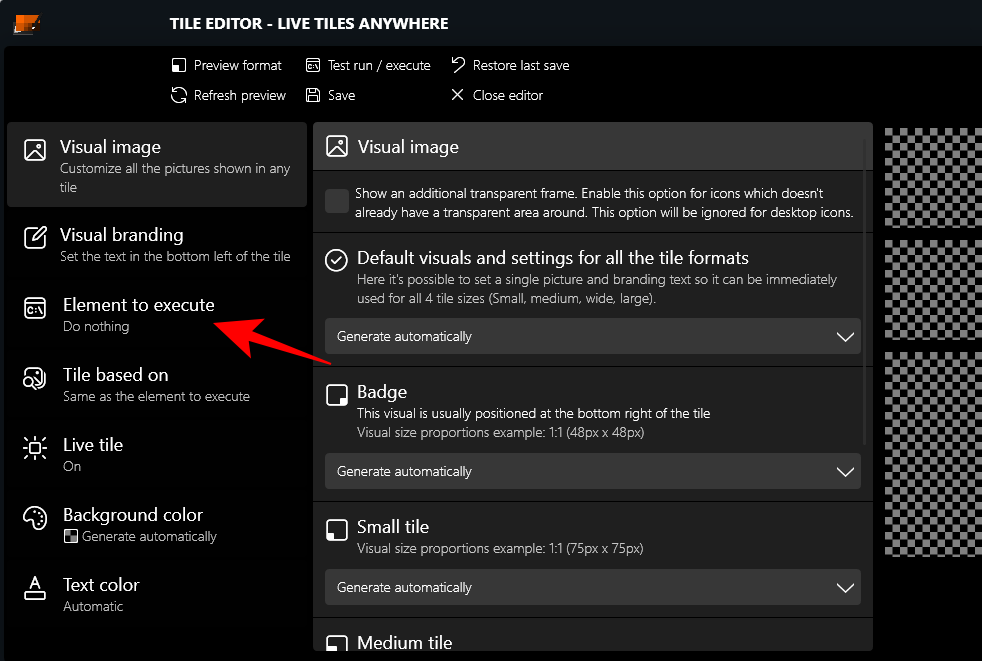
This will bring you to the Tile Editor window. Firstly, click on Element to execute in the left panel.
Here, click on the drop-down menu.
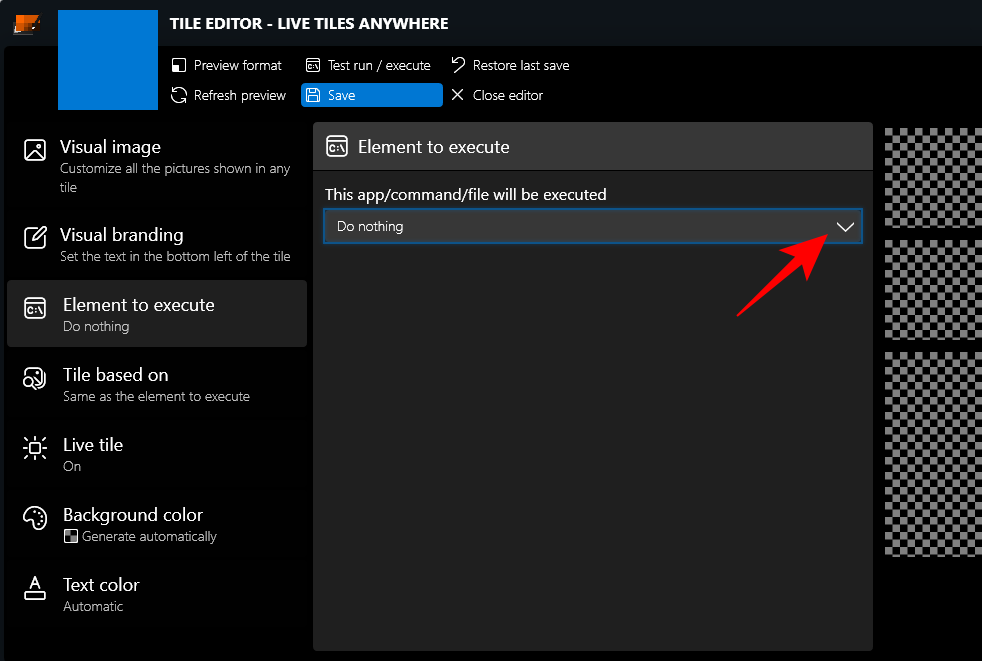
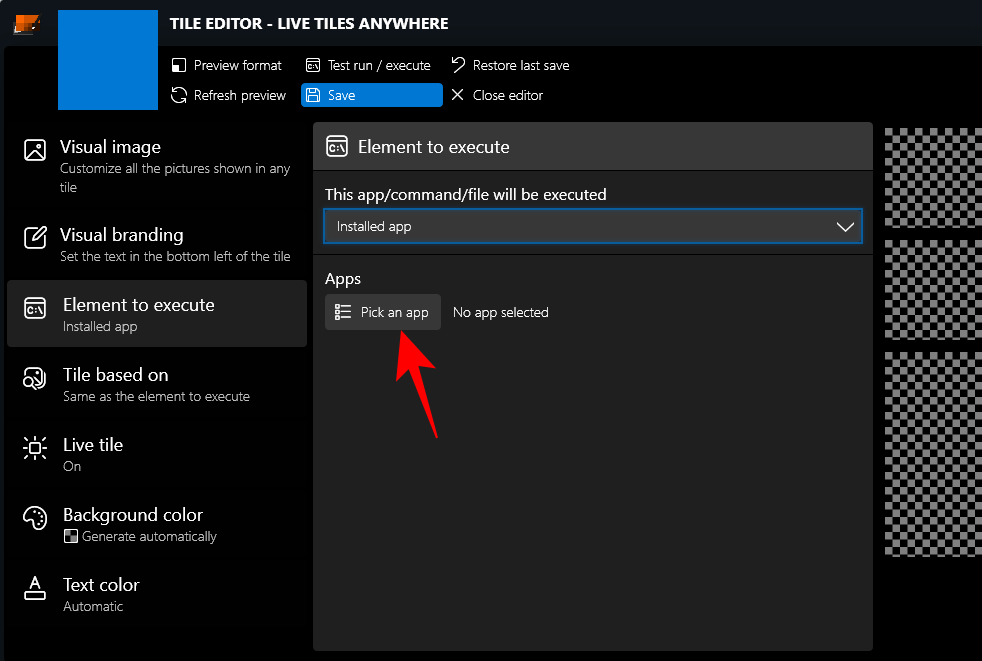
Then select Installed apps.

Then click on Pick an app.
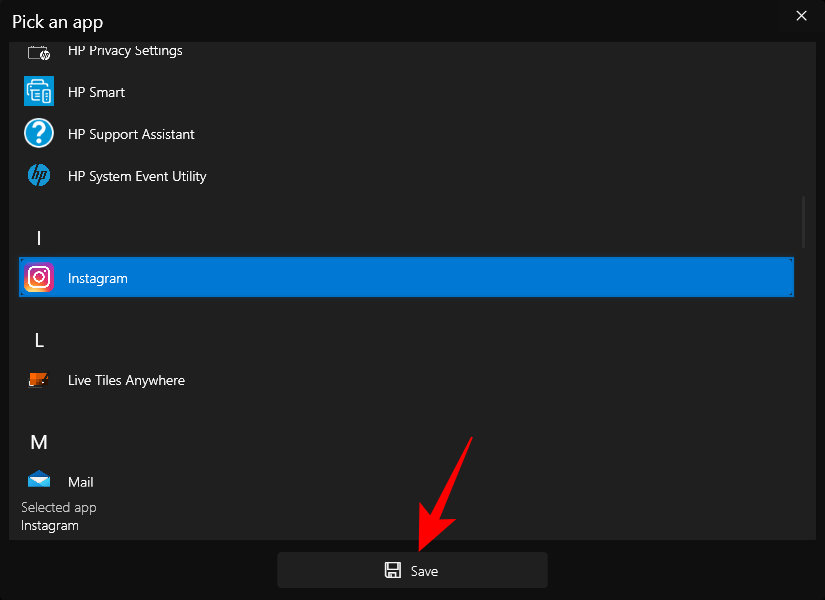
Select an app for your first Live Tile and click on Save.
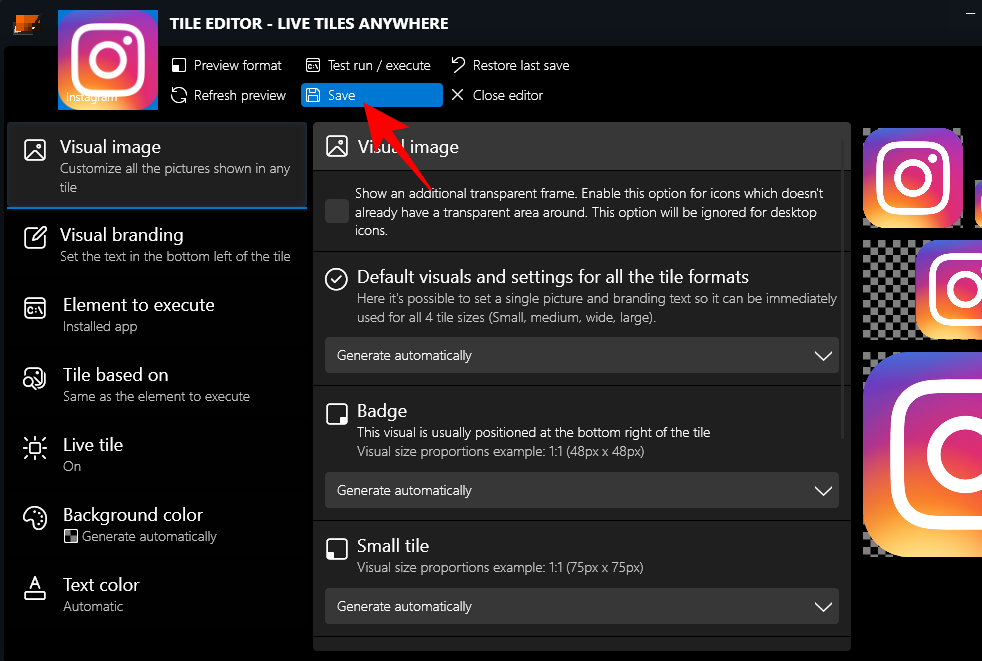
There are a few other customization options such as Background color, text color, visual image, and visual branding, etc. that you can look through.
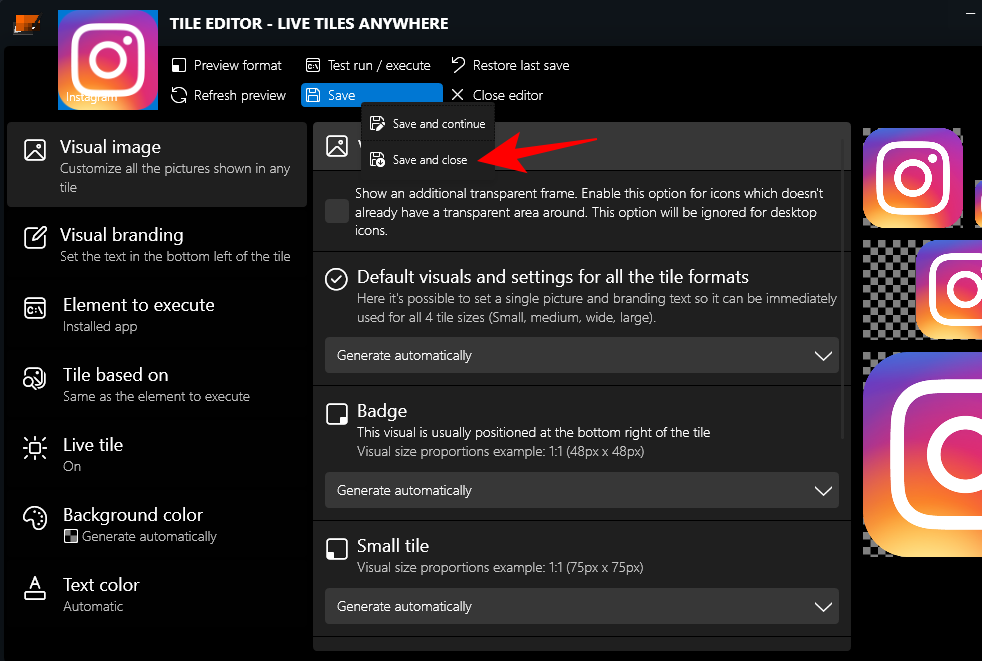
Click on Save to finish.
Then click Save and close.
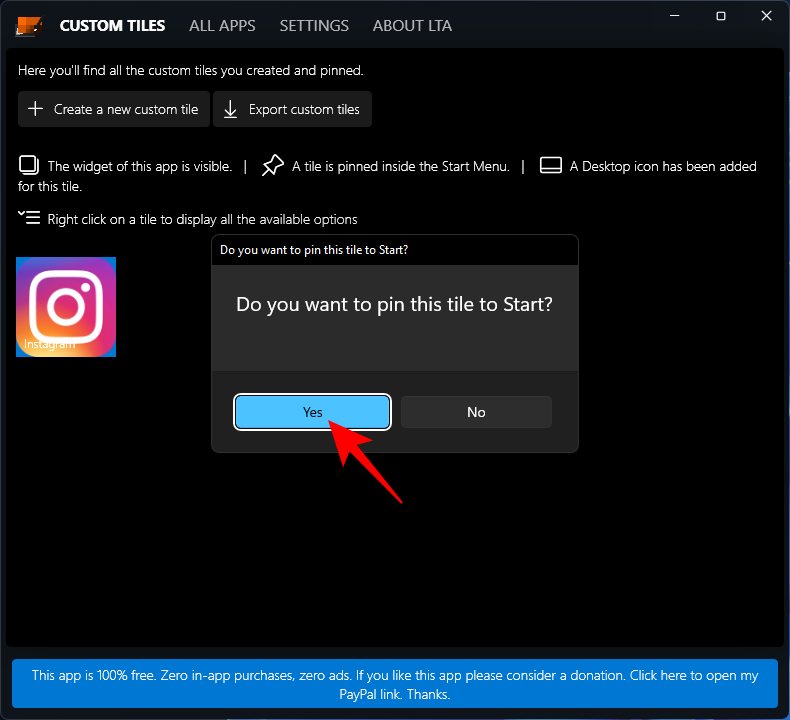
Under the ‘Custom Tiles’ tab, right-click on the tile and click on Pin to the Start Menu.

When prompted, click Yes.
Currently, the app isn’t optimized to show live tiles in the Windows 11 Start Menu nor is it meant to replace its UI components, which use small ‘badges’ as app icons. If you’re using Windows 10, however, you will see it as an actual live tile.
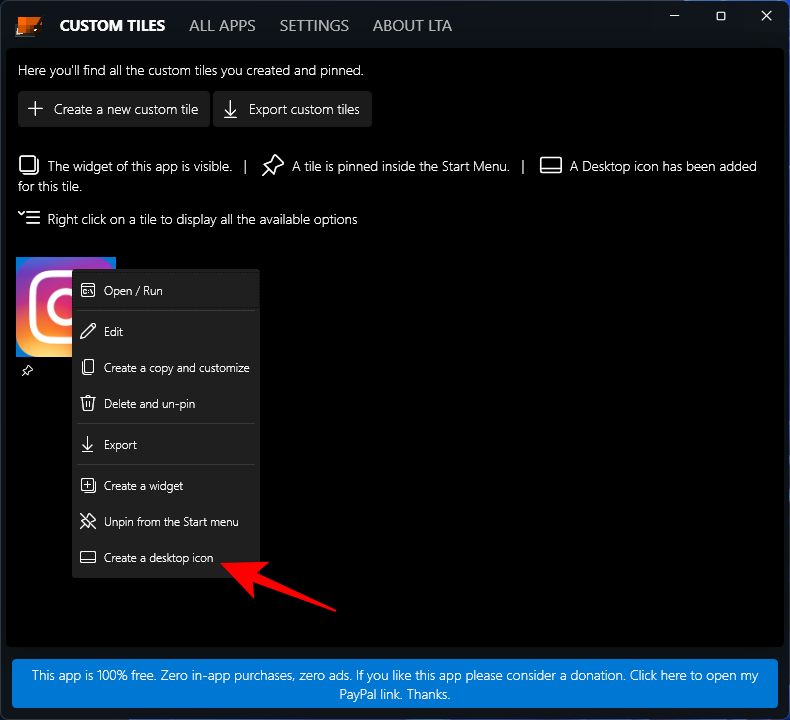
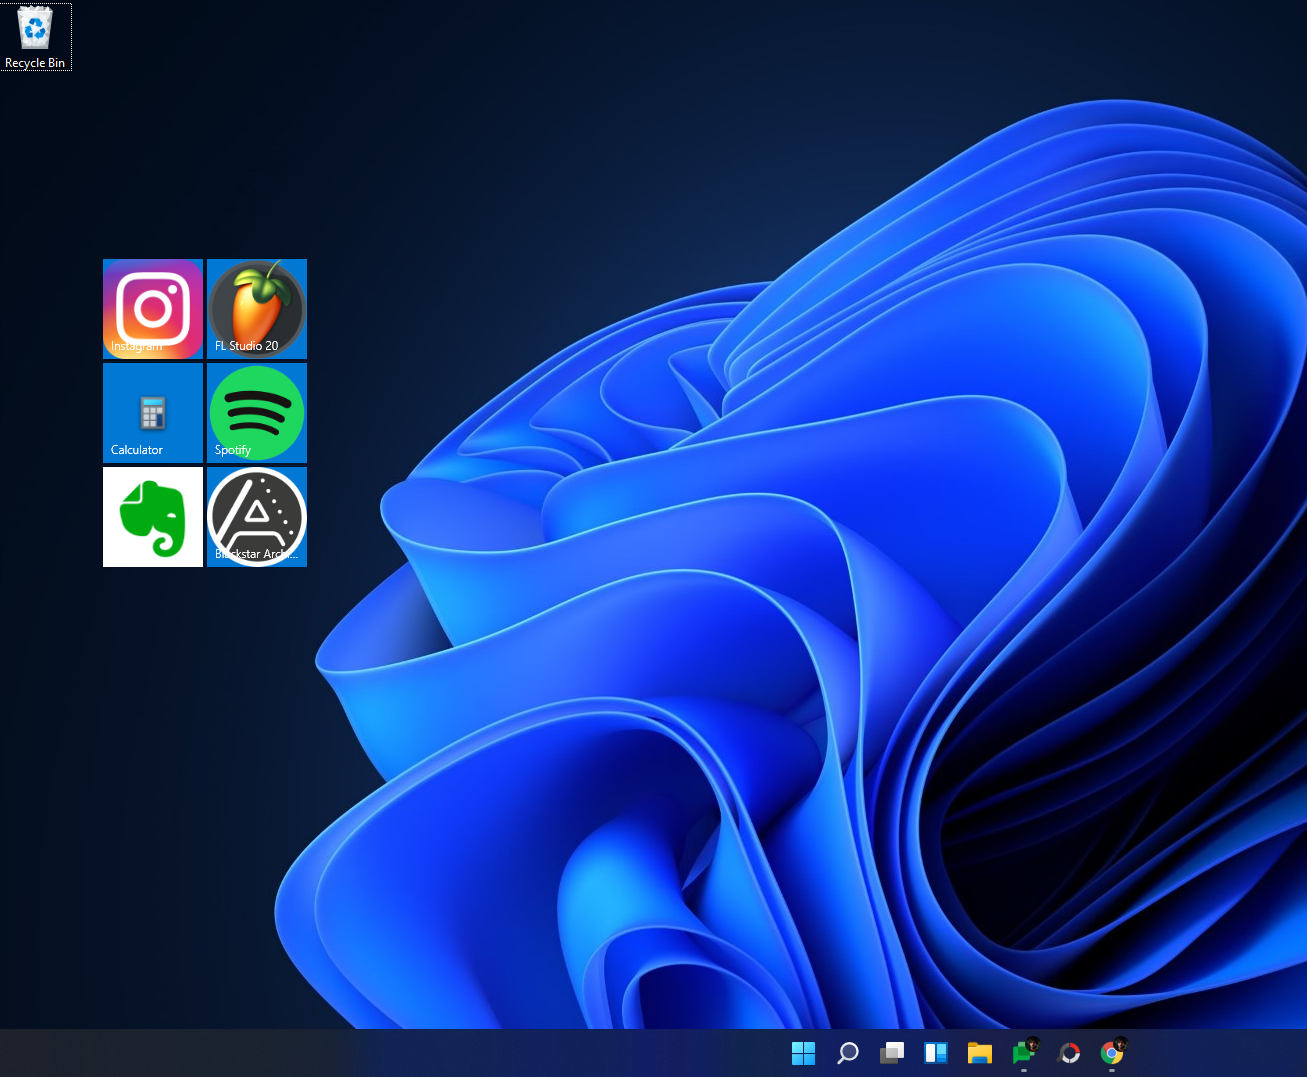
You can also put this tile on the desktop. To do so, right-click the tile and select Create a desktop icon.
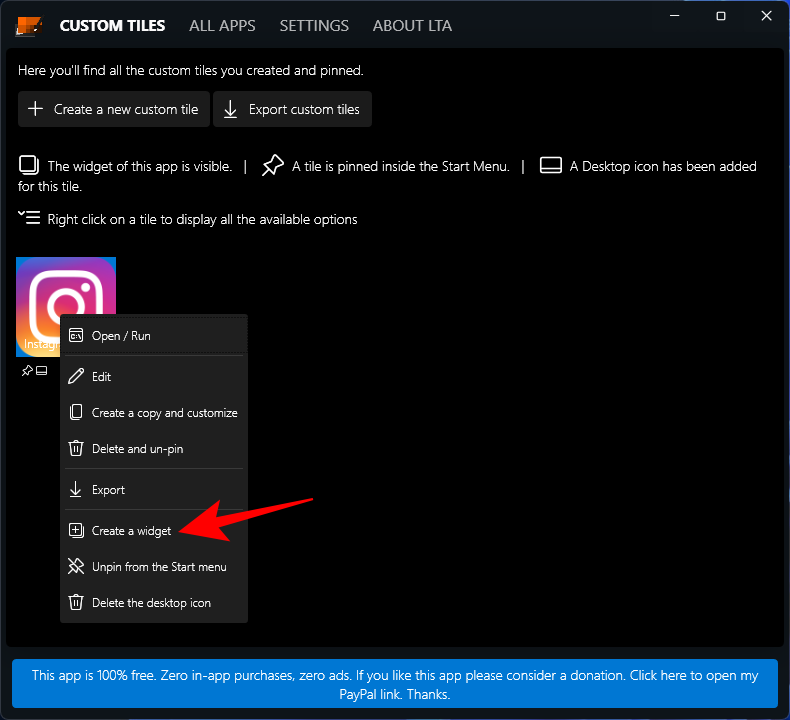
Use Live Tiles as Widgets on Windows 11
Once a custom live tile is created, it can be used as a widget to be placed anywhere on the desktop. To do so, right-click on the live tile and select Create a widget.
Another, quicker way to create a widget on the desktop is to do so without creating a custom live tile. For this, open the ‘Live Tiles Anywhere’ app and go to the ‘All Apps’ tab. Here, search for an app, right-click on it and select Create a widget.
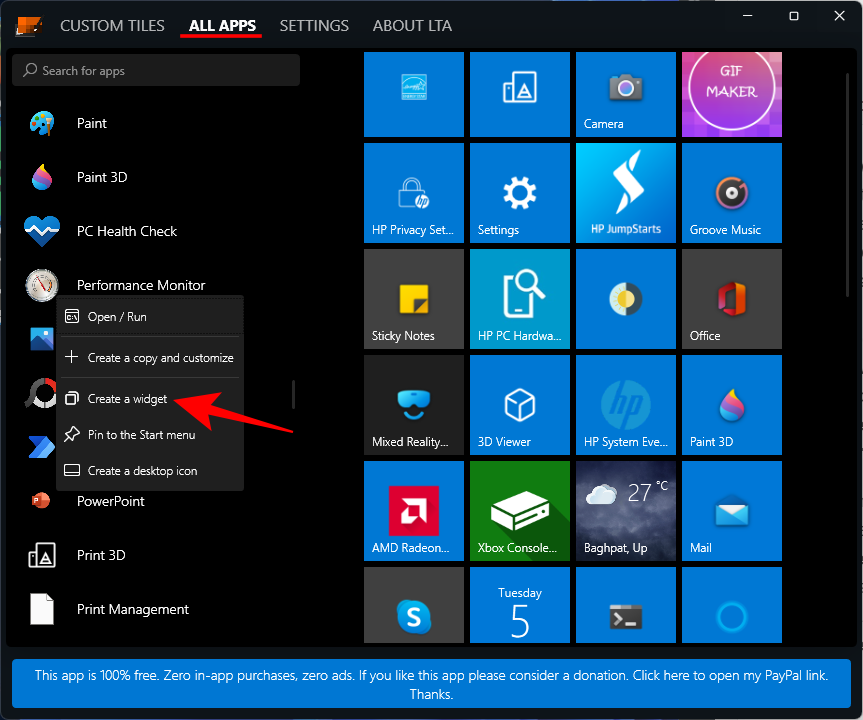
This will directly put the widget on the desktop.
Although not yet perfected, the idea behind the ‘Live Tiles Anywhere’ app has a lot of potential. As the developer makes changes to it, we might see a better version come out soon.
RELATED
- How to Stop the Photos App From Grouping Pictures on Windows 11
- Windows 11 Snap Layouts not working? Here’s how to fix
- How to Set Google Chrome as Default Browser on Windows 11
- How to Change Drive Letter on Windows 11
- How to Make Windows 11 Bootable USB in 4 Easy Steps
- How to Extend Volume Windows 11 or Windows 10
Read Next
Subscribe to Newsletter
Join me on this exciting journey as we explore the boundless world of web design together.
Запись от Storm23 размещена 30.05.2017 в 13:59
Для того, что бы окно постоянно было под всеми другими окнами, нужно менять Z-order окна на значение 1. Это можно сделать следующим кодом:
| C# | ||
|
где Handle — хендл нашего окна.
Поскольку Z-order окна постоянно меняется, нужно вызывать этот код в начале работы и каждый раз когда пользователь активизирует окно.Код для WinForms:
Кликните здесь для просмотра всего текста
| C# | ||
|
Регион Transparency реализует прозрачность окна, Move — позволяет двигать окно за любой участок, а Bottommost — меняет Z-order окна.
Для примера сделаем простенькие Часы (код в присоединенном файле).
Вот так это выглядит на рабочем столе:
Код для WPF:
Кликните здесь для просмотра всего текста
| C# | ||
|
Кликните здесь для просмотра всего текста
| XML | ||
|
Для отправки окна на задний план используется код аналогичный WinForms. Для получения хендла окна используется класс WindowInteropHelper:
| C# | ||
|
Пример Часов — в присоединенном файле.
Выглядит это вот так:
Всего комментариев
|
Новые блоги и статьи
Все статьи Все блоги / |
||||
|
Чем асинхронная логика (схемотехника) лучше тактируемой, как я думаю, что помимо энергоэффективности — ещё и безопасность.
Hrethgir 14.05.2025 Помимо огромного плюса в энергоэффективности, асинхронная логика — тотальный контроль над каждым совершённым тактом, а значит — безусловная безопасность, где безконтрольно не совершится ни одного. . . |
Многопоточные приложения на C++
bytestream 14.05.2025 C++ всегда был языком, тесно работающим с железом, и потому особеннно эффективным для многопоточного программирования. Стандарт C++11 произвёл революцию, добавив в язык нативную поддержку потоков,. . . |
Stack, Queue и Hashtable в C#
UnmanagedCoder 14.05.2025 Каждый опытный разработчик наверняка сталкивался с ситуацией, когда невинный на первый взгляд List<T> превращался в узкое горлышко всего приложения. Причина проста: универсальность – это прекрасно,. . . |
Как использовать OAuth2 со Spring Security в Java
Javaican 14.05.2025 Протокол OAuth2 часто путают с механизмами аутентификации, хотя по сути это протокол авторизации. Представьте, что вместо передачи ключей от всего дома вашему другу, который пришёл полить цветы, вы. . . |
Анализ текста на Python с NLTK и Spacy
AI_Generated 14.05.2025 NLTK, старожил в мире обработки естественного языка на Python, содержит богатейшую коллекцию алгоритмов и готовых моделей. Эта библиотека отлично подходит для образовательных целей и. . . |
|
Реализация DI в PHP
Jason-Webb 13.05.2025 Когда я начинал писать свой первый крупный PHP-проект, моя архитектура напоминала запутаный клубок спагетти. Классы создавали другие классы внутри себя, зависимости жостко прописывались в коде, а о. . . |
Обработка изображений в реальном времени на C# с OpenCV
stackOverflow 13.05.2025 Объединение библиотеки компьютерного зрения OpenCV с современным языком программирования C# создаёт симбиоз, который открывает доступ к впечатляющему набору возможностей. Ключевое преимущество этого. . . |
POCO, ACE, Loki и другие продвинутые C++ библиотеки
NullReferenced 13.05.2025 В C++ разработки существует такое обилие библиотек, что порой кажется, будто ты заблудился в дремучем лесу. И среди этого многообразия POCO (Portable Components) – как маяк для тех, кто ищет. . . |
Паттерны проектирования GoF на C#
UnmanagedCoder 13.05.2025 Вы наверняка сталкивались с ситуациями, когда код разрастается до неприличных размеров, а его поддержка становится настоящим испытанием. Именно в такие моменты на помощь приходят паттерны Gang of. . . |
Создаем CLI приложение на Python с Prompt Toolkit
py-thonny 13.05.2025 Современные командные интерфейсы давно перестали быть черно-белыми текстовыми программами, которые многие помнят по старым операционным системам. CLI сегодня – это мощные, интуитивные и даже. . . |