
Возвращаем классические обои, меню «Пуск» и интерфейс Aero
Обои
Меню «Пуск»
Windows Aero
Обои
Меню «Пуск»
Windows Aero
Многие не хотят переходить на Windows 10 потому, что привыкли к интерфейсу семерки. К счастью, облегчить переход помогут сторонние средства, которые сделают новую операционную систему похожей на предшественницу.
Прежде чем начать, мы рекомендуем вам запоминать место установки всех программ из этого материала или даже собрать их в одну папку. Впоследствии вы сможете все удалить и восстановить стандартный вид Windows 10.
Обои
Самый простой способ сделать Windows 10 похожей на предыдущую версию — установить привычные обои. Если вы, конечно, пользовались стандартным набором. Сборник официальных обоев Windows 7 можно найти на сайте wparena.com.

Также можно установить стандартный синий цвет рабочего стола, который шел с классической темой. В предустановленных наборах цветов его нет, но можно настроить самостоятельно.
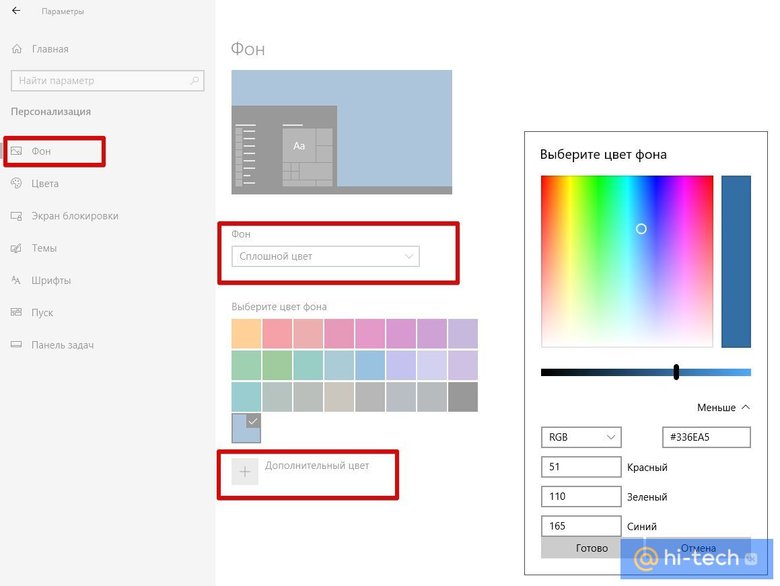
Нажмите Win + R и выберите пункт «Персонализация». На вкладке «Фон» выберите в качестве обоев «Сплошной цвет» и нажмите «Дополнительный цвет», который расположен ниже стандартной палитры. Раскройте дополнительные параметры, нажав «Больше» и установите все, в соответствии со скриншотом. Код для классического синего цвета в системе RBG будет такой: 51, 110, 65.
Меню «Пуск»
В Windows 10 можно вернуть привычное меню «Пуск». Эксперименты в Windows 8 понравились не всем, и в Windows 10 меню хоть и вернулось, но все равно не в классическом виде. К счастью, его можно легко вернуть при помощи программы Open-Shell-Menu. После установки программы нажмите на меню «Пуск», чтобы настроить его вид.
Сама программа только на английском языке, но меню будет работать на русском. По умолчанию используется язык системы.

Кликнув правой кнопкой на меню, можно повторно вызвать настройки программы. Кроме того, вам всегда доступно и стандартное меню Windows 10. Кнопка для перехода в него находится в самом верху списка.
К сожалению, в программе нет замены для кнопки «Пуск». Можно установить классический стиль или собственную версию с ракушкой. Однако все же есть возможность загрузить сторонние изображения.
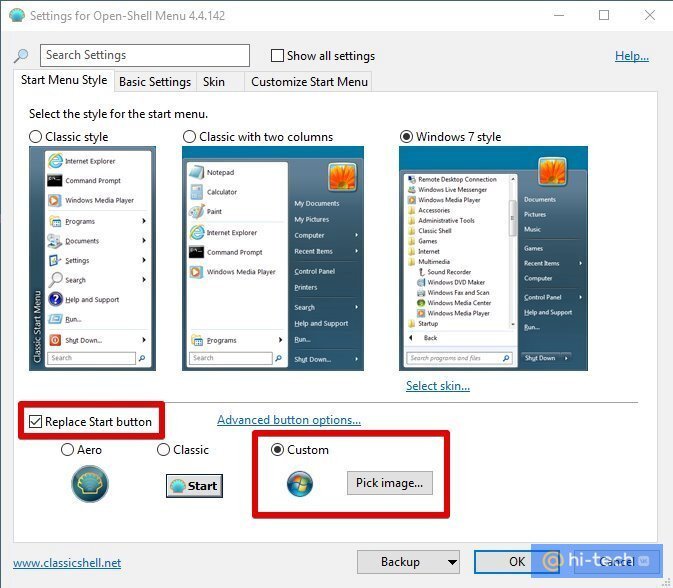
Скачайте дополнительный набор иконок для кнопки на форуме программы. Распакуйте их и зайдите в Open-Shell-Menu. Отметьте галочку Replace Start Button и выберите Custom. Теперь нажмите кнопку Pick Image и загрузите подходящее изображение.
Windows Aero
Следующий шаг — вернуть интерфейс Aero. Его убрали еще в Windows 8, и так и не вернули в 10-й. Тем не менее можно сделать похожий эффект сторонними средствами.
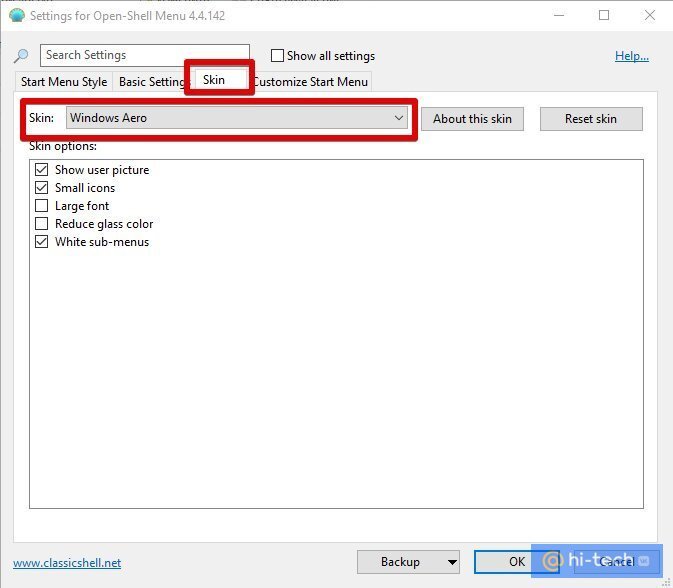
Все в той же программе Open Shell зайдите на вкладку Skin. Выберите Windows Aero в выпадающем списке и нажмите ОК. В результате интерфейс переключится на стиль Aero.
Что касается эффектов прозрачности, то можно попробовать программу Aero Glass. Обратите внимание, что нужно скачивать именно ту версию, которая подходит к вашей системе. Например, есть версии, работающие только на Windows 8.

Кроме того, в качестве альтернативы или дополнения установите крошечную программу Glass2K. С ее помощью можно настроить эффекты прозрачности для окон и панели задач.
- Остаемся на Windows 7. Как обезопасить систему без обновлений
- Как активировать темную тему в Google Chrome
К 2019 году около 40% всех пользователей компьютеров работали на ОС Windows 10. Но еще в конце 2018 года большинство все еще предпочитало использовать предыдущую версию, Windows 7. «Семерка» получилась удобной, понятной и устойчивой. Неудивительно, что пользователи не спешат с ней расставаться ради продвинутой и более безопасной «десятки», в которой оказалось немало непривычных и откровенно неудобных элементов.
ПО ТЕМЕ: Как настроить Windows, чтобы извлекать USB-флешки и накопители без использования «Безопасного извлечения».
На самом деле есть способ получить от продуктов компании все самое лучшее, сохранив эстетику Windows 7, но не жертвуя при этом всеми преимуществами, предоставляемыми «десяткой». Просто «включить режим Windows 7» не получится, зато есть несколько возможностей внешне изменить систему с помощью встроенных инструментов или стороннего программного обеспечения. Перед началом косметических изменений Windows 10 стоит создать в ней точку восстановления, чтобы иметь возможность вернуться к изначальному состоянию системы.
ПО ТЕМЕ: Лучшие «облака» без регистрации, или как удобно передавать файлы между iPhone, Android, Mac и Windows.
Как изменить меню «Пуск» в Windows 10
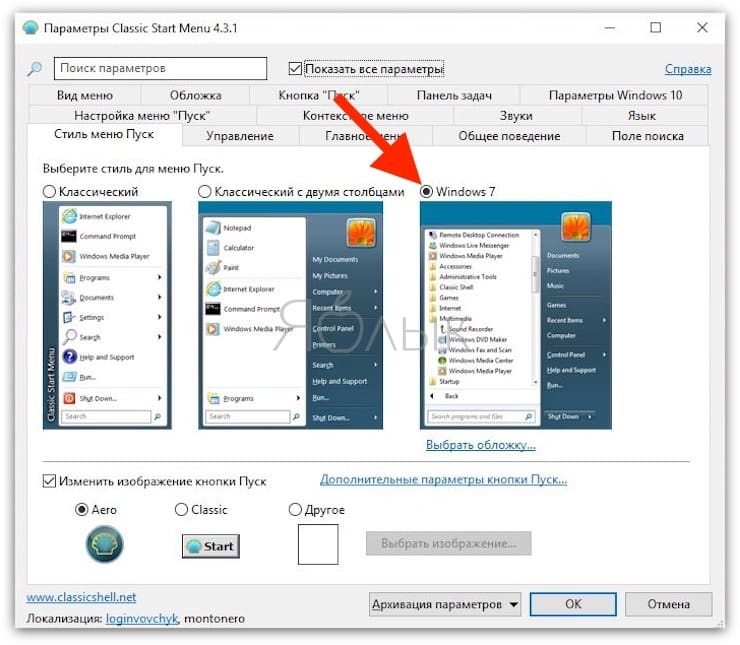
1. Для изменения этого элемента дизайна понадобится бесплатный инструмент Classic Shell. Доступна к скачиванию и его русскоязычная версия. Classic Shell способен изменить меню «Пуск» Windows 10 к виду, представленному в Windows 7. После установки в главной вкладке программы будет предложено сменить и стиль для меню «Пуск», и сам внешний вид классической кнопки. Сразу рекомендуем поставить галочку на поле «Показать все параметры».
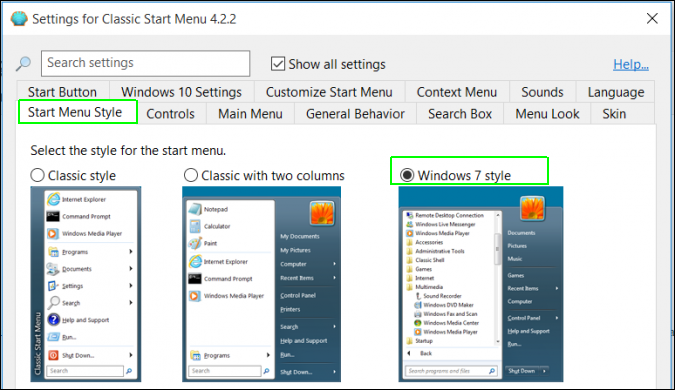
2. На этом шаге выберите самый правый вариант стиля «Windows 7», а в качестве изображения кнопки «Пуск» выбрать вариант «Другое».
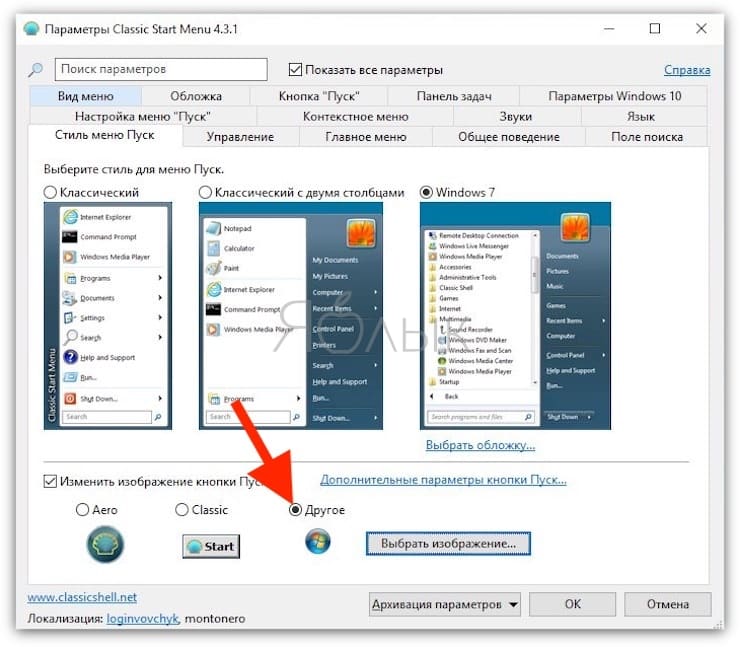
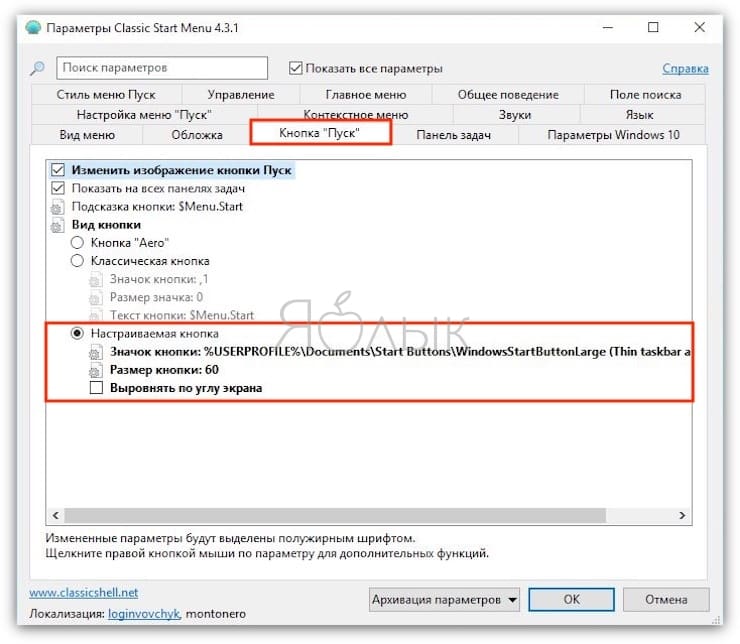
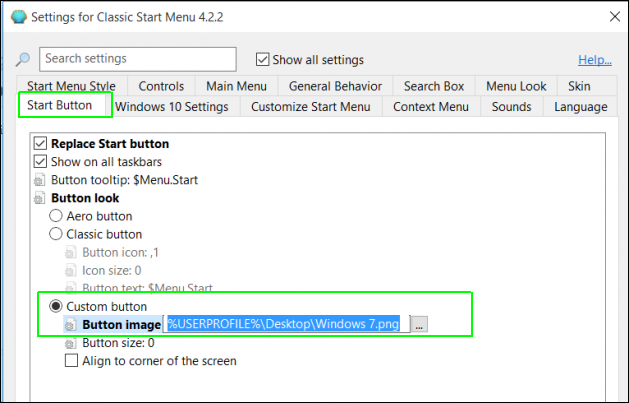
3. Скачайте стандартные иконки для этой кнопки. После этого выберите одну из них в качестве изображения. Обратите внимание, что с большой вероятностью придется подкорректировать размер кнопки. Она может оказаться слишком большой для текущего разрешения экрана и выходить за пределы панели задач. Понадобится перейти во вкладку «Кнопка «Пуск» или нажать на ссылку «Дополнительные параметры кнопки «Пуск» и там настроить размеры этого элемента.
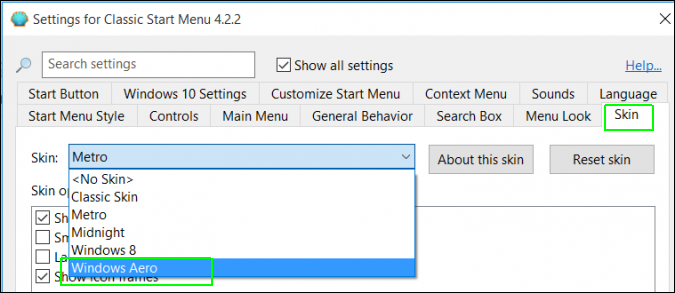
4. На вкладке «Обложка» выберите «Windows Aero».
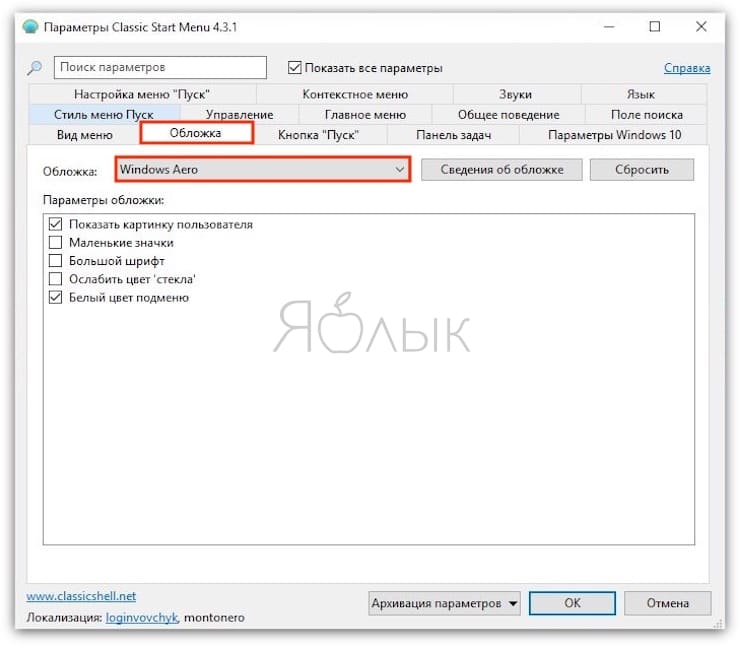
5. Нажмите ОК и любуйтесь изменениями.
ПО ТЕМЕ: Ошибка «разрушительный сбой 0х8000FFFF» на Windows, как исправить?
Как поменять обои рабочего стола в в Windows 10
1. Чтобы установить стандартные обои Windows 7, загрузите изображение отсюда.
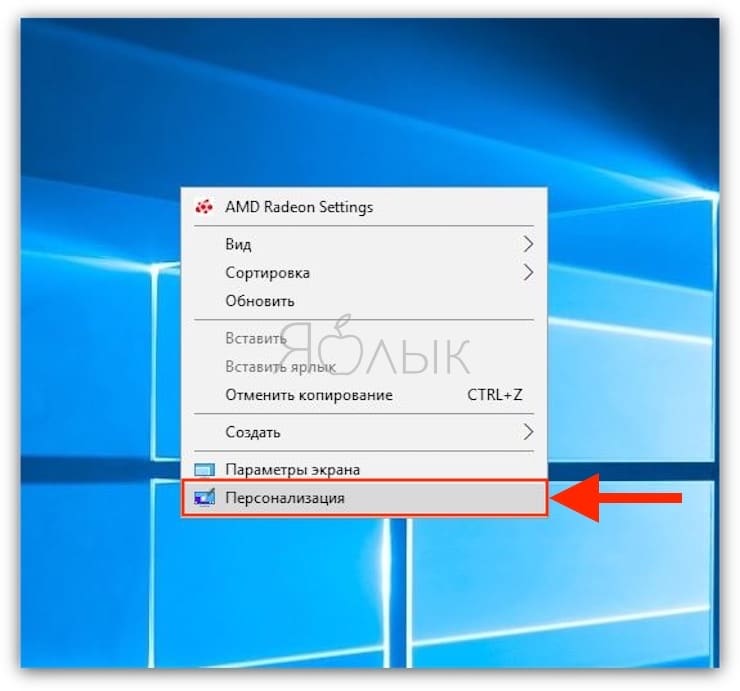
2. Кликните по рабочему столу правой кнопкой мыши и берите раздел «Персонализация».
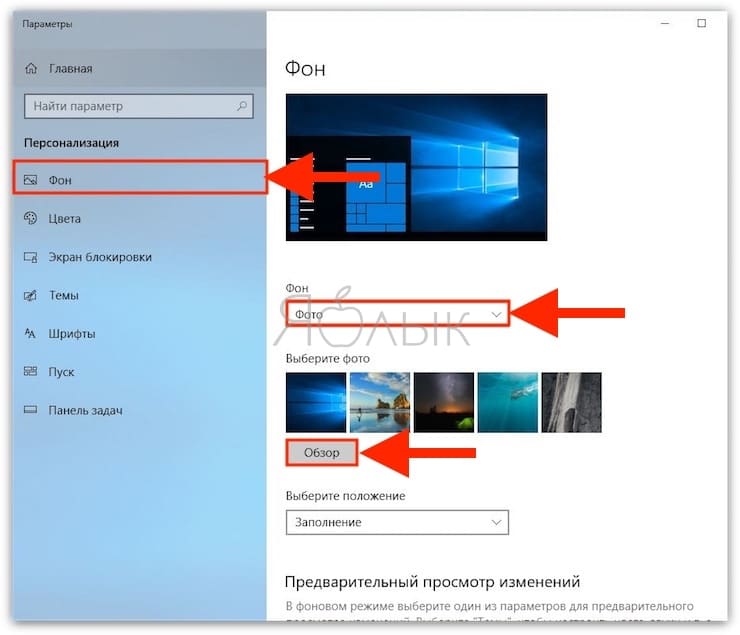
3. В левом столбце появившегося меню по умолчанию будет выбран раздел «Фон». Убедитесь, что в качестве фона выбрано «Фото», а затем нажмите кнопку «Обзор», чтобы выбрать загруженные ранее обои.
ПО ТЕМЕ: 32- или 64-битная Windows: какая разница и какую систему нужно устанавливать?
Как скрыть Кортану и панель задач в Windows 10
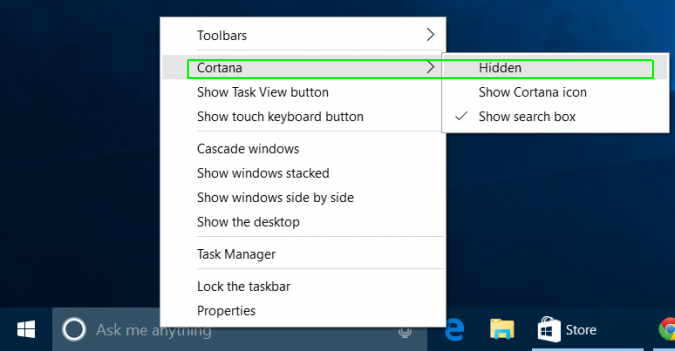
1. Кликните правой кнопкой мыши на панели задач и выберите Cortana, а затем «Скрыто» для удаления голосового ассистента Microsoft. Но это актуально для англоязычной версии Windows
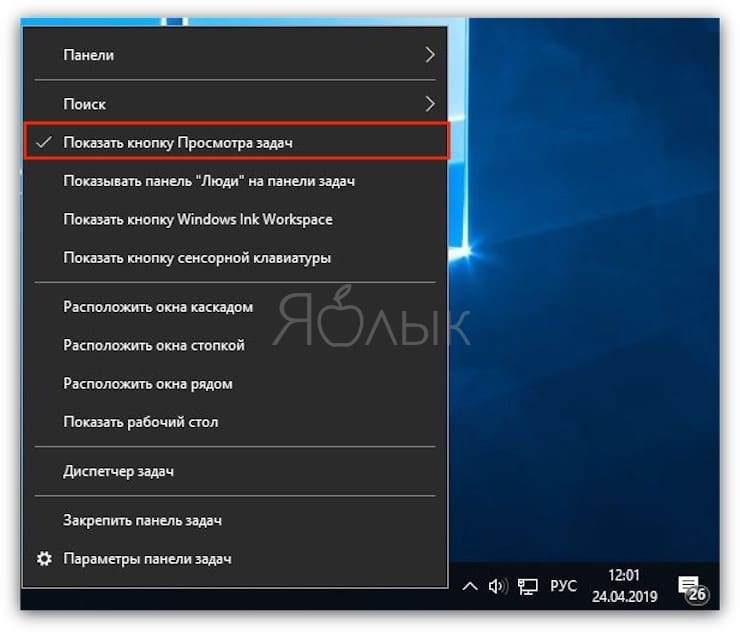
2. Кликните правой кнопкой мыши на панели задач и снимите галочку с пункта «Показать кнопку просмотра задач» для отключения этой функции.
ПО ТЕМЕ: Как ускорить Windows 10, 8 или 7, отключив ненужные службы операционной системы.
Как изменить цветовую палитру в Windows 10
1. Кликните по рабочему столу правой кнопкой мыши и берите раздел «Персонализация».
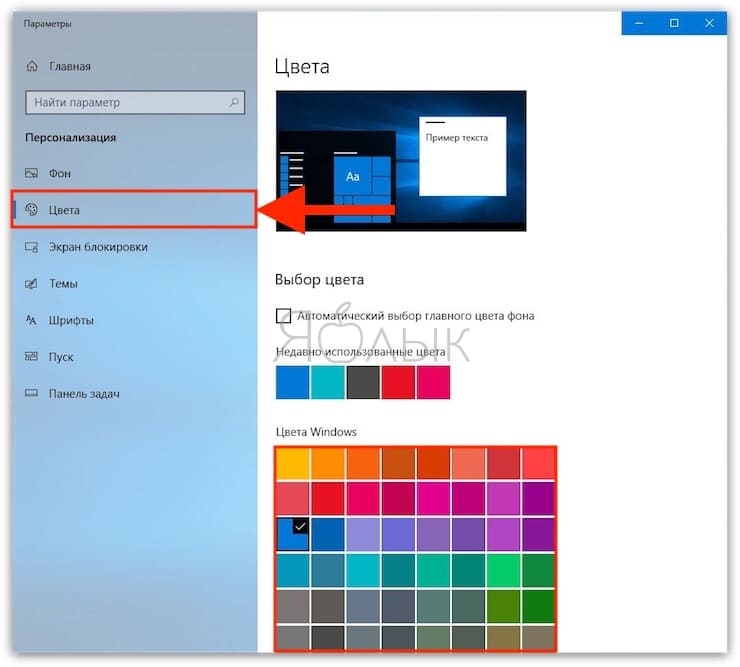
2. Выберите раздел «Цвета» в левой колонке.
3. По умолчанию в Windows 10 установлен темно-синий цвет. Установите желаемый цвет.
4. Теперь включите цвета заголовков окон. Для этого в нижней части панели в разделе «Другие параметры» активируйте поле «В заголовках окон».

ПО ТЕМЕ: Как автоматически переключать язык (раскладку) на клавиатуре в macOS или Windows.
Как поменять местами Microsoft Edge с Internet Explorer в Windows 10
Microsoft Edge является новым браузером, вызываемым по умолчанию в Windows 10. Но он совсем не похож на привычный многим Internet Explorer. Вернуть его можно так.
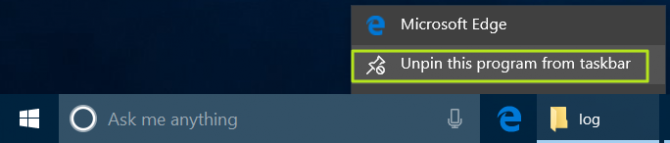
1. Щелкнуть правой кнопкой мыши по значку Microsoft Edge на панели задач и выбрать пункт «Открепить от панели задач».
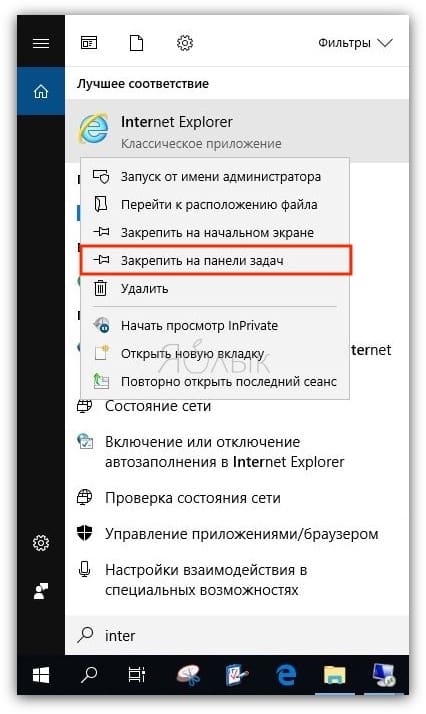
2. С помощью меню «Пуск» или панели поиска найдите Internet Explorer.
3. Нажмите на значке программы правой кнопкой мыши и выберите «Закрепить на панели задач».
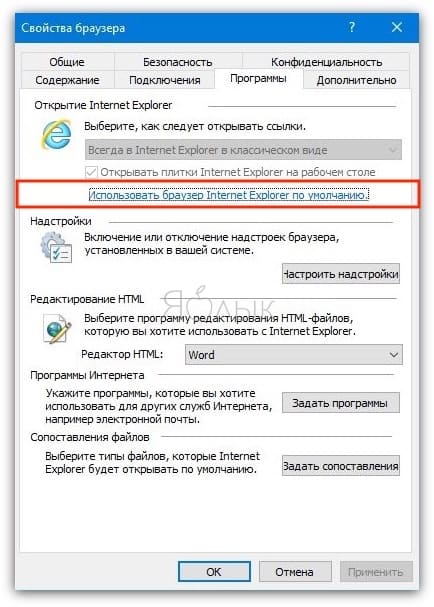
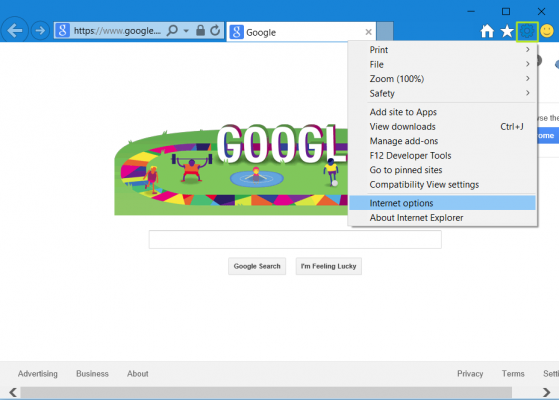
4. Теперь запустите это приложение, перейдите в меню «Инструменты», обозначенное шестеренкой в правом верхнем углу, и выберите «Свойства браузера».
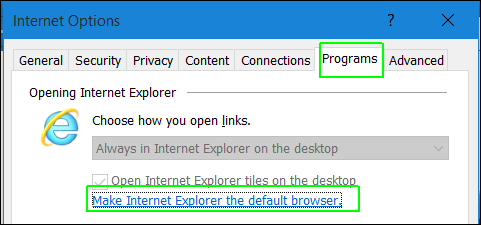
5. После появления окна с параметрами программы перейдите во вкладку «Программы».
6. На этой панели нажмите на ссылку «Использовать браузер Internet Explorer по умолчанию».
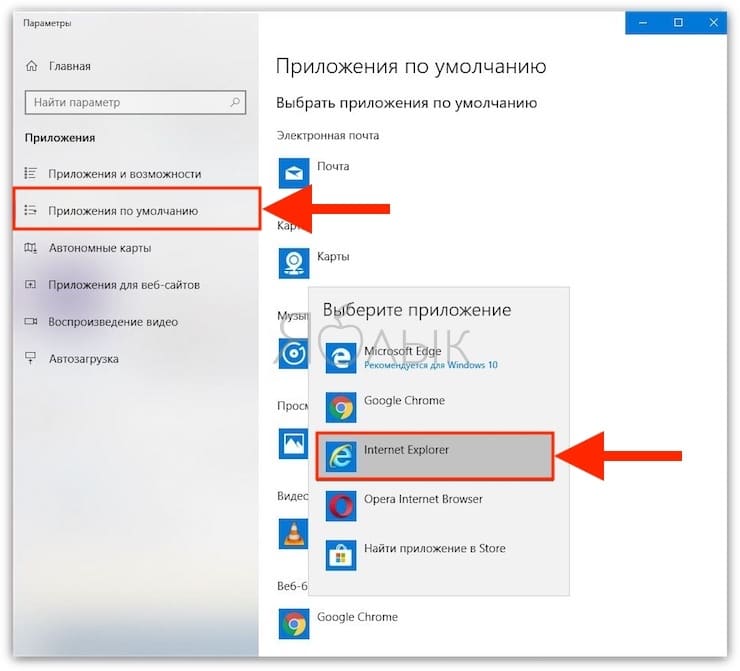
7. Появится окно настройки приложений. В разделе «Приложения по умолчанию» найдите поле Веб-браузер и в нем выберите Internet Explorer. Заметьте, что для Windows 10 система рекомендует воспользоваться Microsoft Edge.
ПО ТЕМЕ: Как установить видеозаставки с Apple TV на Windows и Mac.
Дополнительные действия по превращению внешнего вида Windows 10 в Windows 7
Настроить систему можно с помощью нескольких дполнительных действий. Пользователю они станут доступными в результате работы с программой OldNewExplorer. Она скачивается в виде RAR-файла, поэтому для работы с ней понадобится программа-архиватор. После распаковки запустите файл OldNewExplorerCfg.exe и поменйте в появившемся окне следующее:
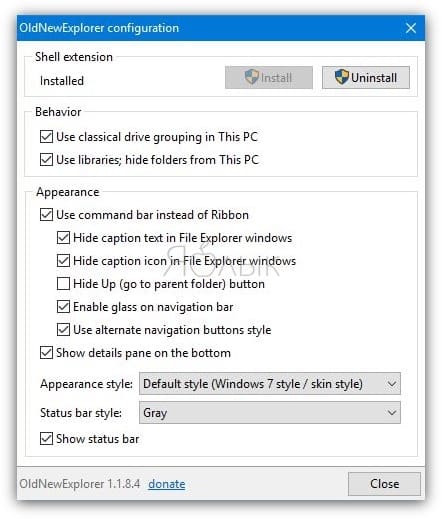
1. Выберите пункт Use classical drive grouping in This PC для классического отображения дисков.
2. Выберите пункт Use libraries; hide folders from This PC.
3. Выберите пункт Use command bar instead of Ribbon для использования командной панели вместо ленты.
4. Выберите пункт Show details pane on the bottom для нижнего расположения панели со сведениями.
5. Для выбора внешнего стиля системы есть три допустимых параметра: По умолчанию, Серебряный кремовый и Плоский белый.
6. Выберите серый стиль оформления для строки состояния.
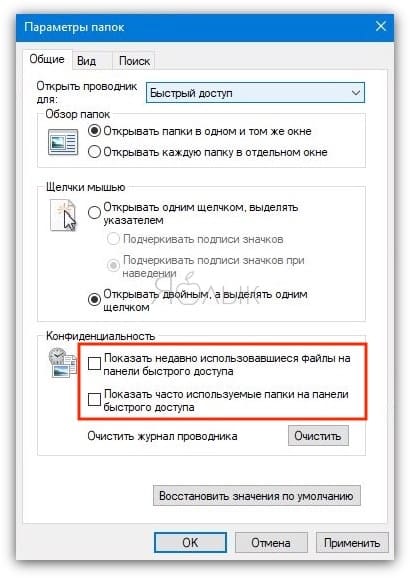
7. Откройте Проводник. Перейдите в меню Сервис → Параметры папок. На вкладке «Общие» в раскрывающемся меню «Открыть проводник для» выберите «Этот компьютер».
8. На той же вкладке «Общие» снимите флажок с пункта «Показать недавно использовавшиеся файлы на панели быстрого доступа».
9. Снимите флажок с пункта «Показать часто используемые папки на панели быстрого доступа».
Смотрите также:
- Как бесплатно скачать программу Google Планета Земля Pro для Mac и Windows (раньше стоила 25 000 руб).
- Как прочитать форматированную (HFS+ и APFS) на Mac флешку в Windows: 4 способа.
- Как изменялась Windows с 1985 года (скриншоты всех версий).
While some people feel that Windows 10 and 11 have an appealing look, others appreciate the old days and the more classic Windows 7 look. If dealing with the appearance of Windows 10 has had you down or Windows 11 has you wishing for a callback to the traditional Window look, you have options!
The good news is that Windows 10 and Windows 11 are highly customizable, so you can engineer their design to look nearly the same as Windows 7. With a few tweaks to elements like wallpaper, color scheme, and default browser, you’ll be back to a Windows 7 look and feel in no time.
Change the Start menu on Windows 10
Step 1: A download called Classic Shell once allowed you to change key menu aspects to look more like Windows 7. Unfortunately, support for Classic Shell ended in 2017, but the code was picked up and continued with Open Shell, which you can download here.
With this free tool, you can modify the Windows 10 Start menu to resemble the version that came with Windows 7. Once installed, you’ll see six entries on your Start menu listed under Classic Shell. Here, you will want to choose the Classic Start menu settings.
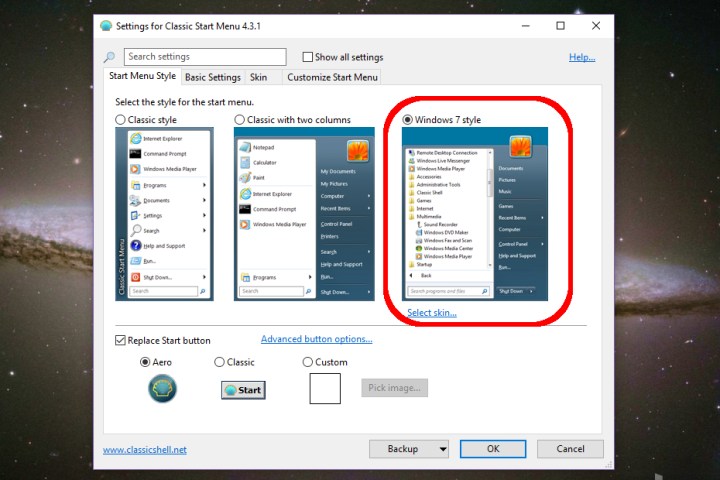
Image used with permission by copyright holder
Step 2: On the Start menu style tab, choose the Windows 7 style.
Step 3: Next, head here to download the Windows 7 Start Menu orb (these are image files, so you can pick them up from many different places if you prefer). Once downloaded, choose Custom near the bottom of the Start menu style tab and select the downloaded image. You may need to tweak the button size — we used 60 given the default setting was too large for our desktop resolution.
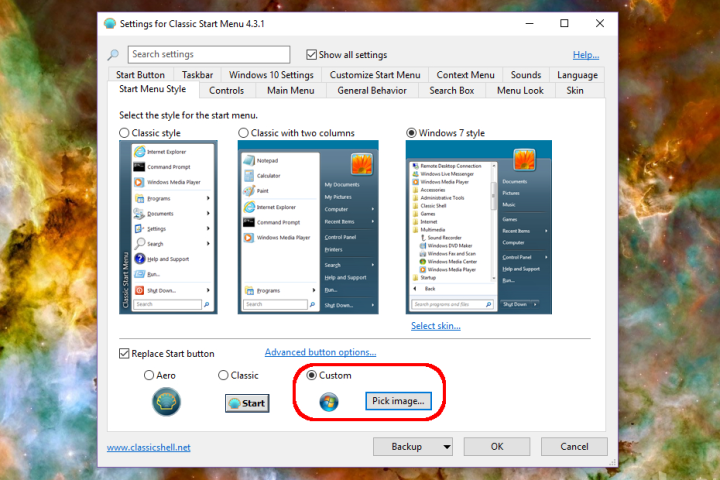
Image used with permission by copyright holder
Step 4: On the Skin tab, choose Windows aero. Select OK to finish up.
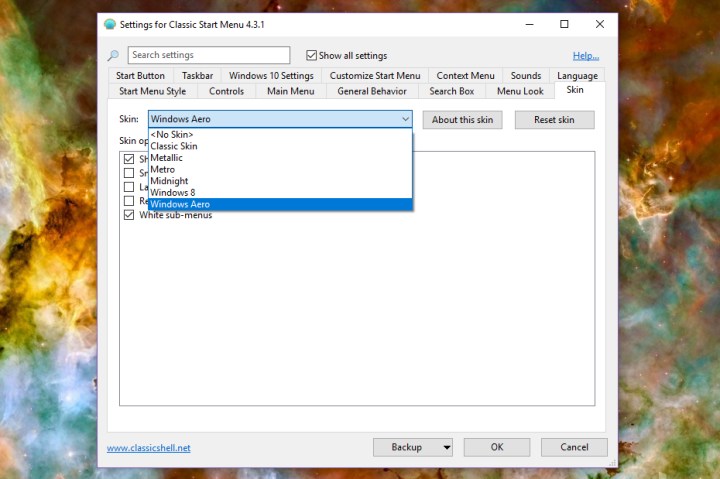
Image used with permission by copyright holder
Step 5: If you don’t care much about the other style options, but you do really miss the option to make the taskbar transparent while you work, then we suggest downloading TranslucentTB instead. It will give you that sweet transparency without changing anything else.
Change the wallpaper on Windows 10
Step 1: To install a Windows 7 wallpaper, download the images from this archive. We have an example here you can use, too.
Image used with permission by copyright holder
Step 2: Right-click on the Windows 10 desktop and select Personalize.

Image used with permission by copyright holder
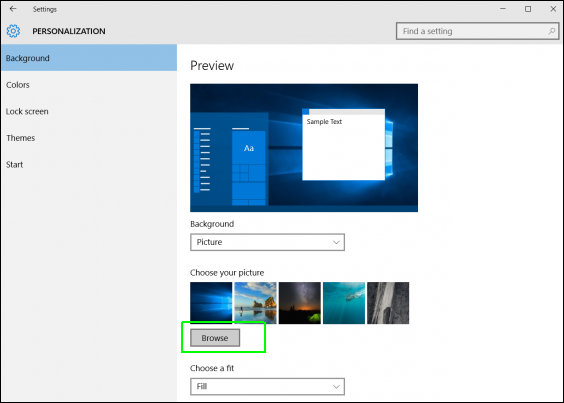
Step 3: The Settings app should then appear, defaulting to the Background panel. Make sure the Background drop-down menu reads Picture and then select the Browse button to find your downloaded wallpaper.
Change the colors in Windows 10
Step 1: Right-click on the desktop and select Personalize.
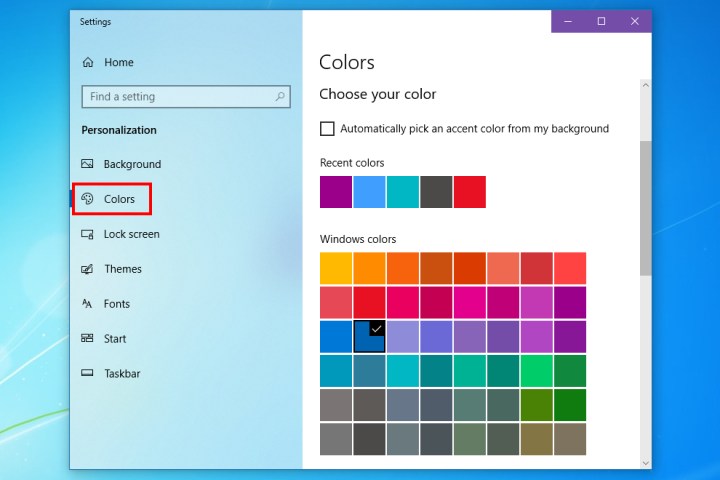
Image used with permission by copyright holder
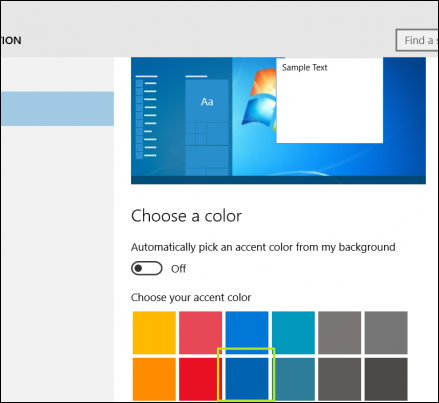
Step 2: Choose Colors on the left of the Settings app. We chose navy blue for the best results, but you can experiment if you want.
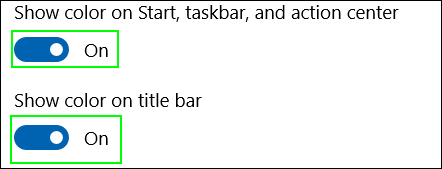
Step 3: Next, we’ll switch the colors of the title bar. Check the Title bars option toward the bottom of the panel. You can add the Start and taskbar if you prefer as well.

Image used with permission by copyright holder
Add Gadgets
Microsoft Gadgets was a popular option in Windows 7. You could instantly see various categories of vital news and daily updates on your desktop thanks to these handy apps. They could display the weather, a clock, stock updates, and more, all while using minimal system resources.
Much to some users’ dismay, Microsoft eliminated Gadgets in Windows 10 to help prevent security issues. Windows 11 is a little better, as it got widgets. (Here are some of the best Windows 11 widgets) that are taking an increasingly Gadget-like role.
Many Windows users miss the way Gadgets functioned in Windows 7. The upside is that you can access many of these features by downloading the 8GadgetPack. The Microsoft store has certified the 8GadgetPack for safety, so you can get the same Windows 7 experience without the risks. Options include Clipboarders, Clock, Agenda, App Launcher, and more.
What about Windows 11?
Many of the steps we’ve discussed for Windows 10 will work for Windows 11 too, but you may run into some compatibility issues. There are a few separate steps you should take if you are trying to convert Windows 11 to a 7 appearance.
Step 1: Download StartAllBack. This is a full package to change Windows 11 into a more traditional UI that brings back many classic favorites, including features from both Windows 10 and Windows 7. You can get a permanent license key for only a couple of bucks if you like how it looks.
StartAllBack is very intuitive, with different sections for the Start menu, taskbar, file management, and more. It’s one of the easiest retro-UI solutions we’ve ever seen and saves a lot of work compared to Windows 10.
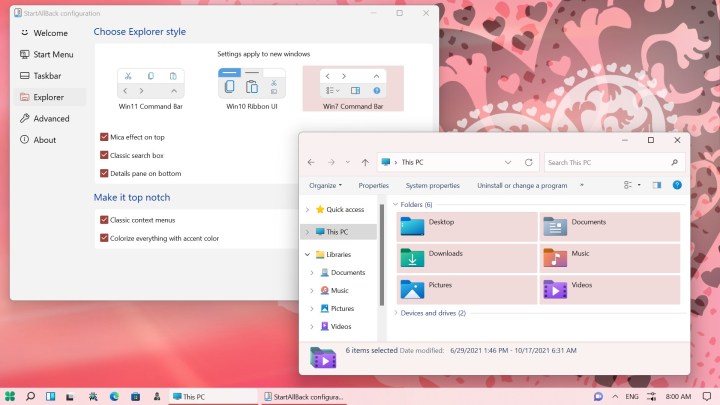
Image used with permission by copyright holder
Step 2: Download the Win11DisableRoundedCorners utility. If you’re a fan of the old style of Windows, you may be especially dismayed by the rounded corners in Windows 11. Running this utility should eliminate them for you.
Step 3: Note that solutions like 8GadgetPack will also work with Windows 11.
Finally, if you’re hesitating between Windows 10 and 11, perhaps now is the time to upgrade. Our review of Windows 11 might just convince you…
Quick Links
-
Get a Windows 7-like Start Menu with Classic Shell
-
Make File Explorer Look and Act Like Windows Explorer
-
Add Color to the Window Title Bars
-
Remove the Cortana Box and Task View Button from the Taskbar
-
Disable the Action Center
-
Log In with a Local Account Instead of a Microsoft Account
-
Play Games like Solitaire and Minesweeper Without Ads
-
Disable the Lock Screen (on Windows 10 Enterprise)
-
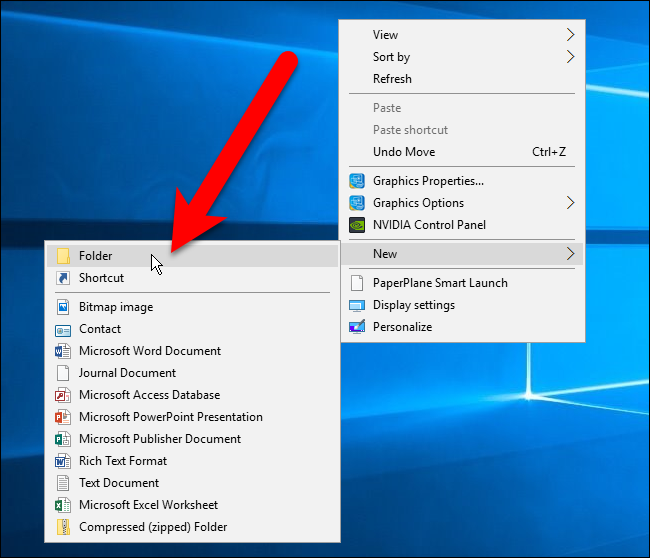
Easily Access the Classic Personalization Window
-
Set the Windows 7 Wallpaper as Your Desktop Background
If you’ve upgraded to Windows 10 but don’t love what you see, there are ways to make Windows 10 look and act like Windows 7. That way, you can get the familiar interface you love while still taking advantage of Windows 10’s other useful features.
Microsoft sort of brought the Start menu back in Windows 10, but it’s been given a big overhaul. If you truly want the Windows 7 Start menu back, install the free program Classic Shell. You can even download images of the Windows 7 Start orb and use that on the Taskbar for the Start menu. Not only is it more similar to Windows 7’s start menu, but it’s insanely customizable, so you can get the Start menu of your dreams.
Make File Explorer Look and Act Like Windows Explorer
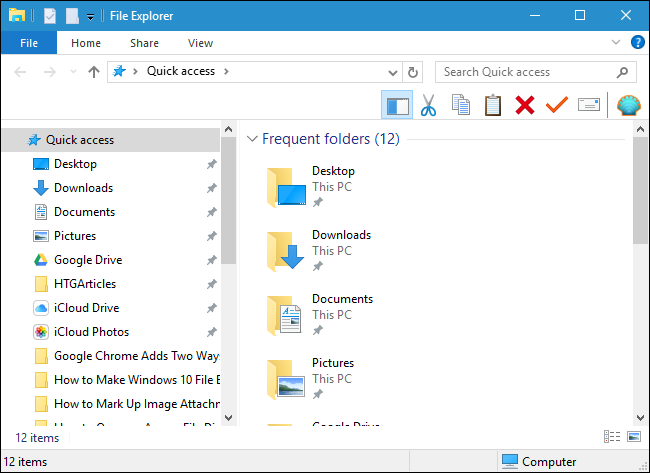
There are a lot of changes in Windows 10’s File Explorer compared to Windows 7’s Windows Explorer. If you’re not happy with the changes, you can get the look and feel of Windows 7’s Windows Explorer back with a free tool called OldNewExplorer, along with some tweaks to the settings and registry that get rid of the ribbon, hide Quick Access, and lots more. Check out our full guide for all the tweaks.
Add Color to the Window Title Bars
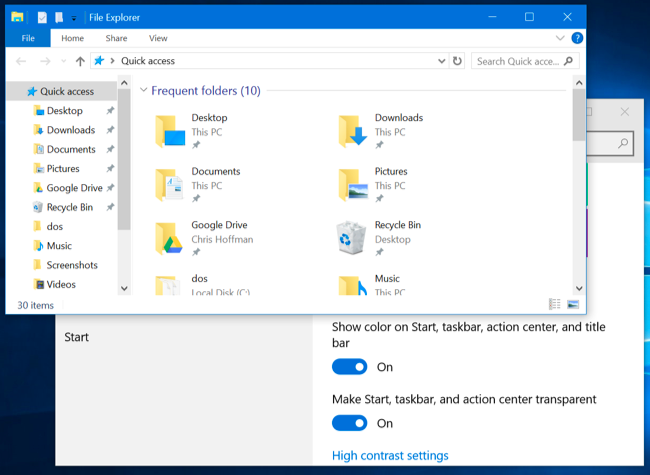
The title bars on windows in Windows 10 are white by default. But that’s boring! Thankfully, the latest version of Windows 10 lets you add some color to the title bars in the settings, letting you make your desktop a little more like Windows 7. Just head to Settings > Personalization > Colors to change them. You can read more about the color settings here.
Remove the Cortana Box and Task View Button from the Taskbar
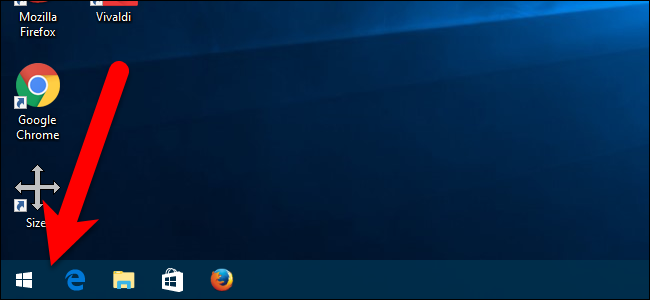
The Windows 7 Start menu included a Search box right on the menu. In Windows 10, that search box was moved to the Taskbar and integrated into Cortana (personal assistant) and the Task View (virtual desktops) button was added to the Taskbar as well. Neither Cortana nor Task View was available in Windows 7. So, to continue our conversion to a Windows 7-like experience, you can remove both of them from the Taskbar—you just need to right-click on the taskbar. De-select «Show Task View Button» and go to Cortana > Hidden.
Disable the Action Center
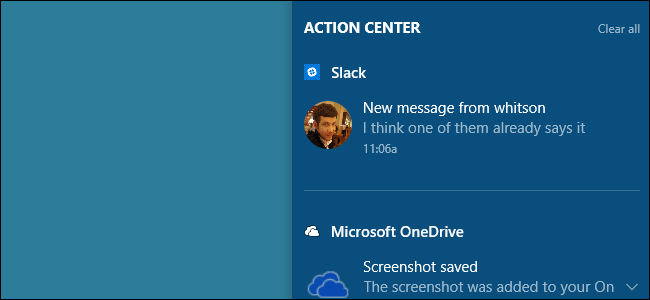
The Action Center is a new feature of Windows 10 that’s available by clicking the message bubble on the right side of the Taskbar. It’s handy for seeing all recent notifications you might have missed, and frankly, we think it’s worth keeping—it’s one of the more useful updates to Windows 10. But, if you really want to get rid of it, you can disable the Action Center by going to Settings > System > Notifications & Actions and clicking «Turn System Icons On or Off». From there you can turn Action Center off with a simple slider.
You will still see popup notifications above your system tray. You just won’t be able to view them after the fact if you miss them.
Log In with a Local Account Instead of a Microsoft Account
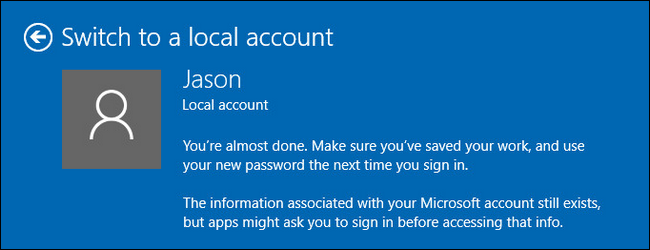
As of Windows 8, your Windows account is tied to your Microsoft account by default, which means you log in to your computer with your Microsoft email and password. If you want to return to using a local account, like you did in Windows 7, you can revert your Windows 10 account to a local one using these instructions. You can also create a new local account that isn’t tied to your Microsoft account, if you prefer.
Play Games like Solitaire and Minesweeper Without Ads
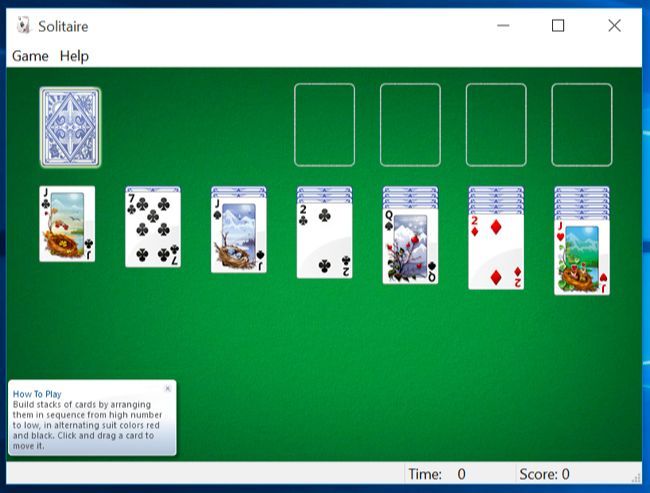
Windows 7’s ever-popular free games, such as Solitaire and Minesweeper, were removed in Windows 8. Windows 10 includes the Microsoft Solitaire Collection app, but the game will show you banner ads and full-screen video advertisements, bugging you for $20 per year to get the ad-free versions. Thankfully, there are plenty of free (and ad-free) versions of these popular games out there. Check out this guide for a few of our favorites.
Disable the Lock Screen (on Windows 10 Enterprise)
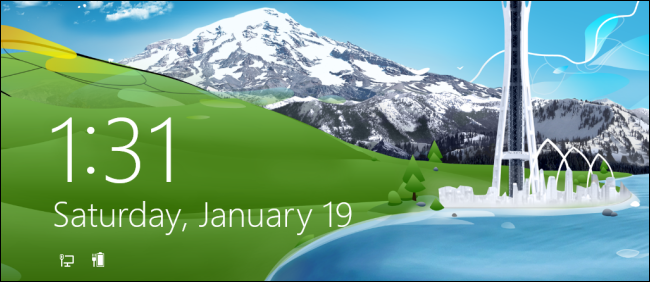
The lock screen is pretty, but is really more of a touch screen-friendly feature. It isn’t really necessary or particularly useful on the desktop. It used to be the case if you were using any version of Windows 10, you could disable the lock screen. However, as of the Anniversary Update of Windows 10, you can only disable the lock screen if you are using Windows 10 Enterprise. So, if you’re using any other version of Windows 10, you’re stuck with the lock screen for now.
Easily Access the Classic Personalization Window
By default, when you right-click on the Windows 10 desktop and select Personalize, you are taken to the new Personalization section in PC Settings. However, the Personalization window from Windows 7 is still available in the Control Panel. You can add a shortcut to the desktop so you can quickly access the classic Personalization window if you prefer it.
Right-click on the desktop and select New > Folder from the popup menu.
Copy and paste the following text into the name of the folder and press Enter.
Personalization.{ED834ED6-4B5A-4bfe-8F11-A626DCB6A921}
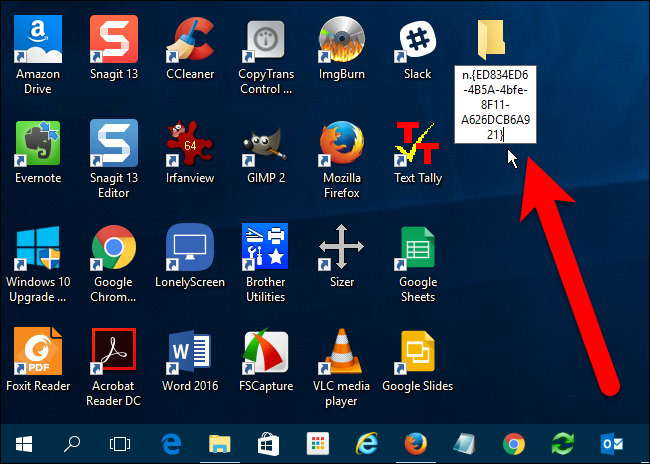
The icon changes to the personalization icon and the name of the folder also changes to Personalization. Double-click this icon to access the classic Personalization window in the Control Panel.
It isn’t as good as right-clicking, but at least you have a quick shortcut now.
Set the Windows 7 Wallpaper as Your Desktop Background

Last, but certainly not least, you can change the desktop background to the classic Windows 7 wallpaper. You can grab it right here—just right-click on the image and save it somewhere on your computer. Then, right-click on the image in File Explorer and choose «Set as Desktop Background.»
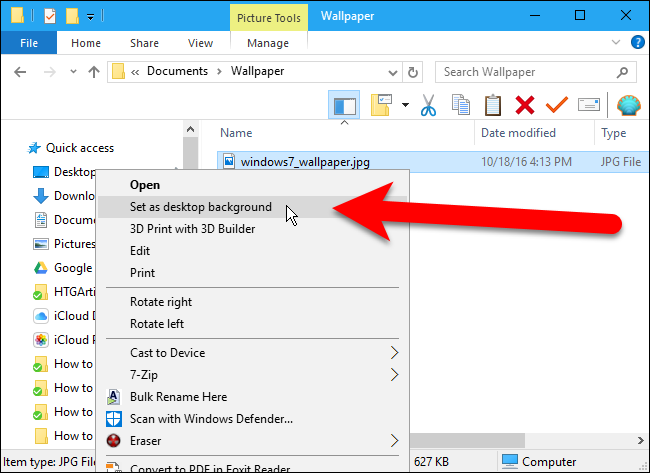
Now, you can pretend that you never upgraded to Windows 10, at least until Microsoft forces Windows 10 updates down your throat.
Windows 10 offers a number of benefits over its predecessors, including improved boot and wake-from-sleep times, the ability to run Universal apps, the Cortana voice assistant and Xbox game streaming. It even has a Start Menu, a key feature that is infamously missing from Windows 8. But what if you like the improved performance and features of Windows 10, but you prefer the look and feel of Windows 7? While you can’t make everything look identical to Microsoft’s old operating system, you can change many key elements, including the Start Menu, wallpaper and taskbar.
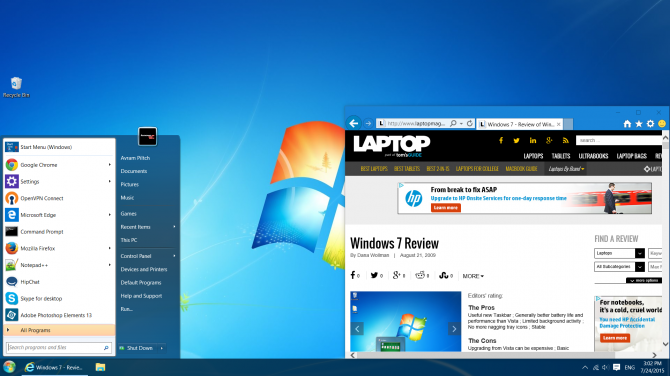
Windows 10 brings back the Start Menu . . . sort of. While there is a Start Menu, it’s very different from the one in Windows 7 and you may not like the differences. Instead of providing a list of icons and folders, the new Start Menu has a set of flashy, but space-wasting, live tiles on its right side and a list of frequently used apps on the left side. You can add live tiles, but you cannot pin a simple icon to the left side like you could in Windows 7 and XP. Fortunately, you can install a third-party Start Menu that looks and functions the way you want it to. There are a couple of Windows 10-compatible Start apps out there, but we like Classic Shell, because it’s free and very customizable.
1.
Download and install Classic Shell version 4.2.2 or higher. As of this writing is 4.2.2 is in beta and available for download from the Classic Shell forums. Earlier versions don’t work properly with Windows 10.
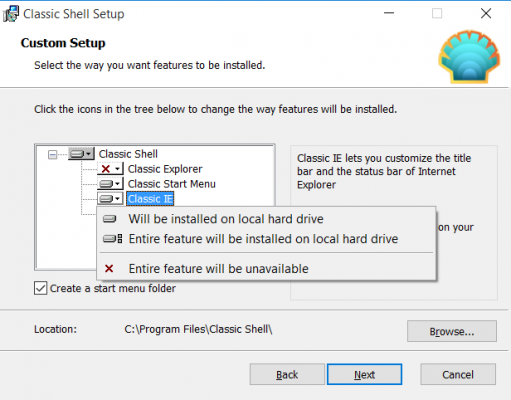
2.
Deselect Classic Explorer and Classic IE during the install process. You can try those programs if you want, but we didn’t find them particularly useful.
3.
Sign up to receive The Snapshot, a free special dispatch from Laptop Mag, in your inbox.
Open Classic Start Menu settings. If Classic Shell is already running, you will see a Shell icon in the lower right corner and can right click it and select settings. Otherwise, you can search for «Classic Start Menu Settings.»
4.
Check Show All Settings if it is not already checked.
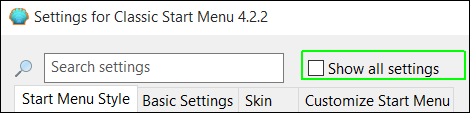
5.
Navigate to the Start Menu Style tab and select Windows 7 Style if it is not already selected.
6.
Download the Windows 7 Start button image from this thread if you want your Start button to look authentic. There are several custom buttons available. Then navigate to the Start Button tab, select Custom button and browse to the image. If you don’t see a Start Button tab, make sure Show All Settings is checked.
7.
Navigate to the Skin tab and select Windows Aero from the pulldown menu.
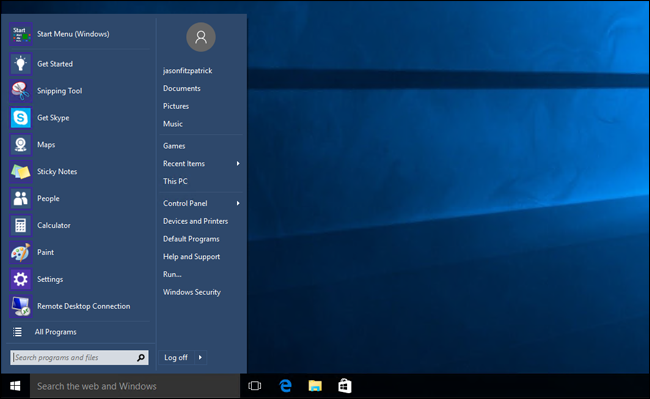
8.
Click Ok. Your Start Menu should look something like this.
II. Hide the Cortana / Search Box
On its taskbar, Windows 10 has a prominent search box which invokes Cortana when you click in it. While this box is actually quite useful, it doesn’t exist in Windows 7 so you may want to get rid of it. Besides, if you install Classic Shell or another Start Menu replacement, that will come with its own built-in search box. To hide the Cortana box:
1.
Right click on the search box. A context menu appears.
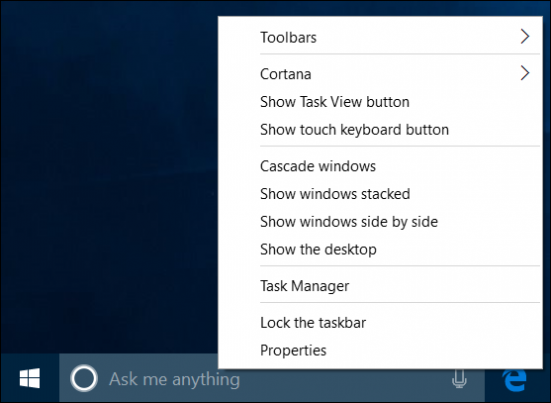
2.
Select Hidden from the Cortana menu.
III. Get Rid of the Lock Screen
The Windows 10 lock screen you get when you boot up or wake from sleep looks attractive but wastes your time. You have to click or swipe to get rid of it, and then you still get hit with the login prompt. In Windows 7, you boot straight to login prompt and you can do the same in Windows 10 if you make a simple registry edit.
1.
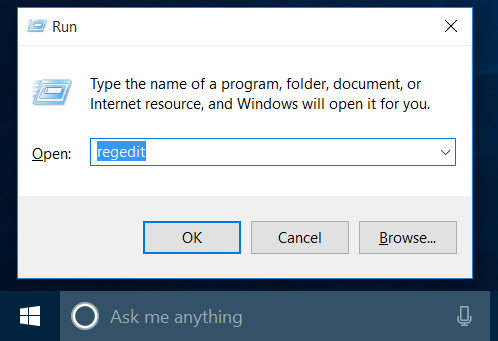
Hit Windows +R to bring up the Run dialog.
2.
Type «regedit» and hit Enter.
3.
Go to HKEY_LOCAL_MACHINE\SOFTWARE\Policies\Microsoft\Windows in the registry tree.
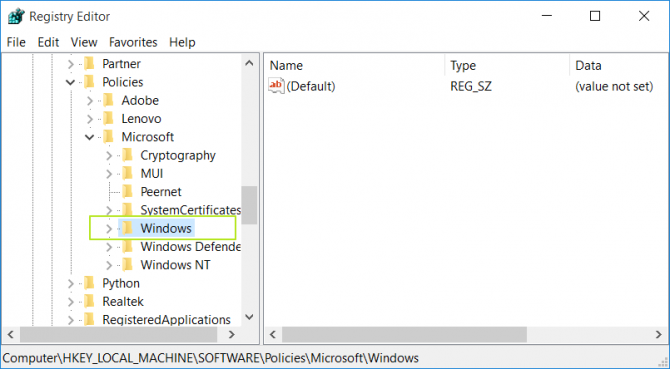
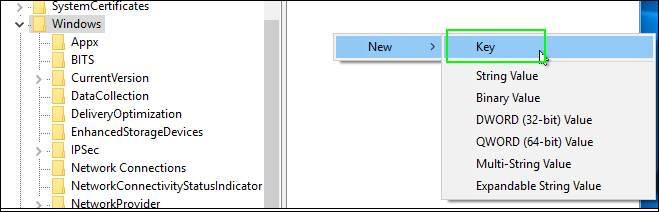
4.
Right click in the right pane and select New > Key. A new key (looks like a folder) appears in the left pane.
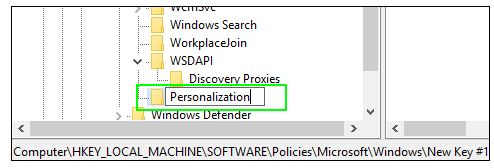
5.
Rename the key to Personalization and select it.
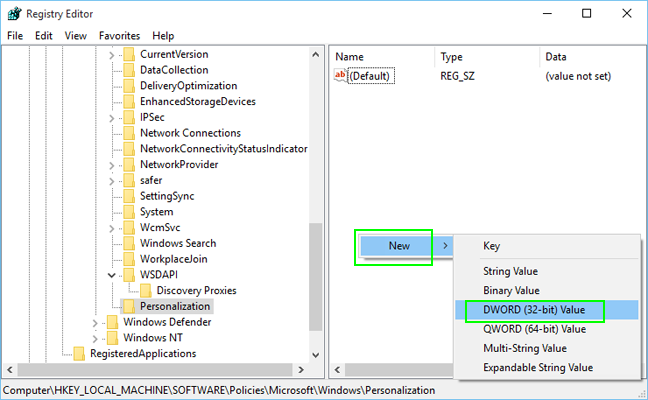
6.
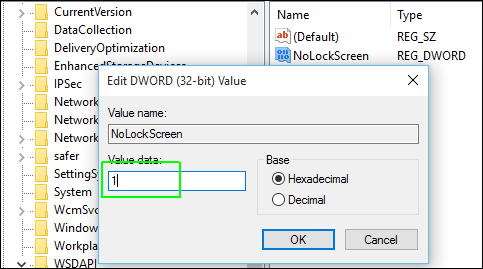
Right click and select New > DWORD (32-bit) Value in the right pane.
7.
Rename the new value to «NoLockScreen.»
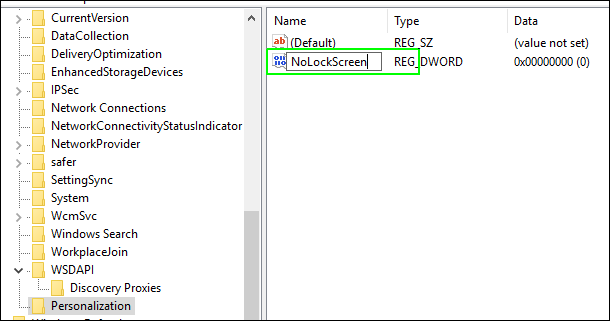
8. Double click on it, set the value to 1 and click Ok.
IV. Add Windows 7 Wallpaper
Nothing makes a computer look like Windows 7 more than using the default Windows 7 wallpaper with the bright blue background and the giant Windows logo in the middle.
1.
Acquire the Windows 7 wallpaper. Windows 10 doesn’t come with the old wallpaper, but you can get it a couple of ways. If you still have access to a computer with Windows 7 on it, you’ll find the wallpaper at C:\Windows\Web\Wallpaper\Windows\img0.jpg. You can also download the wallpaper from various places that have posted it online, including here.
2.
Right click on your desktop and select Personalize.
3.
Click the Browse button and select the wallpaper file.
V. Give the Window Bars Colors
Windows 10 allows applications to select their own title bar colors, but most programs don’t have a custom color set and end up with a depressingly bland white bar. While you can’t get back the transparent aero effect in title bars, you can make them show a nice Windows 7 blue. Here’s how.
1.
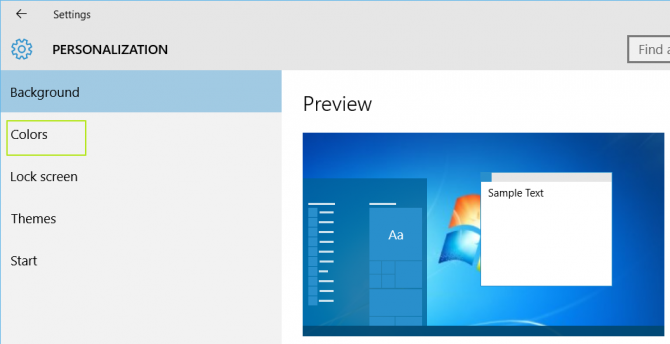
Right Click on the desktop and select Personalization.
2.
Select Colors from the left pane.
3.
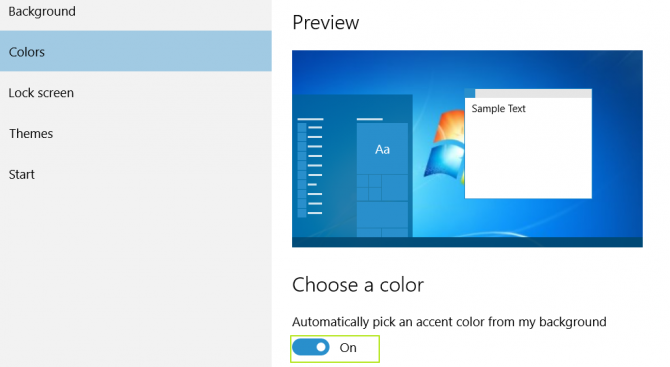
Toggle «Automatically pick an accent color from my background» to off if you want to choose a custom color. Or leave it / toggle it to on to have it change colors based on your wallpaper.
4.
Select a color if you chose to pick a custom color. We recommend the dark blue in the second row for the most Windows 7-like shade.
5. Make sure «Show color on title bar» and «Show color on Start…» are toggled to on.
VI. Replace Edge with Internet Explorer
Windows 7 came with Internet Explrorer as its default browser, with the IE icon pinned to the taskar. If you don’t like Edge browser, Chrome or Firefox, you can easily go back to using Internet Explorer as your default browser in Windows 10.
1.
Right click on the Edge browser taskbar icon and select Unpin.
2. Search for Internet Explorer in the search bar. By the time you type Internet, you should see the icon for it.
3.
Right click on the Internet Explorer icon and select Pin to Taskbar. The IE logo will appear on your taskbar. You might want to drag it to the left so it sits next to the Start button.
4.
Launch Internet Explorer.
5.
Select Internet Options from the menu.
6.
Navigate to the Programs tab and click «Make Internet Explorer the default browser.» A new window opens with a list of programs.
7.
Select Internet Explorer in the left pane and click «Set this program as default.»

8. Click Ok.
Customize Windows 10
- Previous Tip
- Next Tip
- Create Custom Keyboard Shortcuts
- Make Windows 10 Look and Feel Like Windows 7
- Change the Default Windows Font
- Turn Off Notification and System Sounds
- Change Your Desktop Background in Windows 10
- Change the Icon Size
- Give Windows 10 a Dark Theme
- Make Your Own Windows 10 Theme
- Hide Your Name on the Login Screen
- Add Another Column to the Start Menu
- Get Mac-Like File Previews
- Add My Computer Icon to Desktop
- Edit Photos to Fit as Backgrounds
- Add Accent Colors
- Customize Autoplay Menu
- Install and Delete Fonts
- Customize the Action Center
- Disable Transparency Effects
- Get Classic Solitaire and Minesweeper
- Change the Look of Windows 10 Books
- Add a URL Field to the Taskbar
- Add Clocks from Multiple Time Zones
- Get the Old Volume Control Back
- Disable Windows 10 Startup Delay
- Add Quick Contacts to the Start Menu
- Show Hidden Files and Folders
- Enable Spatial Sound
- Best Themes
- All Windows 10 Tips
- Change the Login Screen Background
- Install New Desktop Themes