
When you work with shared resources on a network, you may need to quickly get the link to a shared network folder and paste it into a chat window. Or, for example, you might want to know how to create a hyperlink to a file stored locally on your computer and use it to share that file with other users of your PC. Although it’s not exactly easy to figure out how, both Windows 11 and Windows 10 allow you to copy a file path as a link and to create links to a folder or even a library. Without further ado, here are the answers to questions like “How do I create a link to a file or folder?” and “How do I copy a file path as a link?”:
NOTE: This guide covers Windows 11 and Windows 10. Everything works the same in both operating systems. If you don’t know what your version of Windows is, read: How to tell what Windows I have (11 ways).
Method 1: How to create a link to a file, folder, or library in Windows using the Sharing Wizard
If you want to create a link to a file, folder, or library, you can use the Sharing Wizard. This wizard is enabled by default, both in Windows 11 and Windows 10. However, while in Windows 10, it works for all the items we mentioned, including files, in Windows 11, you can only use it for folders and libraries. To learn more about it, read this guide and follow it to share files, folders, or libraries: How to share folders, files, and libraries with the network, in Windows. Essentially, what you need to do is open File Explorer, navigate to the file, folder, or library you want to hyperlink, and right-click on it to see its context menu. Then, if you’re on Windows 10, select “Give access to” and click or tap on Specific people. If you’re using Windows 11, click “Show more options”, and only then go to “Give access to > Specific people.”

How to start the sharing wizard
Follow the steps of the sharing wizard and, during the final step of the process, when it informs you that the file, folder, or library is shared, don’t close the wizard.
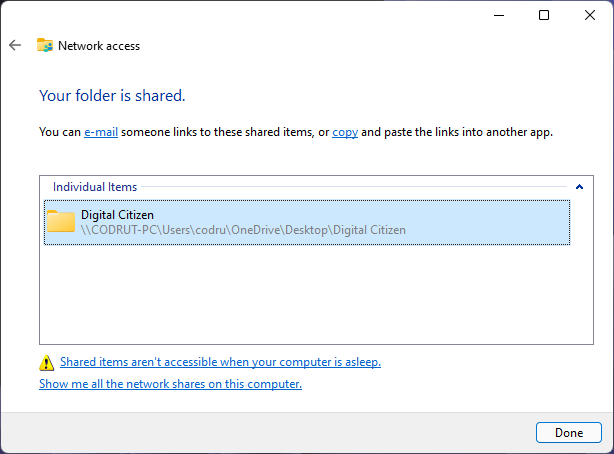
The sharing wizard from Windows 11
Look carefully beneath the “Your file/folder/library is shared” notification. There, Windows says that “You can e-mail someone links to these shared items, or copy and paste the links into another app.”
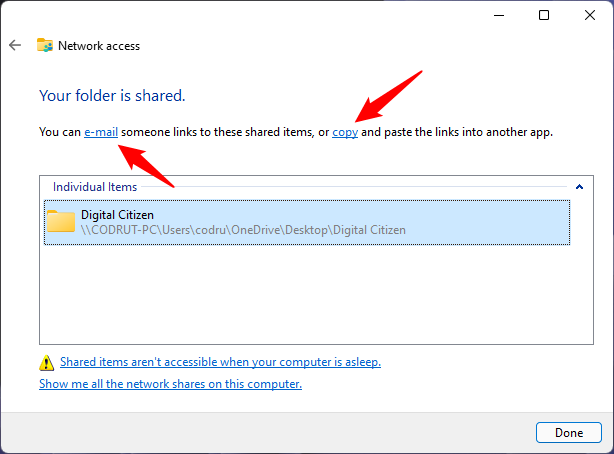
The e-mail and copy links from the last step of the sharing wizard
If you click or tap the e-mail link, your default email client is opened, and the direct link is automatically pasted into a new message. And that’s how to send a link to a file via email.
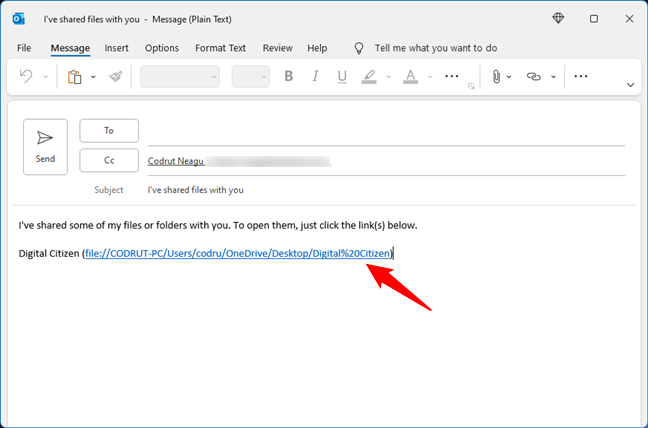
Sending an email with the shared file link
If you press the “copy” link, the link to the shared resource is copied to the clipboard, and you can then paste it into other programs.

Copy and paste a shared file link
Method 2: How to create a link to a file, folder, or library on a shared drive using File Explorer
The second method applies to files, folders, and libraries that you’ve already shared on your Windows computer. If you’re wondering how to create a link to a file on a shared drive, this method works for that too.
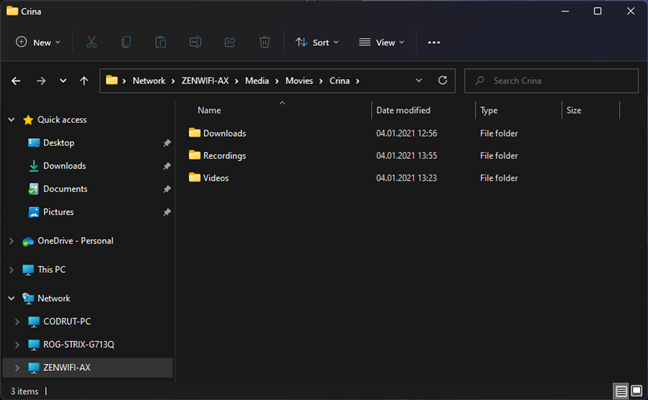
Open File Explorer, go to the Network section, and double-click or double-tap on the PC that stores the file, folder, or library you want to link.
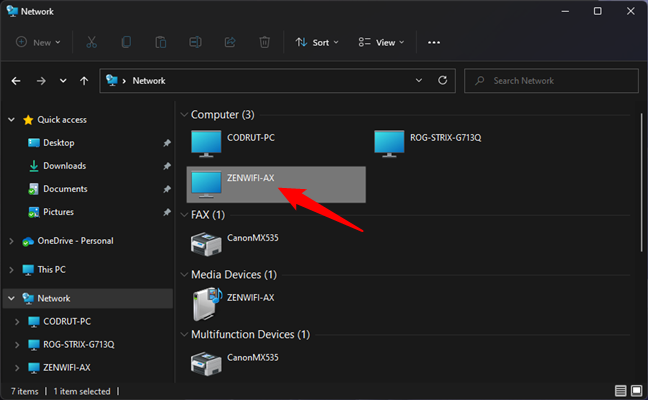
A computer/storage device from the local network
This shows you a list of all the folders that are shared with the network. Browse until you find the specific file, folder, or library for which you want the direct link.
The folders and files shared on a network device
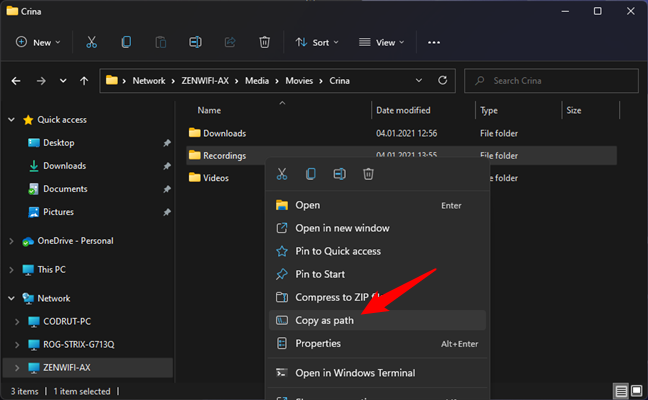
If you’re using Windows 10, hold down Shift on your keyboard and right-click on the file, folder, or library for which you want a link. If you’re using Windows 11, simply right-click on it. Then, select “Copy as path” in the contextual menu.
Copy path for a file in File Explorer
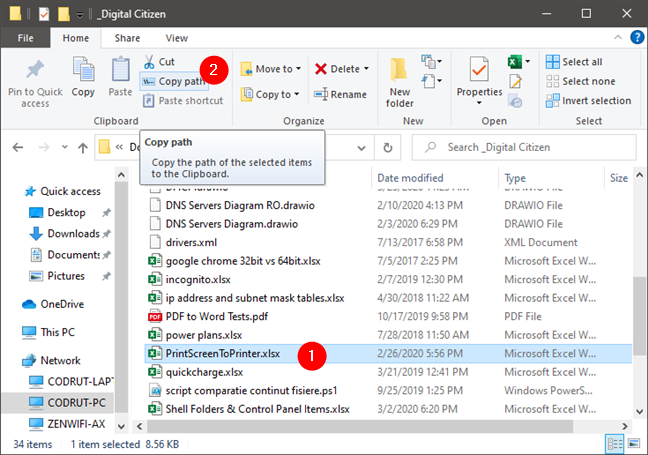
Alternatively, in Windows 10, you can also select the item (file, folder, library) and click or tap on the “Copy as path” button from File Explorer’s Home tab in Windows 10.
Copy path for a file in File Explorer, on Windows 10
In Windows 11, press See more (the three-dot button) from the top toolbar and select Copy path from the menu displayed.

Copy path for a file in File Explorer, on Windows 11
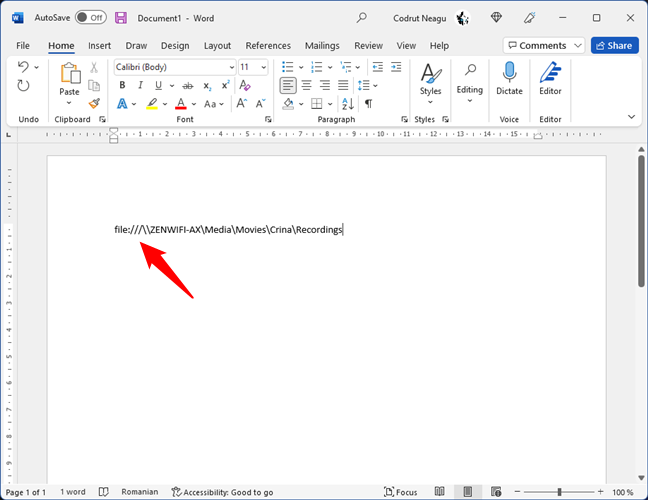
Then, paste the link into the app or document you need it in. You should have something similar to this:
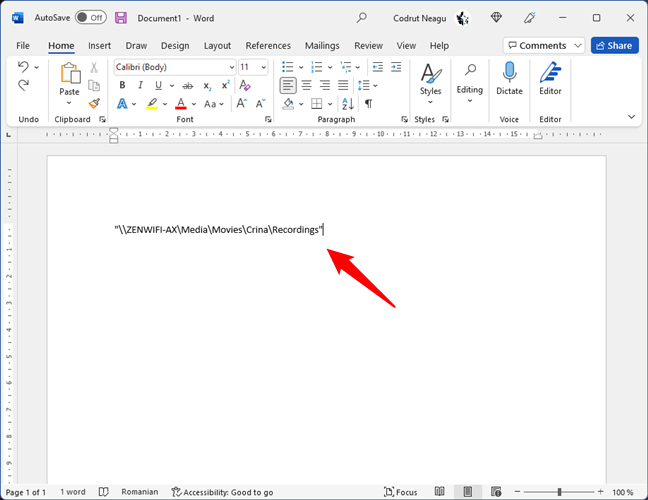
Copy and paste the file link in a document
For the folder, library, or file link(s) to be active, press Enter to make it clickable in the Office application where you copied it. When you Ctrl + click the link, File Explorer opens the shared file, folder, or library, if the network computer sharing that resource is available.

Making the file link clickable
My file path link doesn’t work! Why?
In some cases, the file links you create might not work. There are several possible causes. Here’s what you can try:
Regardless of whether you wanted to create a link to a file, folder, or library, in some apps, you might have to type “file:///” before the network path, like this:
The file link starts with the word file followed by the signs below
In other cases, depending on the apps in which you want to place the file links, you might also have to manually replace all the blank spaces in the link paths with this text: %20. Here’s an example:
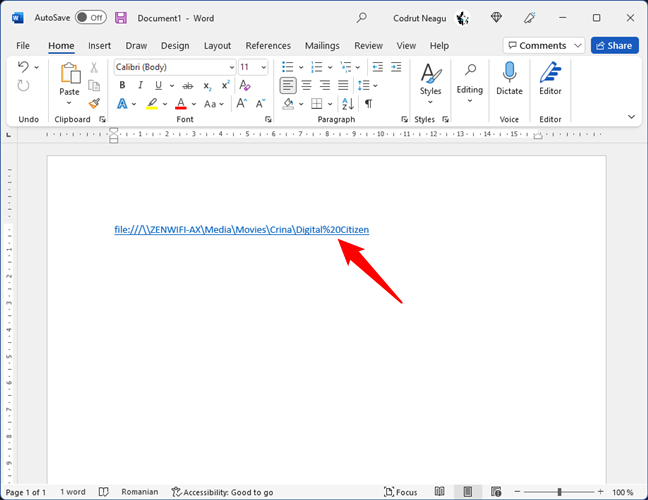
Blank spaces can be replaced with %20 encodings
There’s also the possibility that on some older versions of Windows, or in other operating systems, the backslashes from the network paths aren’t recognized. In that case, you can try to replace all the backslashes (\) with forward slashes (/).
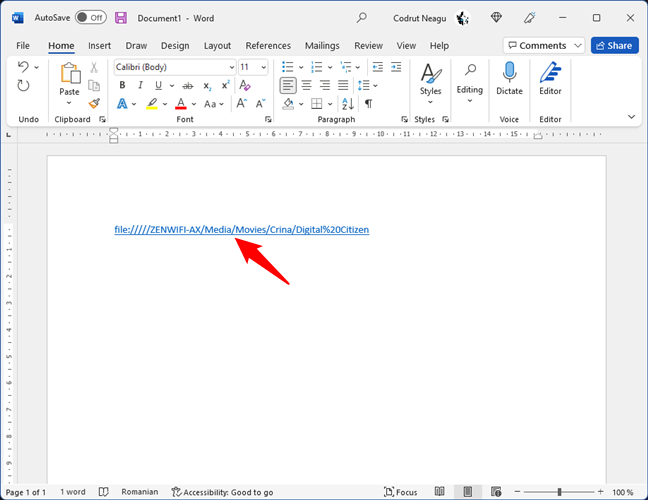
Backslashes can be replaced by forwarding slashes
Finally, note that, whatever you do, in some apps, file links simply don’t work as regular links. Such is the case with most web browsers and chat apps, which treat these local links as security threats. However, even so, the user who gets your file link can still use the link to get to that file, folder, or library. All he or she has to do is copy and paste the link in the address bar of (his or her) File Explorer and press Enter.
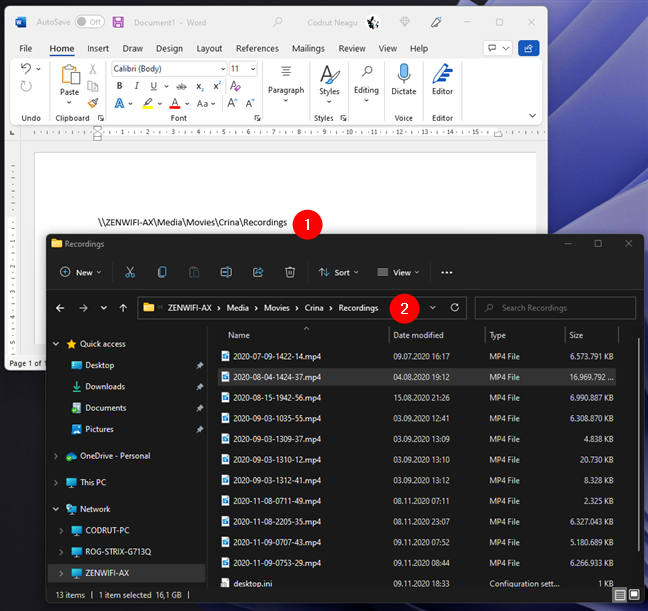
Copy and paste a file link in File Explorer’s address bar
Do you use file hyperlinks?
We hope that you’ve found these tips useful. If you know other ways to generate the link to the files, folders, or libraries shared in a network, don’t hesitate to let us know. Comment below, and let’s share all the ways to generate links in Windows.
Как создавать и удалять симлинки
Обновлено:
Опубликовано:
Используемые термины: Симлинк, Windows, Linux.
Windows
Linux
Проблемы и решения
Работы с символьными ссылками в Windows ведутся из командной строки.
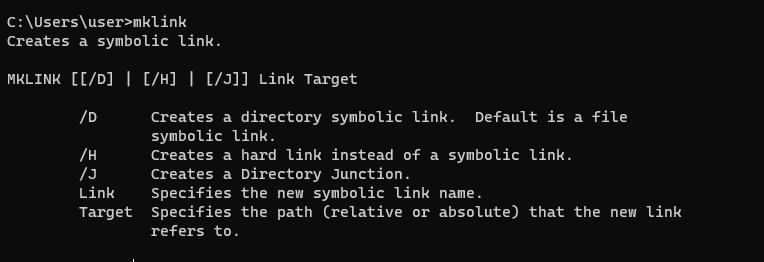
Синтаксис
mklink <имя создаваемого симлинка> <на что ведет симлинк>
Симлинк на файл
mklink C:\Users\dmosk\Desktop\cmd.exe C:\Windows\system32\cmd.exe
* в данном примере на рабочем столе пользователя dmosk будет создан симлинк на файл cmd.exe.
Симлинк на директорию
mklink /D «C:\Users\dmosk\Desktop\Сетевая папка» \\dmosk.local\share
* в примере создается симлинк на сетевую папку \\dmosk.local\share
** так как в названии папки есть пробел, путь заключен в кавычки.
Для создания ссылки на папку доступен также ключ /J. Созданная таким образом ссылка будет по некоторым особенностям напоминать жесткую ссылку.
Удалить симлинк
В Windows его можно удалить в проводнике, как обычный файл или папку.
Или использовать командную строку.
Для папки:
rmdir «C:\Users\dmosk\Desktop\Сетевая папка»
Для файла:
del C:\Users\dmosk\Desktop\cmd.exe
Разрешить симлинки в Windows
Если при попытке перейти по символьной ссылке мы получим ошибку «Символическая ссылка не может быть загружена, так как ее тип отключен», открываем командную строку от администратора и вводим команду:
fsutil behavior set SymlinkEvaluation L2L:1 R2R:1 L2R:1 R2L:1
Если это не помогло, пробуем создать симлинк с ключом /J.
Linux и FreeBSD
Создание
Общий синтаксис
ln -s <на какой существующий объект будет вести> <создаваемый симлинк>
В системах на базе Linux (например, Ubuntu или CentOS) и FreeBSD симлинк для каталога и файла создаются одинаково:
ln -s /usr/share/nginx/html/index.php /home/dmosk/
ln -s /usr/share/nginx/html /home/dmosk/
* в первом примере создана символьная ссылка в домашней директории пользователя dmosk на файл index.php; во втором — на каталог /usr/share/nginx/html.
Удаление
Также используется одна команда:
rm /home/dmosk/index.php
Решение возможных проблем
При работе с симлинками мы можем сталкиваться с различными проблемами. Я рассмотрю те, с которыми приходилось сталкиваться мне.
ln: failed to create symbolic link … Function not implemented
При попытке создать симлинк мы можем получить ошибку Function not implemented, например:
ln: failed to create symbolic link ‘/etc/pve/nodes/pve/fullchain.pem’: Function not implemented
Причина: файловая система, на которой мы хотим создать файл не поддерживает симлинки. Посмотреть файловую систему подмонтированных разделов можно командой:
df -T
Решение: как правило, решения зависит от используемой файловой системы и ее драйвера. Но, обычно, решения у проблемы нет и нужно искать методы работы без использования символьных ссылок.
Символическая ссылка (симлинк, символьная ссылка, Symbolic link) это специальный файл на файловой системе, которые сам не содержит данных, а является по сути ярлыком, указывающим на какой-то другой объект (файл или папку). При обращении к симлику операционная система считает, что это оригинальный файл (папка) и работает с ними совершенно прозрачно.
Символические ссылки используются в Windows довольно часто для системных файлов и каталогов. Пользователь может их применять, когда нужно перенести часть “тяжелых” файлов на другой диск, но чтобы Windows считала, что файлы все еще находятся в исходном каталоге (например в ситуациях, когда нужно экономить место на SSD, перенеся некоторые каталоги на более медленный и емкий SSD, не нарушая работоспособности программ). Можно использовать симлинки на SMB файловом сервере, когда каталоги с разных LUN должны быть доступны через одну точку входа.
В Windows есть три типа файловых ссылок для NTFS томов: жесткие, мягкие (симлинки), точки соединения (Junction point).
- Hard Links (жесткие ссылки) – могут указывать только на локальный файл, но не на папку. Такой файл – это ссылка на другой файла на этом же диске без фактического дублирования самого файла. У него отображается такой же размер и свойства, как у целевого файла (но реальное место на диске он не занимает);
- Junction Points (Directory Hard Link, точка соединения) – могут указывать только на папку (на этом же или на другом разделе);
- Symbolic Links (мягкая ссылка, симлинк) – могут указывать на локальный файл, папку и сетевой каталог на удаленном компьютере (UNC), поддерживаются относительные пути.
В подавляющем большинстве случаев вам будет достаточно функционала symbolic link, как наиболее универсального средства создания ссылки на любой объект.
Как создать символическую ссылку в Windows?
Для создания символических и жестких ссылок в Windows можно использовать встроенную утилиты mklink или PowerShell.
Синтаксис у утилиты
mklink
простой. Чтобы создать символическую ссылку на файл, нужно указать имя ссылки и целевой объект, на который она должна указывать. Можно указать тип ссылки:
/D
— символьная (мягкая) ссылка на каталог,
/H
— жесткая ссылка,
/J
– точка соединения (Junction point).
Чтобы использовать mklinkдля создания символических ссылок нужно запустить командную строку с правами администратора. Иначе при запуске команды появится ошибка “
You do not have sufficient privilege to perform this operation
”.
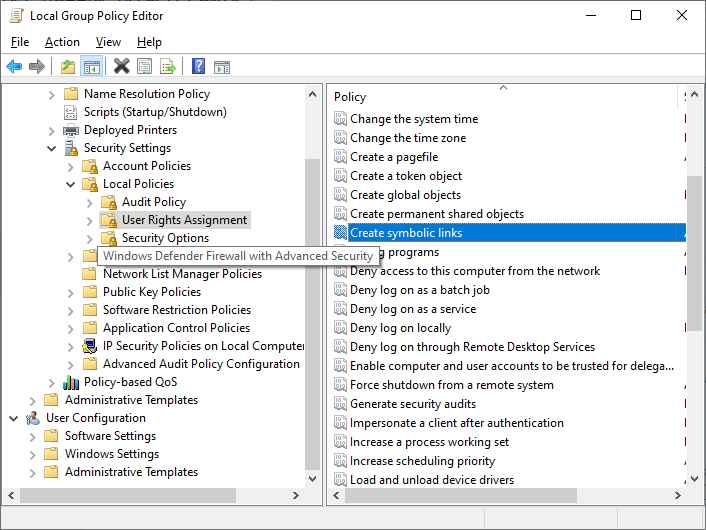
Если вам нужно разрешить создавать символические ссылки обычным пользователям, нужно добавить группу пользователей в параметр групповой политики Create Symbolic Links (Computer configuration -> Window Settings -> Security settings -> User Rights Assignment в редакторе GPO). По умолчанию в этой политике добавлена только локальная группа «Administrators». Обновите локальные политики после изменения параметра: gpupdate /force
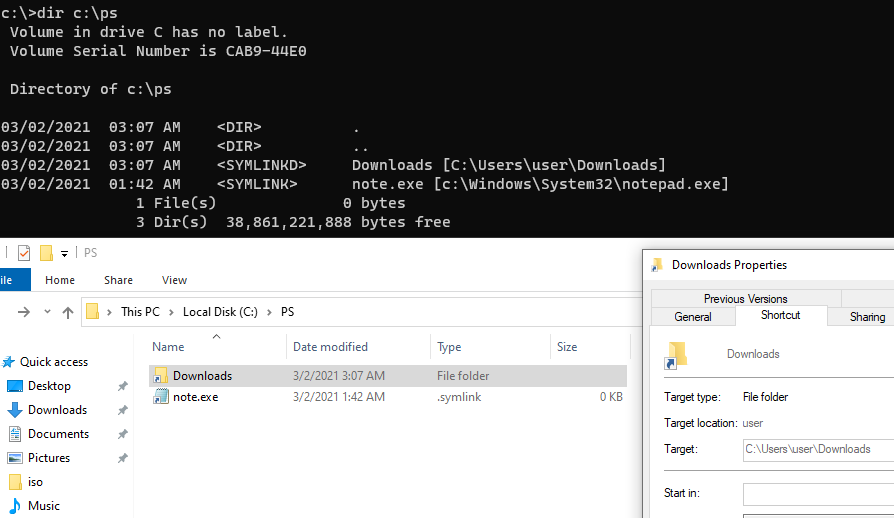
Создадим в каталоге C:\PS символическую ссылку на файл notepad.exe:
mklink C:\PS\note.exe c:\Windows\System32\notepad.exe
Должно появится сообщение:
symbolic link created for C:\PS\note.exe <<===>> c:\Windows\System32\notepad.exe
Теперь для запуска процесса notepad.exe можно использовать символическую ссылку note.exe.
Теперь создадим в этом каталоге симлинк на другой каталог на этом же диcке:
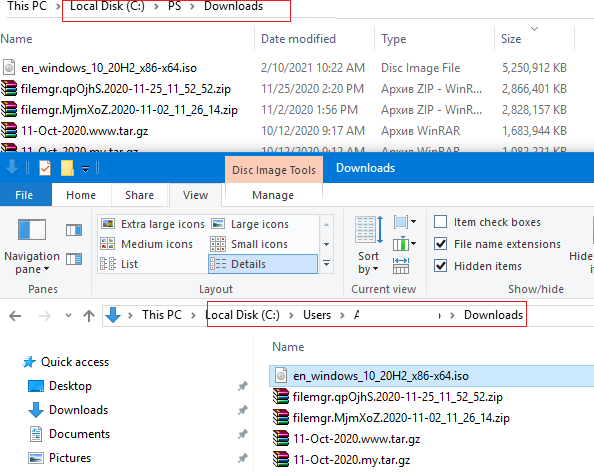
mklink /D “C:\PS\Downloads” “C:\Users\user\Downloads”

Теперь при переходе в каталог C:\PS\Downloads вы будете видеть содержимое каталога, на который он ссылается.
Выведем содержимое каталога C:\PS:
Dir c:\ps
Как вы видите, в атрибутах некоторых файлов указано, что это symlink/simlinkd. Также указан объект, на который они ссылаются. В Windows File Explorer симлинки отображаются с иконками ярлыков, а в их свойствах можно посмотреть целевой объект на который они ссылаются.
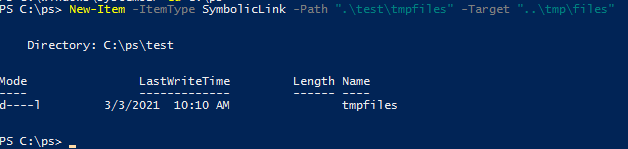
Также можно создать символически ссылки в Windows 10 с помощью PowerShell (в этом примере я использую относительные пути, чтобы создать символическую ссылку):
New-Item -ItemType SymbolicLink -Path ".\test\tmpfiles" -Target "..\tmp\files"
Можно создать символическую ссылку на сетевую папку на удаленном компьютере/сервере. Адрес сетевой папки нужно указывать в формате UNC. Следующий пример создаст симлинк на сетевой каталог на сервере:
mklink /D c:\ps\share \\mskfs01\Share
Например, подключим административную шару C$ с удаленного компьютера по IP адресу:
mklink /D c:\remotePC\server1 \\192.168.31.15\С$
Если при доступе к сетевой папке через симлинк, вы получили ошибку
The symbolic link cannot be followed because its type is disabled
проверьте разрешенные способы использования символических ссылок на вашем компьютере:
fsutil behavior query SymlinkEvaluation
Local to local symbolic links are enabled.
Local to remote symbolic links are enabled.
Remote to local symbolic links are disabled.
Remote to remote symbolic links are disabled.

Чтобы включить использование символических ссылок на удаленные ресурсы, выполните команды:
fsutil behavior set SymlinkEvaluation R2R:1
fsutil behavior set SymlinkEvaluation R2L:1
Вы можете работать с символическими ссылками, как с обычными объектами файловой системы, можно переименовать, переносить или удалить их. Система автоматически изменит настройки таких симлинков, чтобы они указывали на верные целевые объекты.
Для удаления симлинков используются обычные команды, как и для удаления файлов:
Del c:\ps\note.exe
RD c:\ps\downloads
Как найти и вывести все символические ссылки на диске?
В Windows нет простых инструментов для просмотра и управления всеми симлинками на диске.
Вы можете вывести список всех символических ссылок на диске с помощью команды:
dir /AL /S C:\ | find "SYMLINK"
-
/A
– вывести файлы с атрибутом L (симлинк); -
/S
–выполнить команду рекурсивно для всех вложенных каталогов; -
C:\
— укажите имя диска, на котором нужно найти все символические ссылки (если вы не хотите сканировать весь диск, укажите путь к нужному каталогу)

Также можно вывести список всех символических ссылок на диске с помощью PowerShell. Для этого нужно просканировать все каталоги и найти NTFS объекты с атрибутом ReparsePoint:
Get-ChildItem -Path C:\ -Force -Recurse -ErrorAction 'silentlycontinue' | Where { $_.Attributes -match "ReparsePoint"}
Ссылка на сетевую и локальную папку
-
lexkanev
- Сообщения: 5
- Зарегистрирован: 04 фев 2016, 07:52
- Имя: Алексей Канев
Ссылка на сетевую и локальную папку
Здравствуйте!
При работе с Проектами возникла необходимость в описании проекта указывать путь на сетевую папку
(вида \\server\folder\temp\) и папку на локальном компьютере (вида C:\temp\).
Подскажите, как это правильно сделать? Нужно, чтоб при нажатии на ссылку папка открывалась в стандартном проводнике Windows.
Варианты file://\\server\folder\temp\ и аналогичные не работают.
Знак «\» при добавлении в тексте или ссылке не отображается.
-
support
- Техническая поддержка
- Сообщения: 9484
- Зарегистрирован: 19 окт 2014, 18:22
- Имя: Харчишин Сергей
- Откуда: Крым, Евпатория
Re: Ссылка на сетевую и локальную папку
Сообщение
support »
Используйте поле для ссылки с префиксом,
НО с точки зрения безопасности браузеры не позволяют открывать файлы по клику
Ссылку нужно копировать и вставлять в адресную строку чтобы открыть.
- Вложения
-
-
lexkanev
- Сообщения: 5
- Зарегистрирован: 04 фев 2016, 07:52
- Имя: Алексей Канев
-
batlman
- Сообщения: 18
- Зарегистрирован: 04 мар 2015, 13:25
Re: Ссылка на сетевую и локальную папку
Сообщение
batlman »
IE открывает проводник и файлы, если ссылка вставлена через поле «Поле для текста с редактором». Ссылка должна быть «Протокол» <другой>. Просто браузеры не понимают ссылку вида «file://server/share» Мозила вроде тоже работает, но через бубен.
-
Xobbit
- Сообщения: 21
- Зарегистрирован: 18 май 2016, 06:31
- Имя: Илья Оголь
- Откуда: Томск
Re: Ссылка на сетевую и локальную папку
Сообщение
Xobbit »
У меня такая же проблема. И ладно не открывается по ссылке из поля удаляется слеш, что неудобно. Что нужно поправить, чтобы этого не происходило?
Например я ввел путь \\server\folder1\folder2\
При сохранении в любого вида поле текст преобразуется в \serverfolder1folder2, следовательно скопировав я уже никуда не перейду.
-
nikorn
- Сообщения: 342
- Зарегистрирован: 02 апр 2016, 22:26
- Имя: Корняков Никита
- Откуда: РФ, Ярославль
- Организация: Тяжмаштрейд
- Контактная информация:
Re: Ссылка на сетевую и локальную папку
Сообщение
nikorn »
Рискну высказать личное мнение. Мне кажется, что, при необходимости работать с файлами на сервере в локальной сети, более правильно поднять на этом сервере web-сервер или облачное приложение типа ownCloud и работать через http. Тогда ни у кого не будет возникать проблем.
-
support
- Техническая поддержка
- Сообщения: 9484
- Зарегистрирован: 19 окт 2014, 18:22
- Имя: Харчишин Сергей
- Откуда: Крым, Евпатория
Re: Ссылка на сетевую и локальную папку
Сообщение
support »
Xobbit писал(а):В будущем может это и правильно, но сейчас нет такой возможности. Хочется хранить ссылку.
Проблема со слэшами обнаружилась, для исправления откройте файл
\includes\functions\database.php
и удалите следующие строки
Код: Выделить всё
if (function_exists('mysqli_real_escape_string')) {
      return mysqli_real_escape_string($$link,stripslashes($string));
    } elseif (function_exists('mysqli_escape_string')) {
      return mysqli_escape_string($$link,stripslashes($string));
    }
Сообщите результат
-
Xobbit
- Сообщения: 21
- Зарегистрирован: 18 май 2016, 06:31
- Имя: Илья Оголь
- Откуда: Томск
Re: Ссылка на сетевую и локальную папку
Сообщение
Xobbit »
support писал(а):
Xobbit писал(а):В будущем может это и правильно, но сейчас нет такой возможности. Хочется хранить ссылку.
Проблема со слэшами обнаружилась, для исправления откройте файл
\includes\functions\database.php
и удалите следующие строкиКод: Выделить всё
if (function_exists('mysqli_real_escape_string')) {
      return mysqli_real_escape_string($$link,stripslashes($string));
    } elseif (function_exists('mysqli_escape_string')) {
      return mysqli_escape_string($$link,stripslashes($string));
    }
Сообщите результат
Помогло! Спасибо!
Download Windows Speedup Tool to fix errors and make PC run faster
At times, you might need to create a link to a file or folder on Windows 11/10 PC. If so, you can follow this article to find out how you can get the hyperlink or path of a specific folder or file in Windows 11 or Windows 10 PC. Let’s say that you want to mention some files in a text document made in Notepad. There are two ways to do that.
- First, you can enter the file navigation path like this: D drive > Folder-name > File-name.
- Second, you can follow this guide to get the link within moments. Here we have explained three different methods, and you can follow any one of them to get it done.
To create a link to a file or folder in Windows 11/10, you have the following ways:
- From context menu
- Using Properties
- Using Network access
1] From the context menu
It is probably the easiest way to obtain the link of a file or folder. However, this option is available in Windows 11 only. Therefore, if you are using Windows 11 and want to copy the file path or link, you can find an option in the context menu. To explain more, right-click on the file or folder and choose the Copy as path option.
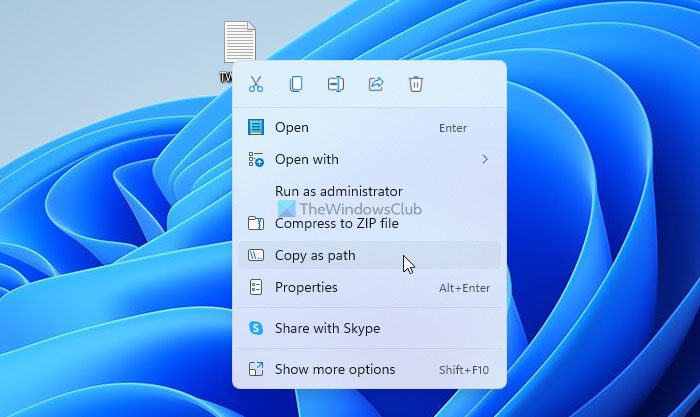
Next, you can paste the file path or link anywhere you want.
2] Using Properties
If you are using Windows 10 or any other older version, which doesn’t have the Copy as path option in the right-click context menu, you can follow this method. It is one of the most common, and it’s been there for a long time.
You need to right-click on the file and select the Properties option. Next, copy the Location on the clipboard and paste it somewhere.
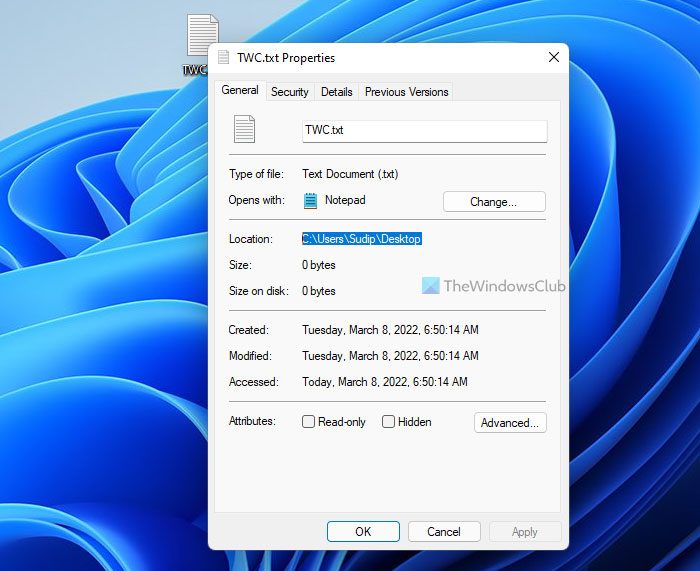
Then, copy the entire file with the file extension and paste it at the end of the file location. For example, if the path is C:\Users\username\Desktop and the file name is my-file.docx, the entire path will look like this:
C:\Users\<username>\Desktop\my-file.docx
After that, you can copy the entire path and paste it anywhere you like.
3] Using Network access
It is a different kind of method, but it works smoothly on any version of Windows. Whether you use Windows 11, Windows 10, or any other, you can follow this guide to copy the file or folder path.
To get started, you need to right-click on the file or folder and select the Give access to > Specific people.

However, if you use Windows 11, you need to click on the Show more options to find the Give access to menu.
Once the Network access window is opened, click the Share button. If it asks you to turn on the network discovery, you do not need to do that. Instead, click the Cancel button.
Then, you can find a window like this:
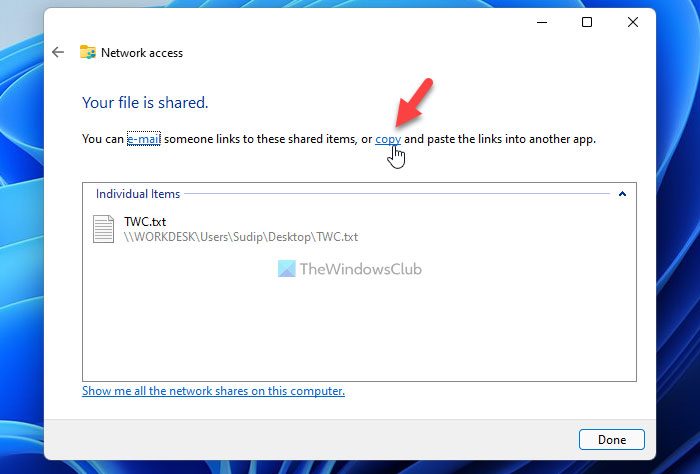
You can click the Copy button to copy the file link in your clipboard.
How do I create a link to a folder in Windows?
To create a link to a folder in Windows 11 or Windows 10, you can follow the aforementioned guide. There are three different methods you can follow to create or get the path or link to a folder or file. The easiest way is by using the Copy as path option in the right-click context menu.
How do I create a link to a file in Windows?
To create a link to a file in Windows, you can go to the Properties menu and copy the Location first. Then, paste the entire file name with the file extension at the end of the location. Once done, you can copy the entire path, which will represent the file or folder you selected.
That’s all! Hope this guide helped.
Read: How to change Copy name extension for Files and Folders in Windows?
When he is not writing about Microsoft Windows or Office, Sudip likes to work with Photoshop. He has managed the front end and back end of many websites over the years. He is currently pursuing his Bachelor’s degree.