
Опция сохранения на компьютере распространена повсюду. Бывает что создавая приложение необходимо, чтобы оно обладало данной функцией.
Создание приложения на C# и Windows Form при использовании Visual Studio достаточно простая задача. (ссылка) Но что если нам понадобится вызвать из приложения окно сохранения. И в сегодняшней статье мы создадим простое приложение Windows Form, рассмотрим как записать данные в файл и в конце добавим окно сохранения.
Для начала создадим новое приложение, так как это описано в одной из статей.
Далее вкладка ВИД > панель элементов. Выбираем элемент Button и помещаем его на форму.
Затем добавим один элемент RichTextBox, принимающий пользовательский ввод. Кнопка сохранения будет помещать введенный текст в указанное место на компьютере.
Результат:
Название на кнопке изменено в окне свойств. Правая кнопка > свойства. Находим поле текст.
Дважды щелкаем по элементу Button. В результате получаем обработчик нажатия. Внутри которого объявляется строковая переменная, которой присваивается текст полученный в элементе RichTextBox.
Для простоты выведем его в новое окно через MessageBox.
        private void button1_Click(object sender, EventArgs e)

        {

            string text = richTextBox1.Text;

            MessageBox.Show(text);

        }
Для открытия окна сохранения используем класс SaveFileDialog.
private void button1_Click(object sender, EventArgs e)
{
string text = richTextBox1.Text;
MessageBox.Show(text);
SaveFileDialog open = new SaveFileDialog();
// открываем окно сохранения
open.ShowDialog();
// присваниваем строке путь из открытого нами окна
string path = open.FileName;
try{
// создаем файл используя конструкцию using
using(FileStream fs = File.Create(path))
{
// создаем переменную типа массива байтов
// и присваиваем ей метод перевода текста в байты
byte[] info = new UTF8Encoding(true).GetBytes(text);
// производим запись байтов в файл
fs.Write(info, 0, info.Length);
}
}
catch (Exception ex)
{
Console.WriteLine(ex.ToString());
}
}
В данном коде используется конструкция using, для безопасного открытия потока на запись с последующим его закрытием. Данная конструкция автоматизирует освобождение ресурсов памяти.
Таким образом мы создали, простое оконное приложение Windows Form на C#, с функцией записи в файл и его сохранением.
-
Создано 07.04.2022 10:00:30
-
Михаил Русаков
Копирование материалов разрешается только с указанием автора (Михаил Русаков) и индексируемой прямой ссылкой на сайт (http://myrusakov.ru)!
Добавляйтесь ко мне в друзья ВКонтакте: http://vk.com/myrusakov.
Если Вы хотите дать оценку мне и моей работе, то напишите её в моей группе: http://vk.com/rusakovmy.
Если Вы не хотите пропустить новые материалы на сайте,
то Вы можете подписаться на обновления: Подписаться на обновления
Если у Вас остались какие-либо вопросы, либо у Вас есть желание высказаться по поводу этой статьи, то Вы можете оставить свой комментарий внизу страницы.
Если Вам понравился сайт, то разместите ссылку на него (у себя на сайте, на форуме, в контакте):
-
Кнопка:
Она выглядит вот так:
-
Текстовая ссылка:
Она выглядит вот так: Как создать свой сайт
- BB-код ссылки для форумов (например, можете поставить её в подписи):
A SaveFileDialog control is used to save a file using Windows SaveFileDialog. A typical SaveFileDialog looks like Figure 1 where you can see the Windows Explorer type features to navigate through folders and save a file in a folder.
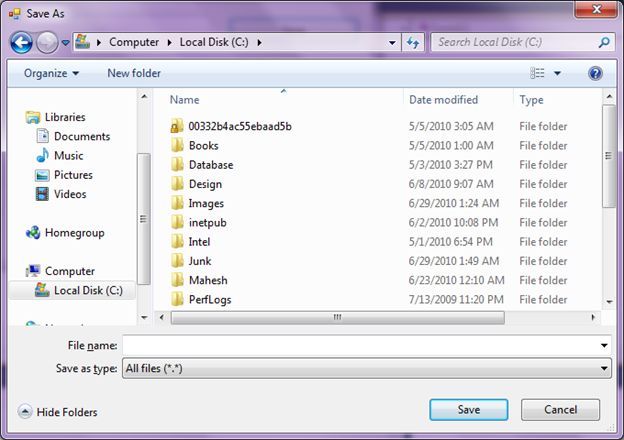
Figure 1
Creating a SaveFileDialog
We can create a SaveFileDialog control using a Forms designer at design-time or using the SaveFileDialog class in code at run-time (also known as dynamically). Unlike other Windows Forms controls, a SaveFileDialog does not have and not need visual properties like others.
Note
Even though you can create a SaveFileDialog at design-time it is easier to create a SaveFileDialog at run-time.
Design-time
To create a SaveFileDialog control at design-time, you simply drag and drop a SaveFileDialog control from Toolbox to a Form in Visual Studio. After you drag and drop a SaveFileDialog on a Form, the SaveFileDialog looks like Figure 2.
Figure 2
Adding a SaveFileDialog to a Form adds the following two lines of code.
private System.Windows.Forms.SaveFileDialog saveFileDialog1;
this.saveFileDialog1 = new System.Windows.Forms.SaveFileDialog();
Run-time
Creating a SaveFileDialog control at run-time is merely a work of creating an instance of SaveFileDialog class, setting its properties and adding SaveFileDialog class to the Form controls.
The first step to create a dynamic SaveFileDialog is to create an instance of SaveFileDialog class. The following code snippet creates a SaveFileDialog control object.
SaveFileDialog SaveFileDialog1 = new SaveFileDialog(); ShowDialog method displays the SaveFileDialog.
SaveFileDialog1.ShowDialog(); Once the ShowDialog method is called, you can browse and select a file.
Setting SaveFileDialog Properties
After you place a SaveFileDialog control on a Form, the next step is to set properties.
The easiest way to set properties is from the Properties Window. You can open Properties window by pressing F4 or right clicking on a control and selecting Properties menu item. The Properties window looks like Figure 3.
Figure 3
Initial and Restore Directories
InitialDirectory property represents the directory to be displayed when the open file dialog appears the first time.
SaveFileDialog1.InitialDirectory = @"C:\"; If RestoreDirectory property is set to true that means the open file dialog box restores the current directory before closing.
SaveFileDialog1.RestoreDirectory = true; Title
Title property is used to set or get the title of the open file dialog.
SaveFileDialog1.Title = "Browse Text Files"; Default Extension
DefaultExtn property represents the default file name extension.
SaveFileDialog1.DefaultExt = "txt"; Filter and Filter Index
Filter property represents the filter on an open file dialog that is used to filter the type of files to be loaded during the browse option in an open file dialog. For example, if you need users to restrict to image files only, we can set Filter property to load image files only.
SaveFileDialog1.Filter = "txt files (*.txt)|*.txt|All files (*.*)|*.*"; FilterIndex property represents the index of the filter currently selected in the file dialog box.
SaveFileDialog1.FilterIndex = 2; Check File Exists and Check Path Exists
CheckFileExists property indicates whether the dialog box displays a warning if the user specifies a file name that does not exist. CheckPathExists property indicates whether the dialog box displays a warning if the user specifies a path that does not exist.
SaveFileDialog1.CheckFileExists = true;
SaveFileDialog1.CheckPathExists = true;
File Name and File Names
FileName property represents the file name selected in the open file dialog.
textBox1.Text = SaveFileDialog1.FileName; If MultiSelect property is set to true that means the open file dialog box allows multiple file selection. The FileNames property represents all the files selected in the selection.
this.SaveFileDialog1.Multiselect = true;
foreach(String file in SaveFileDialog1.FileNames) {
    MessageBox.Show(file);
}
SaveFileDialog Example
The following code snippet is the code for Save button click event handler. Once a text file is selected, the name of the text file is displayed in the TextBox.
private void SaveButton_Click(object sender, EventArgs e) {
    SaveFileDialog saveFileDialog1 = new SaveFileDialog();
    saveFileDialog1.InitialDirectory = @ "C:\";
    saveFileDialog1.Title = "Save text Files";
    saveFileDialog1.CheckFileExists = true;
    saveFileDialog1.CheckPathExists = true;
    saveFileDialog1.DefaultExt = "txt";
    saveFileDialog1.Filter = "Text files (*.txt)|*.txt|All files (*.*)|*.*";
    saveFileDialog1.FilterIndex = 2;
    saveFileDialog1.RestoreDirectory = true;
    if (saveFileDialog1.ShowDialog() == DialogResult.OK) {
        textBox1.Text = saveFileDialog1.FileName;
    }
}
Summary
A SaveFileDialog control allows users to launch Windows Save File Dialog and let them save files. In this article, we discussed how to use a Windows Save File Dialog and set its properties in a Windows Forms application.
Последнее обновление: 31.10.2015
Окна открытия и сохранения файла представлены классами OpenFileDialog и SaveFileDialog.
Они имеют во многом схожую функциональность, поэтому рассмотрим их вместе.
OpenFileDialog и SaveFileDialog имеют ряд общих свойств, среди которых можно выделить следующие:
-
DefaultExt: устанавливает расширение файла, которое добавляется по умолчанию, если пользователь ввел имя файла без расширения -
AddExtension: при значенииtrueдобавляет к имени файла расширение при его отсуствии. Расширение берется из
свойстваDefaultExtилиFilter -
CheckFileExists: если имеет значениеtrue, то проверяет существование файла с указанным именем -
CheckPathExists: если имеет значениеtrue, то проверяет существование пути к файлу с указанным именем -
FileName: возвращает полное имя файла, выбранного в диалоговом окне -
Filter: задает фильтр файлов, благодаря чему в диалоговом окне можно отфильтровать файлы по расширению. Фильтр задается в следующем формате
Название_файлов|*.расширение. Например,Текстовые файлы(*.txt)|*.txt. Можно задать сразу несколько фильтров, для этого они разделяются
вертикальной линией |. Например,Bitmap files (*.bmp)|*.bmp|Image files (*.jpg)|*.jpg -
InitialDirectory: устанавливает каталог, который отображается при первом вызове окна -
Title: заголовок диалогового окна
Отдельно у класса SaveFileDialog можно еще выделить пару свойств:
-
CreatePrompt: при значенииtrueв случае, если указан не существующий файл, то будет отображаться сообщение о его создании -
OverwritePrompt: при значенииtrueв случае, если указан существующий файл, то будет отображаться сообщение о том, что файл будет перезаписан
Чтобы отобразить диалоговое окно, надо вызвать метод ShowDialog().
Рассмотрим оба диалоговых окна на примере. Добавим на форму текстовое поле textBox1 и две кнопки button1 и button2. Также перетащим с панели инструментов
компоненты OpenFileDialog и SaveFileDialog. После добавления они отобразятся внизу дизайнера формы. В итоге форма будет выглядеть примерно так:
Теперь изменим код формы:
public partial class Form1 : Form
{
    public Form1()
    {
        InitializeComponent();

        button1.Click += button1_Click;
        button2.Click += button2_Click;
        openFileDialog1.Filter = "Text files(*.txt)|*.txt|All files(*.*)|*.*";
        saveFileDialog1.Filter = "Text files(*.txt)|*.txt|All files(*.*)|*.*";
    }
    // сохранение файла
    void button2_Click(object sender, EventArgs e)
    {
        if (saveFileDialog1.ShowDialog() == DialogResult.Cancel)
            return;
        // получаем выбранный файл
        string filename = saveFileDialog1.FileName;
        // сохраняем текст в файл
        System.IO.File.WriteAllText(filename, textBox1.Text);
        MessageBox.Show("Файл сохранен");
    }
    // открытие файла
    void button1_Click(object sender, EventArgs e)
    {
        if (openFileDialog1.ShowDialog() == DialogResult.Cancel)
            return;
        // получаем выбранный файл
        string filename = openFileDialog1.FileName;
        // читаем файл в строку
        string fileText = System.IO.File.ReadAllText(filename);
        textBox1.Text = fileText;
        MessageBox.Show("Файл открыт");
    }
}
По нажатию на первую кнопку будет открываться окно открытия файла. После выбора файла он будет считываться, а его текст будет отображаться в
текстовом поле. Клик на вторую кнопку отобразит окно для сохранения файла, в котором надо установить его название. И после этого произойдет сохранение
текста из текстового поля в файл.
The Save File Dialog control (System.Windows.Forms.SaveFileDialog) allows you to save or write data to a specified file. The dialog allows you to browse your file system and pick a directory, then type a filename you want to be the name of the file that will contain the data to be written. You can type the name of the file that exist in the current directory and the dialog can prompt you if you want to overwrite it. You can also type the whole path of a file or directory in the File Name text box located at the bottom of the dialog.

The following table shows some useful properties of the SaveFileDialog control.
| Property | Description |
|---|---|
| AddExtention | Specifies whether to automatically add an extension when the user does not specify a file extension. |
| CheckFileExists | Specifies whether to initiate a warning if the user types a file that does not exist. |
| CheckPathExists | Specifies whether to initiate a warning if the user types a path that does not exist. |
| DefaultExt | The default extensions to add when the user does not indicate a file extension. |
| FileName | The file selected by the user. This can also be the default selected the file when the dialog shows up. |
| Filter | Allows you to add a filter which are a special string indicating which types or files are only allowed to be opened by the user. |
| FilterIndex | If multiple filters are present, this indicates which filter shows as the default starting with index 1. |
| InitialDirectory | The initial directory that the OpenFileDialog will show. |
| OverwritePrompt | Specifies whether the dialog will prompt you to overwrite a file when an existing file is already found. |
| RestoreDirectory | Specifies whether to restore to default directory when the dialog closes. |
| Title | The title of the dialog. |
The AddExtention property automatically adds an extension when the user does not indicate the file extension of the file name. The extension to add is specified by the DefaultExt property. The CheckFileExists and CheckPathExists methods are recommended to be set to true so the dialog will issue a warning message if it cannot find the specified file or directory. The InitialDirectory property specifies the initial directory that the dialog will show when you open it up. The Title property is the title of the dialog located at the title bar. The FileName property is the Filename specified by the user.
Specifying File Types
We can specify the file types that the file will have. We use the Filter property which accepts a string containing a special pattern. For example, we can set the dialog to only allow our file to be saved as a text file with .txt file extensions. The Filter property requires a special pattern.
Description1|Extension1|Description2|Extention2|...DescriptionN|ExtentionNWe first start with a description telling about the type of file. We then follow it with a vertical bar (|) followed by the extension. For example, the following pattern allows you to save files as text files.
Text Files|.txtThe description here is Text Files and the extension are .txt. You can specify multiple extensions. For example, the following pattern allows you to save a file as a .txt, or .png.
Text Files|*.txt|Image|*.pngYou can select the type that the file will be saved as using the combo box below the File Name text box.

SaveFileDialog Control Example
We will now create an example application that uses the basic capabilities of the SaveFileDialog control. The application will allow a user to type into a multiline text box and then save the text into a text file using a specified file name and path. Please note that we need to import the System.IO namespace in our code.
using System.IO;Create a form similar to the one below. Use a multiline text box by setting the Multiline property to true. Drag a SaveFileDialog control from the Dialogs category of the Toolbox to the form.
Double-click the button to create an event handler for its Click event. Again, import the System.IO namespace first at the top of the code. Use the following code for the event handler.
private void button1_Click(object sender, EventArgs e)
{
    //Specify the extensions allowed
    saveFileDialog1.Filter = "Text File|.txt";
    //Empty the FileName text box of the dialog
    saveFileDialog1.FileName = String.Empty;
    //Set default extension as .txt
    saveFileDialog1.DefaultExt = ".txt";

    //Open the dialog and determine which button was pressed
    DialogResult result = saveFileDialog1.ShowDialog();


    if (result == DialogResult.OK)
    {
        //Create a file stream using the file name
        FileStream fs = new FileStream(saveFileDialog1.FileName, FileMode.Create);


        StreamWriter writer = new StreamWriter(fs);
        //Write the contents of the text box to the stream
        writer.Write(textBox1.Text);
        //Close the writer and the stream
        writer.Close();
    }
}
The first line specifies that we can only save our file as a text file with .txt extension. The second one assigns an empty string to the FileName so the File Name text box of the dialog will be initially empty (you can indicate a default filename though). We set the default extension to be .txt so if the user only types the name and forgot or do not include the extensions, the dialog will automatically add the extension name in case no file type is selected. We then open the SaveFileDialog using its ShowMethod property which returns a DialogResult value. The user can now browse the directory where he/she wants to save the file. When the user presses the Save button, then the method ShowDialog will return DialogResult.OK. We tested this using an if statement. We created a FileStreamobject and set the file name and file mode. We then create a StreamWriter object and pass the FileStream object. We use the Writemethod of the writer to write the contents of the text box to the stream and save it to the file. Finally, we close the writer which also closes the file stream.
Execute the application and type anything inside the text box. Click the button and choose a directory. Then type a file name and hit Save. If a similar file exists, you may be prompted if the program should overwrite the file. Setting OverwritePrompt to false will automatically overwrite the file without prompting.
-
SaveFileDialogClass inC# -
Conclusion

This trivial guide is about using the SaveFileDialog class in C# to save the file from your C# app to the Windows file storage.
SaveFileDialog Class in C#
Users can browse the file system and choose which files to save using the SaveFileDialog component. The dialogue box gives back the name and path of the file that the user selected there.
To write the files to the disc, you must write the code.
Steps for Using the SaveFileDialog Class
-
The first step is to create a Windows Form Application and add a
SaveFileDialogcontrol.Using the
SaveFileDialogclass in code at run-time or the Forms designer at design-time, we may create aSaveFileDialogcontrol. ASaveFileDialogdoes not have and is not required to have visual properties like other Windows Forms controls.We can create a
SaveFileDialogcontrol through either of design view or the explicit code. Let’s have a look at both methods:- Create
SaveFileDialogthrough code. The code to create aSaveFileDialogis:
SaveFileDialog saveDialog = new SaveFileDialog();The above code will create a
SaveFileDialogbox object. Now, to display this dialog, we use theShowDialogmethod:- Create
SaveFileDialogthrough Design. Drag and drop aSaveFileDialogcontrol from the Toolbox to a Form in Visual Studio to create a SaveFileDialog control at design time.
The figure below depicts the
SaveFileDialogafter being dropped by drag and drop onto a Form. - Create
-
The second step is to set some properties of the
SaveFileDialog. There are different properties available that can be used according to your coding requirements.Setting properties through the Properties Window is the simplest option. The figure below depicts how the Properties window looks.
Different properties can be set in this window. Let’s discuss some of these properties: —
Initial DirectoryThe
Initial Directoryproperty specifies the default directory to be opened when the dialog box appears for saving the file. This property can be set from the property window shown above or through the code like this:saveDialog.InitialDirectory = @"D:/New Folder";TitleThe
Titleproperty sets the title to be displayed on the dialog box that appears for saving the file:saveDialog.Title = "Save Your File Here";FilterThe
filterproperty on a save file dialogue restricts the kinds of files that can be saved using a save file dialogue. For instance, we can specify the Filter option only to save binary .bin files if you wish users to be restricted to them.saveDialog.Filter = "bin files (*.bin)|*.bin|All files (*.*)|*.*";These are some properties that can be set for saving the file. There are numerous others, but we will discuss these important ones in this article.
-
After you have set the properties, you can write the code to save the file to disc. For this, the
OpenFilemethod is used. This method returns aStreamobject that can be used to save the file onto a disc.Stream fileStream; if (saveDialog.ShowDialog() == DialogResult.OK) { if ((fileStream = saveDialog.OpenFile()) != null) { // You can write the code to write the file here. fileStream.Close(); } }
Let’s now sum up the complete code here to save a file:
using System;
using System.Collections.Generic;
using System.ComponentModel;
using System.Data;
using System.Drawing;
using System.IO;
using System.Linq;
using System.Text;
using System.Threading.Tasks;
using System.Windows.Forms;
namespace WinFormsApp1 {
public partial class Form1 : Form {
public Form1() {
InitializeComponent();
}
private void button1_Click(object sender, EventArgs e) {
SaveFileDialog saveDialog = new SaveFileDialog();
saveDialog.InitialDirectory = @"C:\Users\user01\OneDrive\Documents";
saveDialog.Title = "Save Your File Here";
saveDialog.Filter = "bin files (*.bin)|*.bin|All files (*.*)|*.*";
Stream fileStream;
if (saveDialog.ShowDialog() == DialogResult.OK) {
  if ((fileStream = saveDialog.OpenFile()) != null) {
    // You can write the code to write the file here.
    fileStream.Close();
  }
}
}
}
}
We have written this code on the click event of a button so that when a button is clicked, the save dialog will open. This will generate the following output:
When we click on the Save File button, the following popup dialog box will appear:
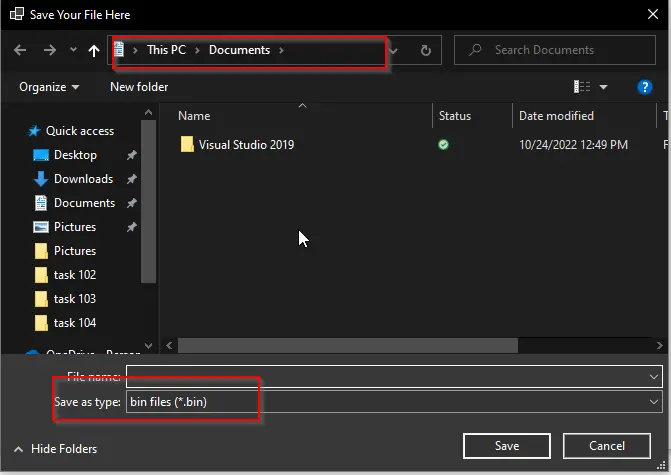
You can see in the dialog box that the location is set to the “Documents” Folder, and the file type is set to “Bin files.”
Conclusion
Users can start the Windows Save File Dialog and save files using a SaveFileDialog control. This article discussed using a Windows Save File Dialog and configuring its properties in a Windows Forms application.
Enjoying our tutorials? Subscribe to DelftStack on YouTube to support us in creating more high-quality video guides. Subscribe
Related Article — Csharp GUI
- How to Group the Radio Buttons in C#
- How to Add Right Click Menu to an Item in C#
- How to Add Items in C# ComboBox
- How to Add Placeholder to a Textbox in C#
- How to Simulate a Key Press in C#