
In this page, you will be informed how to print screen on a Mac running Windows or Windows with a Mac keyboard. For those who are running Windows 10 on a Mac through Bootcamp or Parallels, then you are able to print screen on Mac by following these following steps.
- Function (fn) + Shift + F11: This key combination can be pressed if you want to take a Mac print screen of the whole screen.
- Option (alt) + Function (fn) + Shift + F11: This key combination can be pressed if you want to take a Mac print screen of the front most window.
After you have taken the screenshot, you will need to open Paint, Microsoft Word, or any other apps and do the paste action in order to paste the screen in the document. Please take a note that on the Touch Bar equipped MacBooks, the on screen F11 key will become visible when you press the fn key.
For everyone who is a long time user of Mac, you might be confused by the term “print screen Mac”. In fact, there is nothing to be confused as it is just another term used to call a screenshot on Mac.
Aside from the method to print screen on Mac running Windows or Windows with a Mac keyboard, you will also be informed some other ways to print screen on Mac and some different kinds of keyboards that you might be using, including the normal Mac keyboards, Touch Bar equipped Mac keyboards, and Windows keyboards that being used on Mac.
Print screening on Mac with normal keyboard
Print screen Mac function is really easy to do. Each screenshot taken by using this method is placed on the desktop by default.
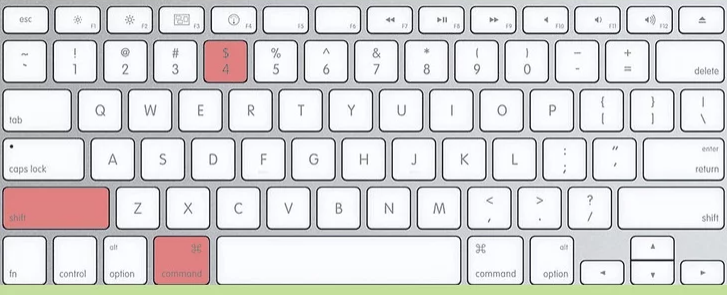
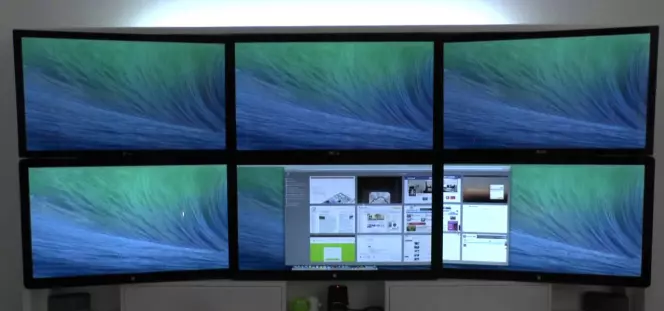
- Command + Shift + 3: This key combination can be used to take a screenshot of the entire screen if you have multiple monitors attached to your Mac. This step will take a screenshot on all of them.
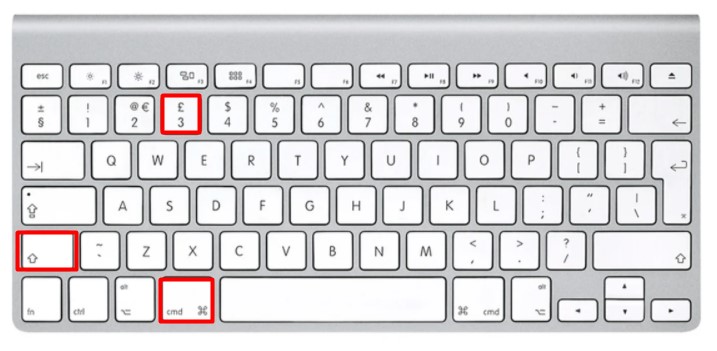
- Command + shift + 4: This key combination can be used to take a screenshot of a specific portion of the screen. After pressing the key combination, then you will need to use the mouse or trackpad in order to choose the portion of the screen that you want to include in the screenshot.

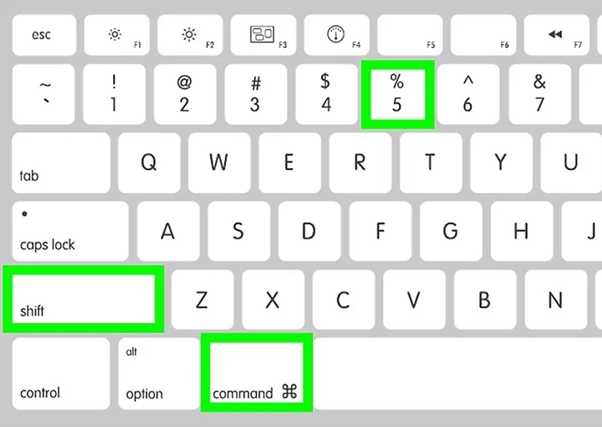
- Command + shift + 5: This key combination can be used to take a screenshot of a specific screen. Once you have pressed all the keys you will get a camera cursor on the screen. Feel free to move the cursor to the screen that you want to take the screenshot of and then left click.

- Command + shift + 4 + Space bar: This key combination can be used to take a screenshot of a specific app or window. Keep in mind that the space bar should be pressed separately from the Command + Shift + 4. After that, click on the app or window that you want to take the screenshot of.

Print screening on Mac with Touch Bar keyboard
If you have a MacBook Pro that comes with a Touch Bar, then you have the special print screen Mac functions that makes it easier for you to print the screen on Mac. With the MacBook Pro that has a Touch Bar, you are able to take a screenshot simply by pressing the Command + Shift + 4 key combination. Your Mac will show the special screenshot buttons on the Touch Bar as soon as you press this key combination.
Then, you can tap on the first button in order to take the screenshot of the full screen or tap on the second one to choose the certain screen or the app on the screen for the screenshot. Apart from that, there is also the third button that allows you to choose the portion of the screen for the screenshot.
In addition, there is a special print screen option on Mac that is exclusively available on Touch Bar keyboard. This one allows you to select the location to store the screenshot. From the Touch Bar of the Mac, you can tap on the option named “Desktop” which is able to be found next to the “Save to” text and from the screen select the folder that you want to save the screenshot in.
Besides, you can also choose the Clipboard option if you want the next screenshot to only be saved to the clipboard. You are then able to paste the screenshot wherever you want. On top of that you can also directly save the screenshot in the Preview app, Messages app, and Mail app.
Print screening on Windows with Mac with keyboard
For those who have Pc running Windows 10 but you are using a Mac keyboard, then you are able to print screen on Windows with Mac keyboard using these following actions.
- Function (fn) + Shift + F11: This key combination can be used if you want to take a print screen of the whole screen.

- Option (alt) + Function (fn) + shift + F11: This key combination can be used if you want to take a print screen of the front most window.

Once you have taken the screenshot, you will have to open Microsoft Word or Paint and do the paste action in order to paste the print screen in the document.
The term “print screen” is normally used in the Windows environment in order to describe and give the power for you to capture the content that you are able to see on the screen. On the Windows compatible keyboards, in particular, you will be able to see that Print Screen is an actual button. On Mac, there is no button named that way. Fortunately, there is a series of keystrokes that you are able to perform if you want to print screen. Basically, they have the same function as Print Screen of Windows. Instead of “print screen”, you might hear the term “capture” or “screenshot” on Mac.
AUTHOR BIO
On my daily job, I am a software engineer, programmer & computer technician. My passion is assembling PC hardware, studying Operating System and all things related to computers technology. I also love to make short films for YouTube as a producer. More at about me…
Как сделать скриншот (screenshot) в операционной системе Windows, который запускается на компьютерах mac (Macbook Pro, iMac).
Работа в Windows на компьютерах Mac имеет свои особенности. В частности это касается особенностей клавиатуры, на которой отсутствуют привычные windows клавиши.
Аналог клавиши с логотипом Windows (Win) на компьютерах Mac является клавиша Command.
Делаем скриншот в Windows 10 на Bootcamp
Сочетание клавиш для создания скриншота:
Сочетание клавиш для записи и остановки видео:
Запись видео происходит через приложение Xbox, которое установлено в Windows 10. Изображения и видео при этом не сохраняются в папке Изображения, а сохраняются по такому пути:
C:\Users\user_name\Videos\Captures
If you’re using a Mac keyboard with Windows 10, you may have noticed that there isn’t a traditional «Print Screen» key like on other keyboards. However, taking screenshots is still possible on a Mac keyboard, and in this tutorial, we’ll show you how to do it.
Step 1: Press the Command + Shift + 3 keys simultaneously. This will capture the entire screen and save it as a PNG file on your desktop.
Step 2: If you only want to capture a specific portion of the screen, press the Command + Shift + 4 keys. Your cursor will turn into a crosshair. Click and drag to select the area you want to capture. Once you release the mouse button, the screenshot will be saved as a PNG file on your desktop.
Step 3: To capture a specific window or application, press the Command + Shift + 4 keys, then press the Spacebar. Your cursor will change to a camera icon. Move the camera icon over the window or application you want to capture and click on it. The screenshot of the selected window will be saved as a PNG file on your desktop.
Step 4: If you prefer to copy the screenshot to the clipboard instead of saving it as a file, add the Control key to any of the previous key combinations. For example, Command + Control + Shift + 3 will capture the entire screen and copy it to the clipboard.
Step 5: To take a screenshot of the Touch Bar on a MacBook Pro, press the Command + Shift + 6 keys. The screenshot will be saved as a PNG file on your desktop.
| Pros | Cons |
|---|---|
| 1. Compatible with a Mac keyboard and Windows 10. | 1. Requires memorizing keyboard shortcuts. |
| 2. Provides different screenshot options (full screen, custom area, specific window). | 2. No dedicated «Print Screen» key. |
| 3. Allows for easy saving or copying to the clipboard. | 3. Limited options for advanced screen capturing. |
Taking screenshots on a Mac keyboard with Windows 10 may require some adjustment if you’re used to the traditional «Print Screen» key, but once you get familiar with the keyboard shortcuts, it becomes a straightforward process. Whether you need to capture the entire screen, a specific area, or a window, these steps will help you accomplish it without any hassle.
Video Tutorial: How do I enable Ctrl Alt Print Screen?
How do I use the Print Screen button on Windows keyboard?
To use the Print Screen button on a Windows keyboard, you can follow these steps:
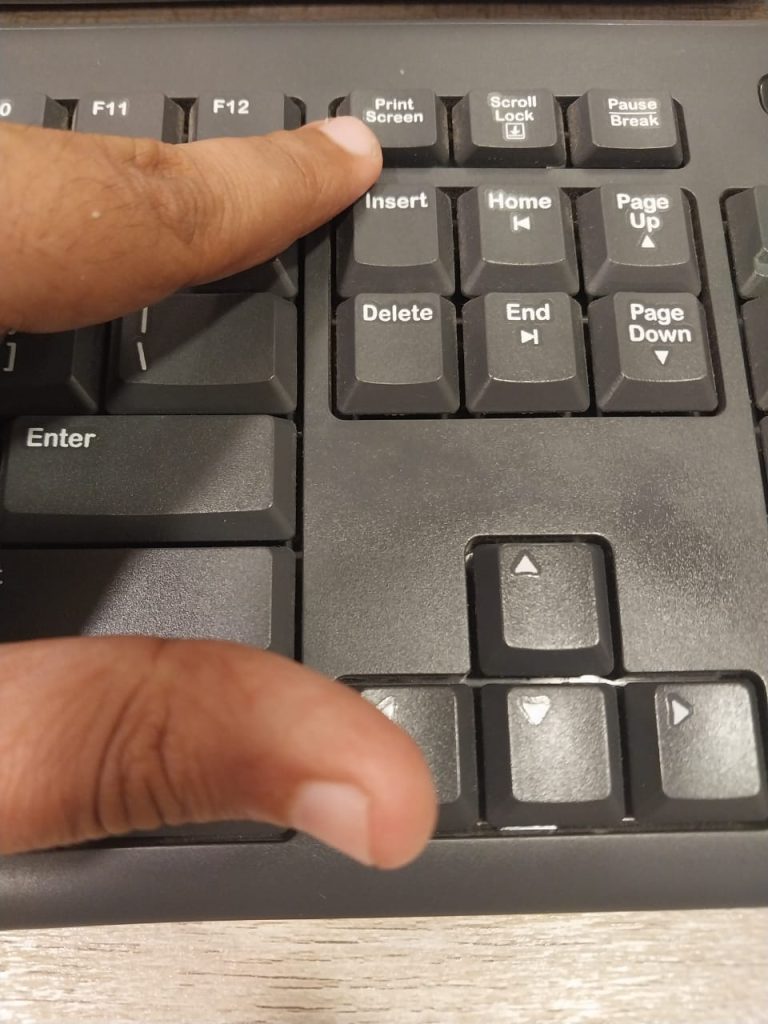
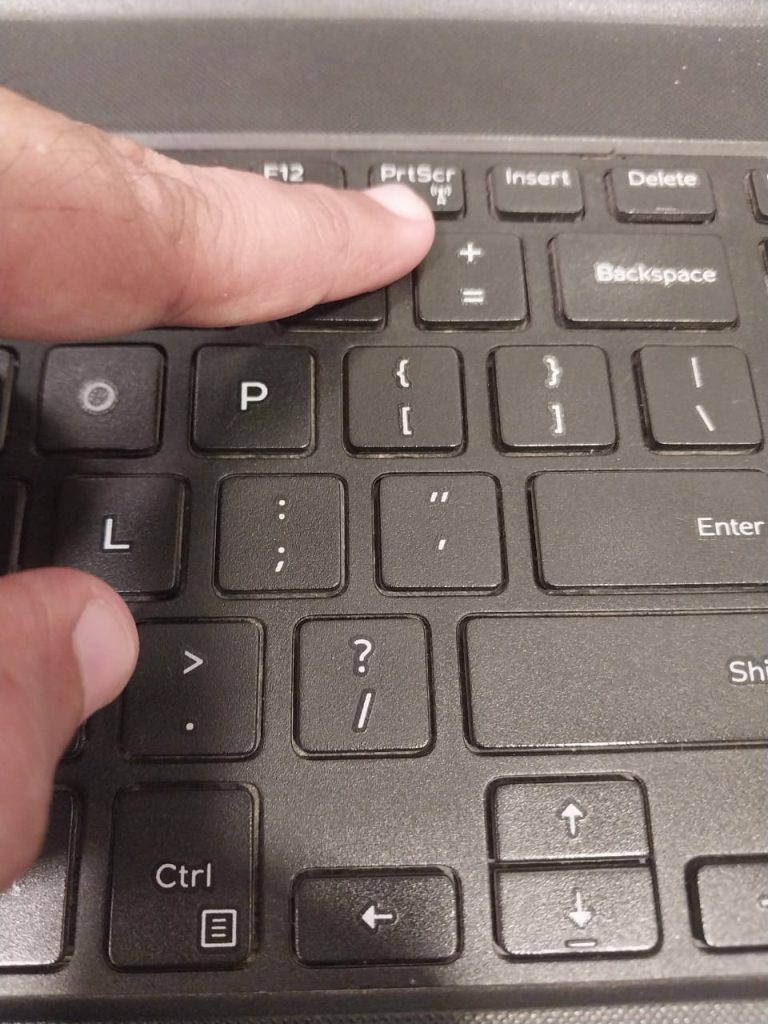
1. Find the Print Screen (PrtScn) button on your keyboard. It is usually located in the top-right section, typically beside the «Scroll Lock» and «Pause/Break» keys. Sometimes, the button may be labeled differently, such as «PrtSc,» «PrtScn,» or similar variations.
2. Press the PrtScn button once. This captures a screenshot of your entire screen and saves it to the clipboard.
3. Open an image editing software, such as MS Paint, Adobe Photoshop, or even a simple program like Paint.NET.
4. Once the software is open, press Ctrl + V on your keyboard, or go to the «Edit» menu and select «Paste.» This action pastes the screenshot from your clipboard onto a blank canvas or image editing workspace.
5. In the image editing software, you can crop, annotate, or make any necessary adjustments to the screenshot. Alternatively, you can save it directly as an image file (e.g., JPEG, PNG) by selecting the «Save» or «Save As» option in the software’s file menu.
Remember, the Print Screen button captures the entire screen. If you want to capture only a specific window, use the Alt + Print Screen combination instead. This captures the active window, and you can proceed with the same steps to edit or save the screenshot.
Please note that these instructions may vary slightly depending on your specific keyboard layout and the version of Windows you are using.
What is F12 on Mac?
F12 on a Mac is a function key that serves a specific purpose. Here’s what F12 does:
1. Show Desktop: Pressing F12 on a Mac will minimize all open windows and display the Desktop. It provides a quick way to access files or shortcuts on the Desktop without the need to manually minimize each window individually.
2. Mission Control: If you have assigned Mission Control as the function for F12 in System Preferences, pressing the key will trigger Mission Control. Mission Control allows you to view all open windows and spaces, making it easier to navigate between different applications and workspaces.
3. Customizable: Depending on individual preferences, the function keys on a Mac can be customized to perform different actions. You can assign specific functions to F12 or any other function key according to your needs through the Keyboard settings in System Preferences. So, the specific functionality of F12 can vary based on the user’s customization.
Overall, F12 on a Mac provides convenient shortcuts for accessing the Desktop, managing open windows, or activating Mission Control. Its functionality can also be tailored to better suit individual preferences and workflows through customization options.
What is the shortcut for Print Screen?
The shortcut for Print Screen, also known as a screen capture or screenshot, depends on the operating system you are using. Here are the shortcuts for various platforms:
1. Windows:
– Press the «PrtScn» or «Print Screen» key on your keyboard. This copies the entire screen to the clipboard.
– To capture only the active window, press «Alt» + «PrtScn» or «Alt» + «Print Screen» instead.
2. macOS:
– Press «Shift» + «Command» + «3» to capture the entire screen. The screenshot will be saved as a file on your desktop.
– For capturing a specific area of the screen, press «Shift» + «Command» + «4«. You can then drag to select the desired region for the screenshot. The screenshot will also be saved as a file on your desktop.
3. iOS (iPhone/iPad):
– To capture the screen, simultaneously press the «Side» (or «Sleep/Wake«) button and the «Volume Up» button. The screenshot will be saved in your Photos app.
4. Android:
– The shortcut may vary depending on the device manufacturer and Android version. Commonly, you can press and hold the «Power/Lock» button and the «Volume Down» button simultaneously. Some devices also have a «Screenshot» option in the notification shade or power menu that you can tap to take a screenshot.
Remember to check your device’s user manual or search for specific instructions if the above shortcuts do not work for you, as they might differ based on the device and operating system version you are using.
How do I Print Screen on Mac using Windows Remote desktop?
To take a screenshot, or perform a print screen, on a Mac using Windows Remote Desktop, follow these steps:
1. Launch the Windows Remote Desktop application on your Mac. Ensure that you have a stable connection to the remote Windows computer you wish to capture the screen from.
2. Once connected, navigate to the window or screen you want to capture on the remote Windows computer.
3. On your Mac keyboard, press the «Command» (⌘) key and the «Shift» key at the same time, along with the «3» key. This combination will capture and save a full-screen screenshot of the remote Windows desktop as a PNG file on your Mac’s local storage.
4. To capture a specific area of the remote Windows desktop, press the «Command» (⌘) key, the «Shift» key, and the «4» key together. Your cursor will turn into a crosshair.
5. Click and drag the crosshair to select the area of the remote Windows screen you want to capture. Release the mouse button to capture the selected area as a PNG file on your Mac.
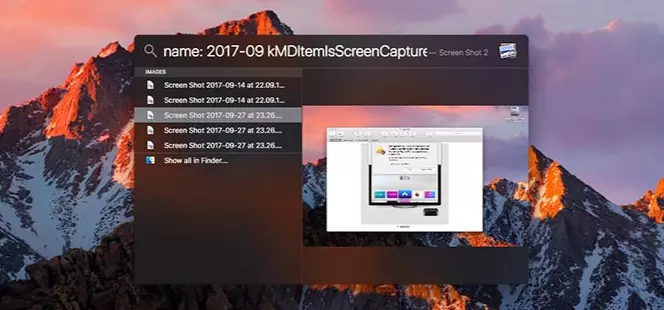
6. By default, the screenshots will be saved on your Mac’s desktop with the filename «Screen Shot [date] at [time].png«. You can also find them in the «Screenshots» folder under your Mac’s «Pictures» directory.
Following these steps should allow you to take screenshots or print screens of the remote Windows desktop while using Windows Remote Desktop on your Mac.
To take a screenshot or print screen on a Mac keyboard, you can follow the steps listed below:
1. Locate the Command key (⌘) on your Mac keyboard. It is typically located next to the Spacebar and has a symbol resembling a cloverleaf or a propeller.
2. To capture the entire screen, press the Command (⌘) + Shift + 3 keys simultaneously. The screen will flash, indicating that a screenshot has been taken.
3. If you only want to capture a specific portion of the screen, press the Command (⌘) + Shift + 4 keys simultaneously. Your cursor will transform into a crosshair.
4. Position the crosshair at the top-left corner of the area you want to capture, click, and then drag to select the desired portion. As you drag, you can see the dimensions of the selected area display in real-time.
5. Once you’ve selected your desired area, release the mouse button or trackpad. The screen will flash, indicating that a screenshot has been taken.
6. To capture a specific window or menu, press the Command (⌘) + Shift + 4 keys simultaneously and then press the Spacebar. The cursor will change into a camera icon.
7. Position the camera icon over the window or menu you want to capture, and it will be highlighted as you hover. Click the window or menu, and the screenshot will be captured.
8. After capturing a screenshot, it will be saved as a .png file on your desktop by default, labeled with the date and time of capture.
These steps should help you easily take screenshots on a Mac using the keyboard shortcuts provided.
What is F11 on a Mac?
F11 on a Mac is a function key that serves a specific purpose on macOS devices. Here are the steps to explain what F11 does on a Mac:
1. F11 is a keyboard function key that corresponds to the «Show Desktop» feature on macOS.
2. When you press F11 on a Mac, all open windows on the screen will be minimized, revealing the desktop and any desktop icons you have.
3. This feature can be useful when you want to quickly access files or applications on your desktop without manually minimizing each window separately.
4. Pressing F11 again or clicking on any open application window will restore the windows to their previous positions.
It’s worth noting that the functionality of function keys can vary depending on the settings in the System Preferences. By default, the F11 key is assigned to the «Show Desktop» function, but you can customize the behavior of function keys in the Keyboard settings if desired.
Many times, when we see something on our computer displays, we want to take a snapshot of it right away. We are completely enveloped by the digital world in this day and age. We have the capacity to capture, save, and share moments with others by taking screenshots.
Here, we’ll go through how you can snap screenshots with ease on MAC or Windows devices.
How to Take a Screenshot on Windows
It’s really easy to take a screenshot of your computer’s whole screen in Windows. Simply hit the “PrtSc” or “Print Screen” key on your keyboard to start printing your screen. This button’s location may vary depending on the model of your computer or keyboard, but it is typically on the right side. It may be found near the top of the keyboard in certain circumstances or at the bottom in others. The print screen button’s placement varies from device to device.
Gorelo RMM Software and PSA | Start Your Free Trial Now
You must first open an image editing program, such as Word or Paint, and then paste the screenshot there by pressing Ctrl + V or right-clicking and choosing paste. Pressing Alt + PrtScn will allow you to only take a picture of the currently active window, which you can then paste into your software.
Taking Screenshot on Mac
On a Mac, taking a screenshot is simple, and depending on your needs, you have a few different alternatives. You can simultaneously hit the command, shift, and 5 keys to capture your full screen. This will open a little panel with three distinct screen capture options for you to choose from: you may either capture your entire screen, a window, or a portion of it.
Reference: https://www.wikihow.com/Take-a-Screenshot-with-a-MacBook
On a Mac, you can simultaneously press the shift, command, and four keys to capture a specific portion of your screen. Your cursor will turn into a crosshair once you do this, allowing you to choose the precise portion of your screen you wish to include in your screenshot.
Now release the trackpad or mouse button to capture screenshot.
How do I take a screenshot on Windows with a Mac keyboard?
You can still utilize keyboard shortcuts to snap screenshots if you’re using a Mac keyboard with a Windows machine or a Mac with a Windows operating system. Simply press and hold the Fn, Shift, and F11 buttons at the same time to capture the entire screen.
Press the Option, fn, Shift, and F11 buttons at the same time to snap a screenshot of the currently open window.
How do I take a screenshot on Mac with a Windows keyboard?
It is possible to take screenshots on a Macbook Pro or any other computer running a Mac OS using keyboard shortcuts from a Windows machine.
Pressing Windows, Shift, and 3 at the same time on a Mac OS keyboard will record the full screen. The screenshot will be saved as a .PNG file to the desktop.
The saved screenshot file can also be right-clicked and renamed to your liking.
Where are Screenshots saved on PC?
On most computers, a screenshot is immediately saved in the “This PC > Pictures > Screenshots” folder after being taken.
You can alter this location at any time by making a brand-new “Screenshots” folder inside of the “Documents” folder. Open the “File Explorer” window, then click “New folder” at the window’s top to create this new folder. Name the new folder “Screenshots” in the file system. You can now store screenshots in the brand-new “Screenshots” folder that you made.
Keyboard Shortcut for Screenshot in Windows 10
The fact that Windows 10 can be operated on a wide range of devices, including PCs, laptops, and tablets, means that there are several shortcut key alternatives for taking screenshots. However, taking screenshots on Windows 10 should be possible with the following function keys. A screenshot is taken by simultaneously pressing the PrtScn button and the Windows Logo Key.
If the keyboard being used lacks the PrtScn button seen in the aforementioned image, a screenshot can be taken by simultaneously pressing the Fn key, the Windows key, and the space bar.
Gorelo: RMM and PSA For Managed Services Providers | Book Your Demo Today

Как сделать скрин на Mac
Используйте Мовавика Запись экрана!
- Создавайте скриншоты всего в два клика
- Используйте инструменты для редактирования
- Сохраняйте изображения на компьютер или на Google Диск
Просто скачайте программу и следуйте инструкции ниже!

Едва приступив к освоению iMac, Mac Pro или MacBook Air, пользователь сталкивается с тем, что его мир никогда не будет прежним: на клавиатурах компьютеров Apple отсутствует волшебная клавиша Print Screen. А если ее нет, то как сделать скрин на Mac? Поспешим успокоить: на ПК и ноутбуках есть не менее волшебные клавиши, выполняющие те же функции, что и «Принт Скрин». Кроме того, существует несколько альтернативных способов, с помощью которых легко не только сделать скриншот на Mac, но и записать его в нужном формате, оперативно отослать друзьям, опубликовать на сайте или в социальных сетях.
Выбор инструмента зависит от того, для какой цели пользователь делает снимок экрана, важен ли формат изображения, требуется ли редактирование. К примеру, скриншот сообщения об ошибке бывает нужен, чтобы отослать его в техподдержку или специалисту. Иногда требуется сохранить скрин текстовой беседы в мессенджере. Составляя презентацию какого-либо приложения, обычно скринят каждый этап его работы. Отредактированные скриншоты вставляют в клипы, используют для создания демотиваторов и фотожаб. Для каждого из этих случаев можно подобрать инструмент, позволяющий выполнить работу с минимальными затратами времени и усилий.
Как сделать скриншот на Mac с помощью встроенных инструментов macOS
Сочетание клавиш
Для того, чтобы сделать скриншот, в операционной системе macOS предусмотрено несколько сочетаний клавиш:
-
Command + Shift + 3 – если нужен снимок всего экрана.
-
Command + Shift + 4 – если требуется снимок части экрана. После нажатия этих клавиш появляется возможность при помощи мыши очертить рамкой часть экрана. Если вы неправильно выделили область и хотите начать все сначала, просто нажмите Esc. После того, как нужная часть экрана будет охвачена рамкой, следует отпустить левую клавишу мыши – и система сделает скриншот.
-
Command + Shift + 4, а затем Пробел – если нужно сделать снимок одного из окон, открытых на экране. После нажатия этих клавиш вместо значка курсора возникнет пиктограмма фотоаппарата. Если вы передумали делать скрин, нажмите Esc. Чтобы получить снимок окна программы, следует навести на него курсор-«фотоаппарат» и щелкнуть левой клавишей мыши. Однако на скрине останутся тени окна. Чтобы сделать снимок без теней, перед выбором окна программы нажмите клавишу Option и удерживайте до тех пор, пока не отпустите клавишу мыши. Скрины окон некоторых программ описанным способом сделать нельзя, так как это запрещено разработчиками. В частности, к таким приложениям относится Apple TV.
Если при создании скриншота нажать и удерживать клавишу Control, система добавит скриншот в буфер обмена. Это удобно, если вы хотите сразу после создания снимка вставить его в документ или отредактировать.
После создания скриншота в углу экрана появляется миниатюра. Щелкнув по ней клавишей мыши, снимок экрана можно открыть для редактирования или перетащить в любую из папок для сохранения. По умолчанию скриншот хранится на рабочем столе. Файл называется «Снимок экрана[дата][время].png».
Проблема в том, что файлы типа PNG отличаются высоким качеством, но занимают довольно много места. Если изображение нужно кому-либо переслать или опубликовать на сайте, лучше преобразовать его в JPG-файл. Это можно сделать при помощи конвертера. Однако в системе предусмотрена и возможность записи скриншотов по умолчанию в другом графическом формате (например, JPG или GIF). Чтобы изменить тип файла скриншота, нужно ввести в строке терминала команду вида:
defaults write com.apple.screencapture type [тип файла]
Соответственно, macOS по умолчанию будет создавать скриншоты в формате JPG после введения команды:
defaults write com.apple.screencapture type jpg
Приложение «Снимок экрана»
Чтобы сделать скриншот, можно воспользоваться приложением «Снимок экрана». Для вызова утилиты следует нажать комбинацию клавиш Command + Shift + 5.
На экране появится панель инструментов, с помощью которой легко сделать снимок окна определенной программы, целого экрана или его фрагмента, записать скриншот. Во всплывающем меню Параметры можно задать папку, куда по умолчанию будут записываться скриншоты, а также включить или отключить опцию показа миниатюры.
Как сделать на Mac скриншот, занимающий более одного экрана
В браузере Safari есть возможность сделать скриншот всей страницы, даже если она целиком не помещается на экране. Алгоритм действий:
-
Включить меню Разработка (если оно не включено). Для этого в меню браузера выбрать Настройки > Дополнения и установить флажок Показывать меню «Разработка».
-
Открыть веб-страницу, скриншот которой нужно сохранить.
-
В меню выбрать Разработка > Подключить веб-инспектор.
-
В окне веб-инспектора навести указатель мыши на первую строчку, начинающуюся с html и щелчком правой клавиши мыши активировать всплывающее меню.
-
Выбрать пункт Сделать снимок экрана.
-
Указать название файла со скриншотом и папку для его сохранения.
Как сделать скриншот на Mac при помощи Мовавика Запись экрана

Очень просто сделать скриншот при помощи программы Мовавика Запись экрана. Одно из главных достоинств приложения – интуитивно понятный интерфейс, а также отсутствие необходимости запоминать длинные комбинации горячих клавиш и косплеить пианиста. Программа не только скринит выбранные фрагменты окон, но и предоставляет возможности для редактирования полученных снимков. Скачать приложение можно с официального сайта, установка займет несколько минут.
Чтобы сделать снимок экрана на компьютере, где установлено приложение Мовавика Запись экрана, нужно выполнить последовательность действий:
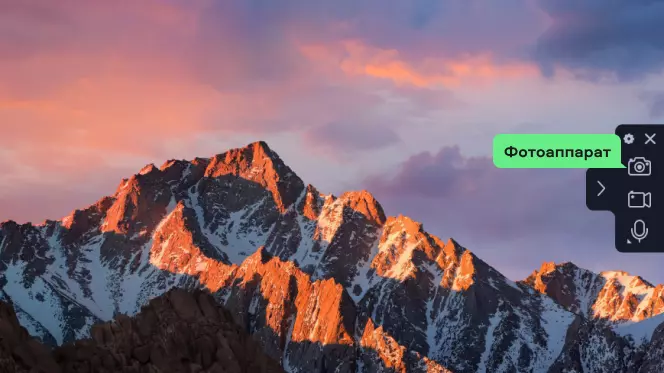
1. Запустить Мовавика Запись экрана. Нажать клавишу F8 или выбрать на расположенной в правой части экрана панели инструментов пиктограмму фотоаппарата.
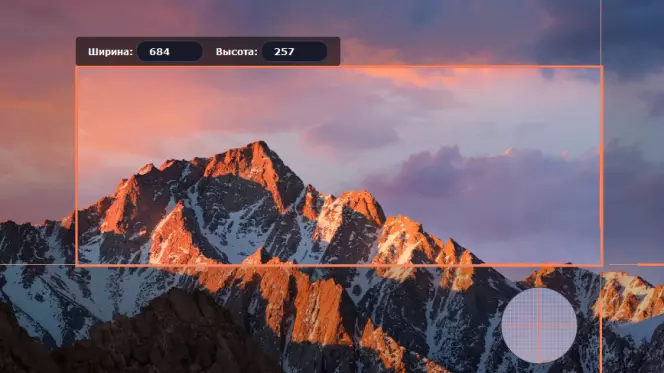
2. Чтобы «сфотографировать» весь экран, достаточно нажать клавишу *Пробел. Если нужен снимок фрагмента экрана, необходимо, растягивая мышью прямоугольную рамку, заключить в нее нужную область. Для создания снимка отдельного окна требуется навести на него указатель мыши и, когда рамка охватит окно, щелкнуть левой клавишей.
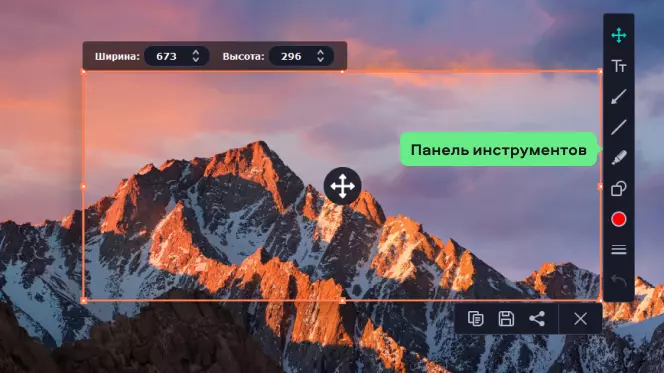
3. Используя панель инструментов, скриншот легко отредактировать: изменить пропорции, нарисовать линию или стрелку, вставить текст.
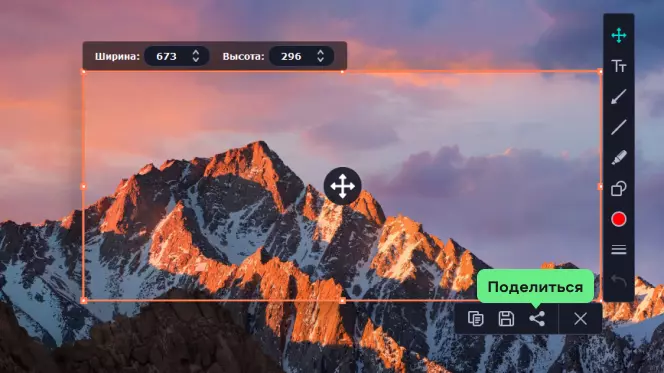
4. Выполнить одно из действий: скопировать скриншот в буфер обмена (без сохранения на диске), сохранить в файле, выбрав любой популярный формат, или загрузить на Google Диск (кнопка Поделиться).
Как сделать скриншот на Маке с Windows
В последнее время большую популярность приобрела утилита Boot Camp, с помощью которой многие пользователи компьютеров Apple в качестве второй операционной системы устанавливают Windows. Некоторые же вообще предпочитают использовать привычную ОС от Microsoft в качестве единственной. Однако, впервые загрузив свой iMac c Windows, пользователь понимает, что привычными средствами сделать скриншот не удастся: ведь кнопки «Print Screen» на «яблочной» клавиатуре по-прежнему нет.
Поэтому полезно знать, что, если компьютер Mac работает под Windows, то для получения скриншота вместо «Принт скрин» на клавиатуре Apple нужно одновременно нажать 3 клавиши: Fn + Shift + F11.
Также для создания снимка экрана можно использовать одно из сторонних приложений. Например, уже упомянутая в статье программа Мовавика Запись экрана работает и на устройствах с ОС Windows. Интерфейс точно такой же, поэтому дополнительно запоминать ничего не придется.
Еще одно полезное стороннее приложение, работающие как на macOS, так и на Windows – Joxi. Программу можно бесплатно скачать с официального сайта. Программа размещает скриншот на удаленном сервере, а пользователю предоставляет ссылку.
Как видим, сделать скриншот на Mac достаточно легко. Однако, как и в любом деле, есть нюансы. Если вам нужна просто картинка с экрана – легче всего воспользоваться одной из перечисленных в статье стандартных комбинаций горячих клавиш.
Joxi часто выбирают, готовый скриншот нужно кому-то переслать. Правда, есть одно «но»: размещение данных на удаленном сервере – не слишком удачная идея с точки зрения информационной безопасности.
Если вы создаете презентацию или клип – использование Мовавика Запись экрана значительно ускорит решение этой задачи. С помощью приложения вы за пару минут превратите снимок экрана в демотиватор или вставите серию скриншотов в клип. Программа предоставляет возможности объединения графических и видеоданных, создания GIF-анимации. Тем, кто часто публикует картинки и видео в социальных сетях или просто любит работать с графикой, это приложение не раз сослужит добрую службу.
Удобная запись экрана для эффективной работы или учебы
Обратите внимание: программа Мовавика Запись экрана не предназначена для записи видео и других материалов, защищенных от копирования. Подробнее
Похожие инструкции
-
Как записать вебинар на компьютер бесплатно и онлайн
-
Как скачать фильм на компьютер бесплатно с Интернета – 4 популярных способа
-
Как создать подкаст самому – простой способ
-
Как сделать скринкаст на Windows, Mac и телефоне
-
Как сделать скриншот онлайн | Топ-5 онлайн программ для скринов
-
Как записать онлайн-видео? | 8 программ для захвата потокового видео
-
Лучшие программы для записи встреч на компьютере и телефоне
-
Как сделать запись лекции на iPad, компьютер и телефон
-
Как сделать скриншот видео | Как сохранить кадр из видео
-
Как озвучивать мультики самому | Озвучка мультфильмов

Остались вопросы?
Если вы не можете найти ответ на свой вопрос, обратитесь в нашу службу поддержки.
Подпишитесь и получайте скидки, советы по монтажу и идеи для контента
На нашу рассылку подписалось уже более 1,5 млн. пользователей