
Applies ToWindows 11 Windows 10
Support for Windows 10 will end in October 2025
After October 14, 2025, Microsoft will no longer provide free software updates from Windows Update, technical assistance, or security fixes for Windows 10. Your PC will still work, but we recommend moving to Windows 11.
Learn more
Screen savers have been a staple feature in Windows for decades. Originally designed to prevent burn-in on CRT monitors, they have evolved into a customizable feature that adds a personal touch to your Windows device. However, with modern advancements, it’s now recommended to put your display to sleep to save energy.
What’s a screen saver?
A screen saver is an animated image or pattern that appears on your screen when your computer is idle for a specified period. While modern LCD and LED monitors are less susceptible to burn-in, screen savers remain a popular way to personalize your device and add an extra layer of security.
Why use a screen saver?
While screen savers are no longer essential for preventing burn-in, they offer several benefits:
-
Personalization: Customize your screen with animations or photos that reflect your style
-
Security: Automatically lock your computer when you’re away, protecting your data
-
Aesthetics: Add a visually pleasing element to your idle screen
-
Prevent Burn-In on OLED Displays: Screen savers can help prevent burn-in on OLED displays by ensuring that static images are not displayed for prolonged periods
Tip: To save energy and reduce wear on your display, it’s recommended to put your computer into sleep mode when it’s idle. Sleep mode consumes significantly less power than running a screen saver and allows your computer to quickly resume where you left off. To learn more, see How to adjust power and sleep settings in Windows.
Configure a screen saver
-
In the Settings app on your Windows device, open Personalization > Lock screen or use the following shortcut:
Lock screen
-
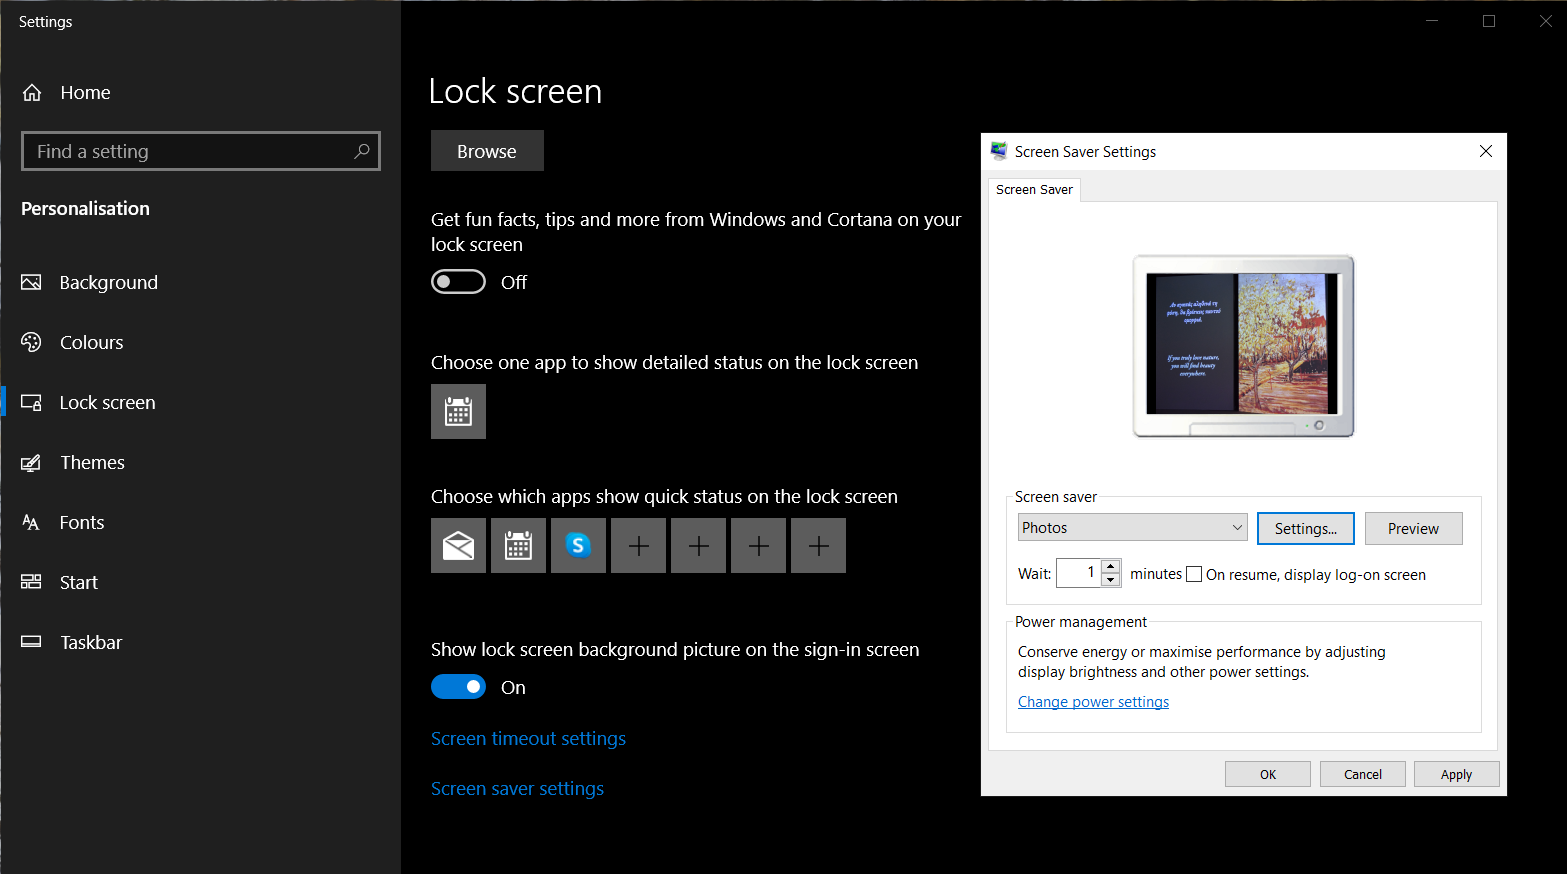
Select Screen saver
-
In the Screen Saver Settings window, select a screen saver from the drop-down list. Options include 3D Text, Blank, Bubbles, Mystify, Photos, and Ribbons
-
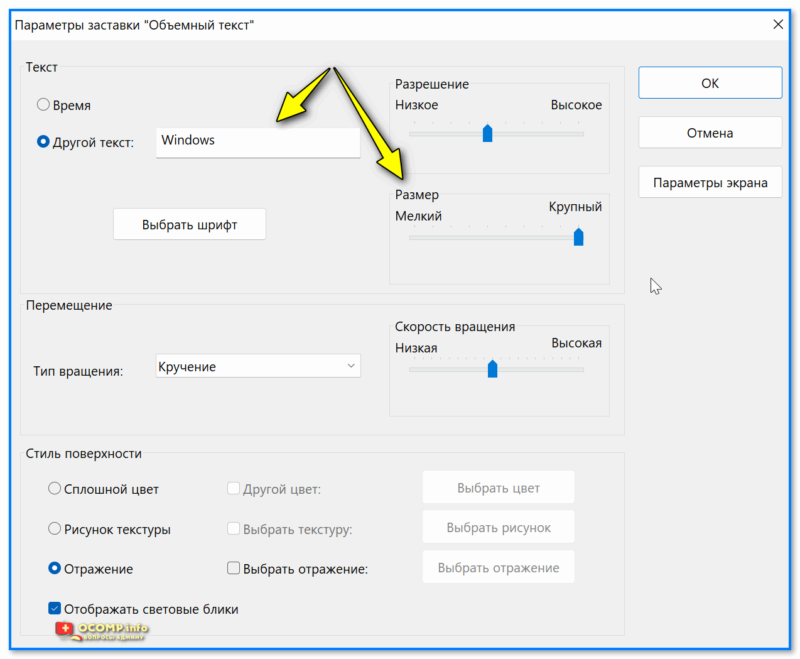
Customize Your Screen Saver: if available, select Settings… to customize the selected screen saver. For example, you can create a custom message in the 3D Text screen saver or choose a folder of pictures for the Photos screen saver
-
Set the Wait Time: use the Wait option to specify the number of minutes of inactivity before the screen saver activates
-
Enable Security: (Optional) Check the On resume, display logon screen option to require a password when resuming from the screen saver
Need more help?
Want more options?
Explore subscription benefits, browse training courses, learn how to secure your device, and more.
По умолчанию, в Windows 10 экранная заставка (скринсейвер) отключена, при этом вход в настройки скринсейвера стал неочевиден, особенно для пользователей, которые ранее работали в Windows 7 или XP. Тем не менее, возможность поставить (или изменить) заставку осталась и делается это очень просто, что и будет показано далее в инструкции.
Примечание: некоторые пользователи под заставкой понимают обои (фон) рабочего стола. Если вас интересует именно изменение фона рабочего стола, то делается это еще проще: кликните правой кнопкой мыши по рабочему столу, выберите пункт меню «Персонализация», а затем в параметрах фона установите «Фото» и укажите изображение, которое хотите использовать в качестве обоев.
Изменение экранной заставки Windows 10
Для того, чтобы зайти в настройки скринсейвера Windows 10 есть несколько путей. Самый простой из них — начать набирать слово «Заставка» в поиске на панели задач (в последних версиях Windows 10 там не находится, но если использовать поиск в Параметрах, то нужный результат есть).
Еще один вариант — зайти в Панель управления (ввести в поиске «Панель управления») — и в поиске ввести «Заставка».

Третий способ открыть параметры заставки — нажать клавиши Win+R на клавиатуре и ввести
control desk.cpl,,@screensaver
Вы увидите то же окно параметров экранной заставки, которое присутствовало в предыдущих версиях Windows — здесь вы можете выбрать одну из установленных экранных заставок, задать ее параметры, установить время, через которое она будет запускаться.

Примечание: по умолчанию, в Windows 10 установлено отключение экрана через некоторое время бездействия. Если вы хотите, чтобы экран не отключался, а показывался скринсейвер, в том же окне настройки заставки нажмите «Изменить параметры электропитания», а в следующем окне выберите пункт «Настройка отключения дисплея».
Как скачать скринсейверы
Заставки для Windows 10 — те же файлы с расширением .scr, что и для предыдущих версий ОС. Таким образом, предположительно, все скринсейверы от предыдущих систем (XP, 7,  также должны работать. Располагаются файлы заставок в папке C:\ Windows\ System32\ — именно туда и следует копировать скаченные где-либо скринсейверы, не имеющие собственного установщика.

Я не назову конкретных сайтов для скачивания, но их предостаточно в интернете, и они легко находятся. А установка заставки не должна представлять собой каких-либо проблем: если это установщик, запускаем его, если просто файл .scr, то копируем в System32, после этого при следующем открытии окна параметров заставки там должен появиться и новый скринсейвер.
Очень важно: файлы экранных заставок .scr представляют собой обычные программы Windows (т.е. по сути, то же самое, что файлы .exe), с некоторыми дополнительными функциями (для интеграции, настройки параметров, выхода из заставки). То есть эти файлы могут также иметь вредоносные функции и в действительности, на некоторых сайтах под видом экранной заставки можно скачать вирус. Что делать: после загрузки файла, прежде чем копировать в system32 или запускать двойным кликом мыши, обязательно проверьте его с помощью сервиса virustotal.com и посмотрите, не считают ли его антивирусы вредоносным.
If you are reading this on your own «personal» computer, you will agree that computers are indeed that—personal. Screensavers for many are maybe a thing of the past, once being needed to prevent phosphor «burn-ins» on CRT and plasma monitors. Today we use it mostly for visual appeal.
And that takes us to the download pages of the many screensaver sites out there. The one problem? They aren’t too personal or one never knows which one could be a malware-pushing host.
To have the best of both worlds, why not make some of our own? Here are some ways to make your own screensaver without all the coding mumbo jumbo.
The Windows Way to Make a Screensaver
Did you know that Windows has its own built-in way of making a screensaver? It’s a great way to avoid downloading anything and create a screensaver that is truly yours.
How to Create a Screensaver in Windows 10
- Arrange your desired screensaver photos in a folder of your choice (or use the default My Pictures folder).
- Right-click anywhere on the desktop to access the Personalize applet. Select the Lock Screen tab and then drill down to Screen saver settings.
- In the window that opens, select Photos from the dropdown menu. To choose a different source than My Pictures, go to Settings>Browse and choose another destination before clicking Save.
- Configure the settings according to the options given, click OK or Apply, and your first self-made screen saver is ready to roll.
How to Create a Screensaver in Windows Vista
The route on Vista is similar. Follow them to find the tools to turn your pictures into a screensaver.
- Right-click and go to Personalize>Screen Saver>Settings.
- Choose Photos from the Screen Saver menu.
- The Settings for the screensaver allows you to further customize the display:
You may have a lot of media to go through, but there are ways you can customize what you do and don’t see with a few easy clicks.
- To show only pictures with a particular tag, type the tag in the With this tag box that is associated with the pictures.
- To display only pictures with a particular rating, click a star rating on the With this rating or higher list.
- To apply a slide show theme to your screensaver, select one from the Use this theme list.
- To play your pictures and videos in random order, check the Shuffle contents box.
How to Make a Screensaver in PowerPoint
We all get those high-impact motivational PowerPoint attachments in our inbox sometime or another. You can turn these into engaging screensavers quite easily with the help of PowerPoint 2021.
I have one which shuffles around motivational quotes whenever my computer goes inactive. Here’s how to make a screensaver from a slideshow:
- Open the presentation that will become your screensaver in PowerPoint 2021.
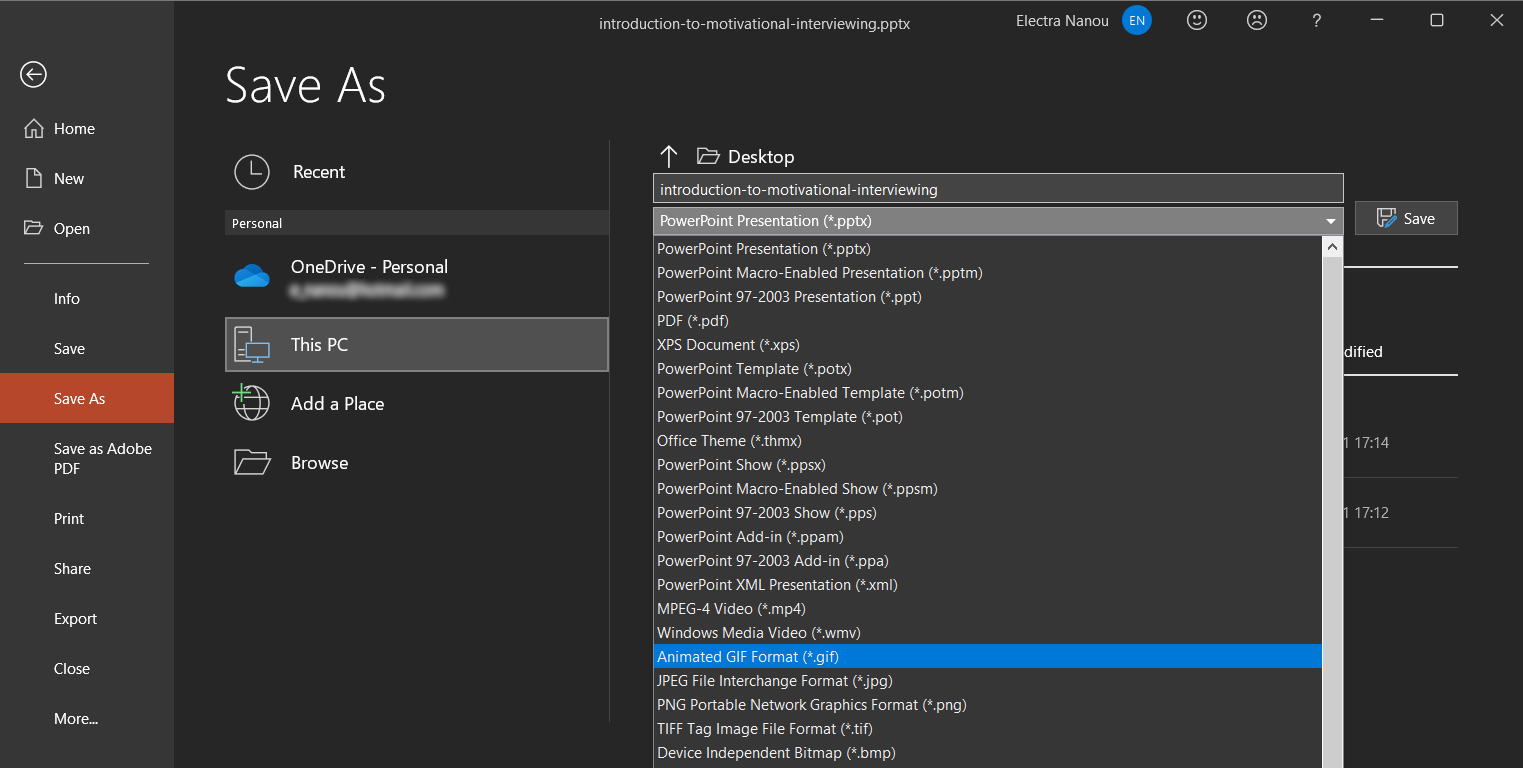
- Click on File>Save As to open the Save As window.
- Through the Save As window, select an empty folder or create a new one to hold the PowerPoint images.
- Enter any file name you want. In the Save As Type dropdown menu scroll down to select any of the image formats (GIF, JPG, TIFF, PNG, BMP). Click Save.
- PowerPoint gives an option to save every slide or the current slide only as an image. Select one to finish this part of the process.
- The screensaver can then be activated using the Personalization>Locks Screen>Screen saver settings tabs as mentioned earlier. Keep in mind that this method fails to retain any animations, transitions, and embedded rich media present in the original PowerPoint slide.
How to Make a Screensaver With Google Photos
Google Photos replaced Picasa as one of the best free photo management apps out there and it has a nifty feature that allows you to create and download a slideshow.
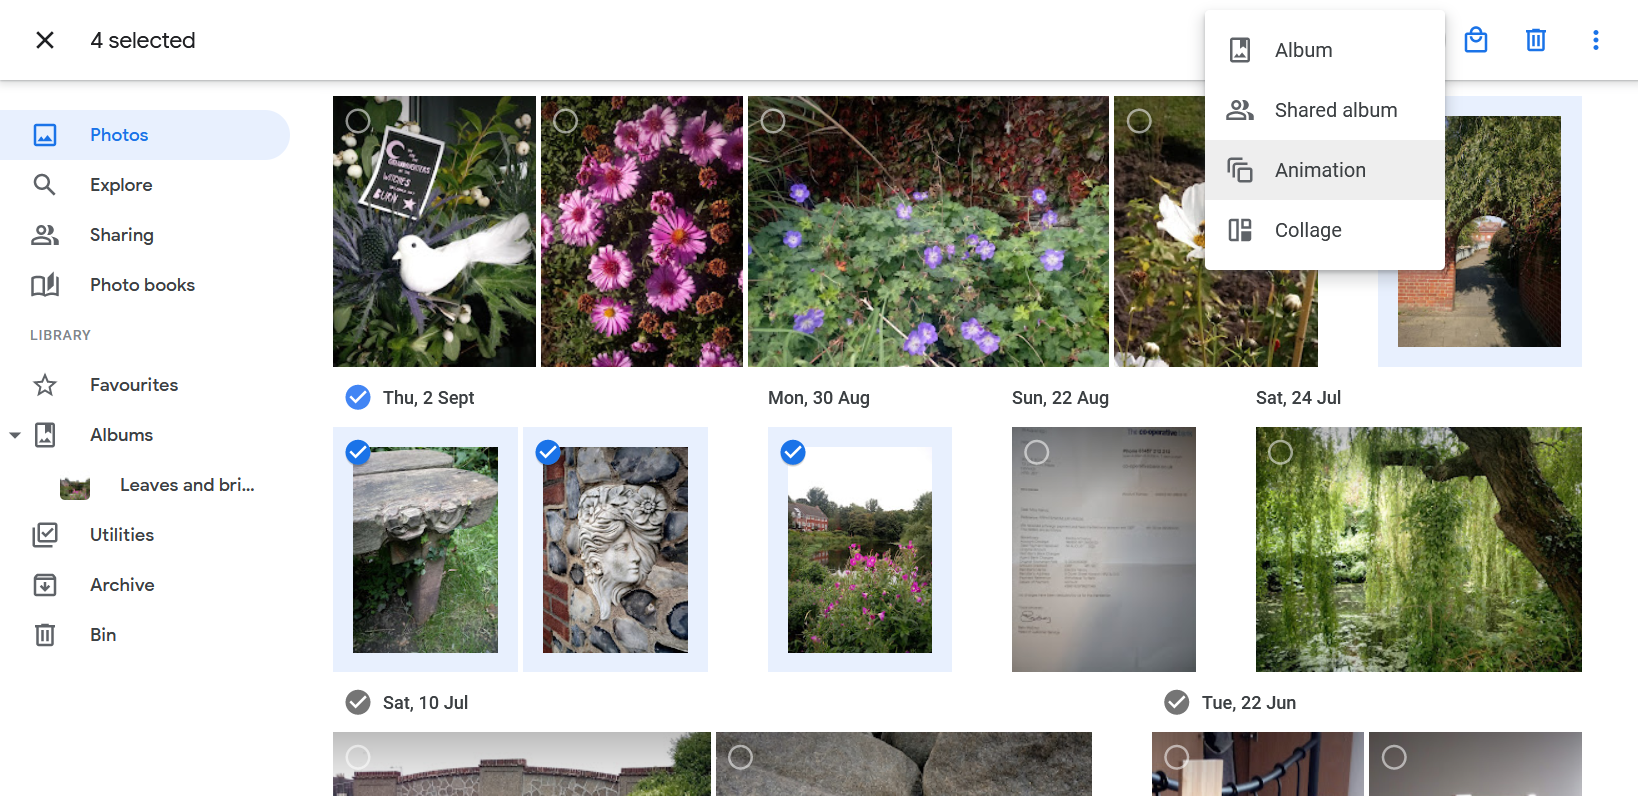
- Open Google Photos and click on the Photos tab.
- In Photos, select the pictures your want in your screensaver.
- Click the Add to or create new plus icon at the top and then Animation.
- When Google Photos shows you the slideshow, go straight to More options>Download.
- Set the downloaded GIF file as your screensaver and you’re done.
How to Make a Screensaver With Finalhit
If you’re wondering how to create a screensaver with dedicated software, take a look at what Finalhit has to offer.
It’s an app you can download and use to design screensavers in a bit more detail than your standard Windows options. It does come with a free trial, so you can try it out before spending any money.
Here’s how to make your own screensaver with Finalhit:
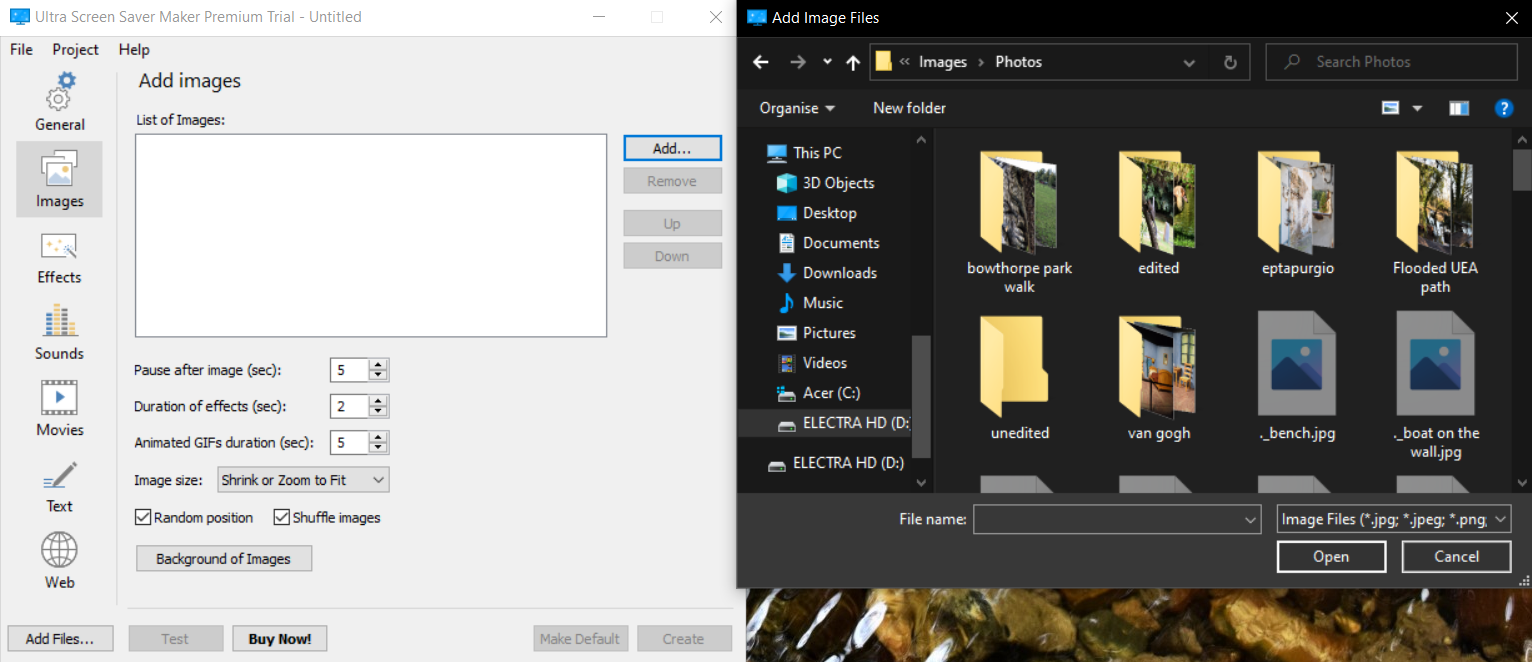
- Launch Finalhit and choose your features—you can have images, videos, sounds, and text.
- In all of these tabs, you’ll find an Add button. Use that to upload the files you want.
- Adjust the settings of each element, which can include pause, duration, size, and shuffle options among other things.
- Click on the Effects tab and select any extra flourishes you want.
- When ready, click the Create button and use the file as your screensaver.
How to Make a Screensaver With Blumentals
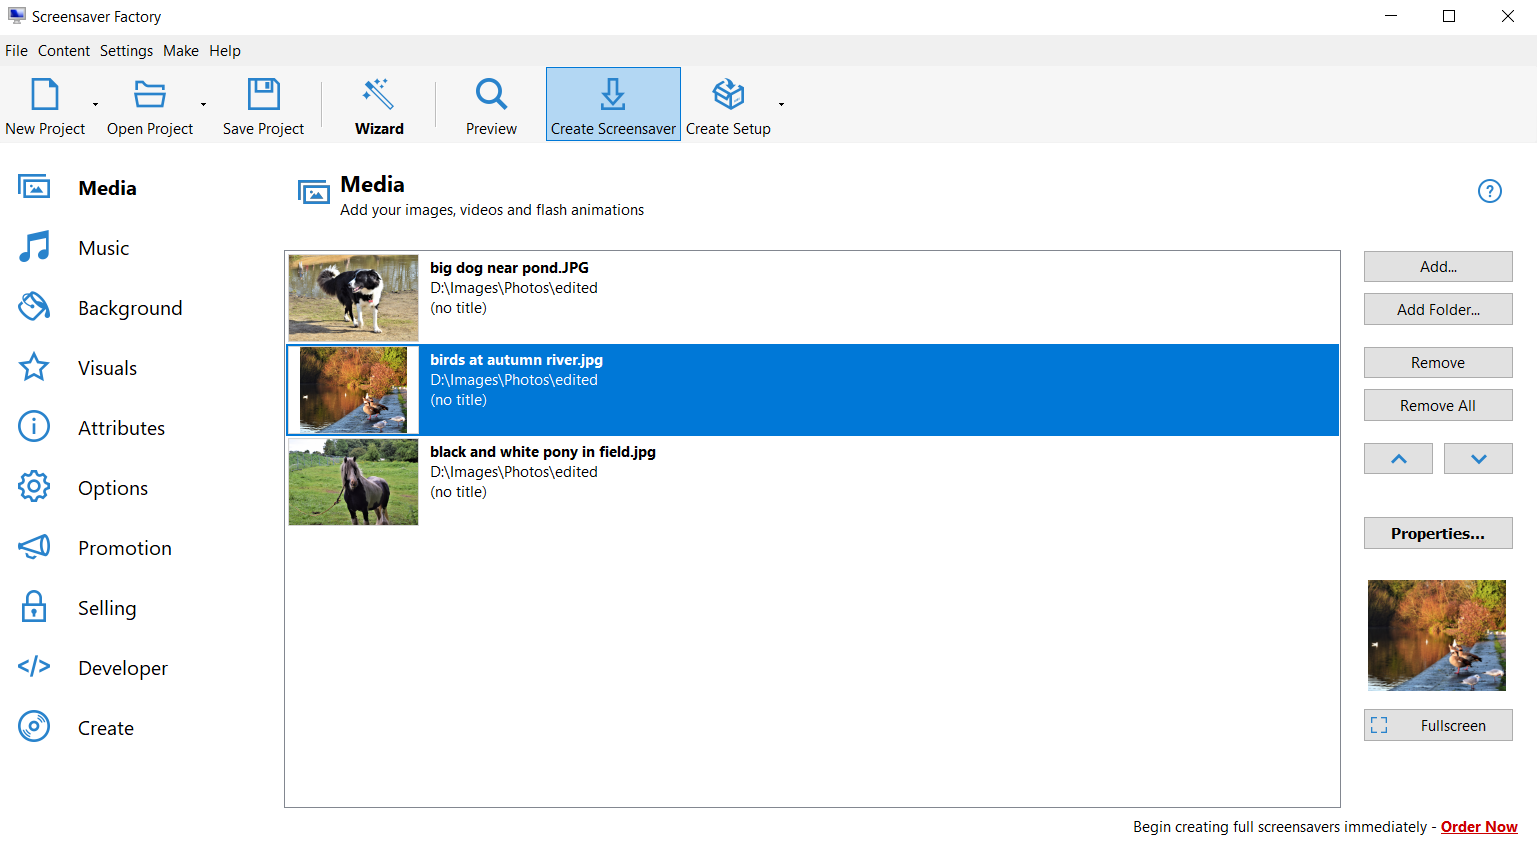
Another downloadable app to consider is Screensaver Factory by Blumentals. It works the same as Finalhit, including the free trial, but with a cleaner interface and more tools, especially for professional clients.
For example, in addition to photos, animations, and audio, you can add visuals like shapes, background patterns, and promotional features to market your brand.
So, here’s how to put all this into a cool new screensaver:
- Launch Blumentals and click the New Project button.
- Use the Add or Add folder buttons to bring in all the audiovisual elements you need.
- Customize everything through the Properties button in some tabs, as well as the menu in Options.
- Click Create Screensaver to save the completed project on your computer.
You Don’t Have to Make Your Own Screensavers
Even though the best screensaver is to power off the monitor, a self-created and personal screensaver is worthwhile. Not only is it fun to learn how to create a screensaver, but judging by the tools around, your results can be very impressive, even professional.
That said, it is time-consuming and not really necessary. Whether you just want a pleasant work environment or to wow people, readymade screensavers work just as well. If you would rather leave all the work to someone else, why not simply download awesome screensavers for Windows?
Содержание статьи:
- Настройка оформления Windows
- Как открыть параметры экранной заставки
- Где загрузить новые заставки и как их установить в систему
- Изменение других настроек оформления Windows
- Вопросы и ответы: 0
Доброго времени всем!
Эту заметку хочу начать с одного небольшого воспоминания…
Раньше на Windows XP по умолчанию был включен хранитель экрана*: если ПК простаивал 10+ мин. — то экран становился черным и по нему начинала прыгать символика «Windows XP».
Кстати, подтверждено, что такая фишка позволяла продлить ресурс монитора* (+ никто не увидит, над чем вы работали).
* Для справки!
Заставка (хранитель экрана, Screensaver) — это динамичный рисунок, который появл. во время простоя ПК (т.е. когда пользователь не нажимает клавиши / не двигает мышку).
Предназначена чтобы снизить износ оборудования, интенсивность его работы и энергопотребление (в некоторых случаях!). За счет устранения статичности рабочего изображения — удается продлить срок службы мониторов на основе электронно-лучевой трубки, плазменных, и OLED/AMOLED — экранов (которым свойственно выгорание).
*
Собственно, ниже хочу показать, как можно установить заставку в свою систему, и как ее настроить. Думаю, 2-3 мин. потраченного времени на такую весьма полезную вещь (особенно, если у вас OLED-монитор) — окупятся с лихвой! 👌
*
Настройка оформления Windows
Как открыть параметры экранной заставки
Способ 1
Итак… В современных Windows 10/11 достаточно 📌открыть параметры системы и перейти во вкладку «Персонализация / Экран блокировки / Заставка». См. скрин ниже. 👇
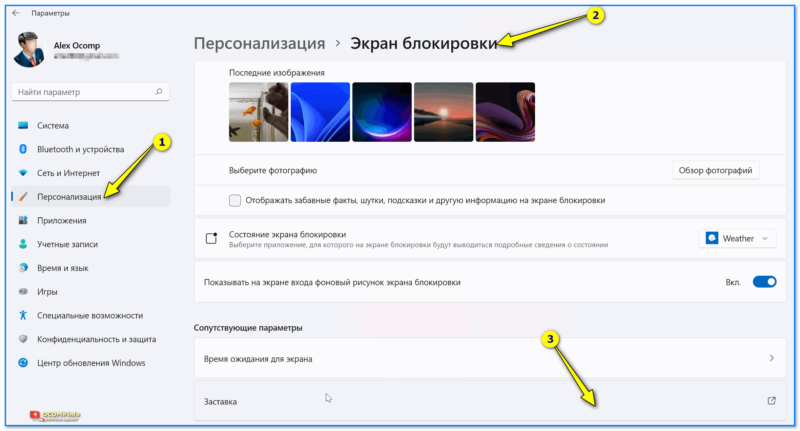
Персонализация — экран блокировки — заставки — Windows 11
Далее из списка можно будет выбрать одну из заставок (Вальс, ленты, пузыри, объемный текст, фотографии) и задать параметры к ней (у разных заставок свои настройки!).
Кстати, обратите внимание на параметр «Интервал» — это время бездействия, после которого заставка сработает. Например, если у вас установлена 1 мин. — значит, если никто за 1 мин. не сделает нажатия на клавиатуре/мышки — компьютер автоматически запустит заставку.
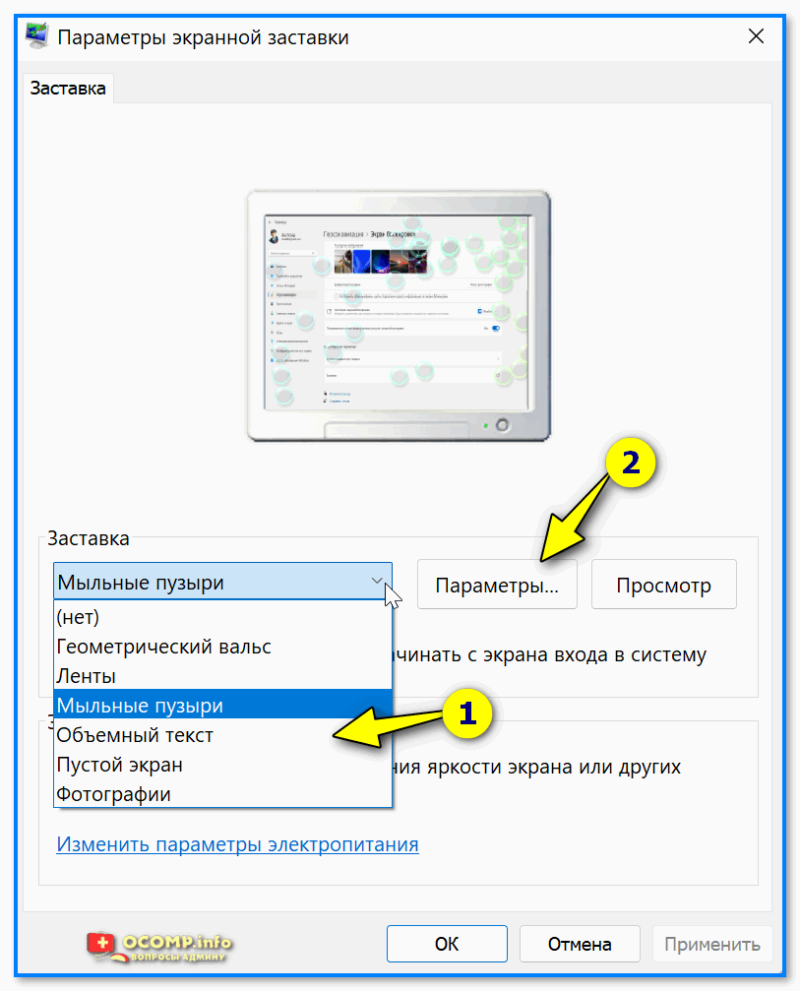
Выбираем одну из доступных доставок
Настройка заставки
*
Пароль для отключения заставки
Если вы хотите, чтобы после заставки появлялось окно с требованием ввести пароль (такое же, которое появл. после загрузки Windows) — не забудьте поставить галочку напротив пункта «Начинать с экрана входа в систему». См. скрин ниже. 👇
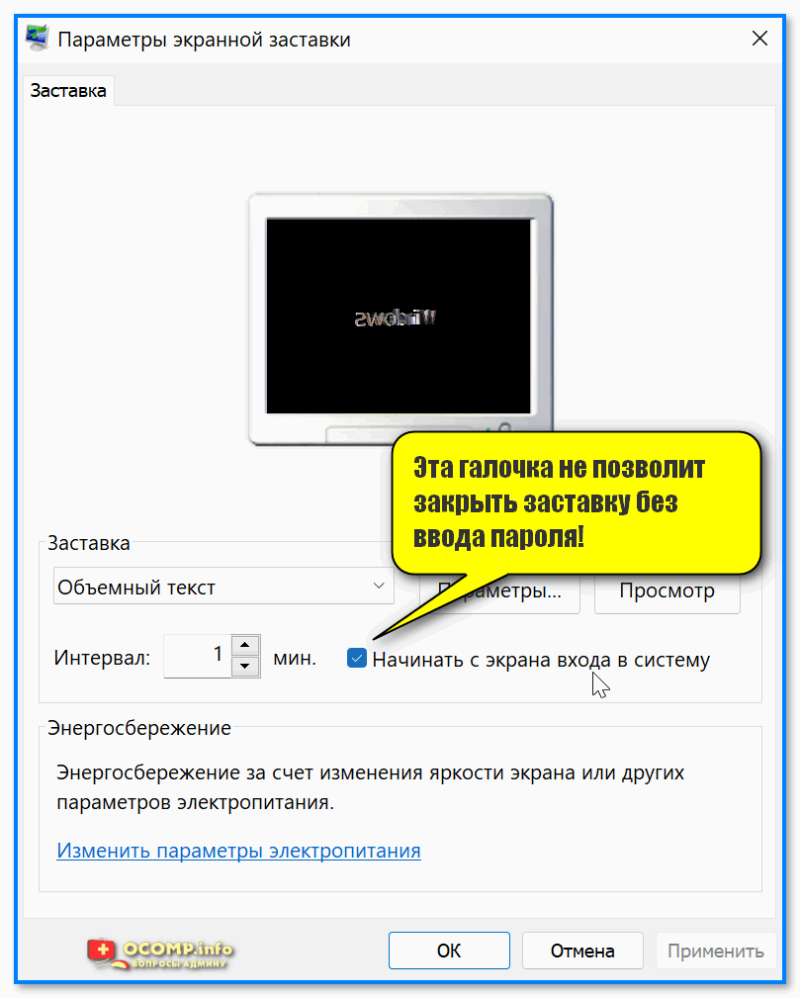
Начинать с экрана входа в систему
В итоге сразу же после заставки — появится окно с вводом ПИН-кода (фото с моего ПК приведено ниже). 👇
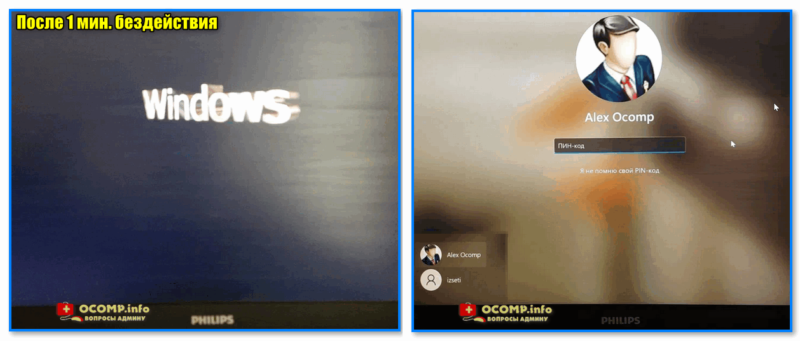
После 1 мин бездействия
*
Способ 2
Чтобы не заходить в параметры системы — можно нажать Win+R (чтобы появилось окно «Выполнять») и использовать одну из нижеприведённых команд:
control desk.cpl,,@screensaver
control desk.cpl,,1
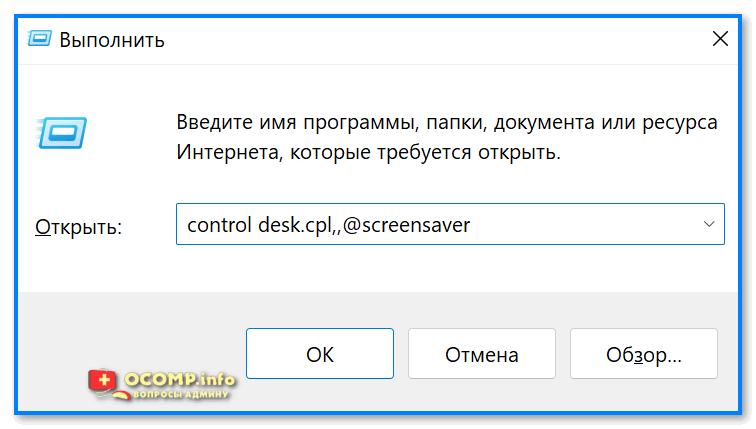
control desk.cpl,,@screensaver — открываем параметры заставок
Далее появится окно с параметрами экранной заставки. Настройки выполняется аналогично, как в п.1 выше…
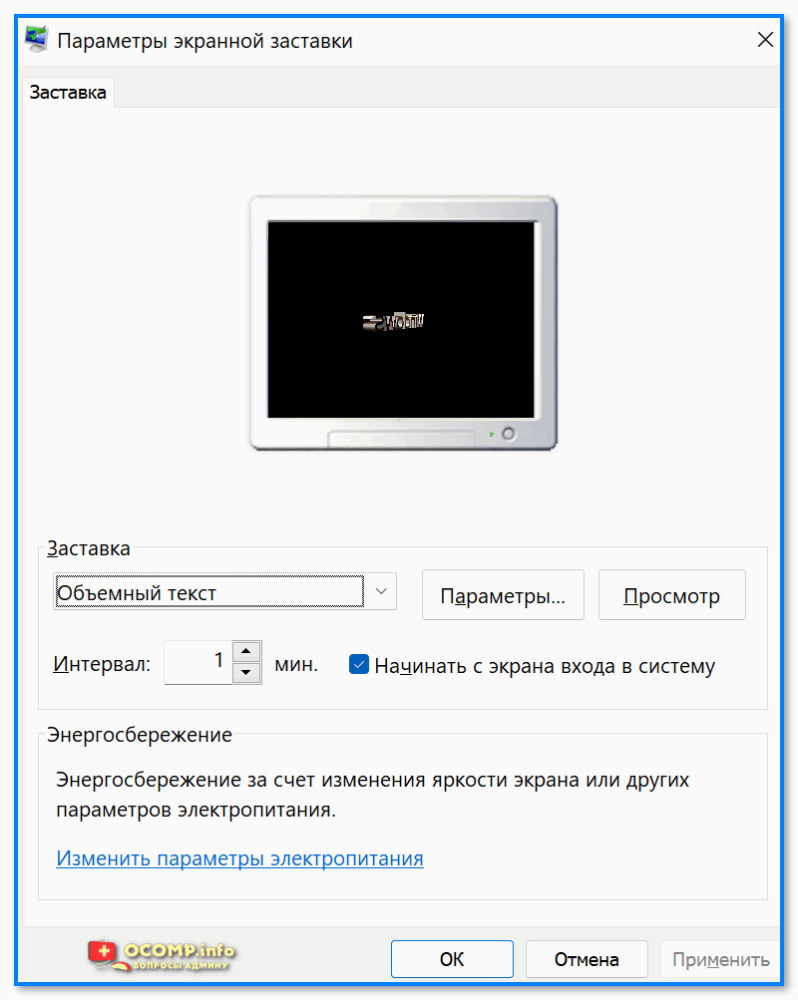
Параметры (то же окно, что и в первом способе)
*
Где загрузить новые заставки и как их установить в систему
Разумеется, в сети есть сотни спец. сайтов, на которых можно найти десятки и сотни скринсейвов (хранителей экранов). Например:
- 👍 www.screensaversplanet.com — по-моему, один из лучших сайтов с огромной коллекцией скринсейвов. Сайт, правда, на англ., но это не страшно, все понятно из контекста!
- www.vsthemes.org — русскоязычный сайт с коллекцией разных «украшалок» для Windows.
- www.windows10screensavers.net — аналогичный сайт, большая коллекция всякой всячины…
- Важно: после загрузки заставок с подобных сайтов — проверяйте их антивирусом (в помощь: подборка онлайн-антивирусов, работают без установки в систему).
*
Покажу на примере первого сайта, как можно загрузить к себе новую заставку (аквариумные рыбки 🙂).
1) Для начала нужно найти эту заставку в списке, открыть ее и загрузить. Меню сайта сделано удобно, по рейтингу можно быстро найти всё самое лучшее! 👇
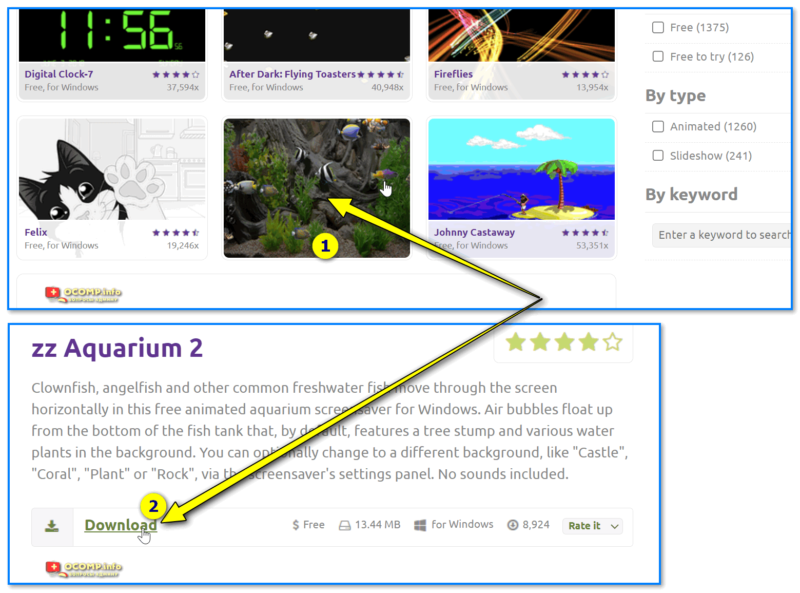
Выбираем заставку и загружаем ее
2) Большинство заставок распространяется в архиве, который требуется извлечь (внутри должен быть файл в формате SCR, он и нужен).
Примечание: некоторые заставки идут в формате EXE, их как правило достаточно запустить — установщик далее автоматически всё добавит куда нужно…

Извлекаем заставку из архива (иногда заставки могут устанавливаться в систему)
3) Затем нужно перенести файл SCR в папку C:\Windows\System32 — она системная, в ней как раз и хранятся все заставки.
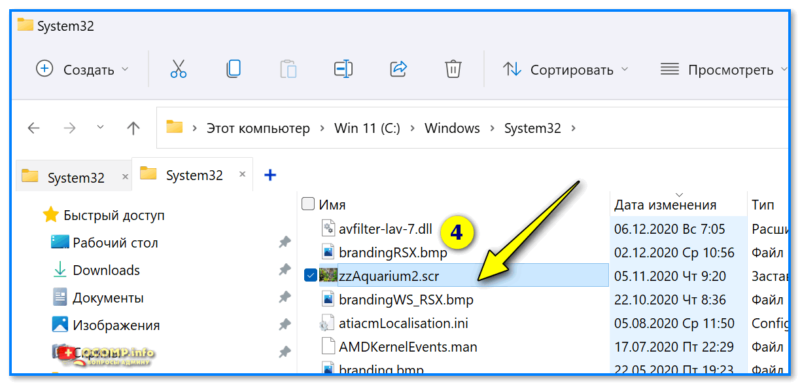
Windows — System32 — копируем заставку в системную папку
4) Затем нужно вновь открыть параметры экранной заставки (Win+R, и команда: control desk.cpl,,@screensaver) и выбрать ее из списка (при необходимости изменить настройки).
Всё! Должно работать! 👌
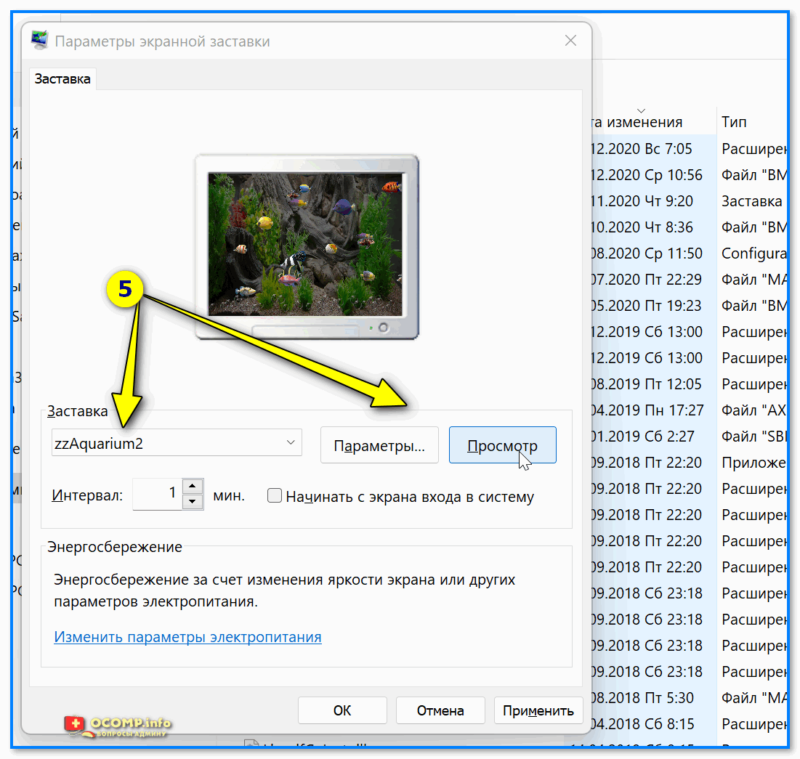
Выбираем загруженную заставку в параметрах
*
Изменение других настроек оформления Windows
Свой копию Windows можно изменить до неузнаваемости, если изменить фон, курсоры мышки, значки, и т.д.
Ну и так как сегодняшняя заметка касается оформления — я не мог не порекомендовать здесь другую свою заметку, где собрана целая коллекция ссылок и рекомендаций по украшению Windows. Рекомендую к ознакомлению! 👇
https://ocomp.info/izmenit-oformlenie-win.html
*
За сим откланяюсь, всем успехов!
👋
Do you remember the time when screen savers used to be pretty high on demand? If you are unfamiliar with it, let me tell you that they were widely used to safeguard cathode-ray tube (CRT) monitor against image burn-in; the issue which tends to crop up when an image is displayed for a long period. With the arrival of LCD displays, the burn-in issues were sorted out and it drastically reduced the popularity of screen savers. However, they are still loved by many (including me) for their unique ability to make the screen appear eye-catching. If you are willing to add a nice visual touch to your PC, read along as we show you how to set screensaver on Windows 10 with ease along with ten of the best screensavers that you can use in 2019.
In the first half, we are going to demonstrate how you can set and customize screensavers on your Windows 10. And in the second half, we have lined up some of the coolest screen savers that you should check out.
- To get going, right-click on your desktop and choose “Personalization” in the menu.
Note: Alternately, you can also search “Screen Saver” in the taskbar search box and choose “Change Screen Saver” to quickly dive into the settings. Or just click on “Start menu” and click on Settings icon -> Lock screen.
2. Now, click on “Lock screen”.

3. Next, click on “Screen saver settings”.

4. Under the Screen saver section, click on the drop-down menu and choose your preferred screen saver. Windows 10 comes with six screen savers: 3D text, Blank, Bubbles, Mystify, Photos, Ribbons. To find out which one can go nicely with your taste, simply select a screen saver and then click on Preview.

5. After selecting a desired Windows 10 screen saver, click on “Settings” to customize it.

One thing worth noting is that the customization options in Settings depend on the screen saver you choose. Besides, not all screen savers have their own settings. Once you have fine-tuned the screen saver settings, click on “OK”. In this tutorial, I have chosen the 3D Text. It offers many customization options like adjusting resolution, size, selecting rotation type and more.

6. Up next, you can use the “Wait” option to choose the number of minutes after which the screen saver will turn on. If you want to automatically lock your PC when the screen saver turns on check the box to the left of On resume, display logon screen. When you have customized the settings, click on “Apply”.

7. Finally, click on “OK” and you are ready to go!

Going forward, Windows 10 will invoke the screen saver based on the settings you have applied. If you ever happen to change it, return to the same settings and make the desired changes as explained above.
Create a Screensaver Shortcut in Windows 10
If you have a penchant for a screensaver and often have to change its settings, it would be apt to create a screensaver shortcut. It would let you dive into the settings with just a click.
- Simply, right-click on the desktop and choose New -> Shortcut.

2. Now, type the location of the item: control desk.cpl,,@screensaver

And then, click on “Next”.
3. Next, give a cool name to this shortcut and click on “Finish”.

Now, a shortcut will be created and saved on the desktop. Whenever you want to access screensaver settings, just click on it.
Best Free Screensavers for Windows 10
Though I find the stock screensavers of Windows 10 to be pretty good, they can’t hold a candle to the third-party offerings. The screensavers that I am sharing here are beautifully crafted and add awesome elegance to the screen. If you aren’t pleased with the native screensavers or want to have more exciting options at your disposal without spending any bucks, jump right in to explore some of the best free screen savers that are designed for Windows 10.
1.Rain View
Most of us adore rainy ambience as it seems to bring peace to our surroundings. With Rain View Windows 10 theme, you will relish the full-fledged view of the rain. The lonely pathway and the green trees would offer complete peace of mind. The soothing visuals coupled with the gentle sound of the rain would be ideal ingredients during relaxation. Moreover, it offers you several options to customize the settings. For instance, you can adjust sound volume, music volume, frame, and effects.

Install: Free
2. Animated snow scenery
It’s time to put an animated snowfall right on your screen! The appealing scenery along with falling snowflakes would easily catch your attention. The presence of the silhouette of the trees and the large mountain creates a fascinating view. Moreover, the glowing moon further enriches the entire scenery. This screensaver also lets you fine-tune many things like effects, music, frames, and brightness for a more personalized experience.

Install: Free
3. The Matrix
The one Windows 10 screen saver that’s been around on my PC for as long as I can remember is The Matrix. The best part about it is that it always looks cool. Initially, it shows the two-dimensional scrolling codes from the trilogy of The Matrix films. And then, it displays 3D representation along with the stunning pics taken from the films. What’s more, you can adjust the playback speed and even embed a nice message into the screensaver.

Install: Free
4. Relaxing Screen
When we feel a bit tired after an exhaustive session of work, we seek relaxation and complete peace of mind. And that’s where this screensaver for Windows 10 can come into the play. As the name itself spells out clearly, it’s designed to help you calm down. Just like many other screensavers, it also provides some customization to let you configure fade duration, number edges and more.

Install: Free
5. Japan Spring Screensaver
The spring of Japan is well-known for its one-of-a-kind beauty. And if you wish to adorn your Windows 10 PC with the amazing spring images, you would be hard-pressed to find a better alternative to Japan Spring Screensaver. With it, you will get the view of the Mount Fuji, which is considered to be the national symbol of Japan. The aesthetic appearance will add a little different appeal to your PC screen.

Install: Free
6. Electric Sheep
Simply put, “Electric Sheep” is one of the most loved Windows 10 screensavers. The top-notch graphics and attention-grabbing design are its biggest highlights. However, I would suggest you try it out only if you have high-bandwidth internet and also don’t face a battery-draining issue on your PC. Besides, it’s available for not only Windows but also macOS and Linux.

Install: Free
7. Lost Watch 2 – Nvidia Edition
3PlaneSoft’s Lost Watch 2-Nvidia Edition looks pleasing to the eyes. This screen saver features a golden watch resting peacefully in the stream of reflective water. Apart from decorating the PC screen, the golden watch also shows the accurate time of the day. So, it’s got more than what meets the eyes.

Install: Free
8. Screen Saver Gallery
“Screen saver gallery” features several attractive photos from around the world. And, they seamlessly transition to give your screen a stunning look. What’s more, the developer keeps on adding new pics weekly so that the gallery never appears outdated. Apart from supporting Windows 10, it also works with Xbox.

Install: Free
9. Helios
There is a lot to like in Helios screensaver. First and foremost, it displays a great attraction/repulsion particle effect topped by the enchanting colorful results. Plus, it provides plenty of customization, allowing you to configure the animation and camera speed, fine-tune the motion blur and even set a frame rate limit.

Install: Free
10. 3D Pipes
3D Pipes is the sort of screen savers that can fit into any mood. That’s probably the main reason why it’s liked by many PC users. To me, the best part about it is the unpredictability that it brings to the table. So, it doesn’t matter how many times you look at the screen, it would always seem to be fresh and eye-grabbing.

Install: Free
SEE ALSO: How to Disable Cortana on Windows 10
Customize Windows 10 with Awesome Screensavers
Long live screensavers and their charm! Their prime purpose might no longer be required, but they still have the quality to be relevant. Using screensavers, you can add some unique customization to your PC lock screen. Speaking of personalization, I would recommend you to check out our 15 best Windows 10 themes as they can also play a nice role in making your PC screen look always attractive. By the way, let me know your thoughts about screensavers and the ones that have found a permanent place on your computer.