
Download Article
Back up your iPhone to an external hard drive using a Mac, Windows PC, and more
Download Article
- Using a Mac
- Using a Windows PC
- Change Backup Location on Mac
- Change Backup Location on PC
- Connecting an External Hard Drive Directly to Your iPhone
- Expert Video
- Video
- Expert Interview
- Expert Q&A
|
|
|
|
|
|
|
|
Do you need to back up your iPhone to an external hard drive? It’s always a good idea to back up your iPhone in case something happens. Usually, when you back up your iPhone using a Mac or a PC, it saves your backup to your computer’s internal hard drive. But what happens when you start running out of space? Luckily, saving your backup to an external hard drive is pretty easy. You can even create a symlink to make your external drive the permanent destination for your backups.
Things You Should Know
- On Mac, go to «~/Library/Application Support/MobileSync/Backup/» in Finder. Copy and paste the backup folder to your external hard drive.
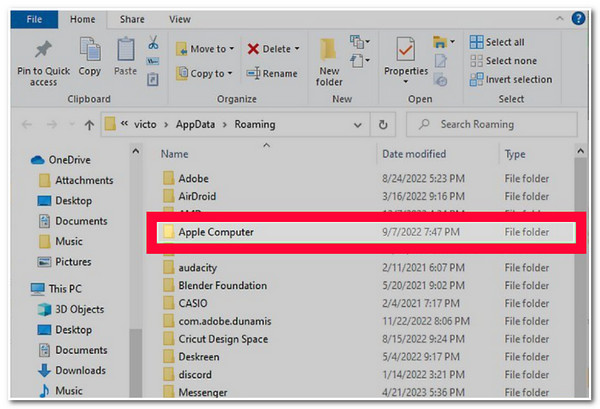
- On PC, go to «C:\Users\[username]\AppData\Roaming\Apple Computer\MobileSync\Backup» in File Explorer. Copy and paste the Backup folder to your external hard drive.
- You can permanently change the location of your backup to an external hard drive by creating a symlink in the Terminal on your Mac.
-

Use the lightning cable that came with your iPhone to connect it to a free USB port on your Mac.
-
It’s the icon that resembles a blue and white smiley face. It’s in the Dock at the bottom of the screen.
Advertisement
-
It’s in the menu panel to the left of the Finder window.
-
It’s under the «Backups» header. This will display a list of all your backups.
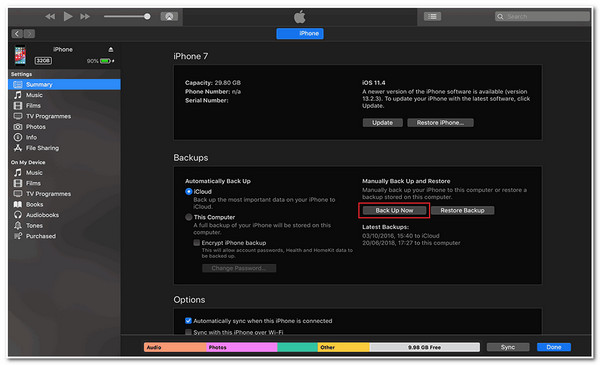
- If you want to back up your iPhone right now, click the radio option next to «Back up all the data on your iPhone to your Mac» and click Back Up Now.
-
This will display a context menu for the backup file you clicked.
-
This will open the Finder window at the location of your iPhone backup file.
-
If you aren’t already in the Backup folder, click the backup folder to open it.
- Alternatively, you can navigate to your backup folder by going to «~/Library/Application Support/MobileSync/Backup/» in Finder.[1]
- Alternatively, you can navigate to your backup folder by going to «~/Library/Application Support/MobileSync/Backup/» in Finder.[1]
-
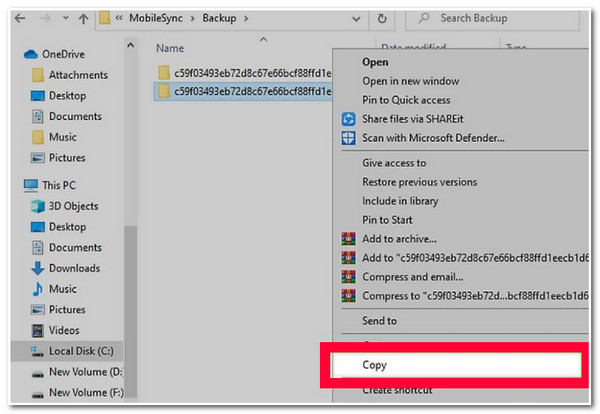
To do so, right-click (or hold Control and click) the folder containing your backup. Click Copy to create a copy of your backup while leaving the original in its current location. Click Cut to remove the backup from your Mac and move it to your external hard drive.
- Alternatively, you can drag and drop the backup folder from your Mac to your external hard drive in Finder.
-
If you haven’t already done so, use a USB cable to connect your external hard drive to your Mac. Open the external hard drive in Finder and go to the location you want to save your backup. Right-click (or Control-click), and click Paste. This will paste your backup to your external hard drive.[2]


Advertisement
-
Use the lightning cable that came with your iPhone and connect it to a free USB port on your PC.
-
File Explorer has an icon that resembles a folder with a blue clip. You can click File Explorer in the taskbar or the Windows Start menu. You can also press the Windows Key and E to open File Explorer.
- If you want to back up your iPhone now, you can using iTunes. Open iTunes, and click the icon that resembles an iPhone at the top. Click the radio option next to «This Computer» and click Back Up Now in the menu
-
To access the backup folder for iTunes, you need to make sure you have hidden files and folders showing in File Explorer. Use the following steps to make sure hidden files and folders are showing:
- Click View at the top of File Explorer.
- Hover over Show (Windows 11 only).
- Click the checkbox next to «Hidden items» or click «Hidden items» in the pop-out menu.
-
The search icon resembles a magnifying glass or a search bar. It is next to the Windows Start menu in the taskbar at the bottom of the screen. If you downloaded iTunes from the web, type «%appdata%». If you downloaded iTunes from the Microsoft Store, type «%userprofile%.» Click the AppData folder or the folder named after your username.
-
Depending on which iTunes version you downloaded, open the Apple or Apple Computer folder.
-
Double-click the MobileSync folder to open it.
-
This is the folder where all your iTunes backups are stored.[3]
- If you downloaded iTunes from the web, the backup folder location is C:\Users\[username]\AppData\Roaming\Apple Computer\MobileSync\Backup.
- If you downloaded iTunes from the Microsoft Store, the backup folder location is C:\Users\[username]\Apple\MobileSync\Backup.
-
To do so, right-click the folder containing your backup. Click Copy to create a copy of your backup while leaving the original backup at its current location. Click Cut to remove your current backup from its current location and move it to the external hard drive.
- Alternatively, you can drag and drop the backup folder from your PC to your external hard drive in File Explorer.
-
If you haven’t already done so, go ahead and connect your external hard drive to your PC using a USB cable. Open the external hard drive in Finder and go to the location you want to save your backup. Right-click and click Paste. This will paste your backup to your external hard drive.


Advertisement
-
It’s in the upper-left corner of the menu bar at the top. Click the icon that resembles the Apple logo to display the Apple menu.
-
It’s near the top of the Apple menu. If you are using an older macOS version, click System Preferences. If you are using the latest version of macOS, click System Settings.
-
If you are using the latest version of macOS, click Privacy and Security in the menu bar to the left. If you are using an older macOS version, click the Security and Privacy option.
-
It’s at the top of the Security and Privacy window.
-
Your user account needs administrative permission to change the Security and Privacy settings. Click the Lock icon in the lower-left corner and enter your user password.
-
It’s in the menu panel to the left.
-
This grants the Terminal full disk access.
-
To do so, click the magnifying glass icon in the upper-right corner. Type terminal in the search bar. Then click the Terminal icon, which resembles a black screen with a white cursor.
-
The command you need to enter to -s /Volumes/[ExternalHarddiskName]/ios_backup ~/Library/Application\ Support/MobileSync/Backup/. Replace «[externalHarddiskName]» with the actual name of your external hard disk. This creates a new symlink on your external hard drive. Whenever you back up your iPhone using your Mac, it will automatically be saved to your external hard drive instead of your Mac.


Advertisement
-
Use a USB cable to connect your external hard drive to a free USB port on your computer.
-
The search bar (or the magnifying glass icon) is in the taskbar at the bottom of the screen. If you downloaded iTunes from the web, type «%appdata%». If you downloaded iTunes from the Microsoft Store, type «%userprofile%.»
- This opens your appdata or userprofile folder in Windows Explorer.
-
If you downloaded iTunes from Apple’s website, it’s called «Apple Computer.» If you got it from the Microsoft Store, it’s called «Apple.»
-
You’ll see a folder called «Backup» inside.
-
For example, if your external hard drive is D:\, you can click and drag the folder over to your D:\ drive in Windows Explorer.
-
To open the Command Prompt (CMD), press the Windows key, type cmd, and click Command Prompt in the search results.
-
The command you need to enter differs depending on where you downloaded iTunes from. Once you create the symlink, your iPhone’s default backup location will change permanently.
- If you downloaded iTunes from the web, type mklink /J “%APPDATA%\Apple Computer\MobileSync\Backup” "[new backup location]" and press Enter.
- For example, mklink /J “%APPDATA%\Apple Computer\MobileSync\Backup” "D:\backup"
- If you downloaded iTunes from the Microsoft Store, type mklink /J “%USERPROFILE%\Apple\MobileSync\Backup” "[new backup location]" and press Enter.
- For example, mklink /J “%USERPROFILE%\Apple\MobileSync\Backup” "D:\iPhoneBackup".
- If you downloaded iTunes from the web, type mklink /J “%APPDATA%\Apple Computer\MobileSync\Backup” "[new backup location]" and press Enter.


Advertisement
-
To connect an external hard drive to your iPhone, you need to purchase a lightning-to-USB-C adapter or Apple’s Lightning-to-USB-3 Camera adapter.
-
Connect the lightning cable attachment on your adapter to the charging port on your iPhone.
-
Once the adapter is connected to your iPhone, connect the external hard drive to the USB port on your adapter.
-
It has an icon that resembles a blue folder. Tap the Files icon on your Home screen.
-
This can be photos, videos, or documents.
-
It’s in the upper-right corner.
-
It should be listed below the thumbnail image of the photo, video, or document you selected.
-
This will save the files you selected to the external hard drive.[4]


Advertisement
Add New Question
-
Question
Are there any other methods to do this?
Naseem Speach is a Tech Expert based in Los Angeles, California. Naseem started his tech reviews YouTube channel in 2020 and has since gained a following of over 34,000 subscribers. He specializes in sharing information about the latest smart home tech, Apple, Samsung, Google, PlayStation, Microsoft, and gaming devices.
Tech Expert
Expert Answer
You can AirDrop your files from your iPhone to your Macbook. From there, you can save your AirDropped files to an external hard drive.
Ask a Question
200 characters left
Include your email address to get a message when this question is answered.
Submit
Advertisement
Video
Thanks for submitting a tip for review!
About This Article
Thanks to all authors for creating a page that has been read 116,767 times.
Is this article up to date?
Как сделать резервную копию iPhone 16 на внешнем жестком диске через Windows/Mac
Хотя облачное хранилище может помочь вам сделать резервную копию вашего iPhone, вы должны потратить деньги. Что касается резервного копирования iPhone на настольные компьютеры, хотя у них большой объем памяти, они могут в конечном итоге достичь своего предела. В этих случаях жизненно важно иметь дополнительное хранилище, например внешний жесткий диск, для резервного копирования iPhone. Теперь, если вы не знаете, как сделать резервную копию iPhone на внешний жесткий диск, этот пост собирает для вас 3 возможных способа! Изучите их сейчас.
Прежде чем перейти к 3 способам резервного копирования iPhone на внешний диск, представленным в этом посте, вам сначала нужно понять, почему вам нужно делать резервную копию вашего iPhone на внешний жесткий диск. Что ж, резервное копирование iPhone на внешний жесткий диск также обеспечивает преимущества, которые не могут предоставить другие типы хранилищ. Теперь, чтобы было легче отслеживать эти преимущества, вот список причин, по которым вам нужно делать резервную копию вашего iPhone на внешний диск.
- Внешние жесткие диски можно использовать в течение 3–5 лет после покупки.
- Внешние жесткие диски можно быстро извлечь и получить к ним доступ в любое время и в любом месте.
- Внешние жесткие диски не подвержены возможной потере данных в случае сбоя системы компьютера или других неисправностей.
Самый простой способ сделать резервную копию iPhone на внешнем диске [Windows/Mac]
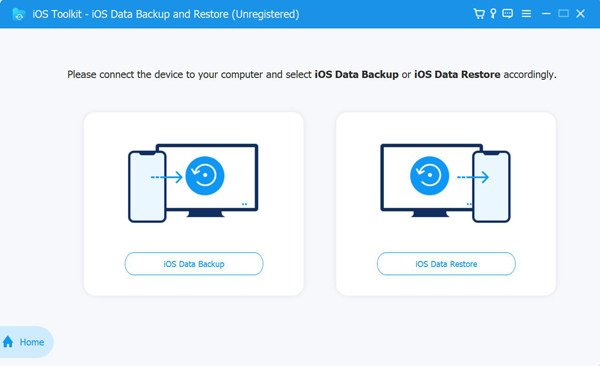
Вот и все! Вот несколько причин для резервного копирования iPhone на внешний диск. Теперь, чтобы наконец начать путешествие по изучению 3 способов, представленных в этом посте, первый вариант, который вы можете использовать, это 4Easysoft Резервное копирование и восстановление данных iOS инструмент! Этот совместимый с Windows и Mac инструмент позволяет вам быстро создавать резервные копии вашего iPhone на внешнем диске. Он позволяет вам одновременно создавать резервные копии более 20 видов данных, таких как медиафайлы, контакты, сообщения, история вызовов и т. д., на внешнем диске. Более того, этот инструмент позволяет вам видеть и выбирать файлы, которые вы хотите создать резервную копию. Благодаря его комплексной функции предварительного просмотра!
4Easysoft Резервное копирование и восстановление данных iOS
Функция режима шифрования для шифрования данных iPhone с помощью пароля для их защиты.
Возможность пакетного резервного копирования данных iPhone одним щелчком мыши.
Гарантия отсутствия потери данных во время процесса резервного копирования iPhone на внешний жесткий диск.
Подходит практически для всех моделей iPhone (iPhone 16).
Как сделать резервную копию iPhone на внешнем жестком диске с помощью 4Easysoft iOS Data Backup and Restore:
Шаг 1Загрузите и установите 4Easysoft Резервное копирование и восстановление данных iOS на вашем компьютере. Затем запустите инструмент, выберите опцию «iOS Data Backup and Restore» и нажмите кнопку «iOS Data Backup». Затем подключите свой iPhone (с помощью кабеля USB) и внешний диск к компьютеру.
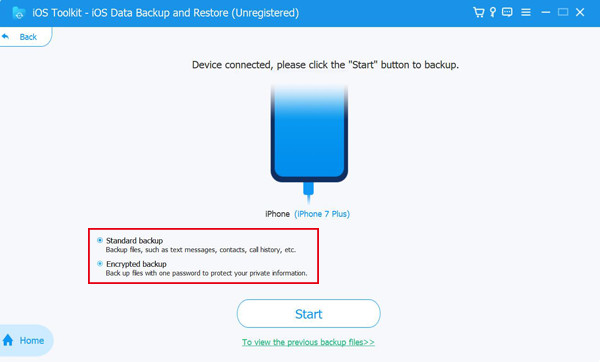
Шаг 2После этого выберите режим «Стандартное резервное копирование» или «Зашифрованное резервное копирование». Если вы хотите сделать резервную копию личных данных, выберите режим «Зашифрованное резервное копирование». Затем нажмите кнопку «Пуск», чтобы перейти к следующему шагу.
Шаг 3Далее выберите данные, которые вы хотите скопировать, в списке опций. Затем нажмите кнопку «Далее», нажмите кнопку «Еще» и выберите «внешний жесткий диск», который вы подключили ранее.
Шаг 4Затем отметьте кнопку «Резервное копирование», чтобы начать резервное копирование выбранных ранее данных на внешний жесткий диск. И вот оно! Это простые шаги для резервного копирования iPhone на внешний диск с помощью этого инструмента!
Как сделать резервную копию iPhone на внешнем диске в Windows 11/10
Помимо самого простого способа выше, вы также можете сделать резервную копию iPhone на внешний жесткий диск в Windows 11/10 напрямую. С этой опцией вам не нужно использовать какие-либо сторонние инструменты. Однако этот вариант довольно трудоемкий и сложный для выполнения. Если вас это устраивает, то вот шаги, показывающие, как сделать резервную копию вашего iPhone на внешний жесткий диск в Windows 11/10:
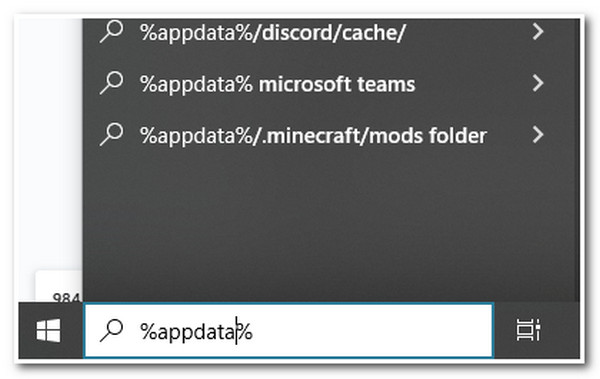
Шаг 1Сначала вам нужно сделать резервную копию вашего iPhone с помощью iTunes. После того, как вы закончите резервное копирование вашего iPhone, перейдите в «строку поиска» Windows, введите «%appdata%» и нажмите клавишу «Enter».
Шаг 2После этого перейдите на «Apple Computer или Apple», выберите папку «MobileSync» и откройте папку «Backup». Затем используйте информацию «Date Modified», чтобы определить последнюю сделанную вами резервную копию.
Шаг 3Затем подключите свой «внешний жесткий диск» к компьютеру, перейдите в папку «Этот компьютер» и откройте каталог «внешний жесткий диск». Оттуда создайте новую папку и назовите ее «iPhone Backup» или как-то так, чтобы ее можно было распознать как резервную копию вашего iPhone.
Шаг 4Затем вернитесь в каталог Шага 2, скопируйте папку резервной копии iPhone и вставьте ее в папку (iPhone Backup), созданную вами ранее.
Резервное копирование данных iPhone 16 на внешний диск на Mac
В противном случае, если вы используете Mac, резервное копирование данных iPhone 16 на внешний жесткий диск потребует от вас выполнения множества шагов для резервного копирования вашего iPhone. Но, несмотря на это, сделав это, вы можете эффективно создать резервную копию вашего iPhone на вашем внешнем диске. Итак, как сделать резервную копию iPhone на внешний жесткий диск на Mac? Вот шаги, которые вам следует выполнить:
Шаг 1Запустите Finder или iTunes на Mac и подключите iPhone через USB-кабель. Затем нажмите кнопку «Создать резервную копию сейчас» в разделе «Ручное резервное копирование и восстановление». После этого подождите, пока iTunes завершит процесс резервного копирования.
Шаг 2После этого отметьте значок «Поиск» в правом верхнем углу экрана Mac и найдите каталог «~/Library/Application Support/MobileSync». Затем найдите самую последнюю резервную копию, щелкните по ней правой кнопкой мыши и отметьте опцию «копировать».

Шаг 3После этого подключите внешний жесткий диск и перейдите в расположение в левом меню Finder. Затем вставьте туда файл резервной копии.
Часто задаваемые вопросы о том, как сделать резервную копию iPhone на внешнем диске
-
Как создать резервную копию iPhone с помощью iTunes на Windows?
Чтобы создать резервную копию iPhone с помощью iTunes на Windows, подключите iPhone к компьютеру и запустите обновленную версию iTunes. Затем нажмите кнопку «Устройство», выберите вкладку «Обзор» и отметьте кнопку «Создать резервную копию сейчас».
-
Как найти резервную копию iPhone на Mac?
Чтобы увидеть недавние резервные копии iPhone на Mac, запустите iTunes/Finder на компьютере и щелкните свое устройство. После этого на вкладке «Основные» щелкните «Управление резервными копиями», чтобы просмотреть список резервных копий. Затем щелкните правой кнопкой мыши по резервной копии и выберите «Показать в Finder».
-
Можно ли создать резервную копию iPhone на внешнем диске без использования компьютера?
Если у вас сейчас нет компьютера и вы хотите сделать резервную копию вашего iPhone на внешнем жестком диске, вам нужно использовать адаптер USB to lighting. Используйте этот адаптер для подключения вашего iPhone и внешнего диска. После этого вы можете перенести данные iPhone на диск.
Заключение
Вот и все! Это 3 возможных способа резервного копирования iPhone на внешний диск на Windows/Mac. С этими 3 способами вы теперь определенно можете сделать резервную копию всех данных iPhone на внешний жесткий диск. Если вы считаете последние два варианта трудоемкими и сложными для выполнения, вы можете использовать мощный 4Easysoft Резервное копирование и восстановление данных iOS вместо этого инструмент. Благодаря мощным функциям резервного копирования данных этого инструмента вы можете легко, эффективно и быстро перенести данные iPhone на внешний диск. Чтобы узнать больше об этом инструменте, посетите его официальный сайт сегодня.
Статьи по Теме
Cloudwards.net may earn a small commission from some purchases made through our site. However, any earnings do not affect how we review services. Learn more about our editorial integrity and research process.

Key Takeaways: How to back up iPhone to an external hard drive
- Find the backup for your iPhone on your Mac or PC, make a copy and paste it to your external hard drive.
- You can directly connect an external hard drive to an iPhone and transfer some of your data, like photos.
- To back up your iPhone on a PC, you will need to download iTunes. On a Mac, backups for your iPhone happen in Finder.
Facts & Expert Analysis
- Best to Backup: Backing up your iPhone is the best way to ensure you don’t lose your data.
- Save Options: You can save your backups using your computer, online cloud backup or an external hard drive.
- Backup Location: You can use the Terminal app to change the backup folder location on your iPhone.
Performing a backup ensures that you don’t lose the important data on your iPhone. You have several options, including cloud backup or backing up your iPhone locally on a computer. External hard drives are not as popular as they once were, but they are still a reliable option. This guide will show you how to back up your iPhone to an external hard drive.
For many, using iCloud is the most direct way to back up your iPhone’s data. We cover the process in our how to backup iPhone to iCloud guide. External hard drives are the other option, and there are still plenty of reasons to consider one.
External hard drives were once the go-to for storing data. Using one makes you the only person in control of your backup files. You can save your iPhone data to an external hard drive using a Mac or PC. Read on to see how to use one to back up your iPhone.
-
02/27/2024 Facts checked
Article rewritten to include updated devices and how-to steps.
- updates
How to Back up an iPhone to an External Hard Drive on Mac
Saving an iPhone backup to an external hard drive begins by creating a local backup on your Mac computer. Having a backup stored on your device is the most direct way to transfer the data to your external hard drive. Later, we will cover how to make an external drive the default location.
- Connect iPhone to Mac
Connect a USB-C or Lightning cable to your Mac, depending on your iPhone model. The iPhone icon will appear under “locations ” in Finder.

- Backup iPhone
If your iPhone does not begin the backup process, click the “back up now” button. Alternatively, you can choose to back up to your Mac or iCloud. There’s also an option to “restore backup” or encrypt your data.

- Find iPhone Backup
The quickest way to find your iPhone backup file is to click “manage backups,” right-click on the latest backup and choose “show in Finder.” You should see a folder with numbers and letters. Alternatively, in Finder, you can select “go” from the menu bar, choose “go to folder” and type in or copy and paste “~/Library/Application Support/MobileSync/Backup/.”

- Connect External Hard Drive
Connect your external hard drive to your Mac computer. You should see it in the same section as your iPhone. Click to open it. If you wish, create a folder called “iPhone backups.”

- Save iPhone Backup
From the previous Finder page with your iPhone backup, make a copy. Apple does not recommend moving this folder from its location on your Mac. Copy and paste the iPhone backup into the external drive.


How to Back up an iPhone to an External Drive on Windows
You don’t need a Mac to back up your iPhone to a computer; you can do so using a PC. You’ll need to download iTunes first, as that app is required to perform a backup. Once downloaded, you can back up your iPhone.
- Open iTunes
Find iTunes in your applications. If this is your first time accessing the app, you’ll need to sign in with your Apple ID. You’ll also have the option to include iCloud, but it is not required.

- Connect iPhone
Depending on your iPhone, connect it using a USB. Grant your PC permission if asked. In iTunes, you’ll see an iPhone icon in the menu bar. Click on it.
- Backup iPhone
In the “backups” section, click “back up now” to back up your iPhone. You can choose “this computer” or “iCloud.” Encrypting your data is also an option.
- Folder Backup Location
Locate your backup by starting in “file explorer.” Select “show hidden items” from the “view” dropdown or the menu to see AppData. Follow this path: Windows (C:)\Users\[Your Profile Folder]\AppData\Roaming\Apple Computer\MobileSync\Backup.

- Connect External Hard Drive
Plug in your external hard drive to your PC. You can find it in “this PC” under “devices and drives.” Open the external drive.

- Backup iPhone to External Drive
Make a copy of your backup from step four and paste it into the external drive.


How to Back up Your iPhone Without a Computer
You have some options if you don’t have a computer or just don’t want to take up a lot of space with backups. You can connect directly to an external hard drive or use cloud backup to back up your iPhone data.
Use a USB-C Cable or Adapter
Depending on your iPhone and your external drive, you can directly connect the two together. The easiest way is to use a USB-C with an iPhone 15. Older models will likely need an adapter. It’s also important to note that the external device must have a single partition formatted for Apple devices and may require a separate power source.
Create an Automated Cloud Backup
Cloud backup services are another way to back up your iPhone without needing a computer. You can check our guide on the best online backup services to find one that suits your needs. You’ll need to create an account and ensure it has enough storage. You may need to download the accompanying mobile app to transfer data from your iPhone to your cloud backup account.
How to Check if Your iPhone Backup Worked
The easiest way to check that your backup worked is to locate it on your computer using the methods outlined in the previous sections. You will know the process worked if you see a folder in the respective backup folder.
Checking to make sure the backup worked is a good habit, as a failed or incomplete backup won’t protect your data. Another option, though not necessarily recommended, is to try and restore your data from a backup. If you click on the “restore backup” button and have the option to choose a backup, you’ll know the backup worked.
Where Is the Default iPhone Backup Location?
Apple stores the backup for your iPhone on your Mac at the following path: ~/Library/Application Support/MobileSync/Backup. Any backups you have will show up through this path. Storage space is the only limit to the number of iPhone backups that you can have.
How to See Your Old iPhone Backups
It is easy to see the older iPhone backups that are saved on your computer. You can check for older backups on a Mac or a PC.
- Open Finder
Open Finder on your Mac. From the menu bar, select “go” and then choose “go to folder.”

- Go to Path
In the window that pops up, enter “~/Library/Application Support/MobileSync/Backup/” and then double-click on the path. This will take you to the folder populated by all of your iPhone backups stored on your Mac.

- Using File Explorer
On a PC, open File Explorer and go to the following path: (C:)\Users\[Your Profile]\AppData\Roaming\Apple Computer\MobileSync\Backup. You should see all the iPhone backups stored on your PC.


How to Change Your iPhone Backup Location on Mac Using a Symlink
If you want to change the default backup location on a Mac, you will need to use the Terminal application. This process is for more advanced users and, if done incorrectly, could create problems with your Mac. In most cases, leaving your backup in the default location is best.
- Open Terminal
Locate the Terminal app in your applications folder. You can also press the “command” key and the space bar and type in “Terminal.”

- Go to the iPhone Backup Location
To gain disk access in Terminal, enter “cd ~/Library/Application/Support/MobileSync.” Type in “open” to see the backup folder in Finder. Change the name of the folder — for example, to “backup-old.”

- Set up the Symlink
In Terminal, enter the command below. Replace “[external drive name]” with the name of your external drive: ln -s “/Volumes/[external drive name]/” ~/Library/Application/Support/MobileSync/Backup/Backup-old

- Restart Mac
Restart your Mac. Any new backups for your iPhone will now be saved in the new location, which is your external hard drive.


Final Thoughts
Using an external hard drive to back up your iPhone is an older option that was popular a few years back. It is still a viable choice, especially if you don’t want to store your data on a business’s servers. Saving your backup to an external hard drive only takes a few steps and can be done on a Mac or a PC.
What do you use to back up your iPhone? Have you ever used an external hard drive? Would you consider using an external hard drive over other backup options? Let us know in the comments section below. Thanks for reading our article.
FAQ: Back Up iPhone
-
In most situations, you’ll need to locate the backup folder for your iPhone on your Mac or PC, make a copy and paste it into your external hard drive.
-
On a Mac, you can use the Finder app to back up your iPhone. For a PC, you need to download iTunes to back up your iPhone.
-
An iPhone 15 can connect directly to a newer external hard drive using a USB-C cord. Older iPhone and external hard drive models may require an adapter.
-
You can back up your iPhone to a flash drive by following the same steps to locate, copy and paste your backup data.
За последний год актуальность создания локальной резервной копии iPhone резко возросла. Полный бекап смартфона в облаке не только требует платной подписки iCloud, но и может быть недоступен из-за программных сбоев или введенных ограничений.
Рекомендуем периодически создавать локальную копию всех данных, а чтобы она не занимала много места на диске компьютера, предлагаем перенести бекап на внешний или сетевой накопитель.
Как перенести бекап iPhone на внешний или сетевой диск
1. Подключите iPhone к компьютеру при помощи кабеля и выдайте разрешение в iOS для синхронизации данных.
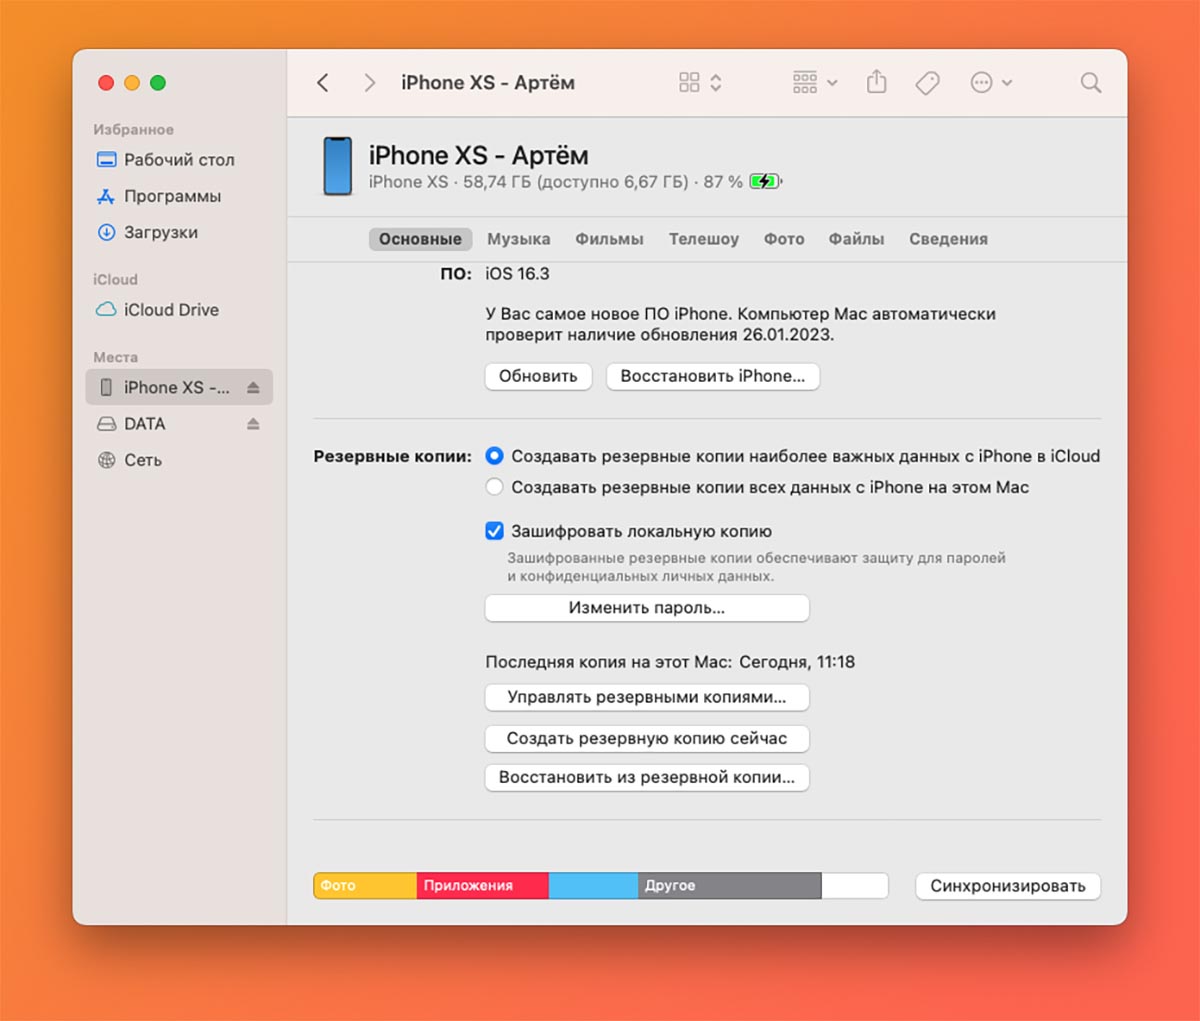
2. На Mac откройте Finder (в macOS Catalina и новее) или iTunes (в более ранних версиях операционной системы).
3. Найдите в боковом меню подключенный iPhone.
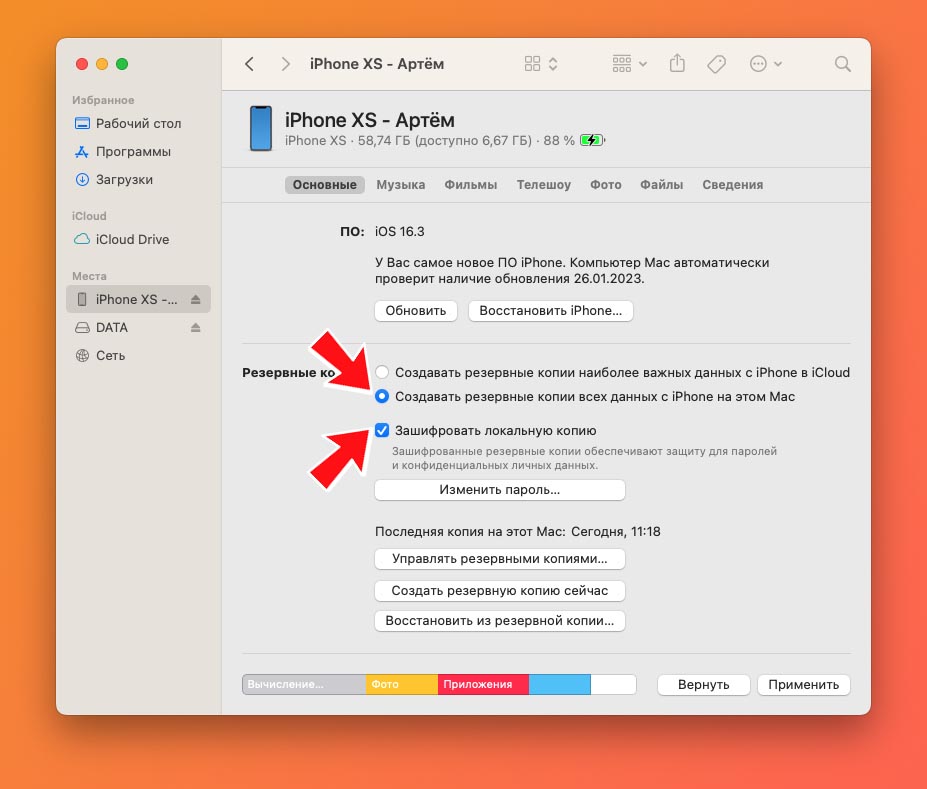
4. Активируйте опцию Создавать резервные копии всех данных с iPhone на этом Mac. Так в бекап на компьютере будут помещены все данные со смартфона.
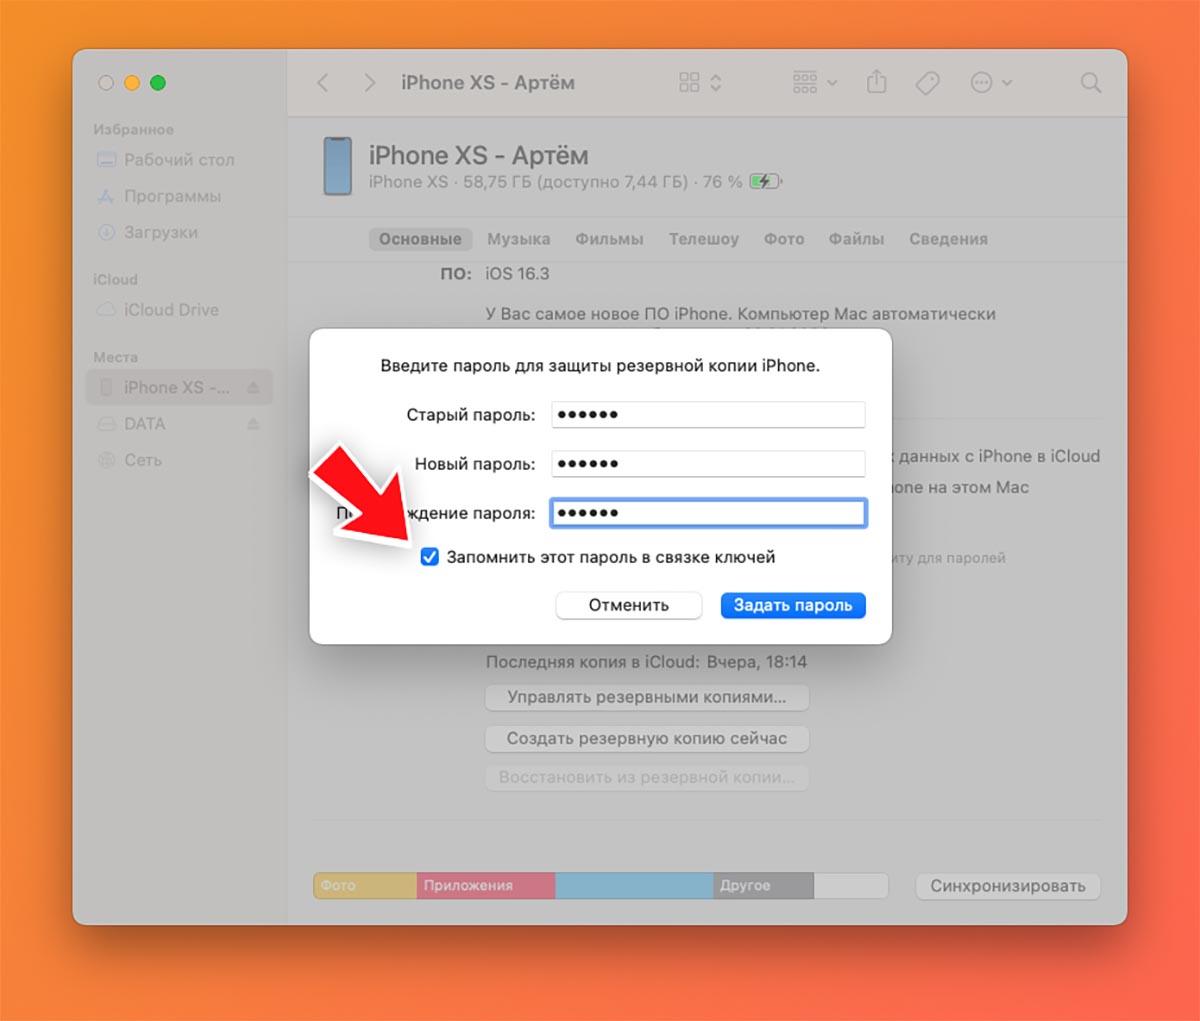
5. Включите фишку Зашифровать локальную копию. Если активировали тумблер ранее, убедитесь, что помните пароль.
В противном случае нужно отключить фишку, затем включить снова и сохранить новый пароль в Связке ключей.
6. Нажмите Создать резервную копию сейчас, чтобы сделать полный бекап iPhone на компьютере.
Для этого потребуется достаточно свободного места на диске. Размер копии будет примерно равен занятому месту на накопителе смартфона.
В тему: 18 способов освободить место на диске вашего Mac. Есть необычные
Сделать первый бекап лучше именно на встроенном диске Mac, так сохранение данных пройдет быстрее всего. Если свободного места на диске не хватает, сразу переходите к следующему пункту.
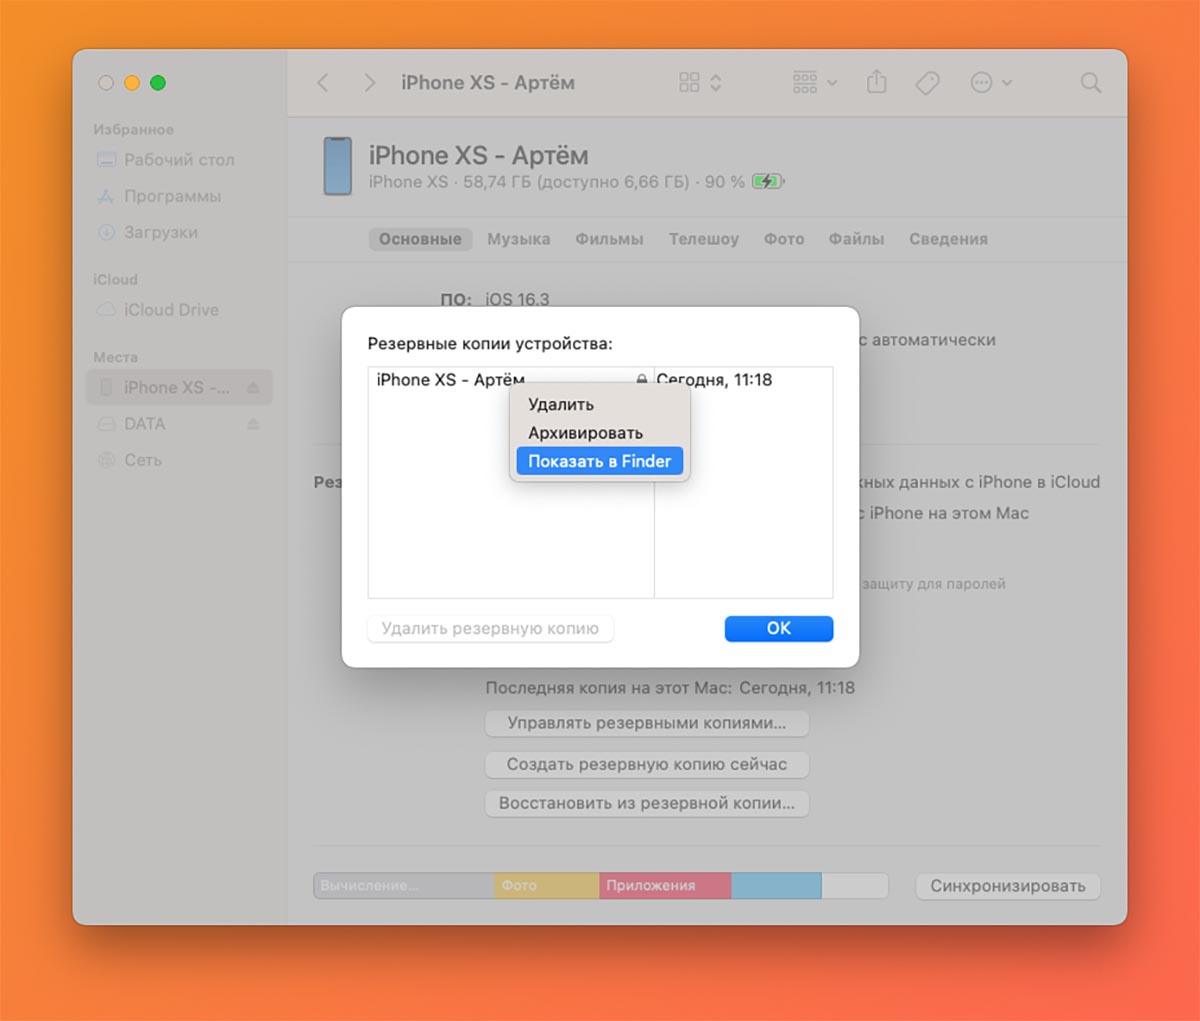
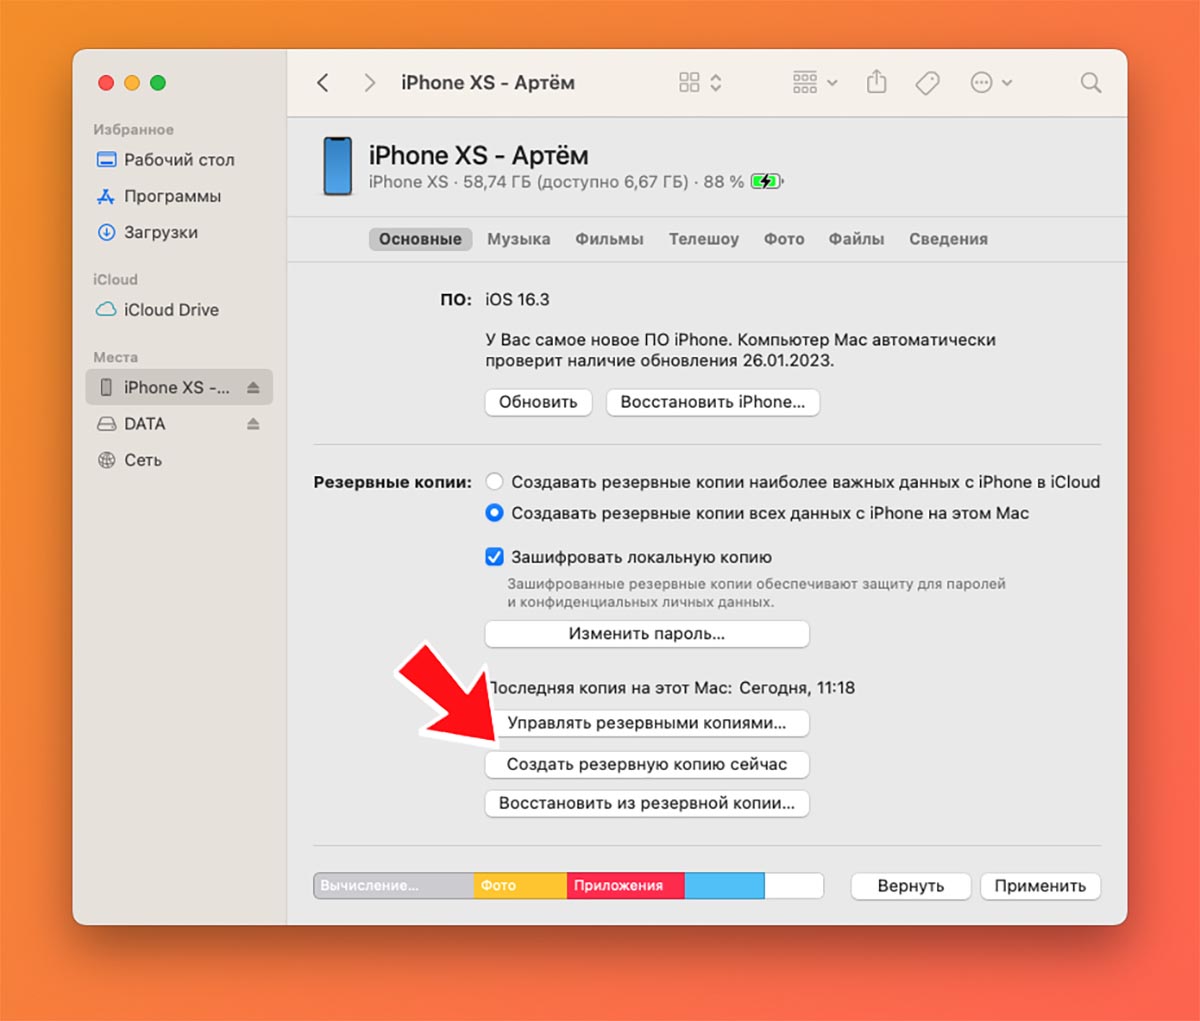
7. Подключите внешний диск для хранения копии или сетевое хранилище к Mac.
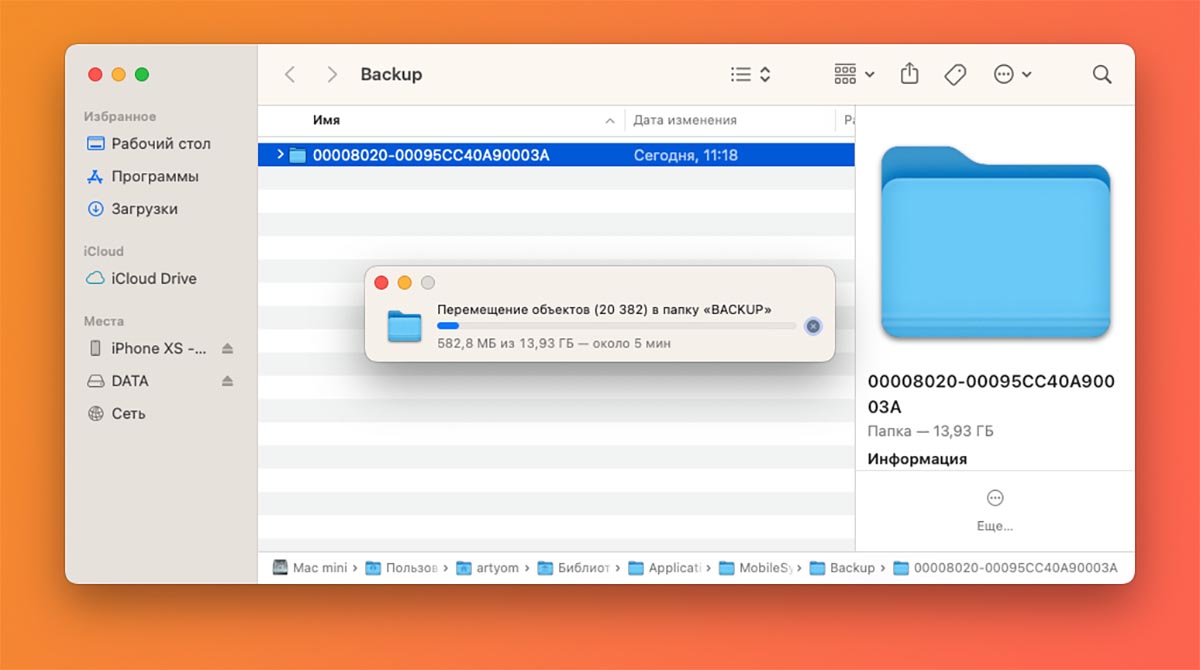
Если вы создавали копию данных на встроенном диске Mac, вручную перенесите её на внешний или сетевой диск в нужную папку.
Чтобы найти место хранения копии, в Finder нажмите кнопку Управлять резервными копиями… и откройте контекстное меню бекапа. Там можно открыть папку с копией в проводнике.
8. Изменить место хранение бекапа можно через Терминал, либо при помощи стороннего ПО.
Первый способ не такой надежный, ведь купертиновцы в разных версиях macOS меняют путь к нужной папке. Если вы захотите сделать все “ручками”, вот наша подробная инструкция.
Есть и более простой путь, например, утилита iPhone Backup Extractor. Приложение платное, но нам хватит и триального 30-дневного периода.
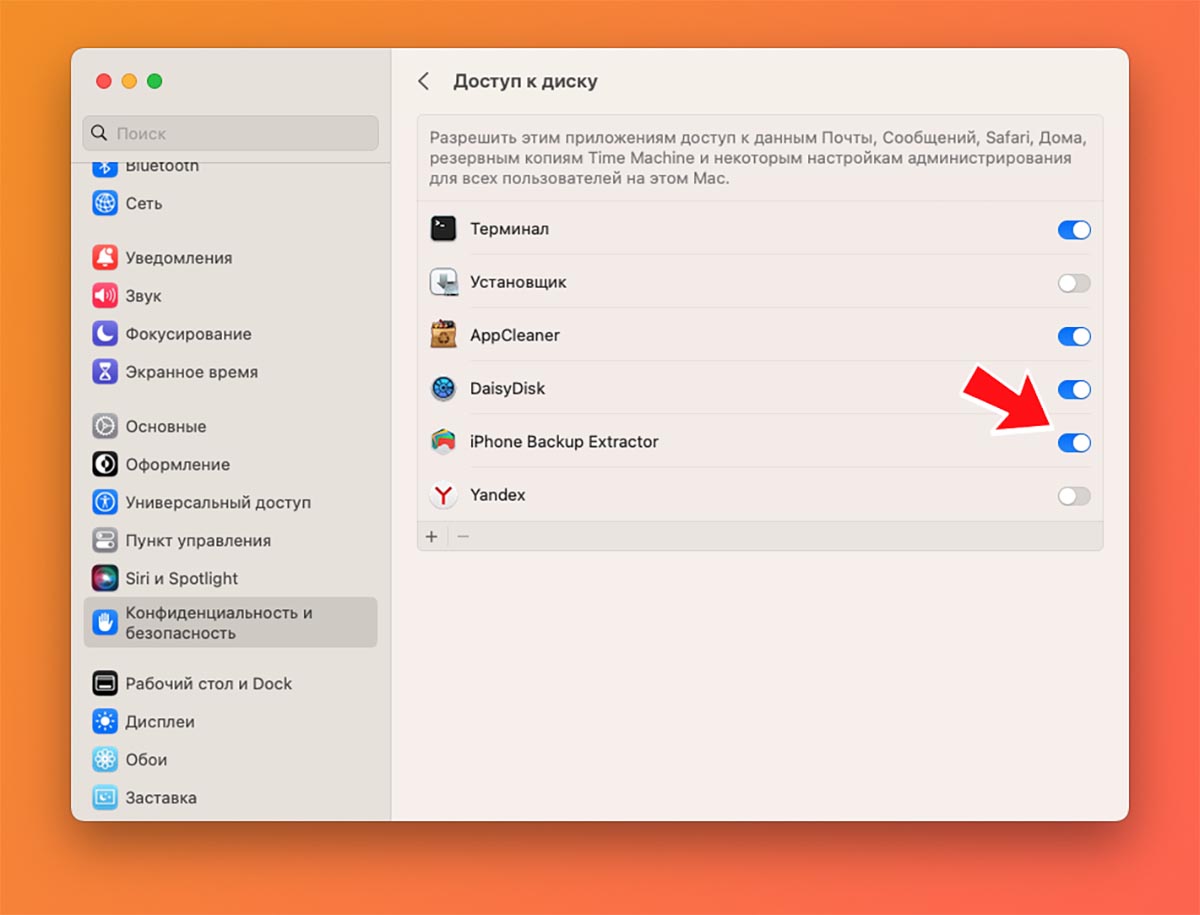
9. Установите и запустите приложение iPhone Backup Extractor (есть версия для macOS и Windows).
Перед первым запуском выдайте необходимое разрешение для работы программы по пути Системные настройки — Конфиденциальность и безопасность — Доступ к диску.
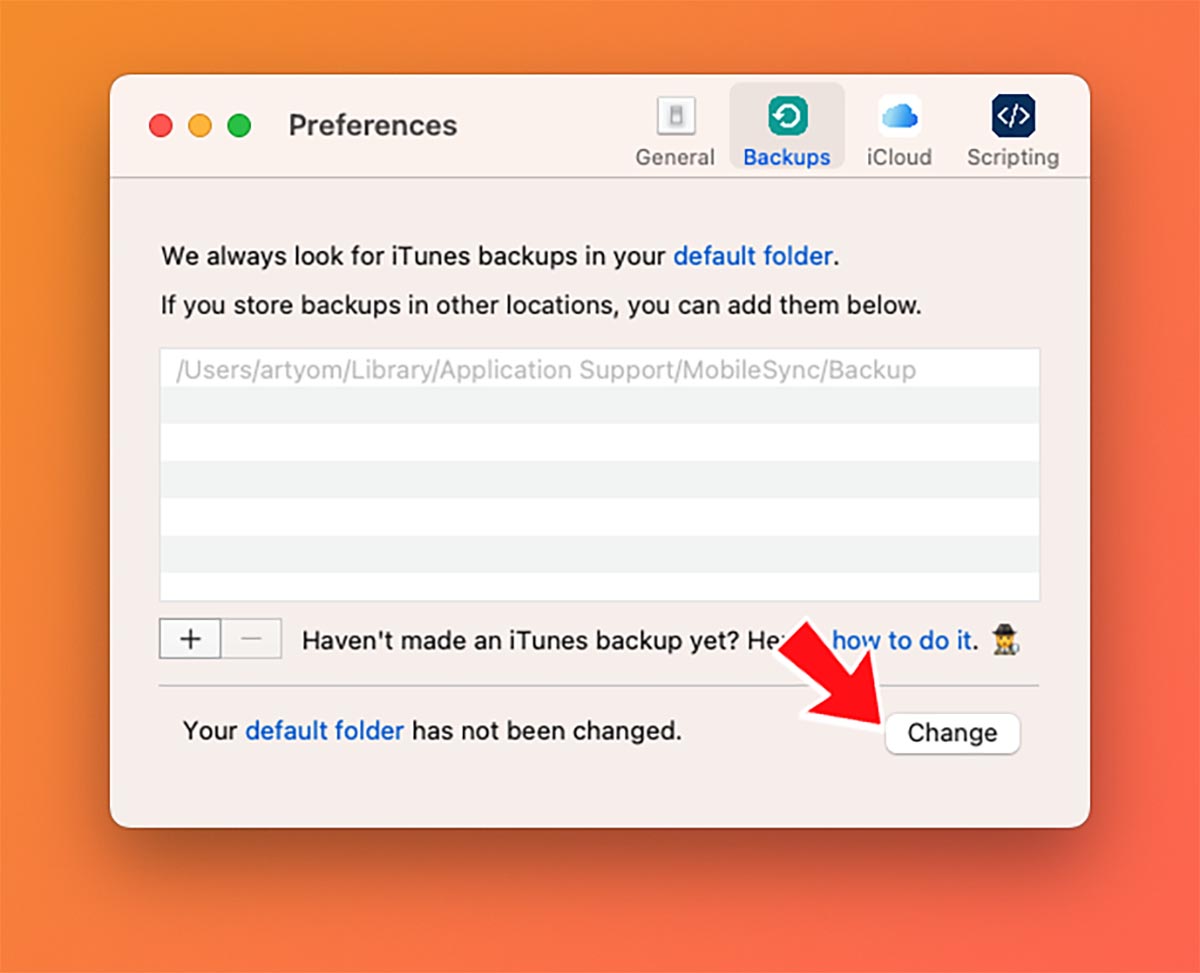
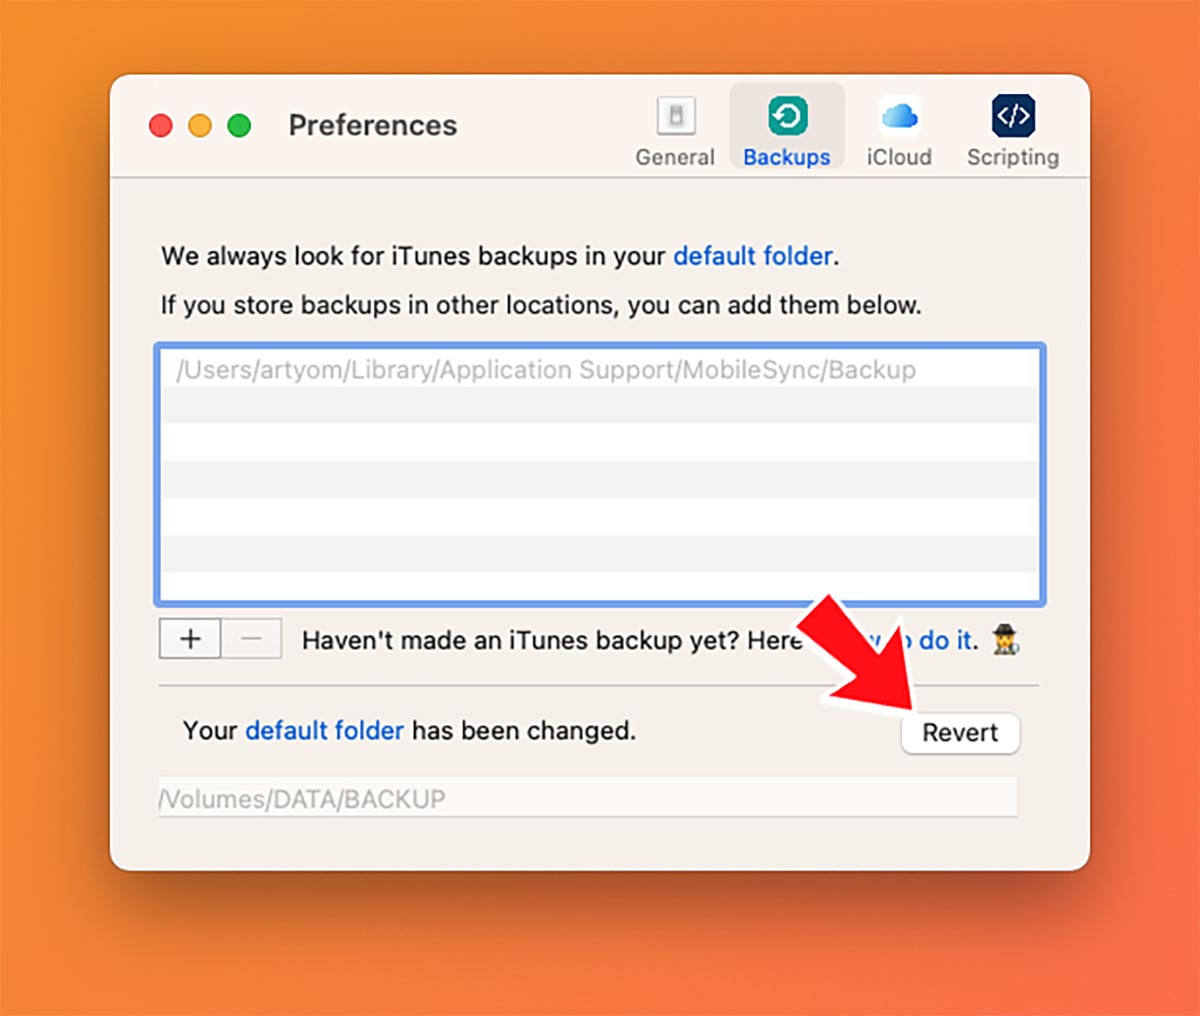
10. В настройках приложения на вкладке Backups нажмите кнопку Change и укажите желаемую папку для хранения бекапов.
Если в старой папке для копий будут храниться какие-то данные, их потребуется удалить.
11. Перезагрузите Mac для вступления изменений в силу.
Теперь можете создать обновленную копию данных подключенного iPhone. Если до этого переносили старый бекап с встроенного диска на внешний (пункт инструкции №6), то обновление копии займет около минуты. Если будете создавать новую копию, придется немного подождать.
Сбросить место хранения копии на стандартное можно в том же разделе настроек iPhone Backup Extractor. Само приложение после внесенных изменений держать на компьютере необязательно.
Главное — не забывайте подключать сетевой или внешний диск перед созданием следующих копий. В противном случае бекапы начнут создаваться на встроенном диске Mac.
(11 голосов, общий рейтинг: 4.45 из 5)
iPhones.ru
Храните нужные данные в надежном месте.
Артём Суровцев
@artyomsurovtsev
Люблю технологии и все, что с ними связано. Верю, что величайшие открытия человечества еще впереди!