
Introduction
Hello guys, in this article we will create a login and registration form with a database in a C# Windows Form application. This application has three forms, login, registration, and home. Users first register themselves, then log in to their account and see the welcome message on the home page.
Step 1
Open your visual studio, here I will use Visual Studio 2019.
Step 2
The clock on file menu on top of the visual studio, hover mouse on new, and click on Project.
Step 3
Search for Windows Form App (.NET framework) and click on next.
Step 4
In this step, you have to enter some details of your application and then click on the Create button. You have to enter the following details:
- Project Name: Name of your project
- Location: Location where you want to store your app on your local computer.
- Solution Name: This name is displayed in solution explorer in visual studio.
- Framework: Select the appropriate framework as per your application requirements.
Step 5
Now your project is created. Open Solution Explorer. If you don’t see solution explorer, you can open it from the View menu on top, or you can try the short cut key “Ctrl+W,S”. We need to create some pages for our application. Right-click on the solution name then Hover the mouse on Add and click on Add New Item, or you can user short cut key “Ctrl+Shift+A”.
Step 6
Now you see a dialog where we add our forms. Select Windows Form, give it a proper name and click on Add. Add a Login, Registration, and Home page in the same way.
Step 7
Now we need to add a database in our project. Right-click on the solution name, then Hover mouse on Add and click on Add New Item, or you can user short cut key “Ctrl+Shift+A”. Select data filter from the left sidebar to see the item which is associated with the database. Select service-based database, give it a name and click on add.
Step 8
Now we create a table that we user in login and registration. Double click on the database file from solution explorer. It will open a database file in the server explorer.
Expand your database and right-click on the table, then click on Add New Table.
Step 9
Create a table field that you want. Here, I added only three fields, ID, Username, and password, where ID is auto incremented by 1. You can set it by right clicking on the field name, click on property, and find the Id Identity Specification. Expand it and make it true (Is Identity) field and give an increment number which increments Id by adding this number in the last Id.
q
CREATE TABLE [dbo].[LoginTable]
(
    [Id] INT NOT NULL PRIMARY KEY IDENTITY,
    [username] NVARCHAR(50) NULL,
    [password] NVARCHAR(50) NULL
)
Step 10
Now we create a Registration form. Create a design for your form as you need. In the below image, you see how I design a form.
Step 11
Now click anywhere on the form. It will generate a Form_Load event where you can enter the following code. This code creates a database connection and opens it. In the next step, you will learn how you get that connection string which are added in SQLConnection Constructor.
private void Registration_Load(object sender, EventArgs e)
{
    cn = new SqlConnection(@"Data Source=(LocalDB)\MSSQLLocalDB;AttachDbFilename=H:\Website\RegistrationAndLogin\Database.mdf;Integrated Security=True");
    cn.Open();
}
Step 12
Go to Server Explorer, right-click on the database, then click on Modify Connection.
Step 13
Now you see a windows dialog popup click on the advance button. This will open another dialog. Before that, click on the test button and check that your database is working properly.
Step 14
Copy the path which shows below on this dialog and close both dialogs. Then paste this path in the form load event. Add @ sign before this path so there’s no need to change the slash.
Step 15
We need to open the login page when the user clicks on the login button, so enter the following code in the Login Button click event.
private void Button1_Click(object sender, EventArgs e)
{
    this.Hide();
    Login login = new Login();
    login.ShowDialog();
}
Code Explanation
- First, we hide the current form which is registration .
- Then we create an object of login page and show login form using that object.
Step 16
Now add the following code in the registration button click event:
private void BtnRegister_Click(object sender, EventArgs e)
{
    if (txtconfirmpassword.Text != string.Empty || txtpassword.Text != string.Empty || txtusername.Text != string.Empty)
    {
        if (txtpassword.Text == txtconfirmpassword.Text)
        {
            cmd = new SqlCommand("select * from LoginTable where username='" + txtusername.Text + "'", cn);
            dr = cmd.ExecuteReader();
            if (dr.Read())
            {
                dr.Close();
                MessageBox.Show("Username Already exist please try another ", "Error", MessageBoxButtons.OK, MessageBoxIcon.Error);
            }
            else
            {
                dr.Close();
                cmd = new SqlCommand("insert into LoginTable values(@username,@password)", cn);
                cmd.Parameters.AddWithValue("username", txtusername.Text);
                cmd.Parameters.AddWithValue("password", txtpassword.Text);
                cmd.ExecuteNonQuery();
                MessageBox.Show("Your Account is created . Please login now.", "Done", MessageBoxButtons.OK, MessageBoxIcon.Information);
            }
        }
        else
        {
            MessageBox.Show("Please enter both password same ", "Error", MessageBoxButtons.OK, MessageBoxIcon.Error);
        }
    }
    else
    {
        MessageBox.Show("Please enter value in all field.", "Error", MessageBoxButtons.OK, MessageBoxIcon.Error);
    }
}
Code Explanation
- First of all, we check that the user entered a value in all fields. If yes, then continue, otherwise, show a message using the message box.
- Then we check if the password and confirm password both are the same.
- Then we check if any record/user is already registered with that username if not then continue further otherwise show an error message.
- In last we insert data in the table using the SQLCommand object.
Step 17
Now we create a login page. Here, I added two text boxes for username and password and two buttons for a login and open registration form.
Step 18
Click on anywhere in a form which generates a Form_Load event add connection code, as shown below.
private void Login_Load(object sender, EventArgs e)
{
    cn = new SqlConnection(@"Data Source=(LocalDB)\MSSQLLocalDB;AttachDbFilename=H:\Website\RegistrationAndLogin\Database.mdf;Integrated Security=True");
    cn.Open();
}
Step 19
On a Registration button click, add the following code which opens the registration form.
private void Btnregister_Click(object sender, EventArgs e)
{
    this.Hide();
    Registration registration = new Registration();
    registration.ShowDialog();
}
Step 20
Add the below code in the login button click for redirecting users to the home page form if the user exists.
private void BtnLogin_Click(object sender, EventArgs e)
{
    if (txtpassword.Text != string.Empty || txtusername.Text != string.Empty)
    {

        cmd = new SqlCommand("select * from LoginTable where username='" + txtusername.Text + "' and password='"+txtpassword.Text+"'", cn);
        dr = cmd.ExecuteReader();
        if (dr.Read())
        {
            dr.Close();
            this.Hide();
            Home home = new Home();
            home.ShowDialog();
        }
        else
        {
            dr.Close();
            MessageBox.Show("No Account avilable with this username and password ", "Error", MessageBoxButtons.OK, MessageBoxIcon.Error);
        }

    }
    else
    {
        MessageBox.Show("Please enter value in all field.", "Error", MessageBoxButtons.OK, MessageBoxIcon.Error);
    }
}
Code Explanation
- Here, first of all, we check if the user enters a value in both fields. If yes, then continue, otherwise, show an error message.
- Then we check if the user exists in our database with that username and password. If the user exists, then open the home page which we generated at the start.
Step 21
Change the start page as login in Program.cs File.
static void Main()
{
Application.EnableVisualStyles();
Application.SetCompatibleTextRenderingDefault(false);
Application.Run(new Login());
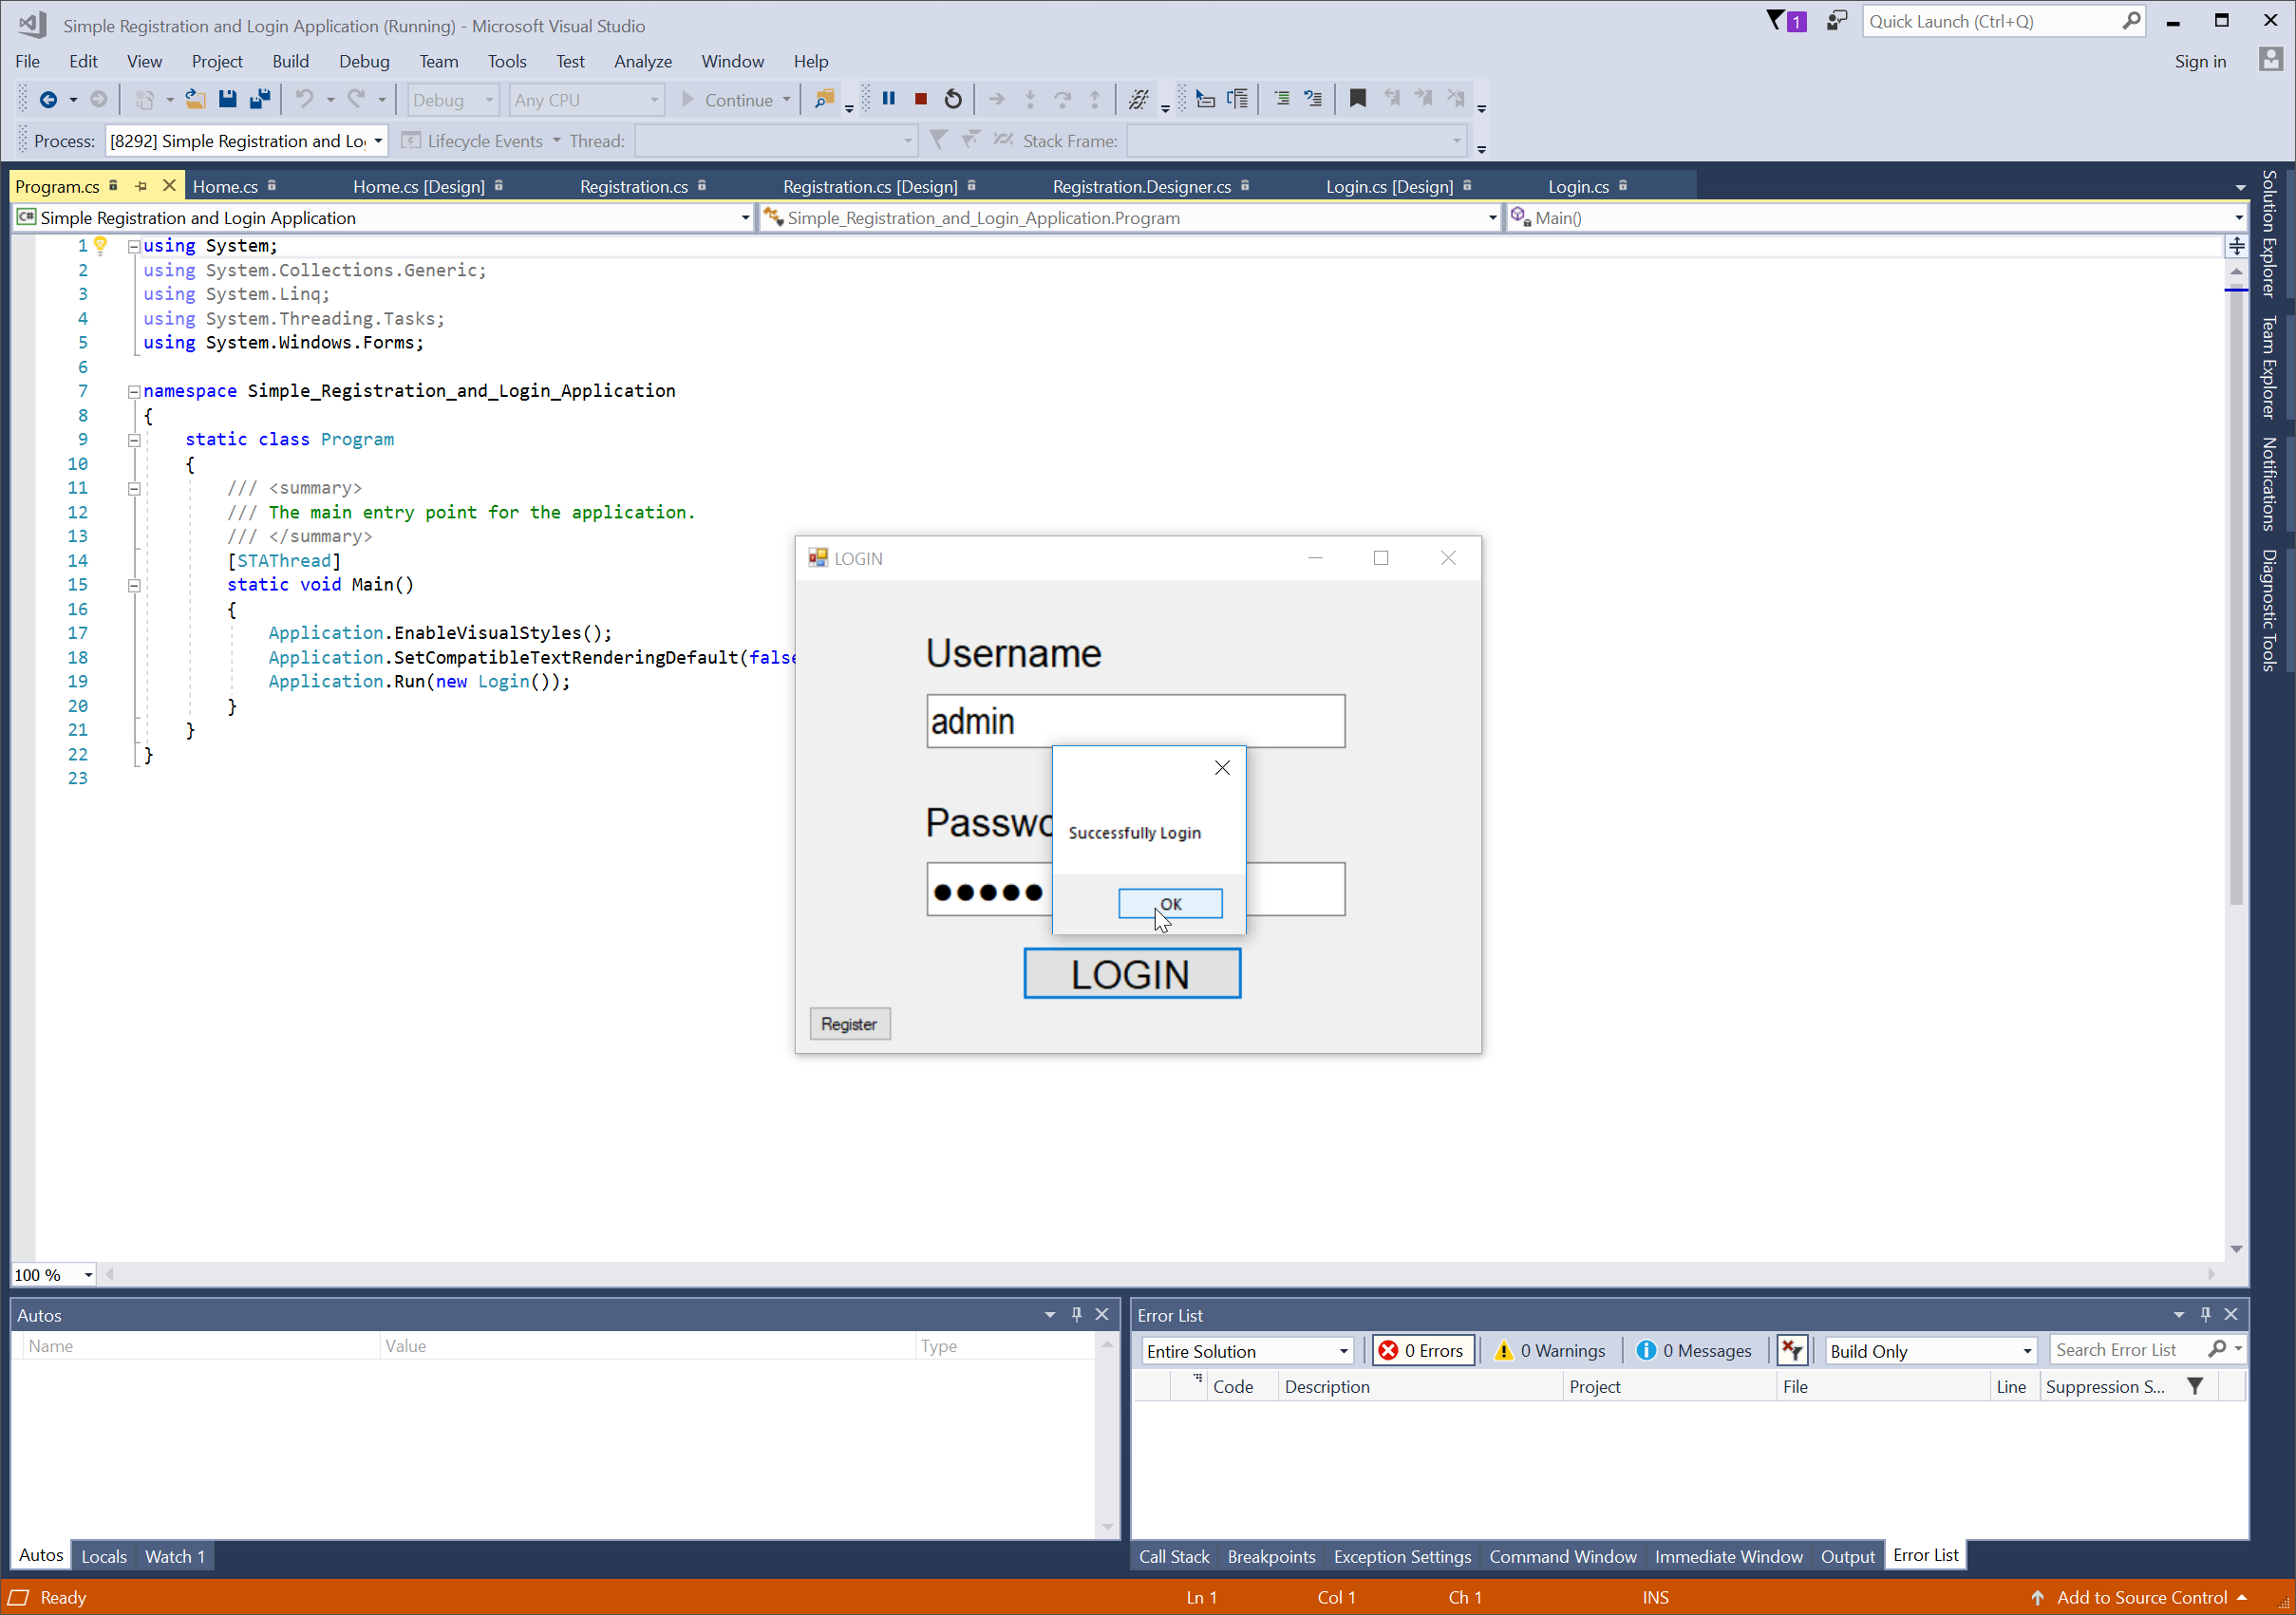
}Step 22
Now run your application.
Login.cs
using System;
using System.Collections.Generic;
using System.ComponentModel;
using System.Data;
using System.Data.SqlClient;
using System.Drawing;
using System.Linq;
using System.Text;
using System.Threading.Tasks;
using System.Windows.Forms;

namespace RegistrationAndLogin
{
    public partial class Login : Form
    {
        SqlCommand cmd;
        SqlConnection cn;
        SqlDataReader dr;

        public Login()
        {
            InitializeComponent();
        }

        private void Login_Load(object sender, EventArgs e)
        {
            cn = new SqlConnection(@"Data Source=(LocalDB)\MSSQLLocalDB;AttachDbFilename=D:\Articles\Code\RegistrationAndLogin\Database.mdf;Integrated Security=True");
            cn.Open();
        }

        private void Btnregister_Click(object sender, EventArgs e)
        {
            this.Hide();
            Registration registration = new Registration();
            registration.ShowDialog();
        }

        private void BtnLogin_Click(object sender, EventArgs e)
        {
            if (txtpassword.Text != string.Empty || txtusername.Text != string.Empty)
            {

                cmd = new SqlCommand("select * from LoginTable where username='" + txtusername.Text + "' and password='"+txtpassword.Text+"'", cn);
                dr = cmd.ExecuteReader();
                if (dr.Read())
                {
                    dr.Close();
                    this.Hide();
                    Home home = new Home();
                    home.ShowDialog();
                }
                else
                {
                    dr.Close();
                    MessageBox.Show("No Account avilable with this username and password ", "Error", MessageBoxButtons.OK, MessageBoxIcon.Error);
                }

            }
            else
            {
                MessageBox.Show("Please enter value in all field.", "Error", MessageBoxButtons.OK, MessageBoxIcon.Error);
            }
        }

    }
}
Registration.cs
using System;
using System.Collections.Generic;
using System.ComponentModel;
using System.Data;
using System.Data.Common;
using System.Data.SqlClient;
using System.Drawing;
using System.Linq;
using System.Text;
using System.Threading.Tasks;
using System.Windows.Forms;

namespace RegistrationAndLogin
{
    public partial class Registration : Form
    {

        SqlCommand cmd;
        SqlConnection cn;
        SqlDataReader dr;

        public Registration()
        {
            InitializeComponent();
        }

        private void Registration_Load(object sender, EventArgs e)
        {
            cn = new SqlConnection(@"Data Source=(LocalDB)\MSSQLLocalDB;AttachDbFilename=D:\Articles\Code\RegistrationAndLogin\Database.mdf;Integrated Security=True");
            cn.Open();
        }

        private void BtnRegister_Click(object sender, EventArgs e)
        {
            if (txtconfirmpassword.Text != string.Empty || txtpassword.Text != string.Empty || txtusername.Text != string.Empty)
            {
                if (txtpassword.Text == txtconfirmpassword.Text)
                {
                    cmd = new SqlCommand("select * from LoginTable where username='" + txtusername.Text + "'", cn);
                    dr = cmd.ExecuteReader();
                    if (dr.Read())
                    {
                        dr.Close();
                        MessageBox.Show("Username Already exist please try another ", "Error", MessageBoxButtons.OK, MessageBoxIcon.Error);
                    }
                    else
                    {
                        dr.Close();
                        cmd = new SqlCommand("insert into LoginTable values(@username,@password)", cn);
                        cmd.Parameters.AddWithValue("username", txtusername.Text);
                        cmd.Parameters.AddWithValue("password", txtpassword.Text);
                        cmd.ExecuteNonQuery();
                        MessageBox.Show("Your Account is created . Please login now.", "Done", MessageBoxButtons.OK, MessageBoxIcon.Information);
                    }
                }
                else
                {
                    MessageBox.Show("Please enter both password same ", "Error", MessageBoxButtons.OK, MessageBoxIcon.Error);
                }
            }
            else
            {
                MessageBox.Show("Please enter value in all field.", "Error", MessageBoxButtons.OK, MessageBoxIcon.Error);
            }
        }

        private void Button1_Click(object sender, EventArgs e)
        {
            this.Hide();
            Login login = new Login();
            login.ShowDialog();
        }
    }
}
Home.cs
using System;
using System.Collections.Generic;
using System.ComponentModel;
using System.Data;
using System.Drawing;
using System.Linq;
using System.Text;
using System.Threading.Tasks;
using System.Windows.Forms;

namespace RegistrationAndLogin
{
    public partial class Home : Form
    {
        public Home()
        {
            InitializeComponent();
        }
    }
}
Program.cs
using System;
using System.Collections.Generic;
using System.Linq;
using System.Threading.Tasks;
using System.Windows.Forms;

namespace RegistrationAndLogin
{
    static class Program
    {
        /// <summary>
        /// The main entry point for the application.
        /// </summary>
        [STAThread]
        static void Main()
        {
            Application.EnableVisualStyles();
            Application.SetCompatibleTextRenderingDefault(false);
            Application.Run(new Login());
        }
    }
}
Conclusion
So here, we created a simple login and registration page in a Windows Form application. I hope you liked this article, share it with your friends.
Many developers in recent years have been using C# to develop their applications. In this tutorial, we’ll go through a simple example of how to create a basic user authentication in C#.
Introduction
C# or C-sharp is an object-oriented programming language developed by Microsoft. C# or C-sharp runs on a framework called the .Net framework.
The language has created many applications like:
- Web applications
- Mobile applications
- Computer games
- Desktop applications
- Database applications
- Virtual reality applications
Prerequisites
To follow this article along it would be helpful to have the following:
- An editor, in my case, I’ll be using Visual Studio.
- Some basic C# and SQL knowledge.
- Knowledge on how to run relational database management in this case, we will use MySQL.
- Visual Studio knowledge and how to create projects.
Step I: Create a database and table with required columns
Create database userdata;

Create table command:
CREATE TABLE `user_info` ( `id` INT NOT NULL AUTO_INCREMENT , `names` VARCHAR(50) NOT NULL , `username` VARCHAR(20) NOT NULL , `password` VARCHAR(50) NOT NULL , PRIMARY KEY (`id`)) ;

Step II: Create a project
Create a Visual Studio project by clicking on File -> New -> Project and then select Visual C#. From the window, choose Windows Forms App(.Net Framework). Give your application a name. Then click ok. The project will come with default form called Form 1.
Step III: Create a config class to execute MySQL queries
Since C# is object-oriented, we will create a class that will handle the execution of queries that we will use in our program.
From the Solution Explorer window right-click and select add -> New Item -> Class. Name the class Config.cs the click on the button add.
- Add MySQL.Data Library by right-clicking on solution explorer window, then Manage Nuget packages, then search for MySQL.Data Library and install.

- Add the following class to help in the execution of MySQL queries.
Config.cs
using System;
using System.Collections.Generic;
using System.Linq;
using System.Text;
using System.Threading.Tasks;
using MySql.Data.MySqlClient;
//add this for MessageBox
using System.Windows.Forms;

// add data function classes
using System.Data;

namespace LoginSysten
{
    public class Config
    {
        string ConectionString = "";  // save connection string
        public MySqlConnection connection = null;
        public string server = "127.0.0.1";// MySQL host / ip of the computer
        public string user = "root";// MySQL user
        public string password = "";// MySQL password
        DataSet ds;
        DataTable dt;
        public string Table = "user_info"; // initialize db table
        public string ConnectionType = "";
        string RecordSource = "";

        DataGridView tempdata;

        public Config()
        {

        }

        // function to connect to the database
        public void Connect(string database_name)
        {
            try
            {

                   ConectionString = "SERVER=" + server + ";" + "DATABASE=" + database_name + ";" + "UID=" + user + ";" + "PASSWORD=" + password + ";";

                connection = new MySqlConnection(ConectionString);
            }
            catch (Exception E)
            {
                MessageBox.Show(E.Message);
            }
        }

        // Function to execute select statements
        public void ExecuteSql(string Sql_command)
        {

            nowquiee(Sql_command);

        }

        // creates connection to MySQL before execution
        public void nowquiee(string sql_comm)
        {
            try
            {
                MySqlConnection cs = new MySqlConnection(ConectionString);
                cs.Open();
                MySqlCommand myc = new MySqlCommand(sql_comm, cs);
                myc.ExecuteNonQuery();
                cs.Close();


            }
            catch (Exception err)
            {

                MessageBox.Show(err.Message);
            }
        }

        // function to execute delete , insert and update
        public void Execute(string Sql_command)
        {
            RecordSource = Sql_command;
            ConnectionType = Table;
            dt = new DataTable(ConnectionType);
            try
            {
                string command = RecordSource.ToUpper();

                //======================if sql contains select==========================================
                MySqlDataAdapter da2 = new MySqlDataAdapter(RecordSource, connection);

                DataSet tempds = new DataSet();
                da2.Fill(tempds, ConnectionType);
                da2.Fill(tempds);

                //======================================================================================


            }
            catch (Exception err) { MessageBox.Show(err.Message); }
        }

        // function to bring selected results based on column name and row index
        public string Results(int ROW, string COLUMN_NAME)
        {
            try
            {
                return dt.Rows[ROW][COLUMN_NAME].ToString();
            }
            catch (Exception err)
            {
                MessageBox.Show(err.Message);
                return "";

            }
        }

        // function to bring selected results based on column index and row index
        public string Results(int ROW, int COLUMN_NAME)
        {
            try
            {
                return dt.Rows[ROW][COLUMN_NAME].ToString();
            }
            catch (Exception err)
            {
                MessageBox.Show(err.Message);
                return dt.Rows[ROW][COLUMN_NAME].ToString();

            }
        }

        // Execute select statement
        public void ExecuteSelect(string Sql_command)
        {
            RecordSource = Sql_command;
            ConnectionType = Table;

            dt = new DataTable(ConnectionType);
            try
            {
                string command = RecordSource.ToUpper();
                MySqlDataAdapter da = new MySqlDataAdapter(RecordSource, connection);
                ds = new DataSet();
                da.Fill(ds, ConnectionType);
                da.Fill(dt);
                tempdata = new DataGridView();
            }
            catch (Exception err)
            {
                MessageBox.Show(err.Message);
            }


        }

        // count Number of rows after selecy
        public int Count()
        {
            return dt.Rows.Count;
        }
    }
}
- Now that we have Config.cs, we can execute any MySQL statement.
Step IV: Create register windows form
In Microsoft Visual Studio, create a new project. Choose project -> Add Windows Form from File submenu in the left corner, give the form a name Register , and click Add.
We have two Windows form classes that is Form1.cs and Register.cs.
Step V: Design login and register interface
Login form
- Click on Form1.cs in Solution Explorer, and on the form that displays, add three buttons, two textboxes, and two labels.
The first button will be the register button, that launch the Register form. The second button will be the Login button. When the second button is clicked, it will query the database with the input entered. The second button will execute the login MySQL query. The third button will close the application.
The first textbox will allow the username input for login, while the second textbox will enable the password’s input. These two inputs will be passed to the SQL.
The labels will indicate the functionality of the two textboxes.

Register form
- Click on Register.cs in the Solution Explorer and on the form that displays add two buttons, three textboxes, and three labels.
The first button will be a register button to save data entered, and the second one will be an exit button that will close the Register form.
The first textbox will allow the input of the names for the user. The second textbox will allow input of the user’s username. The third textbox is for entering the password.
The labels will or show the functionality of the three textboxes.

Step VI: Login logic
- Initialize the Config file in Form1.cs to allow us to access the database with ease.
 // Initialize the connection class
        Config db = new Config();
        public Form1()
        {
            InitializeComponent();
            // pass the database you want to connect to
            db.Connect("userdata");
        }
On click of the register button, add the following code.
 // start register window
            Register register = new Register();
            register.Show();
On click of the login button, add the following code.
  // querry MySQL database for the data passed from textboxes
            db.ExecuteSelect("SELECT * FROM `user_info` where username='" + textBox1.Text+ "' and password ='" + textBox2.Text+"'");

            if (db.Count() == 1)
            {
                MessageBox.Show("Success You will Login as"+db.Results(0, "names"));
            }
            else
            {
                MessageBox.Show("Wrong username and password combination" );
            }
On click of the exit button, add the following code.
  private void button3_Click(object sender, EventArgs e)
        {
            // closes the application
            Environment.Exit(0);
        }
Final Form1.cs.
using System;
using System.Collections.Generic;
using System.ComponentModel;
using System.Data;
using System.Drawing;
using System.Linq;
using System.Text;
using System.Threading.Tasks;
using System.Windows.Forms;

namespace LoginSysten
{
    public partial class Form1 : Form
    {

        // Initialize the connection class
        Config db = new Config();
        public Form1()
        {
            InitializeComponent();

            // pass the database you want to connect to
            db.Connect("userdata");
        }

        private void button1_Click(object sender, EventArgs e)
        {
            // querry MySQL database for the data passed from textboxes
            db.ExecuteSelect("SELECT * FROM `user_info` where username='" + textBox1.Text+ "' and password ='" + textBox2.Text+"'");

            if (db.Count() == 1)
            {
                MessageBox.Show("Success You will Login as"+db.Results(0, "names"));
            }
            else
            {
                MessageBox.Show("Wrong username and password combination" );
            }

        }

        private void button2_Click(object sender, EventArgs e)
        {
            // start register window
            Register register = new Register();

            register.Show();
        }

        private void button3_Click(object sender, EventArgs e)
        {

            // closes the application
            Environment.Exit(0);
        }
    }
}
Step VII: Register logic
- Initialize the Config file in Register.cs to allow us to access the database with ease.
  Config db = new Config();
        public Register()
        {
            InitializeComponent();
            // pass the database you want to connect to
            db.Connect("userdata");
        }
On click of the exit button, add the following code.
 private void button3_Click(object sender, EventArgs e)
        {
            // closses the register window
            this.Close();
        }
On click of the register button, add the following code to save the information.
     private void button2_Click(object sender, EventArgs e)
        {
            // saves data in the database
            db.Execute("INSERT INTO `user_info` (`id`, `names`, `username`, `password`) VALUES (NULL, '"+textBox3.Text+"', '"+textBox1.Text+"', '"+textBox2.Text+"');");

            this.Close()
        }
Find the above application in GitHub Login and Register application.
Conclusion
From the example above, we have seen how we can use C# to create a Desktop system with a login functionality. The object-oriented functionality helps in code re-use without doing much coding from scratch.
In this article:
- We created a database for our application.
- Created Login and Register Interfaces.
- Connected our application with the database.
- Coded logic and functionality.
Happy C-sharp coding ahead!
Peer Review Contributions by: Miller Juma
Submitted by razormist on Thursday, April 12, 2018 — 21:38.
In this tutorial we will create a Simple Registration And Login Application using C#. C# syntax is highly expressive, yet it is also simple and easy to learn. C# is very simplified for the beginners. It is a general-purpose language designed to make all things simpler. It contains several classes that support any C# platforms, like game development. It has a friendly environment for all new developers. So let’s do the coding…
Getting Started
First you will have to download & install the Visual Studio. Visual Studios is an open source development feel free to create any application that you want.
Here’s the link for the Visual Studio https://www.visualstudio.com/.
Here’s the link for the SQLite Browser http://sqlitebrowser.org/.
Setting up SQLite
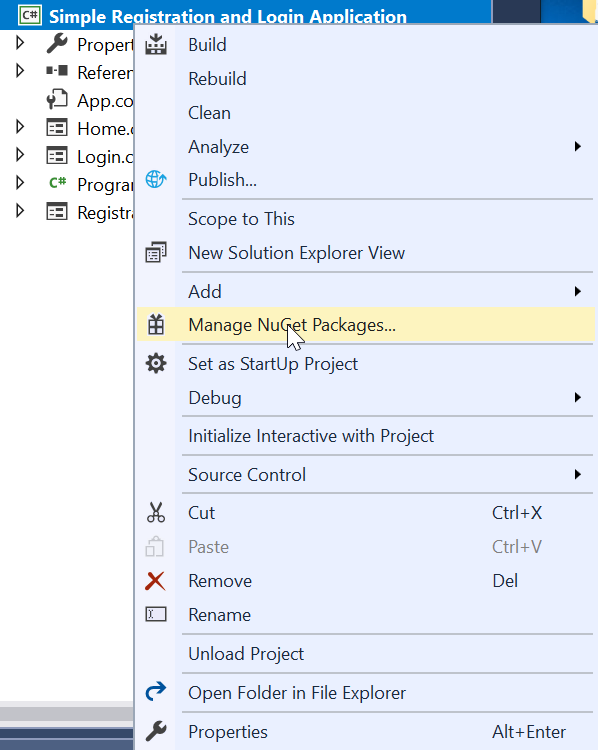
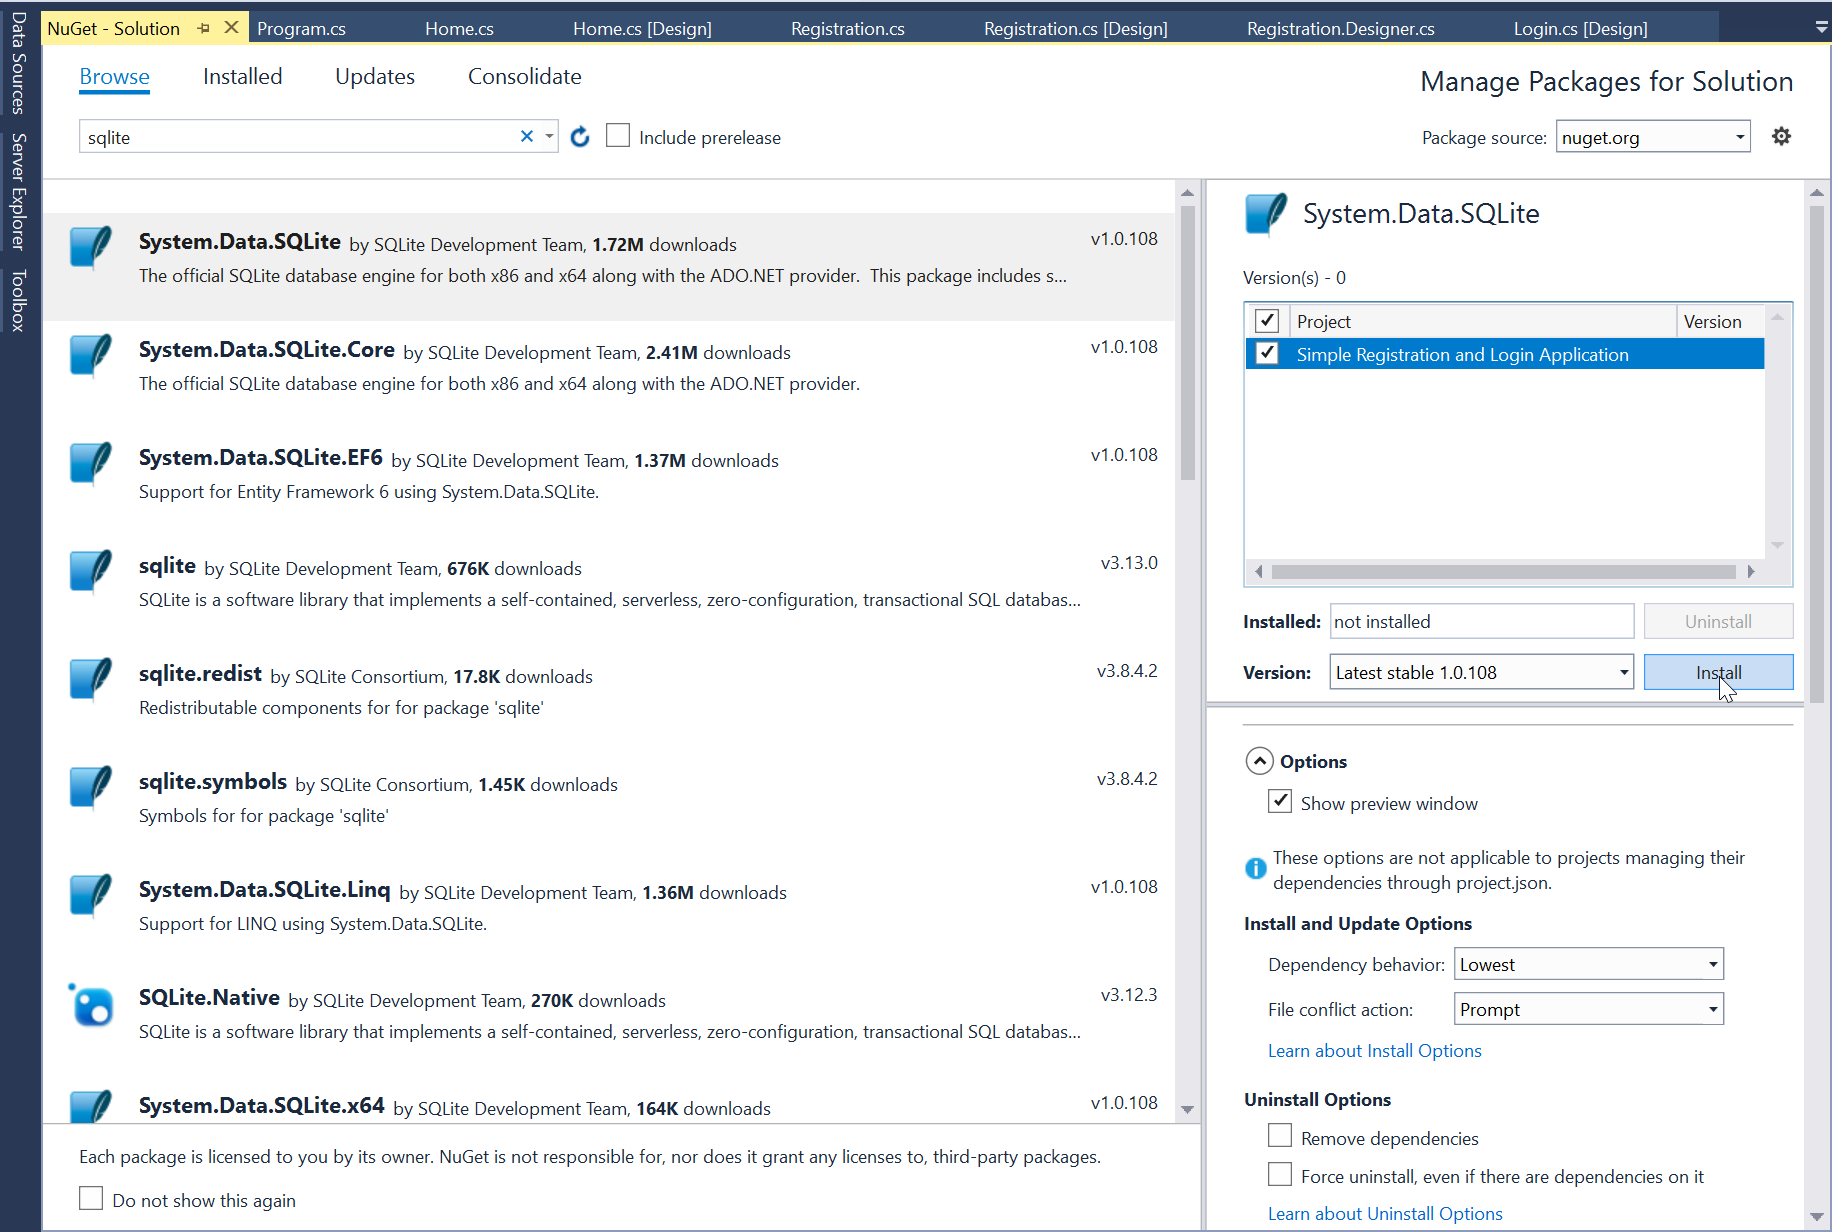
SQLite is very carefully tested prior to every release and relevant to use in some way. SQLite is very usable in any environments especially in embedded devices. First all you need to do is to install the components of the SQLIte database, by right clicking in the Main project title in the solution explorer then selecting the Manage NuGet Packages.
Then go to the browse and search sqlite, after that install it and wait until the process is completed.
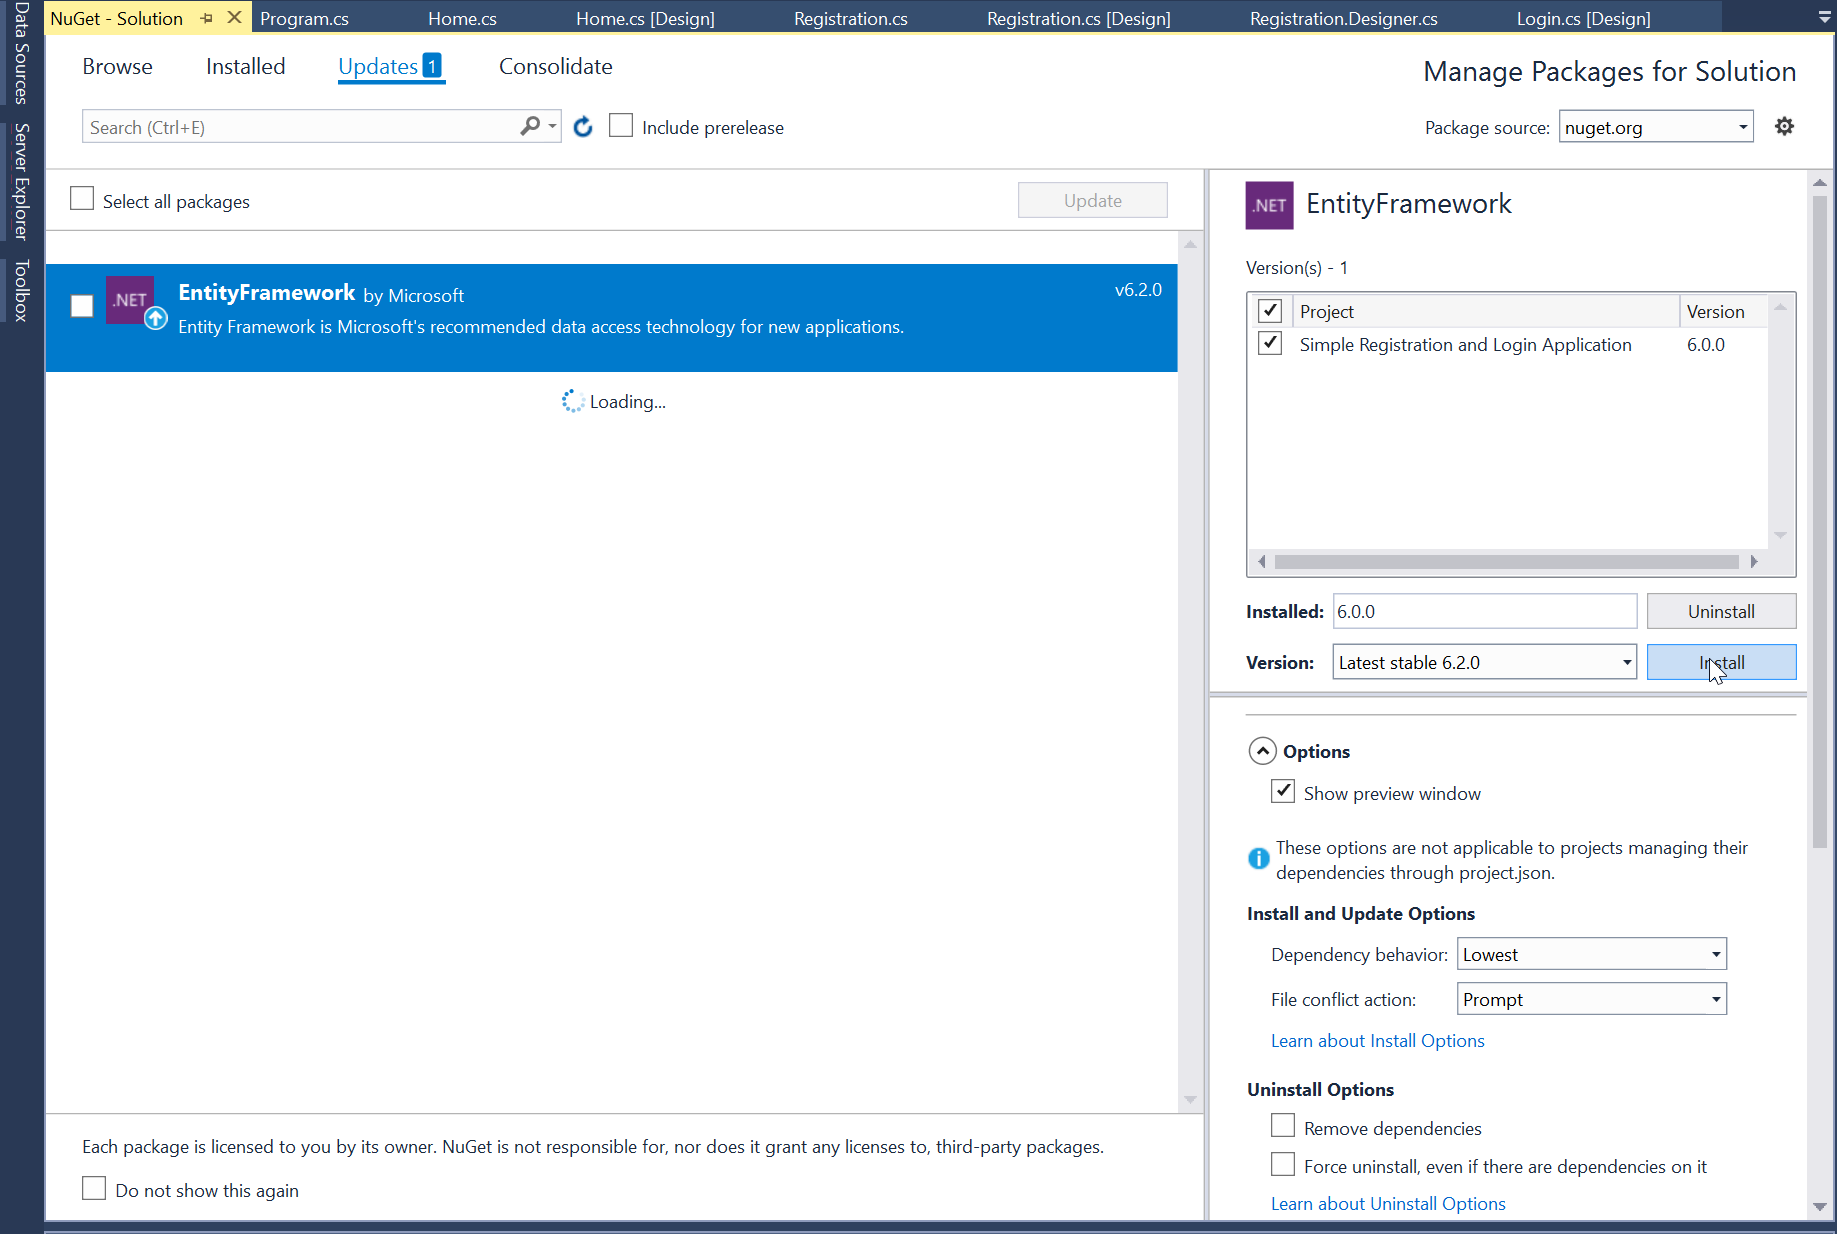
Next go to the Updates and update the needed framework to make sqlite work properly.
Application Design
We will now create the design for the application, first locate the designer file called form1.Designer.cs, this is the default name when you create a new windows form. Rename the form as Login.cs and then write these codes inside your designer file.
-
namespace Simple_Registration_and_Login_Application
-
{
-
partial class Login
-
{
-
/// <summary>
-
/// Required designer variable.
-
/// </summary>
-
private System.ComponentModel.IContainer components = null;
-
/// <summary>
-
/// Clean up any resources being used.
-
/// </summary>
-
/// <param name=»disposing»>true if managed resources should be disposed; otherwise, false.</param>
-
protected override void Dispose(bool disposing)
-
{
-
if (disposing && (components != null))
-
{
-
components.Dispose();
-
}
-
base.Dispose(disposing);
-
}
-
#region Windows Form Designer generated code
-
/// <summary>
-
/// Required method for Designer support — do not modify
-
/// the contents of this method with the code editor.
-
/// </summary>
-
private void InitializeComponent()
-
{
-
this.label1 = new System.Windows.Forms.Label();
-
this.txt_username = new System.Windows.Forms.TextBox();
-
this.label2 = new System.Windows.Forms.Label();
-
this.txt_password = new System.Windows.Forms.TextBox();
-
this.btn_login = new System.Windows.Forms.Button();
-
this.button1 = new System.Windows.Forms.Button();
-
this.SuspendLayout();
-
//
-
// label1
-
//
-
this.label1.AutoSize = true;
-
this.label1.Font = new System.Drawing.Font(«Arial», 20F, System.Drawing.FontStyle.Regular, System.Drawing.GraphicsUnit.Point, ((byte)(0)));
-
this.label1.Location = new System.Drawing.Point(128, 54);
-
this.label1.Name = «label1»;
-
this.label1.Size = new System.Drawing.Size(202, 45);
-
this.label1.TabIndex = 0;
-
this.label1.Text = «Username»;
-
//
-
// txt_username
-
//
-
this.txt_username.Font = new System.Drawing.Font(«Arial Narrow», 20F, System.Drawing.FontStyle.Regular, System.Drawing.GraphicsUnit.Point, ((byte)(0)));
-
this.txt_username.Location = new System.Drawing.Point(138, 123);
-
this.txt_username.Name = «txt_username»;
-
this.txt_username.Size = new System.Drawing.Size(439, 53);
-
this.txt_username.TabIndex = 1;
-
//
-
// label2
-
//
-
this.label2.AutoSize = true;
-
this.label2.Font = new System.Drawing.Font(«Arial», 20F, System.Drawing.FontStyle.Regular, System.Drawing.GraphicsUnit.Point, ((byte)(0)));
-
this.label2.Location = new System.Drawing.Point(128, 237);
-
this.label2.Name = «label2»;
-
this.label2.Size = new System.Drawing.Size(193, 45);
-
this.label2.TabIndex = 2;
-
this.label2.Text = «Password»;
-
//
-
// txt_password
-
//
-
this.txt_password.Font = new System.Drawing.Font(«Arial», 20F, System.Drawing.FontStyle.Regular, System.Drawing.GraphicsUnit.Point, ((byte)(0)));
-
this.txt_password.Location = new System.Drawing.Point(138, 304);
-
this.txt_password.Name = «txt_password»;
-
this.txt_password.Size = new System.Drawing.Size(439, 53);
-
this.txt_password.TabIndex = 3;
-
this.txt_password.UseSystemPasswordChar = true;
-
//
-
// btn_login
-
//
-
this.btn_login.Font = new System.Drawing.Font(«Arial», 20F, System.Drawing.FontStyle.Regular, System.Drawing.GraphicsUnit.Point, ((byte)(0)));
-
this.btn_login.Location = new System.Drawing.Point(238, 396);
-
this.btn_login.Name = «btn_login»;
-
this.btn_login.Size = new System.Drawing.Size(232, 58);
-
this.btn_login.TabIndex = 4;
-
this.btn_login.Text = «LOGIN»;
-
this.btn_login.UseVisualStyleBackColor = true;
-
this.btn_login.Click += new System.EventHandler(this.LoginButton);
-
//
-
// button1
-
//
-
this.button1.Location = new System.Drawing.Point(13, 460);
-
this.button1.Name = «button1»;
-
this.button1.Size = new System.Drawing.Size(89, 39);
-
this.button1.TabIndex = 5;
-
this.button1.Text = «Register»;
-
this.button1.UseVisualStyleBackColor = true;
-
this.button1.Click += new System.EventHandler(this.GoToRegister);
-
//
-
// Login
-
//
-
this.AutoScaleDimensions = new System.Drawing.SizeF(9F, 20F);
-
this.AutoScaleMode = System.Windows.Forms.AutoScaleMode.Font;
-
this.ClientSize = new System.Drawing.Size(721, 511);
-
this.Controls.Add(this.button1);
-
this.Controls.Add(this.btn_login);
-
this.Controls.Add(this.txt_password);
-
this.Controls.Add(this.label2);
-
this.Controls.Add(this.txt_username);
-
this.Controls.Add(this.label1);
-
this.Name = «Login»;
-
this.StartPosition = System.Windows.Forms.FormStartPosition.CenterScreen;
-
this.Text = «LOGIN»;
-
this.ResumeLayout(false);
-
this.PerformLayout();
-
}
-
#endregion
-
private System.Windows.Forms.Label label1;
-
private System.Windows.Forms.TextBox txt_username;
-
private System.Windows.Forms.Label label2;
-
private System.Windows.Forms.TextBox txt_password;
-
private System.Windows.Forms.Button btn_login;
-
private System.Windows.Forms.Button button1;
-
}
-
}
Next create another form then called it as Registration.cs. This is the form for registering an accounts. To do that write these block of codes inside the designer file.
-
namespace Simple_Registration_and_Login_Application
-
{
-
partial class Registration
-
{
-
/// <summary>
-
/// Required designer variable.
-
/// </summary>
-
private System.ComponentModel.IContainer components = null;
-
/// <summary>
-
/// Clean up any resources being used.
-
/// </summary>
-
/// <param name=»disposing»>true if managed resources should be disposed; otherwise, false.</param>
-
protected override void Dispose(bool disposing)
-
{
-
if (disposing && (components != null))
-
{
-
components.Dispose();
-
}
-
base.Dispose(disposing);
-
}
-
#region Windows Form Designer generated code
-
/// <summary>
-
/// Required method for Designer support — do not modify
-
/// the contents of this method with the code editor.
-
/// </summary>
-
private void InitializeComponent()
-
{
-
this.label1 = new System.Windows.Forms.Label();
-
this.txt_firstname = new System.Windows.Forms.TextBox();
-
this.label2 = new System.Windows.Forms.Label();
-
this.txt_lastname = new System.Windows.Forms.TextBox();
-
this.txt_username = new System.Windows.Forms.TextBox();
-
this.label3 = new System.Windows.Forms.Label();
-
this.txt_password = new System.Windows.Forms.TextBox();
-
this.label4 = new System.Windows.Forms.Label();
-
this.button1 = new System.Windows.Forms.Button();
-
this.button2 = new System.Windows.Forms.Button();
-
this.SuspendLayout();
-
//
-
// label1
-
//
-
this.label1.AutoSize = true;
-
this.label1.Font = new System.Drawing.Font(«Arial», 14F, System.Drawing.FontStyle.Regular, System.Drawing.GraphicsUnit.Point, ((byte)(0)));
-
this.label1.Location = new System.Drawing.Point(100, 93);
-
this.label1.Name = «label1»;
-
this.label1.Size = new System.Drawing.Size(139, 32);
-
this.label1.TabIndex = 0;
-
this.label1.Text = «Firstname»;
-
//
-
// txt_firstname
-
//
-
this.txt_firstname.Font = new System.Drawing.Font(«Arial», 14F, System.Drawing.FontStyle.Regular, System.Drawing.GraphicsUnit.Point, ((byte)(0)));
-
this.txt_firstname.Location = new System.Drawing.Point(256, 90);
-
this.txt_firstname.Name = «txt_firstname»;
-
this.txt_firstname.Size = new System.Drawing.Size(276, 40);
-
this.txt_firstname.TabIndex = 1;
-
//
-
// label2
-
//
-
this.label2.AutoSize = true;
-
this.label2.Font = new System.Drawing.Font(«Arial», 14F, System.Drawing.FontStyle.Regular, System.Drawing.GraphicsUnit.Point, ((byte)(0)));
-
this.label2.Location = new System.Drawing.Point(100, 161);
-
this.label2.Name = «label2»;
-
this.label2.Size = new System.Drawing.Size(138, 32);
-
this.label2.TabIndex = 2;
-
this.label2.Text = «Lastname»;
-
//
-
// txt_lastname
-
//
-
this.txt_lastname.Font = new System.Drawing.Font(«Arial», 14F, System.Drawing.FontStyle.Regular, System.Drawing.GraphicsUnit.Point, ((byte)(0)));
-
this.txt_lastname.Location = new System.Drawing.Point(256, 158);
-
this.txt_lastname.Name = «txt_lastname»;
-
this.txt_lastname.Size = new System.Drawing.Size(276, 40);
-
this.txt_lastname.TabIndex = 3;
-
//
-
// txt_username
-
//
-
this.txt_username.Font = new System.Drawing.Font(«Arial», 14F, System.Drawing.FontStyle.Regular, System.Drawing.GraphicsUnit.Point, ((byte)(0)));
-
this.txt_username.Location = new System.Drawing.Point(256, 231);
-
this.txt_username.Name = «txt_username»;
-
this.txt_username.Size = new System.Drawing.Size(276, 40);
-
this.txt_username.TabIndex = 5;
-
//
-
// label3
-
//
-
this.label3.AutoSize = true;
-
this.label3.Font = new System.Drawing.Font(«Arial», 14F, System.Drawing.FontStyle.Regular, System.Drawing.GraphicsUnit.Point, ((byte)(0)));
-
this.label3.Location = new System.Drawing.Point(100, 234);
-
this.label3.Name = «label3»;
-
this.label3.Size = new System.Drawing.Size(143, 32);
-
this.label3.TabIndex = 4;
-
this.label3.Text = «Username»;
-
//
-
// txt_password
-
//
-
this.txt_password.Font = new System.Drawing.Font(«Arial», 14F, System.Drawing.FontStyle.Regular, System.Drawing.GraphicsUnit.Point, ((byte)(0)));
-
this.txt_password.Location = new System.Drawing.Point(256, 295);
-
this.txt_password.Name = «txt_password»;
-
this.txt_password.Size = new System.Drawing.Size(276, 40);
-
this.txt_password.TabIndex = 7;
-
this.txt_password.UseSystemPasswordChar = true;
-
//
-
// label4
-
//
-
this.label4.AutoSize = true;
-
this.label4.Font = new System.Drawing.Font(«Arial», 14F, System.Drawing.FontStyle.Regular, System.Drawing.GraphicsUnit.Point, ((byte)(0)));
-
this.label4.Location = new System.Drawing.Point(100, 298);
-
this.label4.Name = «label4»;
-
this.label4.Size = new System.Drawing.Size(136, 32);
-
this.label4.TabIndex = 6;
-
this.label4.Text = «Password»;
-
//
-
// button1
-
//
-
this.button1.Font = new System.Drawing.Font(«Arial», 14F, System.Drawing.FontStyle.Regular, System.Drawing.GraphicsUnit.Point, ((byte)(0)));
-
this.button1.Location = new System.Drawing.Point(246, 387);
-
this.button1.Name = «button1»;
-
this.button1.Size = new System.Drawing.Size(213, 43);
-
this.button1.TabIndex = 8;
-
this.button1.Text = «Register»;
-
this.button1.UseVisualStyleBackColor = true;
-
this.button1.Click += new System.EventHandler(this.Register);
-
//
-
// button2
-
//
-
this.button2.Location = new System.Drawing.Point(12, 455);
-
this.button2.Name = «button2»;
-
this.button2.Size = new System.Drawing.Size(85, 34);
-
this.button2.TabIndex = 9;
-
this.button2.Text = «Login»;
-
this.button2.UseVisualStyleBackColor = true;
-
this.button2.Click += new System.EventHandler(this.GoToLogin);
-
//
-
// Registration
-
//
-
this.AutoScaleDimensions = new System.Drawing.SizeF(9F, 20F);
-
this.AutoScaleMode = System.Windows.Forms.AutoScaleMode.Font;
-
this.ClientSize = new System.Drawing.Size(702, 501);
-
this.Controls.Add(this.button2);
-
this.Controls.Add(this.button1);
-
this.Controls.Add(this.txt_password);
-
this.Controls.Add(this.label4);
-
this.Controls.Add(this.txt_username);
-
this.Controls.Add(this.label3);
-
this.Controls.Add(this.txt_lastname);
-
this.Controls.Add(this.label2);
-
this.Controls.Add(this.txt_firstname);
-
this.Controls.Add(this.label1);
-
this.Name = «Registration»;
-
this.StartPosition = System.Windows.Forms.FormStartPosition.CenterScreen;
-
this.Text = «Registration»;
-
this.ResumeLayout(false);
-
this.PerformLayout();
-
}
-
#endregion
-
private System.Windows.Forms.Label label1;
-
private System.Windows.Forms.TextBox txt_firstname;
-
private System.Windows.Forms.Label label2;
-
private System.Windows.Forms.TextBox txt_lastname;
-
private System.Windows.Forms.TextBox txt_username;
-
private System.Windows.Forms.Label label3;
-
private System.Windows.Forms.TextBox txt_password;
-
private System.Windows.Forms.Label label4;
-
private System.Windows.Forms.Button button1;
-
private System.Windows.Forms.Button button2;
-
}
-
}
Lastly, create another form for the home form after logging in called Home.cs. Just write these block of codes inside the designer file.
-
namespace Simple_Registration_and_Login_Application
-
{
-
partial class Home
-
{
-
/// <summary>
-
/// Required designer variable.
-
/// </summary>
-
private System.ComponentModel.IContainer components = null;
-
/// <summary>
-
/// Clean up any resources being used.
-
/// </summary>
-
/// <param name=»disposing»>true if managed resources should be disposed; otherwise, false.</param>
-
protected override void Dispose(bool disposing)
-
{
-
if (disposing && (components != null))
-
{
-
components.Dispose();
-
}
-
base.Dispose(disposing);
-
}
-
#region Windows Form Designer generated code
-
/// <summary>
-
/// Required method for Designer support — do not modify
-
/// the contents of this method with the code editor.
-
/// </summary>
-
private void InitializeComponent()
-
{
-
this.label1 = new System.Windows.Forms.Label();
-
this.button1 = new System.Windows.Forms.Button();
-
this.SuspendLayout();
-
//
-
// label1
-
//
-
this.label1.AutoSize = true;
-
this.label1.Font = new System.Drawing.Font(«Arial», 26F, System.Drawing.FontStyle.Regular, System.Drawing.GraphicsUnit.Point, ((byte)(0)));
-
this.label1.Location = new System.Drawing.Point(10, 70);
-
this.label1.Name = «label1»;
-
this.label1.Size = new System.Drawing.Size(457, 60);
-
this.label1.TabIndex = 0;
-
this.label1.Text = «WELCOME USER»;
-
//
-
// button1
-
//
-
this.button1.Location = new System.Drawing.Point(174, 242);
-
this.button1.Name = «button1»;
-
this.button1.Size = new System.Drawing.Size(119, 31);
-
this.button1.TabIndex = 1;
-
this.button1.Text = «Logout»;
-
this.button1.UseVisualStyleBackColor = true;
-
this.button1.Click += new System.EventHandler(this.Logout);
-
//
-
// Home
-
//
-
this.AutoScaleDimensions = new System.Drawing.SizeF(9F, 20F);
-
this.AutoScaleMode = System.Windows.Forms.AutoScaleMode.Font;
-
this.ClientSize = new System.Drawing.Size(479, 325);
-
this.Controls.Add(this.button1);
-
this.Controls.Add(this.label1);
-
this.Name = «Home»;
-
this.StartPosition = System.Windows.Forms.FormStartPosition.CenterScreen;
-
this.Text = «Home»;
-
this.ResumeLayout(false);
-
this.PerformLayout();
-
}
-
#endregion
-
private System.Windows.Forms.Label label1;
-
private System.Windows.Forms.Button button1;
-
}
-
}
or also you create the layout by dragging the proper tools to the forms.
Creating the Script
We will now create the script to make things work. To do that go to the csharp script called Registration.cs then right click and select view code, this will force you to go to the text editor. Then write these block of codes inside the Class of the form.
-
using System;
-
using System.Collections.Generic;
-
using System.ComponentModel;
-
using System.Data;
-
using System.Drawing;
-
using System.Linq;
-
using System.Text;
-
using System.Threading.Tasks;
-
using System.Windows.Forms;
-
using System.Data.SQLite;
-
namespace Simple_Registration_and_Login_Application
-
{
-
public partial class Registration : Form
-
{
-
SQLiteConnection conn;
-
String connectString;
-
public Registration()
-
{
-
InitializeComponent();
-
connectString = @»Data Source=» + Application.StartupPath + @»\Database\login.db; version=3″;
-
}
-
private void Register(object sender, EventArgs e) {
-
using (conn = new SQLiteConnection(connectString)) {
-
try {
-
if (txt_username.Text != «» || txt_password.Text != «»)
-
{
-
SQLiteCommand cmd = new SQLiteCommand();
-
cmd.CommandText = @»INSERT INTO member (firstname, lastname, username, password) VALUES(@firstname, @lastname, @username, @password)»;
-
cmd.Connection = conn;
-
cmd.Parameters.Add(new SQLiteParameter(«@firstname», txt_firstname.Text));
-
cmd.Parameters.Add(new SQLiteParameter(«@lastname», txt_lastname.Text));
-
cmd.Parameters.Add(new SQLiteParameter(«@username», txt_username.Text));
-
cmd.Parameters.Add(new SQLiteParameter(«@password», txt_password.Text));
-
conn.Open();
-
int i = cmd.ExecuteNonQuery();
-
if (i == 1)
-
{
-
MessageBox.Show(«Successfully Created!»);
-
txt_firstname.Text = «»;
-
txt_lastname.Text = «»;
-
txt_username.Text = «»;
-
txt_password.Text = «»;
-
}
-
}
-
else {
-
MessageBox.Show(«Required Fields!»);
-
}
-
}
-
catch (Exception ex) {
-
MessageBox.Show(ex.Message);
-
}
-
}
-
}
-
private void GoToLogin(object sender, EventArgs e) {
-
Login login = new Login();
-
this.Close();
-
login.Show();
-
}
-
}
-
}
Next, go to the other scripts then write the code provided below corresponded to the name of the scripts.
Login.cs
-
using System;
-
using System.Collections.Generic;
-
using System.ComponentModel;
-
using System.Data;
-
using System.Drawing;
-
using System.Linq;
-
using System.Text;
-
using System.Threading.Tasks;
-
using System.Windows.Forms;
-
using System.Data.SQLite;
-
namespace Simple_Registration_and_Login_Application
-
{
-
public partial class Login : Form
-
{
-
SQLiteConnection conn;
-
SQLiteCommand cmd;
-
String connectString;
-
SQLiteDataReader rd;
-
public Login()
-
{
-
InitializeComponent();
-
connectString = @»Data Source=» + Application.StartupPath + @»\Database\login.db;version=3″;
-
}
-
private void LoginButton(object sender, EventArgs e) {
-
if (txt_username.Text == «» || txt_password.Text == «») {
-
MessageBox.Show(«Required Fields!»);
-
}
-
else {
-
using (conn = new SQLiteConnection(connectString))
-
{
-
try
-
{
-
conn.Open();
-
string query = «SELECT * FROM member WHERE username='» + txt_username.Text + «‘ AND password='» + txt_password.Text + «‘»;
-
cmd = new SQLiteCommand(query, conn);
-
cmd.ExecuteNonQuery();
-
rd = cmd.ExecuteReader();
-
int row = 0;
-
while (rd.Read())
-
{
-
row++;
-
}
-
if (row == 1)
-
{
-
MessageBox.Show(«Successfully Login»);
-
Home home = new Home();
-
this.Hide();
-
home.Show();
-
}
-
else
-
{
-
MessageBox.Show(«Invalid username or password!»);
-
}
-
}
-
catch (Exception ex)
-
{
-
MessageBox.Show(ex.Message);
-
}
-
}
-
}
-
}
-
private void GoToRegister(object sender, EventArgs e) {
-
Registration registration = new Registration();
-
this.Hide();
-
registration.Show();
-
}
-
}
-
}
Home.cs
-
using System;
-
using System.Collections.Generic;
-
using System.ComponentModel;
-
using System.Data;
-
using System.Drawing;
-
using System.Linq;
-
using System.Text;
-
using System.Threading.Tasks;
-
using System.Windows.Forms;
-
namespace Simple_Registration_and_Login_Application
-
{
-
public partial class Home : Form
-
{
-
public Home()
-
{
-
InitializeComponent();
-
}
-
private void Logout(object sender, EventArgs e) {
-
Login login = new Login();
-
this.Close();
-
login.Show();
-
}
-
}
-
}
Try to run the application and see if it works.
There you go we successfully created a Simple Registration And Login Application using C#. I hope that this tutorial help you understand on how to develop an application using C#. For more updates and tutorials just kindly visit this site. Enjoy Coding!!!
Comments
Add new comment
- 3845 views
Login-and-Register-System
Login and Register System using C# for Windows Forms
Technologies |
How to use |
License
🧪 technologies
This project was built using the following technologies and features:
- C#
- PostgreSQL
- NpgSql
- Visual Studio IDE
💡 how to use
- Clone the repository.
- Open the project from Visual Studio 2022.
- Rename the file from
APP_config.xmltoapp.configand in the below code section type your database credentials.
<appSettings>
		<add key="MyConnection" value="Server=localhost;Port=5432;Database=yourDataBase;User Id=postgres;Password=yourPassword;" />
	</appSettings>
- Database structure.
For this application, we are using A local PostgreSQL Database.
Table name : csharp_user
create TABLE IF NOT EXISTS csharp_user(
    id Serial ,
    username VARCHAR NOT NULL,
    password VARCHAR NOT NULL,
    PRIMARY KEY (id)
)
INSERT into csharp_user(username,password) values('admin', 'admin')

📄 License
This project was built under MIT. See the file LICENSE for more details.
Hey Guys,
It’s long time to see you again with this post. I am in new team and i would like to share my experience that i have gained in my previous team, where i work mostly with windows Form, SQL, Controls, ASP.NET, JS and lot more interesting…
Let’s start this with a simple registration form using Windows Form C# or VB with back end MS Access to store the data. Programmer have come across creating a simple registration Form in there life, either in there work or to learn as an example !! Its looks like simple but it has complication too !!! Let me make it easy to make programmer who haven’t tried so far or those who are interested to learn !!
Window Form journey in designing the registration form !!
1. Windows Form can be created using Visual Studio and this example can be created either from Visual Studio 2005 to 2015 as your wish !!
2. If you dont have visual Studio , Please download Visual studio express for free from the link.
3. Once installed , Open the Visual studio IDE and click on New project in the getting started page or File -> New Project. A page with project list will be opened.

Getting Started !!!
4. Click okay to create an Empty Windows Form Application.
Designing the Simple Registration Form in Windows Form !!
1. Use the toolbar like Label , Text box , button to design the form as given below.
- Login Page

Login Page
- Main Page – Panel 1

Main Page
- Data Grid View Page – Panel 2

Data Grid View
2. How to design the registration Form in Single pages and that will provide vision like navigation from screen to screen. I have used the panel upon the designed content to provided the visuals.
3. I suggest you to design the Login Form First then apply a Panel – 1 on it and design the Registration form and the same for Data Grid View Page.
4. When form loads , hide the panels and make the flow visible. Please refer the below code for your reference.
Here is the C# Code:
public partial class Form1 : Form
{
OleDbConnection connect = new OleDbConnection(&quot;Provider=Microsoft.Jet.OLEDB.4.0;Data Source='../../sample2.mdb'&quot;);
public Form1()
{
InitializeComponent();
}
private void button2_Click(object sender, EventArgs e)
{
if (textBox1.Text == &quot;admin&quot; &amp;&amp; textBox2.Text == &quot;adminpass&quot;)
{
this.panel1.Show();
this.panel2.Hide();
this.textBox1.Clear();
this.textBox2.Clear();
}
}
private void button1_Click(object sender, EventArgs e)
{
if (textBox1.Text != &quot;&quot; || textBox2.Text != &quot;&quot;)
{
textBox1.Clear();
textBox2.Clear();
}
}
private void Form1_Load(object sender, EventArgs e)
{
this.panel1.Hide();
//Open the connection.
connect.Open();
//Use a variable to hold the SQL statement.
string selectString = &quot;SELECT ID,Name,Department FROM Sample&quot;;
//Create an OleDbCommand object.
//Notice that this line passes in the SQL statement and the OleDbConnection object
OleDbCommand cmd = new OleDbCommand(selectString, connect);
OleDbDataReader reader = cmd.ExecuteReader();
if (!(reader.HasRows))
{
textBox4.Text = &quot;1&quot;;
}
else
{
while (reader.Read())
{
this.label11.Text = reader[&quot;ID&quot;].ToString();
textBox4.Text = (Convert.ToInt16(reader[&quot;ID&quot;]) + 1).ToString();
}
}
reader.Close();
connect.Close();
ClearAll();
}
private void button5_Click(object sender, EventArgs e)
{
this.panel1.Hide();
}
private void button4_Click(object sender, EventArgs e)
{
ClearAll();
}
private void ClearAll()
{
//Clear
textBox3.Clear();
textBox7.Clear();
textBox5.Clear();
textBox6.Clear();
comboBox1.SelectedItem = this.comboBox1.Items[0];
comboBox2.SelectedItem = this.comboBox2.Items[0];
}
private void button3_Click(object sender, EventArgs e)
{
//Register
try
{
int id = Convert.ToInt16(textBox4.Text);
string name = textBox3.Text;
string college = textBox7.Text;
string department = comboBox2.SelectedItem.ToString();
int passedOut = Convert.ToInt32(comboBox1.SelectedItem.ToString());
string mailId = textBox5.Text;
double contactNo = Convert.ToDouble(textBox6.Text);
OleDbCommand cmd = new OleDbCommand(&quot;INSERT into sample (ID,Name,Department,College,PassedOut,MailId,ContactNo) Values(@id,@name,@department,@college,@passedOut,@mailId,@contactNo)&quot;, connect);
connect.Open();
if (connect.State == ConnectionState.Open)
{
cmd.Parameters.Add(&quot;@id&quot;, OleDbType.Integer).Value = id;
cmd.Parameters.Add(&quot;@name&quot;, OleDbType.VarChar).Value = name;
cmd.Parameters.Add(&quot;@department&quot;, OleDbType.VarChar).Value = department;
cmd.Parameters.Add(&quot;@college&quot;, OleDbType.VarChar).Value = college;
cmd.Parameters.Add(&quot;@passedOut&quot;, OleDbType.Integer).Value = passedOut;
cmd.Parameters.Add(&quot;@mailId&quot;, OleDbType.VarChar).Value = mailId;
cmd.Parameters.Add(&quot;@contactNo&quot;, OleDbType.Double).Value = contactNo;
try
{
cmd.ExecuteNonQuery();
MessageBox.Show(&quot;Data Registered !!&quot;);
connect.Close();
UpdateView(id);
ClearAll();
}
catch (OleDbException ex)
{
MessageBox.Show(ex.Source);
connect.Close();
}
//Clear All
}
else
{
MessageBox.Show(&quot;Connection Failed&quot;);
}
}
catch (Exception ex)
{
MessageBox.Show(ex.ToString() + &quot;Provide Correct details&quot;);
}
}
private void UpdateView(int id)
{
this.label11.Text = textBox4.Text;
textBox4.Text = (Convert.ToInt16(textBox4.Text) + 1).ToString();
this.panel1.Refresh();
}
private void button6_Click(object sender, EventArgs e)
{
connect.Open();
//Use a variable to hold the SQL statement.
string selectString = &quot;SELECT * FROM Sample&quot;;
//Create an OleDbCommand object.
//Notice that this line passes in the SQL statement and the OleDbConnection object
OleDbCommand cmd = new OleDbCommand(selectString, connect);
OleDbDataAdapter adp = new OleDbDataAdapter(selectString, connect);
DataTable dt = new DataTable();
adp.Fill(dt);
this.dataGridView1.DataSource = dt;
panel2.Show();
connect.Close();
}
private void button7_Click(object sender, EventArgs e)
{
panel2.Hide();
}
}
Here is the VB code :
Partial Public Class Form1 Inherits Form Private connect As New OleDbConnection(&quot;Provider=Microsoft.Jet.OLEDB.4.0;Data Source='../../sample2.mdb'&quot;) Public Sub New() InitializeComponent() End Sub Private Sub button2_Click(ByVal sender As Object, ByVal e As EventArgs) If textBox1.Text = &quot;admin&quot; AndAlso textBox2.Text = &quot;adminpass&quot; Then Me.panel1.Show() Me.panel2.Hide() Me.textBox1.Clear() Me.textBox2.Clear() End If End Sub Private Sub button1_Click(ByVal sender As Object, ByVal e As EventArgs) If textBox1.Text &lt;&gt; &quot;&quot; OrElse textBox2.Text &lt;&gt; &quot;&quot; Then textBox1.Clear() textBox2.Clear() End If End Sub Private Sub Form1_Load(ByVal sender As Object, ByVal e As EventArgs) Me.panel1.Hide() 'Open the connection. connect.Open() 'Use a variable to hold the SQL statement. Dim selectString As String = &quot;SELECT ID,Name,Department FROM Sample&quot; 'Create an OleDbCommand object. 'Notice that this line passes in the SQL statement and the OleDbConnection object Dim cmd As New OleDbCommand(selectString, connect) Dim reader As OleDbDataReader = cmd.ExecuteReader() If Not(reader.HasRows) Then textBox4.Text = &quot;1&quot; Else Do While reader.Read() Me.label11.Text = reader(&quot;ID&quot;).ToString() textBox4.Text = (Convert.ToInt16(reader(&quot;ID&quot;)) + 1).ToString() Loop End If reader.Close() connect.Close() ClearAll() End Sub Private Sub button5_Click(ByVal sender As Object, ByVal e As EventArgs) Me.panel1.Hide() End Sub Private Sub button4_Click(ByVal sender As Object, ByVal e As EventArgs) ClearAll() End Sub Private Sub ClearAll() 'Clear textBox3.Clear() textBox7.Clear() textBox5.Clear() textBox6.Clear() comboBox1.SelectedItem = Me.comboBox1.Items(0) comboBox2.SelectedItem = Me.comboBox2.Items(0) End Sub Private Sub button3_Click(ByVal sender As Object, ByVal e As EventArgs) 'Register Try Dim id As Integer = Convert.ToInt16(textBox4.Text) Dim name As String = textBox3.Text Dim college As String = textBox7.Text Dim department As String = comboBox2.SelectedItem.ToString() Dim passedOut As Integer = Convert.ToInt32(comboBox1.SelectedItem.ToString()) Dim mailId As String = textBox5.Text Dim contactNo As Double = Convert.ToDouble(textBox6.Text) Dim cmd As New OleDbCommand(&quot;INSERT into sample (ID,Name,Department,College,PassedOut,MailId,ContactNo) Values(@id,@name,@department,@college,@passedOut,@mailId,@contactNo)&quot;, connect) connect.Open() If connect.State = ConnectionState.Open Then cmd.Parameters.Add(&quot;@id&quot;, OleDbType.Integer).Value = id cmd.Parameters.Add(&quot;@name&quot;, OleDbType.VarChar).Value = name cmd.Parameters.Add(&quot;@department&quot;, OleDbType.VarChar).Value = department cmd.Parameters.Add(&quot;@college&quot;, OleDbType.VarChar).Value = college cmd.Parameters.Add(&quot;@passedOut&quot;, OleDbType.Integer).Value = passedOut cmd.Parameters.Add(&quot;@mailId&quot;, OleDbType.VarChar).Value = mailId cmd.Parameters.Add(&quot;@contactNo&quot;, OleDbType.Double).Value = contactNo Try cmd.ExecuteNonQuery() MessageBox.Show(&quot;Data Registered !!&quot;) connect.Close() UpdateView(id) ClearAll() Catch ex As OleDbException MessageBox.Show(ex.Source) connect.Close() End Try 'Clear All Else MessageBox.Show(&quot;Connection Failed&quot;) End If Catch ex As Exception MessageBox.Show(ex.ToString() &amp; &quot;Provide Correct details&quot;) End Try End Sub Private Sub UpdateView(ByVal id As Integer) Me.label11.Text = textBox4.Text textBox4.Text = (Convert.ToInt16(textBox4.Text) + 1).ToString() Me.panel1.Refresh() End Sub Private Sub button6_Click(ByVal sender As Object, ByVal e As EventArgs) connect.Open() 'Use a variable to hold the SQL statement. Dim selectString As String = &quot;SELECT * FROM Sample&quot; 'Create an OleDbCommand object. 'Notice that this line passes in the SQL statement and the OleDbConnection object Dim cmd As New OleDbCommand(selectString, connect) Dim adp As New OleDbDataAdapter(selectString, connect) Dim dt As New DataTable() adp.Fill(dt) Me.dataGridView1.DataSource = dt panel2.Show() connect.Close() End Sub Private Sub button7_Click(ByVal sender As Object, ByVal e As EventArgs) panel2.Hide() End Sub End Class
Here is the Screen short of the MS Access :

MS Access Design View
5. Also i also like to mention the method to find the connection string of the database (MDF,SDF,,mdb) using server explorer.
6. Click View -> Server Explorer (Ctrl + Alt+S) open the server explorer.
7. Right click on the Data Connection -> Add Connection -> Change -> Microsoft Access Database File -> Click Ok.


8. Click Browse to select the (mdf, sdf,mdb) file and Test the connection and it will return Success. This will provide result that the database is linked with server explorer.


9. After click OK then the Database can be accessed using the server explorer and we can view the database , data , modification can be done here !! We can see the connection string of the database in the property panel, Which is used to connect the application to the DB !!!

10. Here is the sample which i coded to write this post , this will certainly help you to understand better !!
Feel free to post you comment and suggestions , this will help me to provide a detail blog in the future 🙂 Meet you with one more interesting codes and concepts !!!