
You can set up a personal proxy server and can use it for many purposes. This article will set up the proxy setup with the squid proxy on the windows server. In this guide, we will go over how to set up and configure a Squid Proxy on Windows Server.
Download & Install Squid Proxy
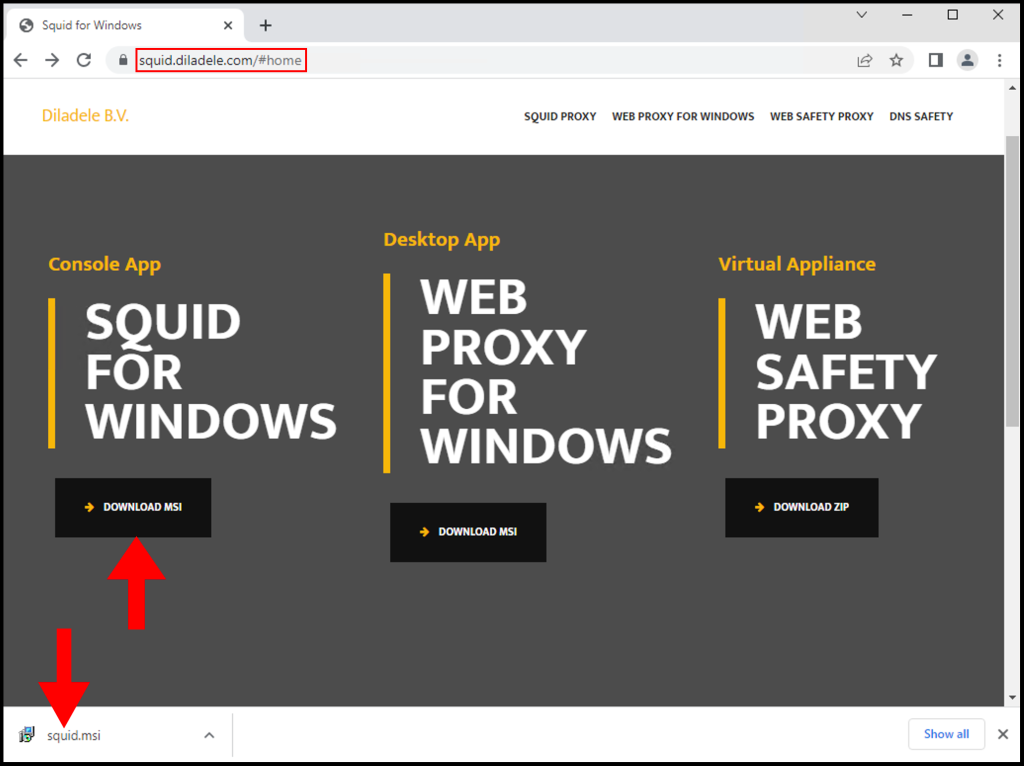
Download the Squid Proxy Installer from the following URL:
https://squid.diladele.com/#home
1. First, download the Squid Proxy application on your Windows server and open the .msi file to install Squid Proxy.
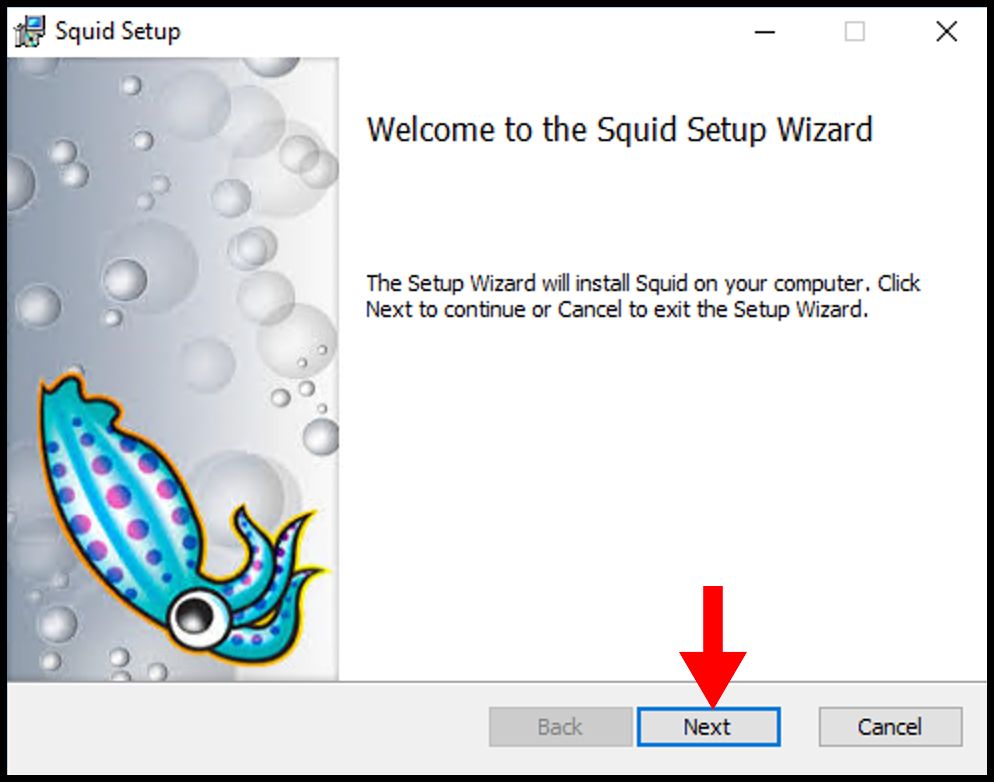
2. Once the Squid Setup window opens, click Next to begin the installation.
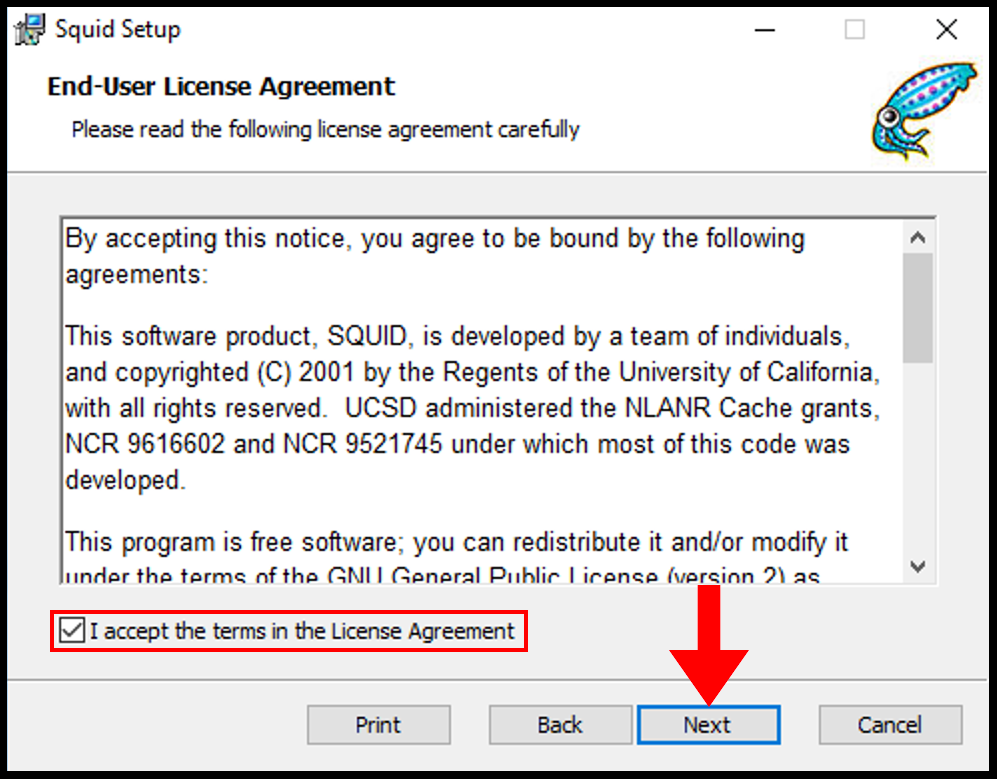
3. Next on the End-User License Agreement page, accept the terms and then click Next.
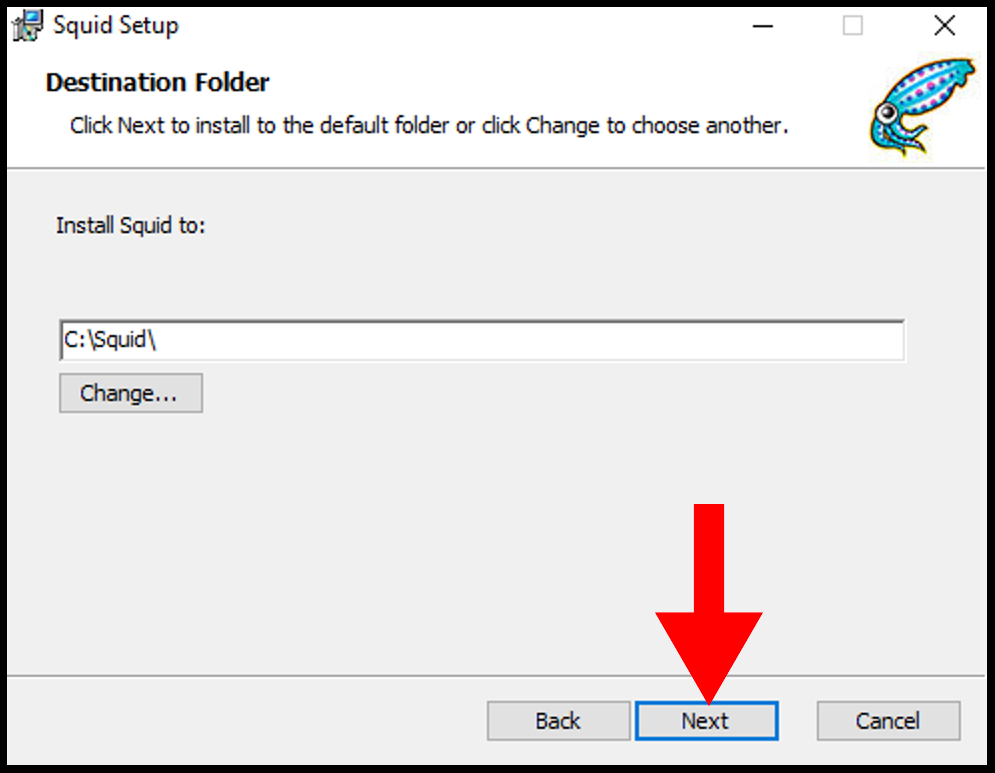
4. Then on the Destination Folder page, you can select the directory you want to install and once you are done click Next.
5. Then on the next page, click Install to begin the installation of Squid.

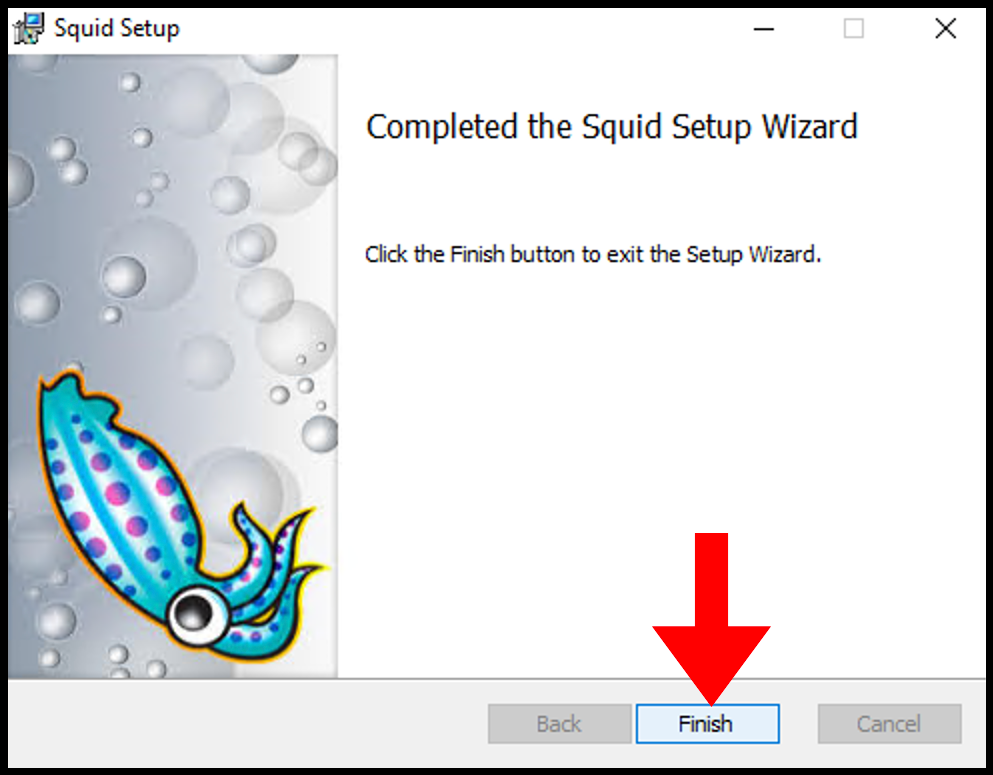
6. Once it’s done, you can close out of the setup window.
Allow Squid Port Through Firewall
Local network usage 3128 TCP port to connect through Squid Proxy. Let us first allow the 3128 TCP port in the firewall inbound rules.
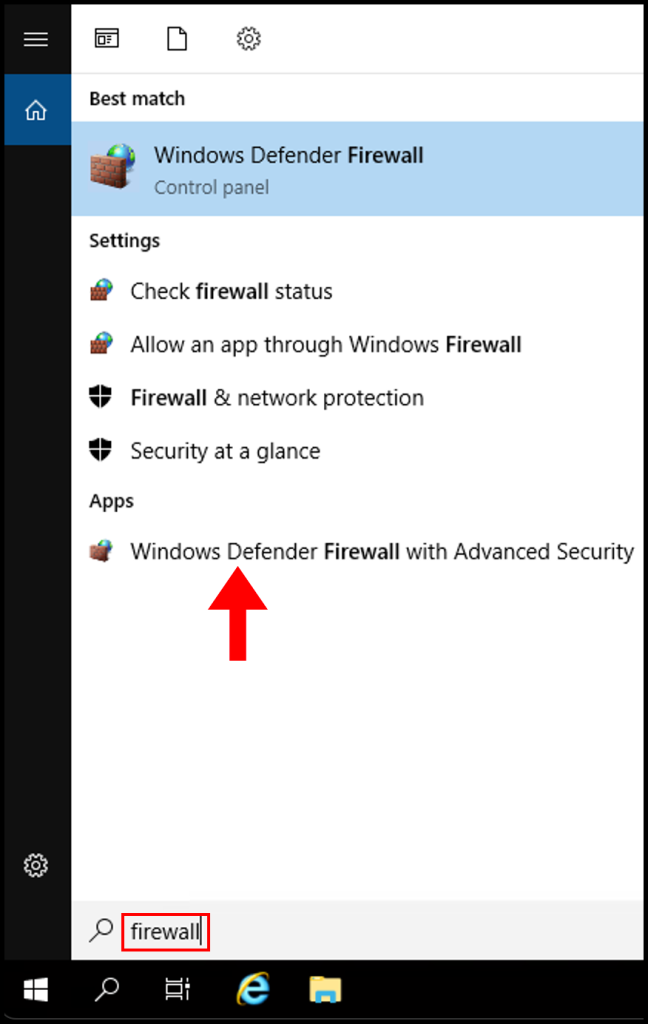
1. Log in to your Windows server, then search and open Windows Firewall with Advanced Security.
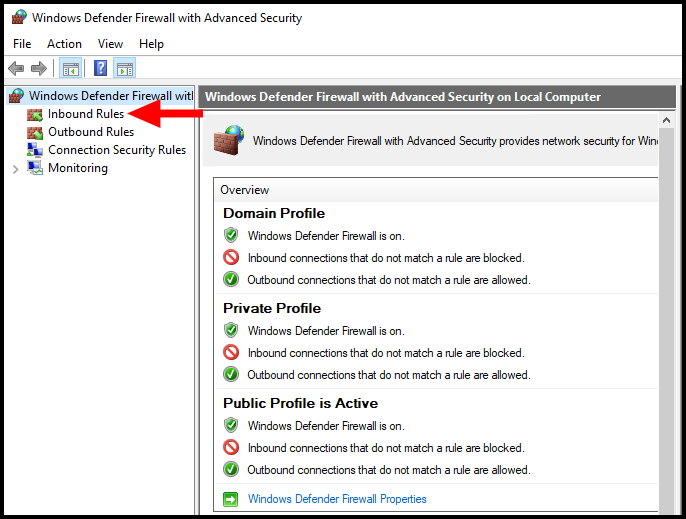
2. Then navigate to Inbound Rules on the left-side menu.
3. Next click New Rule from the right-hand menu.

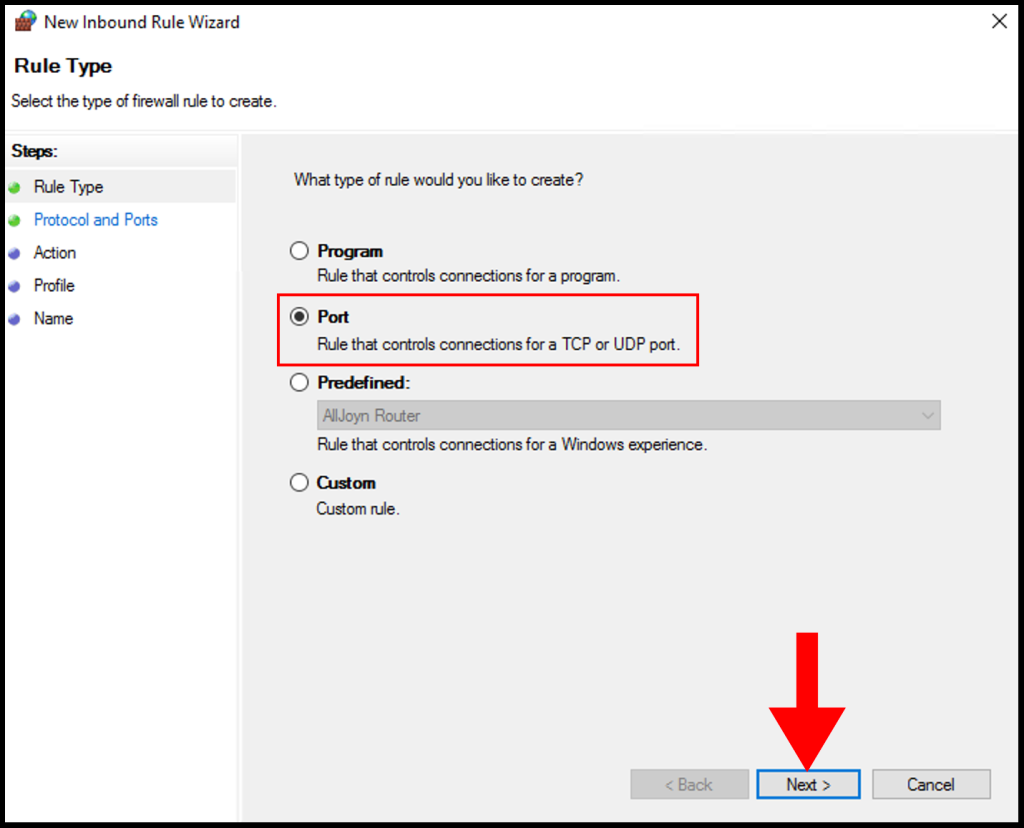
4. On the Rule Type page, select the button next to Port and click Next.
5. On Protocol and Ports, select TCP and select Specific local ports and enter 3128 then click Next.

6. Next, click Allow the connection and click Next to move on.
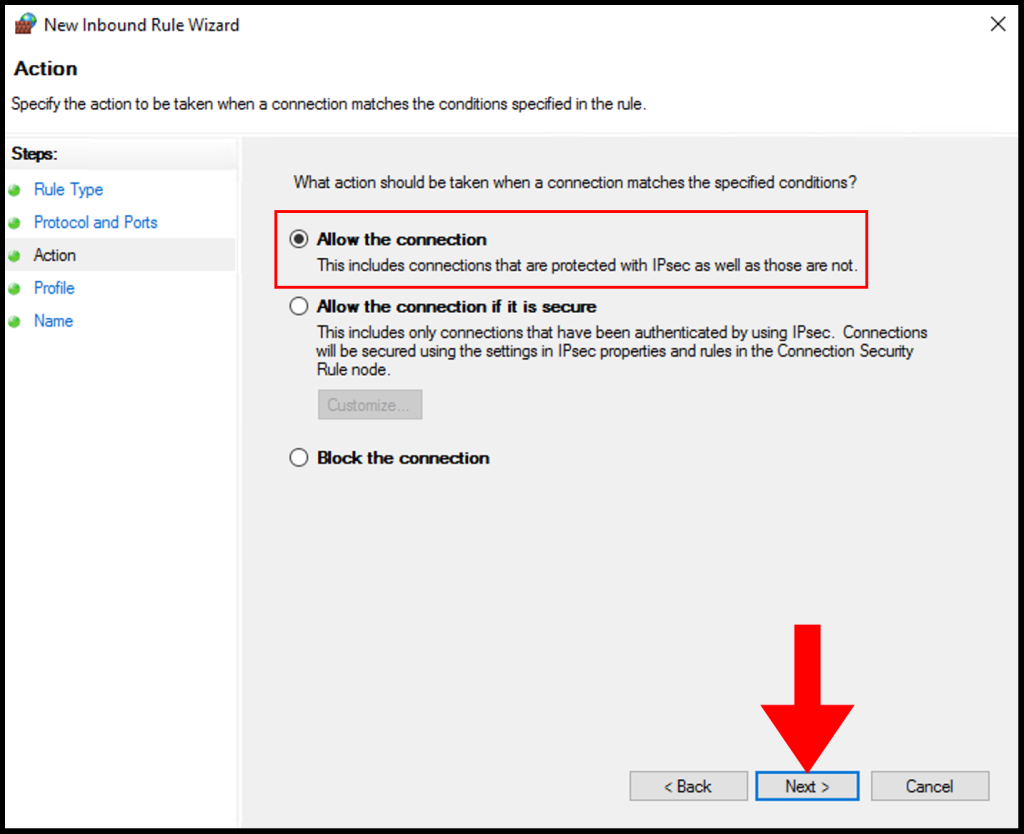
7. In the Profile tab, you need to select the below options and check the boxes for Domain, Private, and Public then click Next to move on.
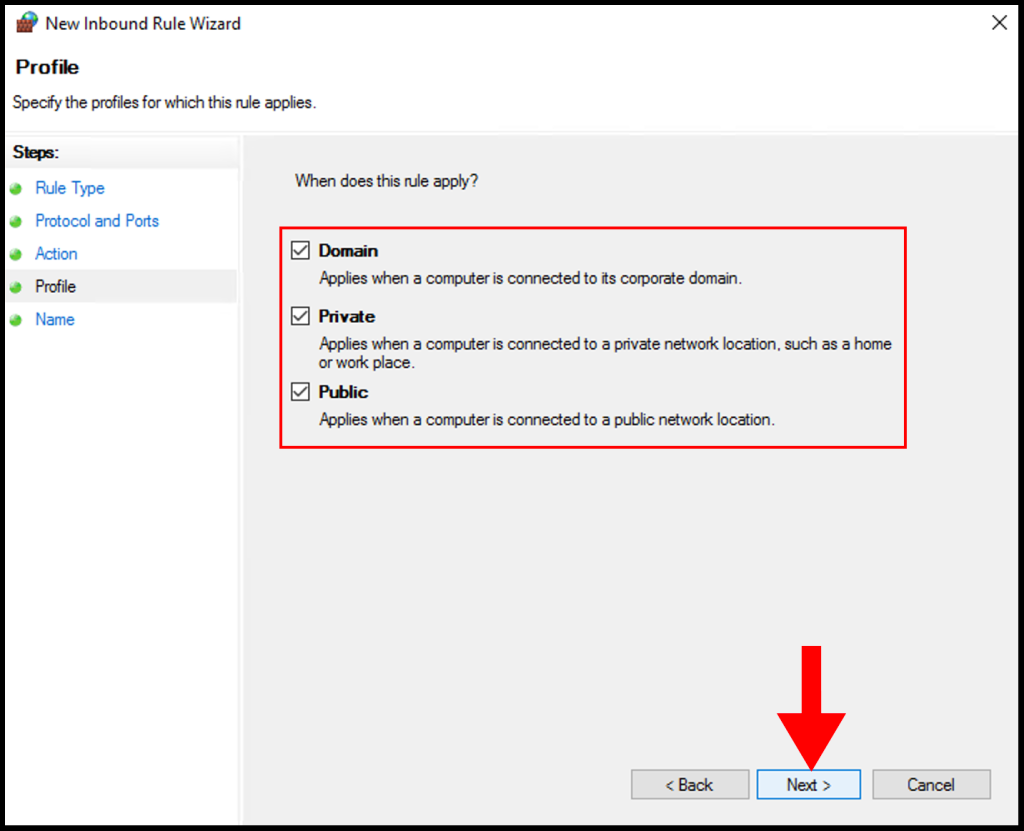
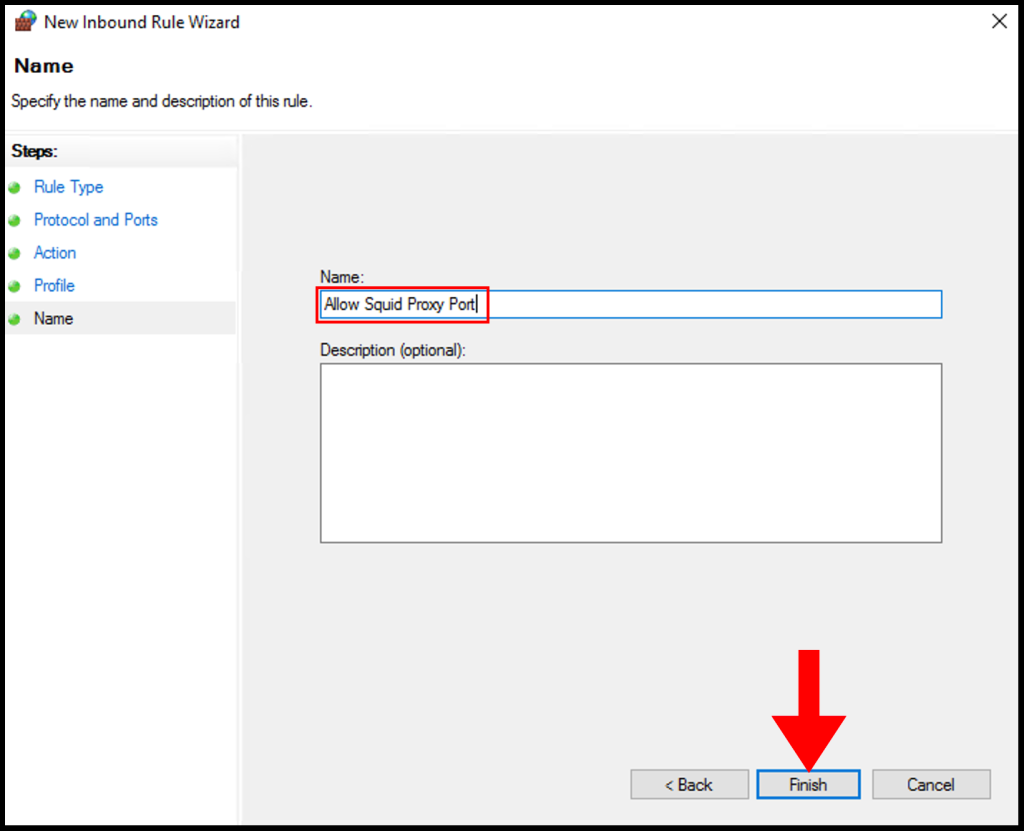
8. In the Name section, you can specify a name that is easily identifiable for the rule, then click Finish. We have successfully setup and configure a Squid Proxy on Windows Server.
Configure Squid Proxy
1. Configure Squid by following the steps below:
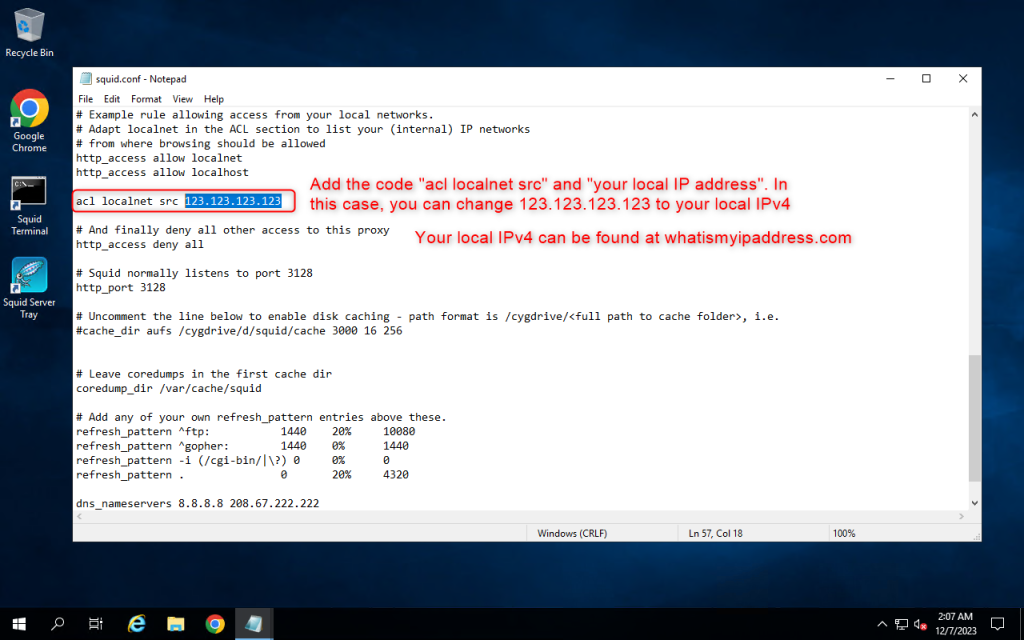
2. Add the code “acl localnet src” and “your local IPv4”. In this case, you can change 123.123.123.123 to your local IPv4. You can find your local IPv4 at https://whatismyipaddress.com/
Then save by pressing Ctrl + S
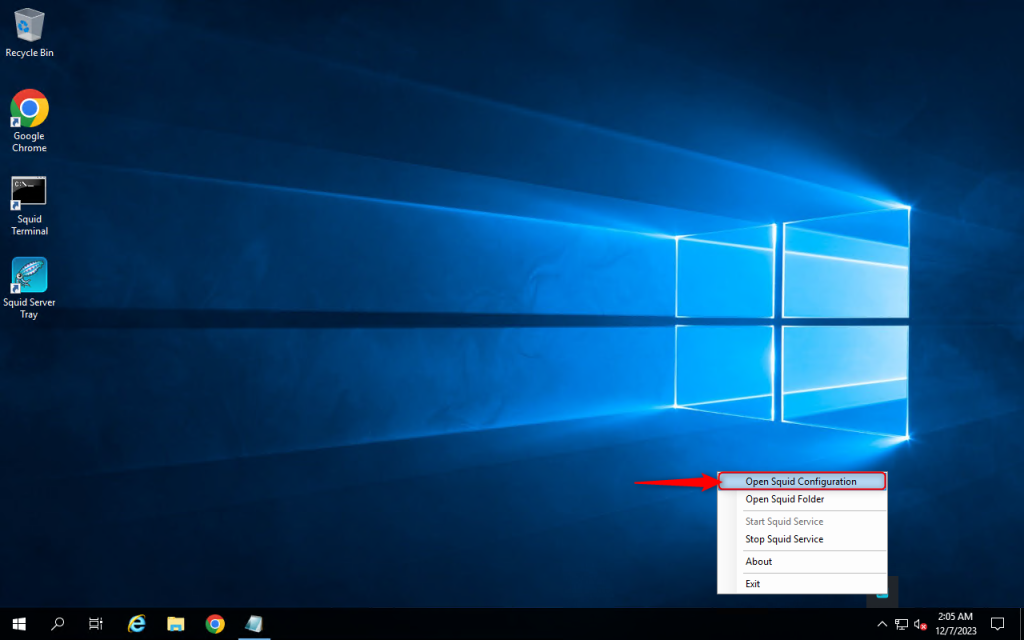
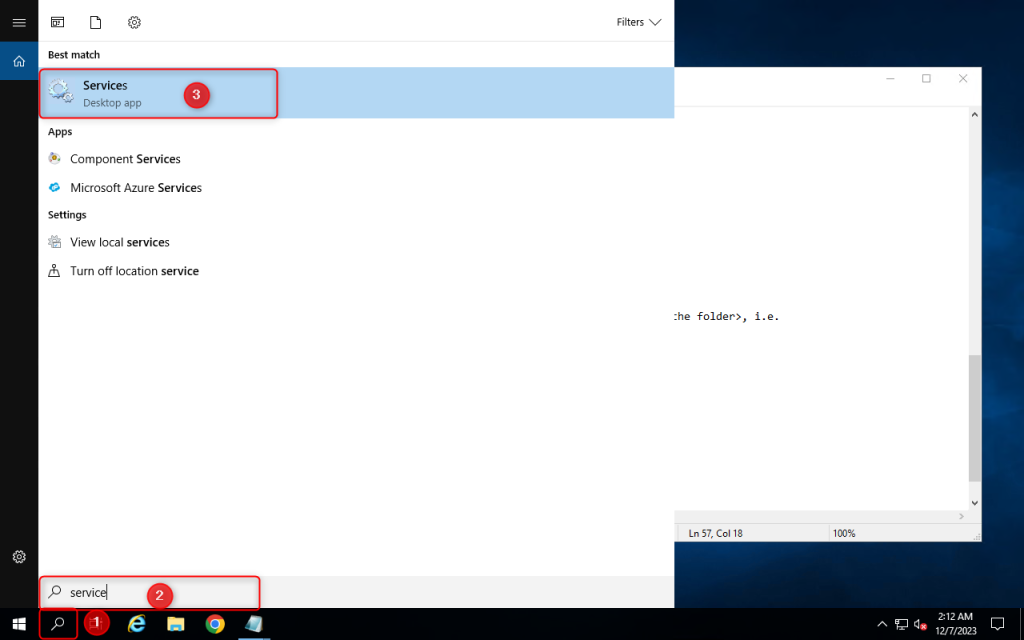
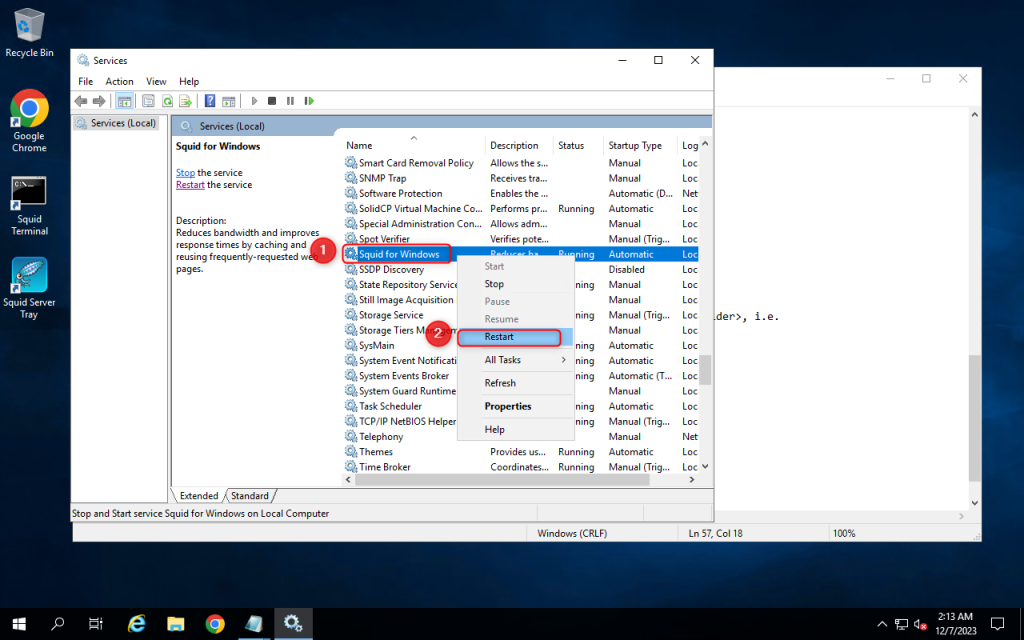
3. Open Services setting and restart the Squid for windows service
Use proxy on a client
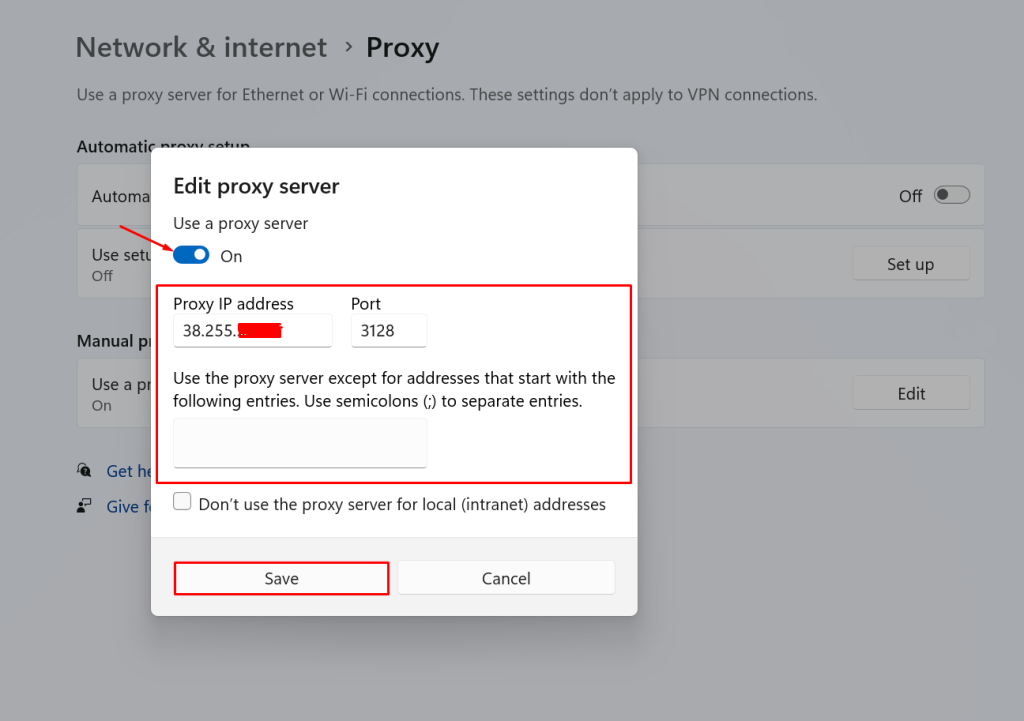
1. Go to your client computer and enter the proxy that has been setted up.

2. Enter Proxy IP address and Port. Now you will be able to use your proxy on a client
Setting up a proxy server on Windows Server 2022 is essential for enhancing network security, improving privacy, and controlling internet traffic within an organization. A proxy server acts as an intermediary between client devices and the internet, providing additional layers of security and management capabilities. This article will provide detailed, step-by-step instructions on how to configure a proxy server in Windows Server 2022. Additionally, we will explore how to set up a proxy through the Mozilla Firefox browser and discuss alternative methods for proxy configuration.
How to Configure a Proxy in the Windows Server 2022 Operating System
Before you start configuring, make sure you have a proxy server. If not, use the Proxy5.net service. This service provides proxies that support HTTP, HTTPS, and SOCKS5, making it easy to set up on Windows 11 and ensuring a reliable connection. Configuring a proxy server on Windows Server 2022 involves several steps. Here’s a comprehensive guide to help you through the process:
Step 1: Access Server Manager
- Click on the Start menu.
- Open Server Manager.
Step 2: Open Local Server Configuration
- In the Server Manager dashboard, select Local Server from the left-hand menu.
- In the Properties section, click on the IE Enhanced Security Configuration option and ensure it is set to Off for both Administrators and Users. This step ensures a smoother configuration process without interruptions.
Step 3: Access Internet Options
- Open Control Panel.
- Click on Network and Internet.
- Select Internet Options.
Step 4: Open the Connections Tab
- In the Internet Options window, select the Connections tab.
- Click on LAN Settings.
Step 5: Configure Proxy Settings
- In the LAN Settings window, check the box that says Use a proxy server for your LAN.
- Enter the IP address and Port of the proxy server you want to use. This information is typically provided by your network administrator or the proxy service you are using.
- If the proxy server requires a username and password, click on the Advanced button. Here, you can enter the necessary credentials.
Step 6: Bypass Proxy for Local Addresses
- Check the box that says Bypass proxy server for local addresses. This ensures that your computer will not use the proxy server for local network traffic.
- Click OK to save your settings.
Step 7: Apply and Save Settings
- After entering all the required information, click OK to close the LAN Settings window.
- Click Apply and then OK in the Internet Options window to save all changes.
Your Windows Server 2022 system should now be configured to use the specified proxy server.
How to Configure a Proxy on Windows Server 2022 via Browser

Setting up a proxy server through Mozilla Firefox on Windows Server 2022 is straightforward and allows for individual browser-level proxy configuration. Here’s how to do it:
Step 1: Open Firefox and Access Settings
- Launch Mozilla Firefox.
- Click on the Menu button (three horizontal lines) in the upper-right corner.
- Select Options from the drop-down menu.
Step 2: Open Network Settings
- In the Options window, scroll down to the Network Settings section.
- Click on Settings next to Configure how Firefox connects to the internet.
Step 3: Configure Proxy Settings
- In the Connection Settings window, select Manual proxy configuration.
- Enter the HTTP Proxy and Port for the proxy server. If your proxy uses a different protocol (like HTTPS, FTP, or SOCKS), enter the details in the respective fields.
- If required, check the box for Use this proxy server for all protocols.
Step 4: No Proxy for Specific Addresses
- In the No Proxy for field, enter any addresses that you want to bypass the proxy. This can include local addresses or specific websites.
- Click OK to save the settings.
Step 5: Restart Firefox
- Close and reopen Mozilla Firefox to apply the new proxy settings.
Your Firefox browser on Windows Server 2022 is now configured to use the specified proxy server.
Alternative Methods for Configuring a Proxy on Windows Server 2022
Besides configuring a proxy through system settings or browsers, there are other methods to set up a proxy server on Windows Server 2022. Here are a few alternatives:
Method 1: Using Proxy Client Software
- ProxyCap: This software allows you to configure proxy settings for individual applications.
- FreeCap: A similar tool that helps redirect connections of specific programs through a proxy.
Method 2: Using a VPN with Proxy Capabilities
- NordVPN: Offers integrated proxy settings that can be configured within the VPN application.
- ExpressVPN: Another VPN service that provides proxy setup options.
Method 3: Browser Extensions
- Proxy SwitchyOmega: A Chrome and Firefox extension that simplifies proxy management within the browser.
- FoxyProxy: A popular extension for Firefox and Chrome, allowing advanced proxy configurations.
Method 4: Configuring Proxy through Command Line
- Open Command Prompt.
- Use the
netshcommand to configure proxy settings. Example:netsh winhttp set proxy proxy-server="http=proxyaddress:port".
Method 5: Using Group Policy Editor
- Open Group Policy Editor by typing
gpedit.mscin the Run dialog. - Navigate to User Configuration > Administrative Templates > Windows Components > Internet Explorer.
- Configure proxy settings in the Proxy Settings policy.
Among these methods, the easiest way for most users to set up a proxy on Windows Server 2022 is through the system settings or directly within the browser. Both methods provide straightforward, user-friendly interfaces and comprehensive options to ensure your internet traffic is routed through the desired proxy server. Whether you choose a manual system configuration or browser-specific setup, you’ll find a method that fits your needs and technical comfort level.
In summary, configuring a proxy server on Windows Server 2022 can be accomplished through various methods depending on your specific needs and technical expertise. Whether you opt for the built-in system settings, browser-specific configurations, or alternative methods such as proxy client software or command line configurations, each approach offers unique advantages and flexibility. This comprehensive guide aims to provide you with all the necessary information to successfully set up and manage a proxy server on Windows Server 2022, ensuring enhanced security, privacy, and control over your network traffic.
Setting Up a Proxy Server on Windows Server 2019
22
days ago · Updated

Setting Up a Proxy Server on Windows Server 2019
In today’s digital age, network security and performance are of utmost importance. One way to enhance both is by setting up a proxy server on Windows Server 2019. A proxy server acts as an intermediary between users and the internet, providing security, anonymity, and performance benefits.
Windows Server 2019 offers the capability to set up a proxy server seamlessly, and one popular type of proxy server is the SOCKS5 proxy. This article will guide you through the process of setting up a SOCKS5 proxy server on Windows Server 2019.
What is a Proxy Server?
Before diving into the specifics of setting up a proxy server on Windows Server 2019, let’s first understand what a proxy server is. A proxy server is a computer system or software that acts as an intermediary between a client and a web server. When a user requests a web page or file, the proxy server evaluates the request and forwards it to the targeted server. The server’s response is then sent back to the proxy server, which forwards it to the client.
The Benefits of Using a Proxy Server
There are several benefits to using a proxy server, including enhanced security, improved performance, and access control. By routing internet traffic through a proxy server, organizations can enforce security policies, filter web content, and monitor user activity. Additionally, a proxy server can cache frequently accessed web pages, reducing bandwidth usage and improving load times.
Setting Up a SOCKS5 Proxy Server on Windows Server 2019
To set up a SOCKS5 proxy server on Windows Server 2019, you can utilize third-party proxy server software designed for Windows. There are various proxy server software options available, both free and paid, that offer SOCKS5 support and easy configuration on Windows Server 2019.
One popular choice for setting up a SOCKS5 proxy server on Windows Server 2019 is to use proxy server software that provides a user-friendly interface for configuration. This software typically allows you to define the proxy server settings, including port number, authentication, and access control.
Proxy Server for Windows – Free and Paid Options
When it comes to proxy server software for Windows, there are both free and paid options to consider. Free proxy server software for Windows often comes with basic features and may be suitable for small-scale deployments. On the other hand, paid proxy server software for Windows offers advanced functionality, technical support, and scalability for larger networks.
Conclusion
In conclusion, setting up a proxy server on Windows Server 2019, specifically a SOCKS5 proxy server, can provide numerous benefits for network security and performance. By leveraging the capabilities of proxy server software designed for Windows, organizations can enhance their network infrastructure and protect their users’ online activities. Whether opting for a free or paid proxy server solution, Windows Server 2019 offers a robust platform for deploying and managing proxy servers to meet diverse organizational needs.

Below we may get step-by-step screenshots,
Step 1 — Verify and ensure appropriate IP addresses are assigned to all required fields.
Step 2 — Click on «Local Server«.
Step 3 — Click on «WORKGROUP«.
Step 4 — Click on «Change…«.
Step 5 — Click on «More…«.
Step 6 — Type the domain name and click on «OK«.
Step 10 — Click on «Close«.
Step 11 — Save rest of your background work, if any and click on «Restart Now«. If planning to restart after some time then click on «Restart Later«.
Step 12 — Click on «Add roles and features«.
Step 13 — Click on «Next«.
Step 14 — Keep selected «Role-based or feature-based installation» and click on «Next«.
Step 15 — Select/Verify the server name and IP address, then click on «Next«.
Step 16 — Locate «Remote Access» and click the check box.
Step 17 — Confirm the Tick mark and click on «Next«.
Step 18 — Click on «Next«.
Step 19 — Click on «Next«.
Step 20 — Locate «Web Application Proxy» and click the check box.
Step 21 — Click on «Add Features«.
Step 22 — Confirm the Tick mark and click on «Next«.
Step 23 — Click on «Install«.
Step 24 — Wait for some time until installation completes.
Step 25 — Click on «Open the Web Application Proxy Wizard«.
Step 26 — Click on «Next«.
Step 27 — Type «Federation Service Name«, «User name and Password» of a local administrator account on the federation servers.
Step 28 — Click on «Next«.
Step 29 — Select appropriate SSL Certificate from the drop down list and click on «Next«.
Step 30 — Review all selections and click on «Configure«.
Step 31 — Wait for some time until configuration completes.
Step 32 — Click on «Close«.
Step 33 — Click on «Publish«.
Step 34 — Click on «Next«.
Step 35 — Click on «Pass-through«.
Step 36 — Click on «Next«.
Step 37 — Type «Name«, «External URL» & «Backend server URL«, for example — «https://sso.dskoli.work/«, select appropriate «External certificate» from the drop down list.
Step 38 — Locate «Enable HTTP to HTTPS redirection«, click the check box, confirm the Tick mark and click on «Next«.
Step 39 — Review all selections and click on «Publish«.
Step 40 — Click on «Close«.
Step 41 — Published Web Application will be displayed in the list.
Step 42 — On the Public DNS Panel of domain, add «Host (A)» record for federation service name pointing to WAP server on Perimeter Network. For example, «sso.dskoli.work» pointing to Public IP.
“Thank You for being with me.”
Microsoft Web Application Proxy [WAP] is a new service added in Windows Server 2012 R2 that allows you to access web applications from outside your network. WAP functions as a reverse proxy and an Active Directory Federation Services [AD FS] proxy to pre-authenticate user access.

vBoring Blog Series:
- How to setup Microsoft Active Directory Federation Services [AD FS]
- How to setup Microsoft Web Application Proxy
Requirements:
- The only hard requirement of WAP is having an AD FS server. Refer to step 1 for setting that up.
- WAP cannot be installed on a server that AD FS is installed on. They must be separate servers.
Installing the Web Application Proxy Server Role:
Open Server Manager and click Manage -> Add Roles and Features:
Click Next:

Role-based or feature-based installation should be selected then click Next:

Select the server you want to install this role on to and then click Next:
Note: Web Application Proxy role and AD FS cannot be installed on the same computer.

Select Remote Access then click Next:

No additional Features are needed. Click Next:

Click Next:

Select Web Application Proxy:

On the pop up click Add Features:

The Web Application Proxy role does not required a reboot. Click Install:

Once complete click Close:

Web Application Proxy is now installed but you need the AD FS certificate to continue.
Export & Import the AD FS Certificate:
You need the certificate from your AD FS server added to your Web Application Proxy server. Login to your AD FS server and open MMC.exe:
Go to File -> Add/Remove Snap-ins -> select Certificates then click Add:

When you click OK you will get the following pop up. Select Computer account then click Next:

On AD FS Server: Drill down to Personal -> Certificates then right click the SSL certificate you used during setup of AD FS. Go to All Tasks -> Export. Save to a location that your Web Application Proxy can access. Ensure you export the Private Key and certificate as a .PFX file.

On Web Application Proxy: Right click on Personal -> Certificates then go to All Tasks -> Import:

This will bring up the Certificate Import Wizard. Click Next:

Browse to the certificate that you exported from your AD FS server and select it. Click Next:

Enter the password for the private key and check the box to make the key exportable. Click Next:

Leave the default certificate store as Personal. Click Next:

Click Finish:

You should now see the certificate from your AD FS servers on your Web Application Proxy server.

Now we are ready to perform the Post Configuration.
Post-Deployment Configuration:
Back on your Web Application Server open Server Manager then click Notifications then the message Open the Web Application Proxy Wizard:
Click Next:

Enter the FQDN of your AD FS name and the Service Account you created during AD FS setup. Click Next:

On the drop down menu select the certificate you imported from your AD FS server. Click Next:

Click Configure:

Once finished click Close:

Remote Access Management Console should open when you clicked Close. On Operations Status you should see all the objects as green.

Publish Web Applications:
Now we are finally ready for the magic. In the Remote Access Management Console click Web Application Proxy then Publish:

Click Next:

Pass-through will let WAP act like a reverse proxy. I will have documentation on setting up AD FS link soon!
Select Pass-through and click Next:

Name: Enter a display name
External URL: Enter the URL that will be coming in your the WAP server externally
External Certificate: The drop down menu will show certificates that are added on the WAP server. Select the same certificate that you used while setting up your application. In my case I used my wildcard certificate.
Backend server URL: Enter the web URL of the server you want the external URL forwarded
Click Next:

Copy the PowerShell command down and with some minor edits you can easily add additional PassThrough applications with ease.
Click Publish:

Click Close to finish:

You will now see the published web application and ready for testing.

You are ready to test the application!
Configure Firewall for 443 Port Forwarding:
Before you can test you need to ensure you have port 443 (HTTPS) being sent to your WAP server. This step does not involve configuration of your WAP environment but on your firewall. Since this can vary greatly I will give you two examples of this step:
For pfSense you would create a NAT: Port Forward Rule:

For DD-WRT you would go to NAT / QOS then Port Forwarding:

Once added you are ready to test!
From outside your network (like on your phone or a PC elsewhere) try to access your web link. You should get your internal web page through your WAP externally! Success!

Coming Soon!! Setting up Microsoft RDS to use AD FS authentication through WAP!