
Windows 10 Default Profile set up
These are the instructions on how to setup a customized default profile for Windows 10. The scripts folder contains some scripts that will automate the application process of the default profile. You will still need to use these instructions to create a default profile first.
This process has been tested on Windows 10 1607 and Windows 10 2016 LTSB.
Creating the Default Profile through sysprep
On a new install of Windows log in to the administrator and open the command line.
Run
cd \Windows\System32\Sysprep
sysprep /audit /reboot
Note: If you log in as another user and windows has a chance to update its apps it won’t let you sysprep. You will have to delete all user profiles and reset the Windows Update cache.
Note: Don’t bother setting the Default apps or Start Menu and Taskbar settings. Those are handled a different way.
Once it reboots set up the administrator account with all the settings you want to be the default.
These are the settings I change.
Settings > PrivacyTurn off all optionsSettings > Network & Internet > Wi-FiDisable open hotspots and paid Wi-FI ServicesSettings > Personalize > Themes > Desktop Icon SettingsEnable ComputerSettings > System > NotificationsDisable Get tips, and suggestionsWindows Explorer > File > Change Folder and search options > ViewDisable Show sync provider notifications- Add Google Chrome, Gmail, Word, PowerPoint, and Excel Icons to the desktop
- Arrange Icons on the desktop.
Note: This will not keep if you change resolutions or text size later. Right click taskbar > Cortanachange to show Cortana icon- Set default hompage for all browsers
Note: You will need to use group policy or a master preferences file for chrome. - Change Firefox search to Google and remove unnecessary search providers
- Make sure Firefox and IE don’t ask to be the default all the time
- Make a small registry change to stop Windows from installing suggested apps. run this in PowerShell command
sp "HKCU:\SOFTWARE\Microsoft\Windows\CurrentVersion\ContentDeliveryManager" "SilentInstalledAppsEnabled" 0
After you are done setting everything up go to the Windows Explorer Right click Quick Access and select Options. Then under click Clear File Explorer history. Clear all browser histories as well.
Create the unattend.xml file and paste this in there. You can also just use the one in this repository.
<?xml version="1.0" encoding="utf-8"?>
<unattend xmlns="urn:schemas-microsoft-com:unattend">
    <settings pass="specialize">
        <component name="Microsoft-Windows-Shell-Setup" processorArchitecture="amd64" publicKeyToken="31bf3856ad364e35" language="neutral" versionScope="nonSxS" xmlns:wcm="http://schemas.microsoft.com/WMIConfig/2002/State" xmlns:xsi="http://www.w3.org/2001/XMLSchema-instance">
            <CopyProfile>true</CopyProfile>
        </component>
    </settings>
</unattend>
<CopyProfile>true</CopyProfile> will tell windows to convert the administrator account to a default profile.
Now run this sysprep command to apply your new default profile
sysprep /oobe /generalize /reboot /unattend:C:\unattend.xml
Go through the Windows set up then log into the administrator account.
Important: You will need to re-enable the administrator account because sysprep disabled it.
Open the control panel and go to System > Advanced system settings Under User Profiles click Settings.
Select the Default profile and then copy it to an empty folder.
Note: You might want to delete AppData\Roaming\Microsoft\Windows\Themes If you set up a default Wallpaper in group policy. If you don’t then Windows will still lock the background but the image might be wrong.
Start Menu and Taskbar
Now we need to set up the start menu and taskbar.
Set up the start menu the way you want it and then open powershell run
Export-StartLayout -Path layout.xml
Now edit the xml file and change LayoutModificationTemplate tag to
<LayoutModificationTemplate
    xmlns="http://schemas.microsoft.com/Start/2014/LayoutModification"
    xmlns:defaultlayout="http://schemas.microsoft.com/Start/2014/FullDefaultLayout"
    xmlns:start="http://schemas.microsoft.com/Start/2014/StartLayout"
    xmlns:taskbar="http://schemas.microsoft.com/Start/2014/TaskbarLayout"
    Version="1">
Then at the bottom right after </DefaultLayoutOverride> add
<CustomTaskbarLayoutCollection PinListPlacement="Replace">
    <defaultlayout:TaskbarLayout>
       <taskbar:TaskbarPinList>
        <taskbar:DesktopApp DesktopApplicationLinkPath="%APPDATA%\Microsoft\Windows\Start Menu\Programs\System Tools\File Explorer.lnk" />
        <taskbar:DesktopApp DesktopApplicationLinkPath="%ALLUSERSPROFILE%\Microsoft\Windows\Start Menu\Programs\Google Chrome.lnk" />
      </taskbar:TaskbarPinList>
    </defaultlayout:TaskbarLayout>
  </CustomTaskbarLayoutCollection>
You can modify the <taskbar:TaskbarPinList> to include whatever you want.
Look at start-layout.xml for a full example.
Now we need to check to make sure the file is valid. Open PowerShell and run:
cd \
Import-StartLayout -LayoutPath C:\start-layout.xml -MountPath C:
If it ran with no errors then you know your xml file is valid.
Note: Sometimes it errors out if you don’t run it from the root of the system drive
Now in the directory you saved your Default Profile add these folders.
AppData\Local\Microsoft\Windows\Shell
in the Shell folder paste your start layout file and name it LayoutModification
Note: If the computer doesn’t have an application that is in your configuration then it will dissapear from the list and leave a hole. You can build your layout in a way that still looks nice when this happens.
Applying the new Default Profile
I like to keep the original Default profile for troubleshooting purposes. So I just leave it alone.
Copy your Default Profile to the C:\Users directory and rename it to whatever you want. As an example I will be renaming it DefaultOrg. Now under its security settings make sure it has the Users group has the permissions Read & Execute, List Folder Contents, and Read. Make sure to apply it to all subfolders as well.
In the registry under HKLM\SOFTWARE\Microsoft\Windows NT\CurrentVersion\ProfileList change the Default Key to point to your new DefaultProfile $SystemDrive%\Users\DefaultOrg.
Just change that back whenever you want to go back to the old Default Profile.
Or you could just rename the Old default profile to Default.old and name yours Default. As long as the permissions are correct that will work too.
Setting the Default Apps
Now set up your default apps in Windows the way you want them. When you are done open a command prompt and run
Dism /online /Export-DefaultAppAssociations:C:\default-apps.xml
Take a look at the file make sure it has everything you want.
Note: It’s best to leave it as complete as possible because if Windows doesn’t have a default app for something it gives a notification that it reset that default for each file type.
To set the default apps run:
Dism /online /Import-DefaultAppAssociations:C:\default-apps.xml
Deleting a Users Profile
When testing your new default profile you’ll probably need to reset your account.
To reset a user and make it apply the Default Profile again you need to log in as a different user delete their profile folder under C:\Users then delete their registry key under HKLM\SOFTWARE\Microsoft\Windows NT\CurrentVersion\ProfileList.
Note: If you don’t delete the key Windows will log you in under a temporary account.
В Windows можно создавать профили пользователей, доступные только на чтение, с помощью обязательных (mandatory) профилей. Mandatory профиль — это специальный преднастроенный тип перемещаемого профиля, который не сохраняет изменения, внесенные пользователем в рамках сессии.
Когда пользователь выходит из системы, любые изменения в профиле сбрасываются и при следующем входе профиль загружается в исходном виде. Внести изменения в такой профиль может только администратор. Обязательные профили можно использовать на общедоступных компьютерах, информационных киосках, школах и других учебных заведениях, когда при завершении сеанса нужно сбрасывать любые изменения, внесенные пользователем.
Содержание:
- Использование обязательных профилей пользователей в Windows
- Создать обязательный (read-only) профиль пользователя в Windows
- Назначить read-only профиль определенному пользователю Windows
Использование обязательных профилей пользователей в Windows
Обязательный профиль, это профиль, который настраивается администратором и недоступен для изменений пользователем. При входе с таким профилем пользователь может вносить любые изменения в свое окружение, но при выходе из системы они будут потеряны.
Обязательный профиль может хранится как локально, так и в сетевой папке (в этом случае он может использоваться сразу на множестве компьютеров).
Существует два типа обязательный профилей пользователей Windows:
- Обычный обязательный профиль пользователя (Normal mandatory user profile) – администратор переименовывает файл NTuser.dat (содержит ветку реестра пользователя HKEY_CURRENT_USER) в NTuser.man. При обнаружении в профиле файла NTuser.man система понимает, что этот профиль доступен только для чтения и не сохраняет в нем изменения. Если такой профиль хранится в сетевой папке, то при недоступности сервера пользователь сможет войти в систему с закэшированной ранее версией обязательного профиля.
- Принудительный обязательный профиль (Super mandatory user profile) — при использовании этого типа профиля, переименовывается сам каталог с профилем пользователя (в конец имени папки добавляется .man). Пользователи с этим типом профиля не смогут войти в систему, если недоступен сервер, на котором хранится профиль.
В этой статье, мы покажем, как создать и назначить пользователю локальный обязательный профиль на компьютере с Windows 10/11.
Создать обязательный (read-only) профиль пользователя в Windows
Есть два способа создания шаблона для обязательного профиля в Windows:
- Первый вариант предполагает создания рабочего окружения для пользователя и применение настроек к профилю Default через режим аудита (Ctrl+Shift+F3) + sysprep с использованием файла ответов Unattend.xml с включенной опцией CopyProfile = True (этот способ подробно описан здесь)
- Второй способ предполагает копирование настроек из Default Profile и внесение изменений в настройки профиля под администратором
Далее мы рассмотрим только второй способ создания mandatory профиля.
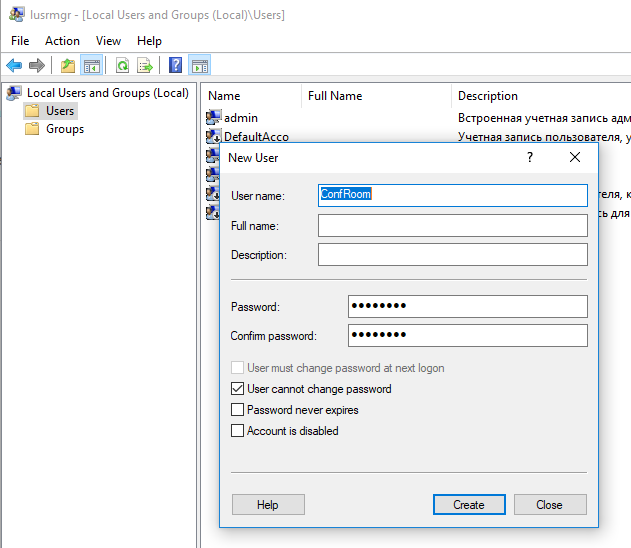
- Войдите в компьютер под учетной запись с правами администратора и откройте консоль управления локальным пользователями и группами (
lusrmgr.msc
). - Создайте новую учетную запись, например, ConfRoom.

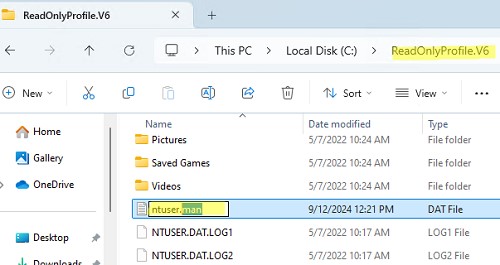
- Теперь нужно скопировать профиль по-умолчанию в отдельный каталог с определенным расширением. Для Windows 11, Windows Server 2022/2019 и Windows 10 1607 и выше, нужно добавить в имя каталога суффикс V6. Например, каталог будет называться:
C:\ReadOnlyProfile.V6
. - Откройте окно с настройками системы (
SystemPropertiesAdvanced.exe
) и нажмите кнопку Settings в разделе User Profiles. - Выберите профиль Default Profile и нажмите кнопку Copy To.
- В качестве каталога, в который нужно скопировать профиль выберите C:\ReadOnlyProfile.V6 (либо вы можете скопировать шаблон профиля в сетевой каталог, указав UNC путь, например
\\server1\profiles\ReadOnlyProfile.V6
). - В разрешениях выберите NT AUTHORITY\Authenticated Users. Опцию Mandatory profile включать не нужно!

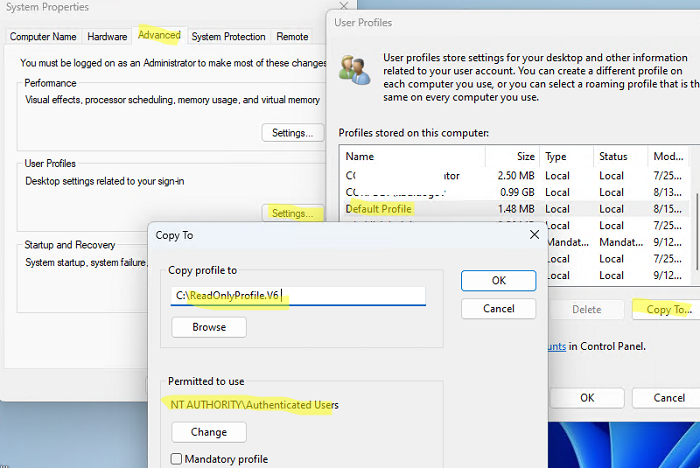
Совет. В Windows 10 1709 и выше при копировании шаблона профиля появилась отдельная опция «Mandatory Profile». При использовании этой опции на папку выдаются права на чтение выбранной группе пользователей.
Назначить read-only профиль определенному пользователю Windows
Теперь вы можете назначить обязательный профиль нужному пользователю.
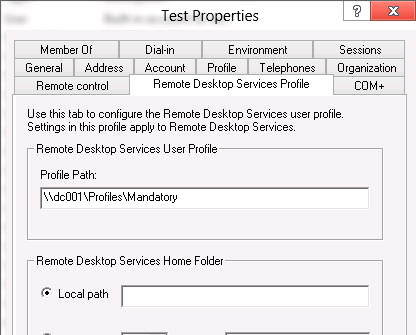
Если у вас используется локальный обязательный профиль, нужно в свойствах пользователя на вкладку Profile в поле Profile Path указать путь к каталогу
C:\ReadOnlyProfile
(обратите внимание, что суффикс V6 в этом случае указывать не надо!!).
Если вы настраиваете перемещаемый обязательный профиль для пользователя в домене AD, то UNC путь к каталогу с профилем нужно указать в свойствах учетной записи в консоли ADUC.
Откройте свойства папки C:\ReadOnlyProfile.V6 и добавьте права
Full Control
для группы «All Application Packages». В итоге на эту папку должны быть назначены следующие разрешения( с наследованием разрешений вниз): :
- ALL APPLICATION PACKAGES – Full Control (без этого некорректно работает стартовое меню)
- Authenticated Users – Read и Execute
- SYSTEM – Full Control
- Administrators – Full Control
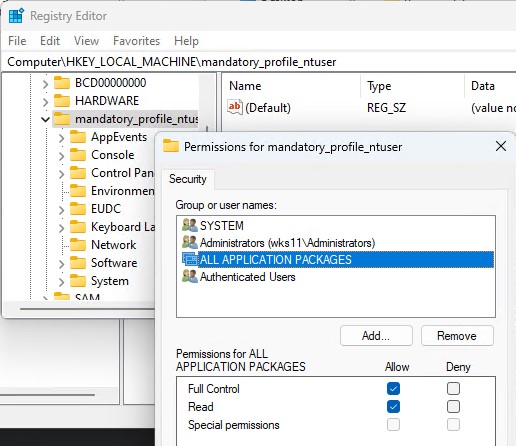
Затем откройте редактор реестра, выберите ветку HKEY_USERS и щелкните File -> Load hive. Загрузите в реестр ветку пользователя из файла
C:\ReadOnlyProfile.V6\ntuser.dat
.
Щёлкните по добавленной ветке и выберите Permissions. Здесь нужно дать
Full Control
права на эту ветку реестра для группы “Authenticated Users” и “All Application Packages”
После этого выгрузите из редактора реестра этот ntuser.dat файл, выбрав File -> Unload Hive.
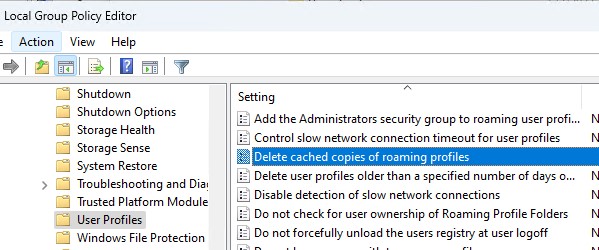
Откройте редактор локальный GPO (gpedit.msc) и настройте следующие политики:
- Computer Configuration > Policies > Administrative Templates > System > User Profiles -> Delete cached copies of roaming profiles =
Enabled
- Отключить анимацию при первом входе в Windows: Computer Configuration -> Administrative Templates -> System -> Logon -> Show first sign-in animation =
Disable - Computer Configuration -> Administrative Templates -> Windows Components -> OOBE -> Don’t launch privacy settings experience on user logon =
Enabled
. - При использовании перемещаемых профилей для корректного отображения стартового меню нужно на всех устройствах задать ключ реестра типа DWORD с именем SpecialRoamingOverrideAllowed и значением
1
в разделе HKLM\Software\Microsoft\Windows\CurrentVersion\Explorer\.
Теперь авторизуйтесь в системе под новым пользователем и выполните необходимые настройки (внешний вид, разместите ярлыки, нужные файлы, настройте ПО и т.д.).
Завершите сеанс пользователя и войдите в систему под администратором и в каталоге с профилем переименуйте файл NTUSER.dat в NTUSER.man.
Теперь войдите в систему под пользователем с обязательным профилем и проверьте, что пользователь может полноценно работать в своем профиле: настраивать параметры окружения, настраивать программы. Чтобы проверить, что используется mandadory профиль, выполните PowerShell команду:
gwmi win32_userprofile | select localpath,roamingpath,status

Путь к используемому обязательному профилю содержится в параметре roamingpath. Status = 4 указывает на то, что используется mandatory тип профиля.
Проверьте NTFS права на корневые папки дисков и убедитесь что у пользователей нет прав на создание в корне диска новых директорий и файлов.
После выхода из системы все изменения в его профиле (в том числе история, куки, параметры приложений, временные файлы) не сохранятся.
Если нужно внести изменения в обязательный профиль, нужно переименовать файл ntuser.man в ntuser.dat и выполнить настройку среды под пользователем, после чего переименовать файл обратно.
При использовании mandatory-профиля на RDS серверах можно воспользоваться следующими политиками, в которых можно указать путь к каталогу профиля и включить использование обязательных профилей. Раздел GPO: Computer Configuration -> Policies -> Administrative Templates -> Windows Components -> Remote Desktop Services -> Remote Desktop Session Host -> Profiles.
- Use mandatory profiles on the RD Session Host server = Enabled
- Set path for Remote Desktop Services Roaming User Profile = Enabled + укажите UNC путь
Также обратите внимание, что, если вы решили использовать перенаправляемые папки совместно с обязательным профилем, не рекомендуется перенаправлять каталог AppData (Roaming).
Creating a custom default profile is a good way to streamline a Windows 10 deployment. How do you achieve this?
Note:- this article refers to the default profile creation process on Windows 10 version 1803, fully patched as of 05/07/2018. Further servicing updates (Windows patches) or feature updates (OS upgrades) will possibly invalidate this, although I will strive to keep this article as up-to-date as humanly possible.
The best way to set up a custom default user profile is to run from Audit Mode. This is a special mode of Windows that is invoked during the build process. The original purpose of it was for corporations to complete installation tasks before shipping them to users who could then complete the installation in the usual fashion. In Audit Mode, the device is logged on as the local Administrator account (which will be disabled afterwards) and allows changes to be made to the device prior to sysprep. However, if sysprep is run with the /copyprofile switch, the local user profile will then be copied into the default user profile and then become the default profile for the image.
Be aware that you can only run Audit Mode a specified number of times if you reach the stage of running sysprep when you’re finished – four times will be your limit, unless you use the /skiprearm switch. I find it easy simply to take a VM snapshot of the reference image prior to running sysprep and restoring if necessary.
In order to invoke Audit Mode, start a Windows 10 build and wait until you reach the point shown in the image below, then press Ctrl Shift and F3.

The machine will then boot into Audit Mode, where it will automatically log on as the built-in Administrator account.

Click on Cancel on the sysprep dialog box. Now, you can set about making any changes you want on a device or user level. Normally at this point I remove UWP apps as specified in this article. However, as this post is merely about the user perspective, here are some of the things I tend to do here:-
- Set background and branding
- Set Explorer to show file extensions
- Set File Explorer to open at “my PC” instead of “Quick Access”
- Set the Start Tiles as required
- Set desktop icons as required (add My Computer and Control Panel)
- Set Taskbar Pinned Items as required
- Set browser homepage and search options

After this, we just need to do a quick bit of tidying up. Simply run this command to grab a copy of the Start Tiles layout to deploy to new users. Run it from an elevated PowerShell session
Export-StartLayout -Path $ENV:LOCALAPPDATA\Microsoft\Windows\Shell\LayoutModification.xml
Once you’ve got this done, you need to create an answer file for sysprep to read to tell it what to do. You can either create one using Windows tools, or simply steal the pre-canned one I have prepared here 🙂 If you’re just interested in running with the pre-determined version, skip ahead to the section marked “Pre-canned answer file”
If you want to do this manually, download and install the Windows ADK, the 1803 version is currently available from this link. Next, install the Deployment Tools option from the ADK only.

Make sure you’ve got your Windows 10 source files available. You will need read/write access to the source files for Windows , so take a copy of the install.wim file from the \sources folder and put it somewhere you can access it with Read/Write permissions.
Once this has completed, run Windows System Image Manager from the Start Menu. From the File menu, choose New Answer File. Click on Yes and locate the install.wim file from your Windows image. Click on Yes to create a catalog file.
Now, we can go to work to customize the answer file as required. Under Components in the bottom left pane, select the folder that starts with amd64_Microsoft-Windows_Shell-Setup (or x86_Microsoft-Windows_Shell-Setup if you’re on a 32-bit platform), select it and choose Add Setting to Pass 4 specialize

Next you will see this is now added to the Answer File section in the middle pane. Expand this out and set the CopyProfile flag on the right-hand pane to True

You can set any of the other options within the answer file as you wish, but this one is the only one we actually need. Once finished, validate the answer file by using Tools | Validate answer file, then save it somewhere as an .xml file. In this case, we are just saving to c:\unattend.xml.
You can then open the file up in a text editor if required and check it.
Pre-canned answer file
If you want to avoid all this mess, here’s a pre-made answer file I use on a regular basis 🙂 Items highlighted in bold you may need to check to match your environment, but otherwise you should just be able to copy and paste into an text file and use it with impunity!
<?xml version=”1.0″ encoding=”utf-8″?><unattend xmlns=”urn:schemas-microsoft-com:unattend”>
<settings pass=”specialize”>
<component name=”Microsoft-Windows-Shell-Setup” processorArchitecture=”amd64” publicKeyToken=”31bf3856ad364e35″ language=”neutral” versionScope=”nonSxS” xmlns:wcm=”http://schemas.microsoft.com/WMIConfig/2002/State” xmlns:xsi=”http://www.w3.org/2001/XMLSchema-instance”>
<CopyProfile>true</CopyProfile>
</component>
</settings>
<cpi:offlineImage cpi:source=”wim:D:/sources/install.wim#Windows 10 Enterprise” xmlns:cpi=”urn:schemas-microsoft-com:cpi” />
</unattend>
Watch out – these lines may wrap.
So once you’ve created your answer file, either manually or using the one above, you now need to run sysprep. Open up an elevated command prompt and run this command
c:\windows\system32\sysprep\sysprep.exe /oobe /generalize /shutdown /unattend:c:\unattend.xml
Naturally, replacing the correct path to your own answer file.
An interesting aside – sometimes I get an error here that directs me to the sysprep log (setupact.log), and I commonly find this happens when I have been removing UWP apps at this stage. If you have removed a provisioned app that still exists in the user profile, sysprep will fail. You need to make sure any provisioned apps removed using Remove-AppxProvisionedPackage have also been removed from the active user account using Remove-AppxPackage. Also it is possible to get an error here if the Windows Media Player Network Sharing Service is running.
Once this is run, sysprep will do its stuff and then shut down the image

The system is now shut down and ready for image deployment with your custom default profile baked-in, but what I usually find is that the default profile will be a bit bloated and contain some references that are not necessary (like PowerShell command history, for instance). To get around this, I run the following script either during imaging or post-imaging just to ensure that the default profile is fully tidied up and as streamlined as possible. There are batch commands in here but they will run from PowerShell without issue, it does however need to run elevated.
takeown /f c:\users\default\appdata\local\Microsoft\WindowsApps /r /a /d Y
icacls c:\users\default\appdata\local\Microsoft\WindowsApps /grant Administrators:F /T /C /L
get-childitem C:\Users\Default\AppData\LocalLow -force | foreach ($_) {remove-item $_.fullname -force -recurse -confirm:$false}
get-childitem C:\Users\Default\AppData\Local\Microsoft\Windows -exclude “Shell”,”WinX” -Force | foreach ($_) {remove-item $_.fullname -force -recurse -confirm:$false}
get-childitem C:\Users\Default\AppData\Local\Microsoft -exclude “Windows” -Force | foreach ($_) {remove-item $_.fullname -force -recurse -confirm:$false}
get-childitem C:\Users\Default\AppData\Local -exclude “Microsoft” -Force | foreach ($_) {remove-item $_.fullname -force -recurse -confirm:$false}
get-childitem C:\Users\Default\AppData\Roaming\Microsoft\Windows -exclude “Start Menu”,”SendTo” -Force | foreach ($_) {remove-item $_.fullname -force -recurse -confirm:$false}
get-childitem C:\Users\Default\AppData\Roaming\Microsoft -exclude “Windows” -Force | foreach ($_) {remove-item $_.fullname -force -recurse -confirm:$false}
get-childitem C:\Users\Default\AppData\Roaming -exclude “Microsoft” -Force | foreach ($_) {remove-item $_.fullname -force -recurse -confirm:$false}
Get-ChildItem c:\users\default -Filter “*.log*” -Force | Remove-Item -Force
Get-ChildItem c:\users\default -Filter “*.blf*” -Force | Remove-Item -Force
Get-ChildItem c:\users\default -Filter “*.REGTRANS-MS” -Force | Remove-Item -Force
This script will strim your default profile from around 125MB to about 4MB. Now, you are ready to deploy the image fully using your default profile that you have customized!
Summary
Setting up the default profile is an easy way to make general customizations, improve logon times, and make the whole user experience a lot more slick. It also cuts down on the amount of baseline policies that are required for the user environment, as they can be baked in. Ideally, this process should be repeated for each new iteration of Windows 10 feature releases.
You can also, if you wanted to, centralize the deployment of your default profile by copying the profile you created into a folder in the NETLOGON share and calling this folder Default User.v6 (for Windows 10 1703 and above, prior Windows 10 versions use the suffix .v5). In this situation, you could make changes in one location and have them reflected everywhere (assuming that DC connectivity is available for the client).
Readers help support Windows Report. We may get a commission if you buy through our links.
Read our disclosure page to find out how can you help Windows Report sustain the editorial team. Read more
Windows allows you to create and manage multiple user accounts on your computer. If you are looking for ways to change the main account on Windows 10, this guide will walk you through the process.
We will cover the steps and prerequisites to change the primary account, ensuring a smooth transition and uninterrupted access to your PC’s resources and settings.
How to change the primary Microsoft account on Windows 10?
Before proceeding with changing the main account on Windows 10, it is important to consider the following prerequisites:
- Ensure your computer is connected to the internet.
- Back up your important data.
- Make sure you have access to the current primary account.
- Verify the UAC is enabled and set to an appropriate level to allow administrative actions during the process.
If you have gone through the checks, use different methods to change the account.
1. Create a new user account
- Press Windows + I to open the Settings app.
- Go to Accounts.

- Click Family & other users.
- Now under Other users, click Add someone else to this PC.

- Follow the onscreen instructions to create a new user account.
- Once the account is created, select it and choose Change account type.

- Now set it as Administrator and click OK.

- Log out from the current primary account and log in to the new one.


2. Switching user accounts
- Press Windows + L to lock your computer or log out of your current account.
- On the login screen, choose the user account you want to use as the primary account and enter the password.
- Press Windows + I to open the Settings app.
- Go to Accounts.

- Click Your info.
- Now click Sign in with a local account instead.

- Select the account and then enter the PIN and click Next.

- Now on Enter your local account info page, enter the User name, and New password, and click Next.

- Log out and log in using the new account, and it will be your main account.


3. Changing from a Microsoft account to a local account
- Press the Windows key, locate the user profile icon, right-click, and choose Change account settings.

- On the Your info section, click Sign in with a local account instead.

- Now click Sign in with a local account instead.
- Select the account and then enter the PIN and click Next.

- Now on Enter your local account info page, enter the User name, and New password, and click Next.

- Log out and log in using the new account, and it will be your primary account.

- Microsoft wants Windows 10 users to upgrade to Windows 11 or Copilot + PCs
- Deleting ‘inetpub’ folder lets hackers permanently stop Windows updates, Microsoft warns
- The latest KB5055612 for Windows 10 22H2 brings huge stability to the OS
- Microsoft April 2025 Patch Tuesday: Fixes for 134 security vulnerabilities, one exploited Zero-Day
4. Use the Control Panel
- Press the Windows key, type control panel, and click Open.

- Select View by as Category, and click User Accounts.

- Select User Accounts again.

- Click Manage another account.

- Choose the user account you want to change.

- Click Change the account type.

- Select Administrator and click the Change Account Type button.

- Now log out and log in using the new account, and it can be the main account.


5. Use the Command Prompt
- Press the Windows key, type command prompt, and click Run as administrator.

- Copy & paste the following command to create a new username after replacing <new username> with the username that you want & <password> with the password you wish to use and hit Enter:
net user <new username> <password> /add - Once the account is created, type the following command and press Enter:
net localgroup administrators <new username> /add
- Now log out and log in using the new account, and it can be the primary account.


So, these are the methods you can use to change your main account on Windows 10.
We also recommend reading our guide on what to do if you can’t log into Windows 10 with the Microsoft account.
If you have questions or suggestions, feel free to mention them in the comments section below,
Srishti Sisodia
Windows Software Expert
Srishti Sisodia is an electronics engineer and writer with a passion for technology. She has extensive experience exploring the latest technological advancements and sharing her insights through informative blogs.
Her diverse interests bring a unique perspective to her work, and she approaches everything with commitment, enthusiasm, and a willingness to learn. That’s why she’s part of Windows Report’s Reviewers team, always willing to share the real-life experience with any software or hardware product. She’s also specialized in Azure, cloud computing, and AI.