
В этой статье речь пойдет о такой интересной функции как Windows To Go. Эта функция записи (установки) Windows на портативный носитель, к примеру USB флешку. Другими словами, Вы можете записать уже установленную Windows на флешку и загружаться с нее. Эта функция работает на Windows 8.1 и Windows 10.
Различия между обычной установкой Windows и Windows To Go:
— Вы не сможете обновляться и получать актуальные обновления.
— Внутренние диски будут находиться в автономном режиме, т.е они будут по умолчанию отключены и у Вас будет возможность использовать только Ваш съемный носитель.
— Отключенный режим гибернации по умолчанию. Включить его можете из параметров групповой политики.
— Недоступна функция отката / восстановления системы.
— Сброс до заводских настроек так же недоступен.
— Отключен BitLocker.
Как создать флешку с установленной Windows?
Существует множество приложений, которые позволяют записать флешку с функционалом Windows To Go, но в этой статье мы рассмотрим самую популярную утилиту в этом направлении — Rufus.
Скачать Rufus можете с нашего сервера, либо с официального сайта Rufus.
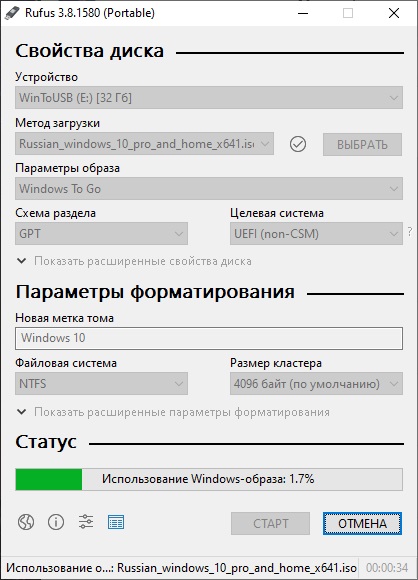
— Запускаем утилиту.
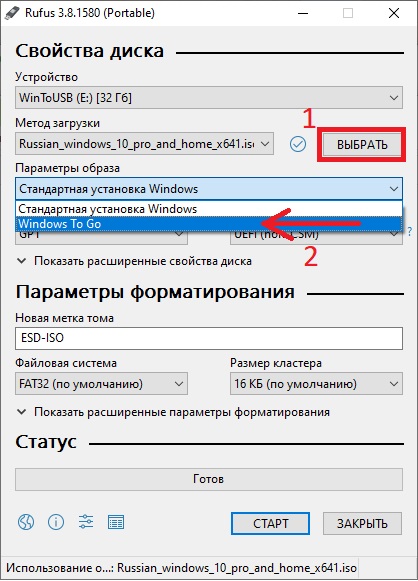
— В выпадающем меню «Устройство» у Вас флешка должна определиться автоматически, но если у Вас несколько USB-устройств, то выберите нужное.
— В «Метод загрузки» на кнопке выбрать выберите заранее скачанный дистрибутив на Вашем ПК. Это может быть любая версия Windows 10 или Windows 8.1. Рекомендуем использовать только оригинальные дистрибутивы Windows. Скачать различные дистрибутивы можете в нашем каталоге на следующей странице.
— В выпадающем меню «Параметры образа» соответственно выбираем — «Windows To Go».
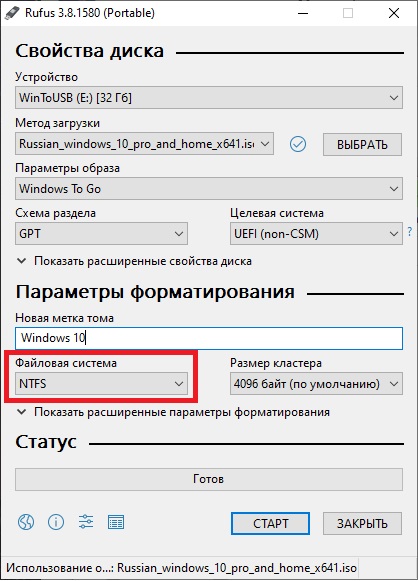
— Далее можете задать имя тома, к примеру «Windows 10».
— Файловую систему выбираете «NTFS».
После можете уже нажать кнопку «Старт».
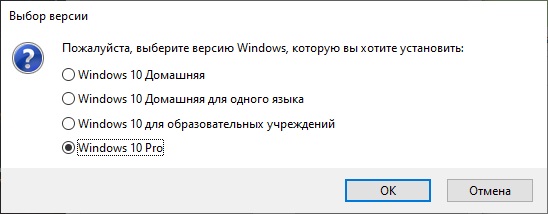
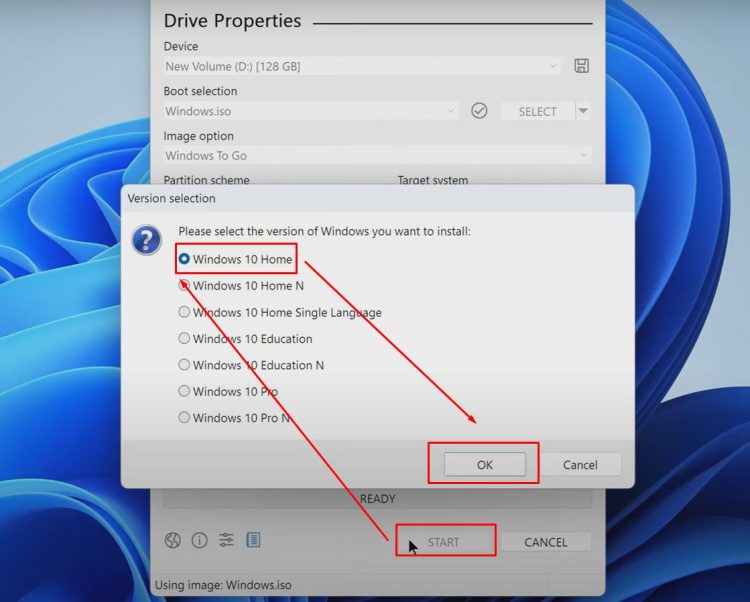
Следующим шагом у Вас выйдет окно выбора версии ОС. Как правило в образах системы для установки доступны несколько версий Windows, к примеру Pro, Домашняя и т.д. Выбираете нужное. В нашем случае выберем Windows 10 Pro.
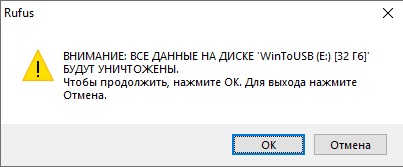
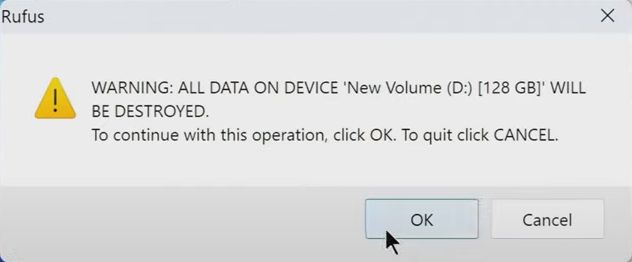
Далее подтверждаете форматирование флешки. Все ранее записанные файлы на флешке будут безвозвратно удалены.
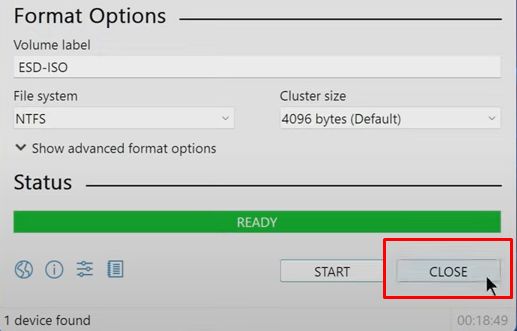
Теперь дожидаетесь окончания процедуры записи. Запись может продолжаться около 40-60 минут. В зависимости от типа USB (2.0 или 3.0), а так же скорости Вашей флешки.
После завершения записи на флешку, можете вставить флешку в нужный ПК и в Bios/UEFI выставить флешку как загрузочную.
Лицензионный ключ активации Windows 10 от
Содержание статьи:
- Портативная Windows: «как ее подготовить» (по шагам)
- ШАГ 1: что нужно
- ШАГ 2: запись накопителя (перенос ОС на флешку/диск)
- ШАГ 3: использование портативной Windows
- Вопросы и ответы: 20
Доброго дня!
Сегодняшняя заметка будет о том, как рабочую ОС Windows 10/11 (т.е. та, которая у вас установлена на HDD/SSD текущего компьютера) перенести на флешку/внешний диск и использовать ее на любом* другом компьютере у которого есть USB-порт. Своего рода «портативная клонированная» ОС Windows! 👌
Когда это может быть полезно:
- 👉 вы куда-нибудь поехали (на дачу, в отпуск, в командировку и пр.). Если что-то случится — вы всегда можете подключить подготовленную флешку к любому компьютеру и получить доступ к своей системе. Удобно?!
- 👉 такой накопитель (флешку) можно подключать к компьютерам с MacOS (это даст возможность использовать некоторый софт и игры, которого там нет);
- 👉 в случае поломки основного диска — такой накопитель будет резервной копией!
- 👉 портативную Windows 11 можно будет запускать даже на тех ПК, где нет модуля TPM 2.0.
В чем же основной плюс такой флешки по сравнению с готовыми LiveCD: а в том, что это будет полная копия вашей текущей ОС со всеми настроенными программами и документами! Причем, вы ее можете использовать прямо-таки сразу, без какой-либо подготовки: подключил и запустил. Через 5 мин. пользуешься своей системой!
Ниже покажу на примере, как ее можно подготовить! 😉
*
Портативная Windows: «как ее подготовить» (по шагам)
ШАГ 1: что нужно
Для решения задачи нам потребуется:
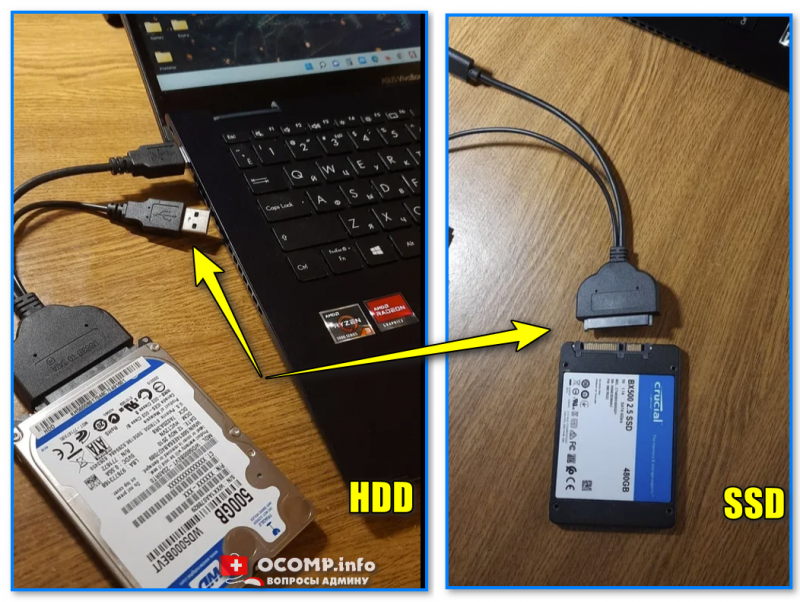
- быстрая флешка, либо внешний HDD/SSD диск: с интерфейсом USB 3.0 или Thunderbolt (размер их должен быть больше, чем занятое место на вашем системном диске с Windows).
👉 Я проверял на обычном HDD и SSD, подключенными к USB-порту ноутбука через переходник: 100+ ГБ рабочей информации с ОС Windows 11 перенеслись за ≈45 / 30 мин. соответственно!). Внешний HDD/SSD можно приобрести 📌в компьютерных магазинах;

HDD, SSD
- программа 📌OS2GO (программа платная, но стоит недорого + использование у нее крайне простое: буквально две кнопки… Ниже увидите все сами на скринах).

OS2GO — превью загрузки

*
ШАГ 2: запись накопителя (перенос ОС на флешку/диск)
Итак, накопитель подключен к текущему рабочему ПК, программа OS2GO установлена и запущена.
1) В первом окне приветствия OS2GO попросит указать диск (флешку), на которую нужно записать текущую версию Windows и нажать кнопку «Next». Обратите внимание на объем накопителя: он должен быть > чем занятое место на системном диске (в моем случае Windows вместе с файлами и ПО занимает 103 ГБ, а диск на 465 ГБ!). См. пример ниже. 👇
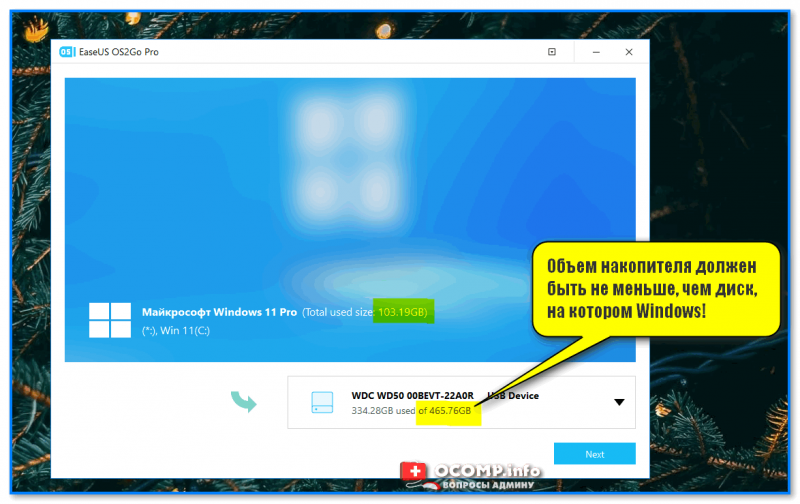
Объем накопителя должен быть не меньше, чем диск, на котором Windows!
2) Далее обратите внимание на две вещи:
- чтобы была выбрана авто-разметка накопителя (опция «Autofit the disk»);
- если копируете Windows на SSD-накопитель — поставьте галочку на пункте «Check the option if the target is SSD». См. скрин ниже. 👇
После нажмите на «Proceed» (важно: вся информация на флешке/внешнем диске будет удалена, а потом перенесена текущая Windows со всеми файлами).

Настройки OS2GO
3) Останется лишь дождаться окончания записи (100%) и нажать кнопку «Finish». Обратите внимание, что в процессе записи утилита не перезагружает ваш рабочий ПК, и вы можете заниматься чем-нибудь параллельно…
Примечание: время записи сильно различается, и зависит (главным образом) от скорости вашего накопителя. Например, в моем случае Windows 11 занимала порядка 100 ГБ, и переносилась на SSD-диск около 30 мин. (диск был подключен к USB 3.1 порту).
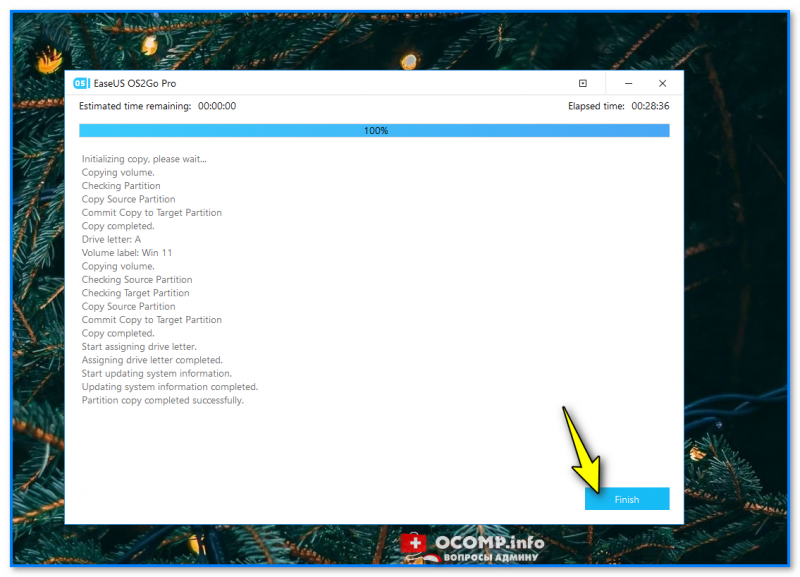
Финиш!
Не забудьте правильно отключить диск: нажав ПКМ по иконке флешки в трее (рядом с часами). Пример ниже. 👇
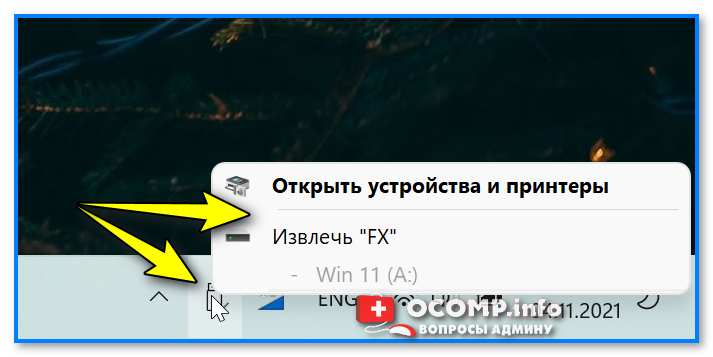
Правильно извлекаем диск
*
ШАГ 3: использование портативной Windows
Собственно, теперь о том, как использовать этот накопитель…
Вариант 1. Положить на полочку и хранить, как копию ОС с файлами. 😉
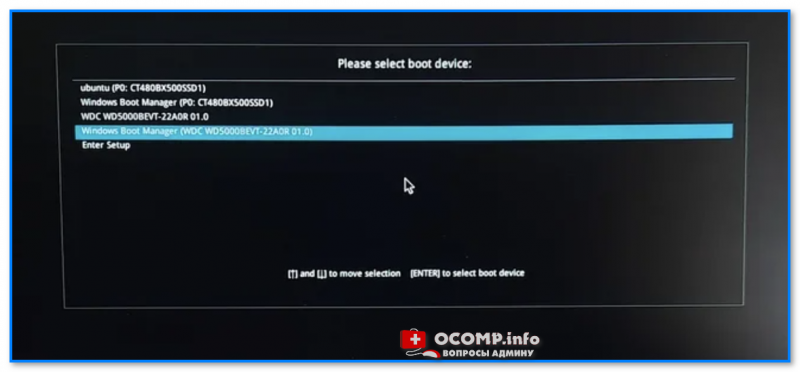
Вариант 2. Подключить к USB-порту компьютера (ноутбука), включить его и войти в BOOT-меню — из списка доступных накопителей выбрать «наш подготовленный накопитель» и произвести загрузку.
📌Заранее предупрежу: загружается Windows с внешнего диска может относительно долго. Например, в моем случае от момента включения компьютера до появления рабочего стола проходило около 4 мин. Затем еще пару мин. компьютер «думал» и медленно реагировал на нажатия (поэтому совет: после начала загрузки — оставьте ПК в покое на 6-10 мин.!).
Подключаем к другому ноутбуку и загружаемся с диска
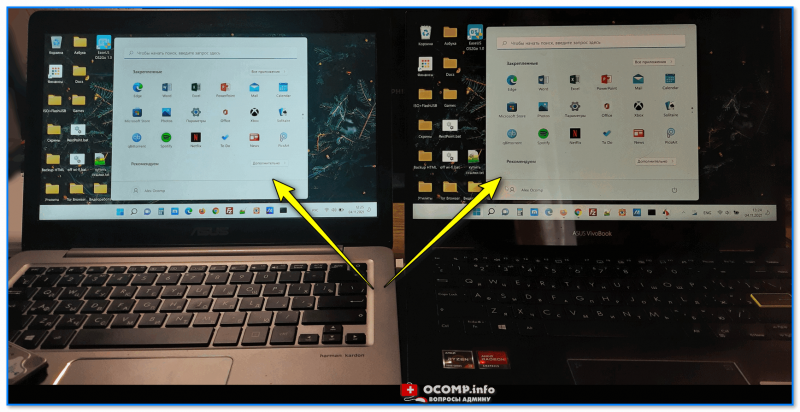
📌Что касается непосредственно работы: для теста я подключил подготовленный накопитель ко второму ноутбуку, включил его и поставил рядом с тем, на котором была оригинальная Windows (т.е. чтобы сравнить оригинальную Windows с «портативной»). См. скрин ниже. 👇
В моих тестах все установленные программы, игры и файлы нормально открывались (правда, на том ноутбуке, который работал с «портативной» Windows, — уходило на это больше времени!). Да, есть неудобства, но в режиме необходимости — вполне себе годный инструмент. 👌
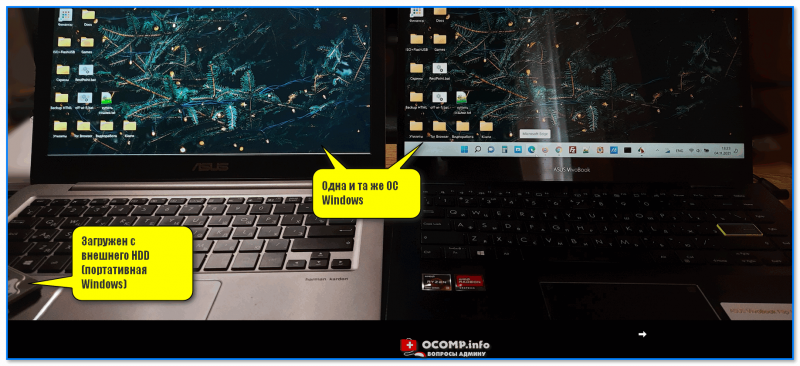
Что в итоге (фото 1) \\ Слева — ноутбук загружен с внешнего SSD (с портативной Windows), справа — с классического M2 SSD
Что в итоге (фото 2, еще один пример) || даже ярлыки все на тех же местах…
📌Кстати, насчет работы портативной Windows с Mac.
В принципе, все аналогично. Сначала нужно подключить накопитель к Mac, перезагрузить его (удерживая Alt на клавиатуре). Затем на стартовом экране выбрать «наш накопитель». В процессе первичной настройки Windows — может потребоваться USB-клавиатура и мышь (потом ее можно отключить и работать без нее)!
Важно: если у вас новое устройство с процессором Apple M1 — оно не сможет использовать Windows 10/11 на флэш-накопителе, созданном с EaseUS OS2Go.
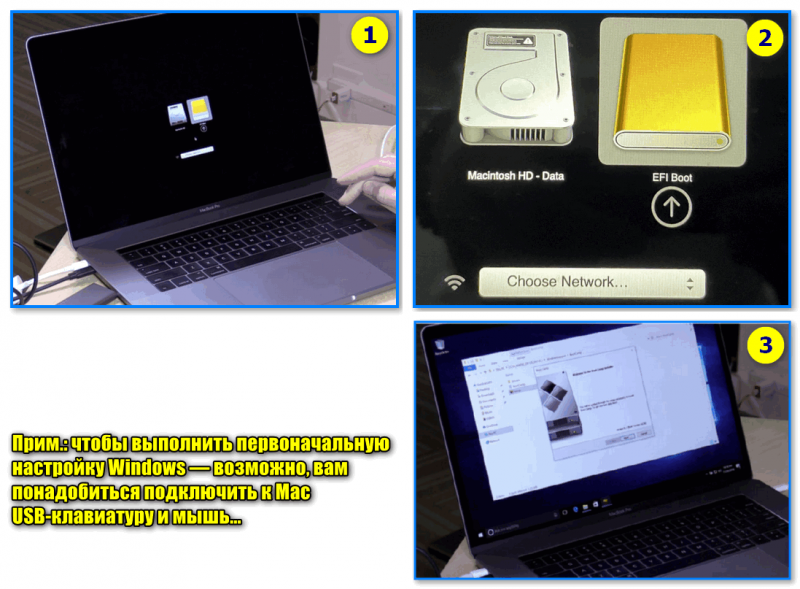
возможно, вам понадобиться подключить USB-клавиатуру и мышь
*
PS
Сделать аналогичную «портативную Windows-флешку» можно и с помощью 📌Rufus (опция «Windows to go»). Однако, Rufus не позволит записать именно свою рабочую Windows со всеми привычными файлами (он запишет «чистую» систему…). К тому же, Rufus — достаточно «капризная» утилита, и нередко флешки (подготовленные в ней) — «отказываются» загружаться… (особенно, это относится к новой Windows 11).
*
На сим пока всё… Дополнения по теме приветствуются!
Успехов!
👋
Hi everybody. Today I will show you how to create a portable Windows 10 on a micro SD card. However, the process is the same for external HDDs, SSDs, and NVMe drives. This operating system will be a full-fledged Windows 10 with all its functions and can be booted on any computer or laptop running Windows, Linux, or Mac OS.
Requirements
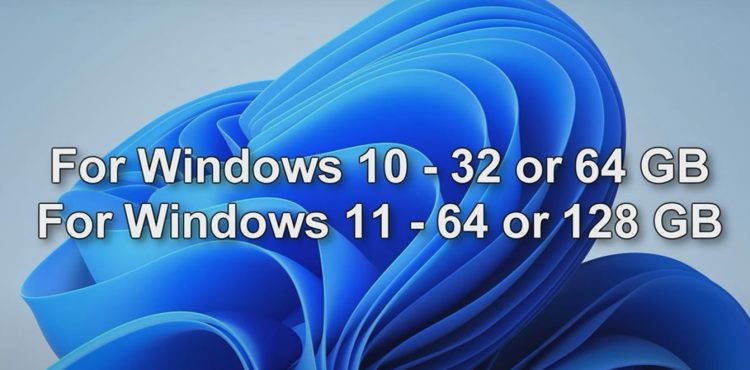
- For Windows 10, the external drive must have at least 32 GB of free space, but 64 GB is better.
- For Windows 11, at least 64 GB is required, and 120 GB is recommended for comfortable use.
Connecting the Micro SD Card
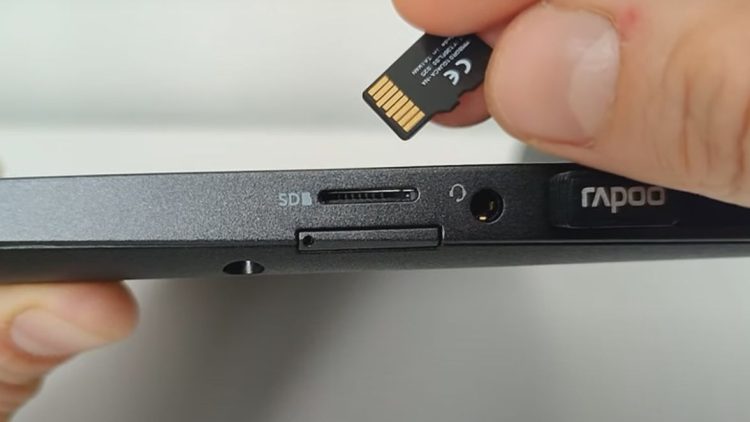
If you are using a laptop, connect your micro SD card to a dedicated port designed for micro SD cards. If your laptop doesn’t have such a port, use a USB card reader.
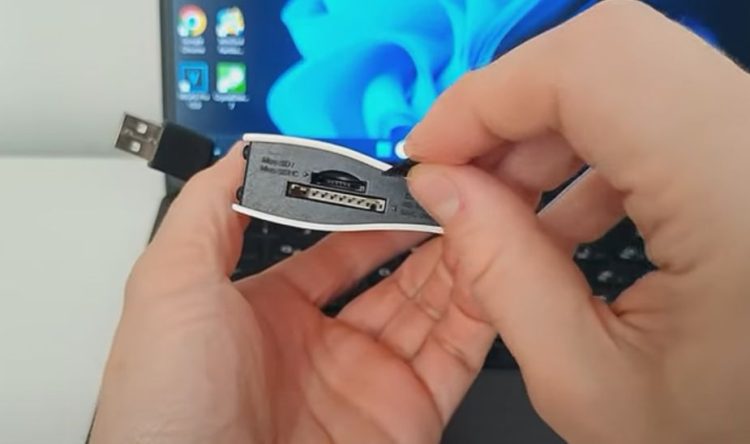
Connect the micro SD card to the card reader, then connect the USB cable from the card reader to the laptop or desktop PC.
Preparing the External Drive
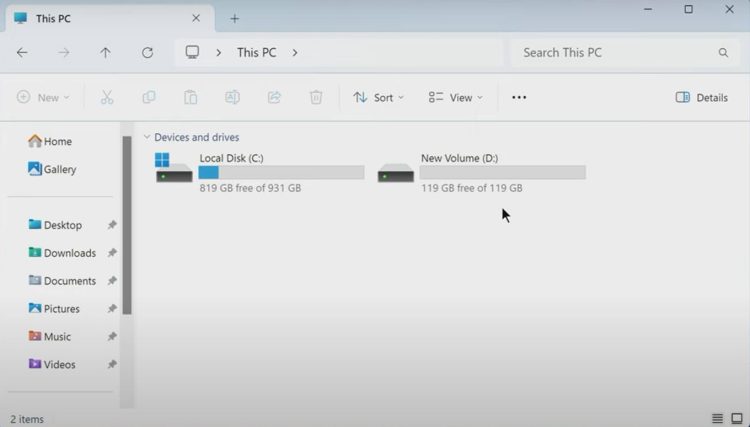
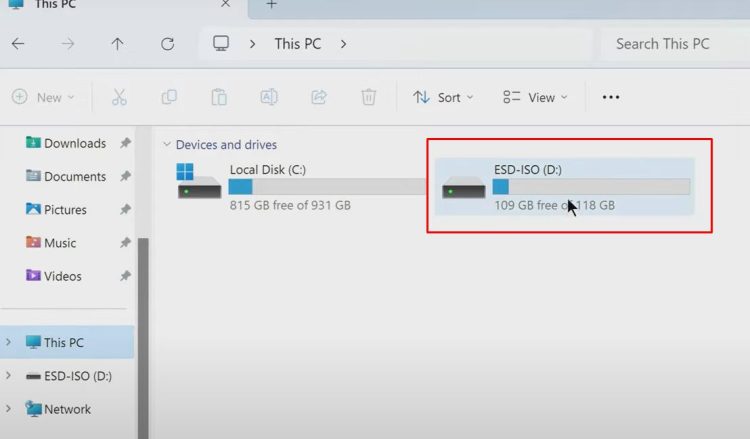
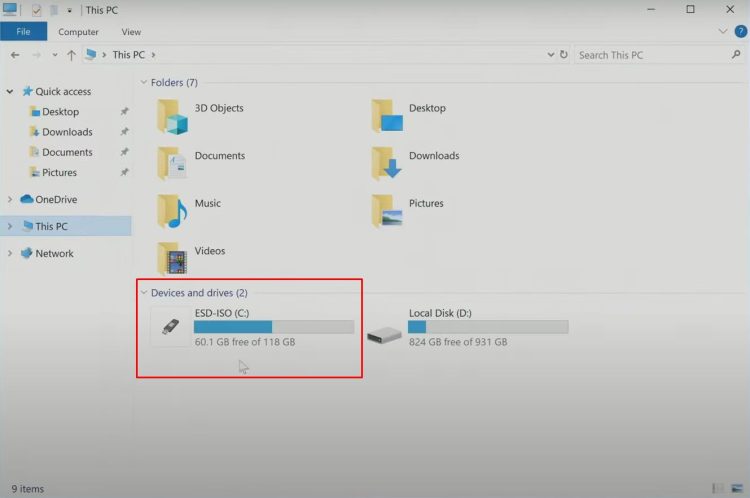
I open “This PC” and see my C drive. All files on the C drive will remain unchanged. After connecting the micro SD card, it appears in Explorer under the letter D.
Downloading Windows 10 ISO
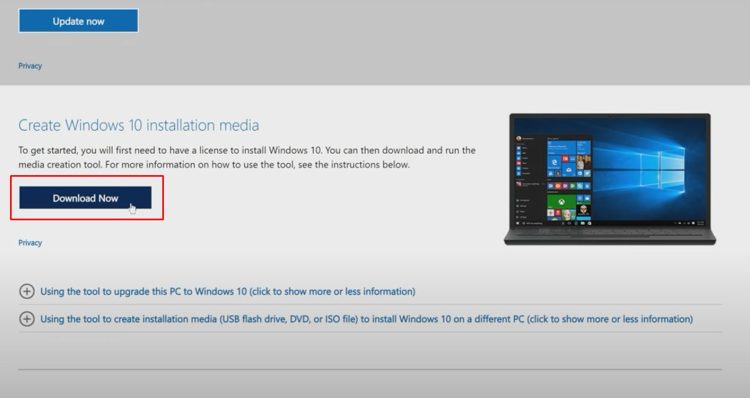
To create a portable Windows 10, download the Windows 10 ISO file to your computer. Сlick the link to the official Windows 10 download page. The Microsoft website will open, allowing you to download the official Windows 10 image.
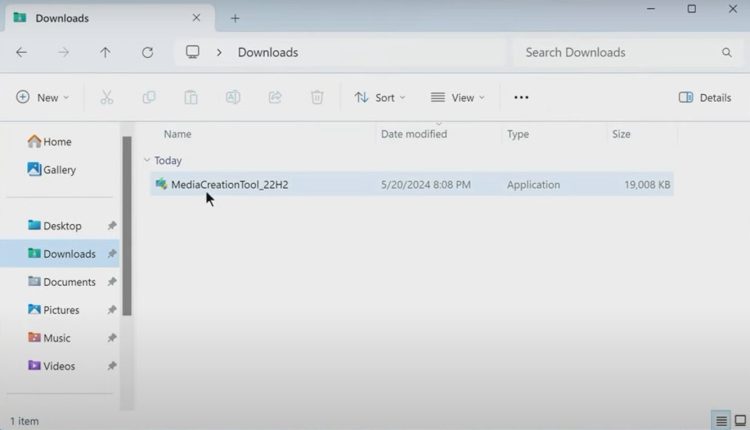
Downloading the Media Creation Tool
Click to download the Media Creation Tool, which will help you obtain the ISO file. Close the browser and open Explorer. Double-click the Media Creation Tool shortcut in the Downloads folder.
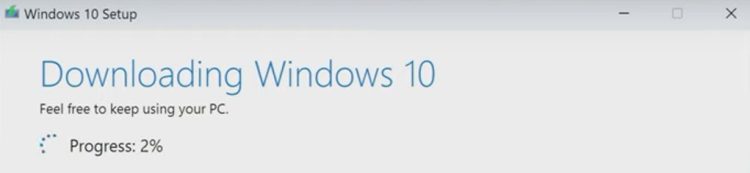
Creating the ISO File
You can continue working on your computer or take a break. Once the download is complete, click ‘Finish.’
Downloading and Installing Rufus
Now, download the Rufus application to write the ISO file to the USB memory drive. Click the link to the official Rufus download page. Scroll down a bit and click to download.

The small application will download quickly. Close the browser and open the Downloads folder. Double-click the Rufus shortcut to open the interface.
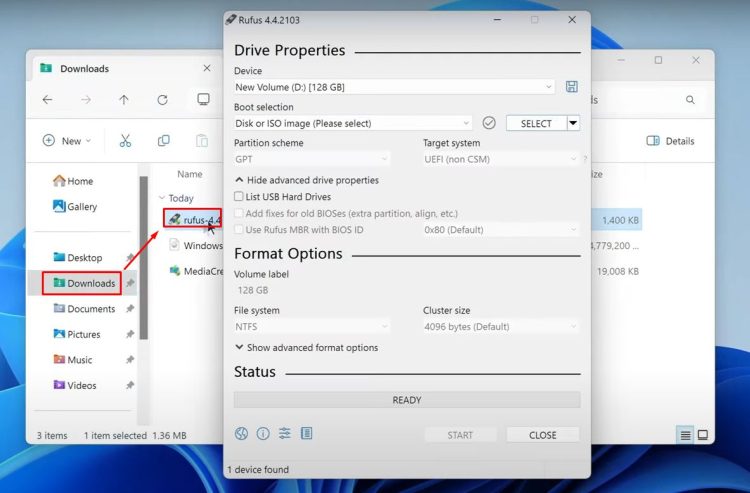
Using Rufus to Create a Portable Windows 10
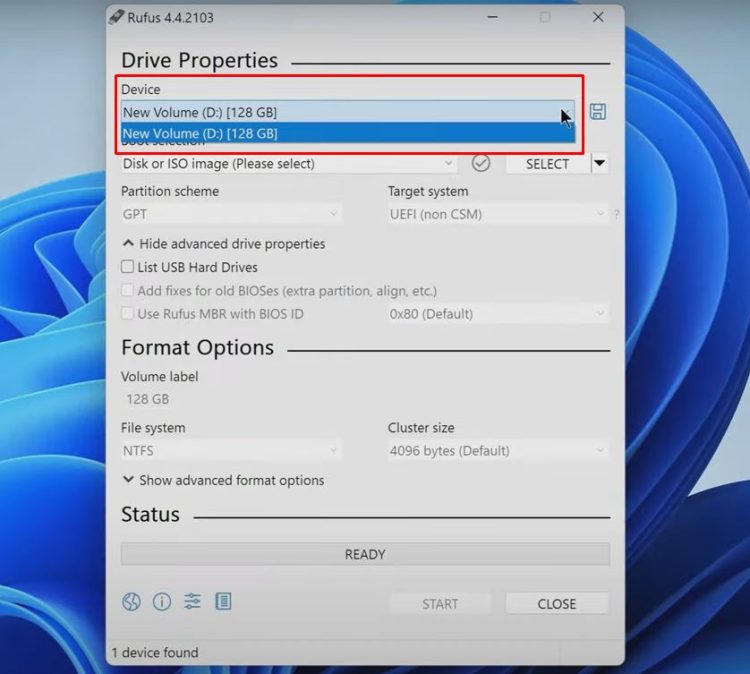
In Rufus, at the top, select your micro SD card. If using an external USB drive, check the appropriate box, click ‘Select,’ and choose the Windows ISO file. Click ‘Open.’
Selecting the ISO Recording Method

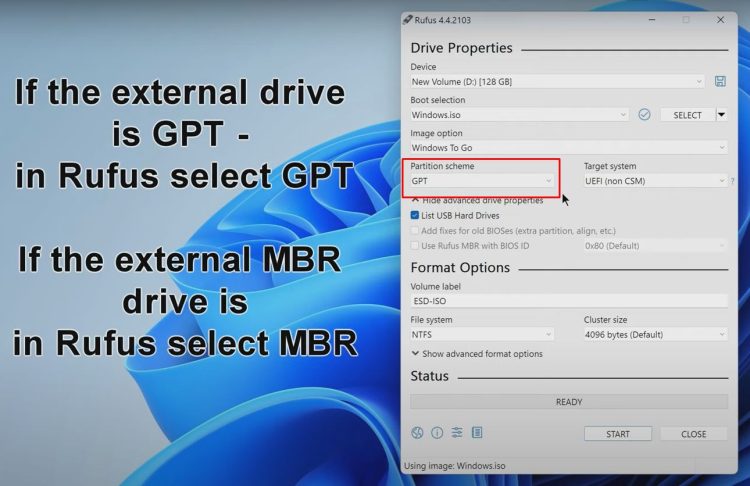
Choose the ISO recording method: ‘Windows To Go.’
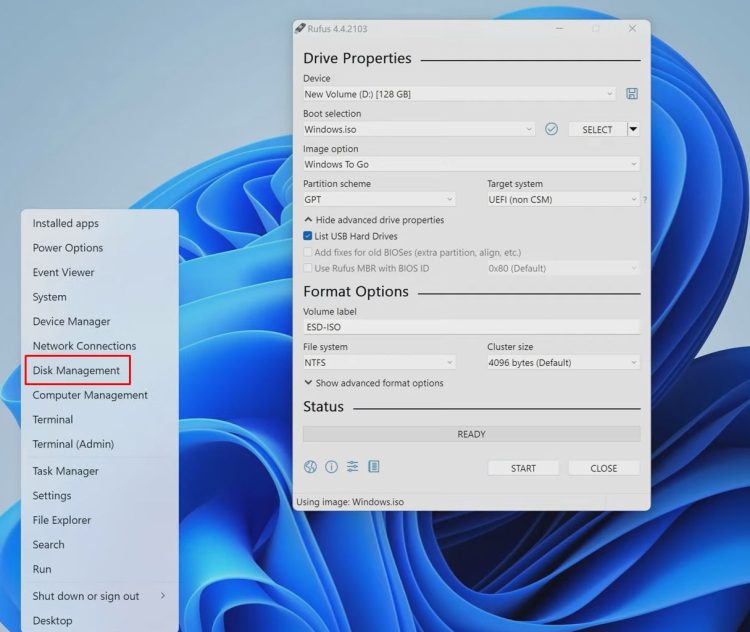
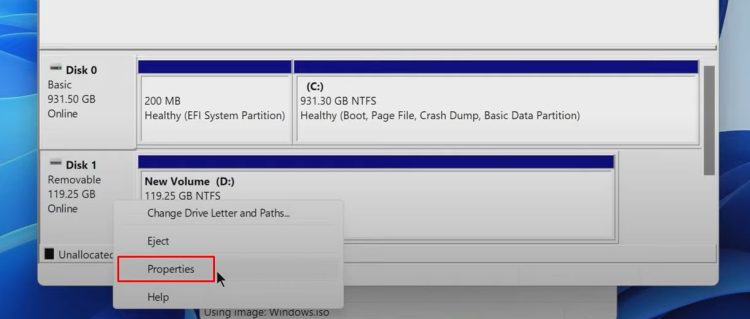
Select the disk partition scheme—MBR or GPT. To determine this, right-click the Start button and select ‘Disk Management.’ Right-click the micro SD card and select ‘Properties.’ Go to the Volumes tab to see the partition scheme. For GPT, select GPT in Rufus; for MBR, select MBR.
Checking the Partition Layout of the Micro SD Card
To find out the layout of the micro SD partition:
- Right-click on the Start button and select Disk Management.

- In the Disk Management window, right-click on the micro SD card and select Properties.

- In the Properties window, go to the Volumes tab. Here, you will see the partition scheme of your micro SD card.

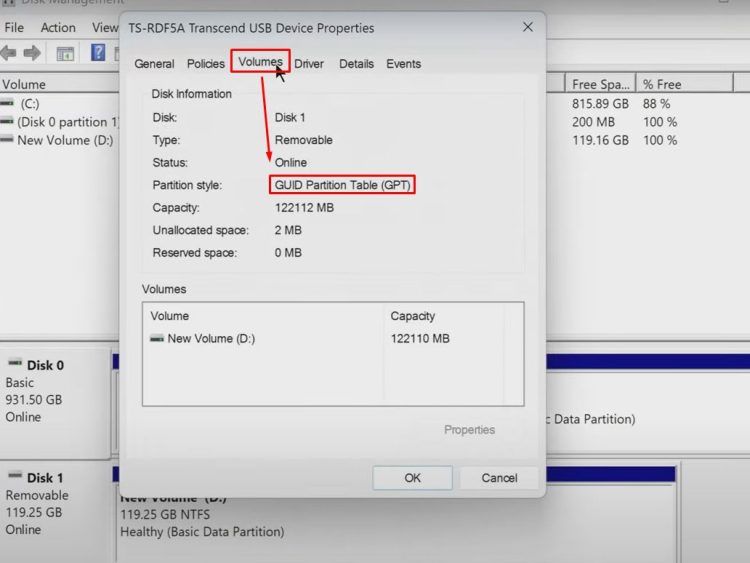
If the partition scheme is listed as GPT, you should select GPT in Rufus. If it is listed as MBR, select MBR in Rufus.
Starting the Process
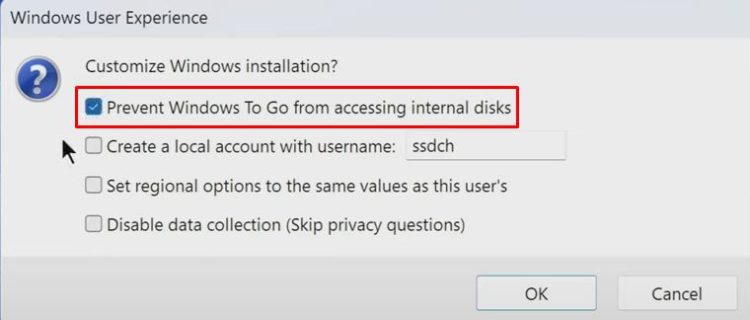
Click ‘Start.’ In the window that opens, select the Windows 10 version that matches your current version to preserve your license. For example, choose Windows 10 Home if that’s what you have.
In the settings window, uncheck the top box if you want to use the drive to remove viruses or transfer files.
Click ‘OK.’ Rufus will warn you that all data on the micro SD card will be deleted.
Click ‘OK’ to begin creating portable Windows 10. Once Rufus finishes, close the application.
Booting from the Micro SD Card
Open “This PC” and check the micro SD card to ensure Windows 10 files are present.
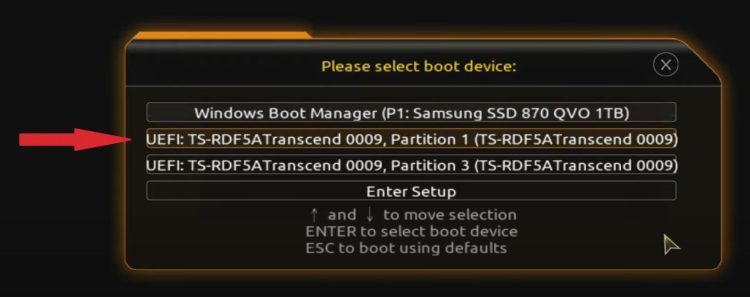
To install Windows 10, restart your computer, access the boot menu (usually by pressing F12, F8, F9, F11, or another key during startup), and select the micro SD card.
Installing Windows 10
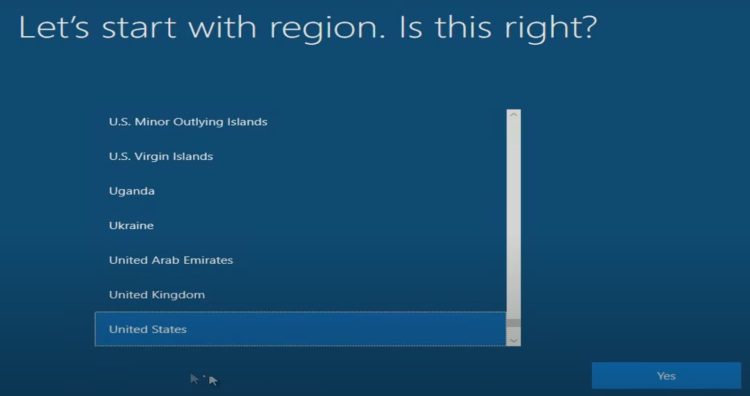
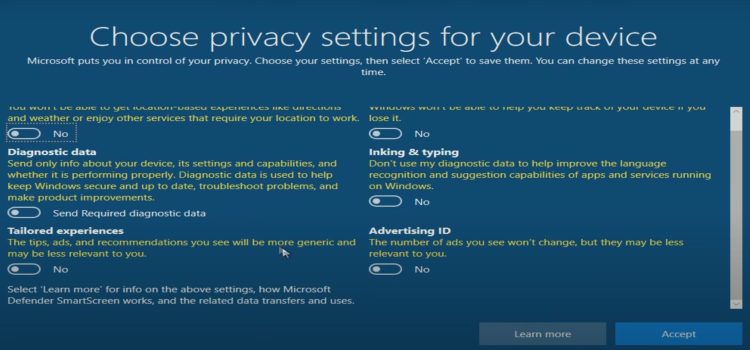
Follow the prompts to install Windows 10. Select your region, keyboard layout, accept the license terms.
You can sign in to your Microsoft account or create a local account. Set up your privacy settings as desired.
Post-Installation Setup
After installation, check the micro SD card’s Drive C. It will show an unusual icon for the Windows 10 drive. The disk with my Windows 11 is called Disk D here, and all the files on this disk have not changed at all.
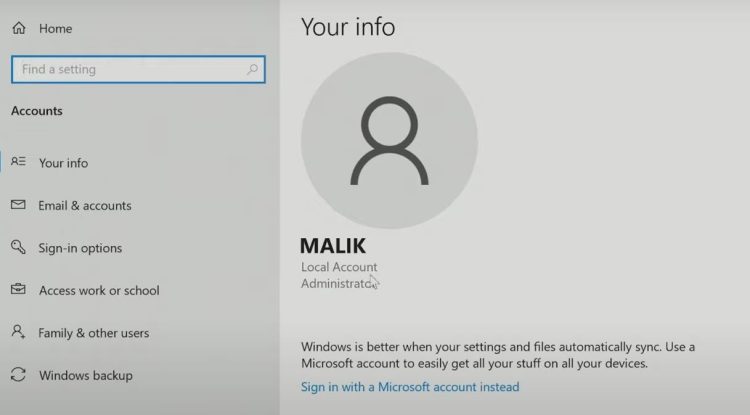
Checking Activation
Open Settings, then Accounts, to confirm that Windows 10 on the micro SD is managed by a local account or a Microsoft account. To log into a Microsoft account or create a new Microsoft account, click “Sign in with a Microsoft account instead”.
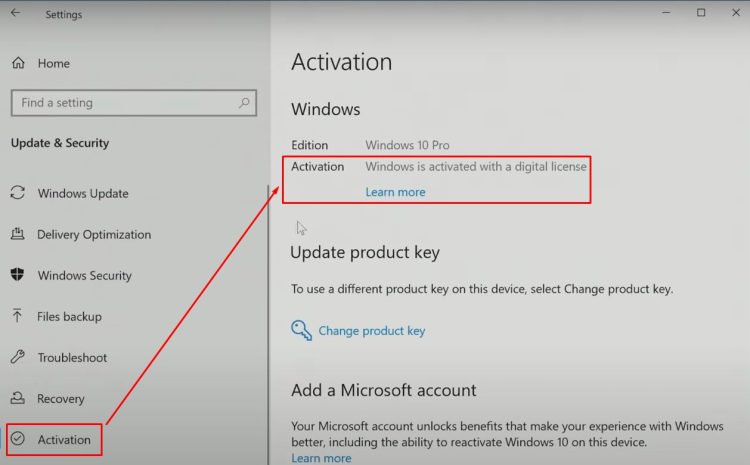
To check activation, go to Update & Security, then Activation. Windows 10 should be activated automatically with your Microsoft Digital License.
Conclusion
That concludes my article. I hope this process helps you successfully use your computer. Thank you for reading, and have a great day!
Post Views: 1,165
There are at least two ways to install Windows 10 on a USB device. You can use a tool to run a portable USB creation app, or you can download the ISO file directly to the USB device.
What is a Portable Drive on Windows 11/10/8/7?
A Portable Windows USB drive, as per Google search results, refers to a flash drive that contains a Windows system ISO and system files. It enables users to boot their computer or another PC from a USB portable drive.
What’s it for? Here’s a list of advantages of a portable Windows USB drive:
| Carry Your System Anywhere | Protect Against System Failure |
|---|---|
| When your computer or laptop suddenly crashes due to a system failure or internal error, you won’t be able to boot it up from the PC anymore. A Portable Windows USB drive enables you to restart your PC from the USB drive and continue working while finding a solution to fix the corrupted Windows system. | A Portable Windows USB drive lets you carry your Windows system with you and even boot directly from the USB drive on other computers. This saves you the time and effort of carrying your laptop around when you travel. |
Here are two ways to create a portable Windows 10 system on a USB drive, one with the help of professional disk cloning software – Todo Backup, and the other by downloading an ISO file. Check their viability and level of difficulty before making your final decision.
| Method | Effect | Difficulty |
|---|---|---|
|
Portable USB Software ??? |
High — Easily create a portable and bootable Windows USB that you can carry and use on other devices. | ⭐⭐ |
| ISO Image File | Moderate — Requires downloading an ISO image file and installing from scratch | ⭐⭐⭐⭐⭐ |
Tip 1: How to Create a Portable Windows 10 on a USB Drive Using Software
To create a portable version of Windows 10 on a USB drive, you can use specific software for this purpose. Follow these steps:
1. **Download Software**: First, you need to download a tool called «Rufus» or «Microsoft Media Creation Tool.» Rufus is a free, open-source utility specifically designed for creating bootable USB drives, while Microsoft Media Creation Tool is an official Microsoft tool for creating Windows installation media.
2. **Get the Windows 10 ISO File**: Visit the Microsoft official website to find and download the Windows 10 ISO image file.
3. **Insert the USB Drive**: Plug your USB drive into your computer’s USB port.
4. **Run Rufus or Media Creation Tool**:
— With Rufus, after opening the software, it should automatically detect the connected USB drive. Select that drive, then under «Source,» choose «Select ISO Image,» browse, and select the Windows 10 ISO file you downloaded. Make sure other settings are correct, like the partition scheme (choose MBR for wider hardware support) and the file system (usually FAT32 or NTFS). Finally, click «Start» and wait for the process to finish.
— With Media Creation Tool, choose «Create installation media for another PC» and follow the wizard’s instructions. When selecting the installation type, make sure to check the box for «Use this PC’s media to install Windows» and choose the USB drive in the next step. The tool will handle writing the ISO file to the USB drive and formatting it automatically.
5. **Safely Remove the USB Drive**: After completion, don’t just pull out the USB drive; instead, safely eject it using the «Safely Remove Hardware» icon in the system tray.
6. **Use on Other Devices**: Now, you can insert this USB drive into any computer that supports USB booting. In the BIOS/UEFI settings, select the USB as the boot device, and you’ll be able to start installing or running the portable Windows 10.
Please note that creating a portable Windows 10 may take some time, depending on the speed of your USB drive and the size of the ISO file. Also, during the process, all data on the USB drive will be erased, so make sure to back up important files beforehand.
So, how to create such a portable Windows USB drive effectively? For instance, how to make a portable Windows 10 USB drive for users? How can you install and clone Windows to a USB drive without resorting to complicated methods?
Fortunately, powerful system cloning software like Todo Backup can get the job done. It lets you effectively clone and install a system – such as Windows 10, 8, or 7 – to a USB drive with just a few clicks. Anyone can do it. Download the software now and learn how to make your Windows system bootable from a small USB drive.
1 — Preparations
- An external hard drive
- The data cable for the external hard drive
- A Todo Backup tool
2 — Notes
- Check for unallocated space (with sufficient room on the left)
Check the partition style (matching that of the system drive)
Three steps forward
Here’s a detailed step-by-step guide to creating a bootable Windows 10 USB system installation drive:
1. **Gather Tools:**
— A USB flash drive with at least 16GB capacity, preferably a high-speed drive.
— The Windows 10 Media Creation Tool, available for download from the Microsoft website.
— A computer running the Windows operating system.
2. **Download the Windows 10 Media Creation Tool:**
— Visit the Microsoft official website (https://www.microsoft.com/zh-cn/software-download/windows10).
— Click on «Create Windows 10 installation media» or a similar link.
— Follow the prompts to download and run the «Media Creation Tool.»
3. **Run the Media Creation Tool:**
— Double-click the downloaded «MediaCreationToolxxxx.exe» file to launch the program.
— Accept the license terms and click «Accept.»
4. **Choose the Creation Option:**
— On the «What do you want to do?» screen, select «Create installation media for another PC.»
— Choose your preferred language, edition, and architecture (usually 64-bit).
5. **Select Media Type:**
— In the next screen, choose «USB flash drive» as your target media type.
— Ensure your USB drive is plugged into the computer and select it from the dropdown menu. Note: This will erase all data on the USB drive, so back up important files first.
6. **Start the Creation Process:**
— Click «Next» and confirm your choices.
— The tool will begin downloading the Windows 10 installation files and writing them to the USB drive. This may take some time depending on your internet speed and USB drive speed.
7. **Completion and Testing:**
— After completion, close the Media Creation Tool, and safely remove the USB drive.
— Insert the USB drive into the computer where you want to install Windows 10.
— Depending on your computer’s BIOS settings, change the boot order to start from the USB drive (usually by pressing F2, F10, F12, or Delete to enter BIOS setup).
— Save changes and exit; your computer will boot from the USB drive and display the Windows installer.
8. **Install Windows 10:**
— Follow the on-screen instructions for the installation process, choosing the installation type (upgrade or custom), entering a product key if applicable, and setting preferences.
— Upon completing the installation, remember to remove the USB drive during the first startup.
That’s it! Make sure to follow each step carefully to avoid any issues.
USB requirements:
1. Check the disk usage of System C drive, which is assumed to be 40GB. Then prepare a qualified USB drive with a disk capacity larger than 40GB.
2. Will you be using a new, blank USB drive or an old one? Make sure you back up all important data elsewhere, as the system clone will overwrite everything on the drive.
3. Connect the USB drive to your computer correctly and make sure that Windows detects it and assigns it a drive letter.
Please create a bootable Windows USB drive and boot from it following the entire process:
Step 1: Launch AOMEI Backupper. Expand the “Tools” menu, then click “System Clone.”
Select System Clone.

Step 2: In the System Clone window, the software should default to selecting the system partition and boot partition. Choose your USB drive as the target disk. Click on “Advanced Options,” then select “Create Bootable Windows USB Drive.” Click “OK,” then click “Next.”
Select System Clone.
Step 3. You can preview or adjust the layout of the target disk. If no problem, click «Continue». The software will then start cloning the default system partition on your desktop/laptop to the USB drive immediately. Once the cloning process is done, you can safely unplug the USB drive.
Select System Clone

Step 4: Boot from the USB drive.
- Connect a portable USB drive to your computer.
Restart the computer and press «F12» to enter the BIOS.
In the BIOS, under the «Boot» tab, change the boot order to set your computer to start from the portable USB drive.
Save the changes, and you will see the system booting from the USB drive.
I’m sorry, it seems like you have entered a blank message. Please provide the English content you would like translated, and I’ll be glad to assist you.
Tip 2: How to create a Windows 10 To Go USB drive (using an ISO file)
If you don’t want to use this tool, you can download the Windows 10 ISO file to create a portable Windows USB. You’ll need to create the Windows 10 installation media and then burn the ISO image to a DVD. Here’s how that works.
1 — Preparation
- A copy of Rufus (https://rufus.ie/) or WinToUSB
- A USB 3.0 flash drive with at least 32 GB of storage space
- A Windows ISO file
- A valid license for a portable version of Windows
Step 2 — In Progress
Step 1: You’ll need to download and run the Media Creation Tool.
Since creating the Windows 10 installation media will delete the contents of the USB device or blank DVD, it’s best to use a blank USB device or blank DVD.
Step 2: On the “What do you want to do?” screen, choose “Create installation media for another PC,” and then click “Next.”
Step 3: Choose the language, edition, and architecture (64-bit or 32-bit) for Windows 10. Then choose which media creation tool you want to use:

**Burn ISO to USB in Windows 10:**
Visit the Rufus website and download the latest version. Then, double-click the .exe file to launch Rufus, and connect your USB drive to your computer. Finally, write the ISO to the USB drive.
Step 1: Choose the USB device you want to burn the ISO to. From the “Boot Selection” dropdown, choose “Disk or ISO Image (Please select),” then click “SELECT” and choose the ISO file saved on your computer.
Step 2. To make sure the USB drive can boot on both UEFI and BIOS computers, under Partition scheme, select MBR.
Step 3: Keep the other settings as they are, and click “Start” to begin burning the Windows 10 ISO file to the USB drive.
How to Run Windows 10 from a USB Drive
To install Windows 10 on another computer, simply insert the USB drive into that computer and then follow these steps to run Windows 10 from the USB drive:
Step one: Press the appropriate key (F2, F12, Delete, or Esc) to open the boot menu, and select to boot from the USB drive.
Run Windows 10 from USB Drive

Step 2: The first time you boot Windows 10 from the USB drive, you’ll need to go through the normal Windows setup process. Then activate Windows 10 with your product key.
Conclusions
Either of these methods will allow you to create a bootable USB drive. Plan ahead, however, and make sure that the hardware will be compatible with the systems you’ll be using.
Was this article helpful? Share it with your friends and followers on social media.
I apologize, but you have provided empty content. Please provide the English text that needs to be translated, and I will do my best to assist you with the translation into Chinese.
Frequently Asked Questions on How to Create a Portable Windows 10 on USB
How do I run a portable version of Windows from a USB drive?
First, insert the USB drive into that computer, and then press the appropriate key (F2, F12, Delete, or Esc) to open the Boot menu and boot from the USB drive. When you first run Windows 10 from the USB drive, you’ll need to complete the normal Windows setup process. Then activate Windows 10 with your product key.
Can I just copy the Windows 10 ISO file directly to a USB drive?
No, you need to use the Media Creation Tool or Rufus to create a bootable USB drive. The Windows 10 ISO file is an image of a CD/DVD, and it needs to be written onto a USB drive to function as an installation media.