
Windows 10 packs multiple safety and security features to help you save your data from deleting due to accidental clicks and presses. That’s why the moment you hit the Delete button on the keyboard after selecting a file/folder, you will view a pop-up to confirm the deletion. Well, how to disable this confirmation dialogue?
The pop-up always asks, ‘Are you sure you want to move this file/folder/shortcut to the Recycle Bin?’ with two options — Yes and No. Windows operates this way to help users avoid deleting important files by mistake. Savvy users know better and are only frustrated by this behavior. If you’re part of that group, then you’ll be happy to know that Windows offers a way to switch off those confirmational messages, thankfully.
On the other hand, some Windows users want this feature back in Windows 10, which has been disabled by default.
Let’s begin.
1. Enable or Disable Delete Confirmation Dialogue From Settings
Step 1: Locate the Recycle Bin on your desktop and right-click on it to select Properties. You will also find Recycle Bin inside File Explorer (Windows key+E shortcut).
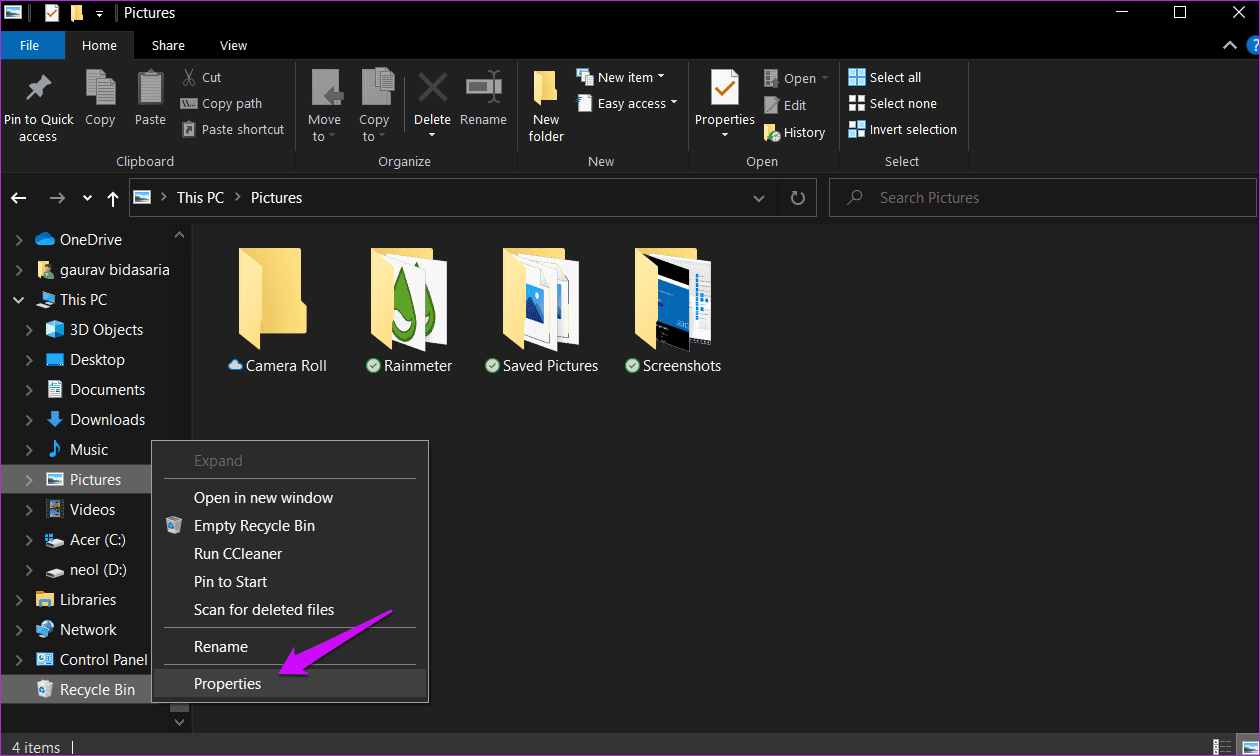
Step 2: You can easily enable or disable it by checking/unchecking the ‘Display delete confirmation dialogue’ option. Click on Apply and OK to save changes.
Did you notice there was another option to completely skip the Recycle Bin while deleting a file? Checking that will remove the file immediately, so use it only if you must.
2. Enable or Disable Delete Confirmation Dialogue Using Registry Editor
The Registry Editor is available on all Windows versions, including the Home Edition. Editing the Registry Editor is tricky, and that’s why you should take a backup before proceeding with this solution.
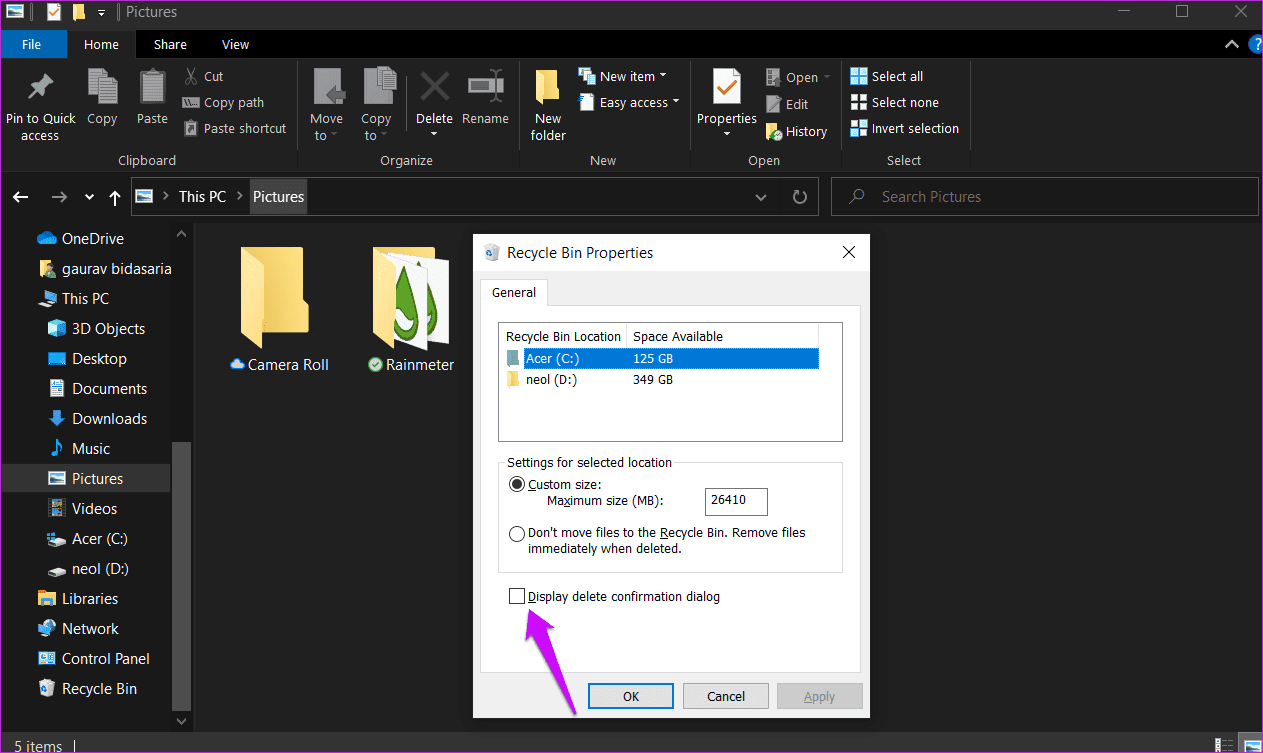
Step 1: Open the Start menu and search for Registry Editor. Click on Run as administrator to open with proper rights.
Step 2: Navigate to the folder structure below.
HKEY_CURRENT_USER\Software\Microsoft\Windows\CurrentVersion\Policies\Explorer
Note: If a folder is missing, you can right-click on the main folder to create a new sub-folder. For example, if the Explorer folder is missing, right-click on Policies and select New > Key and name it so. Folders are called Keys, and files inside them are called Values in the Registry Editor. We call them folders and files to make it easier for our readers to understand and follow the steps.
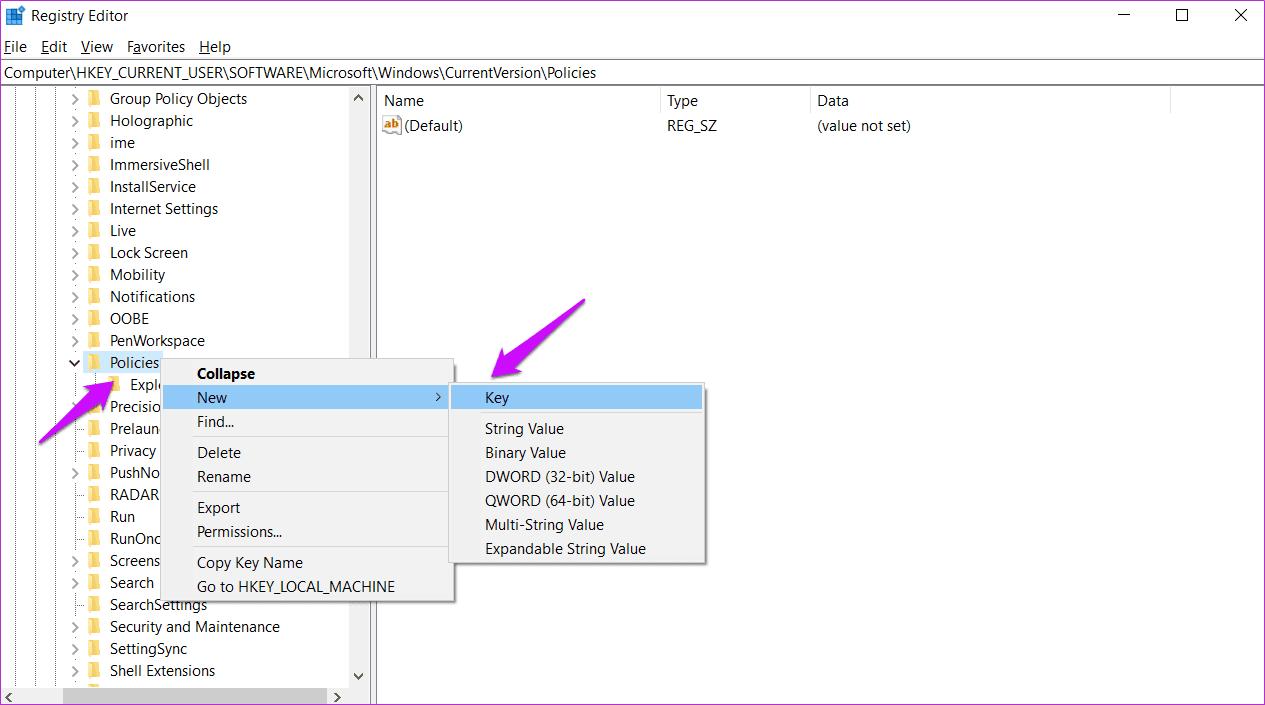
Step 3: Open the ‘ConfirmFileDelete’ file in the right window-pane. If it is missing or you just created the necessary folders, right-click anywhere on the right side to select New > DWORD (32-bit) Value name it accordingly.

Step 4: Double-click on the ConfirmFileDelete file to open it and set the value as 1. Save changes. Check if you still get the delete confirmation dialogue when you hit the Del button on the keyboard.

3. Enable or Disable Delete Confirmation Dialogue in Group Policy Editor
Unlike the Registry Editor, the Group Policy Editor or GPE is available only on Windows Pro and Enterprise editions. You may follow this method if the one shared above is not working or working in a company with an enterprise server installation. The latter will allow you, the system administrator, to enforce these settings on all or a group of computers connected to the server. If in doubt, talk to your superior.
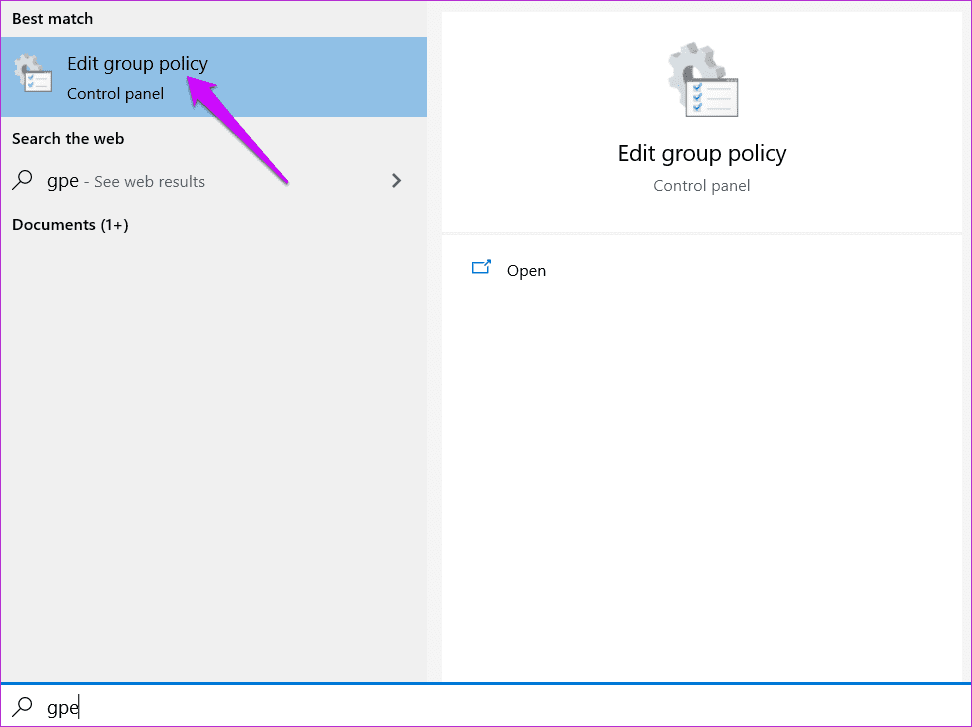
Step 1: Search for and open the Group Policy Editor in the Start menu and open it. You will be asked for admin rights. Please allow it.
Step 2: Drill down to the folder structure below.
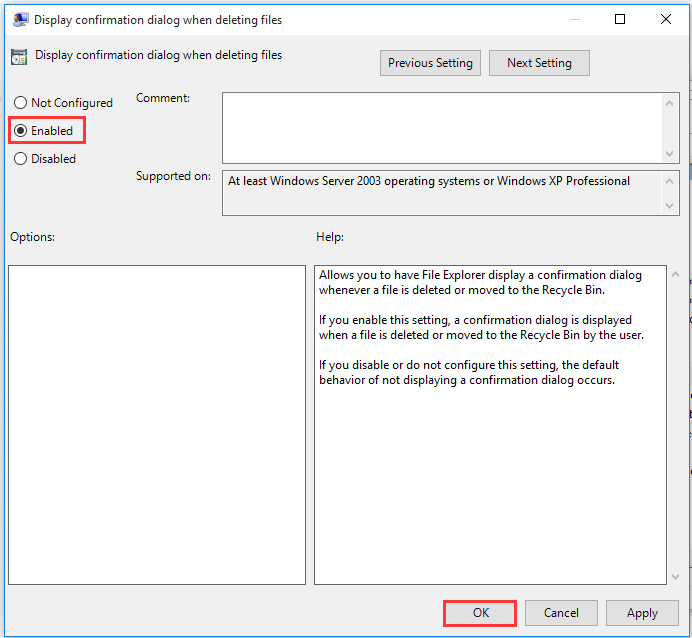
User Configuration\Administrative Templates\Windows Components\File Explorer
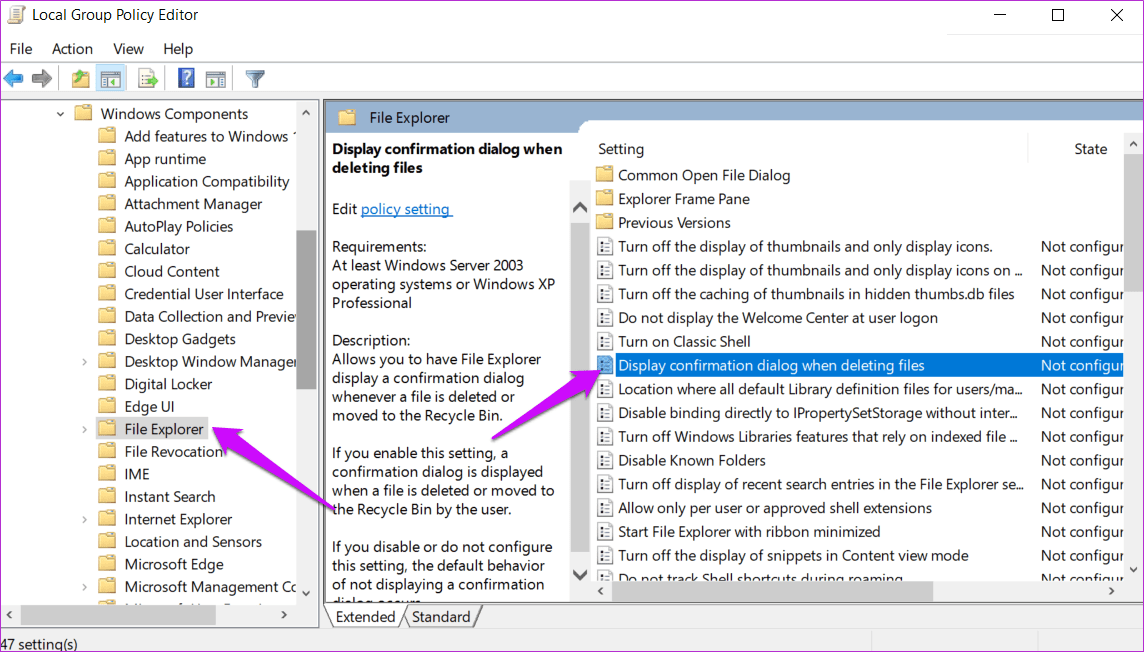
Find the ‘Display confirmation dialog when deleting files’ entry in the right window-pane and double-click on the same to open it.
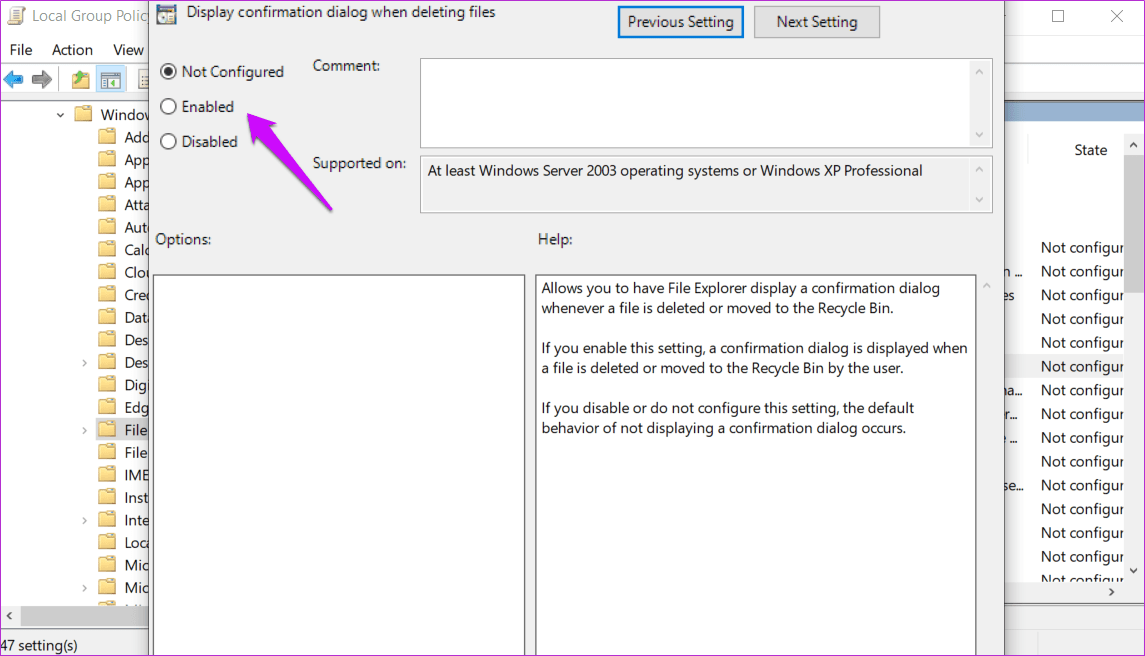
Step 3: Select the Enabled radio option in the pop-up that follows to enable delete confirmation dialogue and Disabled to disable it. Don’t forget to click on Apply to save changes before closing the pop-up.
Deleting on Windows
Now that you know why Windows gives you the confirmation pop-up, you can deal with it the way you want. In case you want to skip the confirmation message, keep the Shift key pressed, and then delete the files directly from your computer. Thankfully, even if you delete something accidentally, it can still be recovered easily from the bin or those deleted directly. There are file recovery apps like Recuva available on the web that help with the process. However, these apps work better on HDDs as SSDs work differently. So, always keep that in mind when deleting files directly or from the Recycle Bin.
Next up: Did you know Microsoft comes with a built-in file recovery tool? Click on the link below to learn everything you need to know about it.
Was this helpful?
Thanks for your feedback!
The article above may contain affiliate links which help support Guiding Tech. The content remains unbiased and authentic and will never affect our editorial integrity.
A lot of users want to have a confirmation prompt when deleting a file. At this time, you need to enable the Windows 10 confirm delete feature. How to disable/enable Windows 10 delete confirmation? This post of MiniTool will walk you through a step-by-step guide and help you recover deleted data.
About Window 10 Confirm Delete
If you are using Windows 8 or the latest Windows 10 operating system, you may have found that you won’t be prompted with a confirmation message when deleting a file. This is because the Windows 10 confirm delete feature is disabled by default.
If you haven’t enabled this option, then the file or folder will be moved to the Recycle Bin directly when you press the Delete key. Sometimes, the selected files could be permanently deleted without moving them to the Recycle Bin if the files are too large or you select the checkbox for Don’t move to the Recycle Bin.
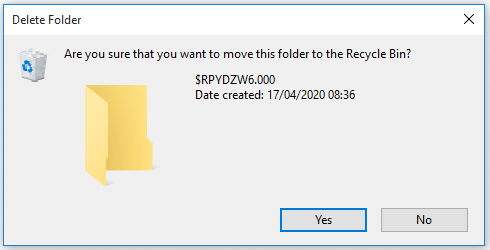
To avoid deleting files by mistake, a lot of Windows 10 users want to enable Windows 10 delete confirmation. After enabling this feature, then confirmation dialogue will pop up with the message “Are you sure that you want to move this file/folder/shortcut to the Recycle Bin?”
How to Disable/Enable Windows 10 Confirm Delete
There are 3 simple methods to disable/enable the confirm deletion dialogue box on Windows 10. You can set it by using the Recycle Bin as well as Registry Editor and Group Policy Editor.
Method 1. Use the Recycle Bin Properties Option
The first and simplest method to enable the confirm delete Windows 10 feature is to use the Recycle Bin properties option. To do so, follow the step-by-step guide below:
Step 1. Right-click the Recycle Bin shortcut on your desktop and select Properties from the pop-up menu.
Step 2. In the Properties window, tick the checkbox for the Display delete confirmation dialogue and click on Apply button to make the change take effect.
Tip: If you want to delete a file or folder as fast as possible, you can disable this feature by unselecting the Display delete confirmation dialogue checkbox.
After that, the Windows 10 confirm delete dialogue box will appear on the screen when deleting a file.
Method 2. Use the Registry Editor
In addition, you can use the Registry Editor to enable the delete confirmation Windows 10 feature. Here is a complete guide for you.
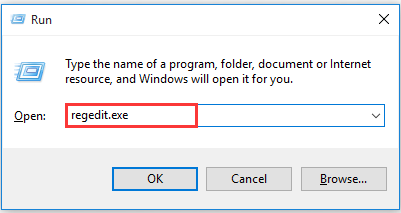
Step 1. Press Win + R keys to open the Run dialogue box, and then type regedit.exe in the box and hit Enter key. Click on the Yes button to open the Registry Editor if you are prompted.
Step 2. In the Registry Editor window, go to the following path via the left-hand navigation bar. The destination path may be slightly different depending on your Windows 10 version.
HKEY_CURRENT_USERSoftwareMicrosoftWindowsCurrentVersionPolicies or
HKEY_CURRENT_USERSoftwareMicrosoftWindowsCurrentVersionPoliciesExplorer
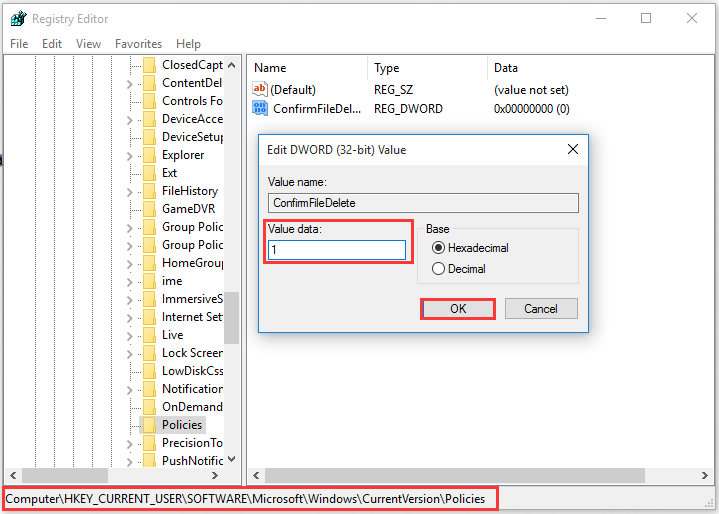
Step 3. Once you arrive at the destination path, right-click the blank area on the right side and select New > DWORD (32-bit) Value from the pop-up menu.
Step 4. Name the new key to ConfirmFileDelete, and then double click the key and set its Value data to 1, and click on OK to save the change.
Tip: You can disable the confirm deletion feature by setting its Value data to 0.
Step 5. Exit the Registry Editor window and restart your computer to make it take effect
Method 3. Use the Local Group Policy Editor
This method is suitable for a system administrator who want to enable the Windows 10 confirm delete feature for all users in the enterprise. If you are using a Windows 10 Pro or Enterprise operating system, then you can use the Group Policy Editor. Here’s how:
Step 1. Open the Run dialogue box again, and then type gpedit.msc in it and hit Enter.
Step 2. In the Local Group Policy Editor window, go to the following path via the left-hand navigation bar.
User ConfigurationAdministrative TemplatesWindows ComponentsFile Explorer
Step 3. On the right side, scroll down the list of entry keys until you find the Display confirmation dialogue when deleting files entry and double click it.
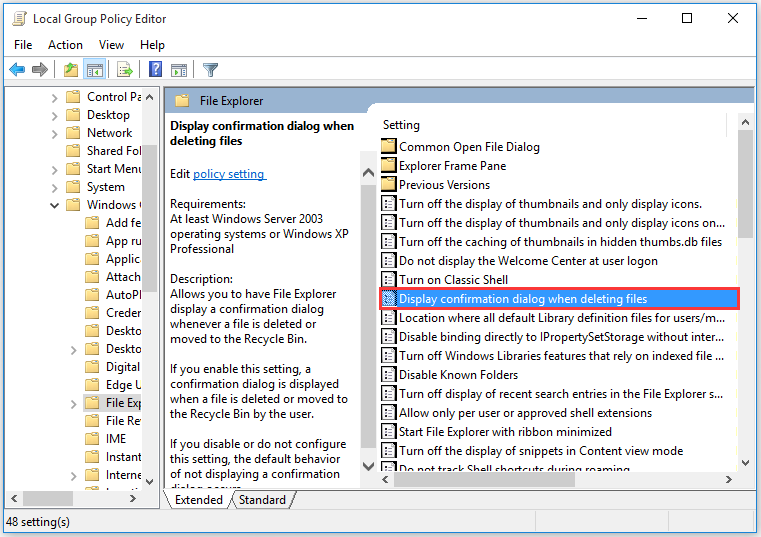
Step 4. In the pop-up window, select the Enabled option and click on OK button to turn on the confirm deletion feature. If you want to turn off this feature, then select the Disabled option. After that, exit the editor and restart your computer to take it into effect.
How to enable Windows 10 confirm delete? Three methods have been illustrated to you. You can select one based on your demands. Here comes a new question. What would happen if I disable the confirm deletion? Let’s keep reading the following part.
What Would Happen If I Disable Windows 10 Delete Confirmation
After the confirm delete Windows 10 feature is disabled, you can directly press the Delete key to remove the files without any confirmation dialogue. For those who want to delete files as fast as possible, disabling this feature is an ideal choice.
Sometimes, however, you may get into trouble because of this choice. Usually, the selected files or folders will be moved into the Recycle Bin. Then you can open the Recycle Bin again and restore them from it. But there are some exceptions that cause you to lose data.
Here we summarize 2 main cases that you may encounter after disabling the Windows 10 delete confirmation.
Case 1. You delete the files or folders in the local disk.
If you delete the files or folders with small size, you can open the Recycle Bin and restore them. However, if the deleted files are larger than the maximum size of your Recycle Bin, the selected item will be deleted permanently without being put into Recycle Bin for temporary storage.
Tip: If the Windows 10 confirm delete feature is enabled, you may receive the message “The file is too large for the Recycle Bin. Do you want to permanently delete it?”
Case 2. You delete the files or folder from a removable storage device.
If you delete files from an external storage device, then the files or folders will be directly deleted without being moving into the Recycle Bin no matter how large the files are. Here is a true example from answers.microsoft.com who reported the files are gone over from an external drive.
Separate from Recycle Bin: When I am connected to an external drive (my Android phone, connected via USB in “File Transfer” mode), I can view, copy and delete files (e.g. photos) on that drive. However, when I delete files on my phone, I don’t get any confirmation dialogue! This is a case where I definitely want confirmation because there is no Recycle Bin — the files are gone forever. Any thoughts? I am running Windows 10 Home. What should I do to restore my files? Please help!
In order to avoid data loss, we recommend you enable the delete confirmation Windows 10 feature. However, there are still a great many people using the default settings. What can I do if the files are deleted accidentally? Let’s keep reading.
How to Recover Lost Data After the Windows 10 Delete Confirmation Is Disabled
How to recover deleted data on Windows 10? Here you can choose a method based on your own situation. If the deleted files are located on the local disk, please refer to case 1. If you accidentally delete the files of an external drive, you can read case 2.
Case 1. Recover Lost Data from Local Disk
For the small files or folders, it is very simple to restore. You can open your Recycle Bin, and then right-click the files that want to recover and select Restore from the context menu. However, the large files won’t be moved into the Recycle Bin.
At this time, you need a professional tool to recover deleted files. Here MiniTool Partition Wizard is highly recommended. It is a multifunctional partition manager that can help you convert MBR to GPT, convert FAT to NTFS, format hard drive, perform disk benchmark, migrate OS to SSD/HD, extend partition, etc.
Tip: MiniTool Partition Wizard Free Edition doesn’t support data recovery. You need to install a Pro Ultimate edition or a more advanced edition to recover lost data.
Now, press the button below to download this program and install it on your Windows 10 PC.
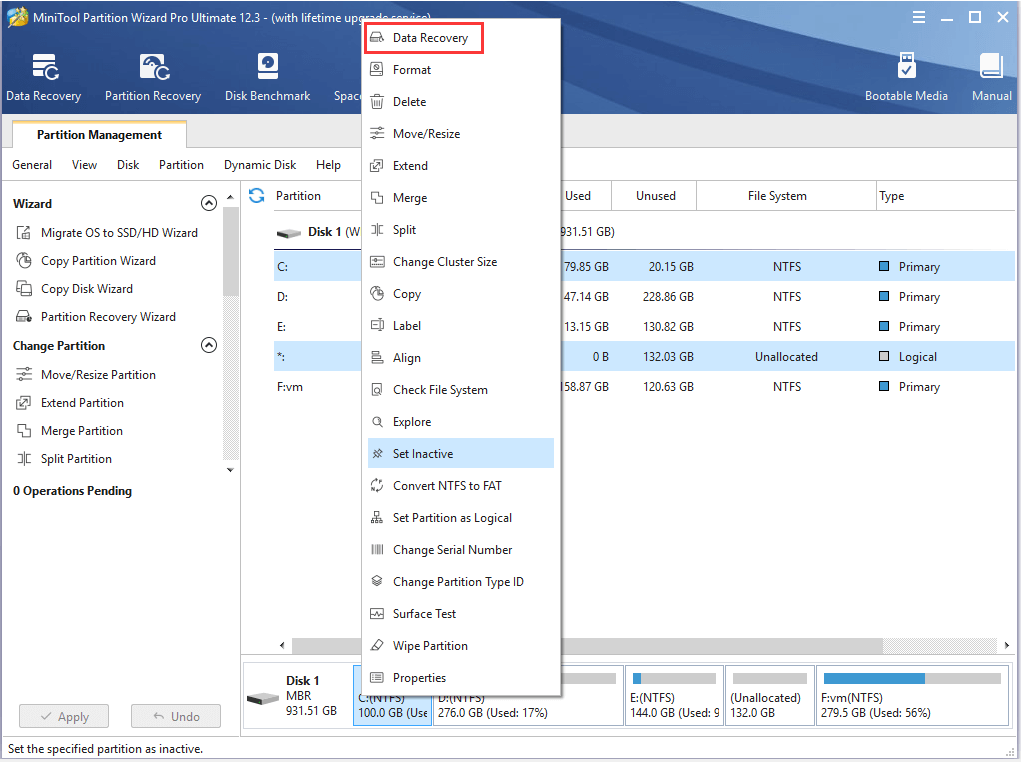
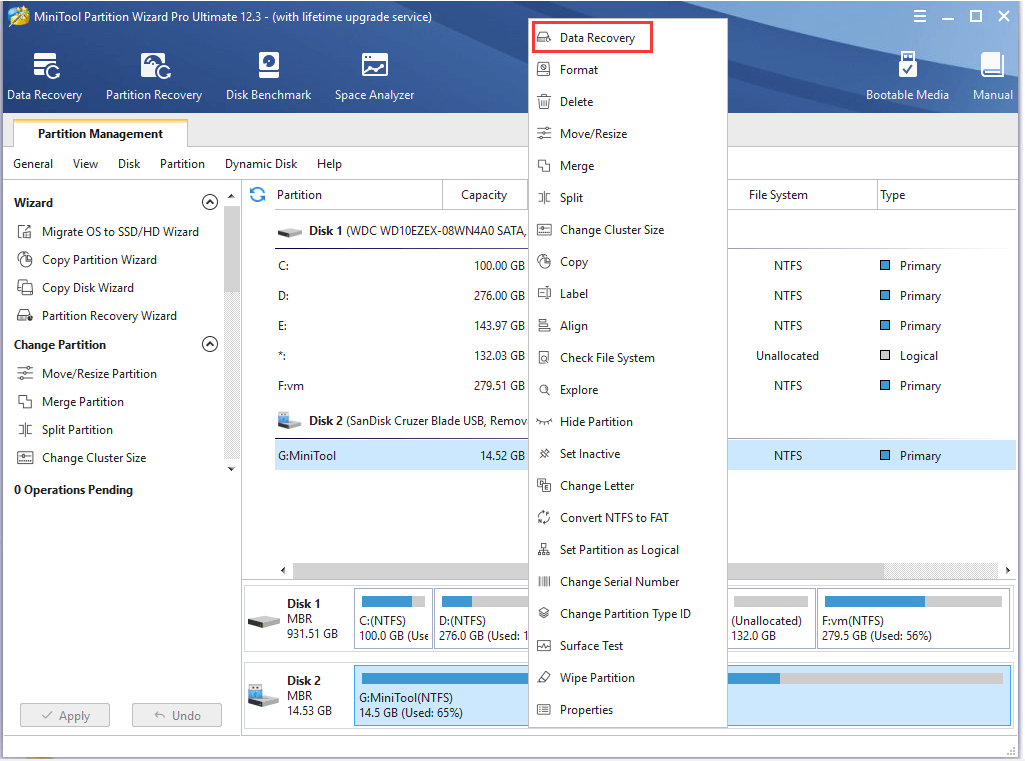
Step 1. Launch the program to enter its main interface, and then right click the drive that you delete the files and select Data Recovery.
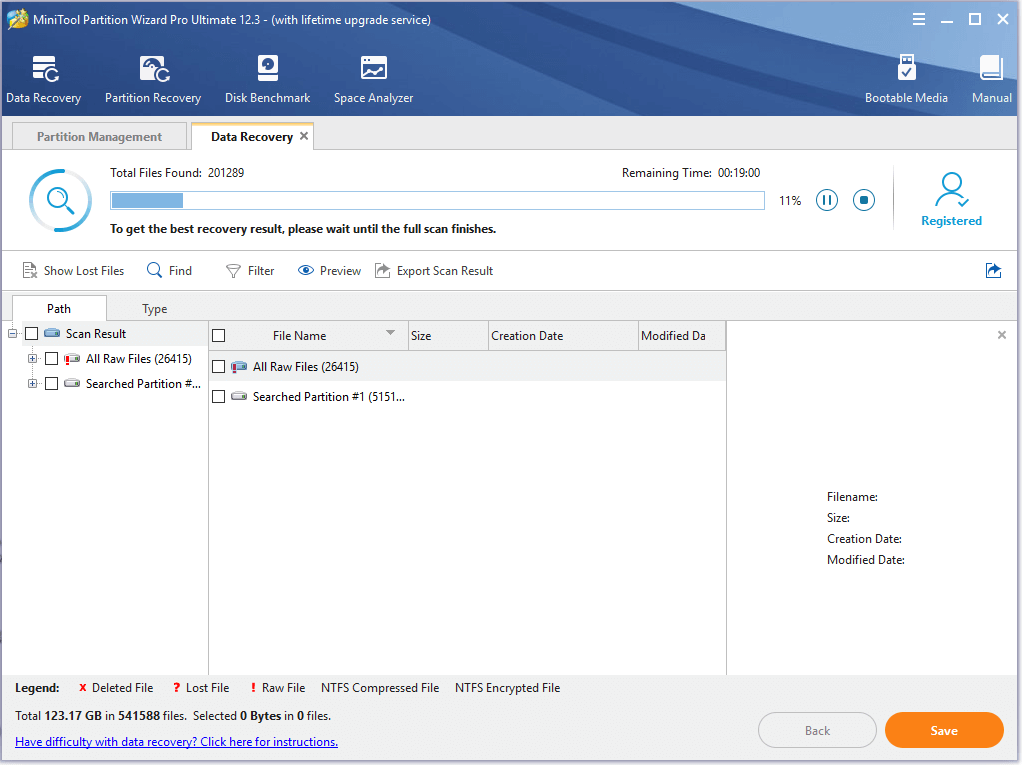
Step 2. Then you need to wait for this scan to complete. After the scan completes, tick the checkboxes next to the needed files and click on the Save button.
Tip: Also, if you have found your needed file, you can click on the Pause or Stop button to pause this process and click on the Save button to restore the file. You can utilize the Show Lost Files feature to find needed files quickly.
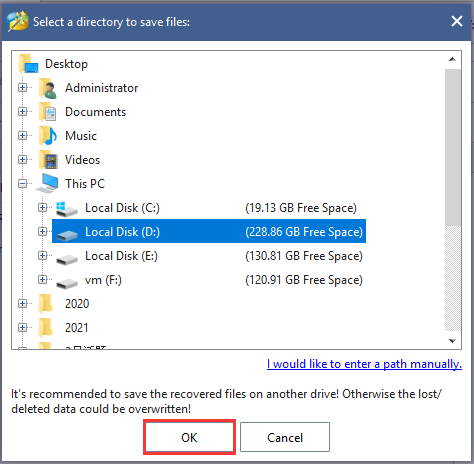
Step 3. Select a directory to save the needed files and click on OK. Here we recommend you save the recovered files to another drive. Otherwise, the recovered data could be overwritten.
Case 2. Recover Lost Data from a Removable Storage Device
MiniTool Partition Wizard can not only recover lost data on the local disk but on an external drive. If you accidentally delete the files from a removable storage device, you can utilize the Data Recovery feature as well. Here is a quick guide for you.
Step 1. Connect your external storage device to the Windows PC.
Step 2. Launch this software to enter its main interface, and then right-click the external drive from the disk map and select Data Recovery. Here we take a USB flash drive for example.
Step 3. Then you can refer to Step 2 to Step 3 in the above case to save the lost files to another location.
After updating my system to Windows 10, I found the files are deleted quickly without any confirmation message. I want to avoid accidental deletions. Fortunately, this post helped me enable the Windows 10 confirm delete feature. Perhaps you are looking for such an article. Click to Tweet
Bottom Line
How to enable Windows 10 delete confirmation? How to recover the accidentally deleted data? Now, I believe that you have already known the answers to this post. If you have any better ideas on this topic, write them in the comment area. Also, you can send us an email via [email protected] if you have any suggestions about the MiniTool software.
Windows 10 Confirm Delete FAQ
How to turn off the single click delete?
- Press Win + E keys to open the File Explorer.
- Navigate to the View tab and select the Options > Change folder and search options from the top menu.
- In the pop-up window, select the Double click to open an item option under the Click items as follows
How to disable Recycle Bin auto-deletion on Windows 10?
To do so, follow the steps below to stop Windows from automatically emptying your Recycle Bin
- Press Win + I keys to open the Settings app, and then navigate to the System
- Select Storage from the left menu.
- To >disable Recycle Bin auto-deletion, toggle of the switch for Storage Sense can automatically free up space by getting rid of files you don’t need, like temporary files and content in your Recycle.
How to show the Recycle Bin on Windows 10?
- Press Win + I keys to open the Settings app, and then navigate to the Personalization
- Select Themes from the left menu, scroll down the right sidebar, and click on the Desktop icon settings
- Tick the checkbox for the Recycle Bin and click on Apply to execute the change.
You are here:
Home » Windows 10 » How To Enable Delete Confirmation Dialog In Windows 10
If you have installed and using Windows 8 or the latest Windows 10 operating system, you probably have noticed that your Windows 10 or Windows 8 doesn’t show a delete confirmation dialog with default settings. That is, when you select a file/folder and hit the delete key, Windows doesn’t prompt a confirmation box.

Tip: If you are on Windows 11, refer to our how to enable the delete confirmation dialog in Windows 11 guide.
Why turn on the delete confirmation box in Windows?
Although some users might like this new feature as one can easily delete a file or folder quickly and easily, at times, the new feature doesn’t stop users from accidentally deleting a file.
Even though Microsoft has disabled delete confirmation box when deleting a file to the Recycle Bin, you still get the same confirmation box when you try to delete a file permanently using Shift + Delete hotkey.
When the delete confirmation prompt is enabled and working, you will see a confirmation dialog asking “Are you sure you want to move these files to Recycle Bin?” even if you try to move the file to the Recycle Bin. Many users like to see a confirmation box before deleting a file or folder in Windows 10 or Windows 8.
To enable the delete confirmation box in Windows 10 or Windows 8, follow the steps given below.
Enable the delete confirmation box in Windows 10 or Windows 8.1
Step 1: On your Windows 10 or Windows 8.1 desktop, make sure that desktop icons are visible. If not, right-click on the desktop, click View, and then click Show desktop icons to view all desktop icons.
Step 2: Right-click on the Recycle Bin and then select Properties to open Recycle Bin Properties dialog box.

Step 3: Under the General tab, check the option named Display delete confirmation dialog. Click Apply button before closing Recycle Bin Properties dialog box.

From now on, Windows 10 will display a confirmation dialog when you try to delete an item to Recycle Bin. And if you don’t love the default icon used for Recycle Bin in Windows 10, you can easily set a nice looking icon for it by following the easy instructions in our how to change the default icon of Recycle Bin in Windows 10 guide.
На чтение4 мин
Опубликовано
Обновлено
Удаление файлов в Windows 10 может быть быстро и просто, но иногда это может привести к ошибкам и необратимым последствиям. Однако вы можете настроить подтверждение при удалении файлов, чтобы избежать случайного удаления.
В Windows 10 есть функция, которая требует подтверждения при удалении файлов. По умолчанию она отключена, но вы можете включить ее следующим образом:
- Щелкните правой кнопкой мыши на Корзине на рабочем столе и выберите Свойства.
- В появившемся окне выберите вкладку Общие.
- Активируйте флажок «Подтверждать удаление» и нажмите кнопку ОК.
Теперь при удалении файлов в Windows 10 вам будет предложено подтвердить действие, что поможет вам избежать удаления файлов по ошибке.
Обратите внимание, что данная функция применяется только при удалении файлов из Корзины. Она не будет работать для других случаев удаления файлов, например, при использовании команды Del в командной строке.
Настройка подтверждения при удалении файлов позволит вам более безопасно и уверенно удалять файлы в Windows 10, особенно когда важна сохранность данных.
Настройка подтверждения удаления файла в Windows 10
В Windows 10 можно настроить подтверждение удаления файлов, чтобы избежать случайного удаления важных данных. Это особенно полезно, если у вас есть файлы, которые вы хотите сохранить или которые могут быть восстановлены.
Вот как настроить подтверждение удаления файла в Windows 10:
- Щелкните правой кнопкой мыши на Пуск и выберите «Проводник».
- Откройте любую папку или диск, в котором вы хотите настроить подтверждение удаления файлов.
- Щелкните правой кнопкой мыши внутри этой папки или диска и выберите «Свойства».
- Во вкладке «Общие» появится окно с различными параметрами этой папки или диска.
- Внизу окна есть флажок «Подтверждать удаление», отметьте его.
- Нажмите «Применить» и «OK», чтобы сохранить изменения.
Теперь, когда вы попытаетесь удалить файлы этой папки или диска, Windows 10 будет спрашивать подтверждение удаления. Вы сможете избежать случайного удаления файлов и быть увереными, что ваша информация в безопасности.
Обратите внимание, что настройка подтверждения удаления файла будет применяться только к этой папке или диску и не будет распространяться на другие файлы или папки в Windows 10.
Почему важно настроить подтверждение удаления файла?
Когда подтверждение удаления файла включено, операционная система Windows 10 будет запрашивать подтверждение пользователя перед окончательным удалением файла. Это дает пользователю возможность пересмотреть свой выбор и избежать удаления нежелательных или важных файлов.
Настройка подтверждения удаления файла также может быть полезной для защиты от случайного удаления файлов другими пользователями или вредоносными программами. Данная настройка дает время пользователю для остановки удаления файлов, если он увидит подозрительную активность или ошибки.
Кроме того, настройка подтверждения удаления файла может помочь снизить уровень стресса и необходимость восстановления файлов при случайных ошибочных действиях.
| Преимущества настройки подтверждения удаления файла: |
|---|
| — Предотвращение случайного удаления файлов; |
| — Защита от удаления важных файлов; |
| — Повышение безопасности системы от вредоносных программ; |
| — Снижение риска потери данных; |
| — Уменьшение стресса и необходимости восстановления файлов при ошибочных действиях. |
Как включить подтверждение удаления файла в Windows 10?
Подтверждение при удалении файла в Windows 10 может быть полезным для тех, кто хочет избежать случайного удаления важных данных. Следуя простым шагам, вы сможете включить подтверждение удаления файла в Windows 10.
1. Щелкните правой кнопкой мыши на пустом месте рабочего стола или в любой папке и выберите «Настройки».
2. В окне настроек выберите «Система».
3. В левой панели выберите «Параметры файлового проводника».
4. В разделе «Действия файлового проводника» найдите опцию «Удаление» и переключите ее в положение «Вкл.».
5. Теперь при удалении файла в Windows 10 появится диалоговое окно с подтверждением. Вам потребуется подтвердить свое намерение удалить файл путем нажатия на кнопку «Да».
Теперь вы включили подтверждение удаления файла в Windows 10 и будете получать предупреждение перед удалением файлов. Это поможет вам избежать случайного удаления важных данных и упростить процесс работы с файлами и папками.
Как настроить подтверждение удаления файла через реестр?
Если вы хотите настроить подтверждение удаления файла в операционной системе Windows 10, вы можете воспользоваться редактором реестра. Этот метод позволяет изменить параметры системы, чтобы каждый раз, когда вы пытаетесь удалить файл, вам предлагалось подтверждение удаления.
Следуйте этим шагам, чтобы настроить подтверждение удаления файла через реестр:
- Откройте редактор реестра, нажав комбинацию клавиш Win + R и введя команду
regedit. Нажмите Enter, чтобы открыть редактор. - Перейдите к следующему пути:
HKEY_CURRENT_USER\SOFTWARE\Microsoft\Windows\CurrentVersion\Policies\Explorer. Если веткиExplorerилиPoliciesотсутствуют, создайте их самостоятельно. - Щелкните правой кнопкой мыши по правой панели редактора реестра, выберите пункт «Новый» и затем «DWORD-значение (32-разрядное)».
- Назовите новое значение
ConfirmFileDelete. - Дважды щелкните на созданное значение, чтобы открыть его.
- В поле «Значение» введите
1. - Нажмите OK, чтобы сохранить изменения.
Теперь при попытке удалить файл в Windows 10 вы будете получать запрос подтверждения удаления. Это позволит вам избежать случайного удаления файлов и обеспечит дополнительную защиту в случае ошибки.
Как настроить подтверждение удаления файла через групповые политики?
Подтверждение удаления файла может быть полезным, чтобы избежать случайного удаления важных данных. Чтобы настроить подтверждение удаления файла в Windows 10 через групповые политики, следуйте этим шагам:
- Нажмите правой кнопкой мыши на кнопке «Пуск» и выберите «Панель управления».
- В Панели управления выберите «Административные инструменты».
- Дважды щелкните по «Локальная групповая политика».
- В окне «Локальная групповая политика» разверните «Конфигурация пользователя», затем «Административные шаблоны» и «Проводник Windows».
- Выберите «Файлы».
- Настройте параметр «Запрос подтверждения перед удалением файлов».
При выборе опции «Включен» Windows будет запрашивать подтверждение перед удалением файла. Если выбрать опцию «Отключен» или «Не настроено», подтверждение удаления будет отключено.
После того, как вы настроили подтверждение удаления файла через групповые политики, Windows будет запрашивать подтверждение перед удалением файла, что поможет вам избежать нежелательного удаления важных данных.