
В этой публикации, друзья, рассмотрим, как сделать живые плитки на рабочем столе в Windows 10 и 11. Живые плитки все мы знаем по Windows 10, это плитки в меню «Пуск», и это плитки по типу виджетов, отображающие обновляемую в реальном времени информацию – погода, число новых писем или сообщений, последние новости и т.п. Ни живые, ни обычные плитки не получили билет в Windows 11, их жизнь прекращается на Windows 10. В Windows 11 Microsoft пошла по пути упрощения элементов системного интерфейса, в меню «Пуск» новой операционной системы могут быть только статические небольшие ярлычки. Но если вам нравятся плитки, в частности, живые, вы можете их организовать хоть в Windows 11, хоть в Windows 10 прямо на рабочем столе. Сделать это можно с помощью бесплатного приложения Live Tiles Anywhere. Давайте рассмотрим его возможности.
{banner_google1}
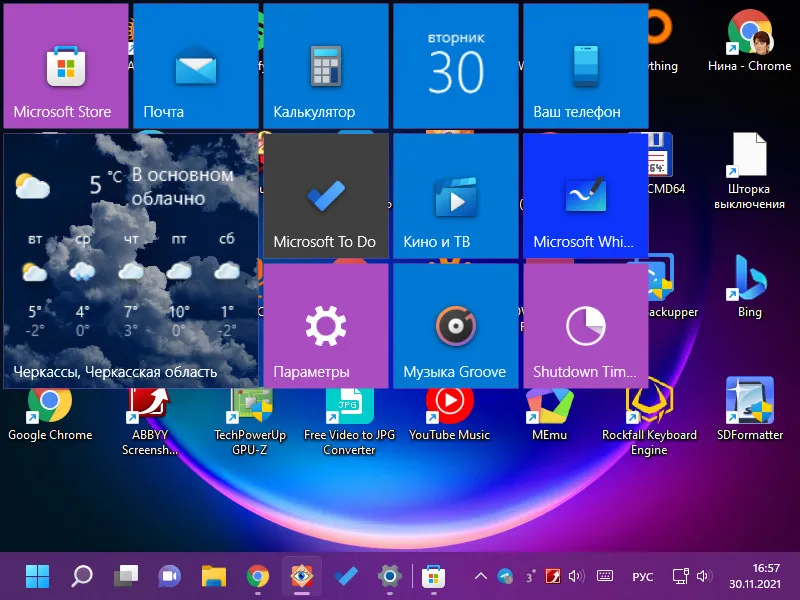
Итак, друзья, плитки формата Windows 8.1 и 10, упразднённые в Windows 11. В Windows 10 нативные плитки обитают в меню «Пуск». Но мы можем и в той же Windows 10, и в Windows 11 поселить их жить на рабочем столе. Хаос обычных ярлыков на рабочем столе на время прячем, убрав в контекстном меню отображение ярлыков.
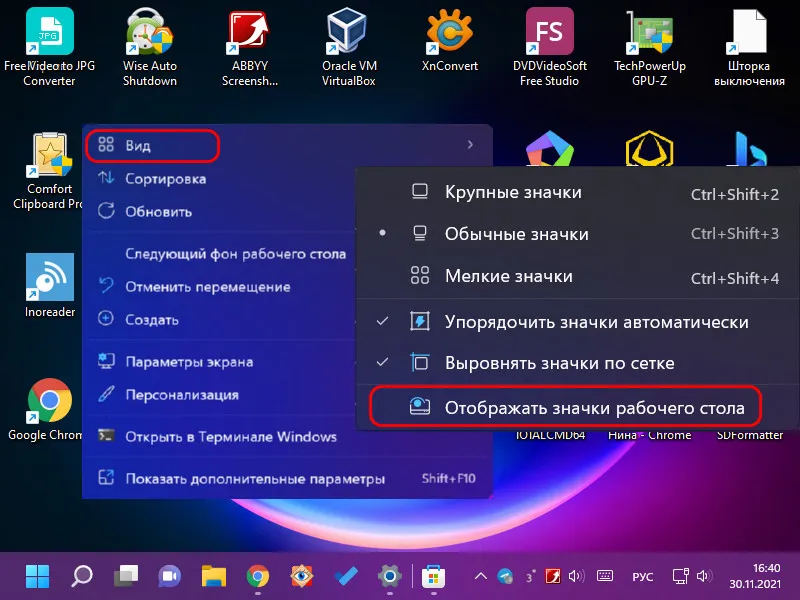
И размещаем на рабочем столе плитки – обычные и живые.
Ярлыки на столе можно и не прятать, а разместить плитки поверх ярлыков или в свободной зоне стола, если такая есть.
Идея, друзья, интересная, и только личный опыт каждого из нас покажет её состоятельность или несостоятельность в деле. Для реализации этой идеи в магазине Microsoft Store устанавливаем современное бесплатное приложение Live Tiles Anywhere.
{banner_google1}
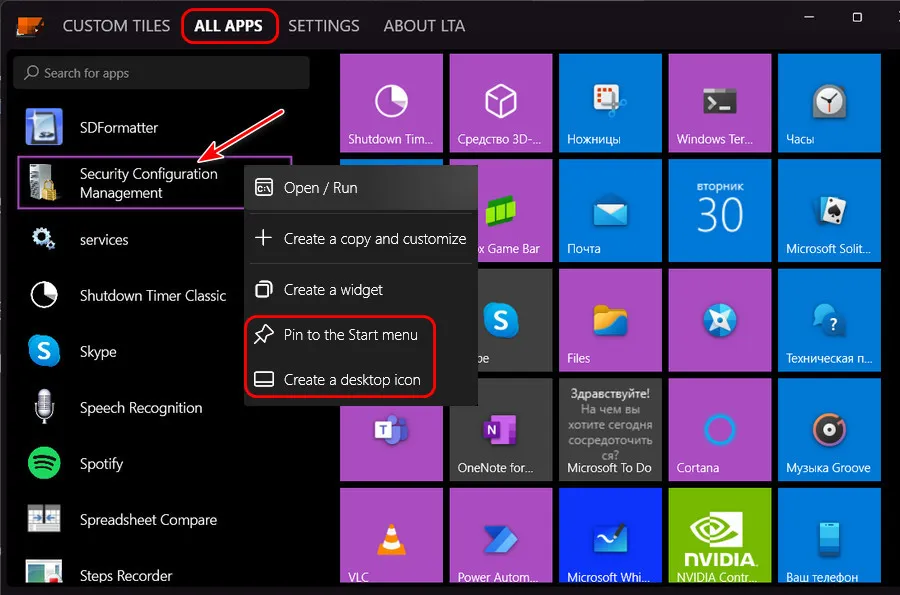
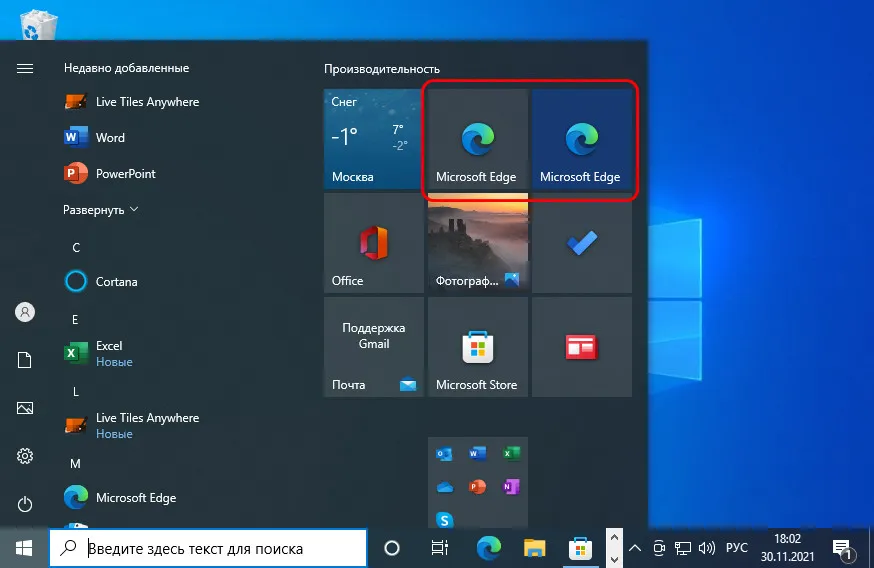
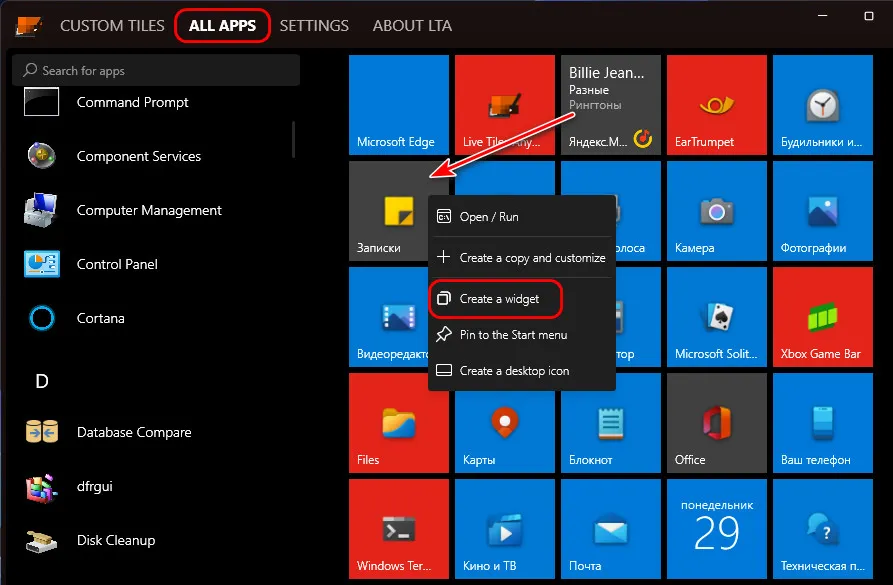
Приложение Live Tiles Anywhere изначально являет собой удобный инструмент для создания ярлыков на рабочем столе и в меню «Пуск». Ничего выдающегося, казалось бы, это просто дублирование системных возможностей. Но примечательность этой функции приложения заключается в том, что оно предлагает нам комплексное создание ярлыков для перечня всех возможных программ и приложений, имеющихся в нашей операционной системе, штатных и сторонних. В число приложений входят также веб-приложения, созданные нами средствами браузеров. Но куда важнее то, что в перечне Live Tiles Anywhere отображаются глубинные системные функции, для запуска которых необходимо лезть в дебри системных настроек, либо же запускать эти функции с помощью специальных команд через командлет «Выполнить» или командную строку. А, запустив приложение Live Tiles Anywhere, можем в разделе «All Apps» пробежаться по всем возможным системным функциям, программам и приложениям. И создать их ярлыки на рабочем столе или в меню «Пуск» Windows 10 или 11. Для этого на нужных функциях, программах и приложениях вызываем контекстное меню и выбираем:
- Pin to the Start menu – закрепить в меню «Пуск»,
- Create a desktop icon – создать ярлык на рабочем столе.
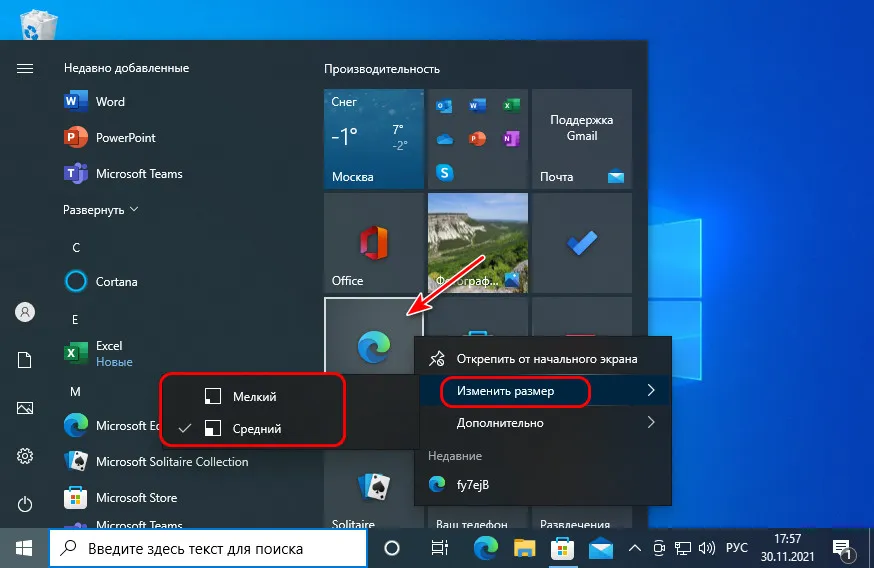
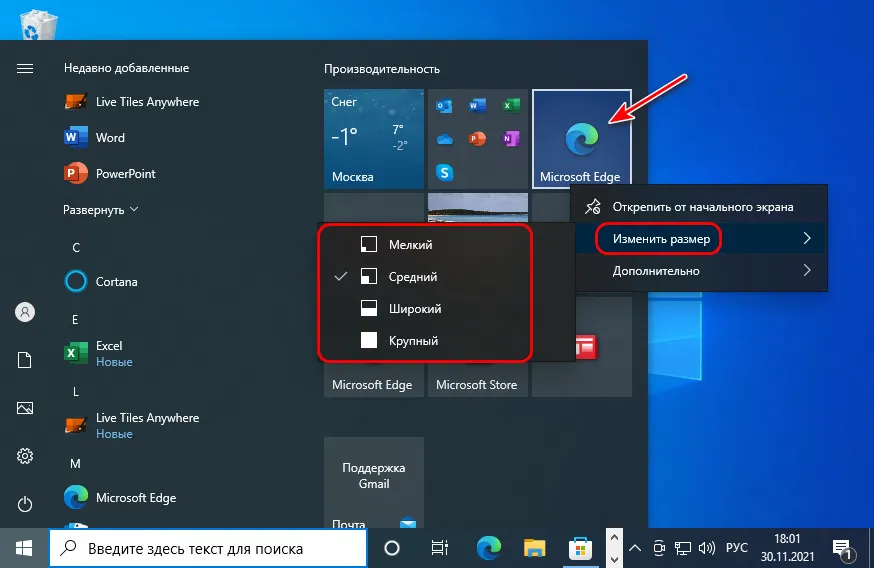
В перечне слева нам предлагаются все функции, программы и приложения. Справа отображаются только современные приложения. Есть поиск по названиям функций, программ и приложений. Что, друзья, ещё примечательно в приложении Live Tiles Anywhere, так это особенности крепления плиток в меню «Пуск» Windows 10. Нативно в «Десятке» выбор 4-х размеров плиток – мелкий, средний, широкий и крупный — доступен только для плиток современных приложений, поддерживающих живые плитки.
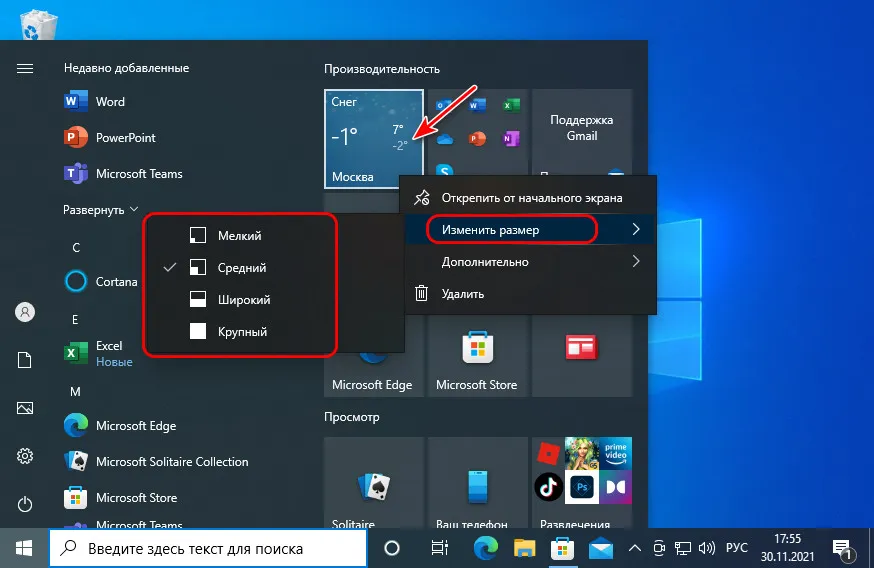
Для плиток обычных приложений и классических программ есть только 2 размера – мелкий и средний.
Так вот созданные приложением Live Tiles Anywhere плитки – не такие, как системные в Windows 10.
Они все изначально идут в формате живых плиток, для них всех можно применять любой из 4-х размеров.
{banner_google1}
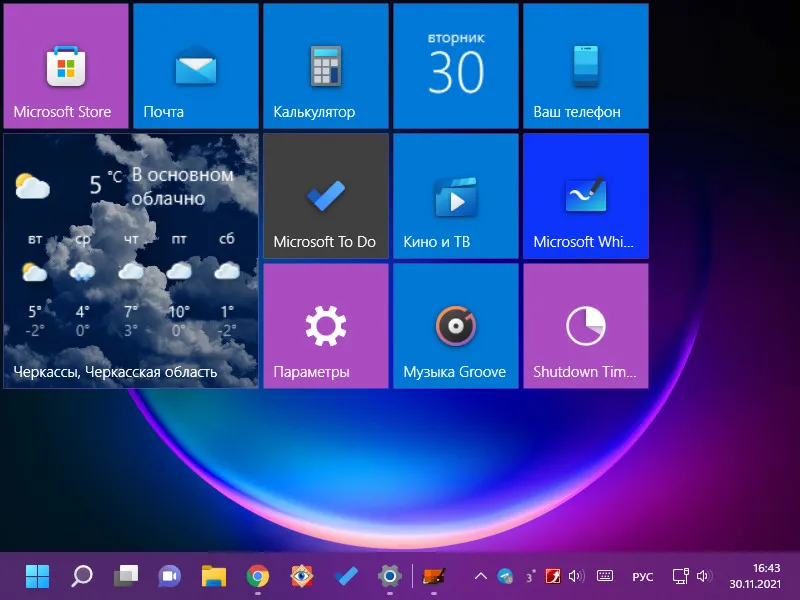
Но, конечно, самая яркая возможность приложения Live Tiles Anywhere – это создание живых плиток на рабочем столе. Да и неживых, в принципе тоже. Помимо создания ярлыков в контекстном меню на системных функциях, программах и приложениях нам будет доступен пункт:
- Create a widget – создать виджет.
Создание виджета – это, собственно, и есть создание плитки на рабочем столе. Если мы создаём виджет для классической функции или программы Windows, либо для современного приложения, не поддерживающего живые плитки, это будет обычная плитка.
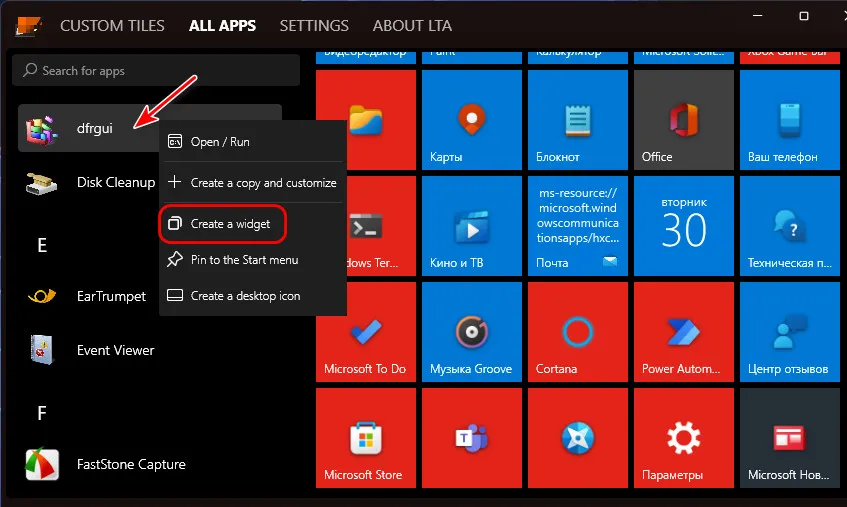
А если виджет создаём для современного приложения с поддержкой живых плиток, то плитка, соответственно, будет живой. Как и для нативных плиток в Windows 10, для плиток, созданных приложением Live Tiles Anywhere, будут доступны размеры – мелкий, средний, широкий и крупный.
Для живых плиток типа погоды можно выбрать большой размер, дабы видеть в плитке больше информации о погоде.

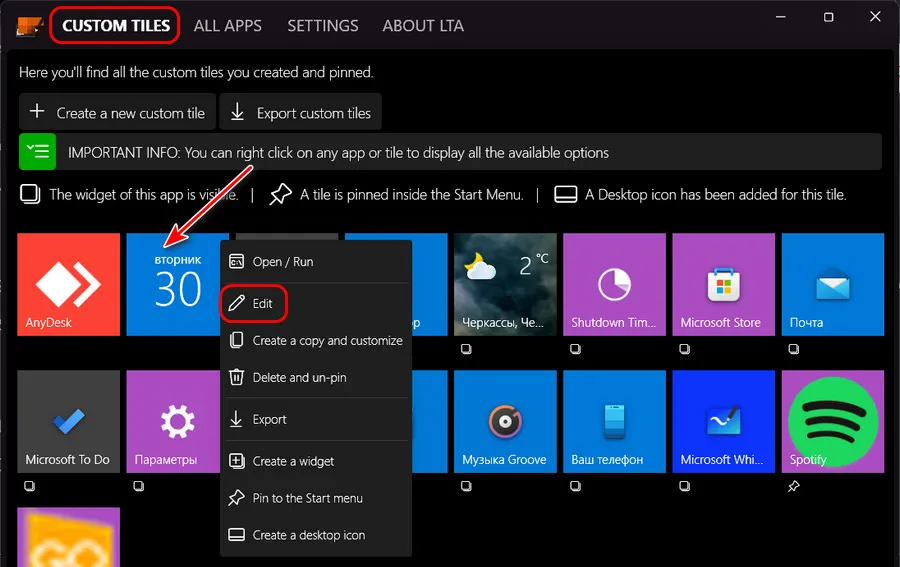
И ещё одна примечательная возможность Live Tiles Anywhere – редактирование вида плиток. В разделе приложения «Custom Tiles» любую из плиток можем отправить в редактор и там поэкспериментировать с её видом.
Ну а дабы все старания по обустройству рабочего стола плитками, старания по их закреплению в меню «Пуск» и, возможно, редактированию не пропали зря, приложение Live Tiles Anywhere предусматривает механизм экспорта-импорта настроек.
Вот такое, друзья, примечательное есть приложение Live Tiles Anywhere, с такими возможностями кастомизации запуска программ.
Обновление: эта настройка работает только в сборке 10.0.22000.51
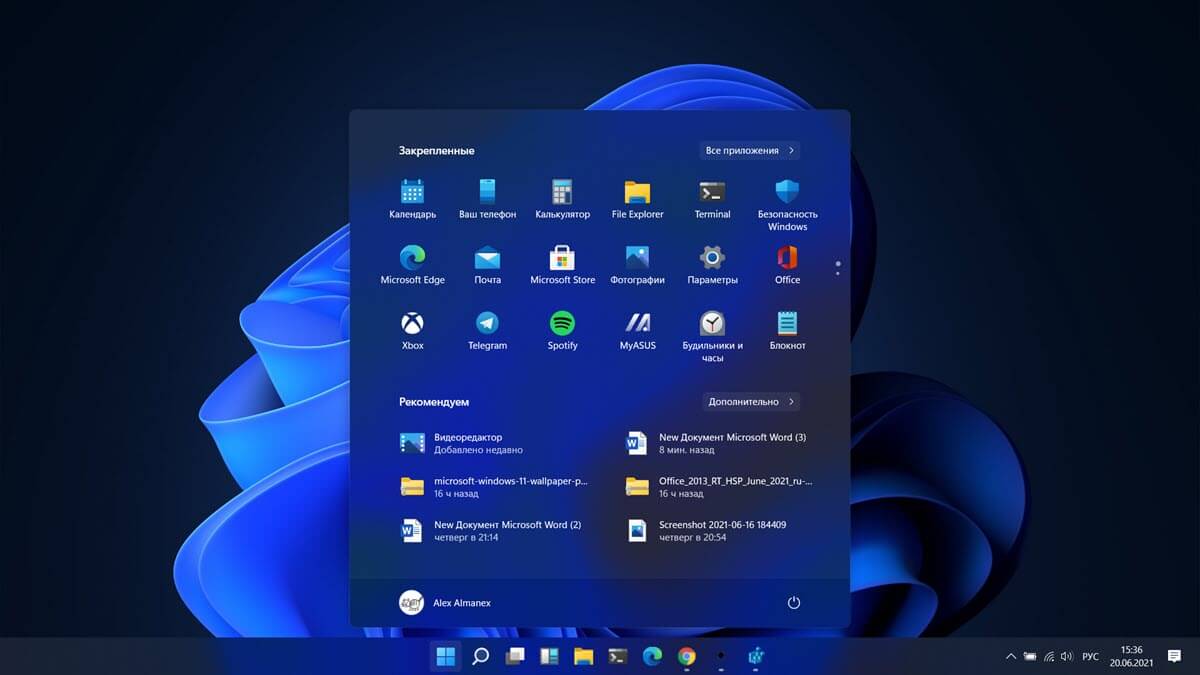
Вы можете восстановить классическое меню «Пуск» в Windows 11, которое будет похоже на старое доброе меню «Пуск» Windows 10 с живыми плитками и списком приложений. Windows 11 представила обновленную панель задач по центру и совершенно новое меню «Пуск». В нем отсутствуют живые плитки, а список приложений теперь скрыт за специальной кнопкой «Все приложения».
Давайте посмотрим, как легко вернуть старое меню Пуск Windows 10 в Windows 11. Обратите внимание, что этот способ требует работы с реестром. Следуйте инструкциям в точности, как указано ниже, и все будет в порядке.
Вернуть меню Пуск Windows 10 в Windows 11
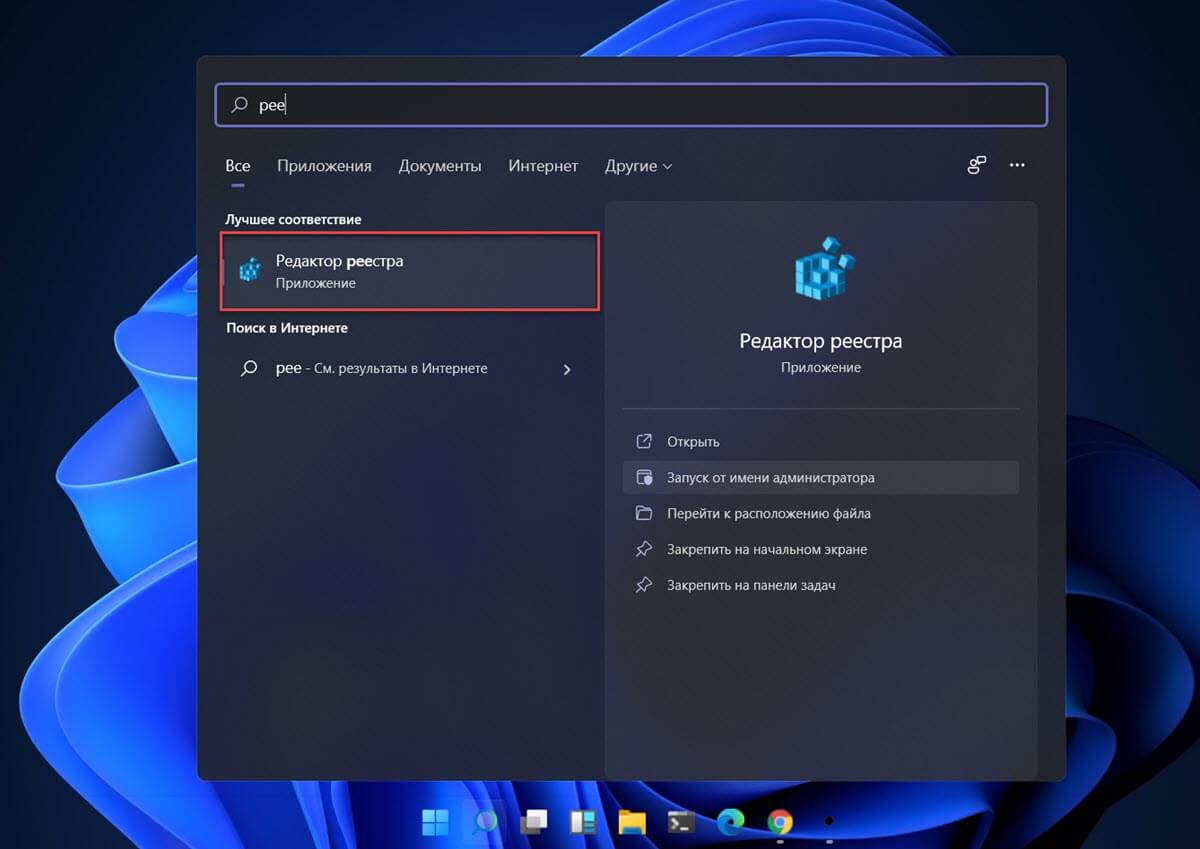
1. Откройте редактор реестра, для этого нажмите кнопку меню «Пуск» и, когда оно откроется, начните вводить «Реестр». Кликните первый результат поиска с надписью «Редактор реестра».
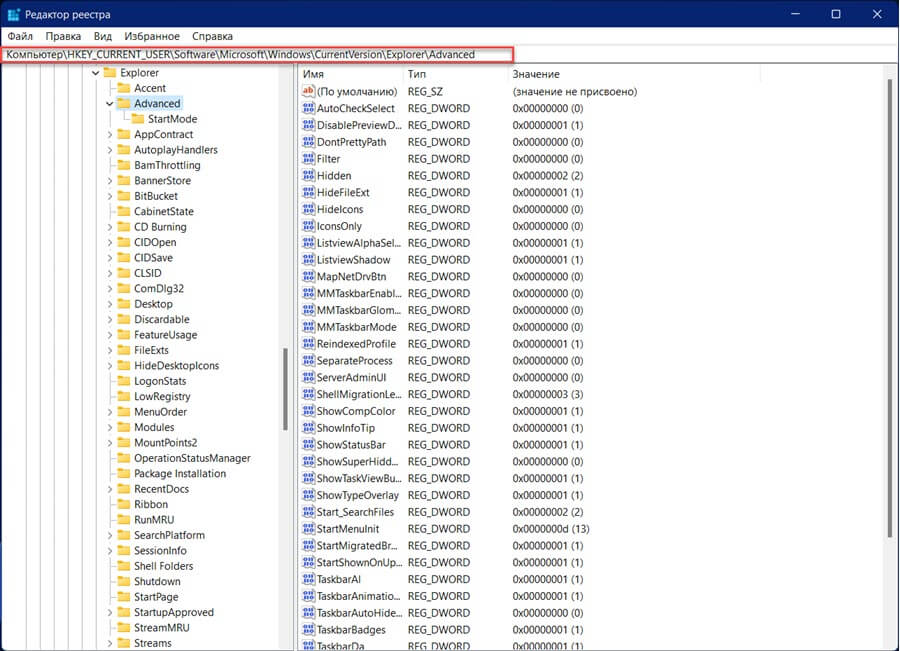
2. В строку поиска редактора реестра скопируйте и вставьте следующий путь и нажмите клавишу Enter.
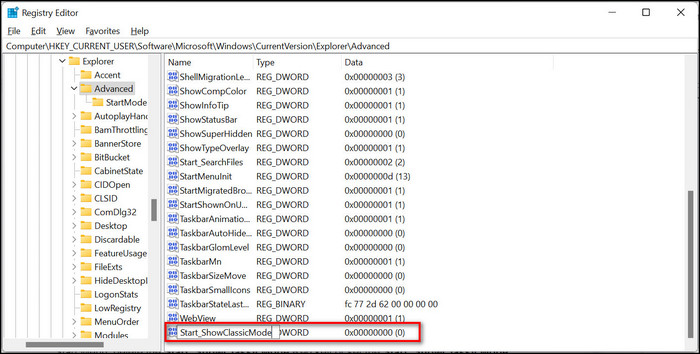
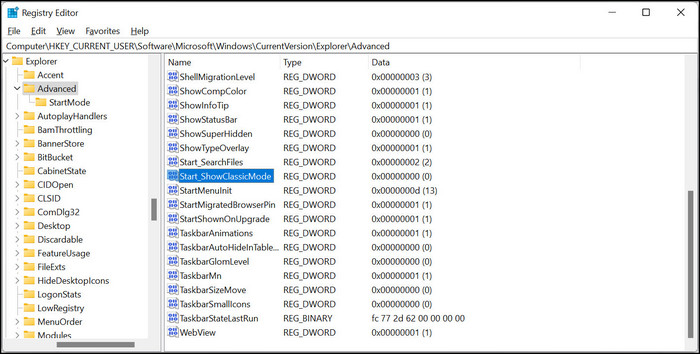
HKEY_CURRENT_USER\Software\Microsoft\Windows\CurrentVersion\Explorer\Advanced
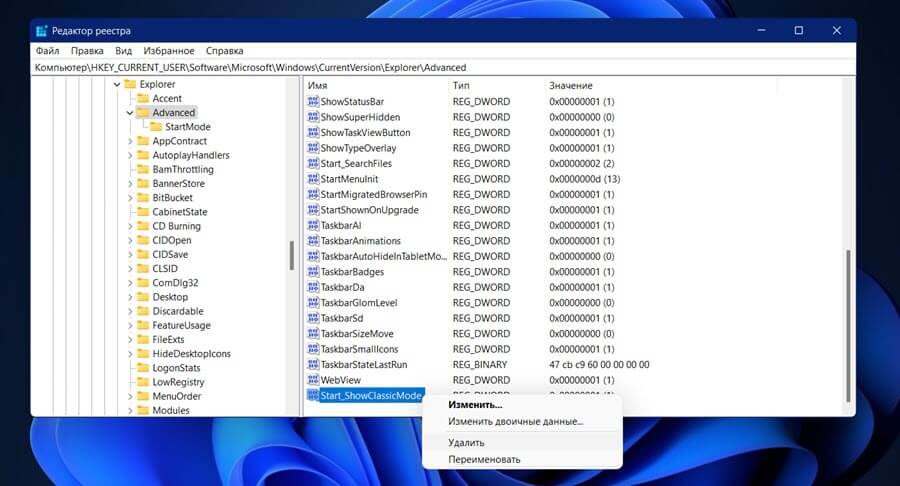
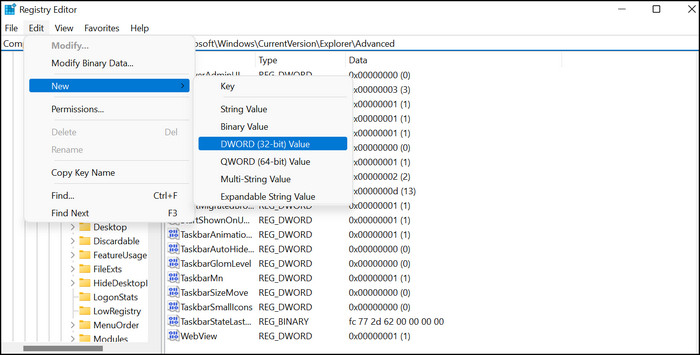
3. Кликните правой кнопкой мыши на папке с именем «Advanced» и выберите в контекстном меню «Создать» → «Параметр DWORD (32-бита)», как показано на изображении ниже.
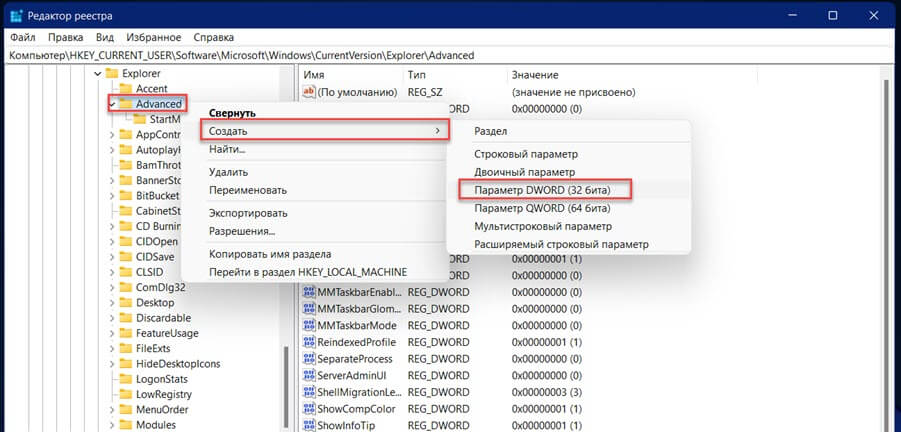
4. Назовите созданный параметр «Start_ShowClassicMode».
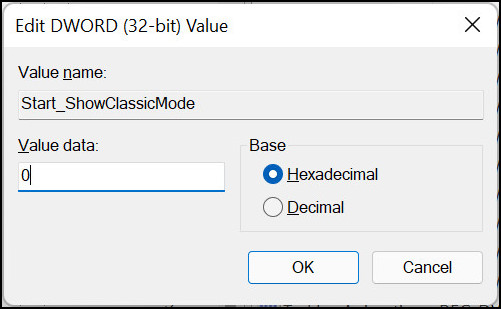
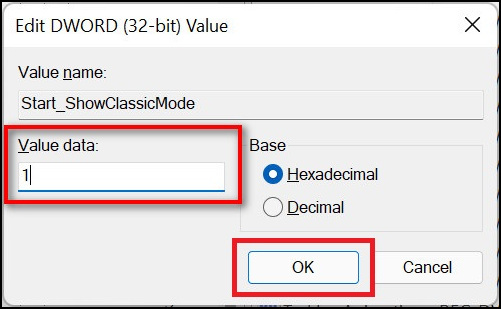
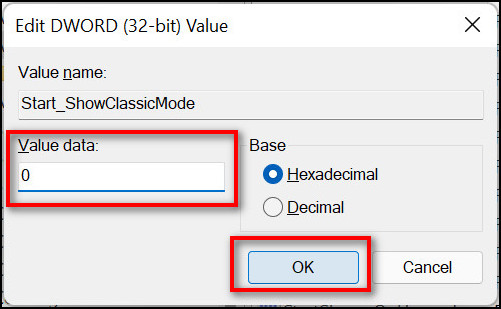
5. Теперь кликните правой кнопкой мыши только что созданный параметр «Start_ShowClassicMode» и выберите «Изменить».
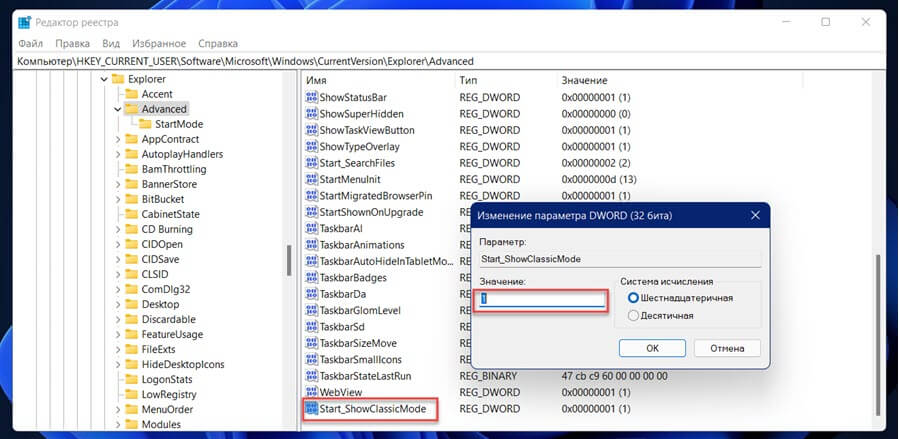
6. Измените значение на 1 и нажмите «OK».
изменить значение dword — вернуть стартовое меню Windows 10 на Windows 11
7. Теперь перезапустите Проводник, или выйдите и войдите в систему с помощью клавиш Win L.
Все! Нажмите на кнопку «Пуск» — и вы увидите старое доброе меню «Пуск» Windows 10 в Windows 11.
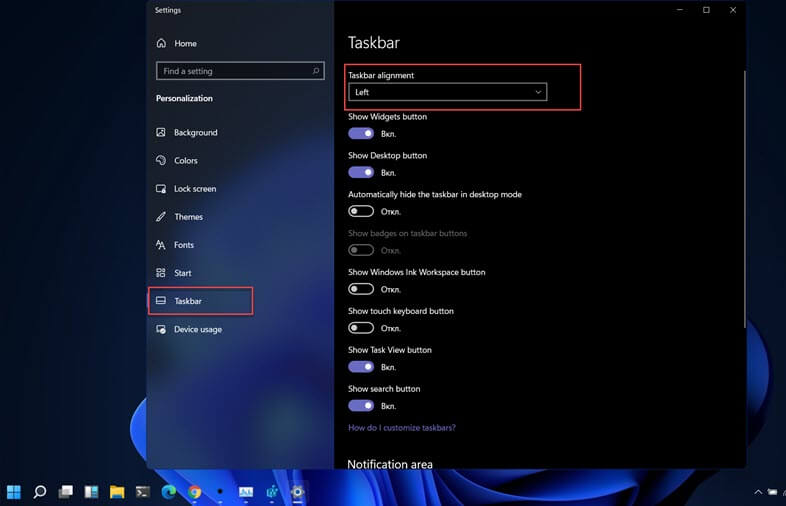
Если ваша Windows 11 активирована, вы также можете расположить элементы панели задач слева, чтобы они больше походили на меню «Пуск» Windows 10 с обновленным значком меню «Пуск». Откройте приложение «Параметры» перейдите в раздел «Персонализация» → «Панель задач» и выберите в выпадающем меню значение «Left».
Если вы передумаете и захотите вернуть новое меню «Пуск» и удалите параметр «Start_ShowClassicMode» и перезапустите проводник.
Теперь Вы, вам нравится новое меню «Пуск» или старое? Не знаете, где взять обои? Вот ссылка для их скачивания.
Что вы думаете о Windows 11? Как думаете, Microsoft движется в правильном направлении? Дайте нам знать в комментариях ниже.
According to the recently leaked information, Windows 11 OS is about to release on the Microsoft Event 2021. It comes with lots of enhancements like redesigned taskbar, new wallpaper, fresh animations, and other modifications. Another significant change here is the absence of live tiles inside the Start Menu that would not every user love.
So, if you’re also one of those who don’t want the new Start Menu and want the old Windows 10’s Start menu back then you’re on the right page. In this post, you’ll see how to disable the new Start menu and enable the classic Start menu Tiles on Windows 11.

Show the Classic Start Menu Tiles on Windows 11
Here is how to enable classic start menu tiles on Windows 11 –
- First of all, open the Run dialog box using the Win+R keys.
- In the Run dialog box, type in regedit and click OK to open the Registry Editor.
- Click Yes if the UAC window appears on the screen.
- Inside the Registry Editor, go to the following registry key –
HKEY_CURRENT_USER\Software\Microsoft\Windows\CurrentVersion\Explorer\Advanced
- Once you’re at the given location, go to the right side and you’ll find a list of files contained within the Reg Key. Search for the Start_ShowClassicMode Reg key.

- If you don’t see that key, you need to create a new DWORD Value. To do so, right-click on the Advanced key and select New > DWORD (32-bit) Value.
- Name the newly created key Start_ShowClassicMode and hit Enter.
- Then double-click on the Start_ShowClassicMode key and set the Value data 1. If you want to revert and bring back the new floating Start menu, set this value to 0, or delete the Start_ShowClassicMode DWORD value.
- Now click the OK button and restart your Windows 11 device.
After performing the above settings, you will see that the restart option is switched to the right side of the Taskbar, and the Live Tiles are again available on your computer.
Does Windows 11 have Start Live Tiles?
No, with the onset of Windows 11, Microsoft entirely disables the Start Menu Live Tiles feature. However, you may enable it back by making a few changes to the registry. The correct procedure for enabling Start Live Tiles on Windows 11 is explained above.
Read Next: How to Align Windows 11 Taskbar Icons to the Left
You are used to the Windows 10 Start Menu Live Tiles, but after upgrading from Windows 10 to 11, you can not find the Start Menu Live Tiles on your Windows 11 system computer.
A group of Windows users is annoyed about the new Windows 11 modern Start Menu design, who are more used to Windows 10 Start menu Live Tiles long time.
Are you also annoyed and frustrated about Windows 11 new Start Menu design and want to get back the Windows 10 Live Tiles Start Menu on your Windows 11 computer?
Don’t worry. You have landed in the right place.
In this in-depth guide, I will guide you through the steps to help you to get back to the Windows 10 Live Tiles Start Menu. You will learn the process of enabling the Start Menu Live Tiles on your Windows 11 computer.
So, let’s go ahead without further delay.
Microsoft disables the Start Menu Live Tiles feature on their new Windows 11 OS. They designed and built a new modern-looking centered-based taskbar and Start Menu.
Majority of Windows 11 users like the new simple modern-looking Start Menu design. But a group of users is not like it because they are familiar and used to the Windows 10 Start Menu and Live Tiles feature.
So, if you are one of them and looking for an ultimate step-by-step guide to enable or get back the Start Menu Live Tiles feature on your Windows 11 PC, you are landed in the right place then.
Getting back the Windows 10 Live Tiles Start Menu on your Windows 11 computer is an easy process. After following some straightforward steps, you can enable the Start Menu Live Tiles.
Check out the easiest way to fix Windows Can’t Access Network Drive On Windows 11.
Here, I will show you the steps to enable or get back the Start Menu Live Tiles feature on your Windows 11 PC.
Let’s deep dive to know the methods.
Here are the steps to get back the Start Menu Tiles on Windows 11:
Using the Registry Editor, you can easily enable or get back the Windows 10 Start Menu Live Tiles feature on your Windows 11 PC.
Here are the steps to enable the Start Menu Tiles using the Registry Editor:
- Press Windows + R keys together on your keyboard to open the Windows Run program.
- Type regedit on the Run dialogue box and hit the Enter key to open the Registry Editor.
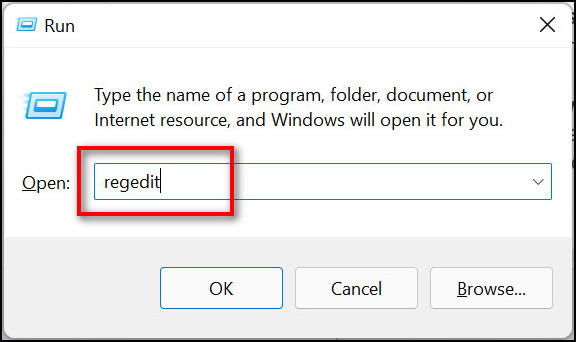
- Click Yes to open the Registry Editor with admin privileges.
- Copy and paste the following path into the Registry Editor address bar and hit the Enter key to navigate the path directly:
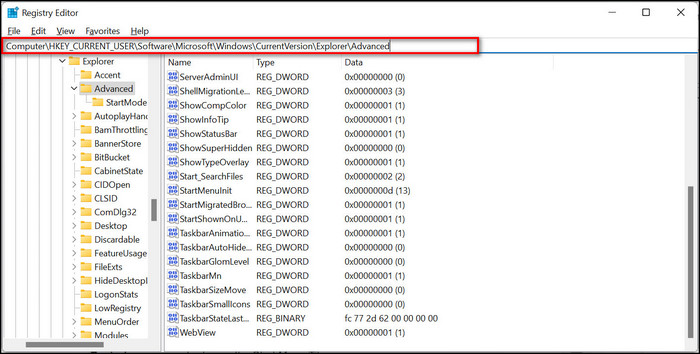
- HKEY_CURRENT_USER\Software\Microsoft\Windows\CurrentVersion\Explorer\Advanced
- Find the Start_ShowClassicMode Reg key on the right side of the screen or create a new value if you do not find the value in the Advanced folder.
- Go to Edit > New and select DWORD (32-bit) Value.
- Set the name Start_ShowClassicMode.
- Double click on the value to edit the value.
- Set the Value data from 0 to 1 and click on the OK button to enable the Windows 10 Start Menu Tiles.
- Restart your computer to see the Start Menu Tiles.
Also, check our latest post on how PC won’t go to sleep mode in Windows 11.
You can easily disable the Windows 10 Start Menu Tiles after enabling the Start Menu Tiles on your Windows 11 computer.
If you want to disable the Windows 10 Start Menu Tiles or get back the Windows 11 default Start Menu, you can do it by following the same procedure you enable the Start Menu Tiles.
So, to do this, follow the steps below:
Here are the steps to disable the Start Menu Tiles using the Registry Editor:
- Press Windows + R keys together on your keyboard to open the Windows Run program.
- Type regedit on the Run dialogue box and hit the Enter key to open the Registry Editor.
- Click Yes to open the Registry Editor with admin privileges.
- Copy and paste the following path into the Registry Editor address bar and hit the Enter key to navigate the path directly:

- HKEY_CURRENT_USER\Software\Microsoft\Windows\CurrentVersion\Explorer\Advanced
- Find the Start_ShowClassicMode Reg key on the right side of the screen.
- Double click on the value, set the Start_ShowClassicMode Reg key Value data 1 to 0, and click the OK button to save the changes.
- Right-click on the value and select Delete to delete the Start_ShowClassicMode Reg key.
- Restart your computer to see the changes.
Related guide: Enable or Disable Startup Programs in Windows 11.
FAQs
Does Windows 11 have Start menu tiles?
No. Microsoft entirely disables the Start menu tiles on their new Windows 11 OS.
But you can enable the feature on your Windows 11 computer by using the Registry Editor. To know the step-by-step method, follow the instructions in this post.
How do I get the Windows 10 Start menu back on Windows 11?
You can get the Windows 10 Start menu back on Windows 11 by creating a Start_ShowClassicMode Reg key in the Register Editor on your Windows 11 computer.
Are live tiles gone in Windows 11?
Yes. Microsoft decided to disable the Start menu tiles on their new Windows 11 OS and designed a new modern-looking centered-based taskbar and Start Menu.
Final Thoughts
Getting back the Windows 10 Live Tiles Start Menu on your Windows 11 computer is an easy process. After following some straightforward steps, you can enable the Start Menu Live Tiles.
Applying the method, I described in this post, you can successfully enable and disable the Start Menu Tiles on your Windows 11 computer.
Can you solve your problem by applying the method? Let me know the technique works or not.
I hope this post is helpful for you and can help you solve your problem.
Farhan Max
Farhan Max is a tech geek with a particular interest in computer hardware. He’s been fascinated by gaming since childhood and is now completing his undergraduate studies while researching and testing the latest tech innovations. Alongside his love for all things geeky, Farhan is also a skilled photographer.
Windows 11 introduces a new Start menu that is similar to the one Microsoft was working on for Windows 10X with a more straightforward interface that floats above the taskbar with rounded corners and features traditional icons and recent documents and folders.
Although the menu has a new fresh design, it’s not something everyone wants since many users are comfortable with the classic Start menu that appears from the left side of the screen and features Live Tiles.
If you are among those users who prefer the classic menu, you can bring back the Start menu with tiles with a third-party application called “Start11.” The app has been designed by Stardock, and it aims to bring back some of the familiar elements that are no longer available on Windows 11.
For example, the app allows you to use Windows 10 style Start menu, or the Windows 7 style for an even more classic experience. Also, it brings back the Taskbar context menu, allows you to change the position of the Taskbar, the ability to ungroup apps in the Taskbar, and much more.
In this guide, you will learn the steps to enable the classic Start menu with Live Tiles on Windows 11.
Enable Windows 10 style Start menu on Windows 11 with Start11
To bring back the classic Start menu, you first need to install Start11. This is a paid app, but it includes a 30-day trial. If you would like to purchase a license, pricing starts at $5.99.
Install Start11
To install Start11 on Windows 11, use these steps:
-
Open Start.
-
Search for Command Prompt, right-click the top result, and select the Run as administrator option.
-
Type the following command to install Start11 on Windows 11 with winget and press Enter:
winget install --id Start11.Start11
Once you complete the steps, the Windows Package Manager will download and install the latest version of Start11 on your computer.
Alternatively, you can always download the installer from Startdock, lunch the installation, and continue with the on-screen directions.
Enable classic Start menu
To bring back the Windows 10 Start menu on Windows 11, use these steps:
-
Open Start11.
-
Click on Start Menu.
-
Turn on the Use the Start11 Start Menu toggle switch.
-
Select the Windows 10 style option.

-
(Optional) Click the menu (gear) button to manage the classic Start menu settings.

On the page, you will be able to manage the shortcut list on the left pane of the menu, and customize the menu’s visual appearance like transparency, font size, and color. Also, you can decide whether to show more tiles, recently added apps, including the ability to enable the full-screen menu.

The app doesn’t remove the new Windows 11 menu. Instead, Start11 runs alongside the new menu and prioritizes the access so that using the Windows key or clicking the Start button will open the other menu.
Once you complete the steps, you can click the Start button to open the menu.
Enable classic Start menu on Windows 11 (deprecated)
Warning: It’s crucial to note that modifying the Registry can cause serious problems if not used properly. It’s assumed you know what you’re doing and created a full backup of your system before proceeding.
In the past, you could edit the Registry with the instructions below, but because of new changes on Windows 11, it’s no longer possible to enable the original Start menu.
-
Open Start.
-
Search for regedit and click the top result to open the app.
-
Browse the following path:
HKEY_CURRENT_USER\Software\Microsoft\Windows\CurrentVersion\Explorer\Advanced
-
Right-click the Advanced key, select New, and click on DWORD (32-bit) Value.

Registry Advanced key -
Name the key Start_ShowClassicMode and press Enter.
-
Double-click the newly created DWORD and change its value from 0 to 1.
Start_ShowClassicMode enable classic Start menu -
Click the OK button.
-
Restart the computer.


Once you complete the steps, the classic Start menu with Live Tiles will once again be available on Windows 11. (See also this YouTube video tutorial to complete this task.)
If you want to revert the changes, you can always follow the same instructions, but on step No. 4, right-click the Start_ShowClassicMode DWORD and select the Delete button.