
Пройдите тест, узнайте какой профессии подходите
Работать самостоятельно и не зависеть от других
Работать в команде и рассчитывать на помощь коллег
Организовывать и контролировать процесс работы
Введение в рисование на форме в Windows Forms
Рисование на форме в Windows Forms предоставляет разработчикам мощный инструмент для создания графических элементов, таких как линии, прямоугольники, эллипсы и изображения, прямо на поверхности формы. Это может быть полезно для создания пользовательских интерфейсов, визуализации данных или просто для добавления декоративных элементов в ваше приложение. В этой статье мы рассмотрим основные принципы рисования на форме в Windows Forms с использованием языка программирования C#. Мы подробно разберем, как использовать класс Graphics для рисования различных примитивов и изображений, а также рассмотрим некоторые полезные советы и трюки, которые помогут вам в работе.

Создание проекта Windows Forms в Visual Studio
Для начала работы нам потребуется создать проект Windows Forms в Visual Studio. Следуйте этим шагам:
- Откройте Visual Studio и выберите Создать новый проект.
- В списке шаблонов выберите Приложение Windows Forms (.NET Framework).
- Укажите имя проекта и выберите расположение для его сохранения.
- Нажмите Создать.
После создания проекта у вас будет форма, на которой мы будем рисовать. Важно отметить, что Visual Studio предоставляет множество инструментов для упрощения разработки приложений Windows Forms, таких как дизайнер форм, который позволяет визуально добавлять и настраивать элементы управления.
Основы работы с классом Graphics
Для рисования на форме в Windows Forms используется класс Graphics. Этот класс предоставляет методы для рисования различных графических примитивов и изображений. Чтобы начать рисование, нам нужно получить объект Graphics, связанный с формой. Это можно сделать в обработчике события Paint формы. Событие Paint вызывается каждый раз, когда форма перерисовывается, что делает его идеальным местом для выполнения всех операций рисования.
Пример кода для получения объекта Graphics и рисования на форме:
Объект Graphics предоставляет множество методов для рисования различных графических примитивов, таких как линии, прямоугольники, эллипсы и изображения. Важно понимать, что все операции рисования должны выполняться в контексте события Paint, чтобы гарантировать правильное отображение графики на форме.
Примеры рисования примитивов
Линии
Для рисования линий используется метод DrawLine. Этот метод принимает объект Pen, который определяет цвет и толщину линии, а также координаты начальной и конечной точек линии. Пример кода:
Прямоугольники
Для рисования прямоугольников используется метод DrawRectangle. Этот метод также принимает объект Pen, а также координаты верхнего левого угла и размеры прямоугольника. Пример кода:
Эллипсы
Для рисования эллипсов используется метод DrawEllipse. Этот метод принимает объект Pen, а также координаты верхнего левого угла и размеры прямоугольника, в который вписан эллипс. Пример кода:
Использование метода DrawImage для работы с изображениями
Метод DrawImage позволяет рисовать изображения на форме. Для этого сначала нужно загрузить изображение в объект Image, а затем использовать метод DrawImage для его отображения. Метод DrawImage предоставляет множество перегрузок, которые позволяют рисовать изображения с различными параметрами, такими как масштабирование и обрезка.
Пример кода для загрузки и отображения изображения:
Также можно масштабировать изображение при рисовании. Это может быть полезно, если вам нужно изменить размер изображения для его отображения на форме:
Дополнительные советы и трюки
Использование буферизации для улучшения производительности
При рисовании сложных графических элементов на форме может возникнуть проблема мерцания. Это происходит из-за того, что форма перерисовывается слишком часто. Чтобы избежать этого, можно использовать двойную буферизацию. Двойная буферизация позволяет сначала рисовать все элементы на скрытой поверхности, а затем отображать их на форме одним кадром, что значительно уменьшает мерцание.
Для включения двойной буферизации можно установить свойство DoubleBuffered формы в true:
Обработка событий мыши для интерактивного рисования
Вы можете сделать ваше приложение более интерактивным, обрабатывая события мыши для рисования на форме. Например, вы можете рисовать линии или другие примитивы в ответ на движение мыши или нажатие кнопок мыши. Для этого нужно подписаться на соответствующие события формы, такие как MouseDown, MouseMove и MouseUp.
Пример кода для рисования линии при перемещении мыши:
Теперь вы знаете основные методы рисования на форме в Windows Forms. Используя эти знания, вы можете создавать разнообразные графические элементы в своих приложениях. Удачи в ваших начинаниях! 😉
Читайте также
Sign in to your MUO account

Windows Forms is a framework that lets you build desktop applications. You can click and drag components like buttons onto a visual user interface. It also helps you manually create various shapes within your code.
This article will show you how to add lines, shapes, and images to your application. This tutorial uses the Visual Studio 2019 Community Edition to show examples.
What Are the Built-In Classes Used for Drawing Graphics?
Windows Forms uses the C# programming language. Its built-in classes and methods allow you to draw various shapes onto a Windows Form canvas. These include the Graphics, Pen, Color, and Brush classes.
|
Class |
Description |
|---|---|
|
Graphics |
The Graphics class allows you to draw shapes and lines onto the canvas. It includes methods such as:
|
|
Pen |
The Pen class allows you to specify the properties of a ‘pen’ tip which you can use to draw your shapes. You can specify properties such as color, thickness, or dash style. Methods include:
|
|
Color |
A color object made up of R (red), G (green), and B (blue) values. You will need a color object for many of the built-in methods that create shapes. |
|
SolidBrush, HatchBrush, TextureBrush |
These brush classes derive from the «Brush» interface. These classes allow you to color in blank spaces on the canvas. You can also choose to fill the spaces using different patterns or textures. You can specify properties such as the color. |
|
Rectangle, Line, Polygon, Ellipse |
You can create objects based on these shapes, and use them when calling methods such as DrawRectangle(). Instead of passing the x, y, width, and height as arguments, you can choose to pass an existing Rectangle object instead. |
To view the source code for a running example of the above tutorial, visit the GitHub repository. You can try out the following examples once you’ve created a Winforms application.
How to Add a Paint on Form Load Event Handler
First, add an event handler to draw shapes when the canvas loads.
-
Add a Paint function for the form.
        private void Form1_Paint(object sender, PaintEventArgs e)
{
    // Code goes here
} - Go into the Design View Tab.
- In the Properties window, select the lightning icon to open the «Events» tab.
-
In «Paint», under «Appearance», select the Form1_Paint function. This will execute the function when you run the application.

How to Draw Lines Onto a Windows Form Canvas
You can use a Color, Pen, and the DrawLine() method to draw lines on a canvas.
-
Inside the Form1_Paint() function, create a Color object with the color you want the line to be. Then, create a Pen object to draw the line with.
        Color black = Color.FromArgb(255, 0, 0, 0);
Pen blackPen = new Pen(black); -
The DrawLine() method from the Graphics class will draw a line using the pen. This will start drawing a line from an x, y position to another x, y position.
e.Graphics.DrawLine(blackPen, 300, 200, 800, 200); -
You can modify the properties for the pen object to change its width, dash style, and start or end cap.
        blackPen.Width = 20;
blackPen.DashStyle = System.Drawing.Drawing2D.DashStyle.Dash;
blackPen.StartCap = System.Drawing.Drawing2D.LineCap.ArrowAnchor;
e.Graphics.DrawLine(blackPen, 300, 200, 800, 200); -
Press the green play button at the top of Visual Studio to see the changes.


How to Draw Shapes Such as Rectangles and Circles
You can use the shapes classes for different shapes, or draw shapes manually onto the canvas.
-
Create a Color and Pen object as shown in the previous steps. Then, use the DrawRectangle() method to create the rectangle. The arguments are the x and y coordinates for the top-left of the rectangle, along with its width and height.
        Color red = Color.FromArgb(255, 255, 0, 0);
Pen redPen = new Pen(red);
redPen.Width = 5;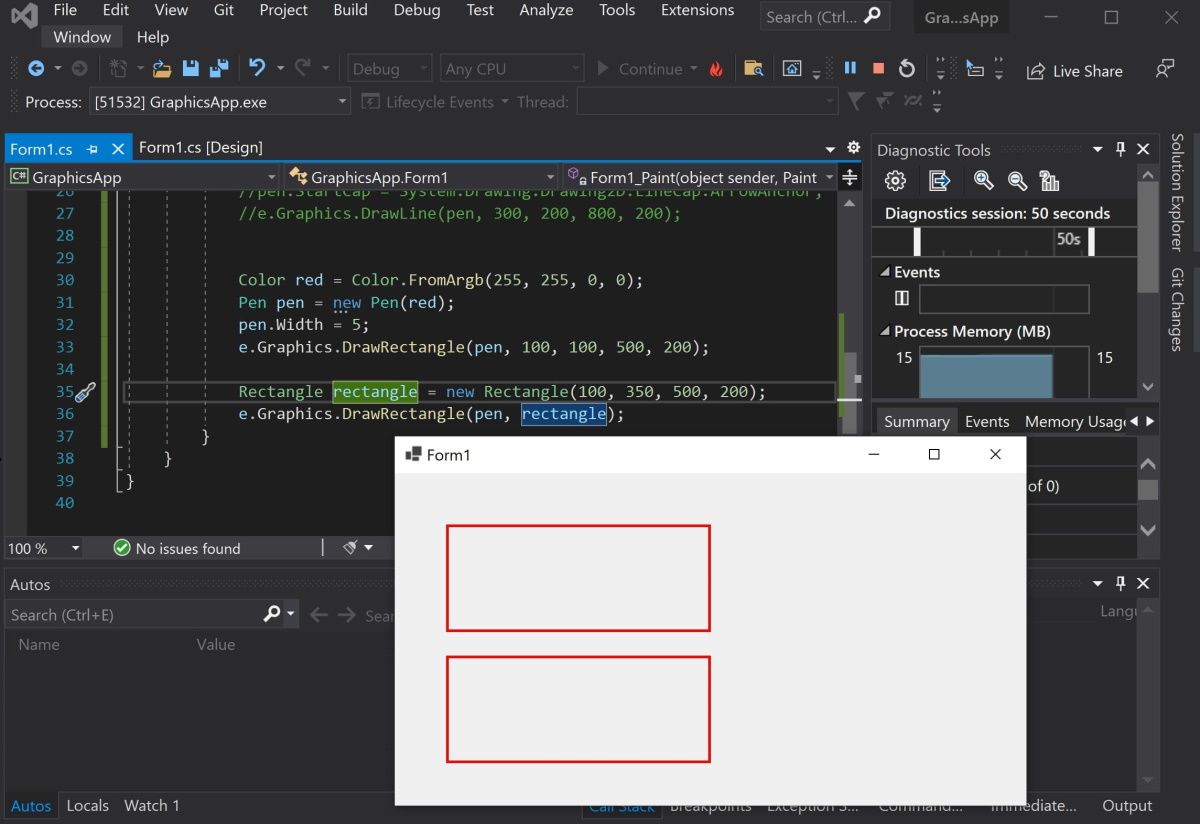
e.Graphics.DrawRectangle(redPen, 100, 100, 500, 200); -
You can also create a rectangle using the Rectangle Class. First, create a Rectangle object. The arguments are also the x and y coordinates for the top-left corner, width, and height.
Rectangle rectangle = new Rectangle(100, 350, 500, 200); -
Use the DrawRectangle() function to draw the rectangle. Instead of passing the x, y, width, and height like before, you can use the Rectangle object instead.
e.Graphics.DrawRectangle(redPen, rectangle); -
Press the green play button at the top of Visual Studio to see the changes.

-
Go back to the code to draw other shapes. Use the DrawEllipse() function to draw a circle.
        Color green = Color.FromArgb(255, 0, 255, 0);
Pen greenPen = new Pen(green);
greenPen.Width = 5;
e.Graphics.DrawEllipse(greenPen, 400, 150, 400, 400);
When you draw a circle, the x and y coordinates (x=400, y=150) refer to the top-left corner of the circle, not the center of the circle.

-
To draw other shapes such as triangles or hexagons, use the DrawPolygon() method. Here you can specify a list of coordinates to represent the points of the shape.
        Color blue = Color.FromArgb(255, 0, 0, 255);
Pen bluePen = new Pen(blue);
bluePen.Width = 5;PointF[] coordinatesForTriangle = new PointF[] {
    new PointF(400, 150),
    new PointF(300, 300),
    new PointF(500, 300)
};e.Graphics.DrawPolygon(bluePen, coordinatesForTriangle);
The DrawPolygon() method will draw lines between the points specified.


How to Use the Brush Class to Fill In Shapes With Color
You can use the FillRectangle(), FillEllipses() or FillTriangle() methods to create shapes with a solid color.
-
First, create a brush object.
        Color purple = Color.FromArgb(255, 128, 0, 0);
SolidBrush solidBrush = new SolidBrush(purple); -
Use the FillRectangle(), FillEllipses() or FillTriangle() methods. They work the same way as the draw functions above, except instead of a Pen, they use a Brush object.
        e.Graphics.FillRectangle(solidBrush, 50, 50, 200, 250);
e.Graphics.FillEllipse(solidBrush, 300, 50, 200, 200);
e.Graphics.FillPolygon(solidBrush, new PointF[] { new PointF(700, 150), new PointF(600, 300), new PointF(800, 300) });
-
You can also input a shape object directly instead of providing coordinates.
        Rectangle rectangle = new Rectangle(100, 350, 500, 200);
e.Graphics.FillRectangle(solidBrush, rectangle); -
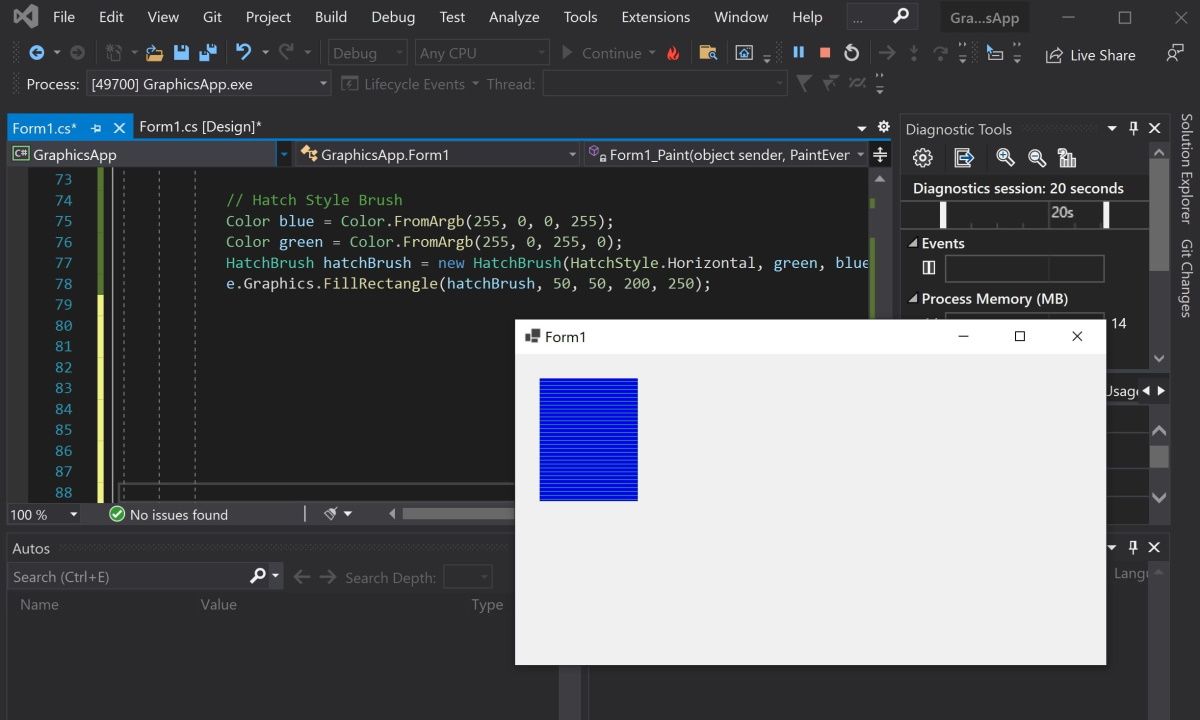
Use the HatchBrush to fill the shape using a different fill style, such as a horizontal or vertical pattern.
        Color blue = Color.FromArgb(255, 0, 0, 255);
Color green = Color.FromArgb(255, 0, 255, 0);
HatchBrush hatchBrush = new HatchBrush(HatchStyle.Horizontal, green, blue);
e.Graphics.FillRectangle(hatchBrush, 50, 50, 200, 250);
-
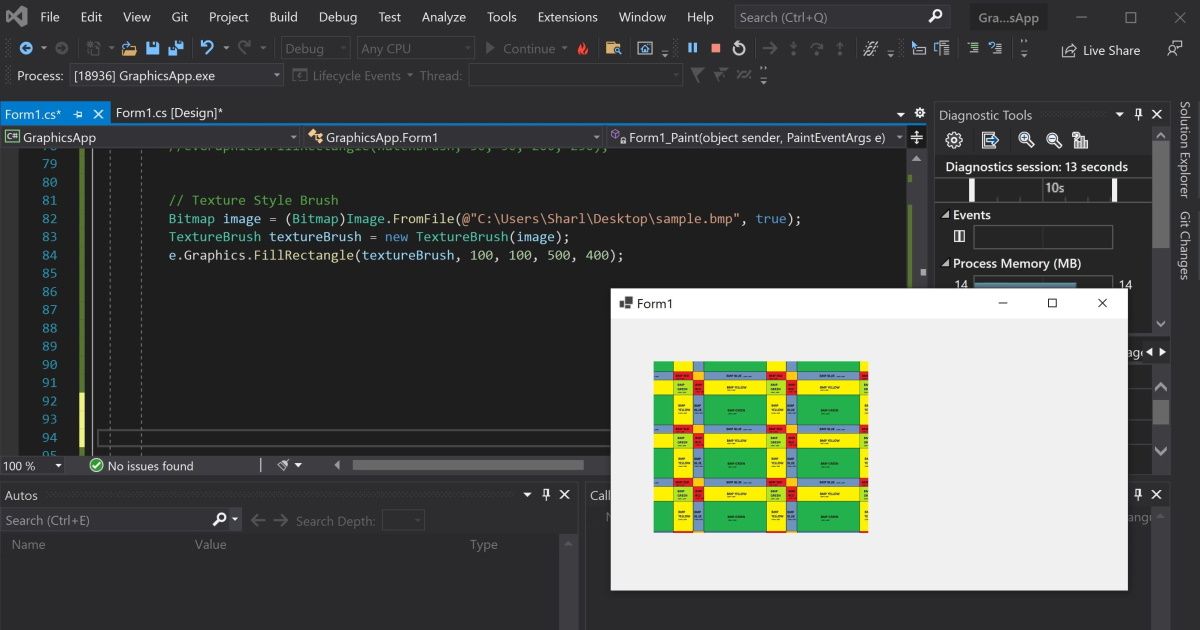
You can use the TextureBrush to fill a shape using an image. Here, create a bitmap by pointing to an image file. Instead of creating a brush using a color, create it using the image.
        Bitmap image = (Bitmap)Image.FromFile(@"C:\Users\Sharl\Desktop\flag.bmp", true);
TextureBrush textureBrush = new TextureBrush(image);
e.Graphics.FillRectangle(textureBrush, 100, 100, 500, 400);

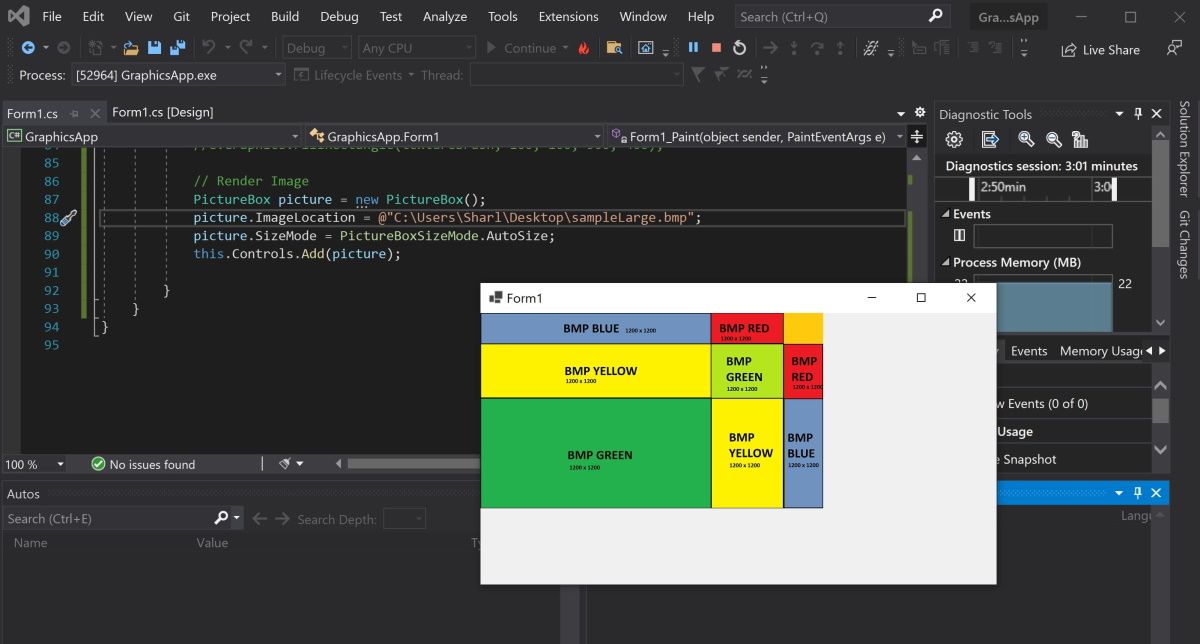
How to Render Images Onto the Form
To render an image, create a PictureBox control object and add it to the form.
-
Create a PictureBox control object using an image file.
        PictureBox picture = new PictureBox();
picture.ImageLocation = @"C:\Users\Sharl\Desktop\flagLarge.bmp"; -
Set the size of the image and add it onto the form so it renders.
        picture.SizeMode = PictureBoxSizeMode.AutoSize;
this.Controls.Add(picture); -
Press the green start button at the top to view the image.

Adding More Shapes to Your Windows Form
You should now understand how to add lines, shapes, and images to your Windows form. You can combine shapes to create new shapes. You can also play around with the built-in functions to create more complex shapes.
Introduction
GDI+ consists of the set of .NET base classes that are available to control custom drawing on the screen. These classes arrange for the appropriate instructions to be sent to the graphics device drivers to ensure the correct output is placed on the screen. GDI provides a level of abstraction, hiding the differences between different video cards. You simply call on the Windows API function to do the specific task, and internally the GDI figures out how to get the client’s particular video card to do whatever it is you want when they run your particular piece of code.
Not only this, but the client has several display devices — for example — monitors and printers — GDI achieves the task of making the printer look the same onscreen as far as the application is concerned. If the client wants to print something instead of displaying it, your application will simply inform the system that the output device is the printer and then call the same API functions in exactly the same way. As you can see, the device-context (DC) object is a very powerful mechanism. Having said that, we can also use this layer of abstraction to draw onto a Windows Form. This paper will therefore begin with an example of a basic Windows Forms development in order to demonstrate how to draw graphics onto a Windows Form, or a control on that form. The focus of this article will be on graphics.
The Form object is used to represent any Window in your application. When creating a main window, you must follow two mandatory steps:
- Derive a new custom class from System.Windows.Forms.Form
- Configure the application’s Main() method to call System.Windows.Forms.Application.Run(), passing an instance of your new Form derived as a class argument.
Here is an example:
C# File: MyForm.cs
using System;
using System.Windows.Forms;
public class MyForm : System.Windows.Forms.Form
{
    public MyForm()
    {
        Text = "No Graphics";
    }
    public static void Main()
    {
        Application.Run(new MyForm());
    }
}
To compile:
C:\Windows\Microsoft.NET\Framework\v2.050727>csc /target:winexe MyForm.cs
So now we have a blank form. So what do we do to learn how to use graphics? If you use Visual Studio 2005 you probably know that the .NET Framework 2.0 supports partial classes. With Visual Studio 2005, a Windows Form is completely defined with a single C# source file. The code generated by the IDE was separated from your code by using regions, therefore taking advantage of partial classes.
By default, each form named Form111 corresponds to two files; Form111.cs which contains your code and Form111.Designer.cs, which contains the code generated by the IDE. The code, however, is usually generated by dragging and dropping controls. One of the simplest uses for the System.Drawing namespace is specifying the location of the controls in a Windows Forms application. More to the point, user-defined types are often referred to as structures.
To draw lines and shapes you must follow these steps:
-
Create a Graphics object by calling System.Windows.Forms.Control.CreateGraphics method. The Graphics object contains the Windows DC you need to draw with. The device control created is associated with the display device, and also with the Window.
-
Create a Pen object
-
Call a member of the Graphics class to draw on the control using the Pen
Here is an example of a Form with a line drawn at a 60 degree angle from the upper-most left hand corner:
//File: DrawLine.cs
using System;
using System.Drawing;
using System.Drawing.Drawing2D;
using System.Collections;
using System.ComponentModel;
using System.Windows.Forms;
using System.Data;
public class MainForm : System.Windows.Forms.Form
{
    private System.ComponentModel.Container components;
    public MainForm()
    {
        InitializeComponent();
        CenterToScreen();
        SetStyle(ControlStyles.ResizeRedraw, true);
    }
    //  Clean up any resources being used.
    protected override void Dispose(bool disposing)
    {
        if (disposing)
        {
            if (components != null)
            {
                components.Dispose();
            }
        }
        base.Dispose(disposing);
    }
    #region Windows Form Designer generated code
    private void InitializeComponent()
    {
        this.AutoScaleBaseSize = new System.Drawing.Size(5, 13);
        this.ClientSize = new System.Drawing.Size(292, 273);
        this.Text = "Fun with graphics";
        this.Resize += new System.EventHandler(this.Form1_Resize);
        this.Paint += new System.Windows.Forms.PaintEventHandler(this.MainForm_Paint);
    }
    #endregion
    [STAThread]
    static void Main()
    {
        Application.Run(new MainForm());
    }
    private void MainForm_Paint(object sender, System.Windows.Forms.PaintEventArgs e)
    {
        //create a graphics object from the form
        Graphics g = this.CreateGraphics();
        // create  a  pen object with which to draw
        Pen p = new Pen(Color.Red, 7);  // draw the line
        // call a member of the graphics class
        g.DrawLine(p, 1, 1, 100, 100);
    }
    private void Form1_Resize(object sender, System.EventArgs e)
    {
        // Invalidate();  See ctor!
    }
}
TO COMPILE:
csc.exe /target:winexe DrawLine.cs
Typically, you specify the Pen class color and width in pixels with the constructor. The code above draws a 7-pixel wide red line from the upper-left corner (1,1,) to a point near the middle of the form (100, 100). Note the following code that draws a pie shape:
//File: DrawPie.cs
using System;
using System.Drawing;
using System.Drawing.Drawing2D;
using System.Collections;
using System.ComponentModel;
using System.Windows.Forms;
using System.Data;
public class MainForm : System.Windows.Forms.Form
{
    private System.ComponentModel.Container components;
    public MainForm()
    {
        InitializeComponent();
        CenterToScreen();
        SetStyle(ControlStyles.ResizeRedraw, true);
    }
    protected override void Dispose(bool disposing)
    {
        if (disposing)
        {
            if (components != null)
            {
                components.Dispose();
            }
        }
        base.Dispose(disposing);
    }
    #region Windows Form Designer generated code
    //
    private void InitializeComponent()
    {
        this.AutoScaleBaseSize = new System.Drawing.Size(5, 13);
        this.ClientSize = new System.Drawing.Size(292, 273);
        this.Text = "Fun with graphics";
        this.Resize += new System.EventHandler(this.Form1_Resize);
        this.Paint += new System.Windows.Forms.PaintEventHandler(this.MainForm_Paint);
    }
    #endregion
    [STAThread]
    static void Main()
    {
        Application.Run(new MainForm());
    }
    private void MainForm_Paint(object sender, System.Windows.Forms.PaintEventArgs e)
    {
        //create a graphics object from the form
        Graphics g = this.CreateGraphics();
        Pen p = new Pen(Color.Blue, 3);
        g.DrawPie(p, 1, 1, 100, 100, -30, 60);
    }
    private void Form1_Resize(object sender, System.EventArgs e)
    {
    }
}
To compile:
csc.exe /target:winexe DrawPie.cs
A structure, or «struct», is a cut-down class that does almost everything a class does, except support inheritance and finalizers. A structure is a composite of other types that make easier to work with related data. The simplest example is System.Drawing.Point, which contain X and Y integer properties that define the horizontal and vertical coordinates of a point.
The Point structure simplifies working with coordinates by providing constructors and members as follows:
// Requires reference to System.Drawing
// Create point
System.Drawing.Point p = new System.Drawing.Point(20, 20);
// move point diagonally
p.Offset(-1, -1)
Console.WriteLine("Point X {0}, Y {1}", p.X, p.Y.);
So as the coordinates of a point define its location, this process also specifies a control’s location. Just create a new Point structure by specifying the coordinates relative to the upper-left corner of the form, and use the Point to set the control’s Location property.
Graphics.DrawLines, Graphics.DrawPolygons, and Graphics.DrawRectangles accept arrays as parameters to help you draw more complex shapes:
Here is an example of a polygon, but with its contents filled. Notice the code responsible for filling the shape:
DrawPolygonAndFill.cs
using System;
using System.Drawing;
using System.Drawing.Drawing2D;
using System.Collections;
using System.ComponentModel;
using System.Windows.Forms;
using System.Data;
public class MainForm : System.Windows.Forms.Form
{
    private System.ComponentModel.Container components;
    public MainForm()
    {
        InitializeComponent();
        CenterToScreen();
        SetStyle(ControlStyles.ResizeRedraw, true);
    }
    protected override void Dispose(bool disposing)
    {
        if (disposing)
        {
            if (components != null)
            {
                components.Dispose();
            }
        }
        base.Dispose(disposing);
    }
    #region Windows Form Designer generated code
    private void InitializeComponent()
    {
        this.AutoScaleBaseSize = new System.Drawing.Size(5, 13);
        this.ClientSize = new System.Drawing.Size(292, 273);
        this.Text = "Fun with graphics";
        this.Resize += new System.EventHandler(this.Form1_Resize);
        this.Paint += new System.Windows.Forms.PaintEventHandler(this.MainForm_Paint);
    }
    #endregion
    [STAThread]
    static void Main()
    {
        Application.Run(new MainForm());
    }
    private void MainForm_Paint(object sender, System.Windows.Forms.PaintEventArgs e)
    {
        //create a graphics object from the form
        Graphics g = this.CreateGraphics();
        Brush b = new SolidBrush(Color.Maroon);
        Point[] points = new Point[]
        {
            new Point(10, 10),
            new Point(10, 100),
            new Point(50, 65),
            new Point(100, 100),
            new Point(85, 40)};   // Notice the braces, as used in structures
            g.FillPolygon(b, points);
        }
    }
    private void Form1_Resize(object sender, System.EventArgs e)
    {
    }
}
Customizing Pens
The color and size of a pen is specified in the Pen constructor, so you can manipulate the pattern and the endcaps. The endcaps are the end of the line, and you can use them to create arrows and other special effects. While pens by default draw straight lines, their properties can be set to one of these values: DashStyle.Dash, DashStyle.DashDot, DashStyle.DashDotDot, DashStyle.Dot, or DashStyle.Solid. Consider this final example:
UsePen.cs
using System;
using System.Drawing;
using System.Drawing.Drawing2D;
using System.Collections;
using System.ComponentModel;
using System.Windows.Forms;
using System.Data;
public class MainForm : System.Windows.Forms.Form
{
    private System.ComponentModel.Container components;
    public MainForm()
    {
        InitializeComponent();
        CenterToScreen();
        SetStyle(ControlStyles.ResizeRedraw, true);
    }
    //  Clean up any resources being used.
    protected override void Dispose(bool disposing)
    {
        if (disposing)
        {
            if (components != null)
            {
                components.Dispose();
            }
        }
        base.Dispose(disposing);
    }
    #region Windows Form Designer generated code
    private void InitializeComponent()
    {
        this.AutoScaleBaseSize = new System.Drawing.Size(5, 13);
        this.ClientSize = new System.Drawing.Size(292, 273);
        this.Text = "Learning graphics";
        this.Resize += new System.EventHandler(this.Form1_Resize);
        this.Paint += new System.Windows.Forms.PaintEventHandler(this.MainForm_Paint);
    }
    #endregion
    [STAThread]
    static void Main()
    {
        Application.Run(new MainForm());
    }
    private void MainForm_Paint(object sender, System.Windows.Forms.PaintEventArgs e)
    {
        //create a graphics object from the form
        Graphics g = this.CreateGraphics();
        // create a Pen object
        Pen p = new Pen(Color.Red, 10);
        p.StartCap = LineCap.ArrowAnchor;
        p.EndCap = LineCap.DiamondAnchor;
        g.DrawLine(p, 50, 25, 400, 25);
        p.StartCap = LineCap.SquareAnchor;
        p.EndCap = LineCap.Triangle;
        g.DrawLine(p, 50, 50, 400, 50);
        p.StartCap = LineCap.Flat;
        p.EndCap = LineCap.Round;
        g.DrawLine(p, 50, 75, 400, 75);
        p.StartCap = LineCap.RoundAnchor;
        p.EndCap = LineCap.Square;
        g.DrawLine(p, 50, 100, 400, 100);
    }
    private void Form1_Resize(object sender, System.EventArgs e)
    {
        // Invalidate();  See ctor!
    }
}
The basics underlying principles in this paper indicate the location and size of points so that they for a line or a shape. This should the new developer to understand that these principles can be expanded upon to specify the size and location of controls that are dragged and dropped onto a Windows Form. For instance, if we were to start Visual Studio 2005 and begin a Forms application, we could set that Form background color to white. The designer file and the source file that comprise the application would both reflect that property: the setting of the property would cause the IDE to generate the code in the Form.Designer.cs file. Well, that all for now.
DrawLine.cs
using System;
using System.Drawing;
using System.Drawing.Drawing2D;
using System.Collections;
using System.ComponentModel;
using System.Windows.Forms;
using System.Data;
public class MainForm : System.Windows.Forms.Form
{
    private System.ComponentModel.Container components;
    public MainForm()
    {
        InitializeComponent();
        CenterToScreen();
        SetStyle(ControlStyles.ResizeRedraw, true);
    }
    //  Clean up any resources being used.
    protected override void Dispose(bool disposing)
    {
        if (disposing)
        {
            if (components != null)
            {
                components.Dispose();
            }
        }
        base.Dispose(disposing);
    }
    #region Windows Form Designer generated code
    private void InitializeComponent()
    {
        this.AutoScaleBaseSize = new System.Drawing.Size(5, 13);
        this.ClientSize = new System.Drawing.Size(292, 273);
        this.Text = "Learning graphics";
        this.Resize += new System.EventHandler(this.Form1_Resize);
        this.Paint += new System.Windows.Forms.PaintEventHandler(this.MainForm_Paint);
    }
    #endregion
    [STAThread]
    static void Main()
    {
        Application.Run(new MainForm());
    }
    private void MainForm_Paint(object sender, System.Windows.Forms.PaintEventArgs e)
    {
        //create a graphics object from the form
        Graphics g = this.CreateGraphics();
        // create  a  pen object with which to draw
        Pen p = new Pen(Color.Red, 7);
        // draw the line
        g.DrawLine(p, 1, 1, 100, 100);
    }
    private void Form1_Resize(object sender, System.EventArgs e)
    {
        // Invalidate();  See ctor!
    }
}
Creating a simple painting program in C# involves using Windows Forms, a framework that allows you to build desktop applications with a visual user interface. You can design an empty form and use events such as MouseMove, MouseDown, and MouseUp to create interactive elements. To add graphics, you can utilize the built-in classes and methods of Windows Forms, including the Graphics, Pen, Color, and Brush classes. These tools enable you to draw various shapes, lines, and images on the canvas, as well as specify properties such as color, thickness, and dash style. By following tutorials and experimenting with code, you can make a simple paint program similar to MS Paint.
| Characteristics | Values |
|---|---|
| Programming Language | C# |
| Framework | Windows Forms |
| Purpose | Build desktop applications |
| Features | Click and drag components, create shapes within code |
| Built-in Classes | Graphics, Pen, Color, Brush |
| Drawing Methods | DrawLine, DrawRectangle, DrawPolygon |
| Pen Properties | Color, thickness, dash style, start/end cap |
| Brush Types | SolidBrush, HatchBrush, TextureBrush |
| Shape Objects | Rectangle, Line, Polygon, Ellipse |
| Event Handler | Form1_Paint |
| Drawing Events | MouseMove, MouseDown, MouseUp |
| Rendering | PictureBox control object |
What You’ll Learn
- Use the Graphics class to draw shapes and lines
- Utilise the Pen class to specify pen tip properties
- Create colour objects using R, G and B values
- Employ the Brush class to fill in blank spaces
- Add images by creating a PictureBox control object
Use the Graphics class to draw shapes and lines
To draw shapes and lines in a C# Windows Form application, you can utilise the Graphics class, which is a part of the Windows Forms framework. This class provides methods that enable you to draw various shapes and lines onto a canvas.
Here’s an example code snippet demonstrating how to use the Graphics class to draw a rectangle:
Csharp
Private void Form1_Paint(object sender, PaintEventArgs e)
{
# Create a Graphics object
Graphics graphics = e.Graphics;
# Create a Pen object to define the properties of the rectangle
Pen redPen = new Pen(Color.Red, 5);
# Draw the rectangle using the DrawRectangle method
Graphics.DrawRectangle(redPen, 100, 100, 500, 200);
}
In this code, we first obtain the Graphics object from the PaintEventArgs in the Paint event. We then create a Pen object to specify the colour (red) and width (5 pixels) of the rectangle. Finally, we use the DrawRectangle method of the Graphics class to draw the rectangle at the specified coordinates (100, 100) with a width of 500 pixels and a height of 200 pixels.
You can also use the Graphics class to draw other shapes, such as circles, ellipses, and lines. Here’s an example of drawing a circle:
Csharp
Private void Form1_Paint(object sender, PaintEventArgs e)
{
# Create a Graphics object
Graphics graphics = e.Graphics;
# Create a Pen object to define the properties of the circle
Pen bluePen = new Pen(Color.Blue, 3);
# Draw the circle using the DrawEllipse method
Graphics.DrawEllipse(bluePen, 50, 50, 100, 100);
}
In this code, we create a blue Pen with a width of 3 pixels and use the DrawEllipse method to draw a circle with a centre at coordinates (50, 50) and a radius of 50 pixels.
The Graphics class provides a wide range of methods for drawing different shapes and lines, allowing you to create complex and interactive graphics in your C# Windows Form applications.
Utilise the Pen class to specify pen tip properties
The Pen class in C# Windows Forms allows you to specify the properties of a pen tip, which you can use to draw shapes. Here’s a detailed guide on utilising the Pen class to specify pen tip properties:
Creating a Pen Object
To create a pen object, you can use the following syntax:
Csharp
Pen variable = new Pen(color, width);
Here, `color` represents the colour of the pen, and `width` represents the thickness of the pen. For example:
Csharp
Pen blackPen = new Pen(Color.FromArgb(255, 0, 0, 0), 1);
This creates a black pen with a width of 1.
Setting Pen Tip Properties
Once you have created a pen object, you can modify its properties to specify the characteristics of the pen tip. Here are some commonly used properties:
- DashStyle: Determines the appearance of lines drawn with the pen. Possible values include `Dash`, `Dot`, `DashDot`, `DashDotDot`, and `Solid`.
- StartCap and EndCap: Specify the style of the start and end of the line drawn with the pen. For example, `LineCap.Round` creates a round cap.
- Alignment: Determines how the pixels drawn with the pen are positioned relative to theoretical lines. Values can be `Center`, `Outset`, or `Inset`.
- LineJoin: Specifies the style for joining the ends of two consecutive lines drawn with the pen.
Here’s an example of setting some of these properties:
Csharp
Pen.SetLineCap(System.Drawing.Drawing2D.LineCap.Round, System.Drawing.Drawing2D.LineCap.Round, System.Drawing.Drawing2D.DashCap.Round);
Pen.StartCap = System.Drawing.Drawing2D.LineCap.Round;
Pen.EndCap = System.Drawing.Drawing2D.LineCap.Round;
Drawing with the Pen
After creating and customising your pen, you can use it to draw lines and shapes on the Windows Form canvas. The Graphics class provides methods such as `DrawLine`, `DrawRectangle`, `DrawEllipse`, and `DrawPolygon` to draw different shapes. For example:
Csharp
E.Graphics.DrawLine(blackPen, 300, 200, 800, 200);
This draws a line using the `blackPen` from the coordinates (300, 200) to (800, 200).
By utilising the Pen class and its properties, you can create lines and shapes with customised pen tip properties in your C# Windows Forms application.
Create colour objects using R, G and B values
To create colour objects using R, G and B values in C# Windows Form, you can use the Color class. This class allows you to specify the red, green, and blue components of a colour, each with a value between 0 and 255. Here’s an example of creating a colour object with red set to its highest value (255) and green and blue set to 0:
Csharp
Color red = Color.FromArgb(255, 255, 0, 0);
In this example, we’re using the FromArgb method to create the colour object. The first parameter is the alpha value, which represents the transparency of the colour. In this case, we’re setting it to 255, which means the colour is fully opaque. The next three parameters are the R, G, and B values, which we’ve set to (255, 0, 0) to create a red colour.
You can also create colour objects using predefined colours. For example:
Csharp
Color red = Color.Red;
Color green = Color.Green;
Color blue = Color.Blue;
These predefined colours are a convenient way to work with common colours without having to specify the individual R, G, and B values.
Once you have created colour objects, you can use them in various methods to draw shapes, lines, and fill colours on your Windows Form. For example, you can create a Pen object with a specific colour to draw lines and shapes:
Csharp
Pen redPen = new Pen(red);
Or, you can use a Brush object to fill shapes with colour:
Csharp
SolidBrush redBrush = new SolidBrush(red);
By combining the Color class with other graphics classes, you can create rich and visually appealing Windows Forms applications.
Employ the Brush class to fill in blank spaces
The Brush class is used to fill areas with colour or a pattern. It is a base class for five concrete brush classes in the .NET Framework: SolidBrush, TextureBrush, HatchBrush, LinearGradientBrush, and PathGradientBrush.
The SolidBrush class fills an area with a solid colour and is found in the System.Drawing namespace. You can create a SolidBrush object with a specific colour using the following constructor:
Csharp
SolidBrush skyBrush = new SolidBrush(Color.FromArgb(99, 200, 210, 255));
You can adjust the transparency of the brush by changing the alpha component of the colour:
Csharp
SkyBrush.Color = Color.FromArgb(50, 200, 210, 255);
The TextureBrush class fills an area with a pattern from an image. You can construct a TextureBrush object with an entire image or just a subset of the image. You can also control how a space larger than the brush is filled using the WrapMode enumeration. Here is an example of creating a TextureBrush with an image:
Csharp
Image logo = Image.FromFile(«C:\\windows\\winnt256.bmp»);
TextureBrush br = new TextureBrush(logo);
The HatchBrush class fills a region with one of 56 hatch patterns, made from a background colour and a foreground colour. You can construct a HatchBrush object by specifying the hatch style and the foreground colour:
Csharp
HatchBrush crossBrush = new HatchBrush(HatchStyle.Cross, Color.AliceBlue);
You can also include a parameter for the background colour:
Csharp
HatchBrush crossBrush = new HatchBrush(HatchStyle.Cross, Color.AliceBlue, Color.DarkOliveGreen);
The LinearGradientBrush class fills an area with colours that transition from one hue to another. There are several ways to create a LinearGradientBrush object. One approach is to create a brush that is the exact size of the area to be filled, which will result in a single gradient transition. Another approach is to create a brush that is smaller than the area to be filled and use the WrapMode enumeration to define how the brush will be tiled within the filled area. Here is an example of creating a LinearGradientBrush with two points that define the edges of the gradient boundary:
Csharp
LinearGradientBrush gradient = new LinearGradientBrush(new Point(0, 0), new Point(0, 5), Color.Red, Color.Bisque);
You can create a gradient that extends at an angle by specifying gradient edges that lie on the desired angle:
Csharp
LinearGradientBrush fader = new LinearGradientBrush(new Point(10, 10), new Point(20, 20), Color.Salmon, Color.Bisque);
The PathGradientBrush class is used to fill areas with a range of gradating colours, similar to the LinearGradientBrush class. However, it offers more flexibility in the shape of the gradient brush. For example, a PathGradientBrush can be used to create filled text patterns and other complex shapes built with graphics paths.
You can create a PathGradientBrush object based on a polygon defined by an array of points:
Csharp
Point [] trianglePoints = new Point[] { new Point(0, 0), new Point(0, 60), new Point(80, 60)};
PathGradientBrush triBrush = new PathGradientBrush(trianglePoints);
By default, the brush will have a black centre with a gradient towards white at every point in the polygon. You can adjust the location of the centre gradient point with the CenterPoint property:
Csharp
TriBrush.CenterPoint = new PointF(5.0f, 30.0f);
You can specify the colour of the centre gradient point with the CenterColor property:
Csharp
TriBrush.CenterColor = Color.AntiqueWhite;
Add images by creating a PictureBox control object
To add images to your C# Windows Form application, you can use the PictureBox control, which is designed for displaying images. Here’s a step-by-step guide on how to add images by creating a PictureBox control object:
- Create a PictureBox Control Object: In your C# code, you can instantiate a PictureBox control object. Give it a name, such as «pictureBox». This object will serve as a container for your image.
- Set the Image Location: Use the ImageLocation property of the PictureBox control to specify the path or URL of the image you want to display. For example, you can set it to an image file on your desktop:
«`csharp
PictureBox.ImageLocation = @»C:\Users\YourUsername\Desktop\your_image.png»;
«`
Specify Image Size Mode: You can control how the image is displayed within the PictureBox using the SizeMode property. For example, setting it to «PictureBoxSizeMode.StretchImage» will stretch the image to fit the PictureBox:
«`csharp
PictureBox.SizeMode = PictureBoxSizeMode.StretchImage;
«`
Add the PictureBox to Your Form: After setting up the PictureBox control, you need to add it to your form so that it becomes visible. You can use the Controls collection of the form to add the PictureBox:
«`csharp
This.Controls.Add(pictureBox);
«`
Resize the Display Area (Optional): If you want to resize the display area of the PictureBox, you can use the ClientSize property. Specify the new width and height in pixels:
«`csharp
PictureBox.ClientSize = new Size(newWidth, newHeight);
«`
Display the Form: Once you have added the PictureBox to your form and set all the desired properties, you can run your application to see the image displayed in the PictureBox.
Here’s a complete example of the code:
Csharp
// Create a PictureBox control object
PictureBox pictureBox = new PictureBox();
// Set the image location
PictureBox.ImageLocation = @»C:\Users\YourUsername\Desktop\your_image.png»;
// Set the size mode (optional)
PictureBox.SizeMode = PictureBoxSizeMode.StretchImage;
// Add the PictureBox to your form
This.Controls.Add(pictureBox);
// Resize the display area (optional)
PictureBox.ClientSize = new Size(500, 300);
// Display the form with the PictureBox
This.Show();
Remember to replace «your_image.png» with the actual file name of your image, and adjust the path if your image is stored in a different location.
Frequently asked questions
Open Visual Studio and click on File -> New -> Project to open up a template window with many developing options.
You can use some events like MouseMove, MouseDown, and MouseUp.
Windows Forms has built-in classes and methods that allow you to draw various shapes. You can use the Graphics class to draw shapes and lines, the Pen class to specify the properties of a ‘pen’ tip, the Color class to create a color object, and the Brush class to fill in blank spaces on the canvas.
Inside the Form1_Paint() function, create a Color object for the line color and a Pen object to draw the line. Then, use the DrawLine() method from the Graphics class to draw the line, specifying the starting and ending x, y positions.
You can use the shapes classes or manually draw the shapes onto the canvas. Create a Color and Pen object, then use the DrawRectangle() or DrawEllipse() method to create the desired shape by specifying the coordinates and dimensions.
Develop Paint Application using basic Windows Form and C# Graphics codes Part — 1/2

Hello friends, Today let’s see how we can create a paint
application step by step using Windows Form and C# DotNet in Visual Studio.
Prerequisites
- Basic c# programming knowledge
- Basic windows form application
development knowledge - Visual studio 2010+
Step
1.
Start a new Windows Form Project in Visual
Studio which will provide you the default form template.

Add a picture box into the form (drag and
drop picture box into the form from the toolbox in the left side) and modify
the size property as shown in the below screenshot.

Step
2.
Add code to create the paint canvas and
show it in the picture box using the bitmap and graphics classes.

The bitmap class is used to create and
handle the image and the graphics class is used to draw things into the image.
Let’s run the application to see if the
bitmap and graphics classes really helps to load the canvas.

Step 3.
Let’s see how we can write code to draw a
line in the canvas. We give two fixed points in the code to draw the line.

Let’s run the application now.

Now let’s create mouse action events (In
visual studio if you click ‘Tab’ button twice after typing ‘+=’ it creates
dummy template for the events. For example, as you see in the below screen type
‘pictureBox1.MouseDown’, type ‘+=’ then click on ‘Tab’ button twice which will
create the event ‘pictureBox1_MouseDown’)

Now let’s define the events and modify the
code in draw line method.
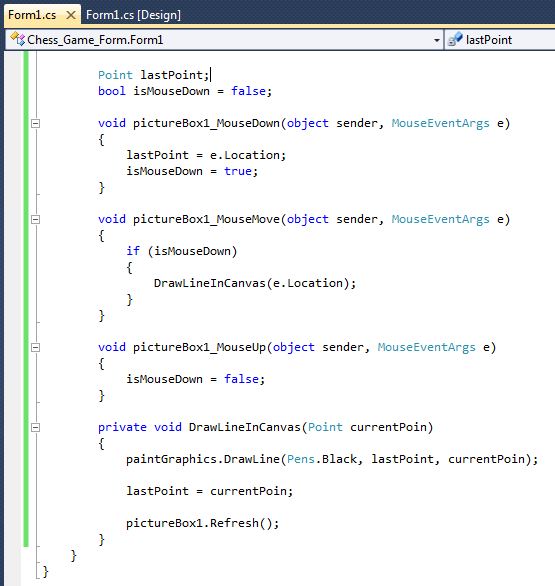
Here the current mouse point location is
stored into the variable ‘lastPoint’ when the mouse down happens and on each
mouse move event the draw line method is called and the ‘lastPoint’ is updated
with current mouse point location which will draw small lines between each
points. The ‘isMouseDown’ bool variable helps us not to draw lines when the we
are moving the mouse without pressing it down.

As the screenshot shows it gives a clean
drawing effect even though they are small straight lines drawn in between.
Step 4.
Drag and drop a button and tracker bar from
the tool box which can be used for choosing the color and size of the pen for
drawing.
Add button click event to show the color
picker and update the draw line method to take the color and size values from
the color picker and tracker bar for drawing the line.
Let’s run the application to see if the
color and size codes works.
Step 5.
Add code to draw rectangle.
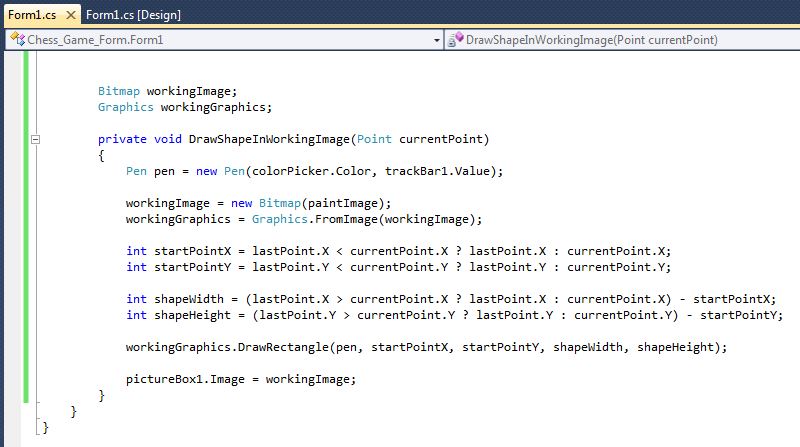
Drawing rectangle is different from drawing
line. As we have to show the rectangle in the canvas while dragging the mouse,
but the real rectangle is drawn only when we leave the mouse button. So, we
will have an additional bitmap (‘workingImage’) and graphics to be used when
the dragging is on.
We have some logics for calculating the
start x and y values in the code as the start point may not be the mouse down point
always. The following screen will probably give more idea on the same

Now let’s update the mouse events to draw
rectangle and update the real canvas image (‘paintImage’) with the working
image.

Let’s run the application and see if the
rectangle drawing really works.

As the screenshot shows the rectangle
drawing with size and color picker works all well.
Visit Part — 2/2 To see how we can add
provision to draw more shapes (Circle, Triangle and line), fill color in the
shapes and draw outlines while drawing shapes.

Enjoy Coding…!!!