
When it comes to managing multiple windows on your Windows 11 desktop, cascading them can be a powerful and efficient way to stay organized. By cascading windows, you can arrange them in an overlapping manner, allowing you to easily switch between different applications and work on multiple tasks simultaneously. Gone are the days of tiptoeing precariously through a cluttered screen; cascading windows brings a new level of productivity and ease.
To cascade windows in Windows 11, simply right-click on an empty area of the taskbar and select «Cascade windows» from the context menu. This will automatically arrange all open windows so that they appear slightly overlapped, with the title bar of each window visible. You can then click on the title bar of a specific window to bring it to the front and focus on that particular application. This feature is particularly handy when you need to compare information from different sources, refer to multiple documents simultaneously, or keep an eye on real-time data.
To cascade windows in Windows 11, follow these steps:
- Open multiple windows that you want to cascade.
- Right-click on the taskbar and select «Show windows side by side».
- All the open windows will be arranged in a cascaded manner.
- Alternatively, you can use the keyboard shortcut «Alt + F5» while the desired window is active.

Understanding Window Cascading in Windows 11
Cascading windows is a convenient feature in Windows 11 that allows you to organize open windows in a cascading stack, making it easier to multitask and navigate between different applications. When you cascade windows, each window is offset slightly from the one above it, creating a visually appealing and organized arrangement. Whether you need to compare data from multiple sources or you simply prefer a neat and structured desktop layout, learning how to cascade windows can greatly enhance your productivity and user experience. This article will guide you through the process of cascading windows in Windows 11.
Step 1: Open Multiple Windows
The first step in cascading windows in Windows 11 is to open multiple windows that you want to cascade. This can include applications, folders, or documents that you need to work with simultaneously. You can open the desired windows by clicking on their respective icons on the taskbar, using shortcuts, or launching them from the Start menu. To cascade windows effectively, it’s necessary to have more than one window open on your desktop.
Once you have opened multiple windows, you are ready to proceed with cascading them for efficient organization and easy access.
Step 2: Right-click the Taskbar
To initiate the window cascading process, you need to right-click on the taskbar. The taskbar is the horizontal bar located at the bottom of your screen that displays open applications, the Start button, and other system icons. Right-clicking on the taskbar will open a context menu with various options.
Alternatively, you can also press and hold the Shift key on your keyboard and right-click on an empty area of the taskbar to access the same context menu.
Step 3: Choose «Cascade Windows»
From the context menu that appears after right-clicking the taskbar, locate and hover your cursor over the «Cascade windows» option. This will open a submenu with the cascading options.
In the cascading submenu, you will find three options: «Cascade windows,» «Show windows stacked,» and «Show windows side by side.» Click on the «Cascade windows» option to initiate the window cascading process.
(Note: The specific wording and order of options may vary slightly depending on your Windows 11 configuration and any installed updates.)
Step 4: Observe the Cascaded Windows
After selecting the «Cascade windows» option, you will notice that your open windows arrange themselves in a cascading stack, with each window offset slightly from the one above it. The cascading order is typically based on the order in which the windows were originally opened.
You can now easily navigate between the cascaded windows by clicking on the title bar of the desired window or using the Alt+Tab keyboard shortcut to cycle through them. This arrangement provides a clear visual hierarchy and makes it convenient to switch focus between different windows without cluttering your desktop space.
It’s worth noting that you can adjust the position and size of the cascaded windows according to your preference. Simply click and drag the title bar of a window to reposition it, or click and drag the edges/corners of the window to resize it. Windows will automatically rearrange themselves as you make these adjustments.
Customizing the Cascade Effect
Windows 11 offers some customization options for the cascading effect, allowing you to tailor it to your needs. To access these options, right-click on the taskbar, follow the steps mentioned earlier, and click on the «Cascade windows» option to open the cascading submenu.
In the cascading submenu, you will find the «More options» link. Clicking on this link will open the Multitasking settings page in the Windows Settings app. Here, you can customize the behavior of window cascading, such as whether to cascade windows only on the main display or across all connected displays, as well as the spacing between cascaded windows.
By exploring the Multitasking settings, you can fine-tune the cascade effect in Windows 11 to align with your preferences and work style.
Ending the Cascade Effect
To end the cascade effect and restore the default arrangement of your windows, right-click on the taskbar again, follow the steps mentioned earlier, and click on the «Cascade windows» option in the cascading submenu. This will remove the cascading stack and restore the windows to their original positions.
You can also end the cascade effect by manually dragging and positioning the windows to desired locations on the desktop or closing the windows.
Enhancing Productivity with Window Cascading
Cascading windows in Windows 11 offers numerous benefits for productivity and organization. Let’s explore some of the key advantages:
- Easy Comparison: When you have multiple windows cascaded, you can effortlessly compare and cross-reference information from different sources without constantly switching between applications or resizing windows.
- Clear Visual Hierarchy: The cascading arrangement provides a clear visual hierarchy, making it easier to identify and locate specific windows. This is particularly useful when working with a large number of open windows.
- Efficient Multitasking: Cascading windows allows you to multitask efficiently by keeping relevant windows visible and easily accessible. You can focus on one window while still keeping an eye on the others.
- Minimized Desktop Clutter: The cascading effect helps in reducing desktop clutter by organizing windows in a stacked layout. This leaves more desktop space for other tasks or applications.
By leveraging the window cascading feature, you can enhance your workflow, streamline your multitasking abilities, and maintain an organized digital workspace.
Take advantage of this powerful Windows 11 feature and discover a more efficient and visually appealing way to manage your open windows.

How to Cascade Windows in Windows 11
Windows 11 offers a convenient way to cascade windows, allowing you to organize and view multiple open windows on your desktop simultaneously. Follow these steps to cascade windows in Windows 11:
1. Right-click on an empty area on the taskbar.
2. From the context menu, select «Cascade windows».
3. Windows 11 will automatically arrange the open windows, overlapping them in a cascading manner.
4. To adjust the position or size of the cascaded windows, click and drag the title bar of each window.
5. To switch between the cascaded windows, click on the desired window.
Using the cascade feature in Windows 11 can be especially useful when you need to compare information or work on multiple tasks simultaneously. It helps to optimize productivity and streamline your workflow.
Remember, cascading windows is just one of the many features Windows 11 offers to enhance multitasking and improve productivity.
Key Takeaways: How to Cascade Windows in Windows 11
- Cascading windows in Windows 11 allows you to organize open windows in a cascading arrangement.
- To cascade windows, right-click on the taskbar and select «Show windows stacked» or «Show windows side by side» from the context menu.
- The «Show windows stacked» option will arrange the open windows in a cascading order, with each window overlapping the one below it.
- The «Show windows side by side» option will arrange the windows in a horizontal layout, with each window taking up an equal portion of the screen.
- Alternatively, you can use the keyboard shortcuts «Windows Key + D» to show the desktop, then right-click on the taskbar and choose the desired cascade option.
Frequently Asked Questions
Are you wondering how to cascade windows in Windows 11? Here are some commonly asked questions and their answers on this topic.
1. How do I cascade windows in Windows 11?
To cascade windows in Windows 11, follow these steps:
1. Open the windows that you want to cascade (e.g., File Explorer, Microsoft Edge).
2. Right-click on an empty space on the taskbar.
3. From the context menu, select «Cascade windows.»
This will automatically arrange the open windows in a cascading layout, where each window overlaps the other in a neat and organized manner.
2. Can I cascade windows in Windows 11 using keyboard shortcuts?
Yes, you can cascade windows in Windows 11 using keyboard shortcuts. Here’s how:
1. Open the windows that you want to cascade (e.g., File Explorer, Microsoft Edge).
2. Press the Windows key on your keyboard to open the Start menu.
3. Type «cascade windows» in the search bar and press Enter.
This will automatically cascade the open windows on your screen.
3. What are the benefits of cascading windows in Windows 11?
Cascading windows in Windows 11 offers several benefits:
1. Improved organization: Cascade windows neatly arranges open windows, making it easier to switch between different applications.
2. Enhanced productivity: With cascaded windows, you can have a clear view of multiple windows simultaneously, allowing for multitasking and increased productivity.
3. Simplified window management: Cascade windows automatically takes care of arranging windows, saving you time and effort in manual window positioning.
4. Can I customize the cascade layout in Windows 11?
No, the cascade layout in Windows 11 is a predefined arrangement where each window overlaps the other in a cascading manner. Currently, there are no options to customize the cascade layout.
5. How do I undo a cascade layout in Windows 11?
To undo a cascade layout and restore the original window positions in Windows 11, follow these steps:
1. Right-click on an empty space on the taskbar.
2. From the context menu, select «Uncascade windows.» Alternatively, you can also choose «Close all windows in stack» to close all cascaded windows.
This will restore the original window positions on your screen.
In conclusion, cascading windows in Windows 11 is a useful feature that allows you to better organize and manage your open windows. By simply right-clicking on the taskbar and selecting the «Cascade windows» option, your windows will automatically arrange themselves in a cascading manner, making it easier to view and access multiple windows at once.
This feature is especially beneficial when working on multiple tasks or projects simultaneously. By cascading windows, you can see all the open windows at a glance, making it simpler to switch between them and improve your productivity. So, next time you find yourself overwhelmed with multiple windows on your screen, give cascading a try and enjoy a more organized and efficient Windows 11 experience.
Cascading windows in Windows 11 is a great way to keep your workspace tidy and manage multiple open applications with ease. While Windows 11 doesn’t include a native option to cascade windows, you can still bring this functionality back using a third-party tool called ExplorerPatcher. With just a few simple steps, you’ll be able to cascade your open windows and enjoy a more organized desktop environment.
After cascading your windows, they’ll be stacked in a way that allows you to see each window’s title bar, making it easier to switch between tasks. If you want to go back to your original layout, undoing the cascade is a quick and easy process.
This section will walk you through the steps to cascade windows in Windows 11 using the ExplorerPatcher tool. By the end, you’ll have a cleaner and more organized workspace, perfect for multitasking.
Step 1: Download ExplorerPatcher
The first step is to download ExplorerPatcher, a free tool that restores some of the features that Windows 11 lacks, including the ability to cascade windows.
You can download ExplorerPatcher from its official GitHub page. The file is lightweight, so the download should only take a few seconds.
Step 2: Install ExplorerPatcher
After downloading the setup file (typically named ep_setup.exe), run it to install ExplorerPatcher on your system.
The installation is straightforward and should only take a couple of minutes. Just follow the instructions on the screen, and the tool will be installed without any hassle.
Step 3: Access the Taskbar Menu
Once ExplorerPatcher is installed, you’ll need to right-click on the taskbar to access a new menu that includes the option to cascade your windows.
With ExplorerPatcher running, your taskbar will have additional options that make it easier to manage and arrange your open windows.
Step 4: Cascade Windows
From the right-click menu on the taskbar, select the “Cascade windows” option. This will immediately arrange all your open windows in a cascading format.
Cascading windows is an efficient way to organize your workspace. Each window’s title bar will be visible, allowing you to easily switch between tasks and keep everything in order.
Step 5: Explore Additional Layout Options
In addition to cascading windows, ExplorerPatcher offers other layout options like “Stack” and “Side by Side.” You can find these options in the same taskbar menu.
These alternatives give you more ways to arrange your windows based on your preferences and needs. Whether you’re comparing documents or just need a different view, these options can enhance your productivity.
Tips for Cascading Windows in Windows 11
Here are some useful tips to help you make the most of cascading windows in Windows 11:
- Get ExplorerPatcher from the Official Source: Always download ExplorerPatcher from its official GitHub page to ensure you’re getting a safe, up-to-date version.
- Explore Other Features: ExplorerPatcher isn’t just for cascading windows. It offers other features that can improve your Windows 11 experience, so take some time to explore.
- Combine with Windows 11’s Snap Layouts: Use cascading windows alongside Snap Layouts to get even more control over how your workspace is arranged.
- Undo Cascading Easily: If you want to undo the cascading layout, you can simply minimize all windows and then restore them, or use the undo option in the window menu.
- Keep the Tool Updated: Regular updates to ExplorerPatcher ensure it stays compatible with the latest Windows 11 updates and continues to function smoothly.
Frequently Asked Questions
Can I cascade windows in Windows 11 without using third-party software?
No, Windows 11 doesn’t include a native option for cascading windows. You’ll need a third-party tool like ExplorerPatcher to enable this feature.
Is ExplorerPatcher safe to use?
Yes, ExplorerPatcher is safe as long as you download it from the official GitHub page. It’s a well-known tool among users who want to restore classic Windows features.
How can I undo a cascade?
To undo a cascading layout, you can minimize all open windows and then restore them one by one, or use the undo option available in the window menu.
Does cascading windows slow down my computer?
Cascading windows itself doesn’t slow down your computer. However, running many applications at once can impact performance, depending on your system’s specs.
Can I choose which windows to cascade?
No, when you cascade windows using ExplorerPatcher, it applies to all open windows. Windows 11 doesn’t allow you to cascade specific windows only.
Conclusion
Cascading windows in Windows 11 is a handy feature that can significantly improve your desktop organization and multitasking abilities. While this feature isn’t built into Windows 11, using ExplorerPatcher makes it easy to bring back. By following the steps in this guide, you can quickly download, install, and use ExplorerPatcher to cascade your windows, creating a more efficient workspace.
Whether you’re a long-time Windows user who misses the old cascading feature or someone new to the idea, this tool can help you keep your desktop neat and organized. Once you’ve mastered cascading windows, consider exploring other features in ExplorerPatcher and Windows 11 to further enhance your productivity.
If you found this guide helpful, don’t hesitate to share it with others who might benefit. And keep experimenting with new tools and features—there’s always something new to discover that can make your computer work better for you.
Kermit Matthews is a freelance writer based in Philadelphia, Pennsylvania with more than a decade of experience writing technology guides. He has a Bachelor’s and Master’s degree in Computer Science and has spent much of his professional career in IT management.
He specializes in writing content about iPhones, Android devices, Microsoft Office, and many other popular applications and devices.
Read his full bio here.
-
Home
-
News
- How to Cascade All Open Windows on Windows 11/10?
By Daisy | Follow |
Last Updated
When you cascade all open windows on Windows 11/10, each window’s title bar is visible, making it a cinch to find and navigate open apps. This post from MiniTool introduces how to cascade all open windows on Windows 11/10.
Window cascading is a feature in Windows 11 that allows users to easily organize multiple windows on the desktop. It allows arranging and organizing windows in a cascading manner on the desktop. This feature can be used to easily side-by-side, overlap, and otherwise arrange windows in various ways.
Cascading windows in Windows 11/10 have several benefits:
- Improved organization: Cascading arrangement allows you to see multiple windows clearly and orderly on the screen, making it easier to navigate and switch between apps.
- Improve productivity: With cascading windows, you can effectively multitask and work on different applications simultaneously, increasing your productivity.
- Visual comparison: When you need to compare information or data from different windows, cascading them provides side-by-side views for easy analysis and informed decision-making. Easy
- Access: With cascading windows, you can easily access all open windows without having to minimize or maximize them individually, saving time and effort.
This post introduces how to cascade all open windows on Windows 11 and Windows 10.
How to Cascade All Open Windows on Windows 10
How to cascade all open windows on Windows 10? Follow the guide below:
1. Right-click any empty space within the taskbar and select Cascade Windows. Windows 10 will now rearrange every window that is not minimized.
2. To return them to their original locations, right-click the taskbar again and select Undo Cascade all windows.
Tips:
If the option is unavailable on your computer, maybe you have enabled the Tablet mode. You need to launch the Action Center and click turn off the Tablet tile to turn it off.
How to Cascade All Open Windows on Windows 11
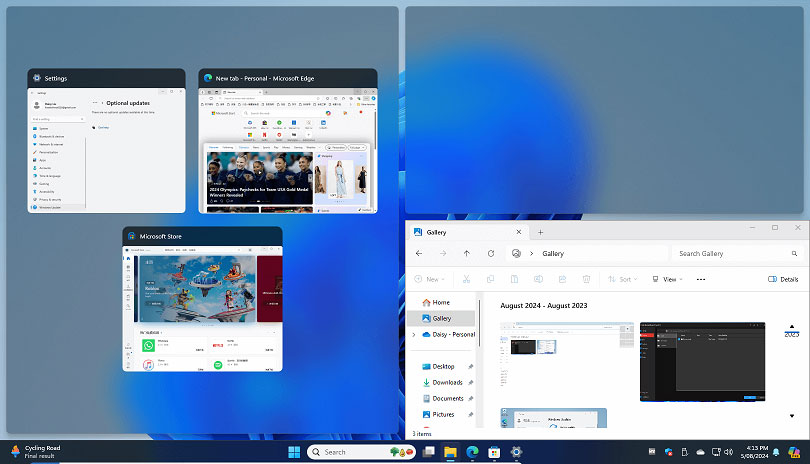
How to cascade all open windows on Windows 11? Acturally, Windows 11 does not have a built-in feature that allows you to cascade all open windows. Is there an alternative? The answer is Yes! You can rearrange windows using Windows 11 Snap Layouts.
It won’t be a “cascade” of Windows on top of one another – instead, you’ll see them all arranged neatly in the pattern of your choice. This is the closest feature to the old Cascade windows feature. Here is how to use the new feature:
1. Open a new File Explorer window.
2. Hover over the Maximize window icon in the top right corner. The Snap Layouts will appear.
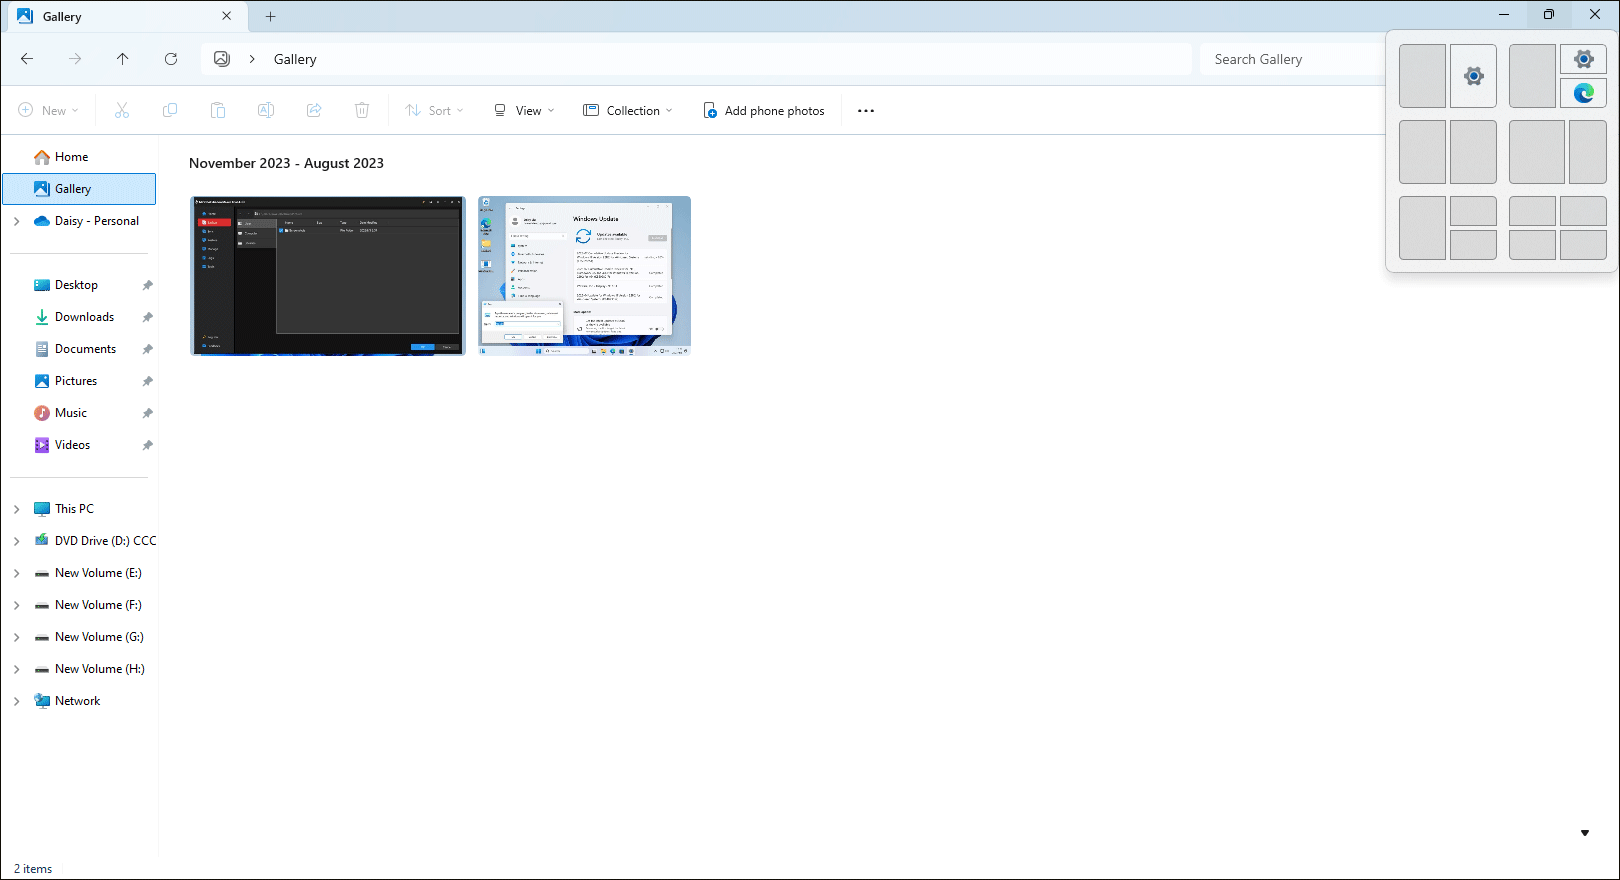
3. Select a Snap layout that suits your window configuration.
Related post: How to Disable or Enable Snap Layouts in Windows 11?
Although Microsoft has removed the Cascade windows feature on Windows 11, many users still want to use it and don’t like the snap layout feature. If you are one of them, you can consider downgrade Windows 11 to Windows 10. You can refer to this post – Downgrade/Uninstall Windows 11 and Go Back to Windows 10.
Before you downgrade Windows 11 to Windows 10, make sure your important files, especially the files on the desktop are backed up to avoid data loss. To do this task, MiniTool ShadowMaker is recommended to back up your critical data.
MiniTool ShadowMaker TrialClick to Download100%Clean & Safe
Final Words
How to cascade all open windows on Windows 11/10? This post provides a steps-by-step guide for you. I hope that this post will be useful to you.
About The Author
Position: Columnist
Having been an editor at MiniTool since graduating college as an English major, Daisy specializes in writing about data backups, disk cloning, and file syncing as well as general computer knowledge and issues. In her free time, Daisy enjoys running and going with friends to the amusement park.
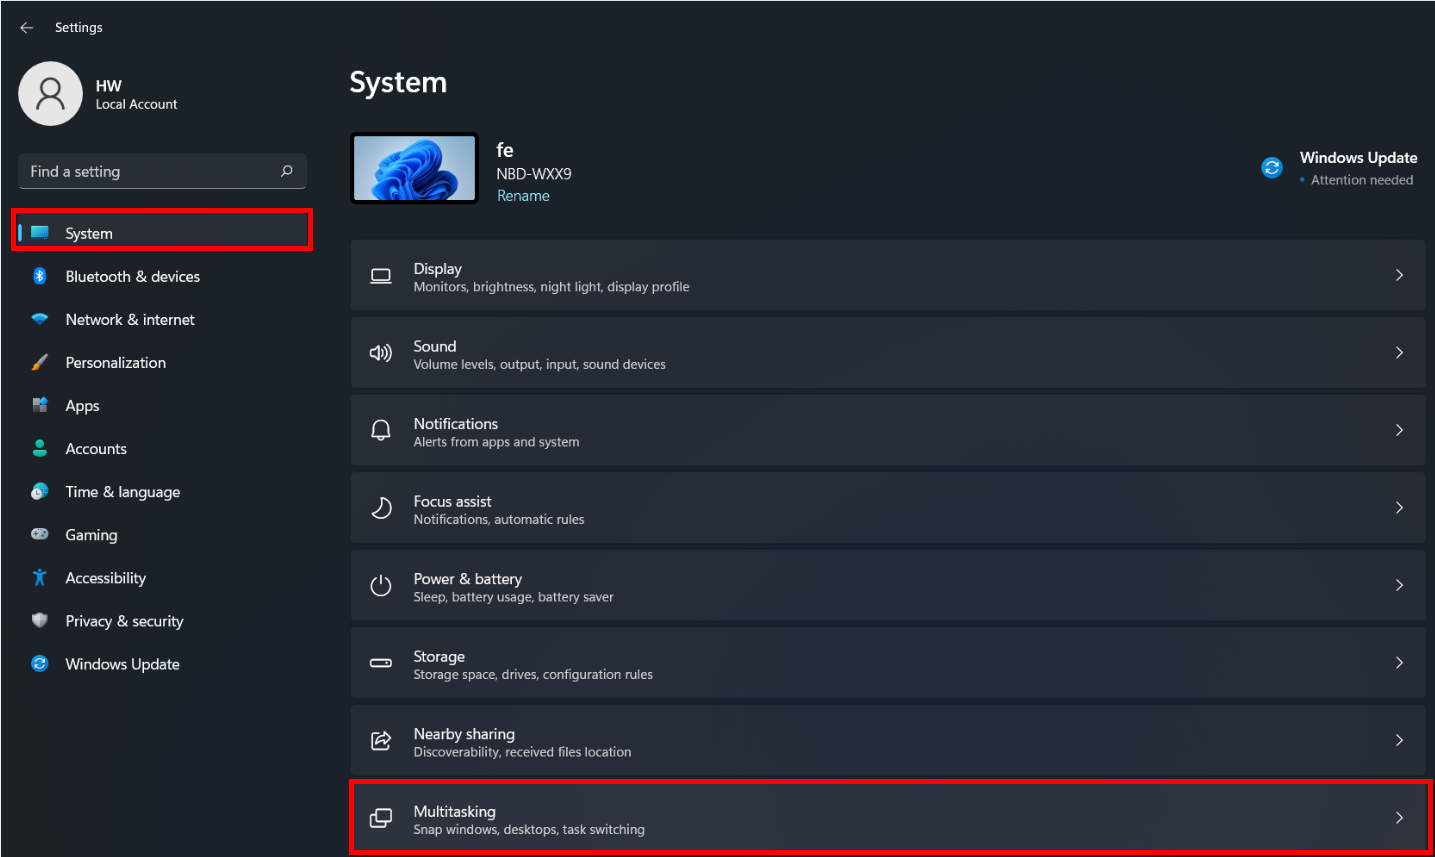
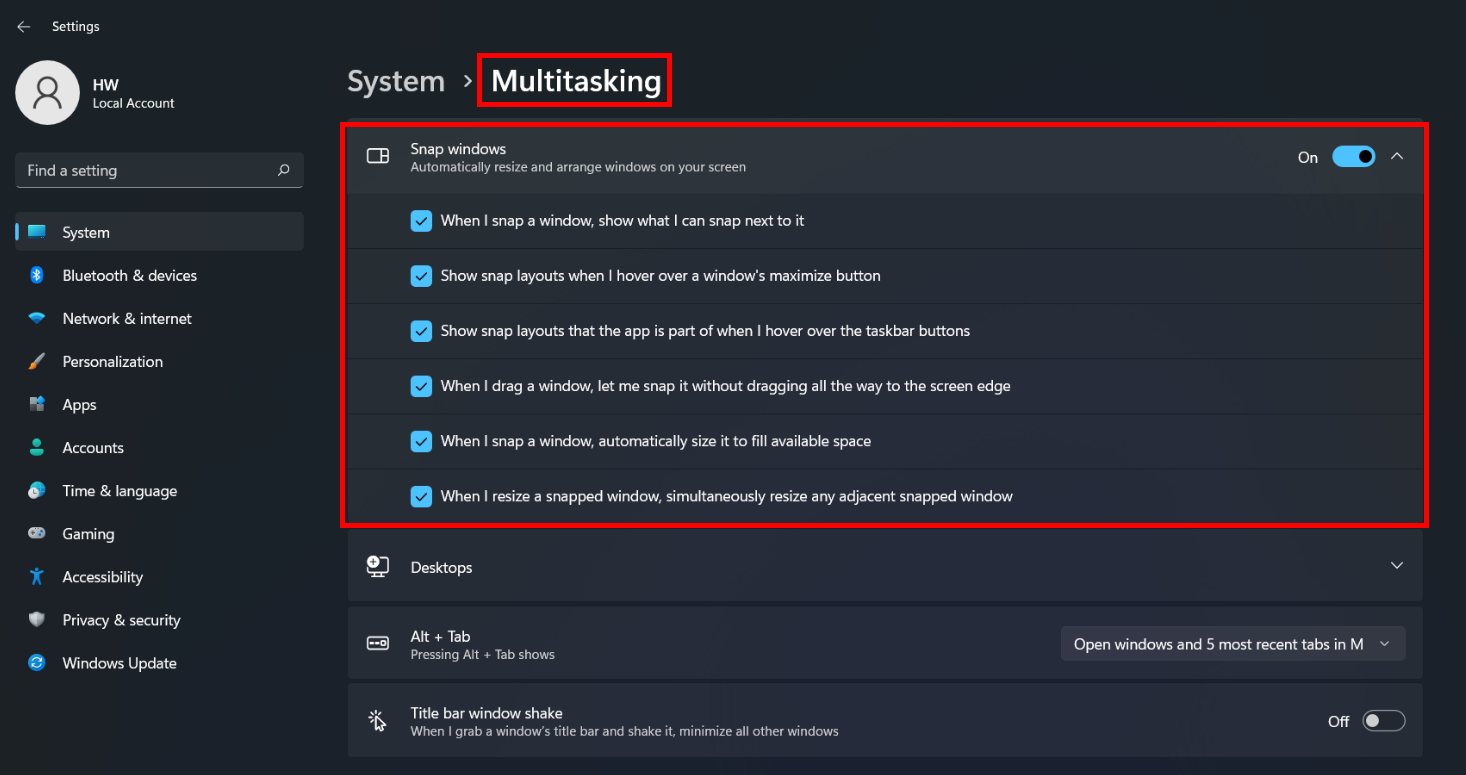
- Нажмите комбинацию клавиш Win+I, чтобы открыть раздел Настройки, перейдите в раздел Система (System), а затем перейдите в раздел Многозадачность (Multitasking).

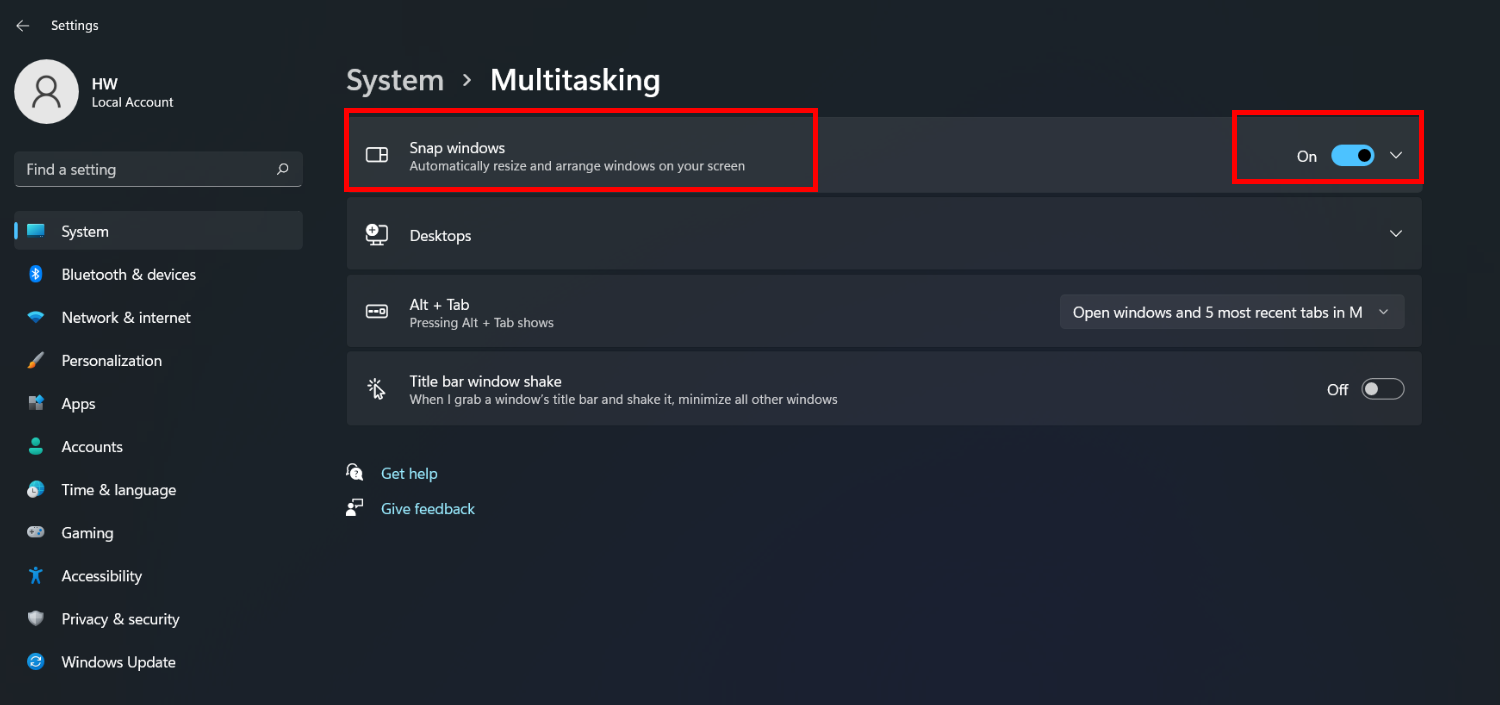
- Включите переключатель функции Прикрепление окон (Snap windows), нажмите на стрелку, чтобы открыть выпадающий список, а затем выберите шесть опций в разделе Прикрепление окон (Snap windows), чтобы включить режим нескольких окон.
Чтобы отключить этот режим, выключите переключатель функции Прикрепление окон (Snap windows).


После включения данного режима вы сможете менять размер окон и перемещать их, перетаскивая в любой из четырех углов экрана. Вы можете развернуть окно на весь экран или расположить от 2 до 4 окон рядом друг с другом.
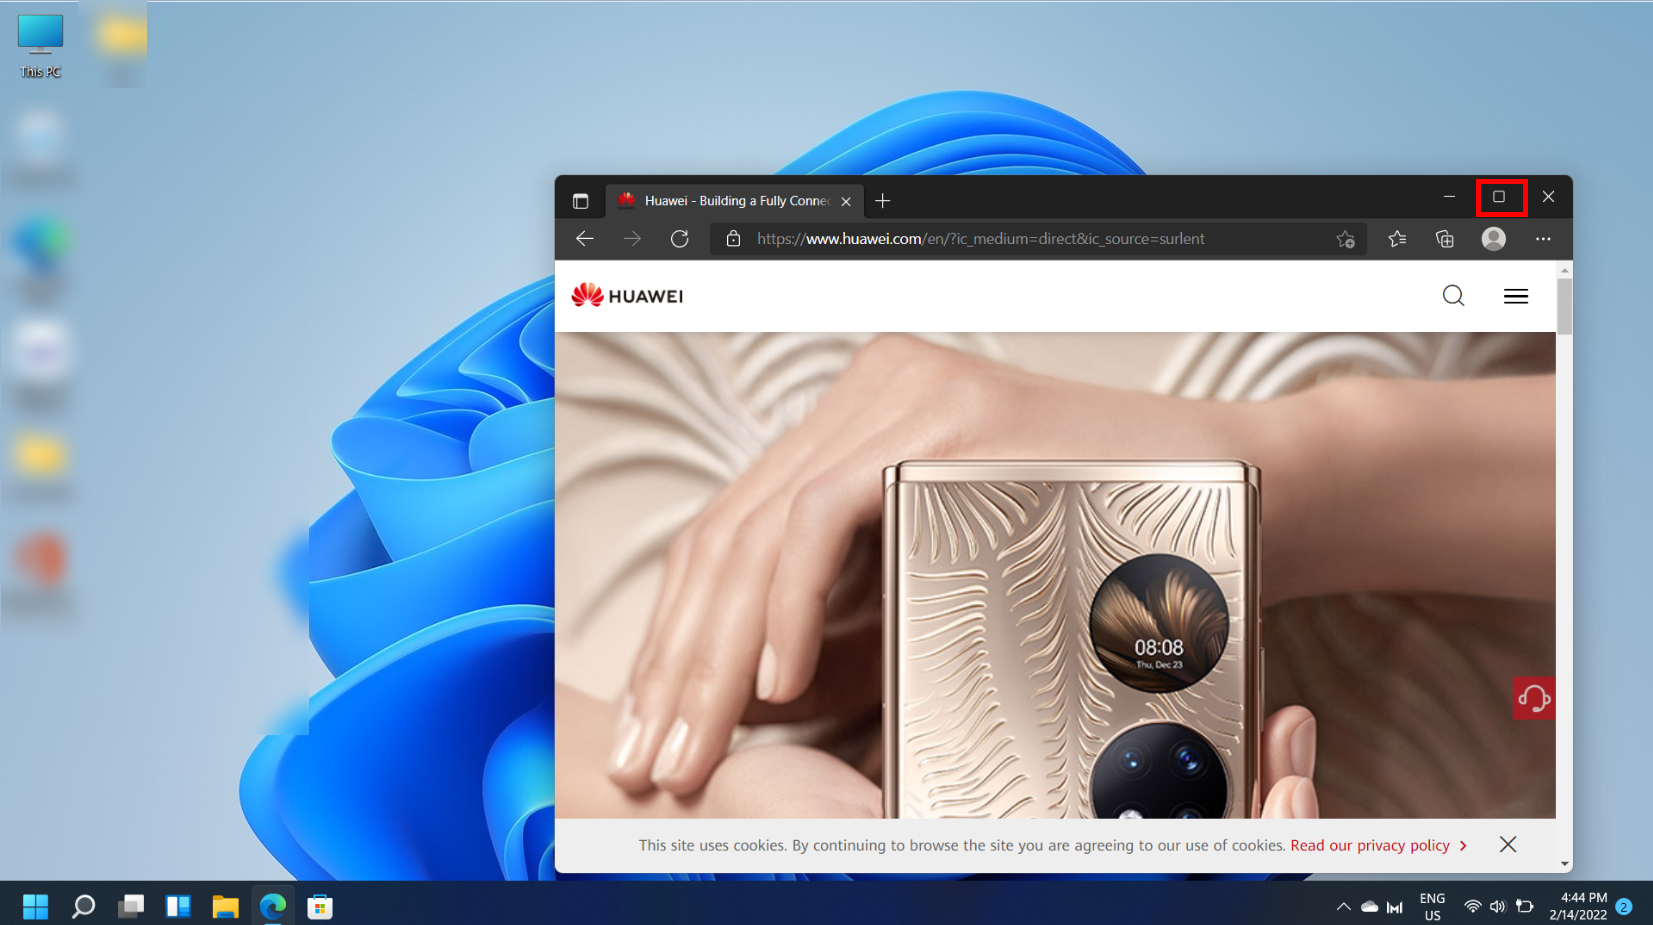
Чтобы развернуть окно на весь экран:
- Нажмите на значок разворачивания, расположенный в верхнем правом углу окна, чтобы развернуть его на весь экран.

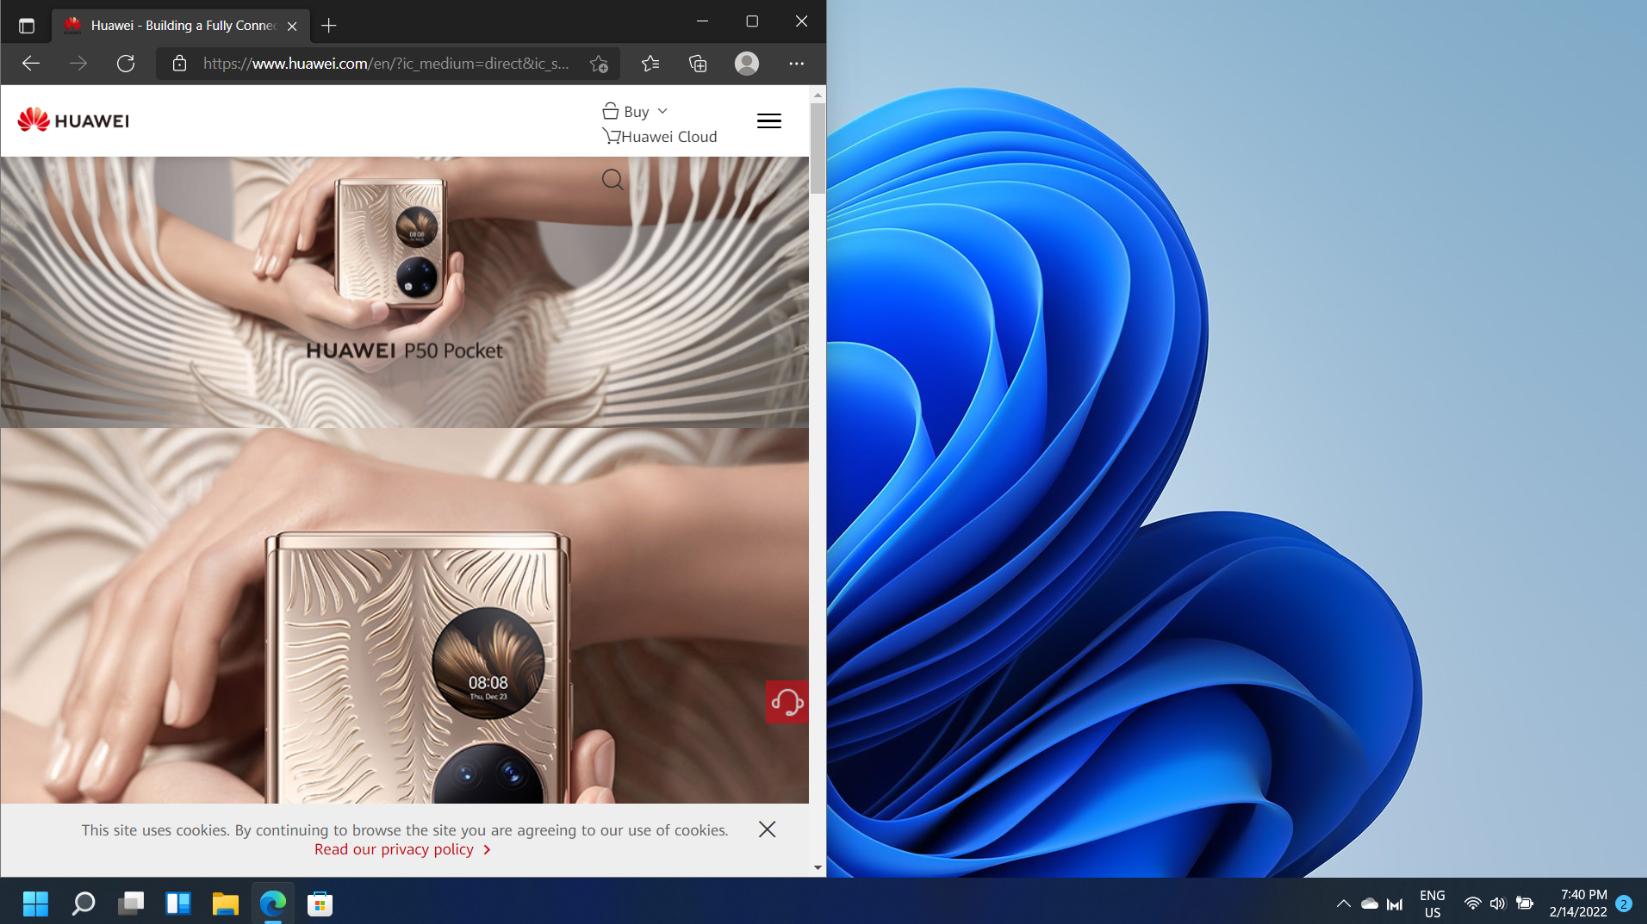
Чтобы развернуть окно на пол-экрана:

- Наведите курсор на значок разворачивания, расположенный в верхнем правом углу окна, чтобы посмотреть опции отображения нескольких окон.

- Нажмите правой кнопкой мыши на верхнюю левую опцию.

- Окно будет развернуто на пол-экрана.
Если вы открыли несколько окон одновременно, другие окна автоматически откроются в свободной части экрана.


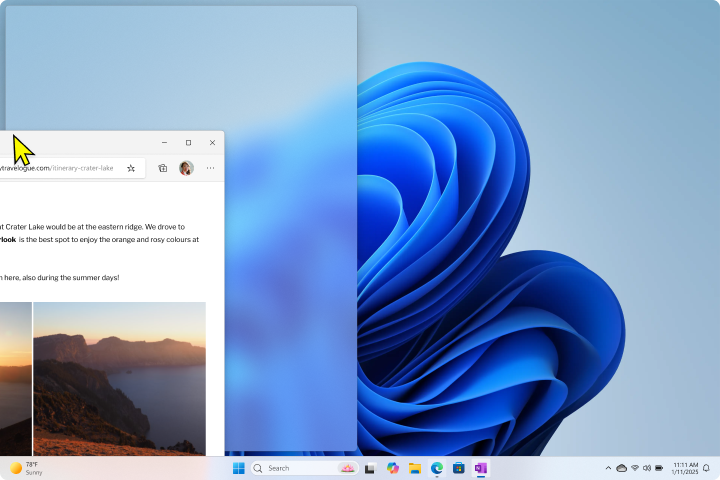
Чтобы развернуть окно на четверть экрана:
- Наведите курсор на значок разворачивания, расположенный в верхнем правом углу окна, чтобы посмотреть опции отображения нескольких окон.

- Наведите курсор на опцию отображения четырех окон и нажмите на нее правой кнопкой мыши.
- Окно отобразится на четверть экрана.


Вы также можете использовать сочетания клавиш, чтобы прикрепить окна к углам экрана.
- Одновременно нажмите на кнопку Пуск и на стрелку вверх, чтобы развернуть окно на весь экран. Одновременно нажмите на кнопку Пуск и на стрелку вниз, чтобы вернуть окно в исходное положение.
- Одновременно нажмите на кнопку Пуск и на стрелку влево/вправо, чтобы развернуть окно на пол-экрана. Одновременно нажмите на кнопку Пуск и на стрелку вправо/влево, чтобы вернуть окно в исходное положение.
- Одновременно нажмите на кнопку Пуск, на стрелку влево/вправо и на стрелку вверх/вниз, чтобы развернуть окно на четверть экрана. Снова одновременно нажмите на кнопку Пуск, на стрелку вправо/влево и на стрелку вверх/вниз, чтобы вернуть окно в исходное положение.
Applies ToWindows 11 Windows 10
Поддержка Windows 10 прекратится в октябре 2025 г.
После 14 октября 2025 г. корпорация Майкрософт больше не будет предоставлять бесплатные обновления программного обеспечения из Центра обновления Windows, техническую помощь и исправления безопасности для Windows 10. Ваш компьютер по-прежнему будет работать, но мы рекомендуем перейти на Windows 11.
Подробнее
Многозадачность в Windows позволяет эффективно управлять несколькими задачами и приложениями одновременно, повышая производительность и упрощая переключение между разными приложениями. Windows предлагает несколько способов многозадаки, включая сочетания клавиш, несколько рабочих столов и функции управления окнами.
Ниже приведены main функций Windows, которые можно использовать для многозадаки:
-
Прикрепление
-
Переключение задач с помощью ALT+TAB
-
«Представление задач»
-
Несколько рабочих столов
Прикрепление
Функция привязки позволяет быстро изменять размер и размещать окна на экране, перетаскивая их в края или углы. Эта функция помогает эффективнее работать, упорядочение нескольких окон таким образом, чтобы максимально увеличить пространство на экране. Например, вы можете привязать окно к левой части экрана, и оно автоматически изменится, чтобы занять половину экрана, в то время как вы можете привязать другое окно к правой части экрана, чтобы заполнить другую половину.
Вы можете привязать окно к одной стороне экрана, перетащив его к краю экрана или нажав клавиши Клавиша Windows + СТРЕЛКА .
Например, Клавиша Windows + СТРЕЛКА ВЛЕВО прикрепит окно к левой половине экрана, а Клавиша Windows + СТРЕЛКА ВПРАВО — к правой половине.
После прикрепления окна в приложении Snap Assist будут отображаться эскизы других открытых окон, что позволяет выбрать, какое окно следует привязать к другой части экрана. Snap Assist помогает создать более упорядоченную и эффективную рабочую область, предоставляя визуальные подсказки и параметры для упорядочения окон.
Snap имеет много интересных функций. Дополнительные сведения об этом см. в статье Привязка к Windows.
Переключение задач с помощью ALT+TAB
Сочетание клавиш ALT + TAB позволяет быстро переключаться между открытыми приложениями на текущем рабочем столе.
Чтобы использовать эту функцию, нажмите клавиши ALT + TAB на клавиатуре, а затем отпустите клавишу TAB. Откроется окно с эскизами всех открытых в настоящее время приложений. Удерживая нажатой клавишу ALT , вы можете нажать клавишу TAB , чтобы циклически перемещаться по приложениям. При каждом нажатии клавиши TAB выбранный фрагмент перемещается в следующее приложение.
После освобождения клавиши ALT выбранное приложение перейдет на передний план.
Совет: В этом представлении можно также щелкнуть или коснуться любых эскизов, чтобы вывести их на передний план и закрыть все открытые приложения, нажав кнопку закрыть окно в верхней части эскиза.
Вы можете выбрать поведение ALT+TAB при переключении между приложениями.
-
В приложении «Настройки» на устройстве с Windows, выберите Системный > Многозадачность или используйте следующую ссылку:
Многозадачность
-
В разделе Показывать вкладки из приложений при привязке или нажатии клавиш ALT+TAB выберите один из следующих параметров:
-
Не показывать вкладки. Этот параметр позволяет переключаться только между открытыми окнами на текущем рабочем столе.
-
N последних вкладок. Этот параметр позволяет переключаться между открытыми окнами, а также включает в себя определенное количество последних вкладок, открытых в браузере Microsoft Edge.

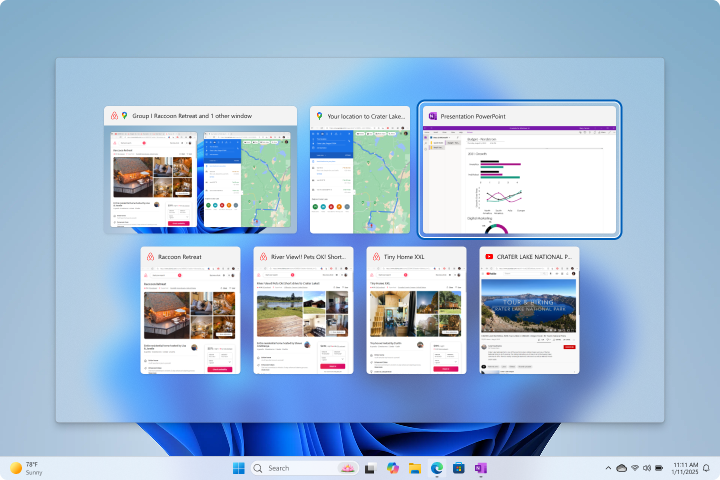
«Представление задач»
Представление задач содержит обзор всех открытых окон и нескольких рабочих столов. Эта функция похожа на ALT+TAB, но она предлагает более полное представление. В представлении задач можно щелкнуть любое окно, чтобы вывести его на передний план, создать новые рабочие столы и перетащить приложения между несколькими рабочими столами.
Чтобы открыть представление задач, можно:
-
Нажмите кнопку представления задач на панели задач
-
Нажмите клавишу Клавиша Windows + TAB.
Совет: В этом представлении можно также щелкнуть или коснуться любых эскизов, чтобы вывести их на передний план и закрыть все открытые приложения, нажав кнопку закрыть окно в верхней части эскиза.
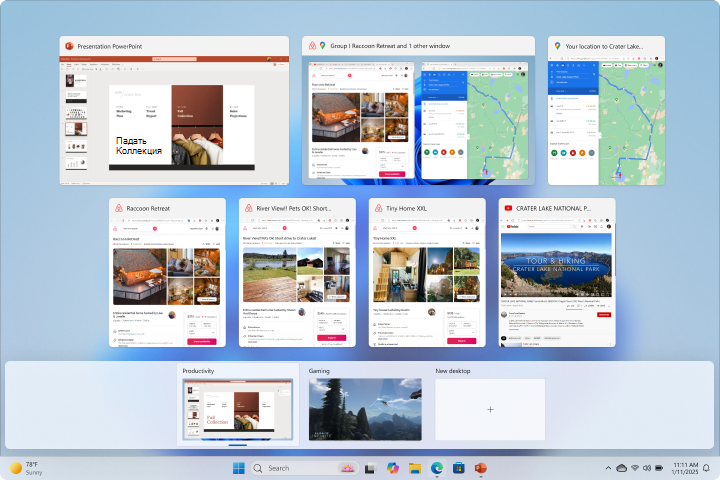
Несколько рабочих столов
Несколько рабочих столов отлично подходят для упорядочения не связанных между собой проектов и быстрого переключения рабочих столов перед собранием. Каждый рабочий стол может иметь собственный набор открытых приложений, что упрощает разделение рабочих и личных задач или разных проектов.
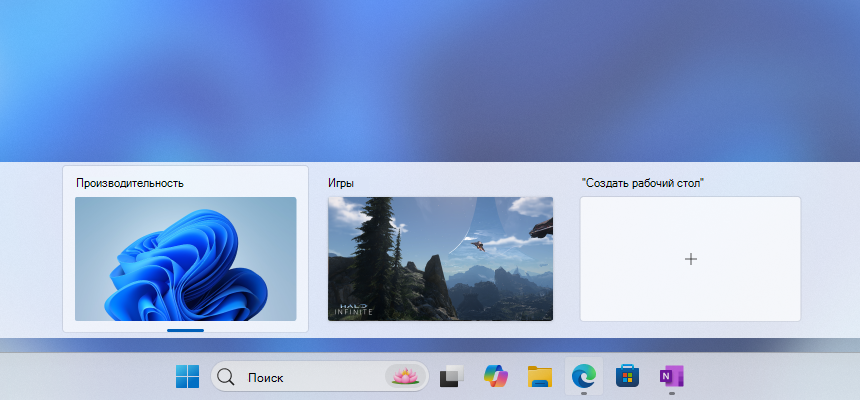
Ниже описано, как создать рабочий стол.
-
Откройте представление задач: наведите указатель мыши на значок представления задач на панели задач или нажмитеКлавиша Windows + TAB.
-
Выберите Новый рабочий стол
-
Откройте приложения, которые вы хотите использовать на этом рабочем столе
Чтобы закрыть рабочий стол, откройте представление задач, наведите указатель мыши на рабочий стол, который нужно закрыть, и нажмите кнопку закрыть окно в верхнем углу эскиза рабочего стола. Все открытые приложения на закрытом рабочем столе будут перемещены на следующий доступный рабочий стол.
Переключиться между рабочими столами можно с помощью следующих параметров:
-
Использование представления задач, в котором отображаются эскизы текущих рабочих столов. Выберите рабочий стол, на который вы хотите переключиться, и он переведет его на передний план.
-
Используя сочетания клавиш, нажав клавиши Клавиша Windows + CTRL + СТРЕЛКА ВЛЕВО , чтобы переключиться на рабочий стол слева, и Клавиша Windows + CTRL + СТРЕЛКА ВПРАВО для переключения на рабочий стол справа
-
Наведите указатель мыши на кнопку представления задач на панели задач и выберите рабочий стол, на который вы хотите переключиться.
Перемещение окон между рабочими столами — это удобный способ упорядочить рабочую область. Это можно сделать следующим образом:
-
В представлении задач, где отображаются эскизы текущих рабочих столов, найдите окно приложения, которое нужно переместить. Выберите и перетащите окно в нужный эскиз рабочего стола, а затем отпустите, чтобы удалить приложение на новый рабочий стол.
-
Находясь в представлении задач, найдите окно приложения, которое нужно переместить. Щелкните правой кнопкой мыши окно приложения, которое нужно переместить. Появится контекстное меню с параметрами для перемещения окна. Выберите Переместить на и выберите рабочий стол, на который нужно переместить приложение, из списка доступных рабочих столов.
Вы можете настроить некоторые аспекты нескольких рабочих столов, включая возможность выбора различных фонов для каждого рабочего стола. Дополнительные сведения см. в статье Настройка нескольких рабочих столов в Windows.
Нужна дополнительная помощь?
Нужны дополнительные параметры?
Изучите преимущества подписки, просмотрите учебные курсы, узнайте, как защитить свое устройство и т. д.