
Дарья Сидорова
Windows 10 позволяет настраивать размер и цвет указателя мыши, чтобы сделать его более заметным и упростить навигацию. Рассказываем, как это сделать.
Как изменить размер курсора
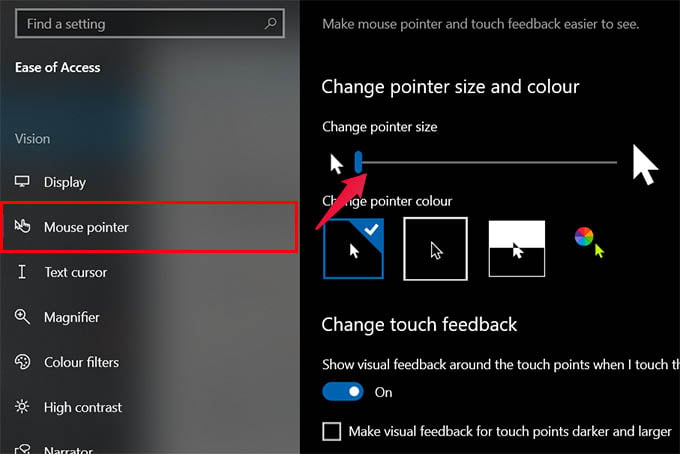
Перейдите в «Параметры» → «Специальные возможности» → «Мышь». Быстро открыть приложение «Параметры» можно комбинацией Windows + i.
Настройте ползунок в разделе «Изменение размера указателя мыши». Можно выбрать размер от 1 до 15. По умолчанию установлен наименьший размер.
Как изменить цвет указателя
Это можно сделать в том же разделе: «Параметры» → «Специальные возможности» → «Мышь». Доступно четыре варианта: белый (по умолчанию), черный, инвертированный (становится черным на белом фоне и наоборот) и выбранный цвет.
Читайте по теме:
7 способов сделать скриншот на Windows 11
Как отключить уведомления с советами и предложениями на Windows 11
Как узнать пароль от Wi-Fi
В последнем варианте по умолчанию установлен салатовый цвет. Но можно выбрать любой другой. Для этого на появившейся панели с рекомендуемыми цветами нажмите «Выбрать цвет указателя».
Текстовый курсор (тот, что похож на заглавную английскую I с более длинными засечками) изменится в соответствии с этими настройками.
Как настроить текстовый курсор
Как было сказано выше, изменения для обычного курсора по умолчанию применяются и к текстовому. Но у второго есть и собственные варианты настройки. Откройте «Параметры» (Windows + i) → «Специальные возможности» → «Текстовый курсор».
Нажмите на переключатель рядом с «Включить индикатор текстового курсора» — сверху и снизу курсора появятся конусы. После этого также можно настроить их цвет.
Индикаторы текстового курсора отлично работают в Microsoft Edge и Firefox, но могут вести себя некорректно, например, в Google Chrome.
В разделе «Специальные возможности» также можно настроить индикатор касания для компьютеров с сенсорным экраном.
Источник.
Фото на обложке: Pixel-Shot / Shutterstock
Нашли опечатку? Выделите текст и нажмите Ctrl + Enter
Последняя версия Windows 10 включает в себя новые возможности изменения параметров указателя мыши или курсора, которые могут быть интересны пользователям, желающим настроить оформление системы по своему усмотрению.
В этой краткой инструкции о том, где находятся новые настройки оформления указателя мыши и что именно они предлагают. Старые способы, позволяющие менять цвет, внешний вид и другие настройки также до сих пор доступны в системе, о них в статье Как изменить курсор мыши в Windows, в ней же присутствует информация о создании собственного указателя мыши.
Новые настройки указателя мыши Windows 10
Новые настройки мыши можно найти в разделе «Параметры» (клавиши Win+I) — «Специальные возможности» — «Курсор и указатель».
По сравнению с предыдущими версиями Windows 10 настройки указателя мыши стали более гибкими и позволяют настроить его желаемым образом:
- Появились дополнительные настройки цвета указателя мыши: он может быть белым (стандартно), черным, инвертировать изображение под собой, а также быть цветным: можно выбрать один из предложенных цветов или же указать свой собственный.

- Диапазон доступных размеров мыши тоже расширился: несмотря на то, что в параметрах самый большой вариант не выглядит огромным, если его выбрать, фактический размер указателя оказывается очень большим, а некоторым пользователям это пригождается (например, при использовании большого ТВ в качестве монитора), пример очень большого размера — на скриншоте ниже (зеленый указатель слева).


В общем-то это всё, на что я хотел обратить внимание: не слишком объемно, но легко не заметить, хотя функции могут быть и полезными. На этой же странице параметров вы можете открыть старые настройки мыши, нажав по ссылке «Дополнительные параметры мыши», а на следующем экране — ещё раз по такой же ссылке (это же окно можно открыть и через Панель управления — Мышь).

Ну и, чтобы статья не была слишком короткой, небольшой ликбез: несмотря на то, что у меня в статье и большинством пользователей используется слово «курсор» для обозначения указателя мыши, в сегодняшних формулировках это не вполне верно (хотя ранее было именно так). Сейчас для обозначения «стрелки» мыши используется «указатель мыши» (pointer), а под «курсором» (cursor) подразумевается индикатор позиции ввода.

- To change mouse size on Windows 10, open Settings > Ease of Access > Cursor & pointer, and choose the pointer size.
- You can also use the Control Panel using the “Mouse” properties.
On Windows 10, the mouse pointer is an essential feature that helps us to navigate the desktop more efficiently. However, if the pointer is too small or too big, depending on your requirements or screen resolution, you can change the size in a few ways.
The easiest way to complete this configuration is through the Settings app, but it’s possible to change the mouse settings from the Control Panel.
In the guide, I’ll explain the steps to change the mouse pointer size using the Settings app and Control Panel on Windows 10.
- Change pointer size on Windows 10 from Settings
- Change pointer size on Windows 10 from Control Panel
Change pointer size on Windows 10 from Settings
To change the mouse pointer size on Windows 10, use these steps:
-
Open Settings on Windows 10.
-
Click on Ease of Access.
-
Click on Cursor & pointer.
-
Choose the pointer size with the slider under the “Change pointer size and color” section.


Once you complete the steps, the pointer will automatically switch to your selected size.
Change pointer size on Windows 10 from Control Panel
To change the pointer size through the Control Panel on Windows 10, use these steps.
-
Open Control Panel.
-
Choose the Large icons option from the “View by” menu on the top right.
-
Click on Mouse.

-
Under the ” Scheme ” section, select the pointer size by choosing one of the mouse schemes, including the system scheme (small), large, or extra large.

-
Click the Apply button.
-
Click the OK button.


After completing the steps, the new mouse pointer size will apply to your computer.
Mauro Huculak is a
Windows How-To Expert and founder of
Pureinfotech
(est. 2010). With over 21 years as a technology writer and IT Specialist,
Mauro specializes in Windows, software, and cross-platform systems such as Linux, Android, and macOS.
Certifications:
Microsoft Certified Solutions Associate (MCSA),
Cisco Certified Network Professional (CCNP),
VMware Certified Professional (VCP),
and
CompTIA A+ and Network+.
Mauro is a recognized Microsoft MVP and has also been a long-time contributor to Windows Central.
You can follow him on
YouTube,
Threads,
BlueSky,
X (Twitter),
LinkedIn and
About.me.
Email him at [email protected].
Windows PCs and laptops are more affordable and user friendly when you are buying a new computer for elderly ones. They still need some extra tweaks to make it elderly-friendly. Old people, especially those with difficulty in vision will need a bigger and faster mouse cursor on Windows 10.
Here we will show you how to change the cursor in Windows 10 into a bigger and faster one for better visibility.
Content
- Change Mouse Cursor Size in Windows 10
- Make Text Cursor Bigger in Windows 10
- Change Mouse Sensitivity/Speed in Windows 10
- Change Trackpad Sensitivity in Windows 10
Change Mouse Cursor Size in Windows 10
The default size of the mouse pointer or cursor in Windows 10 is visible enough for an average person. But if someone you know has difficulty in vision, especially old people, you can help them use the computer by making the cursor bigger in Windows 10.
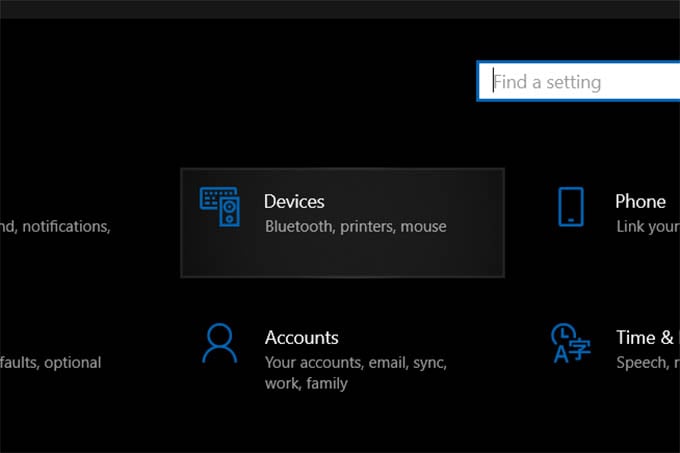
- Open Windows 10 settings by pressing Windows Key+I.
- Go to Devices from settings.
- Select Mouse from the left pane.

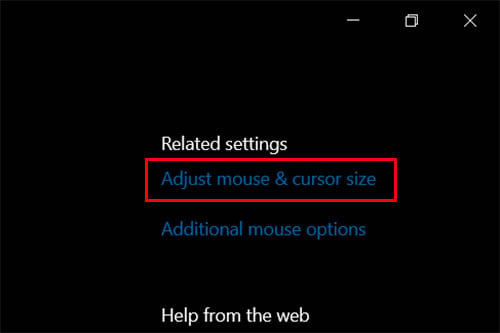
- Click on “Adjust mouse & cursor size” under the “Related settings” section.
- From the next window, use the slider under “change pointer size.”
- After making the cursor big enough to see, you can change the pointer color as well.
You should now see the mouse pointer cursor bigger on your Windows 10 PC screen. Go ahead and change the cursor size any time you want later if the new size is not comfortable for you.
Related: 10 Best Ways to Fix Windows Key Not Working on Windows 10 Computer Error
Make Text Cursor Bigger in Windows 10
Making the mouse pointer bigger in Windows 10 helps you navigate easily while using the computer. But when you are typing or editing a text, the text cursor will be just as small as before. To make typing far easier, you need to change the text cursor sie in Windows 10.
- Open Settings on Windows 10.
- Go to Devices and click on Mouse.
- Click on Change “Adjust mouse & cursor size.”
- On the following window, select Text Cursor from the left pane.

- Use slider under “Change text cursor appearance” to adjust the cursor width while typing.
- If that is not enough, toggle on the “text cursor indicator.”
- Choose a color and size for the text cursor indicator.
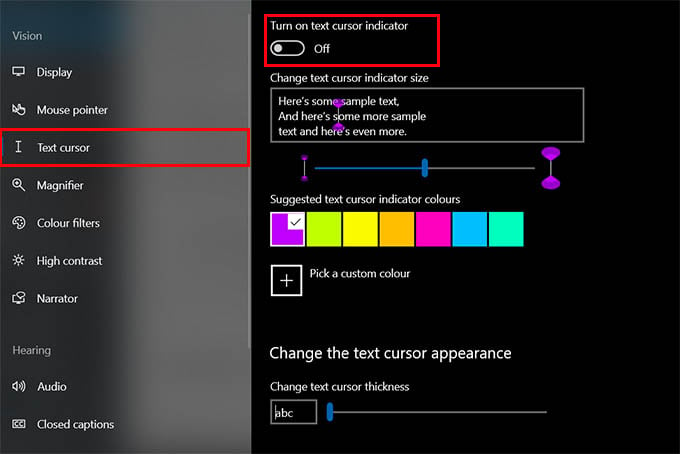
The text cursor indicator on Windows 10 is a colored indicator that appears on the top and bottom of the cursor, which will help you locate the cursor easily.
Related: How to Lock Windows 10 PC Remotely from Anywhere
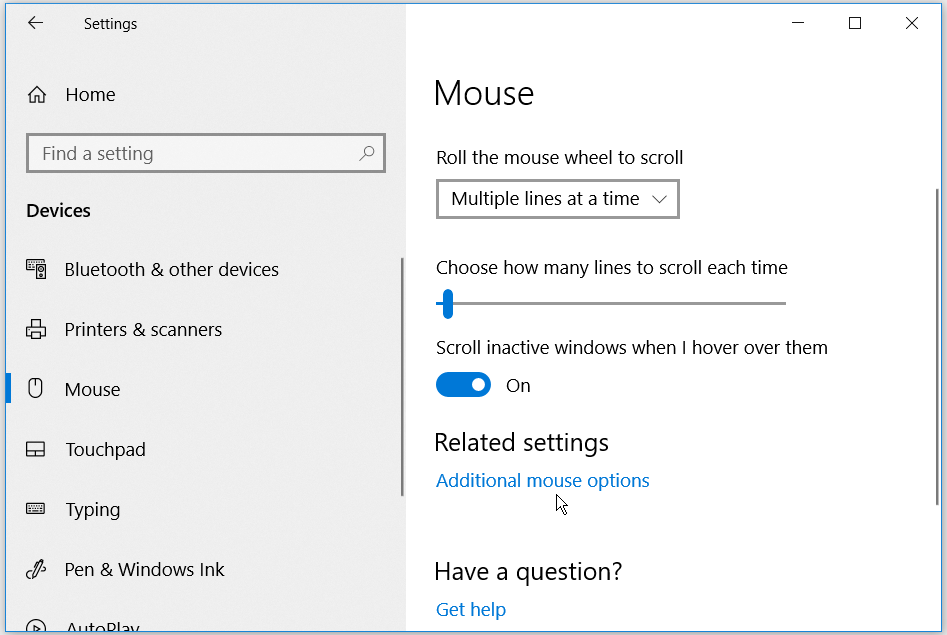
Change Mouse Sensitivity/Speed in Windows 10
If you are using the mouse too slow or feel like the cursor movement is too slow on the screen, you need to adjust the speed. You can change the mouse sensitivity on Windows 10 as follows.
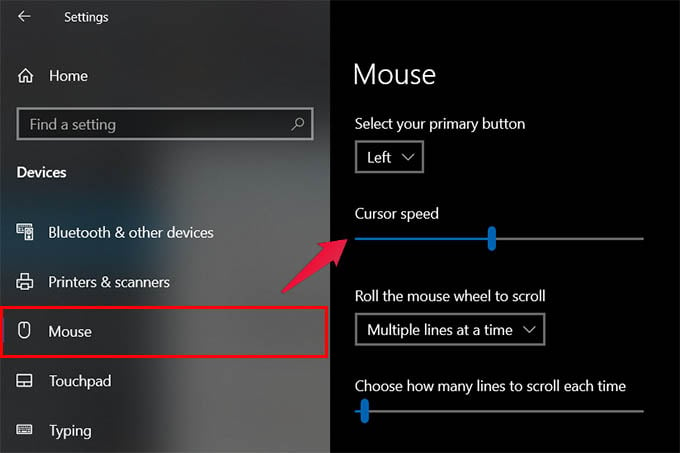
- Open Windows 10 Settings.
- Click on Devices.
- Go to Mouse.
- Use the “Cursor speed” slider to increase or decrease mouse pointer speed.
From the same window, you can also set the scroll amount when you use the mouse scroll wheel or trackpad scrolling. As you increase its sensitivity, more lines will scroll when you turn the mouse scroll wheel.
Related: How to Fix Windows 10 Cursor is Missing or Disappeared Error
Change Trackpad Sensitivity in Windows 10
For trackpad users too, the mouse sensitivity will affect the experience. If your trackpad is too small for you to reach all corners of the screen, changing the mouse sensitivity on Windows 10 will do.
The accidental touch on the touchpad is still an issue for many, especially elderly people. To avoid accidental touch on the trackpad, you can change the touch sensitivity of the trackpad
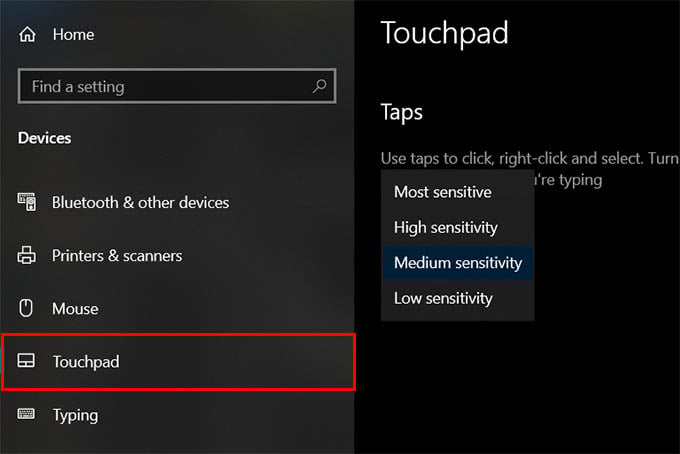
- Open Settings on Windows 10 laptop.
- Click on Devices.
- Go to the Touchpad menu.
- Click on the menu under “Touchpad sensitivity.”
- Choose “Low Sensitivity” to avoid accidental touch.
In case you need a faster response and a “MacBook-like” touch sensitivity, select high sensitivity or “Most Sensitive” from the menu. This will make your laptop trackpad even more sensitive and responsive.
While handing over a Windows PC or laptop to an elderly person, make sure the system has a bigger cursor and a faster mouse speed in order to help them use the PC easier. If you have not, use the above tweaks to change cursor speed and size on Windows 10 PC.
Disclosure: Mashtips is supported by its audience. As an Amazon Associate I earn from qualifying purchases.
Sign in to your MUO account
The mouse pointer is a fundamental part of how you interact with your PC. A pointer that’s too small or dull can seriously affect your productivity, and the default Windows 10 mouse pointer may appear small and unappealing.
At times, you might find it difficult to locate the default mouse pointer on your computer screen. Windows 10 has some exciting features that allow you to configure your mouse pointer size and color. In addition to this, you have the option to download third-party mouse pointers.
Why You Should Configure Your Mouse Settings
There are several reasons why you should configure your mouse pointer settings.
For example, if you have vision impairments, it may be a little harder for you to use the default Windows mouse pointer. Changing the pointer size and color can help make your mouse pointer stand out clearly on the screen.
It can be hard for you to clearly see the mouse pointer at its default size on high-resolution monitors. Reducing your screen resolution could turn out to be an ineffective solution. While you can configure the mouse DPI settings to make your mouse easier to use, the ability to make your mouse pointer bigger and colorful can be very helpful.
Here’s how you can change your mouse pointer size and color in Windows 10.
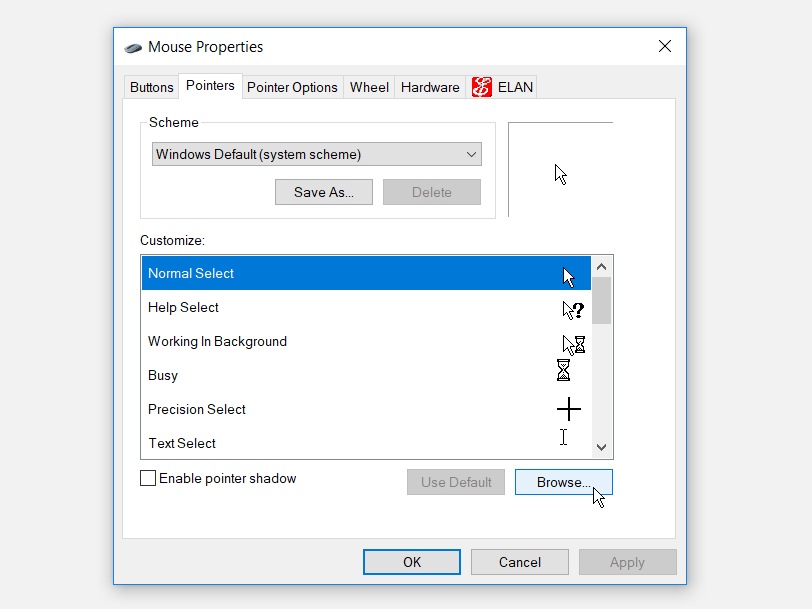
1. Change the Mouse Pointer Size and Color Via Device Settings
Open the Mouse Properties window by navigating to Windows Start Menu > PC Settings > Devices > Mouse > Additional mouse options.
In the window that pops up, click the Pointers tab. Select your desired mouse pointer scheme from the drop-down list under Scheme. Click Apply and then click OK to save the changes. You’ll be able to see a preview of the pointer scheme in the Customize box.
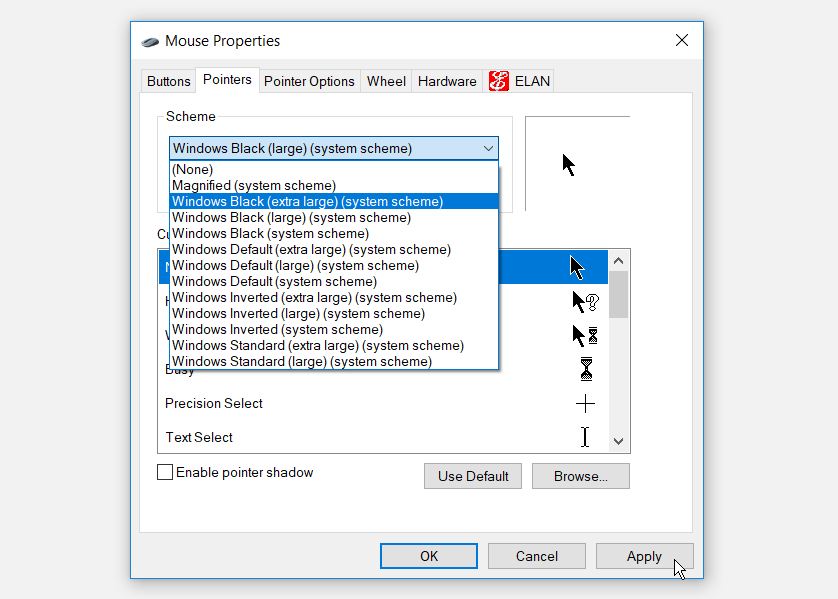
If you want to change your mouse pointer size and color back to their default settings, you can click the Use Default button.
2. Change the Mouse Pointer Size and Color Via Ease of Access Settings
Open the Mouse pointer window by navigating to Windows Start Menu > PC Settings > Ease of Access > Mouse pointer.
You can change your pointer size by dragging the slider under Change pointer size. Choose a pointer size from 1 to 15, where 1 is the default size. You can change your pointer color by selecting any of the four options under Change pointer color.
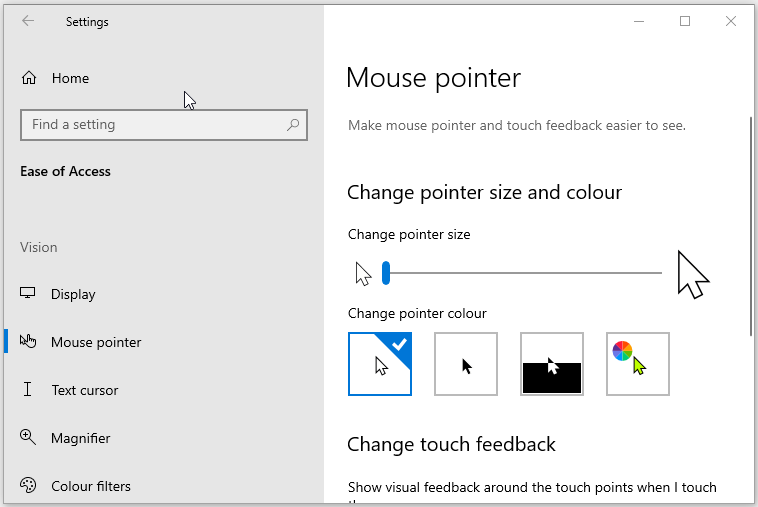
On the four different color options to choose from:
- The first option is the default white mouse pointer with a black border.
- The second option is a black pointer with a white border.
- The third option is an inverted pointer, which appears white on a black background and vice versa. The inverted pointer setting can help you identify the pointer with ease on any type of background.
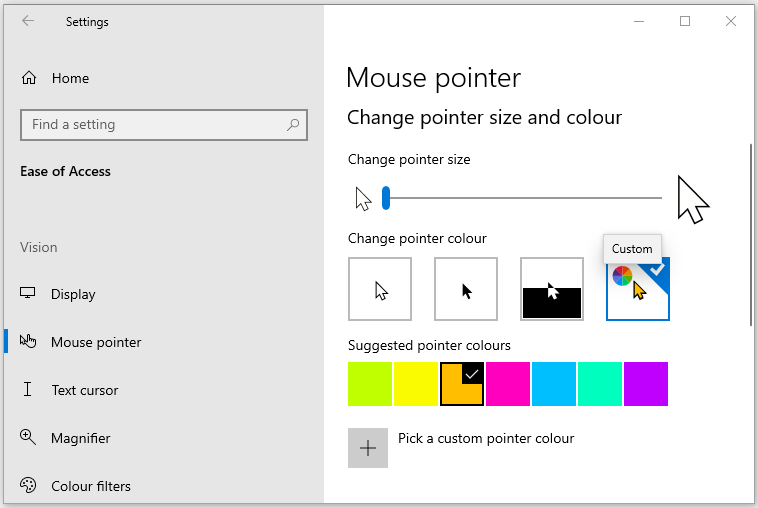
- The fourth option allows you to choose any pointer color of your choice.
If you choose the fourth option under the Change pointer color section, you’ll be able to choose a color from the Suggested pointer colors. If you don’t like these options, you can pick your own color by clicking Pick a custom pointer color.
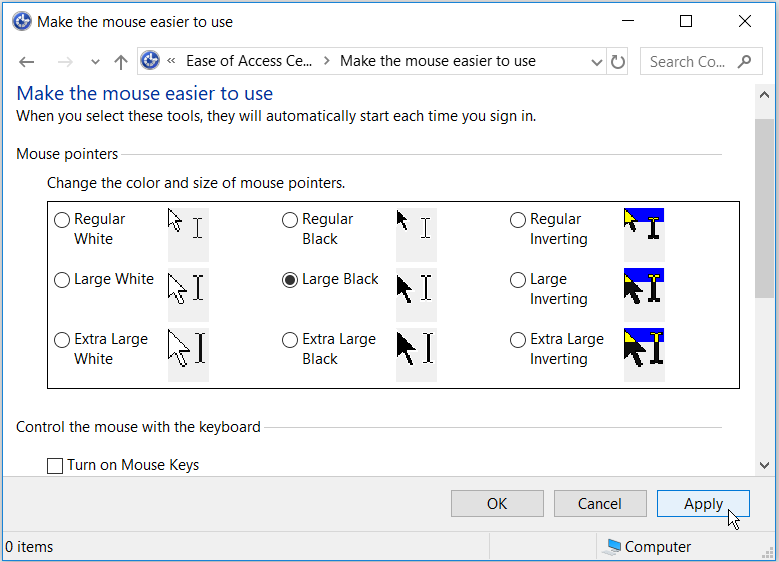
3. Change the Mouse Pointer Size and Color Via the Control Panel
Open the Control Panel by typing Control Panel in the Start Menu search bar and selecting the Best match. When you’re on the Control panel, navigate to Ease of access > Change how your mouse works.
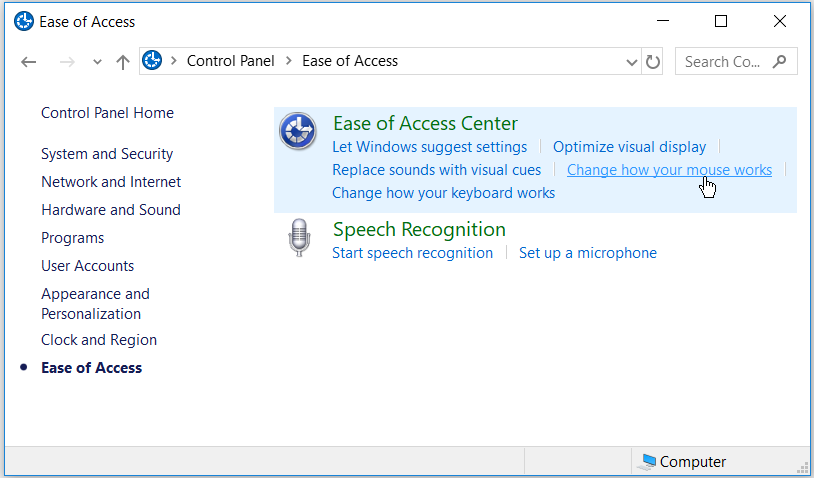
Under Mouse pointers, you can change the size and color of your mouse pointer by selecting any of the options that appear. When you’ve made a choice, click Apply and then click OK to save your changes.
4. Change the Mouse Pointer Size and Color via the Registry Editor
Press the Windows Key + R to open the Run command dialog box. Type Regedit and click Enter to open the Registry Editor. When you’re on the User Account Control prompt, click the Yes button to continue.
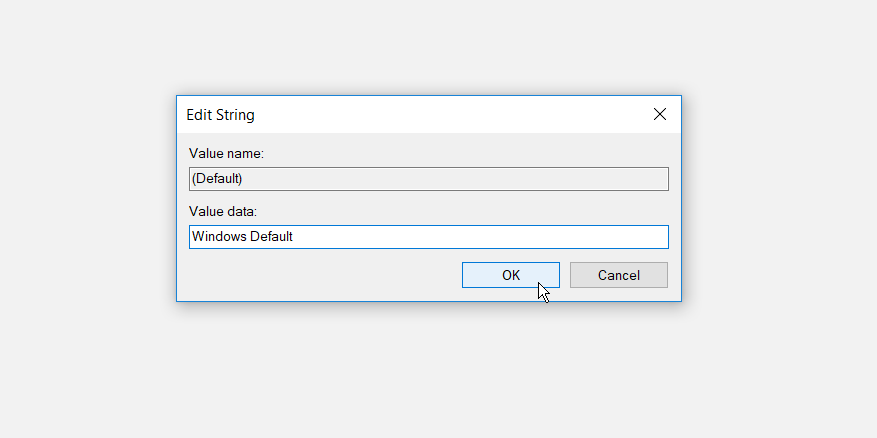
In the Registry Editor, navigate to HKEY_CURRENT_USER > Control Panel > Cursors.
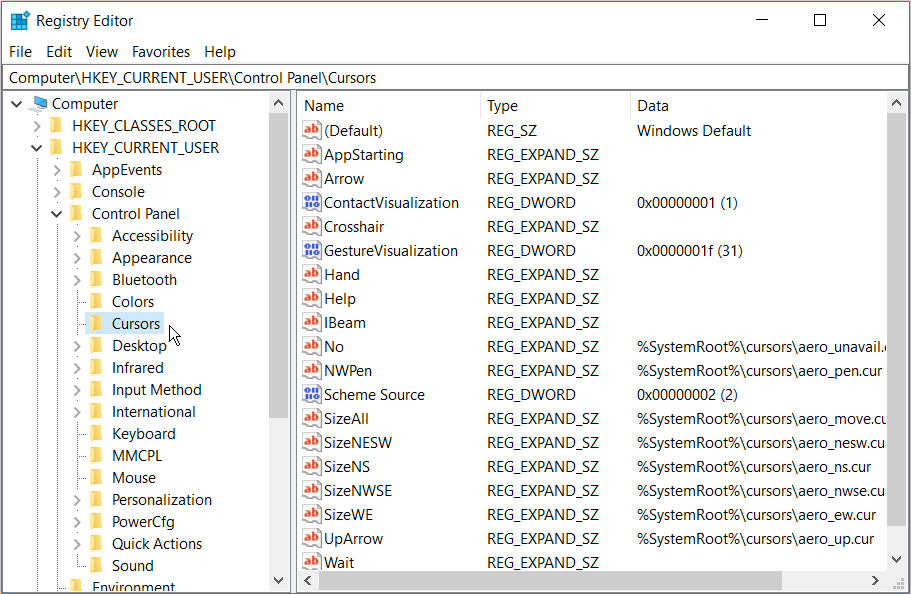
To Select a Pointer Scheme, double-click the (Default) string value in the right-hand side panel. By default, the value data for this string will be Windows Default. The other pointer scheme options you can put as data values are as follows:
- Magnified
- Windows Black (extra large)
- Windows Black (large)
- Windows Black
- Windows Default (extra large)
- Windows Default (large)
- Windows Inverted (extra large)
- Windows Inverted (large)
- Windows Inverted
- Windows Standard (extra large)
- Windows Standard (large)
To change the pointer scheme, simply type in the name of your desired pointer scheme in the Value data box and click OK to finish.
When you finish, close the Registry Editor and restart your computer to apply the changes.
5. Download Third-Party Mouse Pointers
If you’re looking for something more unique than the default Windows pointers, you can install third-party mouse pointers. There are many sites where you can download free attractive pointers, but you must look for safe sites for downloading Windows software.
Here’s how you can get started with installing third-party mouse pointers:
- Download your pointers from a trusted site such as Open Cursor Library.
- Extract your downloaded pointers file to any folder of your choice. To make things simple, you can extract your downloaded pointers to the Cursors folder on your PC. You can navigate to this folder by clicking This PC > Local Disk (C:) > Windows > Cursors.
- To select your downloaded pointers, open the Mouse Properties window by navigating to Windows Start Menu > PC Settings > Devices > Mouse > Additional mouse options.
- Click the Pointers tab in the Mouse Properties window. In the Customize box, select the first default mouse pointer and click Browse. This will help you look for the folder containing your new mouse pointers.
When you land on the mouse pointers folder, select your preferred mouse pointer and click Open. This will change the first default mouse pointer that you selected within the Customize box.
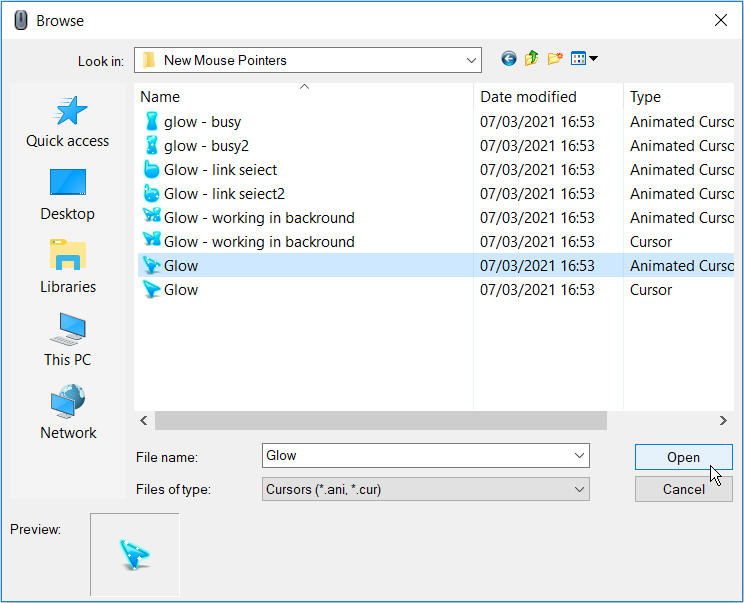
From here, select the other default mouse pointers in the Customize box and replace them with the relevant ones you’ve downloaded. When you finish, click Apply and click OK in the Pointers tab to save the changes.
What Are Your Favorite Mouse Pointer Sizes and Colors?
Changing your mouse pointer size and color is easy if you follow the tips in this article. As you can see, Windows 10 makes it easy for you to configure your mouse pointer settings.
You can also expand your options by downloading your favorite third-party mouse pointers. You can even take things a step further by creating your own custom mouse pointers.