
Последнее обновление: 31.10.2015
Для создания меню в Windows Forms применяется элемент MenuStrip. Данный класс унаследован от ToolStrip и
поэтому наследует его функциональность.
Наиболее важные свойства компонента MenuStrip:
-
Dock: прикрепляет меню к одной из сторон формы -
LayoutStyle: задает ориентацию панели меню на форме. Может также, как и с ToolStrip, принимать следующие значения-
HorizontalStackWithOverflow: расположение по горизонтали с переполнением — если длина меню превышает длину контейнера,
то новые элементы, выходящие за границы контейнера, не отображаются, то есть панель переполняется элементами -
StackWithOverflow: элементы располагаются автоматически с переполнением -
VerticalStackWithOverflow: элементы располагаются вертикально с переполнением -
Flow: элементы размещаются автоматически, но без переполнения — если длина панели меню меньше длины контейнера, то
выходящие за границы элементы переносятся -
Table: элементы позиционируются в виде таблицы
-
-
ShowItemToolTips: указывает, будут ли отображаться всплывающие подсказки для отдельных элементов меню -
Stretch: позволяет растянуть панель по всей длине контейнера -
TextDirection: задает направление текста в пунктах меню
MenuStrip выступает своего рода контейнером для отдельных пунктов меню, которые представлены объектом ToolStripMenuItem.
Добавить новые элементы в меню можно в режиме дизайнера:
Для добавления доступно три вида элементов: MenuItem (объект ToolStripMenuItem), ComboBox и TextBox. Таким образом,
в меню мы можем использовать выпадающие списки и текстовые поля, однако, как правило, эти элементы применяются в основном на панели инструментов.
Меню же обычно содержит набор объектов ToolStripMenuItem.
Также мы можем добавить пункты меню в коде C#:
public partial class Form1 : Form
{
public Form1()
{
InitializeComponent();
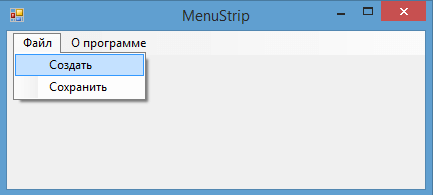
ToolStripMenuItem fileItem = new ToolStripMenuItem("Файл");
fileItem.DropDownItems.Add("Создать");
fileItem.DropDownItems.Add(new ToolStripMenuItem("Сохранить"));
menuStrip1.Items.Add(fileItem);
ToolStripMenuItem aboutItem = new ToolStripMenuItem("О программе");
aboutItem.Click += aboutItem_Click;
menuStrip1.Items.Add(aboutItem);
}
void aboutItem_Click(object sender, EventArgs e)
{
MessageBox.Show("О программе");
}
}
ToolStripMenuItem в конструкторе принимает текстовую метку, которая будет использоваться в качестве текста меню. Каждый подобный объект
имеет коллекцию DropDownItems, которая хранит дочерние объекты ToolStripMenuItem. То есть один элемент ToolStripMenuItem
может содержать набор других объектов ToolStripMenuItem. И таким образом, образуется иерархическое меню или структура в виде дерева.
Если передать при добавление строку текста, то для нее неявным образом будет создан объект ToolStripMenuItem: fileItem.DropDownItems.Add("Создать")
Назначив обработчики для события Click, мы можем обработать нажатия на пункты меню: aboutItem.Click += aboutItem_Click
Отметки пунктов меню
Свойство CheckOnClick при значении true позволяет на клику отметить пункт меню. А с помощью свойства Checked
можно установить, будет ли пункт меню отмечен при запуске программы.
Еще одно свойство CheckState возвращает состояние пункта меню — отмечен он или нет. Оно может принимать три значения:
Checked (отмечен), Unchecked (неотмечен) и Indeterminate (в неопределенном состоянии)
Например, создадим ряд отмеченных пунктов меню и обработаем событие установки / снятия отметки:
public partial class Form1 : Form
{
    public Form1()
    {
        InitializeComponent();

        ToolStripMenuItem fileItem = new ToolStripMenuItem("Файл");

        ToolStripMenuItem newItem = new ToolStripMenuItem("Создать") { Checked = true, CheckOnClick = true };
        fileItem.DropDownItems.Add(newItem);


        ToolStripMenuItem saveItem = new ToolStripMenuItem("Сохранить") { Checked = true, CheckOnClick = true };
        saveItem.CheckedChanged += menuItem_CheckedChanged;

        fileItem.DropDownItems.Add(saveItem);

        menuStrip1.Items.Add(fileItem);
    }

    void menuItem_CheckedChanged(object sender, EventArgs e)
    {
        ToolStripMenuItem menuItem = sender as ToolStripMenuItem;
        if (menuItem.CheckState == CheckState.Checked)
            MessageBox.Show("Отмечен");
        else if (menuItem.CheckState == CheckState.Unchecked)
            MessageBox.Show("Отметка снята");
    }
}
Клавиши быстрого доступа
Если нам надо быстро обратиться к какому-то пункту меню, то мы можем использовать клавиши быстрого доступа. Для задания клавиш быстрого доступа
используется свойство ShortcutKeys:
public partial class Form1 : Form
{
    public Form1()
    {
        InitializeComponent();

        ToolStripMenuItem fileItem = new ToolStripMenuItem("Файл");

		ToolStripMenuItem saveItem = new ToolStripMenuItem("Сохранить") { Checked = true, CheckOnClick = true };
        saveItem.Click+=saveItem_Click;
        saveItem.ShortcutKeys = Keys.Control | Keys.P;

		fileItem.DropDownItems.Add(saveItem);
		menuStrip1.Items.Add(fileItem);
    }

    void saveItem_Click(object sender, EventArgs e)
    {
        MessageBox.Show("Сохранение");
    }
}
Клавиши задаются с помощью перечисления Keys. В данном случае по нажатию на комбинацию клавиш Ctrl + P, будет срабатывать нажатие на пункт
меню «Сохранить».
С помощью изображений мы можем разнообразить внешний вид пунктов меню. Для этого мы можем использовать следующие свойства:
-
DisplayStyle: определяет, будет ли отображаться на элементе текст, или изображение, или и то и другое. -
Image: указывает на само изображение -
ImageAlign: устанавливает выравнивание изображения относительно элемента -
ImageScaling: указывает, будет ли изображение растягиваться, чтобы заполнить все пространство элемента -
ImageTransparentColor: указывает, будет ли цвет изображения прозрачным
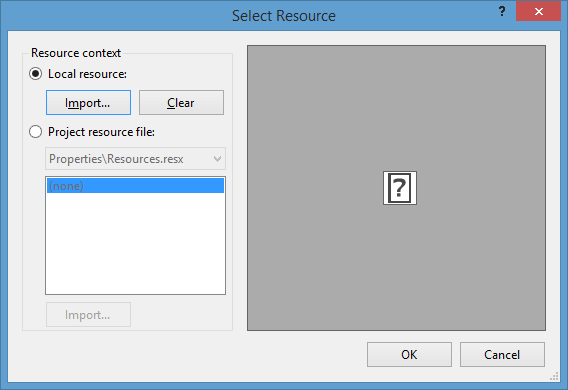
Если изображение для пункта меню устанавливает в режиме дизайнера, то нам надо выбрать в окне свойство пункт Image, после чего откроется
окно для импорта ресурса изображения в проект
Чтобы указать, как разместить изображение, у свойства DisplayStyle надо установить значение Image. Если мы хотим, чтобы
кнопка отображала только текст, то надо указать значение Text, либо можно комбинировать два значения с помощью другого
значения ImageAndText. По умолчанию изображение размещается слева от текста:
Также можно установить изображение динамически в коде:
fileToolStripMenuItem.Image = Image.FromFile(@"D:\Icons\0023\block32.png");
The MenuStrip class is the foundation of menus functionality in Windows Forms. If you have worked with menus in .NET 1.0 and 2.0, you must be familiar with the MainMenu control. In .NET 3.5 and 4.0, the MainMenu control is replaced with the MenuStrip control.
Creating a MenuStrip
We can create a MenuStrip control using a Forms designer at design-time or using the MenuStrip class in code at run-time or dynamically.
To create a MenuStrip control at design-time, you simply drag and drop a MenuStrip control from Toolbox to a Form in Visual Studio. After you drag and drop a MenuStrip on a Form, the MenuStrip1 is added to the Form and looks like Figure 1. Once a MenuStrip is on the Form, you can add menu items and set its properties and events.
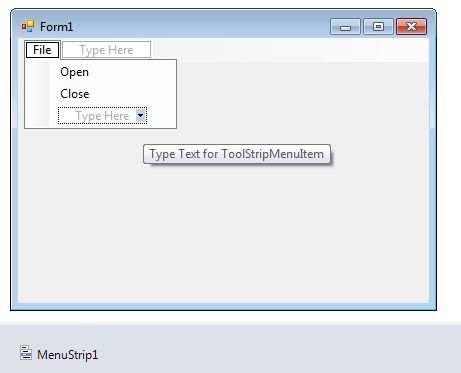
Figure 1
Creating a MenuStrip control at run-time is merely a work of creating an instance of MenuStrip class, setting its properties and adding MenuStrip class to the Form controls.
The first step to create a dynamic MenuStrip is to create an instance of MenuStrip class. The following code snippet creates a MenuStrip control object.
C# Code
- MenuStrip MainMenu = new MenuStrip();
VB.NET Code
- Dim MainMenu AsNewMenuStrip()
In the next step, you may set properties of a MenuStrip control. The following code snippet sets background color, foreground color, Text, Name, and Font properties of a MenuStrip.
C# Code
- MainMenu.BackColor = Color.OrangeRed;
- MainMenu.ForeColor = Color.Black;
- MainMenu.Text = «File Menu»;
- MainMenu.Font = newFont(«Georgia», 16);
VB.NET Code
- MainMenu.BackColor = Color.OrangeRed
- MainMenu.ForeColor = Color.Black
- MainMenu.Text = «File Menu»
- MainMenu.Font = NewFont(«Georgia», 16)
Once the MenuStrip control is ready with its properties, the next step is to add the MenuStrip to a Form. To do so, first we set MainMenuStrip property and then use Form.Controls.Add method that adds MenuStrip control to the Form controls and displays on the Form based on the location and size of the control. The following code snippet adds a MenuStrip control to the current Form.
C# Code
- this.MainMenuStrip = MainMenu;
- Controls.Add(MainMenu);
VB.NET Code
- Me.MainMenuStrip = MainMenu
- Controls.Add(MainMenu)
Setting MenuStrip Properties
After you place a MenuStrip control on a Form, the next step is to set properties.
The easiest way to set properties is from the Properties Window. You can open Properties window by pressing F4 or right clicking on a control and selecting Properties menu item. The Properties window looks like Figure 2.
Figure 2
Name
Name property represents a unique name of a MenuStrip control. It is used to access the control in the code. The following code snippet sets and gets the name and text of a MenuStrip control.
C# Code
- MainMenu.Name = «MainMenu»;
VB.NET Code
- MainMenu.Name = «MailMenu»
Positioning a MenuStrip
The Dock property is used to set the position of a MenuStrip. It is of type DockStyle that can have values Top, Bottom, Left, Right, and Fill. The following code snippet sets Location, Width, and Height properties of a MenuStrip control.
C# Code
- MainMenu.Dock = DockStyle.Left;
VB.NET Code
- MainMenu.Dock = DockStyle.Left
Font
Font property represents the font of text of a MenuStrip control. If you click on the Font property in Properties window, you will see Font name, size and other font options. The following code snippet sets Font property at run-time.
C# Code
- MainMenu.Font = newFont(«Georgia», 16);
VB.NET Code
- MainMenu.Font = newFont(«Georgia», 16)
Background and Foreground
BackColor and ForeColor properties are used to set background and foreground color of a MenuStrip respectively. If you click on these properties in Properties window, the Color Dialog pops up.
Alternatively, you can set background and foreground colors at run-time. The following code snippet sets BackColor and ForeColor properties.
C# Code
- MainMenu.BackColor = Color.OrangeRed;
- MainMenu.ForeColor = Color.Black;
VB.NET Code
- MainMenu.BackColor = Color.OrangeRed
- MainMenu.ForeColor = Color.Black
The new MenuStrip with background and foreground looks like Figure 3.

Figure 3
MenuStrip Items
A Menu control is nothing without menu items. The Items property is used to add and work with items in a MenuStrip. We can add items to a MenuStrip at design-time from Properties Window by clicking on Items Collection as you can see in Figure 4.
Figure 4
When you click on the Collections, the String Collection Editor window will pop up where you can type strings. Each line added to this collection will become a MenuStrip item. I add four items as you can see from Figure 5.
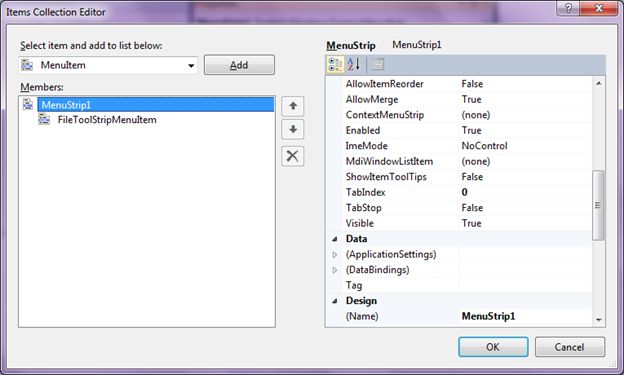
Figure 5
A ToolStripMenuItem represents a menu items. The following code snippet creates a menu item and sets its properties.
C# Code
- ToolStripMenuItem FileMenu = newToolStripMenuItem(«File»);
- FileMenu.BackColor = Color.OrangeRed;
- FileMenu.ForeColor = Color.Black;
- FileMenu.Text = «File Menu»;
- FileMenu.Font = newFont(«Georgia», 16);
- FileMenu.TextAlign = ContentAlignment.BottomRight;
- FileMenu.ToolTipText = «Click Me»;
VB.NET Code
- Dim FileMenu AsNewToolStripMenuItem(«File»)
- FileMenu.BackColor = Color.OrangeRed
- FileMenu.ForeColor = Color.Black
- FileMenu.Text = «File Menu»
- FileMenu.Font = NewFont(«Georgia», 16)
- FileMenu.TextAlign = ContentAlignment.BottomRight
- FileMenu.TextDirection = ToolStripTextDirection.Vertical90
- FileMenu.ToolTipText = «Click Me»
Once a menu item is created, we can add it to the main menu by using MenuStrip.Items.Add method. The following code snippet adds FileMenu item to the MainMenu.
C# Code
- MainMenu.Items.Add(FileMenu);
VB.NET Code
- MainMenu.Items.Add(FileMenu)
Adding Menu Item Click Event Handler
The main purpose of a menu item is to add a click event handler and write code that we need to execute on the menu item click event handler. For example, on File >> New menu item click event handler, we may want to create a new file.
To add an event handler, you go to Events window and double click on Click and other as you can see in Figure 6.
Figure 6
We can also define and implement an event handler dynamically. The following code snippet defines and implements these events and their respective event handlers.
C# Code
- FileMenu.Click += new System.EventHandler(this.FileMenuItemClick);
- privatevoid FileMenuItemClick(object sender, EventArgs e) {
- MessageBox.Show(«File menu item clicked»);
- }
VB.NET Code
- Dim FileMenuItem AsNewToolStripMenuItem(«File», Nothing, _
- NewEventHandler(AddressOf FileMenuItemClick))
- PrivateSub FileMenuItemClick (ByVal sender AsObject, ByVal e AsEventArgs)
- MessageBox.Show(«File menu item clicked!»)
- EndSub
Summary
In this article, we discussed how to create menus using the MenuStrip control. First we discussed how to create menus at design-time and run-time. After that we saw how to set menu properties and click event handlers.
Menu bars can be seen in almost every application out there. Menus are used to contain different commands that the user can use. You can add menu bars to a form by using the MenuStrip control (System.Windows.Forms.MenuStrip). The MenuStrip is the container of the different menus. To add a menu bar to your form, drag a MenuStrip control from the Toolbox. It is located in the Menus & Toolbars Section.
You can also see the MenuStrip control in a section located at the bottom of the Designer. Located here are some non-visual components such as a Timer control and many more.
The MenuStrip control has the following useful properties.
| Property | Description |
|---|---|
| Dock | Determines which location to dock the menu bar. The default is Top. |
| GripStyle | Allows you to show the grip which is used to repositions items in the menu strip. |
| Items | A collection of top-level menus. |
| Stretch | Specifies whether the MenuStrip stretches from end to end in its container. |
Figure 1 – MenuStrip Properties
Adding Standard Menus
Visual Studio offers you a way to automatically add standard items to the MenuStrip control. To do this, open the smart tag, which can be done by pressing the arrow button at the upper right side of the MenuStrip.
Then choose Insert Standard Items.
Visual Studio will fill the MenuStrip with standard menus such as Creating New files, Saving Files, Loading and many more.
Adding Your Own Menus
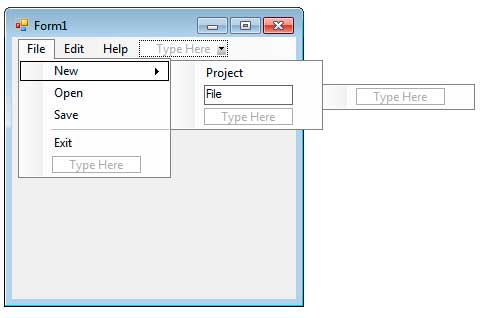
The standard menus might not suit what you specifically need. We can create our own custom menu bar using Visual Studio’s tools. You can either undo the placement of the standard menu by hitting Ctrl+Z or you can simply delete the MenuStrip and add a new one. To add a menu item, click the box labeled “Type Here” and type the name of the menu.
You will notice that as you type, another box will appear beside and below it so you can add more items. As an example, type File, Edit, and Help in the MenuStrip.
To add submenus, click a menu item it will open up a container for all its submenus. You will also see a box that will allow you to insert sub menus.
If you want to add a separator, type the – character.
You can even create submenus of submenus. You can nest and nest menus if you want to. A submenu which contains another submenu can be identified by the arrow at its right side.
Each text menu item you add is represented by ToolStripMenuItem. The separator is represented by ToolStripSeparator. The ToolStripSeparator is only used to separate related menus. Each ToolStripMenuItem is added to the MenuStrip‘s Item property and each submenu is added to the ToolStripMenuItem‘s DropDownItems property. Visual Studio automatically adds a name to each ToolStripMenuItem control which is based on the text you specified. Let’s discuss the properties of the ToolStripMenuItem.
| Property | Description |
|---|---|
| Checked | Tells whether the item is checked. |
| CheckOnClick | Tells whether an item will be checked or unchecked when it is clicked. |
| CheckState | Tells whether the item is checked or unchecked. |
| DropDownItems | A collection of submenus of the current item. |
| Enabled | Enables of disables this item. |
| Image | An optional image or icon that is shown at the left of the label. |
| ShortcutKeys | The shortcut keys associated with the ToolStripMenuItem. |
| ShowShortcutKeys | Tells whether the shortcut keys for an item is shown in the menu. |
| Text | The text or label of the menu item. |
| ToolTipText | The text inside the tooltip that appears when you hover your mouse on the menu item. |
Figure 2 – ToolStripMenuItem Properties
Checking and Unchecking Menu Items
The CheckOnClick property allows a menu item to be checked or unchecked. For example, you can have a menu that shows a list of windows that will be shown. You can turn their CheckOnClick properties to true. When a menu item is checked, you will see a check in its left side.
You can use the Checked or CheckState property of the menu item to tell whether it is checked or unchecked.
Adding Shortcut Keys to a Menu Item
You can add shortcut keys to a menu item. The easiest one is by using the & (ampersand) character when typing the name of the menu item.
The letter following the & character will be considered as the shortcut key. For example, &Save will have S as the shortcut key and E&xitwill have the X as the shortcut key. At the designer, the shortcut key will be underlined. The underline will not be shown during runtime unless you hit the Alt key. Using this type of shortcut key requires the use of the Alt key. To activate a menu item, you hit the Alt + Shortcut Key. For example, if the shortcut Key of the File menu is F, then you use Alt + F combination to activate the menu item.
If you want more complex shortcut combinations, then we have to use the ShortcutKeys property. Select a menu item and then go to the Properties Window and find the ShortcutKeys property. Click the drop down arrow to show you a small window that allows you to choose the shortcut keys for the current menu item.
Once you specified a shortcut combination, it will now appear beside the label of a menu item provided that the ShowShortcutKeysproperty of the menu item is set to True.
Adding Icons to Menu Items
You can add images or icons at the left side of a menu item as seen in the standard menus.
We use the Image property to do just that. Click the drop down button of the Image property in the Property Window. Choose which resource to use and then browse for the appropriate image. If the image is too large, then it will automatically be scaled based on the value of the ImageScaling property.
Adding Functionality to the Menu Items
Menu items have the Click event which occurs when the menu item is clicked. We can handle this event to give functionality to menu items. To add a Click event to a menu item, in the Designer, double-click the menu item and Visual Studio will automatically create an event handler for you. For menu items that have CheckOnClick properties set to true, you can handle the CheckedChange or CheckStateChange events. As an example create another form and create a menu as seen below.
Double click the Exit menu item. Visual Studio will create an event handler for its Click event. Add the following code.
private void exitToolStripMenuItem_Click(object sender, EventArgs e)
{
    Application.Exit();
}
The static method Exit of the Application class simply closes the application.
Использование ToolStrip для организации меню на главной форме приложения
Для организации меню на главной форме приложения возможно использование ToolStrip.
Внимание! Версия Visual Studio должна быть 2005 или выше.
В основном проекте приложения в скобках программиста необходимо указать три метода:
AddToolStripMenu
ChangeToolStripMenuItem
CopyMenuToStrip
// *** Start programmer edit section *** (ThreatsModelDesktop CustomMembers)
        static void AddToolStripMenu(ToolStrip ts, int menuindex, int submenuindex,
            string Text, Image image, EventHandler e, System.Windows.Forms.Keys shortkeys)
        {
            ((ToolStripMenuItem)ts.Items[menuindex]).DropDownItems.Insert(submenuindex, new ToolStripMenuItem(Text, null, e));
            ChangeToolStripMenuItem(ts, menuindex, submenuindex, image, shortkeys);
        }
        static void ChangeToolStripMenuItem(ToolStrip ts, int menuindex, int submenuindex, Image image, System.Windows.Forms.Keys shortkeys)
        {
            ToolStripMenuItem tsmi = ((ToolStripMenuItem)((ToolStripMenuItem)ts.Items[menuindex]).DropDownItems[submenuindex]);
            tsmi.ShortcutKeys = shortkeys;
            tsmi.ShowShortcutKeys = true;
            tsmi.ImageTransparentColor = Color.Magenta;
            tsmi.Image = image;
        }
        static void CopyMenuToStrip(MenuItem mi, ToolStrip ts, ToolStripMenuItem tsmi)
        {
            if (!mi.Visible) return;
            ToolStripItem mtddb = null;
            if (mi.Text == "-")
            {
                mtddb = new ToolStripSeparator();
                tsmi.DropDownItems.Add(mtddb);
            }
            else
            {
                mtddb = new ToolStripMenuItem(mi.Text, null, mtsb_Click);
                if (tsmi == null) ts.Items.Add(mtddb);
                else tsmi.DropDownItems.Add(mtddb);
            }
            mtddb.Tag = mi;
            for (int i = 0; i < mi.MenuItems.Count; i++)
            {
                CopyMenuToStrip(mi.MenuItems[i], ts, (ToolStripMenuItem)mtddb);
            }
        }
В методе main в скобках программиста изменяются настройки меню:
//Уберем Properties
desktop.menuItem1.MenuItems[0].Visible = false;
//Вставим обработчик на Help
desktop.menuItem4.Click += new EventHandler(menuItem4_Click);
//Скопируем существующее меню в ToolStrip
ToolStrip ts = new ToolStrip();
ts.Parent = desktop;
for (int i = 0; i < desktop.mainMenu1.MenuItems.Count; i++)
{
CopyMenuToStrip(desktop.mainMenu1.MenuItems[i],ts,null);
desktop.mainMenu1.MenuItems[i].Visible = false; //скрываем меню..
}
//Добавить новые элементы меню с картинками и горячими клавишами
AddToolStripMenu(ts, 0, 0, "Создать модель ИСПДн", (System.Drawing.Image)global::IIS.Product.Properties.Resources.new16,new EventHandler(WorkMenu_Click),Keys.Alt | Keys.N);
AddToolStripMenu(ts, 0, 1, "Открыть модель ИСПДн...",(System.Drawing.Image)global::IIS.Product.Properties.Resources.Open16, new EventHandler(WorkMenu_Click), Keys.Alt | Keys.O);
ts.Items.Insert(1,new ToolStripMenuItem("Справочники"));
AddToolStripMenu(ts, 1, 0, "Угрозы...", null, new EventHandler(WorkMenu_Click), Keys.Alt | Keys.U);
AddToolStripMenu(ts, 1, 1, "Меры противодействия...", null, new EventHandler(WorkMenu_Click), Keys.Alt | Keys.M);
AddToolStripMenu(ts, 2, 1, "Лицензионное соглашение...", (System.Drawing.Image)global::IIS.Product.Properties.Resources.Attrib16,  new EventHandler(menuItem4_Click), Keys.Alt | Keys.F10);
//Для меню "Выход", вставляем иконку и горячую клавишу
ChangeToolStripMenuItem(ts, 0, 3,(System.Drawing.Image)global::IIS.Product.Properties.Resources.Exit16, Keys.Alt | Keys.X);
//Для меню "Помощь..." , вставляем иконку и горячую клавишу
ChangeToolStripMenuItem(ts, 2, 0,(System.Drawing.Image)global::IIS.Product.Properties.Resources.Help16,  Keys.F1);
В результате компиляции обновляется интерфейс:
Меню «Файл»:
Меню «Справочники»:
Меню «?»:
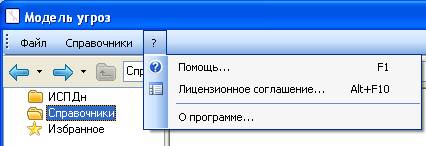
В результате решено несколько проблем:
- Меню выглядит более консервативно.
- Усилен визуальный эффект от меню за счет иконок.
- Расширена возможность горячих клавиш.
Меню в главной форме приложения
В приложении в методе Main необходимо найти переменную desktop, у которой в свойствах находятся все элементы существующего меню.
Пример
- Убрать видимость элемента меню “Свойства”.
- Добавить элемент меню “Сменить пользователя” с обработчиком.
- Добавить обработчик на элемент меню “Помощь”.
[STAThread()]
static void Main()
{
//...
      БорьбаDesktop desktop = new БорьбаDesktop();
      //...
      desktop.menuItem1.MenuItems[0].Visible = false;                 //Свойства;
      desktop.menuItem1.MenuItems.Add(0,new MenuItem("Сменить пользователя...",new EventHandler(БорьбаDesktop_Click)));
      desktop.menuItem4.Click += new EventHandler(menuItem4_Click);   //Помощь;
      //...
}
Chapter 4. Menus and Toolbars
Menus are often the only practical way to present a rich array of
functionality without cluttering up the user interface. Whether
appearing at the top of the window, or as a context menu accessed
through the righthand mouse button, menus allow an application to
show concisely which operations are available. An
application’s usability can be further enhanced by
making the most important operations available through toolbar
buttons as well as menus.
The Windows Forms framework provides support for both menus and
toolbars. Despite the fact that these two technologies serve similar
roles—toolbar buttons often correspond directly to menu
items—they are presented through two largely unrelated parts of
the class library. However, as we will see later, it is possible to
unify the way you handle events from them in your application.
In this chapter, we will first examine the support for menus. Then we
will see how to create toolbars. Finally, we will see how events from
both can be dealt with by a single set of event handlers.
Menus
The
Windows Forms framework provides support for adding menus to your
applications. It uses a single programming model both for normal
window menus and for context menus. The model allows menus to be
modified dynamically, or even combined, providing flexibility at
runtime, and supports the ability to reuse and extend menu
definitions.
We will start by examining the object model used for constructing
menus. Then we will see how to attach them to a form. Next, we will
look at how to add context menus. Finally, we will see how to reuse
and extend your menu definitions by merging items from one menu into
another, both in the context of MDI applications, and also when
reusing forms through inheritance.
The Object Model
For your application to use menus, you must provide Windows Forms
with a description of their structure and contents. You do this by
building hierarchies of objects that represent menus and the items
they contain. Although you will typically get Visual Studio .NET to
do this for you, a sound understanding of the object model it uses is
important to use menus effectively in your applications.
This object model revolves around the
Menu class, which is arguably misnamed, because it
represents a more abstract concept than its title suggests. It can
correspond to any element of a menu structure, and it is the base
class of all the other types in the menu object model. So while a
Menu object might represent a menu, it could just
represent a single item of a menu. (Perhaps
MenuElement would have been a more descriptive
name.) Representing menus and menu items with the same base type
seems a little strange at first, but it makes sense when you consider
that menus can be hierarchical. A menu item might well be a nested
menu, in which case, it makes sense for that menu item to be
represented by an object whose class derives from
Menu.
The main job of the Menu class is to represent the
structure of a menu. You can find out whether a particular
Menu object is a leaf item or an item with
children by examining its
IsParent property. If
IsParent is true, its child
items will be in a collection on the object’s
MenuItems property.
You will never use the Menu class directly. Its
constructor is protected, which means that to obtain a reference to a
Menu, you must instead create one of its
derivatives: MainMenu,
ContextMenu, or MenuItem.
The
MainMenu class
represents a form’s main menu, and
ContextMenu
represents a pop-up context menu. Every menu structure has one or the
other of these at its root, and you’ll see more
about how to use them later on. But everything else in the menu is
represented by
MenuItem objects.
Every line that the user sees in a menu (and every top-level menu in
a form’s main menu) is represented by a
MenuItem. A leaf item (i.e., a menu item that does
not lead to a submenu) is indicated by the fact that it has no
children. If the item leads to a submenu, the same object represents
both the item and the submenu.
Figure 4-1 shows an example application with
a main menu. As you can see, a single MenuItem
object represents both the Edit caption and the menu associated with
it. Each entry in the menu (Undo, Redo, etc.) has its own
MenuItem object. The object that corresponds to
the Find and Replace item also represents the submenu (although the
entries in that submenu all have their own
MenuItem objects).
Figure 4-1. Menus and their objects
We’ll now look at how to go about building such
hierarchies of objects to add menus to an application.
Building menus
The easiest way to create a menu is to
use the Visual Studio .NET Forms Designer. It provides two
menu-related controls in the tool box: MainMenu
and ContextMenu. Each of these provides a visual
interface for editing the contents of a menu. Somewhat confusingly,
Visual Studio uses the same interface for both. This is a little
strange, because it means that the editor makes context menus look
like the form’s main menu. But this is just a
design-time anomaly—context menus are displayed correctly at
runtime.
As we have seen in previous chapters, anything done in the Forms
Designer simply ends up generating code. Menus are no exception, and
regardless of which kind of menu you create, the Forms Designer
generates the same kind of code. It will create a top-level menu
(either a MainMenu or a
ContextMenu), and then one
MenuItem
for each element of each menu. The C# code appears as follows:
this.mainMenu = new System.Windows.Forms.MainMenu();

this.menuFile = new System.Windows.Forms.MenuItem();

this.menuFileNew = new System.Windows.Forms.MenuItem();

this.menuFileOpen = new System.Windows.Forms.MenuItem();

this.menuFileClose = new System.Windows.Forms.MenuItem();

this.menuFileExit = new System.Windows.Forms.MenuItem();
The corresponding VB code is:
Me.mainMenu = New System.Windows.Forms.MainMenu()

Me.menuFile = New System.Windows.Forms.MenuItem()

Me.menuFileNew = New System.Windows.Forms.MenuItem()

Me.menuFileOpen = New System.Windows.Forms.MenuItem()

Me.menuFileClose = New System.Windows.Forms.MenuItem()

Me.menuFileExit = New System.Windows.Forms.MenuItem()
Tip
By default, the Designer will choose unhelpful names for the menu
items, such as menuItem1,
menuItem2, etc. If you want your code to be
readable, it is a good idea to change each menu
item’s Name property to something
more meaningful in the Designer, as has been done in this example.
(The Name property is in the Design category of
the Properties window.)
Of course, creating a few menu items is
not enough to describe the menu fully—with the code as it
stands, Windows Forms will have no idea that
menuFile is an item of
mainMenu, or that menuFileNew,
menuFileOpen, and menuFileClose
are members of menuFile. So the designer also
generates code to establish the menu hierarchy.[15] In C#, the code looks
like this:
//

// mainMenu

//

this.mainMenu.MenuItems.AddRange(

    new System.Windows.Forms.MenuItem[] {

        this.menuFile,

        this.menuEdit,

        this.menuView,

        this.menuHelp});

//

// menuFile

//

this.menuFile.Index = 0;

this.menuFile.MenuItems.AddRange(

    new System.Windows.Forms.MenuItem[] {

        this.menuFileNew,

        this.menuFileOpen,

        this.menuFileClose,

        this.menuFileExit});
In VB:
'mainMenu

'

Me.mainMenu.MenuItems.AddRange( _

    New System.Windows.Forms.MenuItem() _

        {Me.menuFile, _

         Me.menuEdit, _

         Me.menuView,

         Me.menuHelp})

'

'menuFile

'

Me.menuFile.Index = 0

Me.menuFile.MenuItems.AddRange( _

    New System.Windows.Forms.MenuItem() _

        {Me.menuFileNew, _

         Me.menuFileOpen, _

         Me.menuFileClose, _

         Me.menuFileExit})
Note that the designer uses the same code for adding items to the
main menu as for adding items to the File submenu. This illustrates
why all the various menu classes derive from the
Menu base class—Menu
supplies the functionality common to all menu elements, such as the
ability to contain menu items.
A menu’s items are stored in the
MenuItems property,
whose type is the special-purpose collection class
Menu.MenuItemCollection. The code uses this
collection’s AddRange method to
add a list of MenuItem objects. Of course, because
each MenuItem inherits from
Menu, it has a MenuItems
property too, and can have further subitems added—this is how
nested menu structures are built.
The order in which you add menu items to a parent menu has no bearing
on the order in which they appear on screen. Their order is
controlled by the
Index property. This
property is an int or Integer,
and it is used to number child items sequentially starting from 0.
(The Designer does this automatically, and adjusts the
Index properties when you reorder items visually.)
The framework will also need to know what text should be displayed
for each menu item, and whether it has any keyboard shortcut
associated with it. So for each item, the Designer generates code
like this in C#:
this.menuFileNew.Index = 0;

this.menuFileNew.Shortcut = System.Windows.Forms.Shortcut.CtrlN;

this.menuFileNew.Text = "&New...";
And code like this in VB:
Me.menuFileNew.Index = 0

Me.menuFileNew.Shortcut = System.Windows.Forms.Shortcut.CtrlN

Me.menuFileNew.Text = "&New..."
As we have already seen, the Index property
determines the order in which menu items appear. The
Text property determines what text should be
displayed. (If you set this to a hyphen, the menu item will appear as a
separator—a dividing line between
menu items.) The
ampersand denotes something called an
accelerator; both this and the
Shortcut
property allow experienced users to use menus much more quickly than
would otherwise be possible.
Accelerators and shortcut keys
Most Windows applications can be
controlled from the keyboard as well as with the mouse. In fact, this
is a requirement for earning the Designed for Windows logo.
Accelerator keys and shortcut keys are two long-established
mechanisms for making menus easier to use from the keyboard.
Menus can be navigated with the arrow keys, but with large menu
structures, this rapidly becomes tiresome, so accelerator keys are also supported. These are keys that can be
pressed to select a particular menu item without having to use the
mouse or arrow keys. Each item in a menu can have a letter associated
with it, and if the user presses that key while the menu is visible,
the effect is the same as clicking on the item.
The previous code fragments illustrate how to choose an accelerator
key: in the Text property, we simply place an
ampersand in front of the relevant letter. So in this example, if the
user presses the N key while the File menu is open, the New menu item
will be selected. The user can find out what accelerator keys are
available by pressing the Alt key while the menu is open: the
accelerators will be underlined, as shown in Figure 4-2. (Older versions of Windows show the
accelerators at all times, even when Alt has not been pressed.)
Figure 4-2. Menu with accelerators and shortcuts
Menu accelerators can make it easy for experienced users to use menus
quickly without taking their hands off the keyboard. However, for
very frequently used operations, keyboard shortcuts provide a more
direct form of access.
Unlike menu accelerators, which can only be used while the relevant
menu is visible, a
shortcut
key can be used at any time. In this example, the New menu
item’s shortcut key is Ctrl-N. The user can press
Ctrl-N without a menu visible, and it will be as if he had selected
the New item from the File menu.
Shortcuts are assigned with the
Shortcut property on
the MenuItem class, and its value must be one of
the key combinations enumerated in the Shortcut
enumeration. This is a subset of all possible key presses; it
includes the function keys, with various combinations of modifier
keys (e.g., F12 or
CtrlShiftF3), and the alphanumeric keys with Ctrl
or Ctrl and Shift, (e.g., CtrlA,
CtrlShiftQ, Ctrl3). By default,
the shortcut will be displayed in the menu, as shown in Figure 4-2, although this can be disabled by
setting the ShowShortcut property to
false.
Shortcut keys only work because the Form class
knows about menus—when handling key presses, a form will offer
keys to the both the main menu and the context menu for that form.
This means that shortcuts only work properly for menus that have been
attached to a form (as described later on). You would usually not use
them on context menus that have been attached to specific controls.
So we know how to create hierarchical menu structures, and how to
assign text, accelerators, and shortcut keys to menu items. But for
all this to be of any use, we need to know when the user clicks on
one of our menu items. So we will now look at the events raised by
menus.
Event Handling
The entire point of adding menus to an
application is so that users can ask the application to do something,
such as save a file or perform a search. So as developers, we want
our code to be notified whenever the user chooses an item from a
menu. Menus therefore provide events to inform us of user input.
The most important menu event is
Click. This is
very similar to the Control
class’s Click event[16]—a MenuItem raises this event
when the user clicks on the menu item or performs an equivalent key
press (using either an accelerator or a shortcut key). It even has
the same signature as Control.Click:
EventHandler. If you double-click on a menu item
in the Designer, Visual Studio .NET will add a new method and attach
it to the menu item’s Click
event, as shown in C# in Example 4-1 and in VB in
Example 4-2.
Example 4-1. Menu Click handler in C#
private void InitializeComponent()

{

    . . .

    this.menuFileNew.Click +=

        new System.EventHandler(this.menuFileNew_Click);

    . . .

}


private void menuFileNew_Click(object sender, System.EventArgs e)

{

    . . . handle click here

}
Example 4-2. Menu click handler in VB
Friend WithEvents menuFileNew As System.Windows.Forms.MenuItem


Private Sub menuFileNew_Click(ByVal sender As System.Object, _

  ByVal e As System.EventArgs) Handles menuFileNew.Click

    . . . handle click here

End Sub
The handler method’s first parameter is, as always,
the source of the event (the MenuItem object, in
this case). The second parameter is the usual placeholder and will
normally be EventArgs.Empty.
The MenuItem class also provides a
Popup event, which is
fired whenever a menu is about to be displayed. This provides a
useful opportunity to make sure that the state of all the items is up
to date (e.g., you can place ticks by certain menu items, as
described in the next section). The event occurs on the
MenuItem that represents the menu that is about to
appear. Its parent is not notified, and neither are the individual
items that make up the menu. For example, when the File menu in the
preceding examples is about to be displayed, the
Popup event would occur on the
menuFile object, not on the main menu, and not on
any of the File menu’s items.
You can also be notified when an item has been highlighted (i.e.,
when the mouse moves over it). That item’s
Select event is raised
when this happens. This event also occurs when the item is selected
with the arrow keys. The name Select is slightly
misleading. Selecting a menu item sounds like a fairly positive
operation by the user, but it typically indicates that the mouse has
simply moved over the item. The Click event is the
one raised when a user actively chooses an item.
If you are familiar with the old C++ MFC Library, you might be
expecting to see events for handling menu item state. In that
library, every time a menu item was displayed, an event was raised
asking whether the item should be enabled and whether it should have
a tick by it. In .NET, things are a little different—Windows
Forms exposes these features as properties on the
MenuItem object.
Menu Item State
You will often want a menu
item’s appearance to change according to the
application’s state. For example, a menu item that
turns something on or off (such as a status bar) can have a tick
beside it to indicate that the feature is currently on. Some menu
items may sometimes be unavailable and should be grayed out or even
hidden. We will now see how to modify the appearance and behavior of
menus at runtime to achieve this.
Each MenuItem has an
Enabled property. By
default, it is set to true, but when it is
false, the item will be grayed out and will not be
clickable. More drastically, you can set the
Visible property to false,
which will prevent the item from appearing at all. The
MenuItem class also provides a
Checked property. When
this is set, a tick will be displayed next to the menu item.
Tip
If you preferred the old MFC approach, in which you decided which
items should be ticked or disabled at the last minute, you can still
do this. Simply supply a Popup handler for the
menu and set the flags for each menu item in it. This approach can be
useful, because it guarantees that menu items are always up to date,
but an event-driven approach is no longer mandatory, so you can use
whichever is simpler for your particular application. Remember that
the Popup event is raised for the menu, not for
each of its items, so your code will not look quite the same as it
did with MFC—you will have a single handler setting the state
of all necessary items, rather than one handler per item.
So,
we now know how to create menus, how to handle the events they
generate, and how to modify the appearance of individual items. All
that remains is to make sure these menus appear when and where we
want them, which is the subject of the next section.
Attaching Menus
There are two ways in which a menu can
appear. It can either be permanently visible at the top of a form, or
it can be a so-called Context Menu that pops up when the
user clicks the right (or alternate) mouse button. In either case, we
simply associate a hierarchy of menu items with a form or a control.
The menu that appears at the top of a window is determined by the
Form class’s
Menu property. You can set this property
to a
MainMenu object
representing the root of a hierarchy of MenuItem
objects. The Forms Designer does this automatically when you add a
main menu to a form.
Setting a context menu is very similar, except context menus may be
assigned to any control, not just a form. This means that you can
provide different context menus for each control in a window. This is
done by setting the
ContextMenu property of
the control or form.
Remember that the Form class derives from
Control, so it is possible to set a context menu
for the whole form. Be aware though that when you add a context menu
to a form with the designer, Visual Studio .NET does not presume that
the menu should be attached to the form—for all it knows, you
might be planning to associate it with a control, so it leaves it
unattached. You must explicitly attach the menu either to the form or
to a control by setting the relevant object’s
ContextMenu property.
Be aware that keyboard
shortcuts for a context menu will only
work if the control that owns the menu is able to process keys. For a
context menu attached to a form, this means that the shortcuts will
work so long as the form is active, but for menus attached to a
particular control on a form, the shortcuts will only work when that
control has the focus. So it is not always useful to put shortcut
keys on a context menu attached to a control, because the whole point
of shortcut keys is that they can be used from any context. (The
exception would be if your control can receive the focus and presents
a nontrivial interactive user interface. For example, a text box
provides clipboard shortcuts such as Ctrl-C for copy. In this case,
it makes sense for the shortcuts only to be available when the
control has the focus.)
Sometimes it is useful to know if a menu is currently being displayed
to avoid distracting or interrupting the user—it can be
annoying if an application pops up a notification dialog while you
are using a menu, because this causes the menu to be closed. If you
want to disable or defer certain operations while a menu is open, you
simply need to observe the Form
class’s
MenuStart and
MenuComplete events. These are fired just before a
menu receives the focus and just after it disappears. These events
are fired for the form’s context menu as well as for
its main menu. Unfortunately, the form does not raise these events
for a control-specific context menu, and although you could handle
such a menu’s Popup event, there
is unfortunately no corresponding event to tell you when it goes
away.
Menu Merging
Many
applications present several forms that all have similar but slightly
different menus. This is particularly common when forms inheritance
is in use (see Chapter 6). MDI applications often
have a related requirement: a form may make subtle changes to its
menu structure depending on which child window (if any) is active.
Unfortunately, we cannot exploit inheritance here as we would for
building a group of similar forms: whereas the structure and behavior
of a form is represented by a class definition, the structure and
behavior of a menu is defined by an object graph constructed at
runtime. All menus are made from a collection of objects that are
always of the same types (several MenuItem objects
and either one MainMenu or one
ContextMenu), so inheritance cannot help us here.
The good news is that the Menu class provides a
solution. It provides a method called
MergeMenu
that allows us to take an existing menu structure and extend or
modify it to create a new menu. The resulting menu will be the
combination of the two menus, as illustrated in Figure 4-3.
Figure 4-3. Merged menus
Figure 4-3 illustrates the simplest way of using
menu merging—two menus are combined, and the result is a menu
containing all the items from each. The MergeMenu
method does a deep copy, so any submenus will also be duplicated.
This merging is easy to do—the following C# code (the VB code
is almost identical) shows how to create a new context menu by
merging the items from two other menus:
ContextMenu mergedMenu = new ContextMenu();

mergedMenu.MergeMenu(menuFirst);

mergedMenu.MergeMenu(menuSecond);
But even this simple example raises an interesting question: how does
the framework decide the order in which to place the items in the
created menu? While it has not reordered the items from each
individual menu in Figure 4-3, it has decided to
insert the items from the second menu halfway through those of the
first menu. The framework determines how to interleave the
menus’ contents by looking at the
MergeOrder property on
each MenuItem. This property is an
int or Integer, and the
framework guarantees that when combining menus, it will merge items
in ascending MergeOrder order. So the reason the
framework decides to insert the second menu’s
contents halfway down becomes clear when we see the
MergeOrder property settings on the original
menus:[17]
this.menuHello.MergeOrder = 5;

this.menuWorld.MergeOrder = 5;

this.menuSeparator1.MergeOrder = 10;

this.menuFoo.MergeOrder = 100;

this.menuBar.MergeOrder = 100;


this.menuMore.MergeOrder = 20;

this.menuStuff.MergeOrder = 20;
The More and Stuff items in the second menu have a merge order of 20,
which means that they appear between the separator and the Foo entry,
which have orders of 10 and 100, respectively. You can choose
whatever values you like for a merge order, but using 0 for the items
you want to appear first, 100 for those you want to appear last, and
more or less evenly spaced values for those in between is a popular
choice. (The default MergeOrder is 0.)
Advanced merging
The merging technique shown above is sufficient for many purposes,
but you might need to do something a little more complex. For
example, sometimes it is not enough simply to add new items to a
menu—you may wish to remove items. Also, if you want to insert
new items into a submenu instead of the top level menu, the
naïve approach is insufficient: by default you will end up
with two identically named submenus.
To support these more subtle merging techniques, the
MenuItem class provides a
MergeType property,
which controls the way an item is treated when it is merged. By
default, its value is MenuMerge.Add, meaning that
all items in the menu being merged will be added as new items.
You can set MergeType to
MenuMerge.Remove, which causes the corresponding
entry not to appear. You would use this value if the menu you are
modifying contains an entry you would like to remove.
Tip
You must set the MergeType property on both source
menus for this technique to work. If the new menu being merged into
the original menu attempts to remove an item, that attempt will be
ignored unless the original menu’s corresponding
item (the item with the same MergeOrder) is also
marked as MenuMerge.Remove.
So the
MergeType property really has two
meanings—on the original item it indicates the allowable
operations, and on the new item it indicates the operation being
requested. Unfortunately, not only is this overloading slightly
confusing, it is somewhat restrictive— there is no way to
create a menu item that allows both the MergeItem
and the Remove operations. Conflicts are also
dealt with a little inconsistently—if the original is
Add and the new is Remove, the
new item is ignored; if the original is Remove and
the new is MergeItem, the item is replaced!
Setting MergeType to
MenuMerge.Replace is similar to remove, except it
replaces the original item with the one in the menu being merged.
Finally, MergeType can be set to
MenuMerge.MergeItems. This value is used when you
wish to modify the contents of a submenu. Although you could modify a
submenu by replacing it entirely, MergeItems is
useful when you want to make only minor modifications. You use this
by supplying a MergeItems item corresponding to
the submenu item in the original menu, and then put child items
underneath it, using Add,
Remove, Replace, or
MergeItems as appropriate. For example, if you
wanted to add an item to a main menu’s File menu,
you would not replace the entire main menu, or even the entire File
menu. The following code (in C#) would suffice:
MenuItem mergingFileMenu = new MenuItem();

mergingFileMenu.MergeType = MenuMerge.MergeItems;

mergingFileMenu.Text = "&File";


MenuItem menuExtraFileItem = new MenuItem();

menuExtraFileItem.Text = "Ext&ra";

menuExtraFileItem.MergeOrder = 10;

MenuItem menuExtraFileSeparator = new MenuItem();

menuExtraFileSeparator.Text = "-";

menuExtraFileSeparator.MergeOrder = 10;


mergingFileMenu.MenuItems.AddRange(new MenuItem[] {

    menuExtraFileItem,

    menuExtraFileSeparator});


MainMenu mergingMainMenu = new MainMenu(new MenuItem[] {

    mergingFileMenu });

mainMenu.MergeMenu(mergingMainMenu);
This adds an item labeled Extra to the File menu, followed by a
separator. So even though we are merging two main menus together, we
are able to modify one of its submenus without having to replace that
submenu wholesale. And although this may look like a lot of code to
add a single item, it is rather less than would be required to
reconstruct the whole menu. Furthermore, building a modified File
menu from scratch presents code maintenance issues—if you want
to change the basic File menu, you would also need to change all the
places where you build a modified version. But if you use menu
merging, any changes to the basic menu will automatically propagate
to the modified versions.
Remember that this will only work if the original main
menu’s File menu item also has its
MergeType set to
MenuMerge.MergeItems; if it were set to the
default of MenuMerge.Add, you would end up with
two File submenus in the main menu.
Merging and MDI applications
If you build an MDI application, the
framework can automatically take advantage of menu merging. The menus
in such applications typically consist of two types of items: those
that are associated with a document window and those that are a part
of the main application frame. The set of available menu items is
determined by whether a document window is active (and if there is
more than one kind of document window, it will depend on which one is
active).
The application-level menu items are those that should always be
present and that make sense even if there are no open documents, such
as items for file opening, document creation, or application
configuration. Document-level menu items are those that only make
sense in the context of a document, such as items for file closing or
saving, editing operations, or view settings. MDI applications
usually present just a single menu bar as part of the main
application frame, but its contents change between being just the
application-level items or the complete set, according to whether a
document is active.
This seems like an ideal opportunity to use menu merging—the
application-level items could be placed into one
MainMenu, the document level items into a second
MainMenu, and these could be merged to create a
third. All that would need to be done would be to swap in the
appropriate merged or unmerged version according to whether a child
window is active. Indeed, this is exactly how MDI applications
usually work in .NET, but it turns out that Windows Forms can do the
menu merging automatically.
If you use the framework’s built-in support for MDI
applications (i.e., you establish the parent/child relationship with
the Form class’s
MdiParent or MdiChildren
properties), it will assume that the parent form’s
MainMenu contains the application-level menu
items, and that any child form’s
MainMenu contains document-level items. Whenever
an MDI child form is activated, the framework will automatically
merge its menu into the parent form’s menu. If all
MDI child windows are closed, it reverts to the original parent
form’s menu.
So using menu merging in MDI applications requires almost no effort.
The only thing you need to be careful about is setting the correct
MergeType—very
often a child window will want to add entries (such as for adding a
save and a close entry to the File menu) into an existing menu in the
parent. Both the parent and the child form’s main
menus will need to contain File submenus, which must both have the
same MergeOrder, and they must both have a
MergeType of
MenuMerge.MergeItems.
Merging and forms inheritance
It is possible to define a form that
derives from another form. We will be looking at the use of
inheritance in detail in Chapter 6, but we will
quickly examine the inheritance-related aspects of menu merging here.
When building an inherited form, the derived class will automatically
acquire the base class’s menu. However, if you try
to edit the menu in the derived class, the Forms Designer will
prevent you, complaining that the menu is defined on the base class.
To modify a menu on the derived form, you must use menu merging.
To modify the menu in the derived class, you must add a new
MainMenu component to the form. Place whatever
modifications you require in this menu. To merge this menu in with
the main menu requires a little code. Add the following C# code to
your constructor:
MainMenu mainMenu = new MainMenu();

mainMenu.MergeMenu(this.Menu);

mainMenu.MergeMenu(mainMenuDerived);

this.Menu = mainMenu;
The equivalent VB code is:
Dim mainMenu As New MainMenu()

mainMenu.MergeMenu(Me.Menu)

mainMenu.MergeMenu(mainMenuDerived)

Me.Menu = mainMenu
This builds a new MainMenu object, which takes the
original menu and merges in mainMenuDerived (or
whatever you choose to call the MainMenu that you
added to your derived form). It then sets this merged menu as the new
main menu of the form.
Owner-Drawn Menus
The
standard appearance provided by the Windows Forms framework for menu
items is pretty basic—you get simple text, and you can
optionally annotate menu items with a tick (just set the
Checked property). If you want to draw your own
annotations, or otherwise provide richer visual information, the
framework lets you draw your own menu items. The use of GDI+ to
perform custom drawing is discussed in detail in Chapter 7, but here we will look at the menu-specific
aspects of owner drawing.
You can decide to do your own drawing on a per-item basis by setting
the MenuItem object’s
OwnerDraw property to
true. Unfortunately, it is an all or nothing
decision: if you ask the framework to let you draw a particular item,
you are required to manage the whole drawing process. First, you must
tell the framework the size of your menu item by
handling the
MeasureItem event;
otherwise, the item will default to having a height of 0 pixels. And
you must also handle the
DrawItem event, in
which you are responsible for drawing everything, including the text
of the menu. (Turning on OwnerDraw will prevent
Windows from drawing anything other than the menu background.)
Tip
Because owner drawing is a per-item decision, it is possible to have
a single menu with a mixture of owner-drawn and system-drawn items.
You will receive the DrawItem event every
time the item needs redrawing. This happens when the menu appears,
directly after the MeasureItem event, but it also
happens again every time the mouse moves on or off the menu item, so
that you can highlight your item like Windows does for normal items.
Your event handler will be passed a
DrawItemEventArgs object, whose
State member indicates how the item should be
drawn. This field is of type DrawItemState, which
is a bit field, so it may indicate multiple styles simultaneously.
The flags that may be set are Selected (indicating
that the mouse is currently over the item),
NoAccelerator (indicating that accelerator keys
should not be displayed; this will normally be set unless the user is
operating the menu through the keyboard), and
Checked (indicating that a tick should be drawn by
the item).
Examples Example 4-3 and
Example 4-4 show a pair of event handlers for a very
simple owner-drawn menu. The item is always the same size because the
MeasureItem handler always returns the same width
and height. The DrawItem handler simply draws an
ellipse as the menu item, but it illustrates an important technique:
it checks the item’s state to see if it is selected,
and if so, it draws the menu background in the normal selected menu
item color, and draws the ellipse in the same color as selected text
in a menu would be drawn. Note the use of the
DrawBackground method of the
DrawItemEventArgs object to fill in the menu
background—it draws the background in the appropriate color
(i.e., SystemColors.Menu, unless the item is
selected, in which case it uses
SystemColors.Highlight). We call this whether the
item is in the selected state or not. You might think that this is
unnecessary because, as mentioned above, the framework draws the
background for us. Unfortunately it only does that when the menu is
first opened, so if we change the background when our item is
selected, we are required to put it back again when it is deselected.
Example 4-3. Simple owner-drawn menu item in C#
private void menuItem_MeasureItem(object sender,

    System.Windows.Forms.MeasureItemEventArgs e)

{

    e.ItemHeight = 17;

    e.ItemWidth = 100;

}


private void menuItem_DrawItem(object sender,

    System.Windows.Forms.DrawItemEventArgs e)

{

    Graphics g = e.Graphics;

    bool selected = (e.State & DrawItemState.Selected) != 0;

    Brush b = selected ?

        SystemBrushes.HighlightText : Brushes.Blue;

    e.DrawBackground();

    g.FillEllipse(b, e.Bounds);

}
Example 4-4. Simple owner-drawn menu item in VB
Private Sub menuItem_MeasureItem(sender As Object, _

  e As System.Windows.Forms.MeasureItemEventArgs) _

  Handles menuItem.MeasureItem

    e.ItemHeight = 17

    e.ItemWidth = 100

End Sub


Private Sub menuItem_DrawItem(sender As Object, _

  e As System.Windows.Forms.DrawItemEventArgs) _

  Handles menuItem.DrawItem

    Dim g As Graphics = e.Graphics

    Dim selected As Boolean = (e.State & DrawItemState.Selected) <> 0

    Dim b As Brush

    If selected Then

        b = SystemBrushes.HighlightText

    Else

        b = Brushes.Blue

    End If

    e.DrawBackground()

    g.FillEllipse(b, e.Bounds)

End Sub
Now that we have seen how to create menus, let us see how we can
provide expert users with more direct access to the most frequently
used operations with toolbars.
Get .NET Windows Forms in a Nutshell now with the O’Reilly learning platform.
O’Reilly members experience books, live events, courses curated by job role, and more from O’Reilly and nearly 200 top publishers.