
Applies ToMicrosoft accessories
Макросы — это последовательности событий (например, нажатий клавиш, щелчков мышью и задержек), которые можно воспроизводить для выполнения повторяющихся задач. Их также можно использовать для воспроизведения последовательностей, занимающих много времени или трудных для выполнения. Вы можете назначить клавише или кнопке мыши макрос, записанный в приложении Microsoft Mouse and Keyboard Center. Вы также можете использовать функцию повторения макроса, чтобы непрерывно воспроизводить и повторять макрос, а затем остановить воспроизведение в любой момент.
Макросы Microsoft Mouse and Keyboard Center сохраняются в виде отдельных файлов с расширением MHM в стандартной вложенной папке «Документы\Оборудование Майкрософт\Макросы». Макросы, записанные на клавиатуре и мыши, являются взаимозаменяемыми. Вы можете запускать и редактировать их в любой программе.
Внимание: Не сохраняйте в макросах пароли и другие конфиденциальные сведения.
-
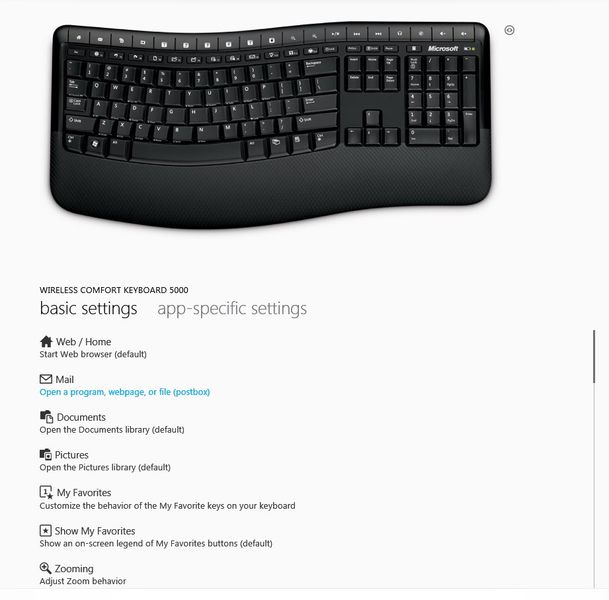
Используя мышь, которую требуется настроить, запустите программу Microsoft Mouse and Keyboard Center.
-
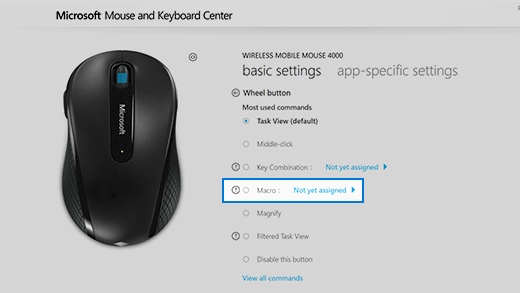
В списке для нужной кнопки выберите Макрос.

-
Нажмите Создать макрос.
Создается пустой макрос, который добавляется в список макросов.
-
В поле Имя введите имя нового макроса.
-
Нажмите поле Редактор и введите макрос.
Вы можете записывать события, такие как нажатие клавиш, щелчок мышью и задержки между действиями. Невозможно записывать движения мыши и другие действия, которые выполняются через макросы, назначенные поддерживающим эту функцию клавишам.
-
Убедитесь, что новый макрос выбран в списке Доступные макросы.
Запись нескольких событий одновременно
-
Введите первое событие (например, нажмите клавишу SHIFT).
-
Щелкните выбранное событие правой кнопкой мыши и выберите пункт Разделить. Событие будет разделено на три события: нажатие и удержание клавиши, временную задержку и отпускание клавиши.
-
Щелкните другое событие (до или после задержки).
-
Введите второе событие (например, нажмите первую кнопку мыши).
Изменение существующего макроса
-
Используя мышь, которую требуется настроить, запустите программу Microsoft Mouse and Keyboard Center.
-
В списке для нужной кнопки выберите Макрос.
-
Выберите нужный макрос в списке Доступные макросы.
-
Нажмите поле Редактор и измените макрос или введите новые события.
Воспроизведение макроса
-
Нажмите кнопку, назначенную макросу.
Отмена макроса во время воспроизведения
-
Снова нажмите кнопку, назначенную макросу, или запустите другой макрос
Включение повторения макроса
-
В редакторе макросов выберите макрос в списке Доступные макросы.
-
Нажмите значок Изменить макрос.
-
Включите параметр Повторять.
Примечания: Функция повторения макросов не поддерживает переключение между приложениями. Например, если открыть веб-браузер во время повторения макроса в игре, макрос перестанет повторяться. Аналогично, если включить в макрос команду переключения на другое приложение, то повторение макроса не сработает, и он будет выполнен только один раз.
-
Если нажать кнопку, назначенную для запуска повторяющегося макроса, а затем — кнопку, назначенную другому макросу, то повторяющийся макрос остановится.
-
При повторении макроса не добавляется временная задержка в конце последовательности. Чтобы добавить задержку, используйте поле «Редактор».
Включение и выключение повторяющегося макроса
-
Включив повторение макроса, нажмите назначенную ему клавишу, чтобы запустить макрос.
Снова нажмите эту кнопку, чтобы остановить повторение макроса.Кроме того, чтобы остановить повторяющийся макрос и запустить другой макрос, нажмите клавишу, назначенную для другого макроса.
Нужна дополнительная помощь?
Нужны дополнительные параметры?
Изучите преимущества подписки, просмотрите учебные курсы, узнайте, как защитить свое устройство и т. д.
How to Create a Macro in Windows 10
Creating a macro in Windows 10 can greatly boost your productivity by automating repetitive tasks. In this guide, you’ll learn how to create a macro using built-in tools and third-party software. Follow these steps to easily set up a macro that simplifies your workflow.
Creating a macro in Windows 10 involves using the built-in Task Scheduler or third-party software to automate tasks. Here’s a step-by-step guide to help you set up a macro on your Windows 10 system.
Step 1: Open Task Scheduler
First, open Task Scheduler from the Start menu.
Task Scheduler is a built-in Windows tool that allows you to automate tasks. You can find it easily by typing «Task Scheduler» in the Start menu search bar.
Step 2: Create a New Task
Next, click on «Create Basic Task» on the right-hand side.
This action will open a wizard that guides you through the process of setting up a new task. Give your task a name and a description that will help you identify it later.
Step 3: Set the Trigger
Choose when you want the macro to start by setting a trigger.
Triggers define the conditions under which your task will start. You can set it to run daily, weekly, or even when a specific event occurs, like system startup.
Step 4: Define the Action
Specify what action the macro will perform.
Actions can range from running a script to opening an application. Select «Start a program» and then browse to the program or script you want to run when the trigger conditions are met.
Step 5: Review and Finish
Review your settings and click «Finish.»
Double-check all the settings you’ve configured. Once you’re sure everything is correct, click «Finish» to save your new macro in Task Scheduler.
After completing these steps, your macro will run automatically based on the trigger you set. You won’t have to worry about manually performing the repetitive task anymore.
Tips for Creating a Macro in Windows 10
- Use Descriptive Names: Give your tasks clear and descriptive names to easily manage multiple macros.
- Test Your Macro: Always test your macro to ensure it works as expected.
- Backup Scripts: Keep a backup of any scripts used in your macros in case you need to recreate them.
- Check Permissions: Ensure you have the necessary permissions to run the tasks and scripts you’ve set up.
- Utilize Third-party Tools: For more complex tasks, consider using third-party macro tools like AutoHotkey for greater flexibility and control.
Frequently Asked Questions
What is a macro?
A macro is a sequence of instructions that automate repetitive tasks.
Can I edit a macro after creating it?
Yes, you can edit a macro by opening Task Scheduler and modifying the task.
Is it safe to use third-party macro tools?
Generally, yes, but make sure to download from reputable sources to avoid malware.
Can I schedule multiple macros?
Yes, you can create and schedule multiple macros to run at different times or events.
Do I need programming skills to create a macro?
Basic macros can be set up without programming skills, but advanced macros may require some scripting knowledge.
Summary
- Open Task Scheduler.
- Create a New Task.
- Set the Trigger.
- Define the Action.
- Review and Finish.
Conclusion
Creating a macro in Windows 10 is a fantastic way to automate repetitive tasks and boost productivity. Whether you choose to use Task Scheduler or third-party software, these steps will help you get started. Remember to test your macros and make sure they work as intended. With a little practice, you’ll be able to automate even more complex tasks, saving you time and effort. Feel free to explore further by checking out more advanced tools and techniques to enhance your automation skills. Happy automating!
Matt Jacobs has been working as an IT consultant for small businesses since receiving his Master’s degree in 2003. While he still does some consulting work, his primary focus now is on creating technology support content for SupportYourTech.com.
His work can be found on many websites and focuses on topics such as Microsoft Office, Apple devices, Android devices, Photoshop, and more.
by Rachel Jones|2025-01-09 |
5 min read
Are you someone who loves speed and efficiency and has an eye for automation? Creating the keyboard macros is the first thing that comes to the mind.
They help users access frequently-used PC resource immediately without regular long methods. This is particularly useful if your PC lacks touchscreen or don’t have access to a multi-button mouse.
Let us take a closer look at what exactly is keyboard macros Windows 10 and how to set them up quickly.
- Part 1: What are Macros Keyboard?
- 1.1.Types of Macros Keyboard
- 1.2.Does Windows 10 have a macro recorder?
- Part 2: How to Setup A Macro?
- 2.1 Create shortcut keys
- 2.2 Microsoft Mouse and Keyboard Center
- 2.3 PDNob Windows Shortcuts
Part 1: What are Macros Keyboard?
In the world of computers, a macro is a single command. When pressed, it is «automatically expanded into a series of instructions to perform a specific task.»
Putting it differently, a keyboard macro is a sequence of commands on a keyboard shortcut that is keyed to execute a particular task on your computer. They are almost same as Windows shortcuts like CTRL + C command to copy and CTRL + V command to paste directly.
A good example of keyboard macros Windows 10 is if you need to start multiple emails with the same word or phrase, setting up a keyboard macro for it will help you instantly enter that particular phrase anywhere with a single click. The rationale is to save time, increase accuracy, and eliminate redundancy.
1.1.Types of Macros Keyboard
Fundamentally, there are two basic types of keyboard macros Windows 10: Hardware Keyboard Macros and Software Keyboard Macros.
The hardware macro triggers a series of functions when you use physical keys on keyboard or mouse while the software macros run through special apps that run scripts in the background.
1.2.Does Windows 10 have a macro recorder?
Unfortunately, Windows 10 doesn’t have a built-in macro recorder. Worry not as the internet is awash with third-party macro recorder tools that help you record, share, and edit keyboard macros effortlessly.
Part 2: How to Setup A Macro?
Coming to the most important question of how to setup a macro on your Windows. Below is a step-by-step guide to create Macros on your computer without any hassles.
2.1 Create shortcut keys
-
First, locate your preferred app, right-click it, and hit Create Shortcut.
-
On the new pop-up tab, click on Yes to create the shortcut on the desktop as shown in the figure.
-
Next on how to get macros on PC, right-click the shortcut icon on the desktop and click on Properties.
-
Here, go to the Shortcut tab and enter any key combination in the Shortcut key box starting with Ctrl + Alt + L. Hit Apply > Ok to save the settings.
And voila, you have successfully configured the keyboard macro for that app. Press the key combination to open it instantly.
2.2 Microsoft Mouse and Keyboard Center
On a Windows PC, keyboard shortcuts or hotkeys is a series of one or several keys that you assign to particular commands to quickly perform a function. Like you can create hotkeys to access shortcuts, commands, and Microsoft Mouse and Keyboard Center features rather quickly.
Here’s how to create shortcut keys on your PC.
-
First, download and install Microsoft Mouse and Keyboard Center on your computer.
-
After connecting keyboard that you want to configure with hotkeys, launch Microsoft Mouse and Keyboard Center.
-
Select a key that you want to make the hotkey and choose a command for your hotkey in the Command list.
-
Finally, click Ok to configure the hotkey.
Now that you know how to get macros, be sure not to use the same keyboard macro combination twice.
2.3 PDNob Windows Shortcuts
Setting up a keyboard macro on a Windows PC is quite easy but memorizing different key combinations for each macro is quiet frustrating. That’s where PDNob Windows
Shortcuts comes to your rescue.
This easy-to-use tool offers the simplest way to setup a macro or hotkey for any function on your PC and execute them with a single click. With this program, you don’t need to memorize any key combination and the action icon comes right on its interface.
This way, you have the freedom to assign shortcuts to all the apps or tasks you need to perform on regular basis. So, if you wish to automate multiple keystrokes, run specific commands, send template text, or open an app, URL, or folder in just a second, this powerful app is your answer.
Aside from keyboard macros Windows 10, PDNob Shortcut lets you take screenshot, OCR an image, use calculator, pin app on top, and perform other important functions – all with a single click.
In the below section, we will show you how to use Send Template Text and Stimulate Keystroke to perform to get your tasks done faster.
Send Template Text
The below steps illustrate how to use the Send Text feature of this amazing tool:
-
Install and launch PDNob Shortcuts program on your PC.
-
On its main panel, click on the + icon and select Create Action to navigate to the action tab.
-
Here, you need to select Send Text to get going.
-
Next on how to get macros, enter the relevant text that you want to set macro for, and also give the suitable Action Name to it.
-
Hit Save to add this macro to the program’s main panel. Now, you can simply click on this action box and it will paste the text (How are you?) to the active window. This will save your time if you need to send the same text to different people.
-
Go to the main panel, right-click the recently-saved action, and select Create shortcut Key.
Add a shortcut key that you can use to trigger this hotkey anytime you want.
Simulate keystrokes
Want to automate a complex function with just a single click on your keyboard. Check out the below steps to stimulate keystrokes on PDNob Windows Shortcuts.
-
Hit the + icon to create action and select Stimulate Keystroke.
-
Next, Add the preferred keystroke under the Combination key tab. Give an action name that they key combination is supposed to perform and click on Save.
-
When you click on the icon, the keystrokes will be simulated automatically.
Final Remarks
This article shows that creating keyboard macros Windows 10 can optimize your work and increase efficiency remarkably. But it can be difficult to memorize various keyboard macro combinations. That’s why we introduce you to a highly efficient Windows management tool, namely PDNob Windows
Shortcuts.
With this program, you can create unlimited macros, shortcuts, and hotkeys, to perform your tasks with remarkable speed. And you don’t need to remember any keystroke as you can trigger them from the program’s main panel.
PDNob Windows Shortcuts
Discover how PDNob can improve your productivity.
Is there a way to do repetitive tasks automatically if your work demands it daily basis? What if we tell you that with a single click, you can now complete a long chain of commands without having to raise your hand? Sounds amazing, doesn’t it? Macros are a series of keystrokes, delays, or mouse clicks on a keyboard shortcut that is pressed to carry out a specific computer job for you. So, how can you create a Macro in Windows 10? Let’s find out.

Now you can save a ton of time, and increase the efficiency and accuracy of your work by implementing macros. Whether you have to send hundreds of emails with the same phrase or perform a repetitive task in Excel, Macros are here to make your work easy. Check out the methods.
Method 1: In Excel
You can directly record a macro task if you are working on Excel. Check out the steps below to do the same:
1. Open Excel, click on File at the top left corner of the tab, and then on Options.
2. Select Customize Ribbon from Excel Options.
3. Tick on Developer under Main Tabs and select OK.

4. Now, click Developer in the main tab on your Excel sheet and then click on Record Macro in the top left corner.
5. Enter the Macro name, Shortcut key of your choice, Description, and select OK.

6. Perform your task and click on Stop Recording from the Developer tab.
This way your Macro will be recorded and stored in your workbook; you can select the shortcut key any time you wish to perform the same action.
Method 2: In Desktop
If you wish to create a macro for any specific apps on your desktop, follow the steps mentioned below to do the same:
1. Right-click over any app of your choice and select Create shortcut.
2. Select Yes to confirm your action.
3. Now, right-click on the shortcut created and select Properties.
4. In the Shortcut tab, enter your keys under Shortcut key, then click on Apply, followed by OK.
That’s it, now you can press the selected key to open your preferred app.
Method 3: In Microsoft Mouse and Keyboard Centre
Keyboard shortcuts are also known as hotkeys which are a group of one or more keys that you can program to execute specific tasks on a Windows computer quickly. Follow these steps to create shortcut keys:
1. Install Microsoft Mouse and Keyboard Centre on your PC.
2. Open Microsoft Mouse and Keyboard Centre after connecting the keyboard you wish to set up with hotkeys.
3. Decide which key to use as your hotkey, select a command from the Command list, and click OK.
Now whenever you press the key, your shortcut will start taking place.
Method 4: Via Third-party Apps
Since Windows 10 does not have an in-built feature to record all macros across its device, trusted third-party apps can help you out.
1. Visit the official page of TinyTask and click on Download.
2. Double-click on the TinyTask application to open the toolbar.
3. Click on the Rec button to start recording your command.
4. Perform your action and then click on the Rec button again to stop recording.
5. Now, click on the exe button to save your command.
6. Name your macro file and click on Save.
This way you will be able to easily execute macros across your PC. Just open your file at any time to perform the recorded task.
Also Read: Discord Keyboard Shortcuts for Windows and Mac (2023)
We hope our guide helped you create a Macro in Windows 10. Keep visiting TechCult to know the latest tech walkarounds. If you have any queries or suggestions, do reach out to us in the comment section.
Isn’t it boring to do the same task over and over again on your computer? Have you ever wished for a magic wand that does it without you having to break a sweat? Don’t worry! Keyboard macros for windows are here for your rescue.

Microsoft defines macros as sequences of events (such as keystrokes, mouse clicks, and delays) that can be played back to help with repetitive tasks. So yeah, that’s what we are going to deal with in this article.
You can assign a shortcut key without downloading third-party applications to launch a program. If you want to carry out activities like more than one keystroke and mouse click, you will have to seek the help of a macro recorder for Windows.
Also Read:-
- How to Fix Mouse Lag in Windows 10
- How to Format text on Telegram Desktop using Keyboard Shortcuts
- Main Useful Apps For Writing
- HyperTerminal Alternatives for Windows 10/11: Install Just like Windows XP
How to Make a Keyboard Macro? (without Third-Party Apps)
In this segment, we are going to assign a set of keystrokes to launch an app. Just follow the steps here for that. Creating keyboard macros in Windows 11 and 10 involves similar steps.
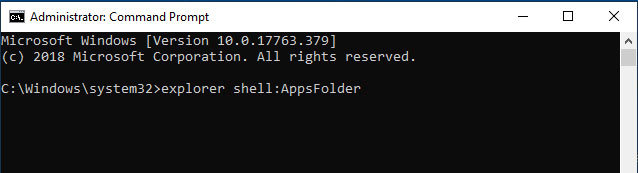
- First, we need to ensure the program for which you want the macro has a shortcut on the desktop. If it doesn’t, press the Win key and search for CMD.
- Right-click on the command prompt and select Run as an administrator.
- Enter the following command (or you can simply copy-paste).
explorer shell: AppsFolder
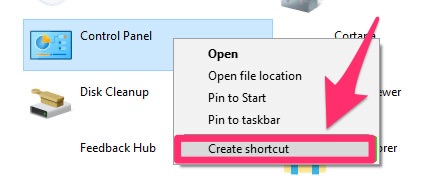
- You will see a new window displaying all the apps loaded on the computer. Right-click on your app of choice and opt for Create shortcut.
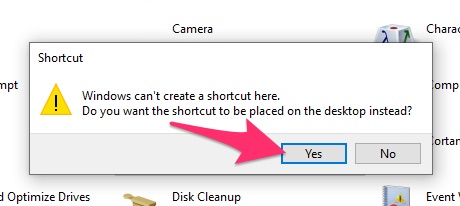
- Now, you will see a prompt with the question “Windows can’t create a shortcut here, would you like to create a shortcut on the desktop?”. Hit Yes.
- You can see the shortcut on the desktop, can’t you? Right-click on that and click on Properties (alternatively, you can select the shortcut and hit Alt+ Enter).
- Go to the Shortcuts tab. Click on the field next to the Shortcut key, and press a key on the keyboard. No matter what key you press, the shortcut will start with Ctrl+ Alt.
- Hit Ok.
There you go. Whenever you hit Ctrl+ Alt+ (your chosen key), the app will open.
How to Create Keyboard Macros? (with Microsoft Mouse and Keyboard Center)
Before venturing into third-party apps, you had better try Microsoft Mouse and Keyboard Center. It’s a tool to help you work with macros.
- The first step, as expected, is downloading. Use this link.
- Make sure you have the hardware keyboard connected to the computer.
- Now, install the software using the setup file you got from the link given above.
- Launch the app (use the start menu).
- Go to the Hotkeys tab. Click on Create/add new hotkey.
- You can edit the already assigned hotkeys or create new ones. For creating, first, select the hotkey.
- Then, choose the command from the list that appears.
- Hit Ok to finish the process.
That’s it. You should fiddle with the program to get a grip on it. Let’s just show you another Windows macro recorder.
How to Make Macros for Windows? (using a Third-Party App)
Here, we are going to give you a step-by-step tutorial on macro creation using Pulover’s Macro Creator. You can go for any third-party app. We just chose this one because we’ve had successful past experiences.
The software has a ton of useful features. You don’t have to jump into using all of them in a hush. Once you are used to the program, you can try out different configurations. Here, we are going to show you how to record a macro and use the same in the future.

- Click here to download Pulover’s Macro Creator.
- Go through the installation process (same as any other software installation).
- Open the program (you can use the Start menu or the desktop icon).
- On the toolbar, you can see a red circle (record button). Press on the same. Or else, you can just hit Ctrl+ R to begin the macro recording process. Then, hit the record hotkey (default is F9).
- It’s time to do the steps (keyboard strokes, mouse clicks, and delays) you want in the macro. The macro creator will record all of them.
- To stop the recording, hit the record hotkey once again.
There you go! You can press the playback hotkey (default is F3) to see your macro in action. Don’t forget to save the macro. Whenever you want to do this specific task, just open the saved macro.
Frequently Asked Questions
What are keyboard macros?
Keyboard macros are of two types; hardware and software. Hardware macros are a set of keys, which when pressed, do a task or a sequence of tasks. On the other hand, software macros are created with the help of a third-party app to perform a process that involves keystrokes and delays.
Is there a default Windows 10 macro recorder?
No, there isn’t! Windows 10 doesn’t come with a default macro recorder. They have a Mouse and Keyboard Center. You have to download that too.
Does Windows 10 have a macro recorder?
No, but Microsoft has one. You can download the setup file from the official site. For most simple macros, that’s enough.
How do I enable macros in Windows 11?
Right-click on the application shortcut. Choose Properties and go to the Shortcuts tab. Enter a key beside the Shortcuts key. That’s it. When you press Ctrl+ Alt+ the key you just entered, your preferred app will open.
Also Read:- How to Make your Existing PC to Run on Windows 10 smoothlys
Conclusion
You have got everything you wanted, haven’t you? Keyboard macros on Windows 10 and 11 are easy to create. Whether you use a third-party program or not depends on the facilities you need. For a process that involves keystrokes, mouse clicks, and delays, we recommend you go with a third-party piece of software.