
По умолчанию, панель задач Windows 10 предоставляет пользователю некоторые возможности настройки оформления, такие как мелкие или обычные значки, выбор цвета и некоторые другие. Однако, в некоторых случаях этого может оказаться недостаточно. Например, частый вопрос: как разместить значки по центру или сделать панель задач прозрачной, бывают и другие задачи. Одна из простых бесплатных программ, позволяющие сделать это — TaskbarX (ранее называлась FalconX).
В этом обзоре подробно о возможностях настройки оформления панели задач в TaskbarX, доступных функциях и особенностях использования программы.
Загрузка и установка
Программа TaskbarX доступна в магазине Microsoft Store, но является платной. Однако, если использовать официальный сайт разработчика — https://chrisandriessen.nl/taskbarx мы можем скачать программу в виде ZIP-архива (portable-версию) полностью бесплатно. Также, в бесплатном виде она доступна на GitHub автора.
Портативная версия программы не требует какой-либо установки на компьютере: достаточно распаковать архив с файлами программы в удобное вам расположение на компьютере и приступить к использованию.
Использование TaskbarX для изменения оформления панели задач
В папке с распакованной программой вы найдете два основных исполняемых файла — TaskbarX, запускающий саму программу и TaskbarX Configurator для настройки того, как именно будет выглядеть ваша панель задач.
Для того, чтобы приступить, достаточно запустить TaskbarX (при этом значки на панели задач будут расположены по центру между крайними левыми системными элементами панели задач и значками в трее Windows 10), после этого — запустить TaskbarX Configurator для того, чтобы настроить оформление.

Доступные настройки в TaskbarX Configurator (для того, чтобы увидеть эффект от сделанных изменений, достаточно нажать кнопку «Apply»):
- Style — стиль оформления панели задач. Можно включить прозрачную панель задач, выбрать другие варианты оформления: градиент, полупрозрачная, с размытием фона. Здесь же можно задать параметры цвета и уровень прозрачности панели задач (не применяется для выбора пункта «Transparent» с полностью прозрачной панелью задач). Отметка «Switch back to Default on maximized window» включает стандартный вид панели задач при разворачивании окна на весь экран.
- Animation — стиль и время анимации при появлении новых значков на панели задач (при запуске какой-либо программы).
- Position — сдвиг значков панели задач относительно автоматически рассчитанного центра. Под Primary Taskbar здесь понимается панель задач на первом мониторе, под Secondary — на втором и последующих. Пункт Skip Resolution позволяет отключить размещение значков по центру для выбранного разрешения экрана. Здесь же можно полностью отключить размещение значков по центру (пункт «Don’t Center Taskbar»).
- Taskschedule — нажав кнопку «Create» на этом экране вы создадите задание планировщика заданий Windows 10, которое будет автоматически запускать TaskbarX при входе в систему.
- Extra — дополнительные настройки. Позволяют включить размещение по центру только для одного монитора, скрыть область уведомлений и кнопку Пуск на панели задач, включить отображение иконки TaskbarX в области уведомлений. Пункт «Pause looper when fullscreen app is running» отключает перерисовку панели задач в полноэкранных программах (может быть полезно в играх, если панель задач появляется поверх игры).
Для того, чтобы убрать другие элементы панели задач (не отраженные в разделе Extra), например, поиск или кнопку представления задач, используйте системные средства: просто нажмите правой кнопкой мыши по элементу, отключите отображение ненужной кнопки или строки поиска (как убрать поиск с панели задач Windows 10). На изображении ниже — пример результата после использования TaskbarX и средств системы для настройки панели задач.

Разобраться сравнительно не сложно, а работает это не только для панели задач, размещенной внизу экрана, но и для других её расположений. Возможно, также будет интересной статья Оформление меню Пуск в Windows 10.
Каких только экспериментов с Windows различных версий мы не проводили в материалах 3DNews! Мы проверяли на практике необычные техники сброса пользовательского пароля в операционной системе, рассказывали о самостоятельной сборке Live CD/USB-дистрибутивов ОС, способах отключения «шпионских» функций телеметрии и защиты данных, выуживали сведения о скрытых настройках и малоизвестных возможностях платформы, а также об эффективных и надёжных методах восстановления Windows при возникновении сбоев. Пришло время продолжить былые эксперименты и поделиться информацией о способах модификации интерфейса Windows 10, самой распространённой на сегодня системы для персональных компьютеров. Цель не то чтобы благородная, зато интересная.
Дисклеймер. Использование перечисленных в заметке инструкций и утилит, как правило, влечёт изменение системных файлов и библиотек Windows 10, вмешательство в которые может нарушить стабильную работу ОС и привести к сбоям. Воспроизводить описанные ниже действия можно исключительно по собственной инициативе и на свой страх и риск. Во избежание неприятностей настоятельно рекомендуем создать резервную копию операционной системы и данных. Редакция не несёт никакой ответственности за любые возможные последствия.
⇡#Добавление системных индикаторов на панель задач
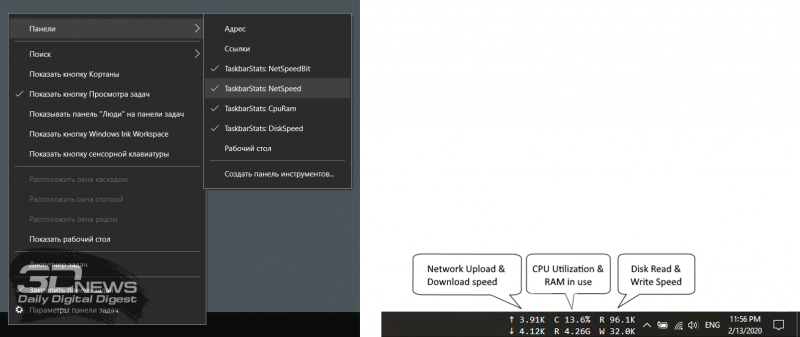
С помощью утилиты Taskbar stats можно расширить информативность панели задач Windows 10 и разместить на ней индикаторы загруженности процессора и оперативной памяти, скорости входящих и исходящих сетевых соединений, а также сведения об операциях с дисковым накопителем. Всё, что необходимо сделать, — это установить приложение (по ссылке находится страничка приложения на Github) и затем в контекстном меню панели задач включить отображение подходящих индикаторов. Распространяется Taskbar stats бесплатно и потребляет минимум ресурсов.
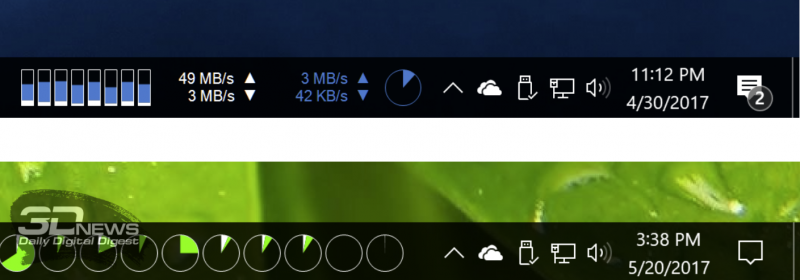
Тем, кому индикаторы Taskbar stats кажутся излишне аскетичными, можем посоветовать утилиту XMeters. Она решает аналогичные задачи, но по части визуализации данных намного интереснее, да и настроек в ней больше. XMeters представлена в двух редакциях — Free и Professional, последняя стоит 5 долларов США. Расставаться с кровными с ходу не стоит, так как возможностей бесплатной версии программы вполне достаточно для оперативного мониторинга системных ресурсов компьютера.
⇡#Выравнивание значков панели задач по центру (как в macOS и Chrome OS)
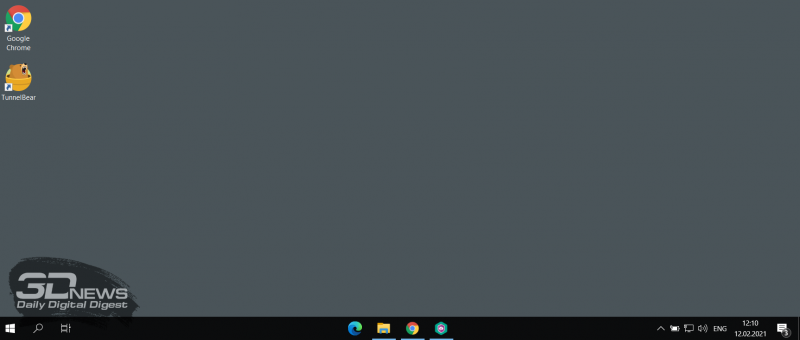
Научить Windows 10 автоматически центрировать иконки приложений в панели задач позволяет крохотная и занимающая около сотни килобайт утилита CenterTaskbar. Программа использует API Microsoft UI Automation, умеет взаимодействовать с размещённой вертикально панелью задач, поддерживает мультимониторные системы и распространяется с открытыми исходными кодами.
⇡#Добавление дня недели в часы на панели задач
По умолчанию часы Windows 10 демонстрируют в правом нижнем углу рабочего стола только текущее время и дату, которые посредством нехитрых манипуляций с настройками ОС можно дополнить информацией о дне недели. Проделывается данная операция в панели управления Windows 10, в настройках региональных параметров и формата даты.
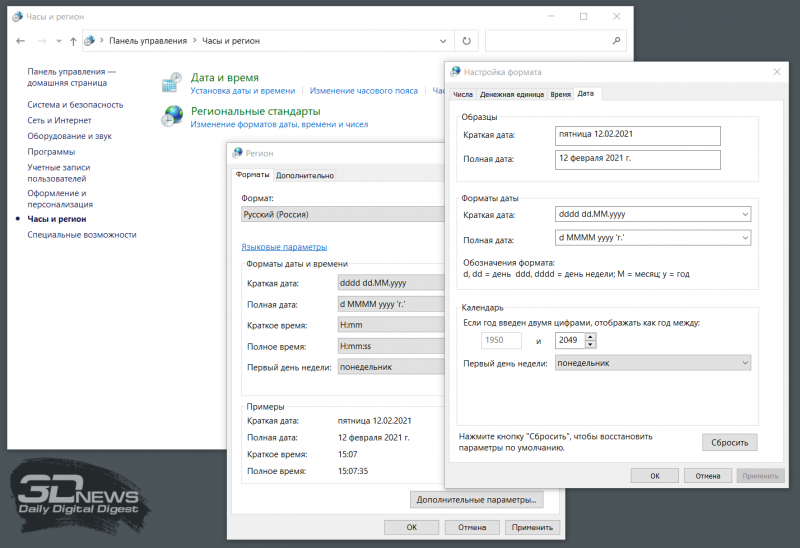
Достаточно, руководствуясь приведёнными выше скриншотами, добавить в поле «Краткая дата» символы dddd и нажать клавишу «Применить». В результате размещённые в области уведомлений часы дополнятся сведениями о текущем дне недели. Самое то для забывчивых пользователей и тех, кто привык вдумчиво наблюдать за течением времени.

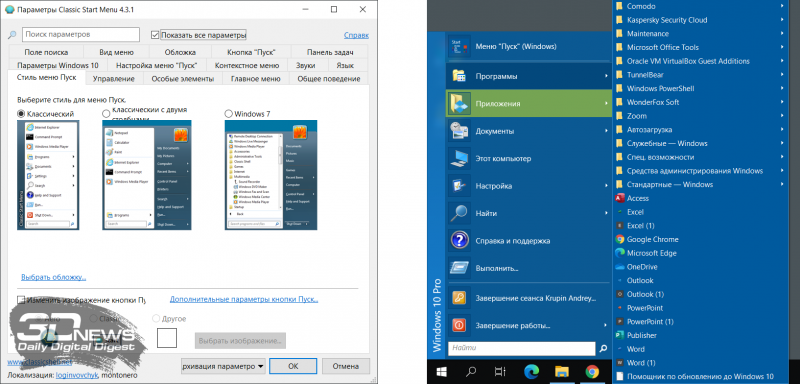
⇡#Возвращение классического меню «Пуск»
Кто устал от бесконечных экспериментов разработчиков Windows 10 с плиточным меню «Пуск», тот может вернуть в операционную систему классическое оформление этого элемента интерфейса. Повернуть время вспять позволяет утилита Classic Shell, в один клик мыши возвращающая прежнее древовидное меню «Пуск», которое было в Windows 7 и более ранних версиях ОС. Приложение также дает возможность поиграться с настройками панели задач, контекстного меню и прочими элементами рабочего окружения Windows 10. Единственное но: поскольку программа Classic Shell не обновлялась более трёх лет (последняя версия была выпущена в декабре 2017 года), некоторые функции в ней уже не работают. Тем не менее со своей основной задачей приложение справляется отлично.
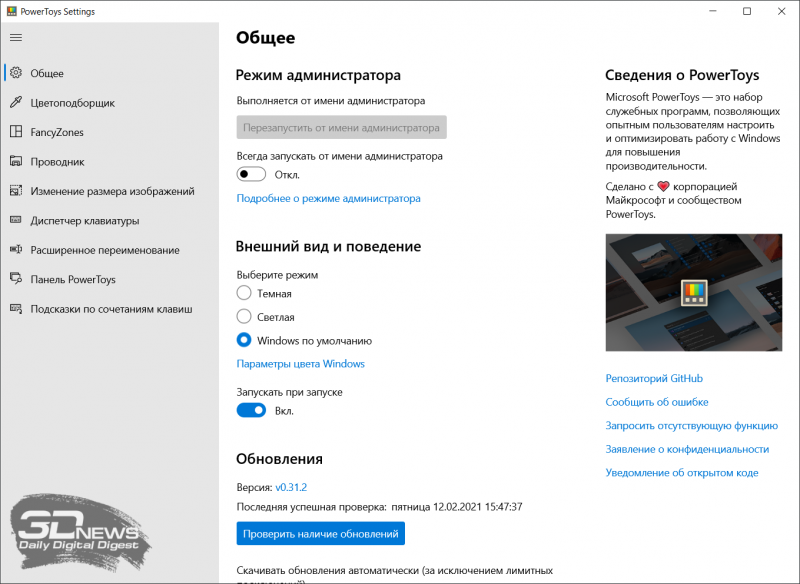
⇡#Расширение возможностей рабочего окружения Windows 10
В этом деле можно положиться на разработанный командой Microsoft фирменный набор приложений PowerToys, добавляющий в «десятку» массу полезных функций и инструментов. Среди них: цветоподборщик, возможность предварительного просмотра значков SVG-файлов (.svg) и документов Markdown (.md), расширение оболочки Windows 10 для быстрого изменения размера изображений, диспетчер клавиатуры, средства мгновенного запуска программ и массового переименования файлов, а также многие другие функции. Интересной особенностью PowerToys является диспетчер окон FancyZones, который позволяет легко создавать сложные макеты окон и быстро размещать окна в этих макетах. Внимания заслуживают также всплывающие подсказки по сочетаниям клавиш, появляющиеся, когда пользователь удерживает клавишу Windows более одной секунды. При этом отображаются все доступные сочетания клавиш для текущего состояния рабочего стола.
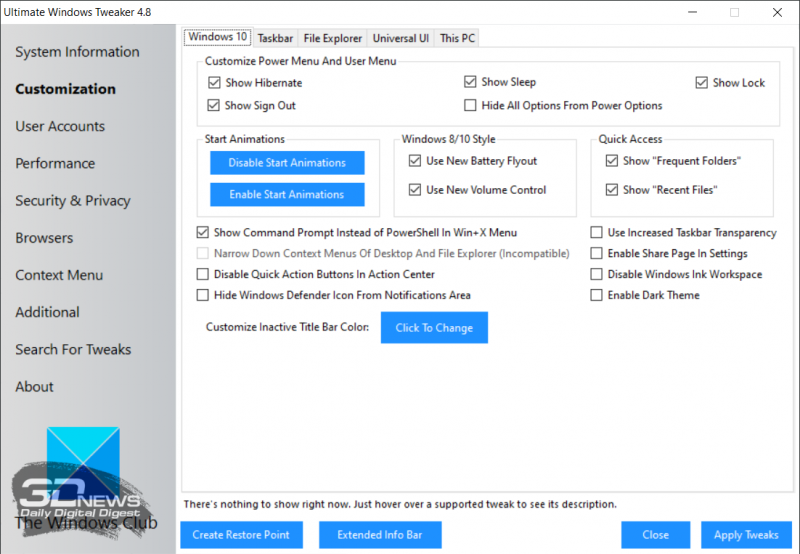
⇡#Настройка скрытых параметров интерфейса Windows 10
Для любителей копнуть поглубже предназначены всевозможные утилиты-твикеры, позволяющие добраться до самых потаённых настроек операционной системы. В глобальной сети представлено огромное множество таких программ. Из заслуживающих доверия выделим Ultimate Windows Tweaker, открывающий доступ более чем к двум сотням скрытых параметров ОС и позволяющий конфигурировать едва ли не все элементы пользовательского интерфейса «десятки» — от меню «Пуск» и панели задач до настроек проводника и рабочего стола. Как правило, для активации тех или иных функций твикеры изменяют значения в реестре либо в конфигурационных файлах Windows 10. Именно по этой причине взаимодействие с подобного рода приложениями требует предельной аккуратности и понимания того, что любые внесённые в систему изменения могут нарушить её стабильную работу.
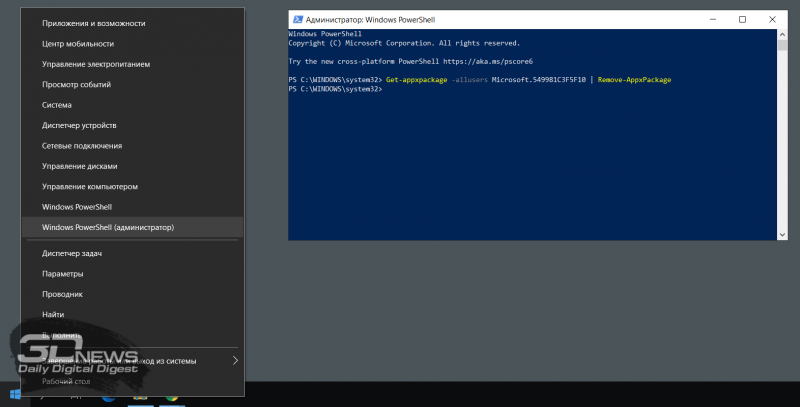
⇡#Удаление голосового помощника Cortana
Для русскоязычных пользователей Windows 10 этот напичканный искусственным интеллектом инструмент несёт довольно мало практической ценности, и его можно смело исключить из системы. Чтобы значок «Кортаны» не мозолил глаза, а на диске освободилось место, нужно открыть консоль PowerShell от имени администратора и ввести команду Get-appxpackage -allusers Microsoft.549981C3F5F10 | Remove-AppxPackage. После этого от голосового помощника Cortana останутся одни воспоминания.
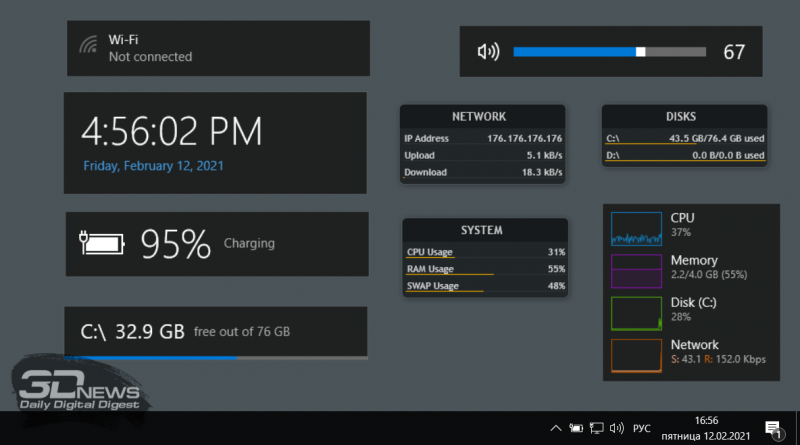
⇡#Добавление виджетов в Windows 10
В былые времена программная платформа Windows позволяла размещать на рабочем столе виджеты (в мире Windows известные как гаджеты) — миниатюрные приложения, отображающие ту или иную полезную для пользователя информацию. Впоследствии из соображений безопасности Microsoft отключила эту функцию, которую без труда можно вернуть на место посредством сторонних решений, таких, например, как Win10 Widgets. Данная программа построена на базе известной opensource-разработки Rainmeter и содержит большое количество разнообразных настраиваемых виджетов, позволяющих мониторить состояние системы, следить за расходом трафика, контролировать заряд аккумулятора ноутбука и решать прочие задачи.
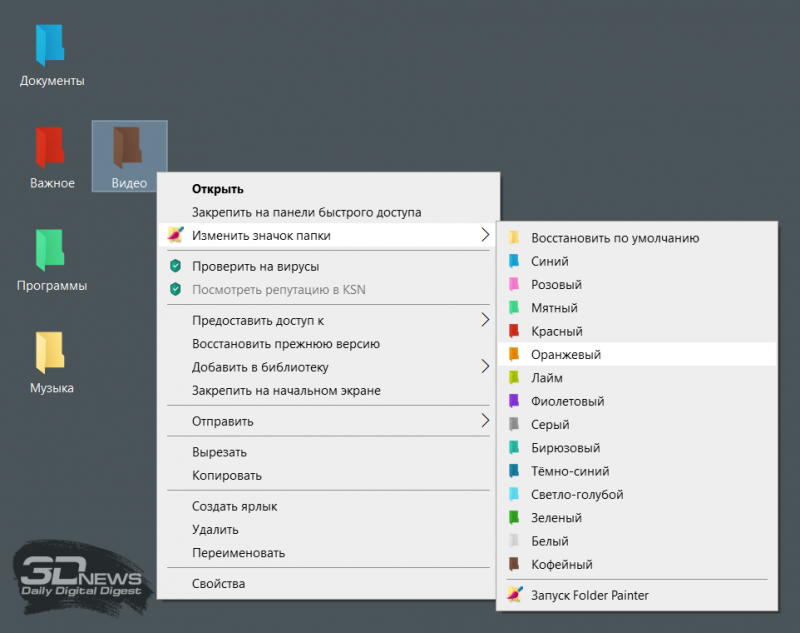
⇡#Окрашивание значков директорий в различные цвета
Такая функциональность Windows 10 не только добавит красок в рабочее окружение системы, но и упростит визуальный поиск папок с файлами. Реализовать её можно с помощью бесплатной утилиты Folder Painter, которая добавляет в контекстное меню необходимые опции для цветовой пометки значков директорий. Всё гениальное просто.
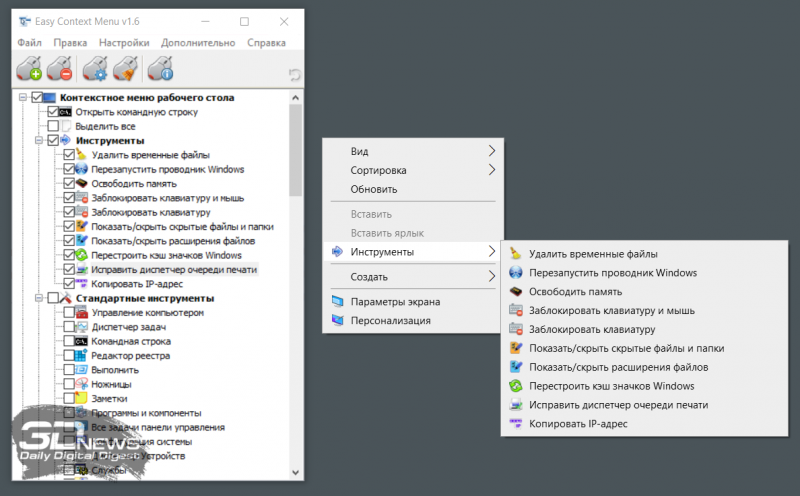
⇡#Расширение функциональности контекстного меню
С этой доработкой можно существенно повысить эффективность работы в операционной системе Windows 10. Необходимо всего лишь воспользоваться программой Easy Context Menu, позволяющей дополнить контекстное меню часто используемыми командами и инструментами. Например, можно добавить пункты для открытия командной строки, блокировки клавиатуры, удаления временных файлов, копирования IP-адреса и прочие элементы меню, выполняющие те или иные быстрые действия. Особо мудрить с Easy Context Menu не стоит, так как в противном случае вся польза от этой программы может сойти на нет.
⇡#Автоматическое переключение между светлой и тёмной темами оформления Windows 10
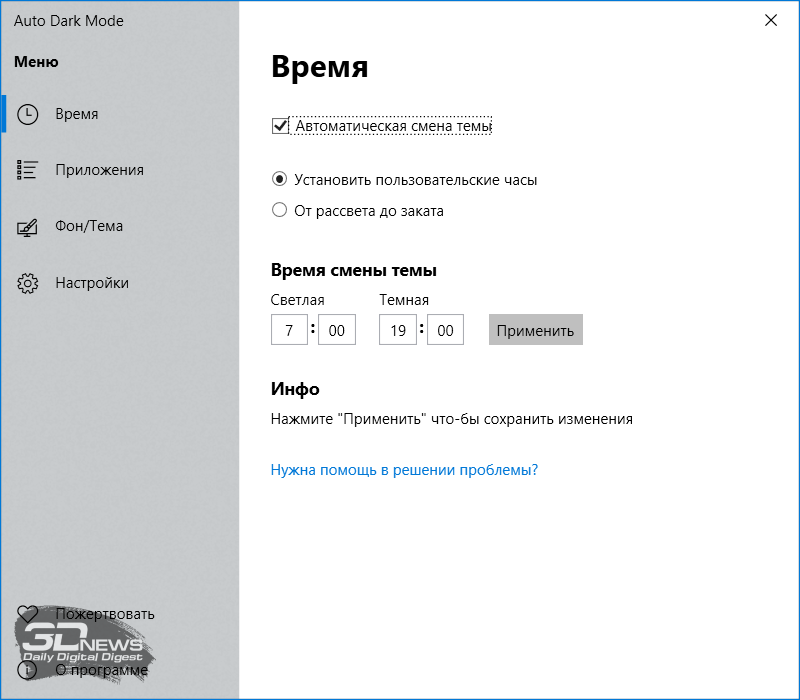
Для быстрого выбора подходящего режима работы пользовательского интерфейса предусмотрена соответствующая опция в меню уведомлений «десятки», однако куда практичнее доверить управление этой функцией автоматике. Сделать это можно с помощью утилиты Auto Dark Mode. Процесс настройки предельно простой: устанавливаем программу, запускаем, ставим галочку напротив пункта «Автоматическая смена темы», выбираем подходящее время для переключения в дневной/ночной режим и жмём «Применить». Ничего сложного.
Ну а в завершение выпуска в очередной раз напомним о важности резервного копирования данных, создания дисковых образов и файловых архивов. В арсенале Windows 10 для этого имеются все необходимые средства, а регулярное и своевременное их использование позволит быстро восстановить работу компьютера в случае технических сбоев операционной системы.
Если Вы заметили ошибку — выделите ее мышью и нажмите CTRL+ENTER.
How to get a sexy, streamlined taskbar.
Sarah is a freelance writer and CNET How To blogger. Her main focus is Windows, but she also covers everything from mobile tech to video games to DIY hardware projects. She likes to press buttons and see what happens, so don’t let her near any control panels.
We were all excited to get the Start menu back in Windows 10, and we wasted no time in customizing it to the best of our abilities.
But what about the poor, neglected taskbar, who never left us in the first place? Here’s how to make the taskbar look pretty and work for you.
Add some shortcuts
Enlarge Image
Smaller taskbar buttons
Enlarge Image
Are the buttons on your taskbar unnecessarily large? Make them smaller by right-clicking on the taskbar, clicking Settings, and turning on Use small taskbar buttons. Checking this option will also remove the date from your taskbar clock.
Clean up the System Tray
Enlarge Image
The System Tray is the part of the taskbar where all those pesky notification icons and useless things like clocks show up. Good news — you can get rid of all of these icons, including the built-in system icons like the clock, volume and network icons.
Enlarge Image
To start cleaning it up, right-click the taskbar and click Settings to open the Taskbar settings menu. Under Notification area, click Select which icons appear in the taskbar. Here, you can either choose to always show all program icons in the taskbar, or you can turn icons on/off individually.
Enlarge Image
To turn off system icons, such as the clock, volume control, or the action center, click Turn system icons on or off. You can toggle off just about everything, including the power, location and Windows Ink Workspace icons.
Get rid of Cortana
Enlarge Image
Cortana is sweet and all, but her search icon takes up valuable taskbar real estate. Right-click the taskbar, hover over Search and click Hidden to remove Cortana’s button from the taskbar completely.
Get rid of the Task View button
Enlarge Image
Task View is a new Windows 10 feature that lets you see and use virtual desktops. The Task View button is a small button on the taskbar that lets you quickly access these desktops. To get rid of it, right-click the taskbar and click Show Task View button to toggle it off.
Taskbar buttons, your way
Enlarge Image
If your taskbar is looking cluttered — because you love having 64 Firefox windows open at once — maybe it’s time to customize your taskbar buttons. Right-click the taskbar and click Settings. Under Combine taskbar buttons, click the dropdown menu and choose your flavor: Always, hide labels (this will combine one program’s windows into one taskbar button); When taskbar is full (this will only combine a program’s windows into one taskbar button when there’s no more room on the taskbar); or Never.
If you have multiple displays, you can choose separate options for how the taskbar on your main display is presented (versus the taskbars on your secondary displays).
Hide it
Enlarge Image
If you hate the way the taskbar looks, you can set it to automatically hide whenever it’s not in use (move your mouse over the taskbar area to see it again). Do this by right-clicking the taskbar, clicking Settings, and turning on Automatically hide the taskbar in desktop mode.
Lock it
If you love the way the taskbar looks, and you don’t want to accidentally resize or move it with your clumsy mouse handling, you can lock it in place. To do this, right-click the taskbar and check Lock all taskbars from the menu that pops up.
Add toolbars
In Windows 10, you can add toolbars, as well as folders, to the taskbar. There are three toolbars already created for you: Address, Links, and Desktop. The Address toolbar is an address box — type a URL into it and hit Enter, and your default web browser will open that page. The Links and Desktop toolbars are just folders — the Links toolbar lets you see all the files in your Links folder; the Desktop toolbar lets you see all the files on your desktop.
Enlarge Image
To add a toolbar, right-click the taskbar, hover over Toolbars, and then check the toolbars you want to add.
You also have the option to add a New toolbar, which is essentially just a folder that you’ll be able to quickly access from your taskbar. Click New toolbar… and navigate to the folder you want to add. Click Select Folder and your new toolbar will appear on the taskbar.
Change the color and transparency
To change the color and transparency of your taskbar, open the Settings menu and go to Personalization > Colors. Scroll to the bottom of the screen and make sure Show color on Start, taskbar, action center, and title bar is turned on. Choose the color you want to use and your taskbar will change to reflect your choice.
Enlarge Image
To make the taskbar transparent, scroll down to the bottom of the screen and turn on Make Start, taskbar, and action center transparent.
Editors’ note, August 12, 2016: This article was originally published February 11, 2016, and was updated to reflect changes made in the Windows 10 Anniversary Update.
The taskbar has been with us for a long time and is present in Windows 10 too. It’s one of the most useful parts of the Windows desktop, allowing you to access various applications, settings, and notifications on your computer. As such, it deserves to be customized to fit your needs. You can change its position, size, hide it, select which icons to show, and more. If you’re curious about what can be personalized on your Windows 10 taskbar and how to do it, read on:
NOTE: The screenshots used in this article are from Windows 10 version 22H2. If you have an older version of Windows 10, you should update it to get all the new features and improvements. Here’s how to upgrade Windows 10 to the latest version.
How to open the taskbar settings in Windows 10
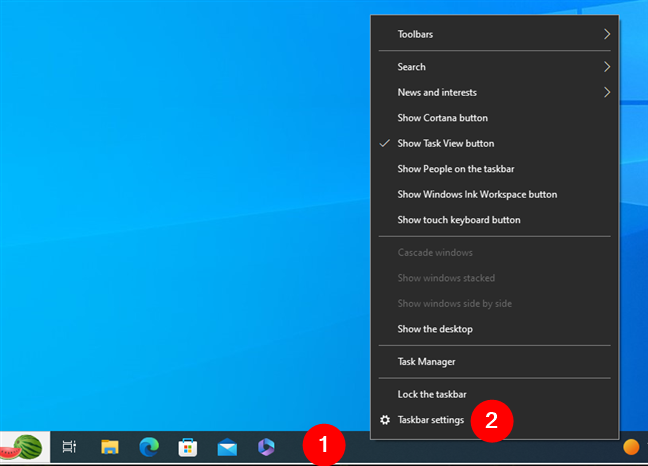
The first thing you must do in order to customize the way your taskbar looks and works is to open its settings. To do that quickly, right-click (or press and hold) on any empty space from the taskbar, and then click or tap on Taskbar settings.
How to open Taskbar settings in Windows 10
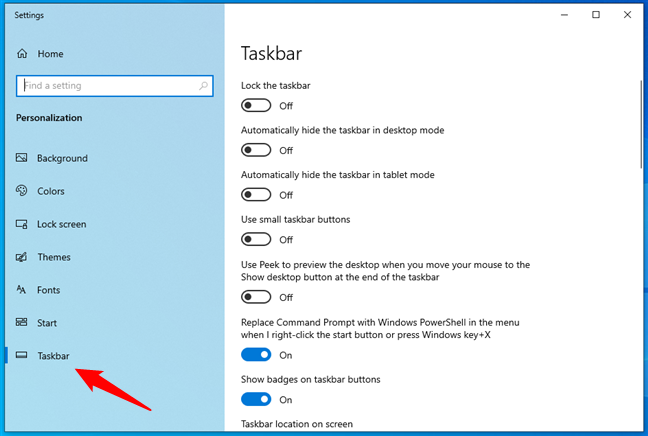
This opens the Settings app and automatically takes you to the Taskbar section of the Personalization category of settings.
The Taskbar page in Windows 10’s Settings
Of course, you can also access the Windows 10 taskbar options by opening the Settings app and going to Personalization > Taskbar.
How to customize Windows 10’s taskbar appearance
The taskbar is one of the most frequently used features of Windows 10. It lets you access your favorite apps, switch between open windows, and see important notifications. However, you may want to customize its appearance to suit your preferences and needs. Here’s how to do that:
How to move the taskbar in Windows 10
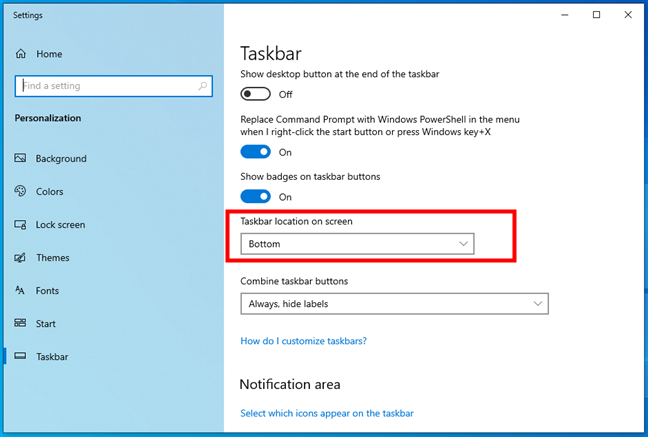
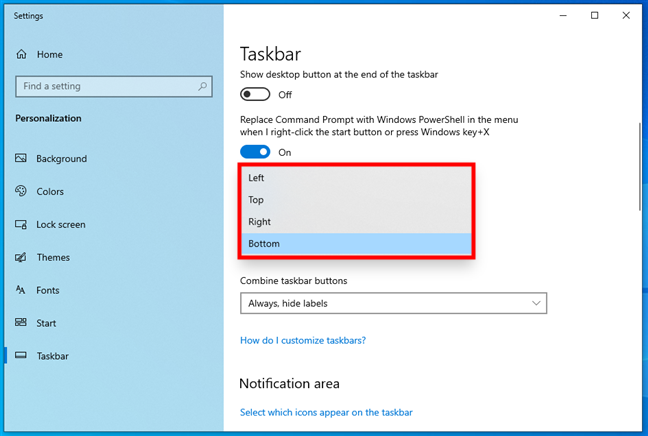
By default, Windows 10’s taskbar is located at the bottom of the screen. However, you can choose to place it on any other edge. To change the location of your taskbar, scroll the list of available Taskbar settings on the right until you find the “Taskbar location on screen” option.
Taskbar location on screen
You can select to place the taskbar to the left, right, top, or bottom of your screen. Choose your preferred location, and Windows 10 immediately moves the taskbar, without asking for additional confirmation.
How to move the taskbar in Windows 10
For instance, in the next screenshot, I relocated the Windows 10 taskbar to the top of the screen.
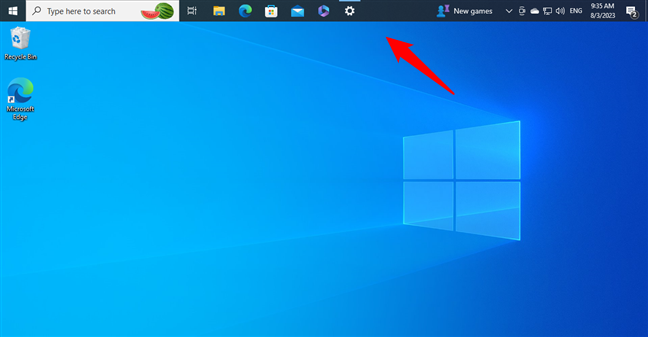
Windows 10’s taskbar shown at the top of the screen
TIP: You can also simply drag and drop the taskbar to the edge where you want it on your desktop. However, for that to work, you must first unlock it from the Taskbar settings by disabling the “Lock the taskbar” switch.
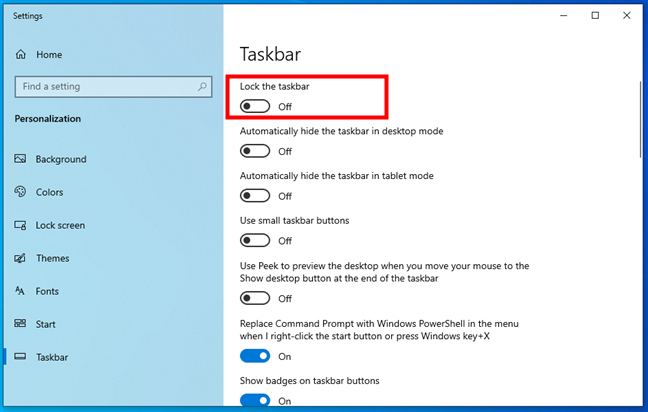
The Lock the taskbar switch
How to resize the taskbar in Windows 10
Would you like a bigger taskbar on your Windows 10 computer? Or maybe some coworker or friend played a prank on you enlarging your taskbar, and now you’re wondering “Why is my taskbar so big?”. No matter the case, if you want to, you can resize the taskbar to make it larger or smaller.
To change the size of the taskbar in Windows 10, you need first to unlock it. Return to the Taskbar page in the Settings app, and disable the “Lock the taskbar” switch.
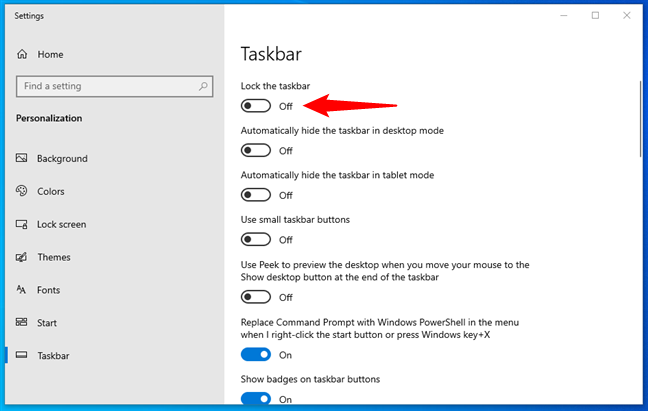
Unlock the taskbar in Windows 10
Then, you can resize your taskbar, just like any regular window. Hover with your mouse pointer over the upper margin until the “resize” cursor appears, and drag the margin up or down. Note that the taskbar has minimum and maximum values beyond which it can’t be dragged/resized.
Resize the taskbar in Windows 10
How to hide the taskbar in Windows 10
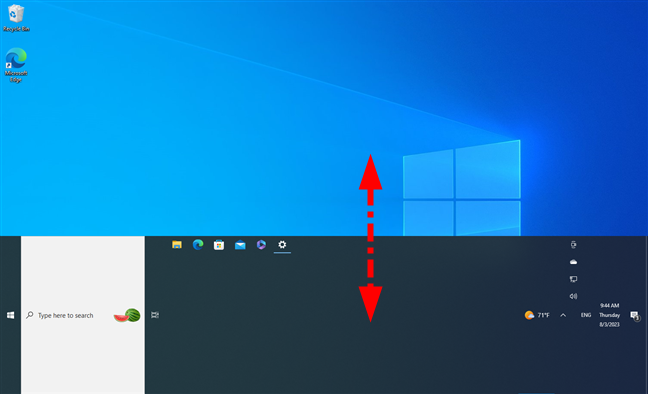
You might prefer not to see the taskbar on your desktop. If that’s the case, you can make your taskbar hide automatically when not in use. In other words, you can make the Windows 10 taskbar invisible until you hover your mouse pointer over the area where it’s hidden. And then, when you do that, the taskbar slides into view. Once you move away from it, it hides again.
To automatically hide your taskbar when you’re using your Windows 10 computer in desktop mode, turn on the “Automatically hide the taskbar in desktop mode” switch.
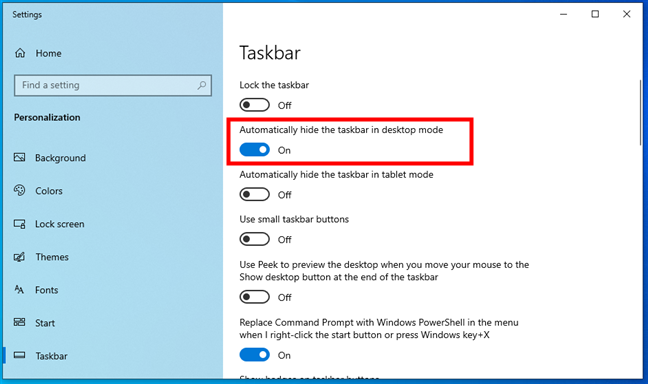
Hide the taskbar in Windows 10
Hiding the taskbar makes more room on your desktop, and that’s something quite important if you’re using a small screen like that of a tablet or a hybrid 2-in-1 device. If you want that, enable the “Automatically hide the taskbar in tablet mode” switch.
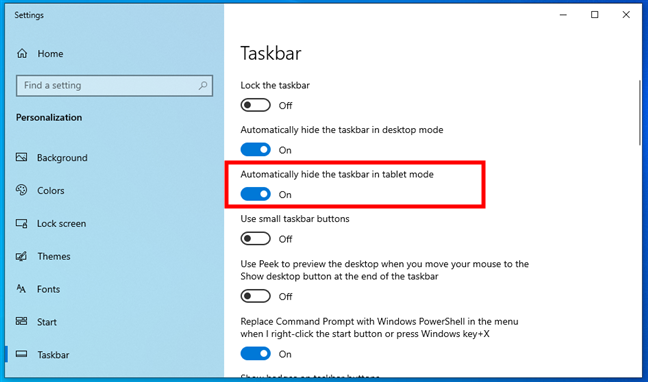
Hide the taskbar in Windows 10’s tablet mode
How to customize the buttons on the taskbar
By default, Windows 10 displays large buttons on the taskbar. However, you might feel they’re too big, making you wonder how to resize your taskbar icons. If you prefer smaller and more subtle buttons on your taskbar, you can set Windows 10 to “Use small taskbar buttons.”
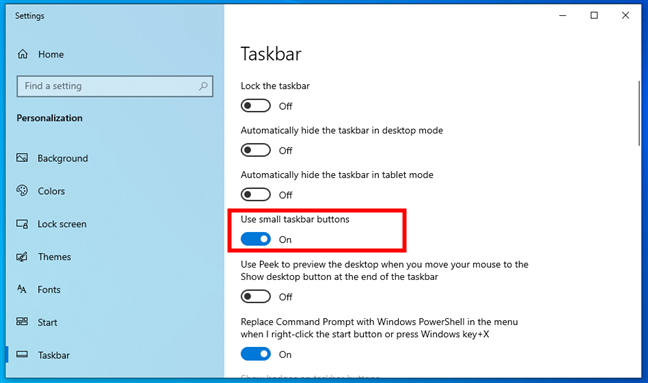
Make the taskbar icons smaller
Using small buttons can make the Windows 10 taskbar feel a bit less obtrusive, as this also decreases its width.
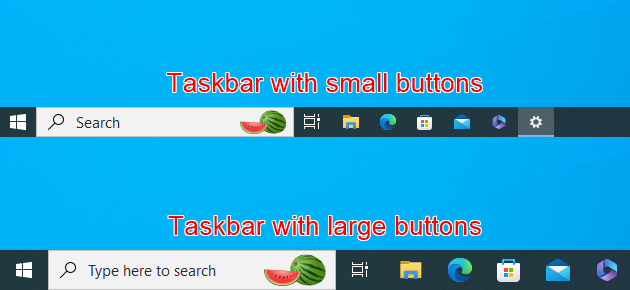
Windows 10’s taskbar icons: small versus large
How to customize what’s shown on the taskbar in Windows 10
Now you know how to personalize the looks of the Windows 10 taskbar. However, there’s more: next, I’ll show you how to customize the different sections of the taskbar, like the system tray icons or the apps pinned to the taskbar. Here’s how:
How to select which icons are displayed on the Windows 10 taskbar
The right side of the taskbar is the place where you get notifications from the Action Center, check what date and time it is, and see a whole range of icons for various system options and apps installed on your Windows 10 computer or device. That’s why this part of the taskbar is also known as the Notification area or the system tray. Fortunately, you can control it, as Windows 10 allows you to select exactly what icons are displayed here.
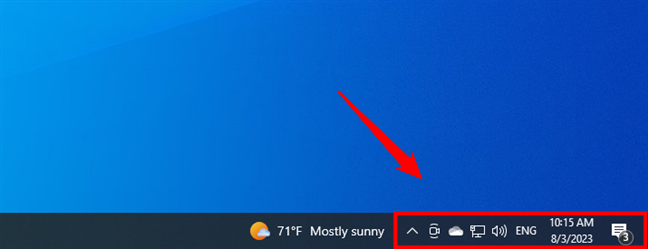
The system tray icons in Windows 10
If you want to customize the icons that appear on your taskbar, this guide covers the subject in detail: The Windows 10 system tray — How to show or hide icons.
How to show or hide Widgets on Windows 10’s taskbar
Widgets are a relatively new feature in Windows 10. They let you access personalized information such as weather, news, your calendar, and more. These bits of information are shown by default on the Windows 10 taskbar, left of the system tray icons.
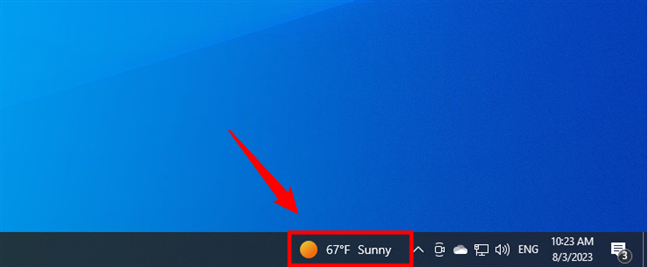
The Widgets taskbar button in Windows 10
While some people find them useful, others may not like them and would rather remove them completely. If you want to learn how to use Widgets in Windows 10, or if you’d rather clean up your taskbar by disabling the Widgets, read this guide: News and interests in Windows 10: How to get it, configure it, or disable it.
How to pin items to the Windows 10 taskbar
You probably have some apps, programs, or other tools you use often, and you want to have speedy access to them. Pinning those items to the taskbar is a good way to reach them quickly.
If you want to pin an item to the taskbar, it usually suffices to right-click (or press and hold) its icon or shortcut and then select the “Pin to taskbar” option from the context menu.
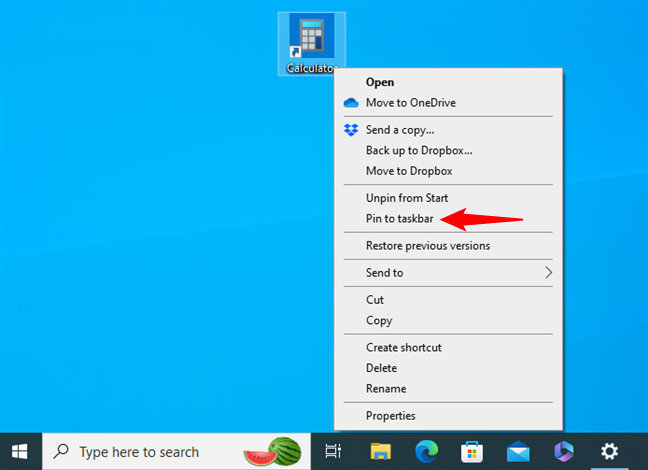
Pin an item to the Windows 10 taskbar
However, there are many ways to pin an item to the Windows 10 taskbar. For example, if you want to pin a shortcut, there are nine different methods, and you can learn them all from this guide: 9 ways to pin shortcuts to the Windows 10 taskbar. If you have a favorite website you’d like to add to the taskbar, these steps will show you how to do it: How to pin a website to the taskbar or the Start Menu. And last but not least, you can even add contacts or pin folders to the taskbar if that’s what you want.
How to show or hide the search box from the Windows 10 taskbar
By default, Windows 10 shows a large search box on the taskbar that you can use to look for things on your PC and on the internet.
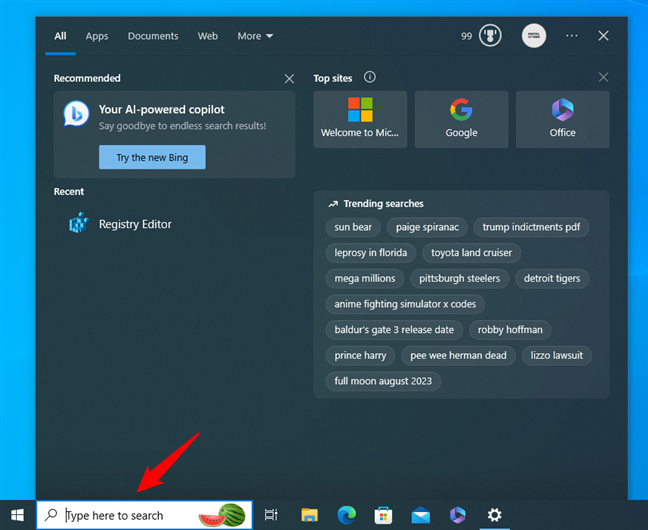
The search box on the taskbar in Windows 10
However, if you feel that this search box is taking too much space from your taskbar, you can either replace the search box with a simple icon or even disable it completely. To do that, right-click (or press and hold) on an empty space of the taskbar, hover your cursor or click/tap on Search, and then choose what you want: Show search box, Show search icon, or set it Hidden from view.
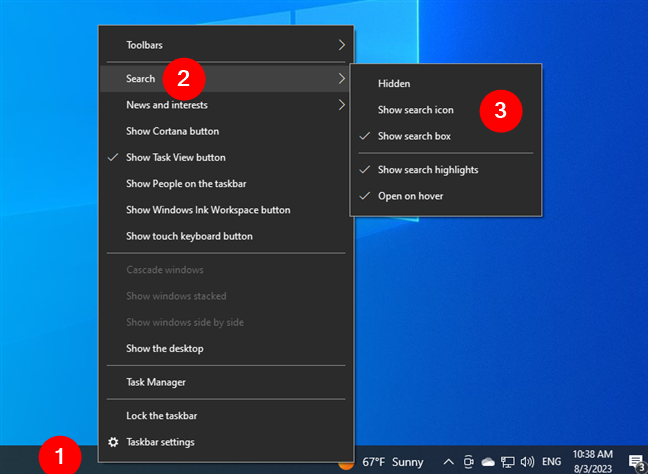
Change the search bar to an icon or hide it from the taskbar
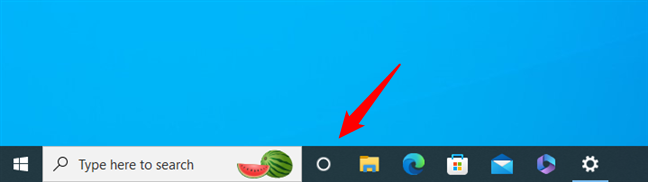
If you’re curious, this is what the search icon looks like:
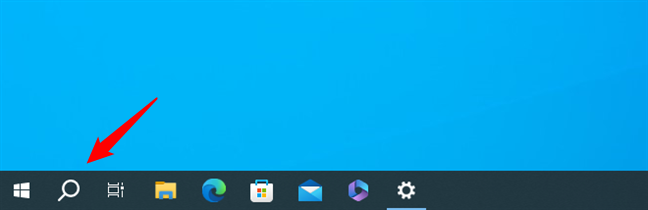
The Search button on the Windows 10 taskbar
If the search disappeared from the taskbar, follow the same steps as above and select the “Show search box” or “Show search icon” option, depending on your preference.
How to show or hide the Task View button from the taskbar
Besides search, Windows 10’s taskbar also includes the Task View button by default. If you’d like to learn how to work with multiple virtual desktops, know that we’ve covered all the ins and outs of this feature here: How to use multiple desktops in Windows 10. However, if you’re not thrilled about virtual desktops and would rather get rid of the Task View button from the taskbar, you can.
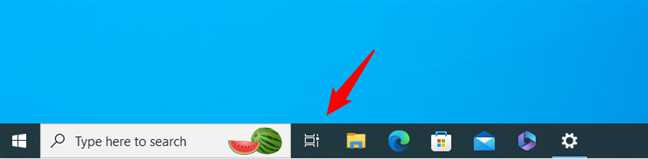
The Task View button on the taskbar
To remove Task View from the Windows 10 taskbar, right-click (or press and hold) on an empty space from the taskbar and deselect the “Show Task View button” option.
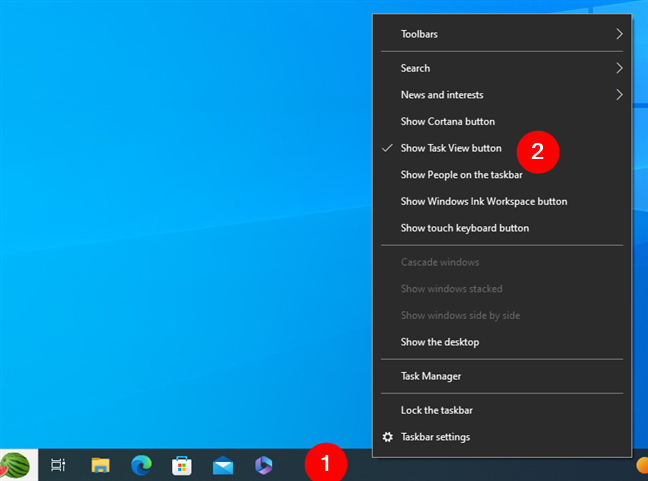
Show Task View button
If you want to show Task View on your taskbar, repeat the same steps, but this time, enable the “Show Task View button” option.
How to show or hide Cortana on the taskbar in Windows 10
Windows 10’s taskbar can also show a button for Cortana, not just for Task View and Search. While it’s hidden by default in the latest operating system version, you can turn it on if you’re using this virtual personal assistant. To do so, right-click (or press and hold) on an empty space from the taskbar, and enable the “Show Cortana button” option.

Show Cortana button
You’ll then see Cortana’s button displayed next to the search bar, just like in the next screenshot.
Cortana on the Windows 10 taskbar
To hide Cortana from Windows 10’s taskbar, follow the same steps and turn off the “Show Cortana button” option.
How to add or remove toolbars to the Windows 10 taskbar
You can add toolbars to the taskbar if you like. To do that, right-click (or press and hold) on a blank space on the taskbar, click/tap or hover over Toolbars and choose to add one of the default toolbars or create a new one.
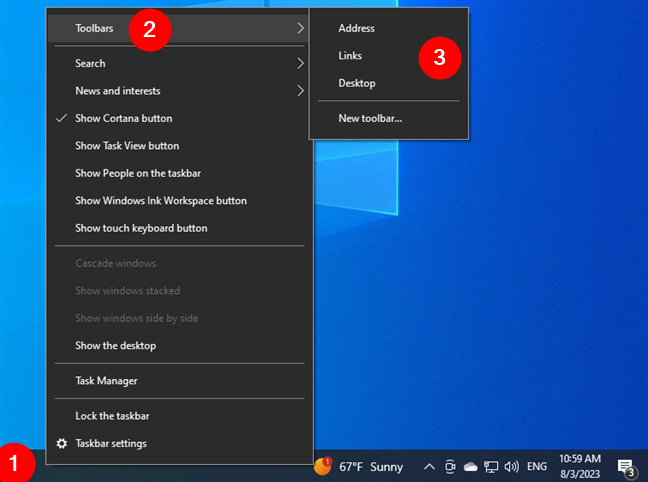
Adding Toolbars to the Windows 10 taskbar
The default toolbar choices are:
- Address — adds the equivalent of a URL bar to the taskbar, so you can type in frequently used websites or file locations.
- Links — puts in a toolbar with all your favorite websites, but only if your default browser is Internet Explorer. If you’re using the latest version of Windows 10, the default web browser is Microsoft Edge (unless you change it), so this toolbar is pretty much useless in this case.
- Desktop — repeats all the shortcuts on your desktop and is a fairly useless choice.
- New toolbar… — if you create a new toolbar, Windows 10 lets you put in a custom toolbar containing any folder you choose. If the folder you pin has a lot of content, your taskbar can fill up quickly, and it will take longer to load. The default folder is your Documents library.
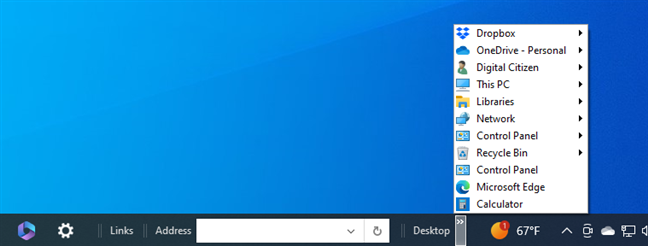
Taskbar toolbars in Windows 10
You can also remove a particular toolbar from your taskbar if you don’t want to see it. Right-click (or press and hold) on an empty space from the taskbar, click/tap or hover over Toolbars, and then uncheck the toolbar you want to hide. Items you have added will disappear, while default items on the list will just be unchecked, so you can add them back if you change your mind.
How to show the Windows 10 taskbar on multiple displays
The taskbar is not displayed on all your screens by default if you have a dual or multi-monitor setup. However, if you want it to show everywhere, you can enable the “Show taskbar on all displays” option from the Multiple displays section of the Taskbar settings. You can also specify whether the buttons on the other taskbars from the other screens will combine or not. Note that these settings are grayed out if you don’t have two or more displays installed on your computer.
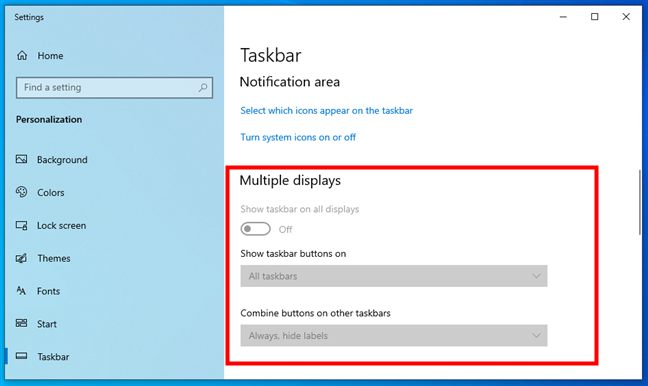
Multiple displays options for the Windows 10 taskbar
As a reminder, the fastest way to get to the Taskbar settings is to right-click or press and hold on a blank space from your taskbar and then click or tap on Taskbar settings.
How did you customize the taskbar on your Windows 10 PC?
As you’ve seen, the taskbar in Windows 10 is highly customizable, and there are many things you can change about how it looks and works. Carefully go through all the items shown in this guide, and customize your taskbar as you see fit. Then, let me know if you have any questions and how you like your Windows 10 taskbar to look and be organized.
The taskbar is one of the most frequently accessed areas of Windows operating system. With Windows 10, Microsoft has made subtle changes to the taskbar to add the universal search box and task view icons.
While there is nothing wrong with the default look of the taskbar, like other areas of Windows operating system, Windows 10’s taskbar can be customized in a number of ways without the help of third-party tools. And if you don’t mind using free, third-party tools, you get new possibilities to tweak and customize the taskbar in Windows 10.

If you love customizing Windows, here are the best ways to customize the taskbar in Windows 10.
1. Change the color of taskbar
Black is the default color of the taskbar in Windows 10. Unlike previous Windows versions, Windows 10 doesn’t automatically change the taskbar color to match the window border color.

If you’re bored with the default black color of the taskbar, open Settings app, click Personalization, click Colors and then turn on the option titled Show color on Start, taskbar, and action center.

On the same page, you can click on one of the tiles to choose an accent color and use it as taskbar color.
NOTE: With default settings, taskbar, Start menu, window borders, and some other areas of the operating system share the same (accent) color. If you would like to set a different color for the taskbar, follow our how to set a different color for taskbar in Windows 10 guide.
2. Enable or disable transparency
Unlike previous Windows versions, Windows 10 allows you enable or disable transparency for the taskbar without the help of third-party tools. To turn on or off the transparency, open Settings, click Personalization, click Colors and then turn on or off the option titled Make Start, taskbar, and action center transparent.

3. Add or remove the search box
The search box on the taskbar is quite useful to quickly search your PC as well as the web, but it takes considerable amount of space on the taskbar and might not be perfect on smaller screens.


If you feel that the search box is taking up good amount of space and you have little space for other icons, you can place a small search icon instead of search box by right-clicking on the taskbar, clicking Search and then clicking Show search icon. Here you can also select Hidden if you would like to use the search without the search box or icon.

If you didn’t know, one can use the Start menu search without the search box or icon. All you need to do is, open the Start menu and start typing. Go through our use the Start menu search without search box or icon guide for detailed information on this.
4. Move taskbar to the top, right or left of the screen
The bottom edge of the screen is the default location of the taskbar in Windows 10. However, if you’re on a tablet or netbook with small screen, you could move it the left or right to get more vertical space for applications.
To change the default position:
Step 1: Right-click on the empty area of the taskbar and click Properties.
Step 2: Under Taskbar tab, next to Taskbar location on screen, select Top, Left or Right, and then click Apply.

5. Auto-hide the taskbar
If you would like to have more screen real estate, configure the taskbar to auto-hide when not in use. The hidden taskbar can be revealed by moving the mouse cursor to the bottom edge (or where taskbar is positioned on screen) or by pressing Windows logo key.
To auto-hide the taskbar:
Step 1: Open Taskbar and Start Menu Properties by right-clicking on taskbar and then clicking Properties.
Step 2: Here, under the Taskbar tab, check the option titled Auto-hide the taskbar, and then click Apply button.

6. Use small icons to accommodate more icons
Are you running Windows 10 a tablet or netbook and don’t have enough space on the taskbar? Configure Windows 10 to show small buttons or icons on the taskbar, so that you can have more icons.

To use small icons:
Step 1: Open up the Taskbar and Start Menu Properties.
Step 2: Select Use small taskbar buttons and click Apply.
If you need larger icons/buttons, follow our how to make Windows 10 taskbar icons bigger guide.
7. Add or remove icons from the taskbar
Long time PC users who have used Windows 7 or Windows 8 before jumping to Windows 10 likely know that one can pin programs to the taskbar for quick access (right-click on the program in Start menu and click Pin to taskbar). Likewise, an icon pinned to the taskbar can be removed by right-clicking on it and clicking Unpin this program from taskbar option.
What if you want to remove icons from the system tray area of taskbar like this?

If you want to remove default icons like Action Center, Network and power icons from the taskbar, here is how to do that:
Step 1: Open Settings app clicking its icon on the Start menu or using Windows + I hotkey.
Step 2: Click System (Display, notifications, apps, power).
Step 3: Click Notifications and actions.
Step 4: Click Which icons appear on the taskbar and turn on or off the icons that you want to see or don’t want to see on the taskbar.
Step 5: Go back to Notifications and action, click Turn system icons on or off, and then remove system icons like clock, power icon, network, action center and other things.

8. Resize the taskbar
If want to create additional space on the taskbar, you can do so by increasing the default height of the taskbar.

To increase the height, here is what you need to do:
Step 1: Right-click on the empty area of the taskbar and make sure that there is no check mart next to Lock taskbar. If there is a check mark, click on Lock taskbar option to remove it.
Step 2: Place the mouse pointer at the top edge of the taskbar until the pointer changes into a double headed arrow and then drag it towards the top of the screen to increase the height.
Step 3: Lock the taskbar again by right-clicking on the empty area of the taskbar and then clicking Lock the taskbar.
9. Pin folders to the taskbar
Although Windows 10 doesn’t allow you pin folders to the taskbar, there are workarounds to add folders to the taskbar. Please go through our how to 3 ways to pin folders to the taskbar guide to all the ways out there to pin folders to Windows 10 taskbar.
10. Show labels for taskbar icons
By default, the Windows doesn’t display labels for icons on the taskbar. Although this saves some space, you might find it difficult to recognize icons on the taskbar.

If you want to see labels for icons on the taskbar:
Step 1: Open Taskbar and Start Menu Properties by right-clicking on the empty area on the taskbar and then clicking Properties.
Step 2: Under Taskbar tab, next to Taskbar buttons, select Combine when taskbar is full option. Click Apply.

11. Add a toolbar to the taskbar
Want to quickly access all the files on the desktop or in a folder? You can use the Toolbars feature to create a new toolbar on the taskbar to quickly access a folder located anywhere on the PC.

To create new toolbar:
Step 1: Right-click on the empty area, click Toolbars and then click New toolbar.
Step 2: Browse to the location where the folder is saved and then click Select Folder button to the add the toolbar.

The toolbar can be removed by right-clicking on the empty area of the taskbar, clicking Toolbars and then clicking toolbar’s name. When the toolbar is inactive, the check mark will not appear next to it.
12. Hide the Start button on the taskbar
The extreme left of the taskbar is reserved for the Start button. The purpose of the Start button is to help uses open the Start menu, but that can be done by pressing Windows logo key. If you’re one of those users who use Windows logo key to access the Start menu, you can hide the Start button by using a free tool called 7+ Taskbar Tweaker for Windows 10.


After downloading and running the tool, check the option titled Hide the Start button.
13. Hide the Peek button
The Peek or desktop Peek feature was introduced back with Windows 7 to let users quickly peek through all open applications to view the desktop but most users are not aware of this handy feature.

If you’re not using this feature, you can remove the Peek button that appears at the right edge of the taskbar. Before hiding the button, it’s a good idea to turn off the feature first. To turn off the Peek feature:
Step 1: Open Taskbar and Start Menu Properties.
Step 2: Under Taskbar tab, uncheck the option titled “Use peek to preview the desktop when you move your mouse to the Show desktop button at the end of the taskbar”.
To remove the peek button from the taskbar:
Step 1: Download, install and run 7+ Taskbar Tweaker for Windows 10.

Step 2: Check the box next to Hide the show desktop button to remove the same. That’s it!
14. Pin custom folder to the taskbar
While Windows 10 doesn’t support pinning folders to the taskbar, you can pin folders with a small workaround. Please refer to our how to pin folders to Windows 10 taskbar for step-by-step instructions.
15. Center icons on the taskbar
By default, icons on the taskbar are aligned to the left. If you would like to center taskbar icons, you can do so by referring our how to center taskbar icons in Windows 10 article.
Enjoy Windows 10!