
Все способы:
- Способ 1: Lively Wallpaper
- Способ 2: HD 4K Живые обои
- Способ 3: DeskScapes
- Способ 4: Push Video Wallpaper
- Вопросы и ответы: 0
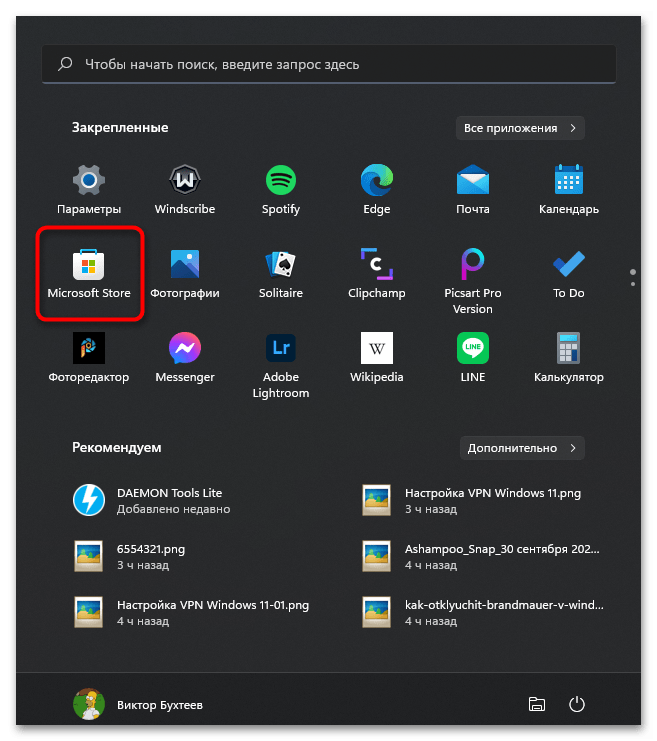
Способ 1: Lively Wallpaper
По умолчанию в Windows 11 отсутствует инструмент, с помощью которого можно было бы установить живые обои. Для выполнения этой задачи пользователям понадобится скачивать дополнительные программы. Одна из подходящих называется Lively Wallpaper и распространяется через Microsoft Store. Давайте рассмотрим процесс ее установки и использования в операционной системе.
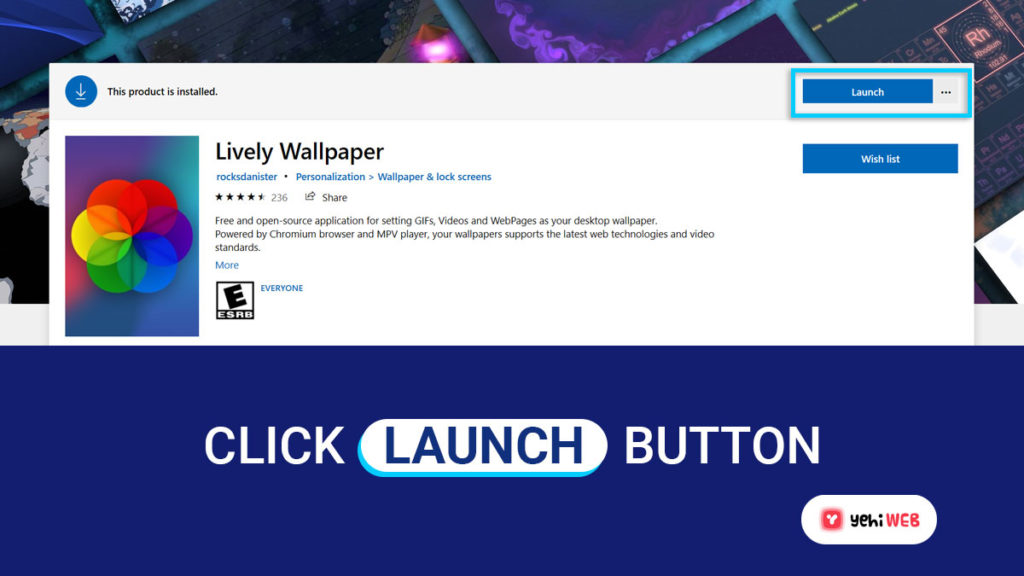
- Откройте меню «Пуск» и в списке закрепленных значков найдите «Microsoft Store». Запустите магазин для поиска приложения внутри него.
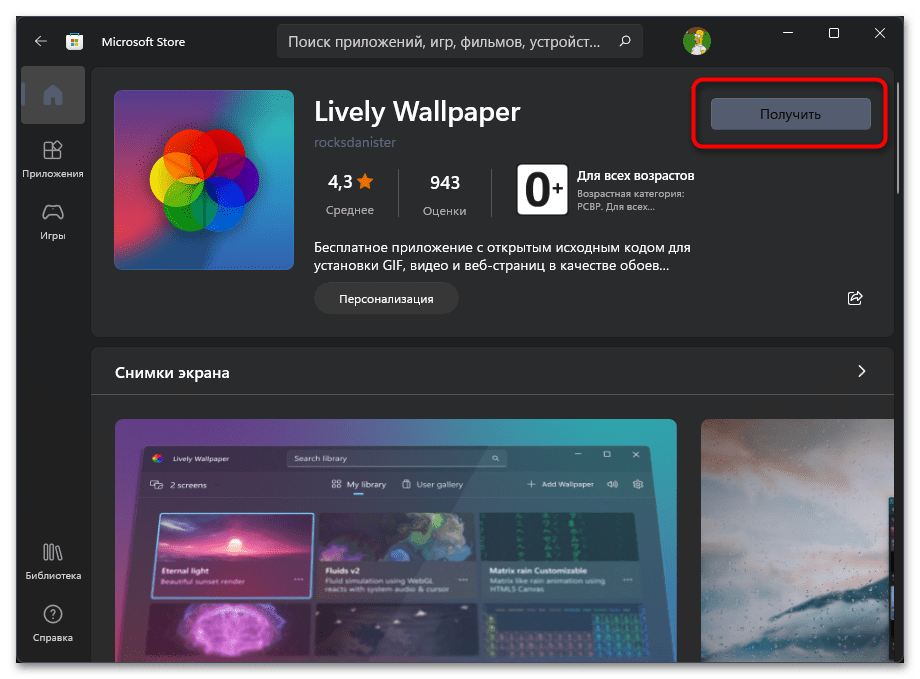
- Активируйте строку поиска, найдите «Lively Wallpaper» и перейдите на страницу приложения.
- Нажмите «Получить», чтобы запустить установку.
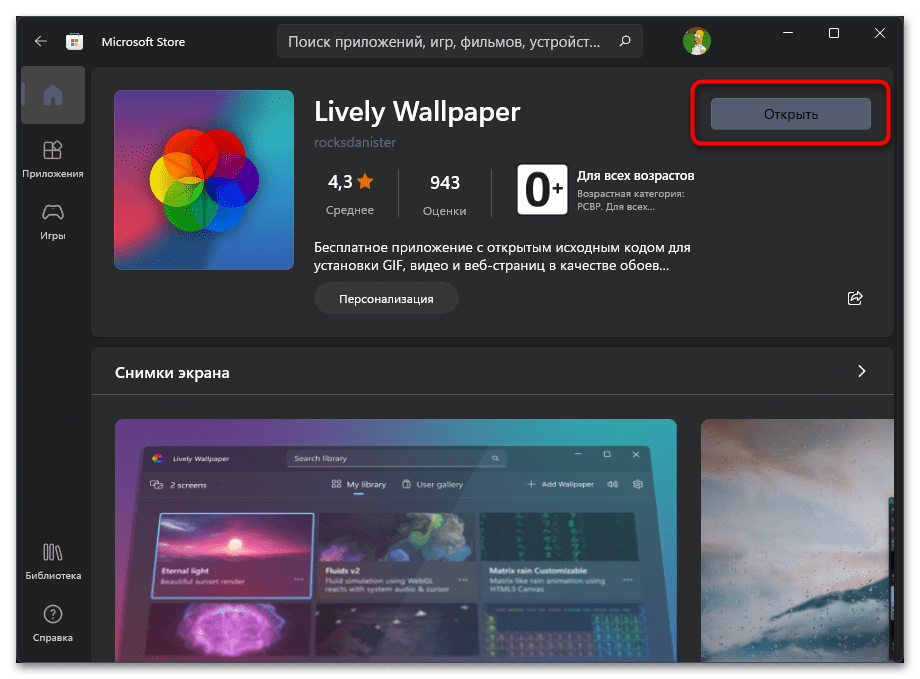
- Вы можете следить за процессом инсталляции, а по завершении нажать «Открыть», чтобы сразу запустить программу и перейти к ее настройке.
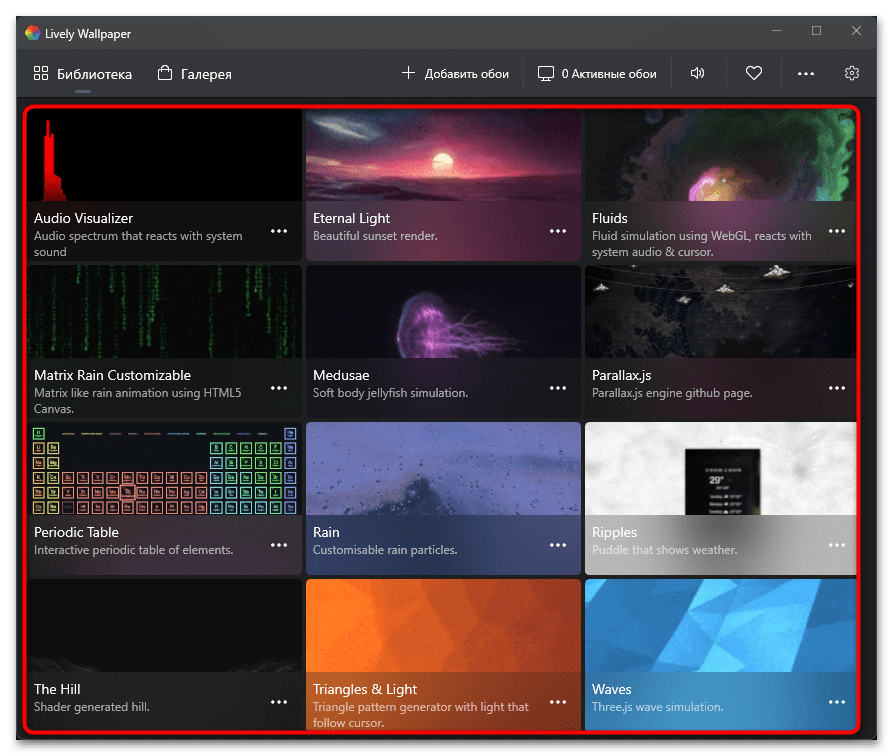
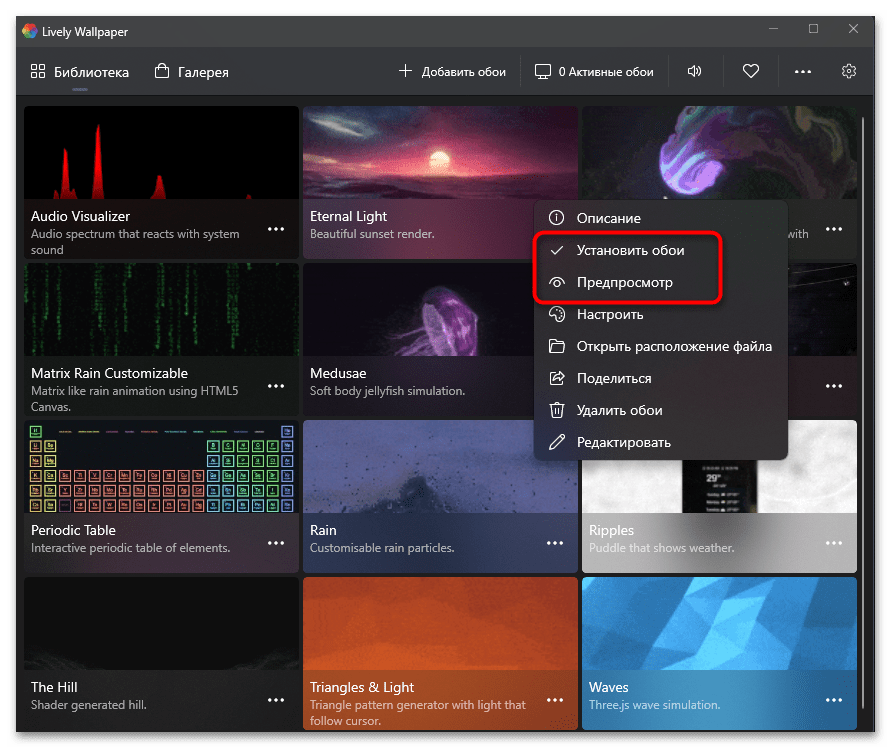
- Разработчики сразу же предлагают на выбор большое количество разных живых обоев из встроенной библиотеки. Ознакомьтесь с этим списком и отыщите среди них подходящий вариант.
- Нажмите по кнопке с тремя точками справа от подходящих обоев, чтобы сразу установить их на рабочий стол или перейти к предпросмотру.
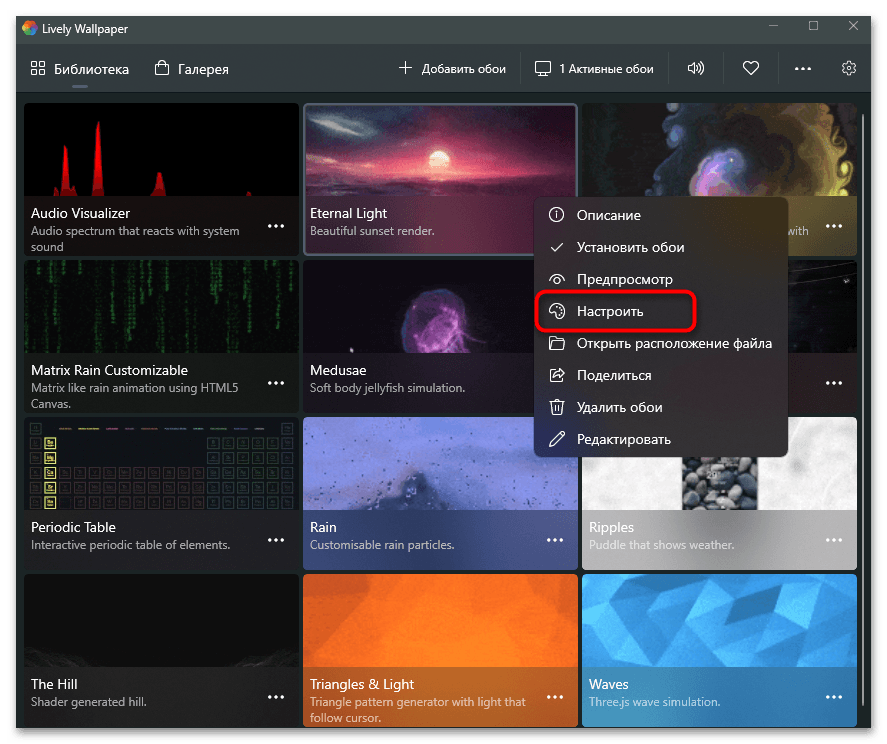
- Заметим, что все обои, присутствующие в Lively Wallpaper, обладают персональными настройками, напрямую влияющими на внешний вид анимации.
- Вы можете изменять яркость, контраст, гамму, сатурацию и скорость воспроизведения. Если выбранные обои имеют звуковое сопровождение, а вам оно не нужно, активируйте галочку возле пункта «Mute».
- Сверните окно с параметрами и обратите внимание на рабочий стол. Изменения вступают в силу сразу же, поэтому вы будете видеть, как теперь выглядят живые обои.
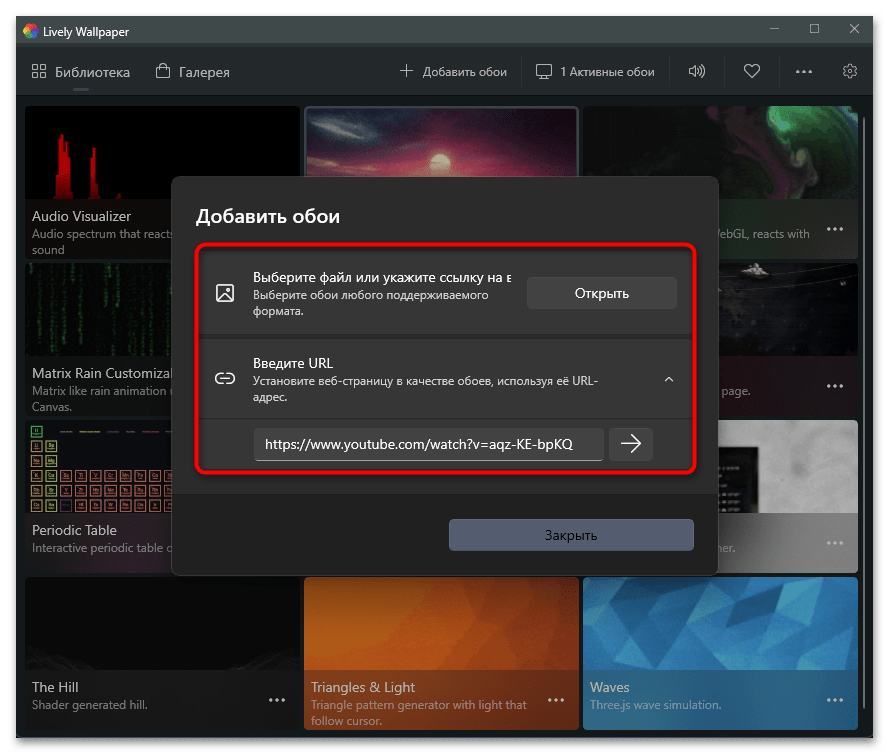
- Если ничего подходящего из библиотеки найти не удалось, можно нажать кнопку «Добавить обои», чтобы выбрать локальный файл или вставить ссылку на видео с YouTube.
- В новом окне выберите подходящий тип импорта и завершите добавление своих собственных живых обоев, которые хранятся в формате GIF или любом современном типе видео.
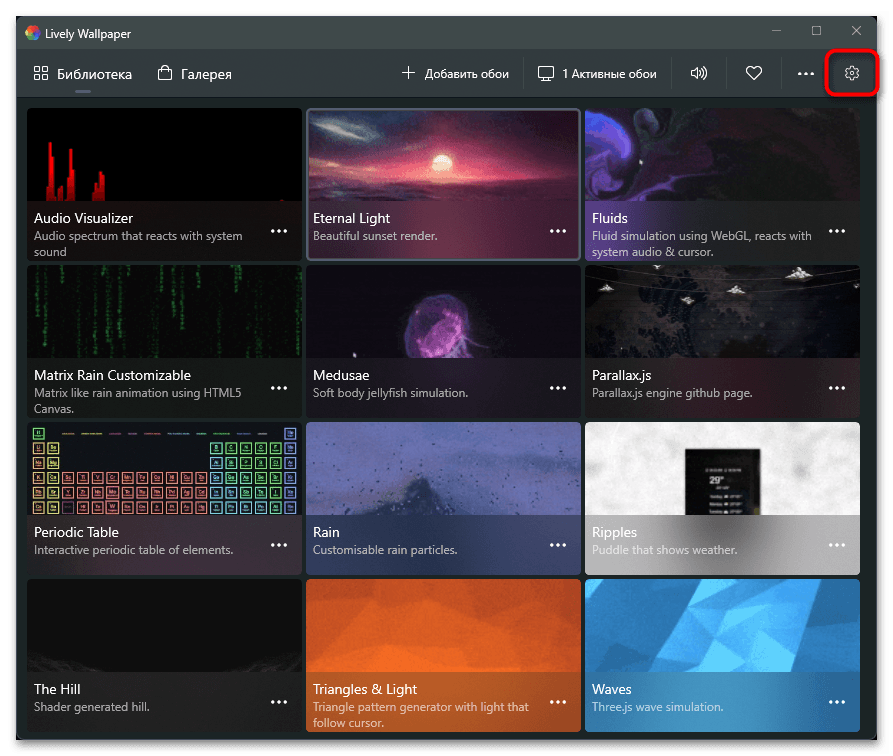
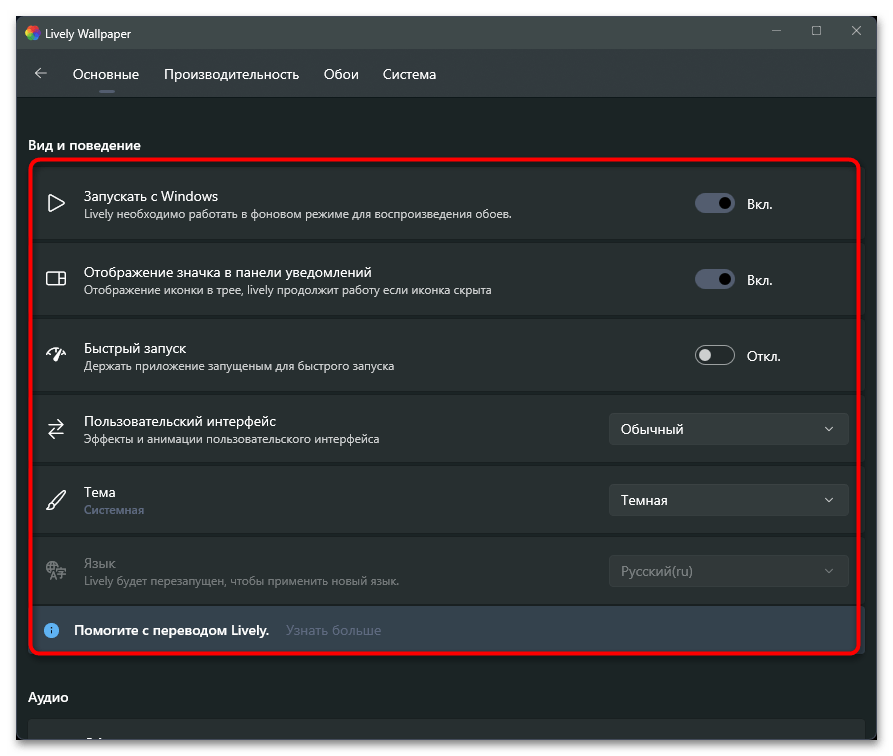
- В завершение обзора данного приложения разберем его общие настройки, для перехода к которым нужно нажать по значку с изображением шестеренки справа вверху.
- Среди основных параметров вы найдете переключатель для автоматического запуска с Windows, что обязательно нужно для воспроизведения живых обоев. Сможете настроить отображение значка на панели уведомлений и активировать быстрый запуск, чтобы получать оперативный доступ к библиотеке с живыми обоями.
- Перейдите на вкладку «Производительность» для просмотра параметров воспроизведения и отдельных функций для ноутбуков. Останавливаться на всех них не будем, поскольку каждый из них имеет свое описание на русском языке, с помощью которого вы и сможете понять, стоит ли активировать ту или иную функцию.


Способ 2: HD 4K Живые обои
Разберем еще одно приложение для установки живых обоев, которое можно скачать бесплатно через Microsoft Store. Его функциональность не такая широкая, как у предыдущей программы, а также отсутствует встроенная библиотека с эффектами. Мы бы рекомендовали использовать HD 4K Живые обои тем юзерам, кто уже скачал видео, которое будет установлено в качестве живых обоев, или нашел на него ссылку на YouTube.
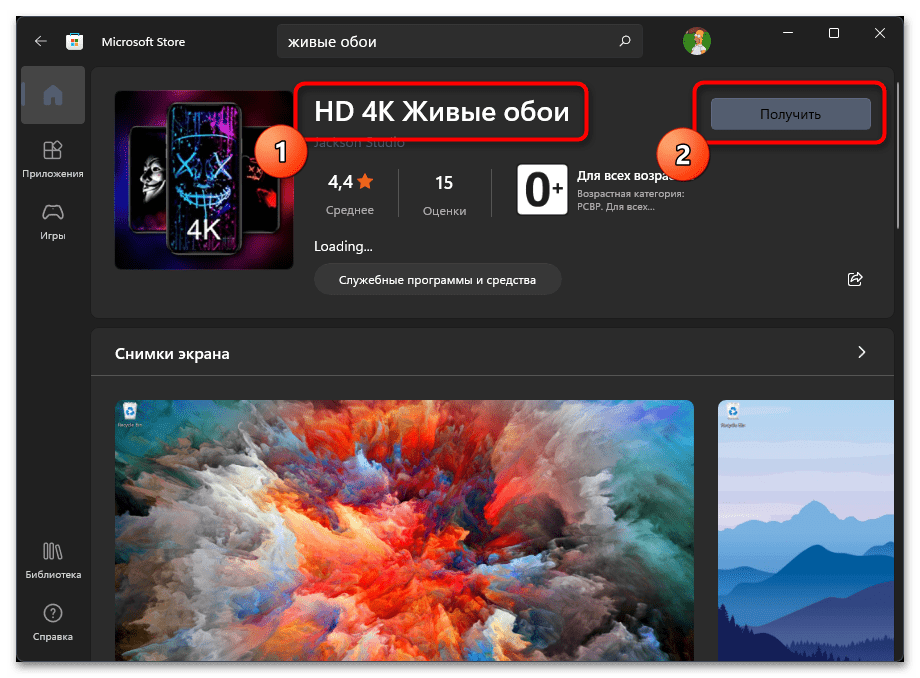
- Отыщите страницу приложения HD 4K Живые обои по названию в магазине и нажмите кнопку «Получить».
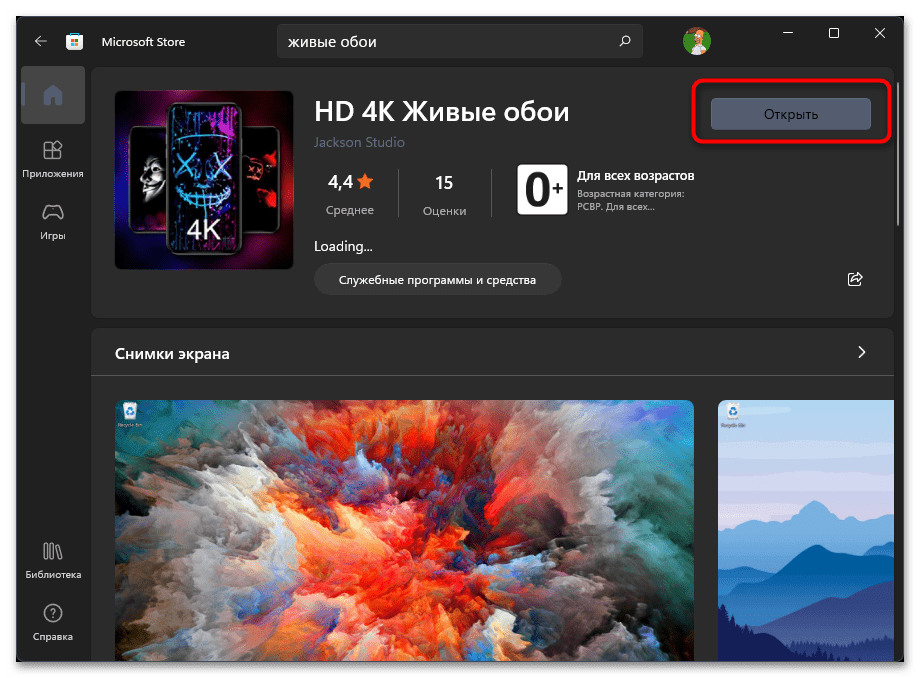
- После установки щелкните по «Открыть» или используйте для запуска значок, который должен автоматически добавиться в меню «Пуск».
- Окно у HD 4K Живые обои минималистичное. На выбор предлагается два варианта работы и список для переключения экранов, если таких используется несколько. По умолчанию будет выбран режим воспроизведения локального файла, а для выбора конкретного видео понадобится нажать кнопку «Browse».
- Если вам больше подходит использование ролика с YouTube без предварительного скачивания файла на компьютер, поставьте галочку возле пункта «YouTube/Niconico Video» и вставьте ссылку в поле ниже.
- Остается только нажать «play», чтобы запустить воспроизведение.
- Больше в HD 4K Живые обои никаких настроек нет, поэтому вы можете просто просматривать воспроизведение живых обоев на рабочем столе, время от времени менять их или останавливать проигрывание через меню программы.
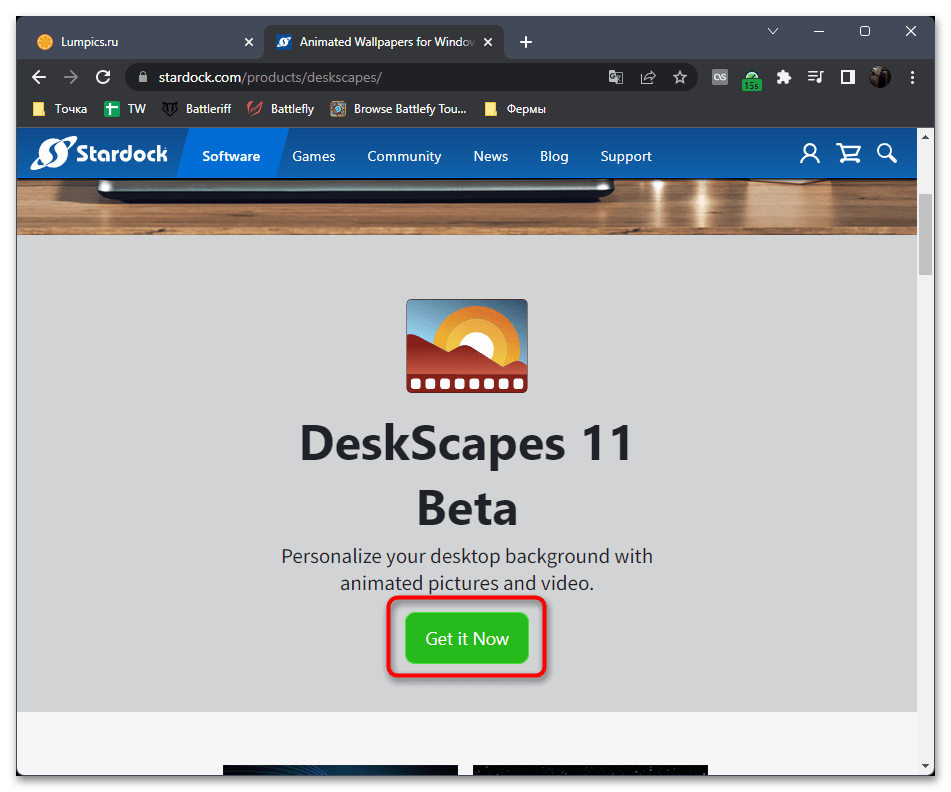
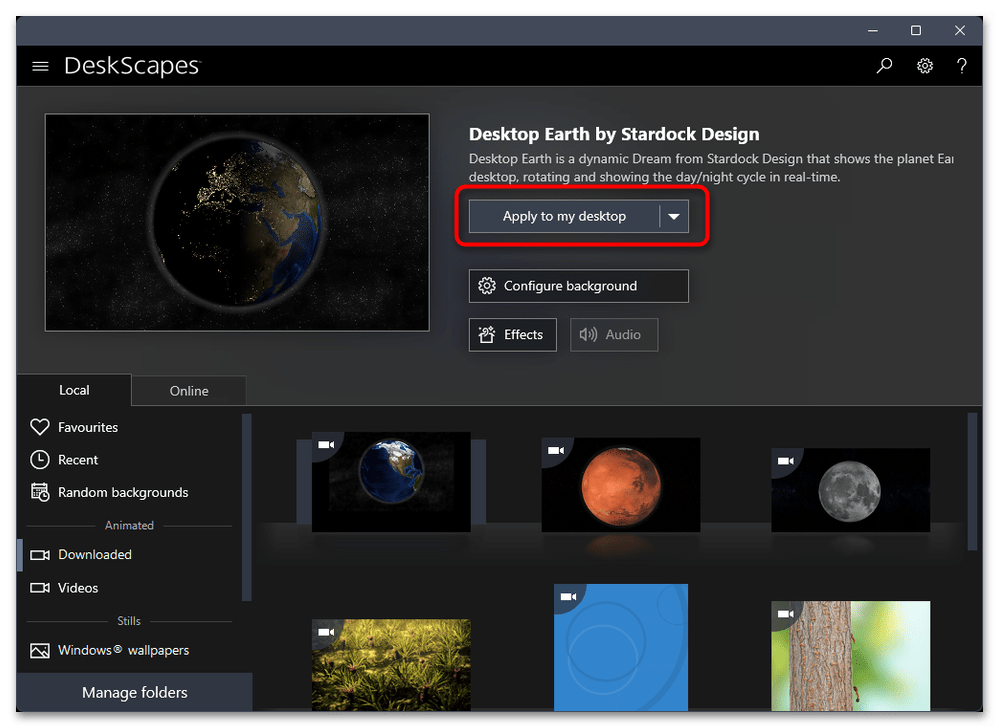
Способ 3: DeskScapes
Далее остановимся на программном обеспечении под названием DeskScapes. Для его использования понадобится загрузить пробную версию на 30 дней или оформить покупку на официальном сайте, что обязательно нужно учитывать еще до перехода к ознакомлению со следующей инструкцией. Данный софт имеет много разных настроек и большую встроенную библиотеку с живыми обоями.
Скачать DeskScapes с официального сайта
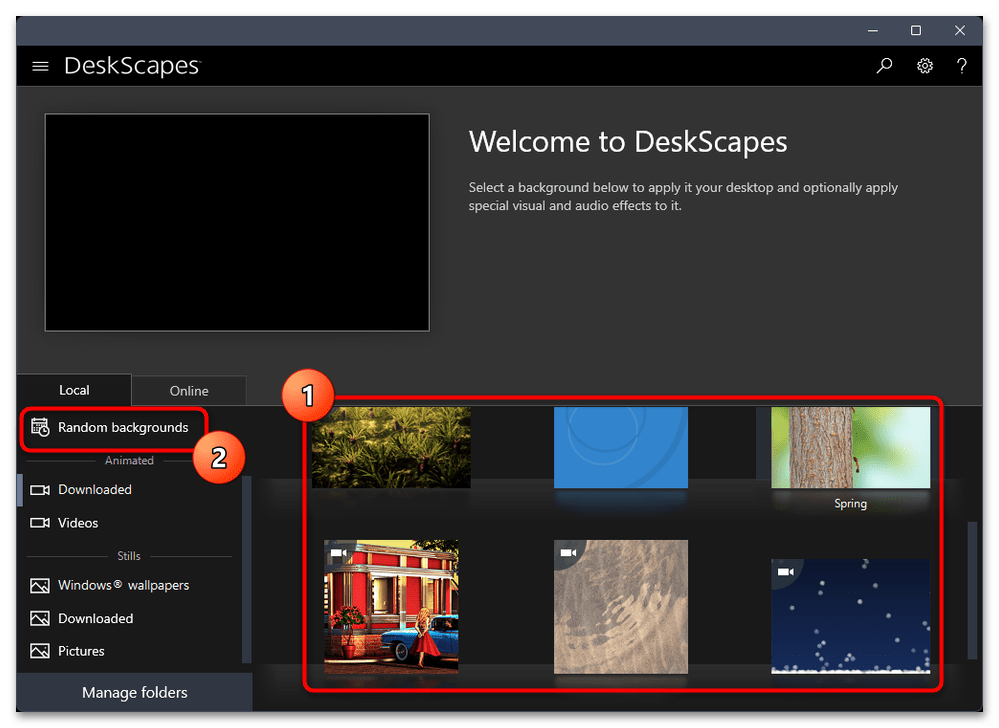
- Начните с выбора сборки или скачивания пробной версии программы с официального сайта. Затем пройдите установку и запустите софт.
- Справа вы увидите список живых обоев, которые уже скачаны и доступны к использованию. Дополнительно можно нажать по кнопке «Random backgrounds», чтобы настроить случайное воспроизведение.
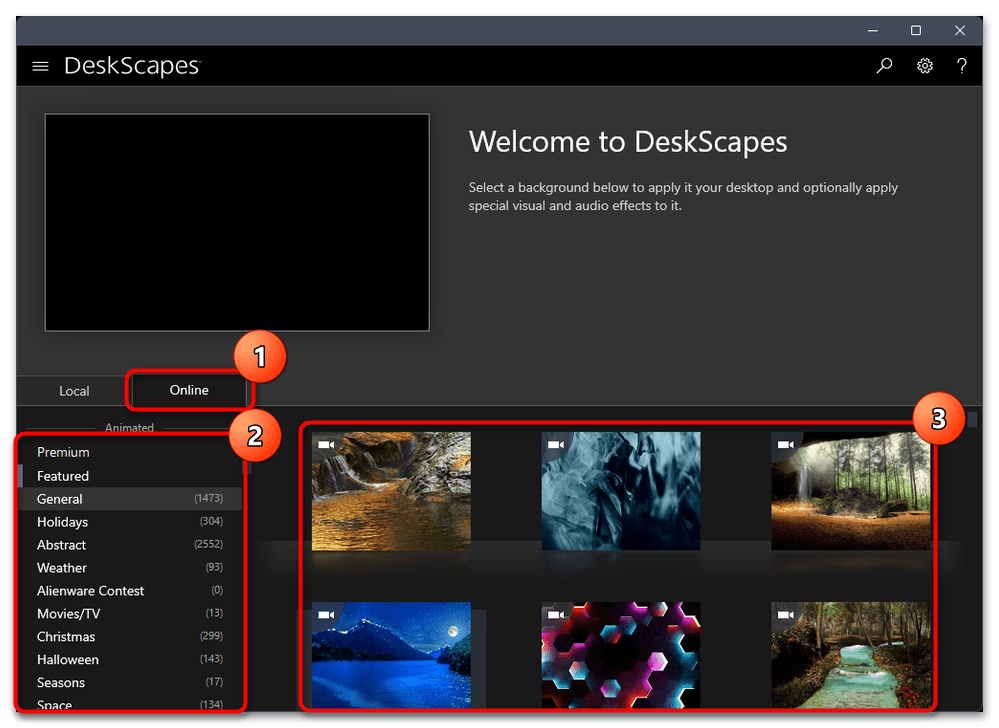
- Переключитесь на вкладку «Online» для поиска живых обоев, которые можно скачать на компьютер и использовать через DeskScapes. В списке слева вы найдете перечень доступных категорий, а справа увидите все варианты живых обоев.
- Выберите подходящее видео и нажмите «Download this background», чтобы скачать его на ПК и применить в качестве фона рабочего стола.
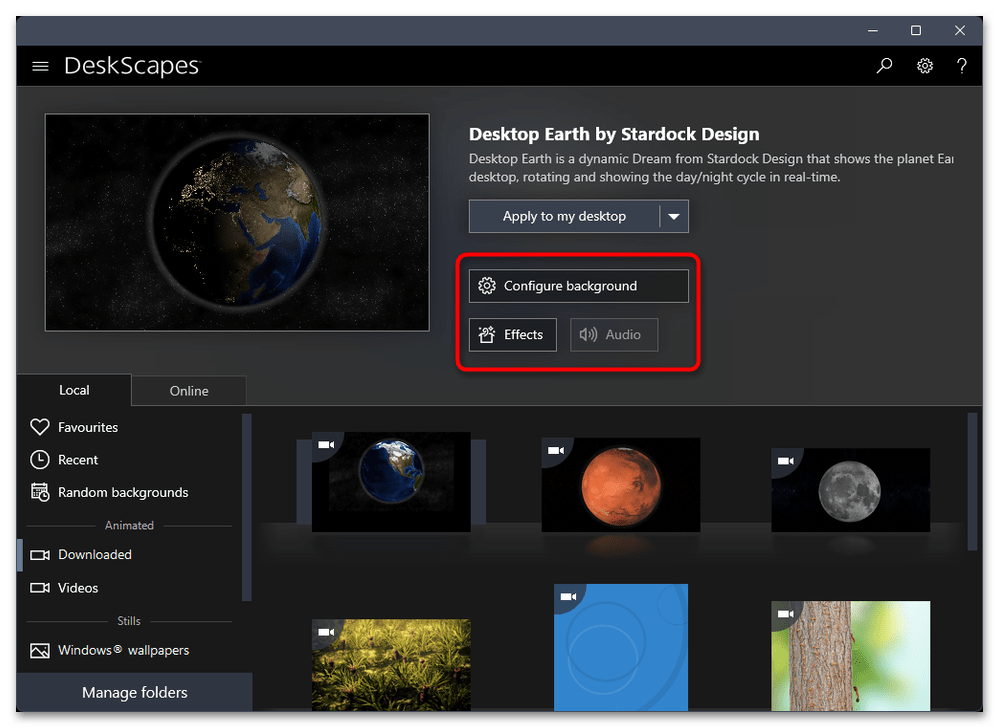
- Каждые обои имеют свои особенные настройки и расширенные эффекты, за переход к выбору которых отвечают две кнопки на панели с презентацией самого фона рабочего стола.
- В отдельном окне вы сможете настроить скорость анимации и движение находящихся на ней объектов. Количество настроек зависит исключительно от того, какой фон был выбран.
- Для применения живых обоев и установки их на рабочий стол в Windows 11 нажмите кнопку «Apply to my desktop».
- Дополнительно отметим, что на панели слева есть категории с разными обоями и видео. В них вы можете выбирать одну из загрузок или переходить к библиотеке установленных файлов для их переключения.


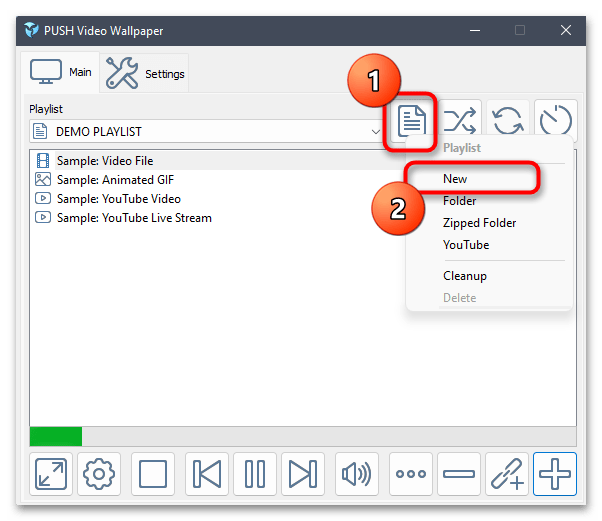
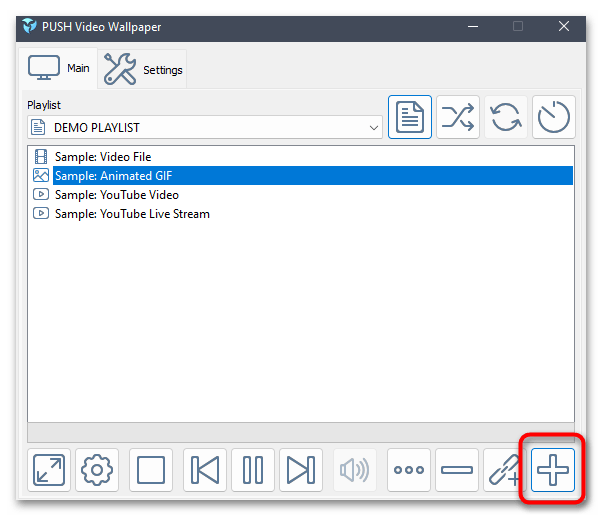
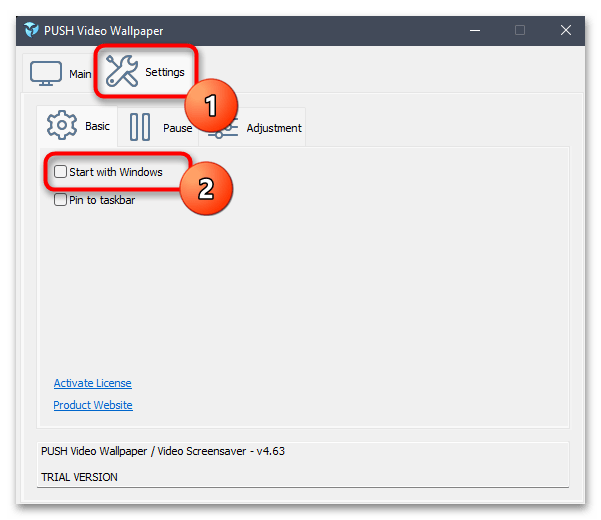
Способ 4: Push Video Wallpaper
Push Video Wallpaper — более простое программное обеспечение, но и распространяется оно бесплатно. В нем есть несколько разных заготовок для установки живых обоев, но больше всего акцент сделан на возможности выбора видео с YouTube для установки его как фона рабочего стола или добавления видео, которое предварительно было скачано на компьютер. Кстати, загрузка разных живых обоев доступна с официального сайта, где присутствует довольно обширная библиотека.
Скачать Push Video Wallpaper с официального сайта
- Сначала скачайте Push Video Wallpaper по ссылке выше и установите программу в Windows 11.
- После запуска можете выбрать один из любых шаблонов, чтобы проверить воспроизведение живых обоев.
- Если нужно создать собственный профиль для дальнейшего добавления видео или ссылок с YouTube, нажмите по значку с изображением файла и выберите вариант «New».
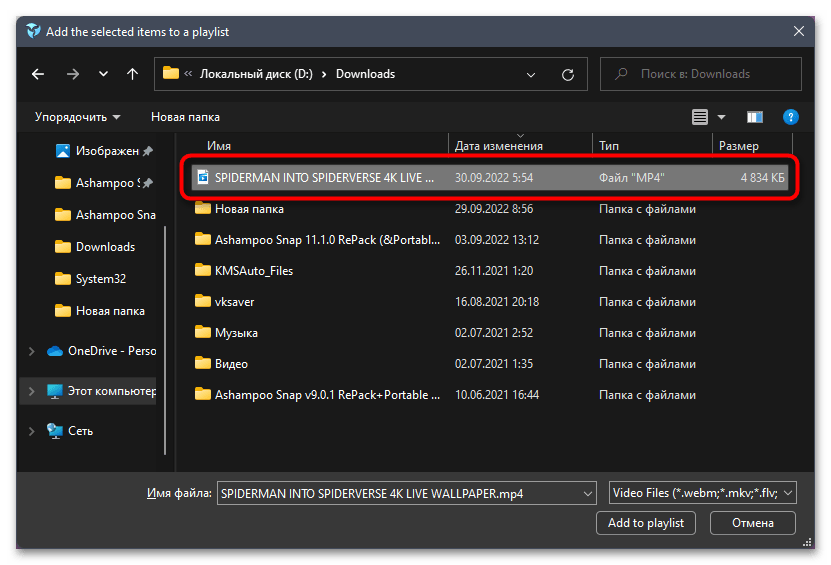
- Далее щелкните по кнопке с плюсом, чтобы перейти к выбору файла или вставке ссылки.
- Ссылка вставляется в отобразившееся на экране поле, а файл выбирается через открывшееся окно «Проводника». После этого изменения сразу же вступят в силу и вы увидите, что фон рабочего стола был изменен на выбранную анимацию.
- Дополнительно рекомендуем переключиться на вкладку «Settings» и установить галочку «Start with Windows», чтобы Push Video Wallpaper запускалась вместе с операционной системой и сразу применяла анимированный фон рабочего стола.


Наша группа в TelegramПолезные советы и помощь
Do you find working on your Windows 11 computer boring? It may be because you left the customizations in their default settings, or perhaps configured the theme and color preferences ages ago to the same old wavy background that Microsoft offers for Windows.
It is about time you made your work computer fun as well! No, we are not saying that you install games. But simply add more color and life to it.
Table of Contents
By default, Windows 11 only offers 5 static desktop backgrounds, the same ones used in the 6 themes that are offered. So it does not leave you with many options to choose from.
Themes and Desktop Backgrounds can be set from the Settings app >> Personalization in Windows.

But we are going to show you how you can set live, interactive wallpapers, also known as “animated wallpapers” on your PC. Not only that, but you can also have a GIF, or even a YouTube video running as your desktop wallpaper.
Lively Wallpaper is a free application that the Microsoft Store offers that can be used to customize your desktop background. You can perform the following using this app:
- Set up interactive wallpapers
- Configure wallpaper on one or multiple display devices, as per preference
- Set up a video from YouTube as a desktop background
- Set GIF animation as desktop background
- Play audio on live wallpaper when the desktop is in focus
- Customize the Taskbar theme
- Manage live wallpaper in different conditions (Battery-saving mode, Remote Desktop, etc.)
Continue reading to download and install the app, and then move on to customizing your desktop background. But before you do, there are a few downsides to setting up a live wallpaper on any device.
Why Not Set Live Wallpaper as Your Background
Live animated wallpapers indeed bring some color and magic to your PC. However, it also has a few cons you must consider.
Since the live wallpapers are continuously running in the background, they consume a huge amount of processor and memory that affects system performance. This consequently also affects the amount of power consumption, which is not ideal if you are using a laptop on battery.
Another thing to consider is the continuous shifts of the pixels on your device. This not only consumes the battery but could be dangerous for the screen if too many color changes occur.
That said, if you are still willing to take the risk, the sections below illustrate how to configure live wallpaper on your Windows 11 computer.
Download and Install Lively Wallpaper App
Let us begin by installing the free application.
- Open the Lively Wallpaper Microsoft Store page and click Get.

- Now click Open Microsoft Store from the popup at the top of the browser.
- The Microsoft Store application will now launch with Lively Wallpaper displayed. Click Get again.

- The application will now begin downloading and then installing. When it does, launch the application.
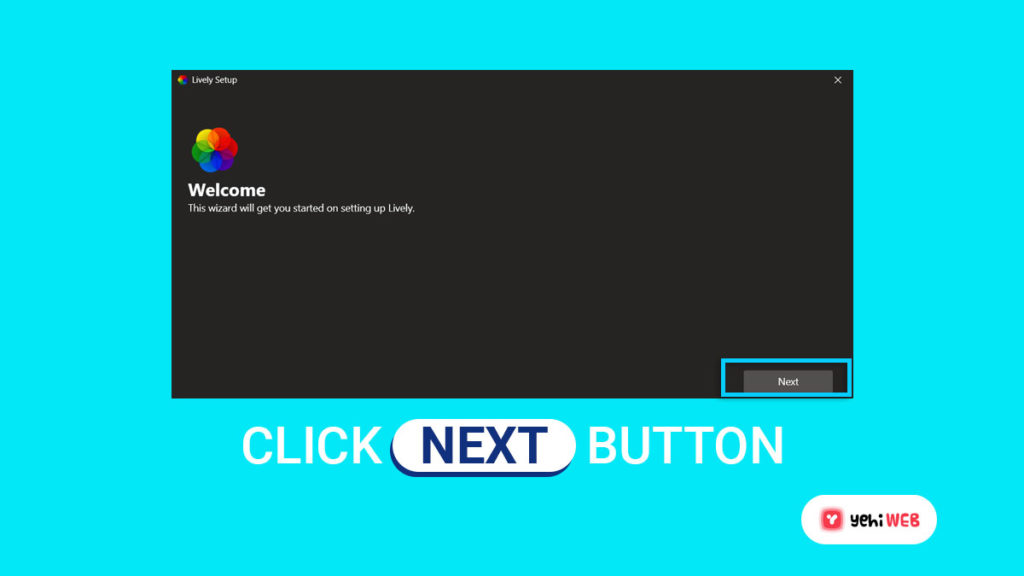
- On the first welcome screen, click Next.

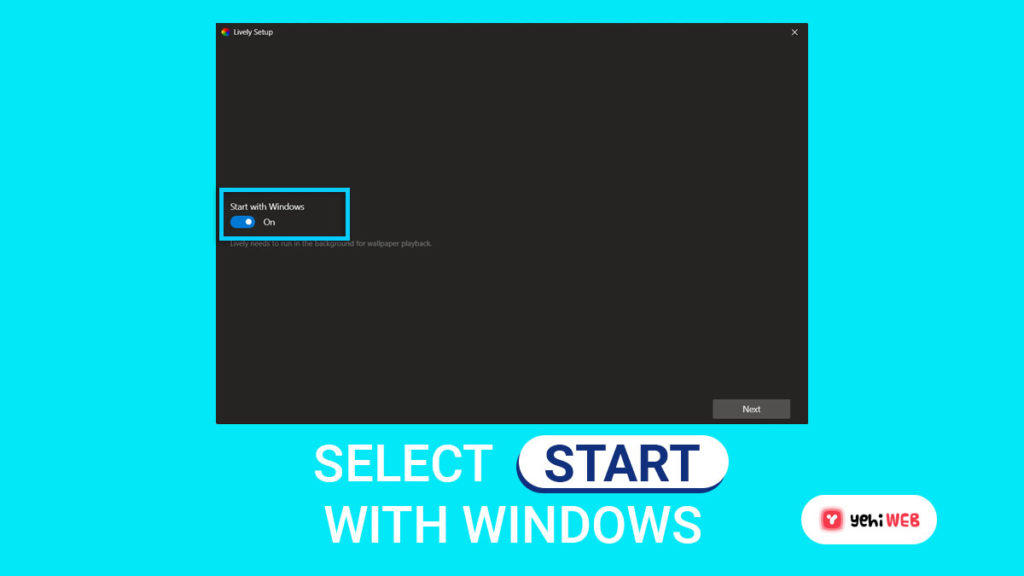
- On the next screen, choose whether you want to run the app (and the live wallpaper) as soon as the computer starts, or run it later manually. Then click Next.
- Now choose how you would like to customize the Taskbar from the dropdown menu under Taskbar Theme. Click Next when selected.
- On the next screen, you will have a little pictorial of how to manage your wallpaper directly from the Taskbar. Click OK.


The Lively Wallpaper application is now ready for you to begin your personalization. You will be presented with the Home screen/Library where you can find the live wallpaper to choose from. Click on the background that you wish to set.

Note that this will only set the live background on the primary screen if you have more than one connected. Continue to the next section to learn how to manage the wallpaper across multiple screens.
How to Set Live Animated Wallpapers on Multiple Monitors
As we said, the application only sets the live wallpaper to the primary display device if more than one is connected. However, you can configure it to either duplicate across all screens, or expand it. Here is how:
- Click on the monitor icon at the top of the Lively Wallpaper app to open the Display Control Panel.

- From the Control Panel, under the Placement method section, select whether you would like the wallpaper to span across screens or Duplicate the same wallpaper.
- Now close the Control Panel to save the settings.


You can choose which live wallpaper to set on these multiple display devices before or after performing the steps above.
Set YouTube Video/GIF as Desktop Wallpaper in Windows 11
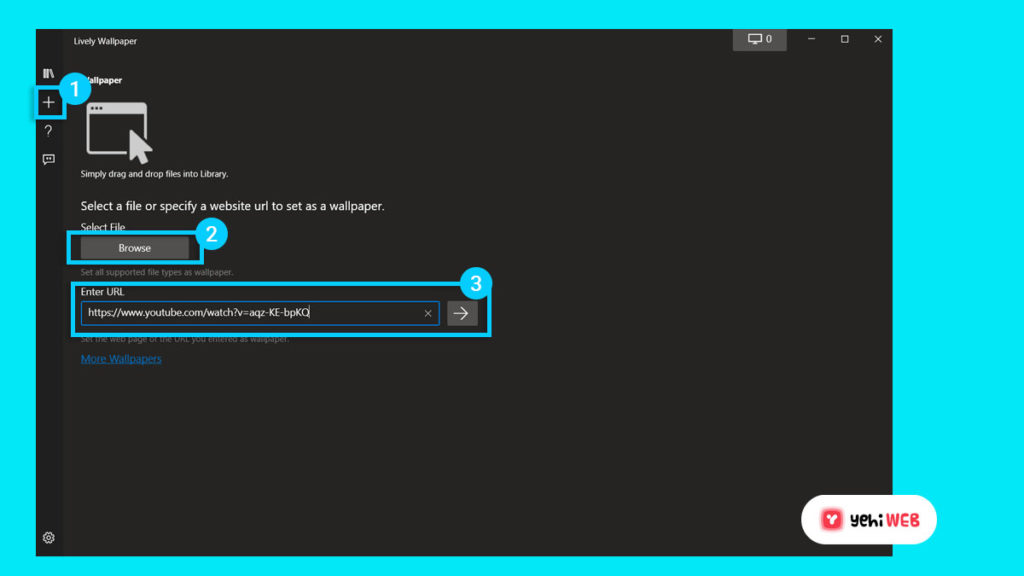
If you find that the default animated wallpaper offered by the Lively Wallpaper application is insufficient, you can add your GIF or a video from YouTube to the wallpaper library and have it running as your desktop background.
- Click on the “+” (plus) sign on the menu to the left of the app.
- On the next screen, click Browse and then navigate to the downloaded GIF to set it as live wallpaper. Or, paste a YouTube video link in the text field under “Enter URL” to set a video as your background, and then click the arrow button in front of it.
- If you enter a YouTube video URL in the last step, then you will be presented with a popup such as the one below. Click OK.


The GIF/Video will now commence playing in the background and repeat itself when it finishes.
How to Turn Off Live Wallpaper in Windows 11
If you are running live wallpaper in the background and think that they are consuming too much of your system resources, you can simply close the Lively Wallpaper application to revert your preferences to the way they were configured through the Windows Settings app.
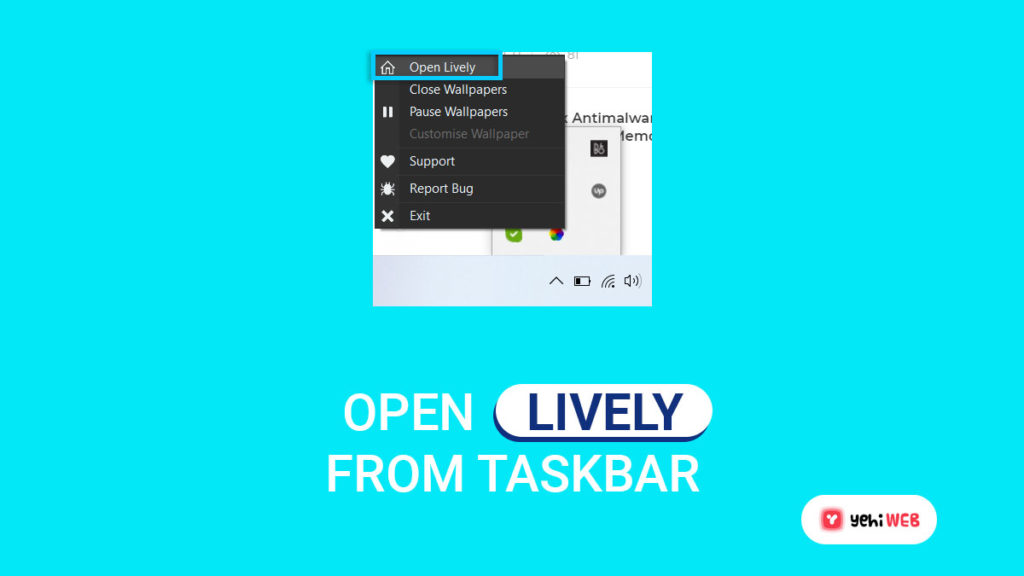
Simply right-click on the Lively Wallpaper icon in the Taskbar and click Exit on the context menu to remove the close the app, and consequently remove the live wallpaper.

More Live Wallpaper Applications for Windows 11
There are other applications online that you can use to set up live animated wallpapers on your computer. However, some of them are either paid apps or offer only a limited trial period.
DeskScapes
DeskScapes is a paid application that you can use to set and adjust live wallpapers on your computer. However, you can try it out for 30 days before purchasing it as it offers a trial period with all the same options as the fully-paid version. It is compatible with Windows 11 as well as Windows 10 and 8.
After choosing a live wallpaper, you can then add special customized effects to it and also adjust the color saturation according to your preferences.
Wallpaper Engine
Wallpaper Engine is another paid application that you can use to set live wallpapers on your Windows PC. This application costs USD 2.79 at the time of writing. However, it doesn’t offer a trial period.
It provides one of the best live animated wallpapers that you can then customize as well. Another great feature this application offers is that it pauses the live wallpaper whilst you’re playing a game, freeing up system resources.
WinDynamicDesktop
WinDynamicDesktop is a free application that is also available through the Microsoft Store. It does not provide any interactive wallpaper. The only reason this app made it top the list is that it brings the wallpaper from the MacOS to Windows with the day and night effects.
The app synchronizes itself with your sunrise and sunset timing and changes the theme of the wallpaper accordingly.
Final Thoughts
Having a good desktop background wallpaper is not only important aesthetically, but also keeps your mind fresh in case you are working long hours on a screen.
Not too long ago, Microsoft released 2 special backgrounds for the Insiders which you can also try out if you do not wish to put any extra load on your processor or your RAM.
Как поставить анимированные обои на ПК
Анимированные обои могут превратить ваш рабочий стол в настоящее произведение искусства, добавив динамики и уникальности вашему компьютеру. В этой статье мы расскажем, как легко и быстро установить анимированные обои на ваш ПК, будь то Windows 10 или 11. Вы узнаете о лучших приложениях для создания живых обоев, а также получите пошаговые инструкции по их установке и настройке. Готовы вдохнуть новую жизнь в ваш рабочий стол? Тогда начнем!
Живые обои — это анимированные изображения, которые используются в качестве фона рабочего стола компьютера или экрана смартфона. В отличие от статичных картинок, живые обои создают иллюзию движения и динамики, добавляя уникальности и оживляя ваш рабочий стол.
Живые обои могут быть выполнены в виде видеороликов, анимированных GIF-файлов или слайд-шоу из нескольких изображений. Они позволяют выразить индивидуальность, улучшить эмоциональное состояние и создать особую атмосферу на вашем устройстве.
Для установки «живых» обоев нам, несомненно, потребуется программа. Самая популярная и удобная из подобных — Wallpaper Engine. С помощью нее ваш рабочий стол полностью преобразится, а большой архив в программе подстроится под стиль каждого. Программа платная, однако стоит не так уж и много — 249 рублей в Steam. Однако никому не секрет, что пополнить кошелек Steam в настоящее время не так уж и просто. Ниже мы, в редакции GGSel, расскажем вам, как можно пополнить свой кошелек и сэкономить на покупке Wallpaper Engine!
Многие старые способы пополнения баланса стали неактуальными, тем не менее работающие все еще есть. Мы расскажем про проверенный и долговечный способ пополнения кошелька.
В Steam есть собственная торговая площадка, где можно выставить свои предметы из различных игр. Цену за вещи вы можете установить самостоятельно, но если она будет сильно завышена относительно рыночной, то шанс на продажу будет не велик. После продажи предметов деньги поступят напрямую в ваш кошелек. В соответствии с желаемой суммой вы можете выложить несколько предметов на ТП, а на вырученные приобрести Wallpaper Engine.
Также кошелек можно пополнить и другим, наиболее простым способом — через маркетплейс GGSel. Продавцы берут небольшую часть от пополняемой суммы за предоставленную услугу, обычно около 10-20%. Wallpaper Engine в Steam стоит 249 р., если пополнить кошелек таким способом, приложение обойдется в ≈ 273 р.
На маркетплейсе GGSel можно как пополнить кошелек Steam, так и купить Wallpaper Engine подарком, ключом или вовсе аккаунтом, тем самым сэкономив свое время и финансы. Для сравнения, приложение в Steam стоит = 249 р., а на GGSel ключ, способ доставки gift-ом или аккаунт ≈ 149 р.
1. Если вы хотите пополнить кошелек, то на GGSel заходим в категорию «Steam» и находим соответствующую услугу. В случае покупки гифтом/ключом указываем название приложение «Wallpaper Engine» в поисковой строке и выбираем понравившееся предложение.
2. При выборе товара также рекомендуем обращать внимание на количество продаж, цену, отзывы и рейтинг продавца.
3. Следом нужно прочитать описание, в нем содержится вся основная информация о товаре и способ его получения.
4. Далее нажимаем кнопку «Купить» и перенаправляемся на страницу оплаты, где вводим свою почту и совершаем платеж любым удобным способом.
5. В случае покупки гифтом, после оплаты продавец добавится к вам в друзья Steam и отправит Wallpaper Engine подарком. Если выбор пал на ключ приложения, то вам отправят код, который нужно будет активировать в Steam. А при пополнении самого кошелька ваш баланс будет пополнен спустя небольшой промежуток времени.
- Выбор обоев:
В главном окне программы выберите вкладку “Обои”.
Вы можете выбрать обои из предложенных или найти новые в разделе «Workshop».
- Настройка обоев:
После выбора обоев вы можете настроить их параметры, такие как скорость анимации, цвет и положение. Для этого нажмите на значок шестеренки рядом с выбранными обоями.
- Оптимизация производительности:
В настройках программы вы можете изменить параметры производительности, чтобы снизить нагрузку на систему. Это особенно полезно, если у вас не самый мощный компьютер.
- Создание собственных обоев:
Вы можете создать свои собственные обои, используя встроенный редактор.
Для этого выберите “Создать обои” и следуйте инструкциям на экране.
Заходите на GGSel.net — онлайн-площадку с широким ассортиментом игр для различных платформ. Здесь вы также можете пополнить баланс на игровых и неигровых сервисах, приобрести DLC и купить или продать игровые аккаунты. Все это доступно по выгодным ценам!
Are you looking for a fun and easy way to spice up your Windows desktop? You should try using a GIF wallpaper. It’s a nice balance between the more intensive nature of video wallpapers and the static high-quality of a standard image.
While it might be easy to set a GIF wallpaper on smartphones, Windows doesn’t natively support this, so you must rely on third-party software. Here’s how to use a GIF as your wallpaper on Windows 10 and Windows 11.
How to Set a GIF Wallpaper on Windows 10 and 11 Using Plastuer
Plastuer can help you set up GIFs, videos, and HTML5 webpages as your wallpaper. It uses WebGL and the open-source Chromium browser to render animation on the desktop.
It costs $5, which is a reasonable amount for software that works effortlessly, and you’ll receive the download link by email. You only have an hour before the download link expires, so don’t wait around. However, once you’ve downloaded the ZIP, you can run Plastuer indefinitely.
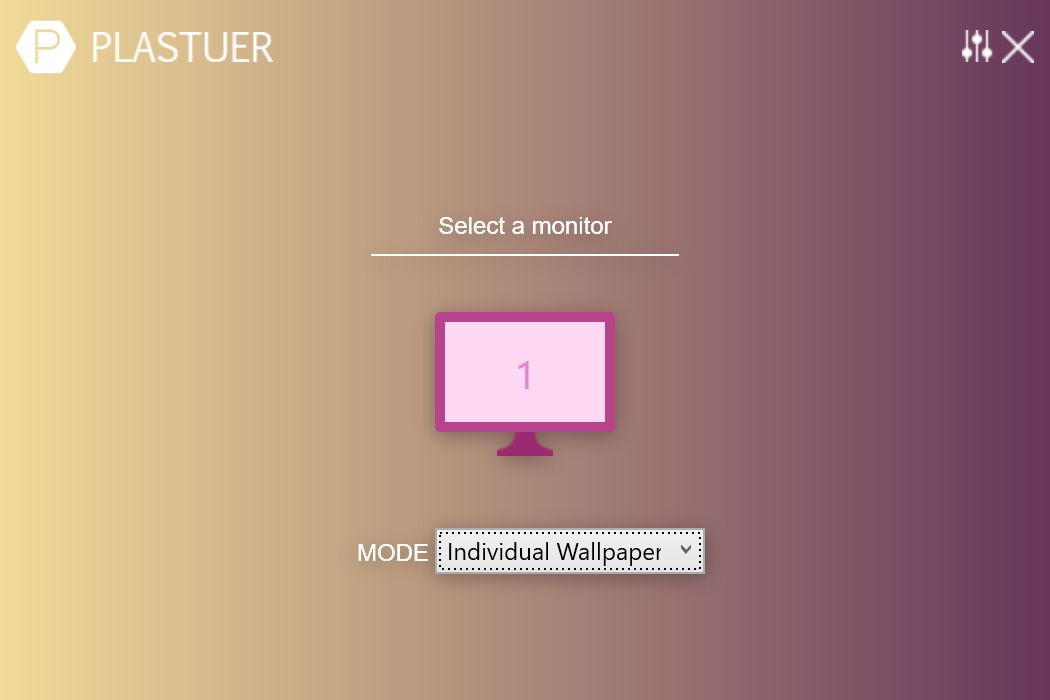
The software supports multiple monitors. On launch, it detects your monitors and you can choose which you want your animated GIF wallpaper on.
Once you select a monitor, you can pick an animated GIF in many ways.
- Use the URL field to point it to a source for a GIF (we’ve listed some good GIF providers later in this article).
- You can also add several URLs with the Create Playlist field.
- Click on the Select File option to choose a GIF file from your PC.
- Alternatively, choose Browse Gallery to select a GIF from the Plasteur gallery.
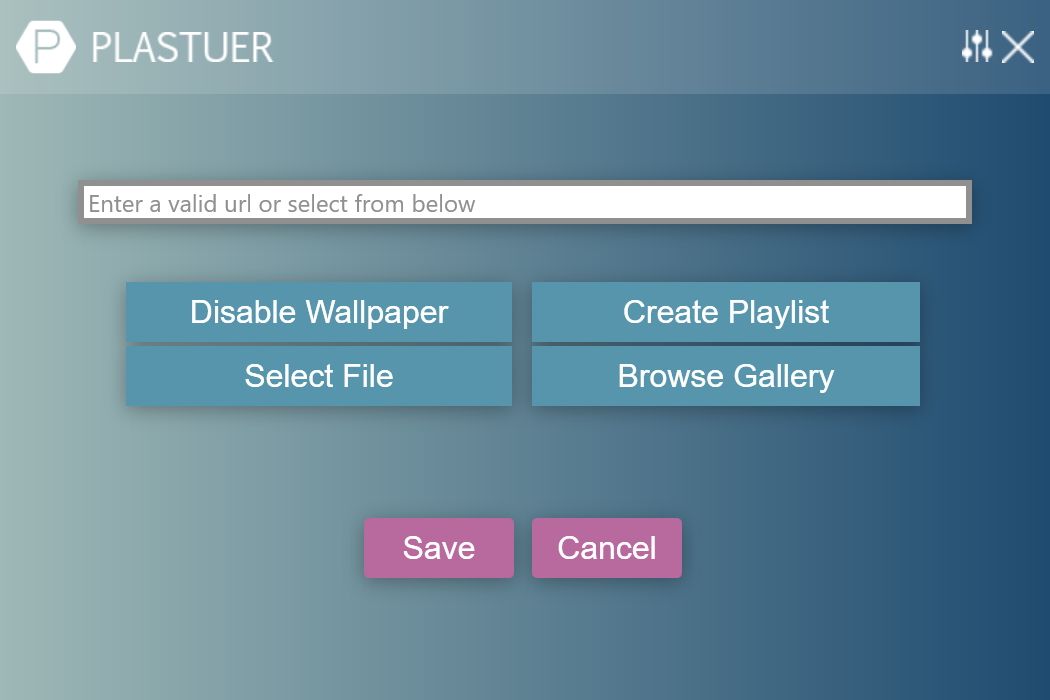
You can disable the active wallpaper anytime by clicking Disable Wallpaper.
You might also want to go into the settings (click the sliding buttons icon in the top-right) and set the behavior of the wallpaper when a full screen or a maximized application like a movie or a game is running. By default, Plastuer automatically detects full screen and maximized applications and pauses animations to conserve your RAM.
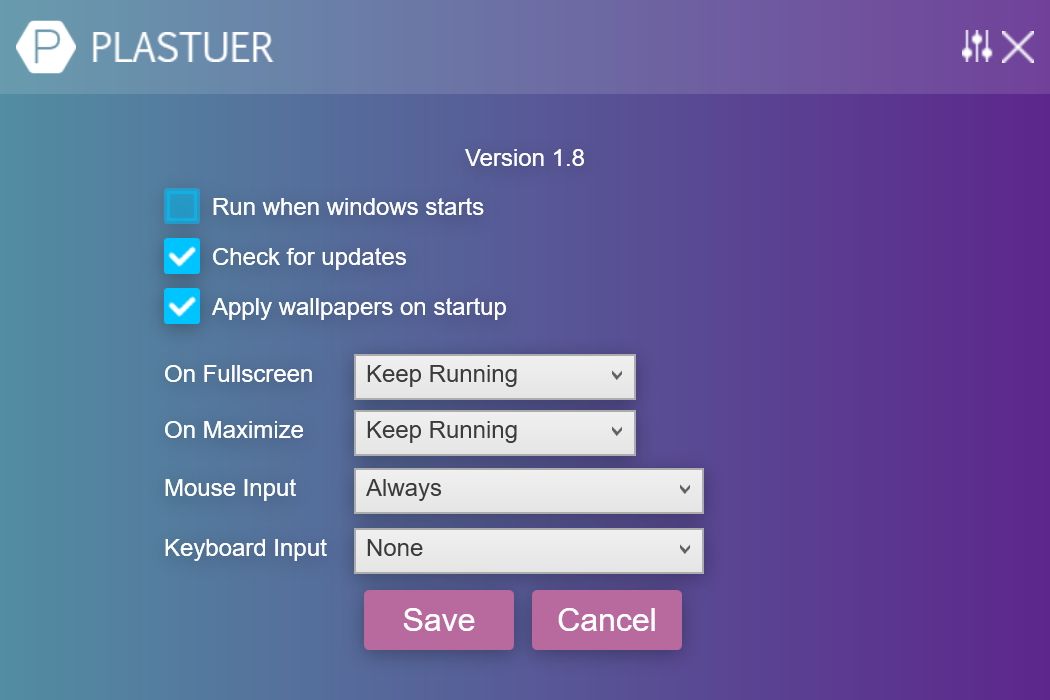
It’s here that you’ll find other options, like whether Plastuer opens on start-up and whether it should automatically check for updates.
Download: Plastuer ($5)
How to Set a GIF Wallpaper on Windows 10 and 11 Using BioniX Wallpaper Changer
BioniX Wallpaper Changer is software that offers all sorts of customization options. You can create themes, quickly send wallpapers to friends, bulk download wallpapers, and more. For our purposes, we’ll focus on the feature that lets you set a GIF as your wallpaper.
Download and install the software, which is completely free. It’ll launch automatically. When it does, press Ctrl + F to search for a local GIF file on your computer. Alternatively, press Insert to input a GIF URL.
Once your image is loaded into the playlist section, double click it to set it as your Windows desktop wallpaper. The change will take place immediately—you now have a GIF wallpaper!
You don’t have to stick with a single GIF. You can load multiple into the playlist. Then, switch to the Countdown tab to choose how often the wallpaper changes. You can also use the Shuffle toggle if you want the wallpapers to display in a random order.
Download: BioniX Wallpaper Changer (Free)
How to Set a GIF Wallpaper on Windows 10 and 11 Using Rainmeter
Rainmeter is one of the most popular desktop customization software. While it can be used to set up an animated GIF wallpaper on Windows, the process is complicated for a new user. If you want the challenge, check our guide on how to use an animated GIF wallpaper with Rainmeter.
However, unless you want a really advanced solution, stick with the other methods outlined above.
Make Your Own GIF Wallpapers
One of the easiest ways to make your own animated GIF wallpaper is to start with a video. GIF tools like Giphy’s GIF maker can convert your videos to animated GIFs. With Giphy’s creator, you can upload a MP4 or MOV file, or add a video URL from services like YouTube and Vimeo, and turn it into a GIF. Then, download the GIF and use one of the programs above to make it your Windows wallpaper.
Alternatively, you can download pre-made GIFs from sites like:
- Giphy
- Tenor
- Gfycat
Ensure Your System Is Powerful Enough for a GIF Wallpaper
Be wary that animated wallpapers can surprisingly eat away at a lot of your computer’s resources to render the graphics. The richer the animation, the more resource-hungry it will be. If you notice your system slowing down, the animated wallpaper might be the culprit; if so, remove it and see if your system returns to normal.
However, if you have a capable graphics card and adequate system memory (at least 4GB), then GIF and video wallpapers are a nice enhancement for your Window 10 or Windows 11 desktop.
You can then go full throttle with live wallpapers and animated background software for Windows too.
Windows Operating system offers its users to have a background of their own choice. But it limits the feature by not letting them having an animated image or a GIF file.
With few clicks, you can set any image of your choice as your desktop background. But using a GIF for background in Windows 10/ Windows 11 is a different story altogether.
Windows Operating Systems has never allowed users to use GIF for background. And even after the release of Windows 11, users still can’t use GIFs for backgrounds. In short, like its predecessors, Windows 11 does not allow its users to use GIFs for background.
And when you try to set your GIF file as a background, it sets a single frame from your animated GIF as a background. Windows 11 and its predecessor Windows 10, can’t set a GIF for background on its own.
Luckily, you can use a few programs to play and set GIFs for your desktop’s background. Following are the best applications to use a GIF for your desktop’s background image:
- Lively Wallpaper
- BioniX Wallpaper
So, if you’ve downloaded a cool animated GIF image and want to use it as your desktop background, you can do that with the apps mentioned above.
What is a GIF?
A GIF (pronounced “gif” or “jiff“) is an image file in its simplest form. A GIF file is a lossless image file format that can hold both animated and static images. Before PNG became a viable alternative, it was the standard for 8-bit color images. You may have seen them in a lot of email signatures.
Use GIF for Background Via Lively Wallpaper
Lively wallpaper is a free and open-source application. It allows you to set GIF, Video, and webpages as your desktop wallpaper. For Windows 11 and Windows 10 users to set GIF for background.
Follow the instructions outlined below to use a GIF for background:
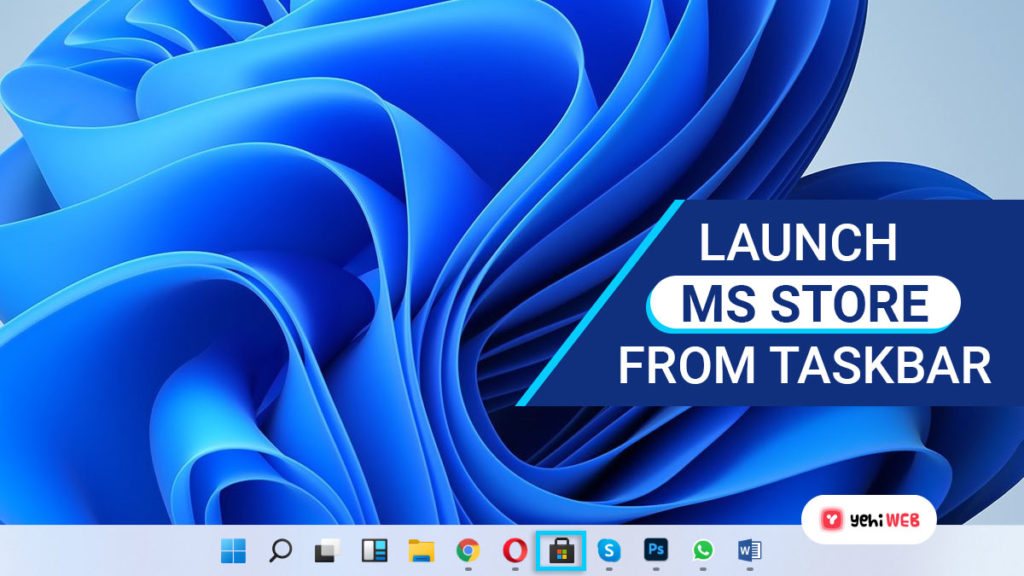
- Launch Microsoft Store from the taskbar.
- From the top-right corner, click on the search icon. And in the search field, type “Lively Wallpaper.”
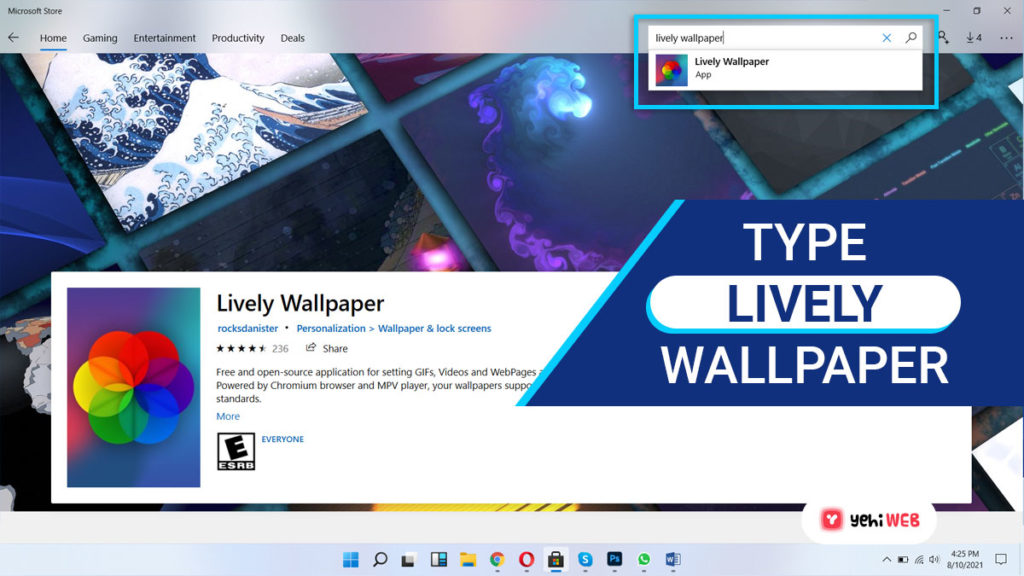
- Select Lively Wallpaper from the search results in the Apps section.
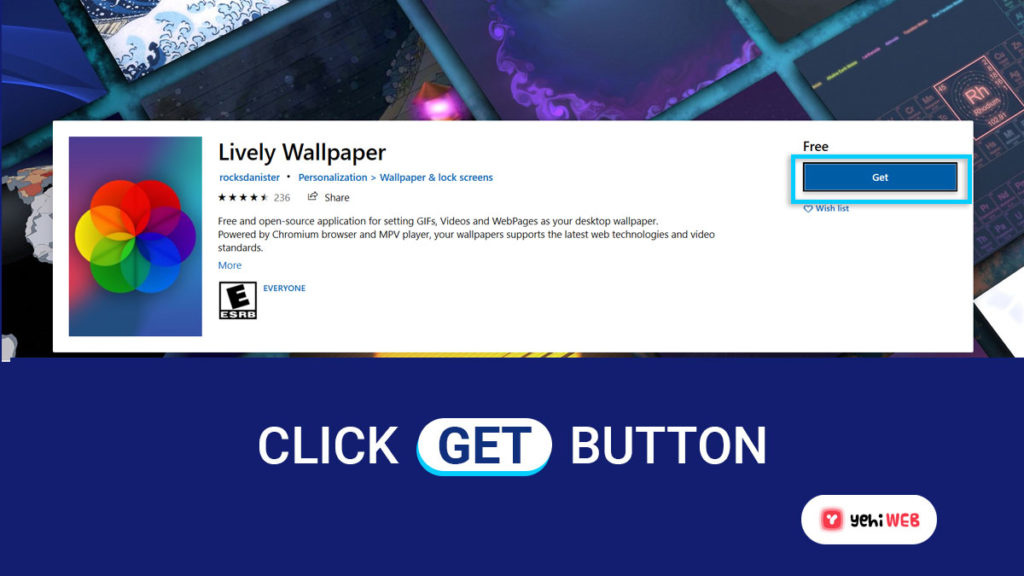
- On the next page, click on the “Get” button to download and install the application.
- To open the application setup window, click the launch button after the application is installed.
- On the Setup Wizard window, click on the “Next” button.
- Ensure that the switch associated with “Start with Windows” is turned on on the next window. After that, click on the Next button.
Note
Start with windows switch allows the app to GIF, videos, or Webpages for your computer’s background.
- To finish the setup, click the “OK” button.
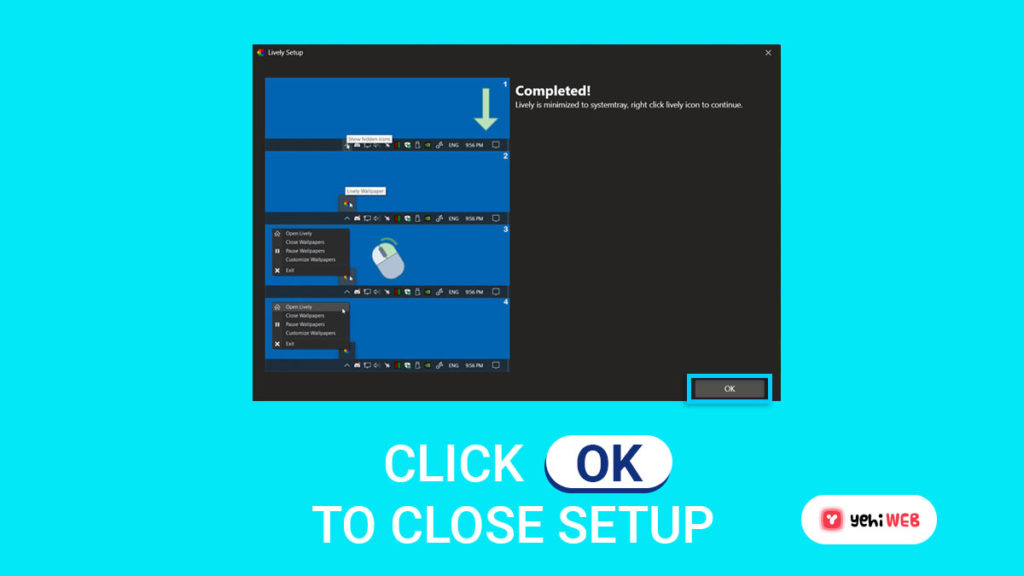
- Lively is now running in the background. Now to use a GIF for background, right-click on the Lively app icon and select open Lively.
- Use the available GIF in Lively or click on the + icon from the left menu and select your downloaded GIF to use as background.
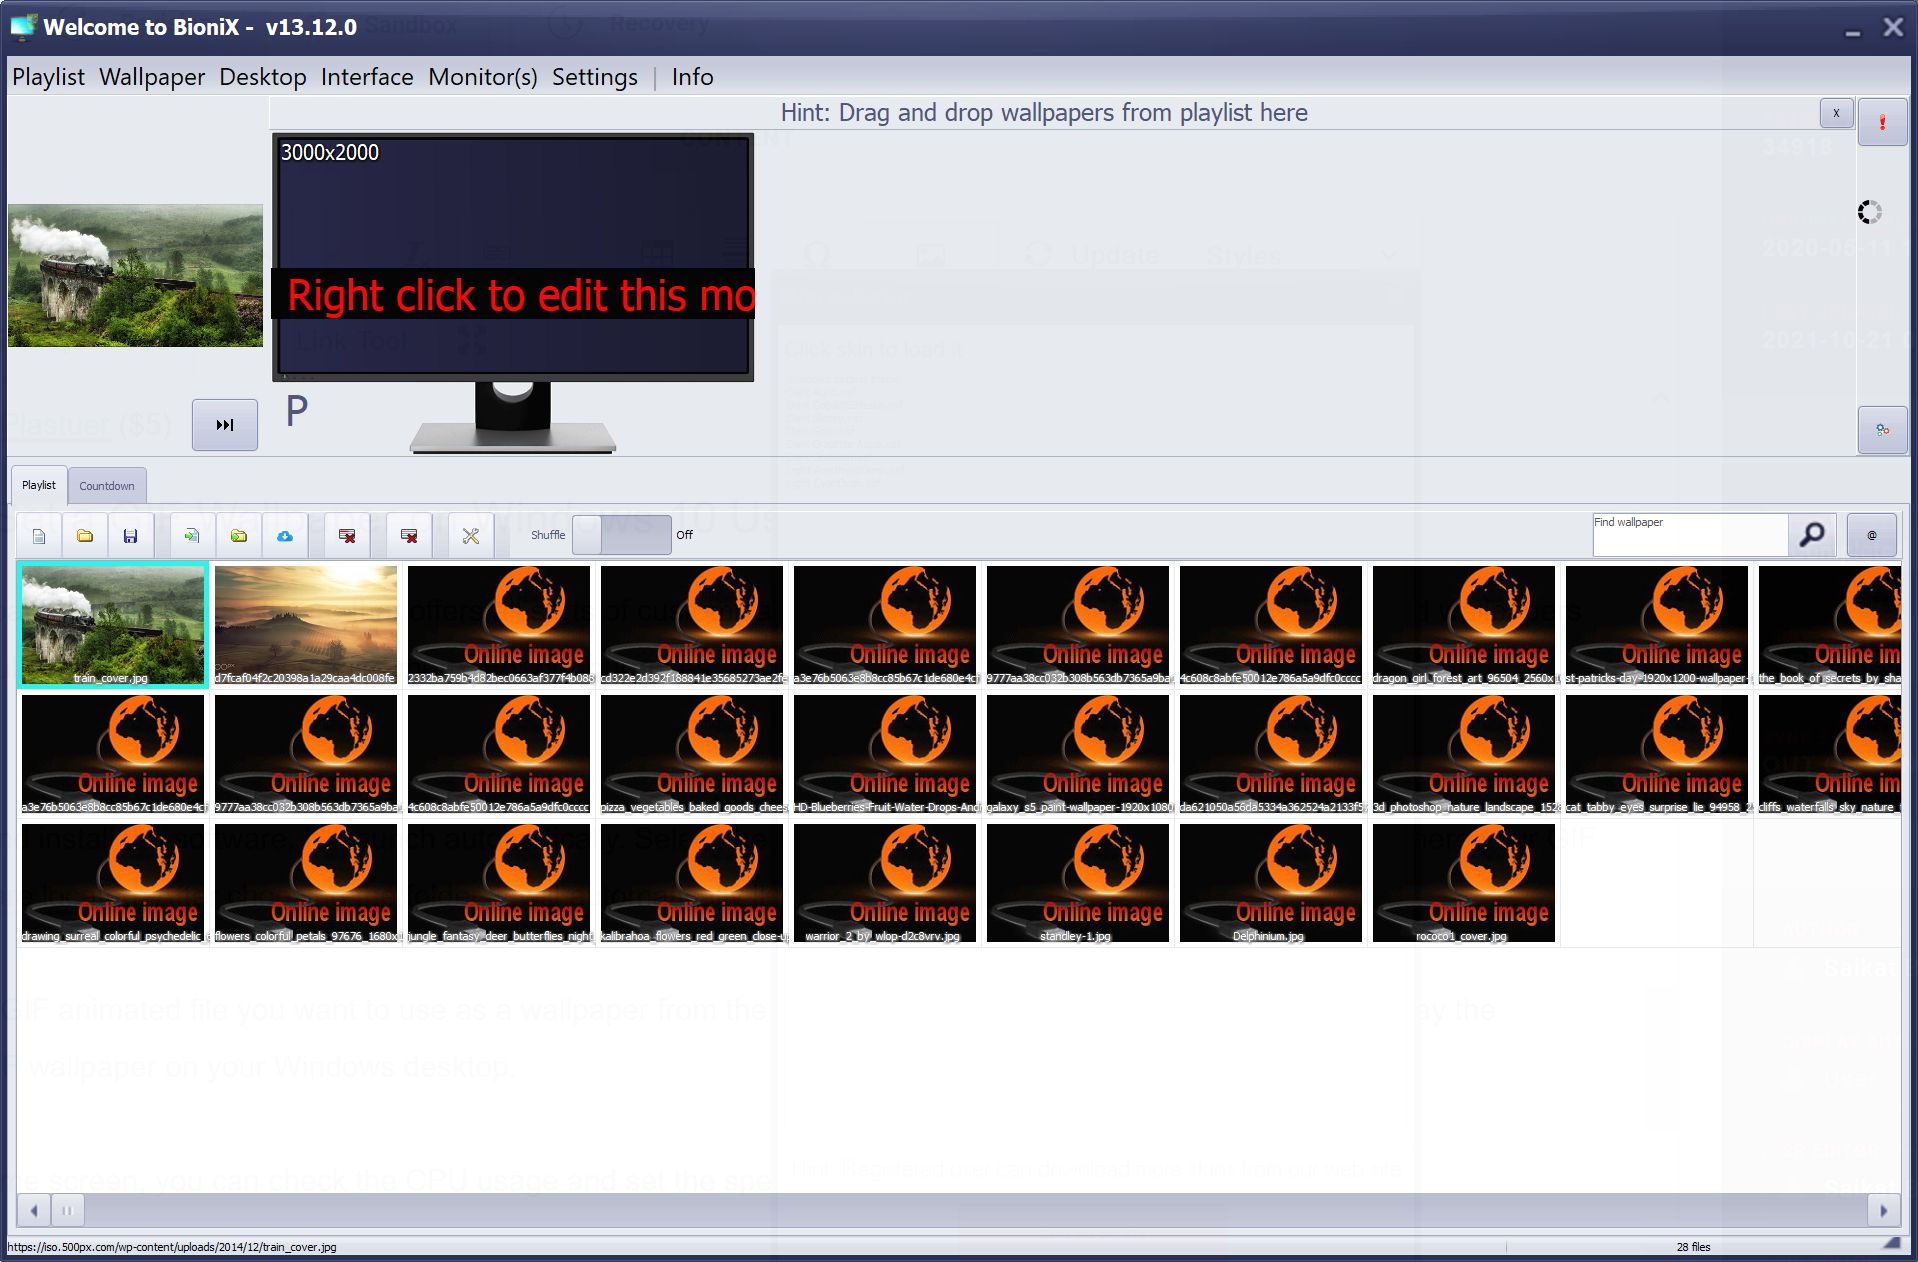
Use GIF for Background Via BioniX Wallpaper
Follow the instructions outlined below to use a GIF for background via BioniX:
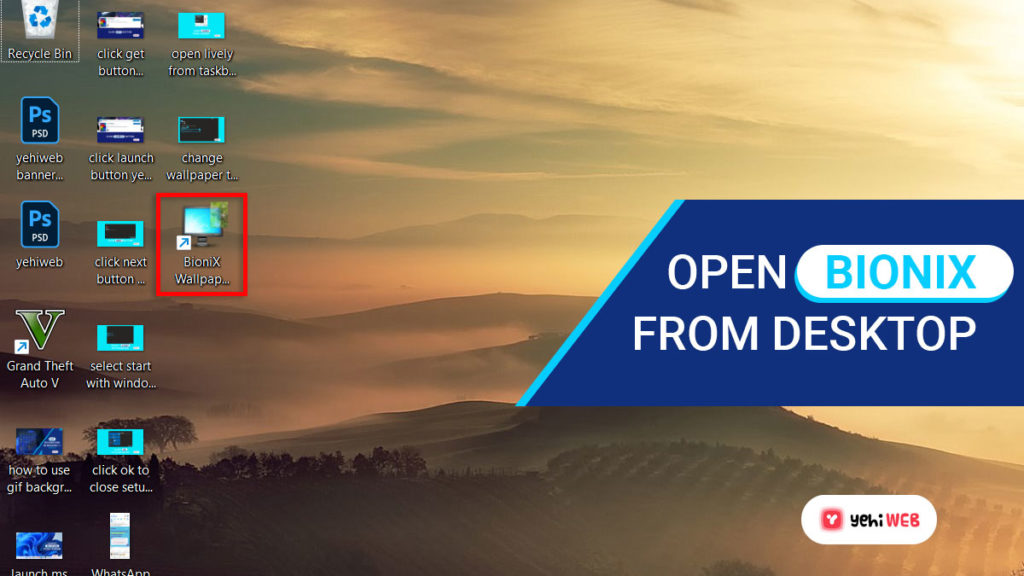
- First, Download the BioniX Wallpaper application from here and install it.
- After installation of the application, launch it from the shortcut created on Desktop.
- After launching the program, from the top menu bar, click on Tools > Wallapaper animator.
- From the next window, navigate to the directory housing your downloaded GIFs.
- BioniX will list all your GIFs from the directory.
- Select any GIF you wish to use as your background wallpaper from the list on the left.
- BioniX will assign that as your computer background as soon as you select it. From here, you can also customize the following features:
- Playback Speed
- Quality
- Zoom
Note
Note: You can also configure BioniX to animate your GIF in a specific location of your desktop.
After using BioniX to set a GIF for wallpaper, minimize the animator and main application. Both windows will disappear to the notification area of your taskbar.
To make changes in the future or select a new GIF, access and open the animator from the system tray. To bring up the settings, click on the red dragon icon in your taskbar.