
In the interest of data security, some people are turning to third-party USB devices that act as security keys for their PCs. Without one plugged in, your computer won’t unlock. It’s as simple as that. There are two ways you can go about getting one of these security keys to add an extra layer of protection: you can buy one, or you can create your own. Let’s take a look at both methods, as well as how to actually make your own USB security key using an old thumb drive.
What is YubiKey?
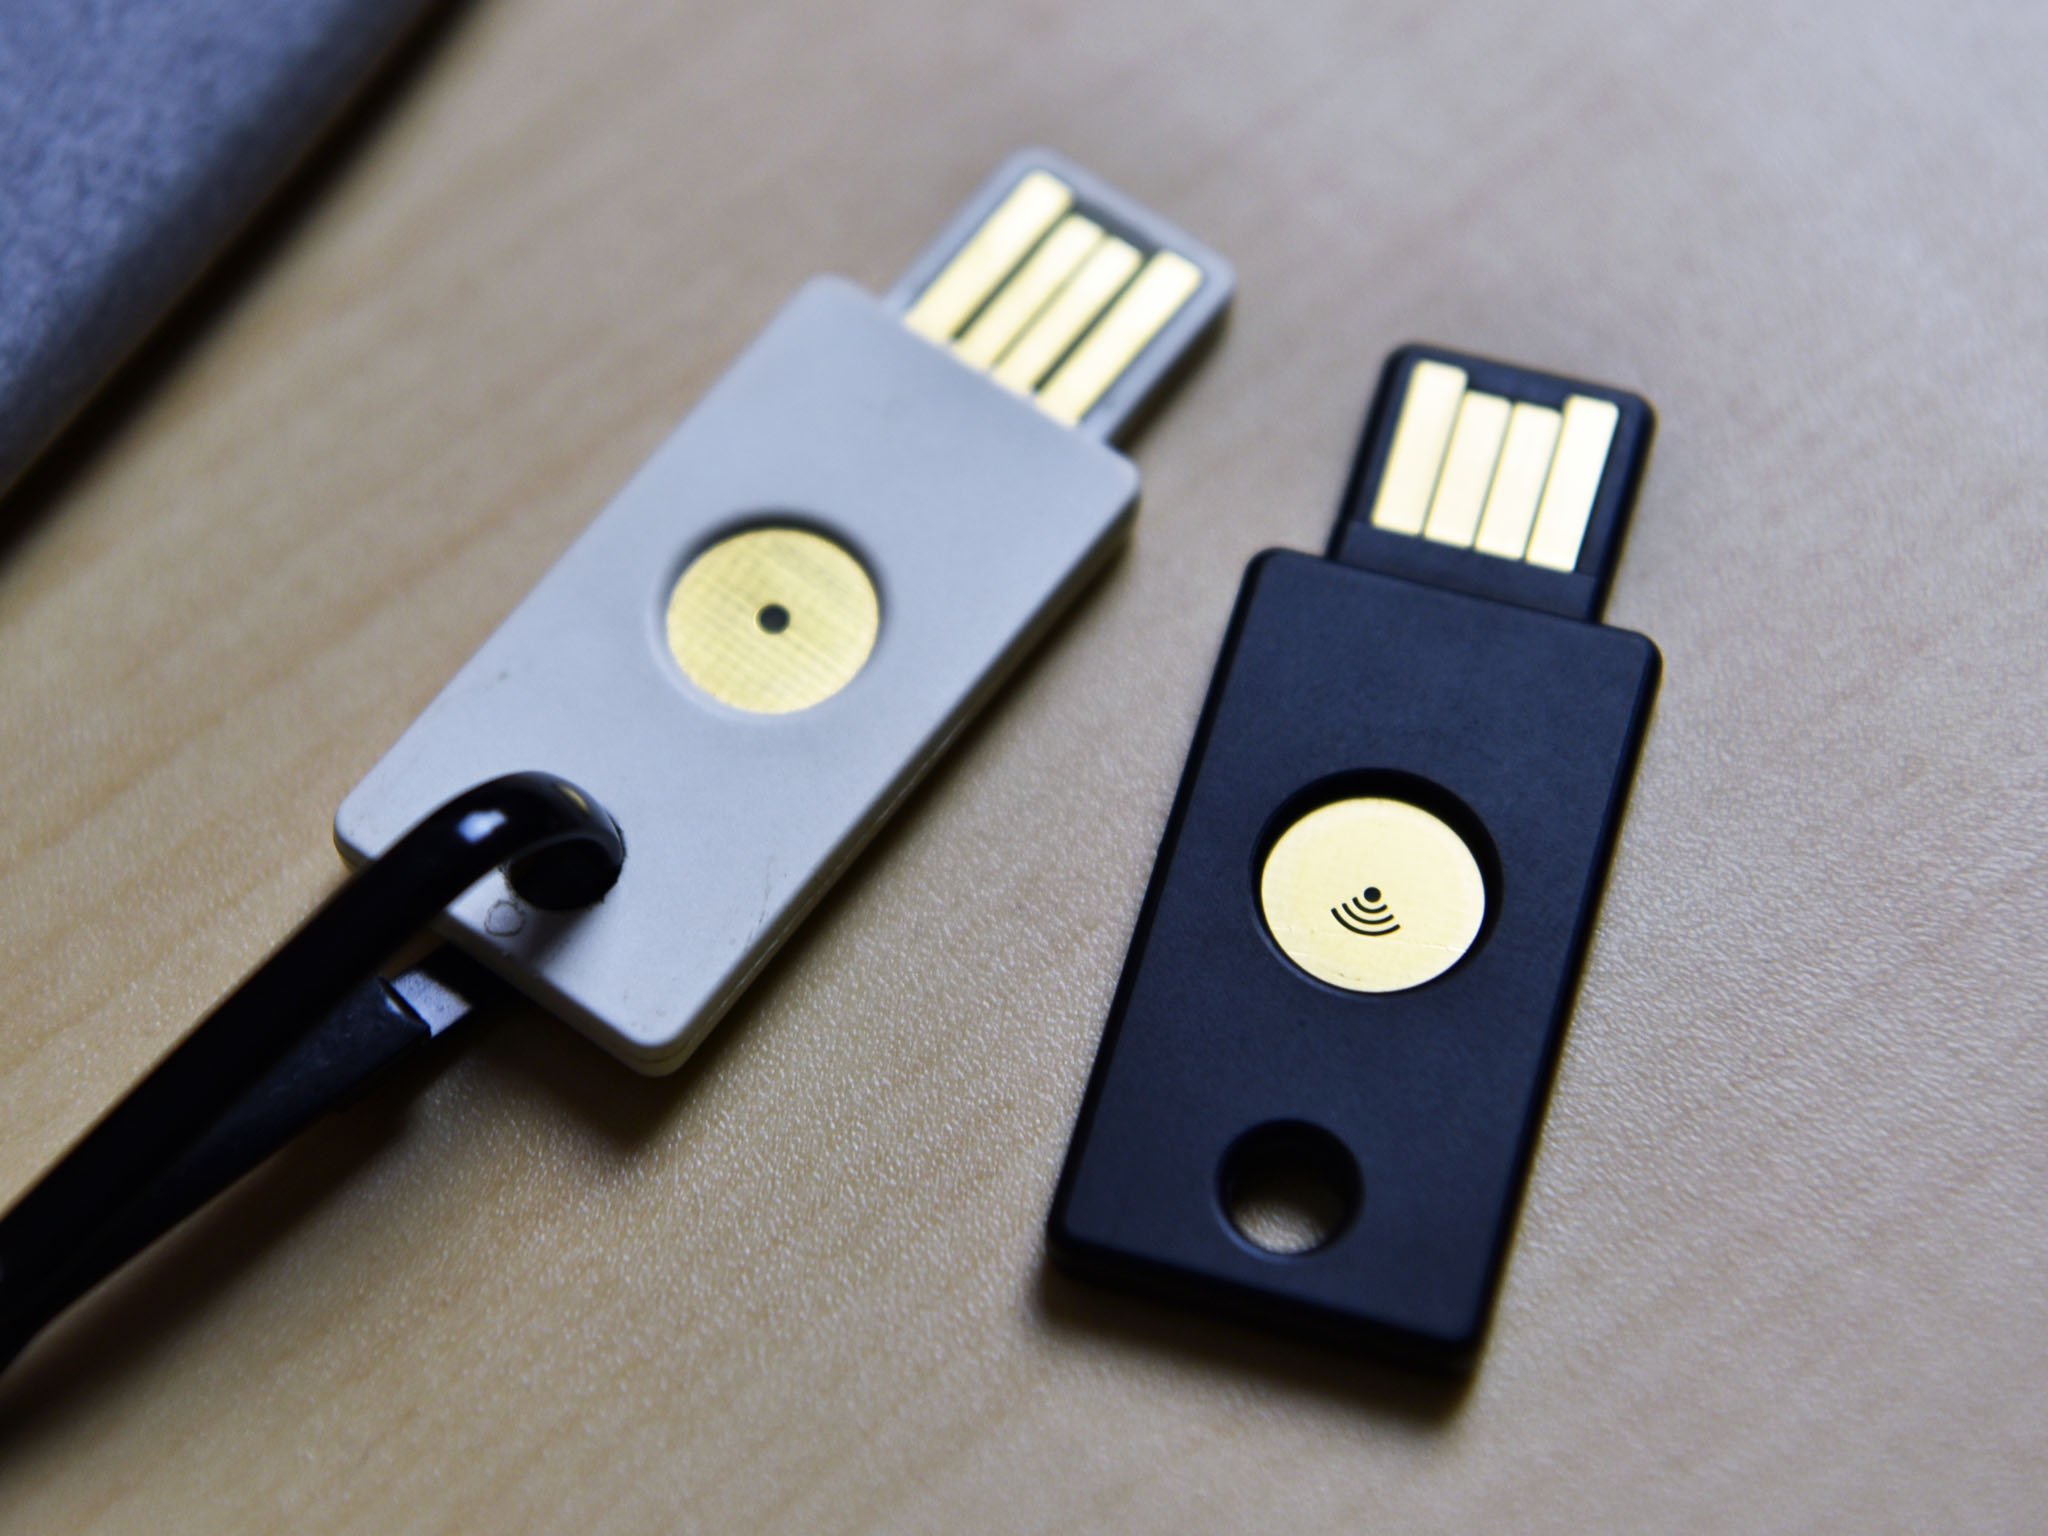
One company, Yubico, created the YubiKey, a USB security stick that is compatible with Windows Hello and a bunch of other services that should be kept secure, such as LastPass, KeePass, Google, Dropbox, and Evernote.
Once you have it in your possession, all you have to do is plug it into your PC, register it, and you’re ready to go. There are a few different YubiKey options. You have your standard YubiKey that connects via USB, a Nano YubiKey that is much smaller, and a YubiKey NEO that can connect via NFC as well as USB.
- See at Amazon | YubiKey 4 (USB)
- See at Amazon | YubiKey 4 Nano (USB)
- See at Amazon | YubiKey NEO (USB and NFC)
For more information on the YubiKey, including detailed instructions on how to get it all setup, be sure to check out our Executive Editor Daniel Rubino’s in-depth guide.
All you need to know about YubiKey for Windows Hello and Windows 10
How to create your own USB security key
In an article about clever uses for extra USB thumb drives, we mentioned creating your own security key for your PC. Before starting on this endeavor, however, remember that creating a USB security key for your PC comes with some downsides. If you lose the USB key, you’ll have a tough time getting into your PC, especially if you disable the ability to enter a password as a backup entry. You’re also going to lose the ability to use one of the USB ports on your PC while the lock is active.
There are more than a few options when it comes to the software used for this process, but USB Raptor, Rohos Logon Key, and Predator are a few favorites, although the latter two are paid services. Rohos Logon Key costs $34, while Predator costs $10.
All the latest news, reviews, and guides for Windows and Xbox diehards.
Since USB Raptor is free, we will show you how to get it set up using Windows 10 and an old thumb drive. It really doesn’t matter how much space is on the thumb drive, because all that’s created is a 1KB .k3y file.
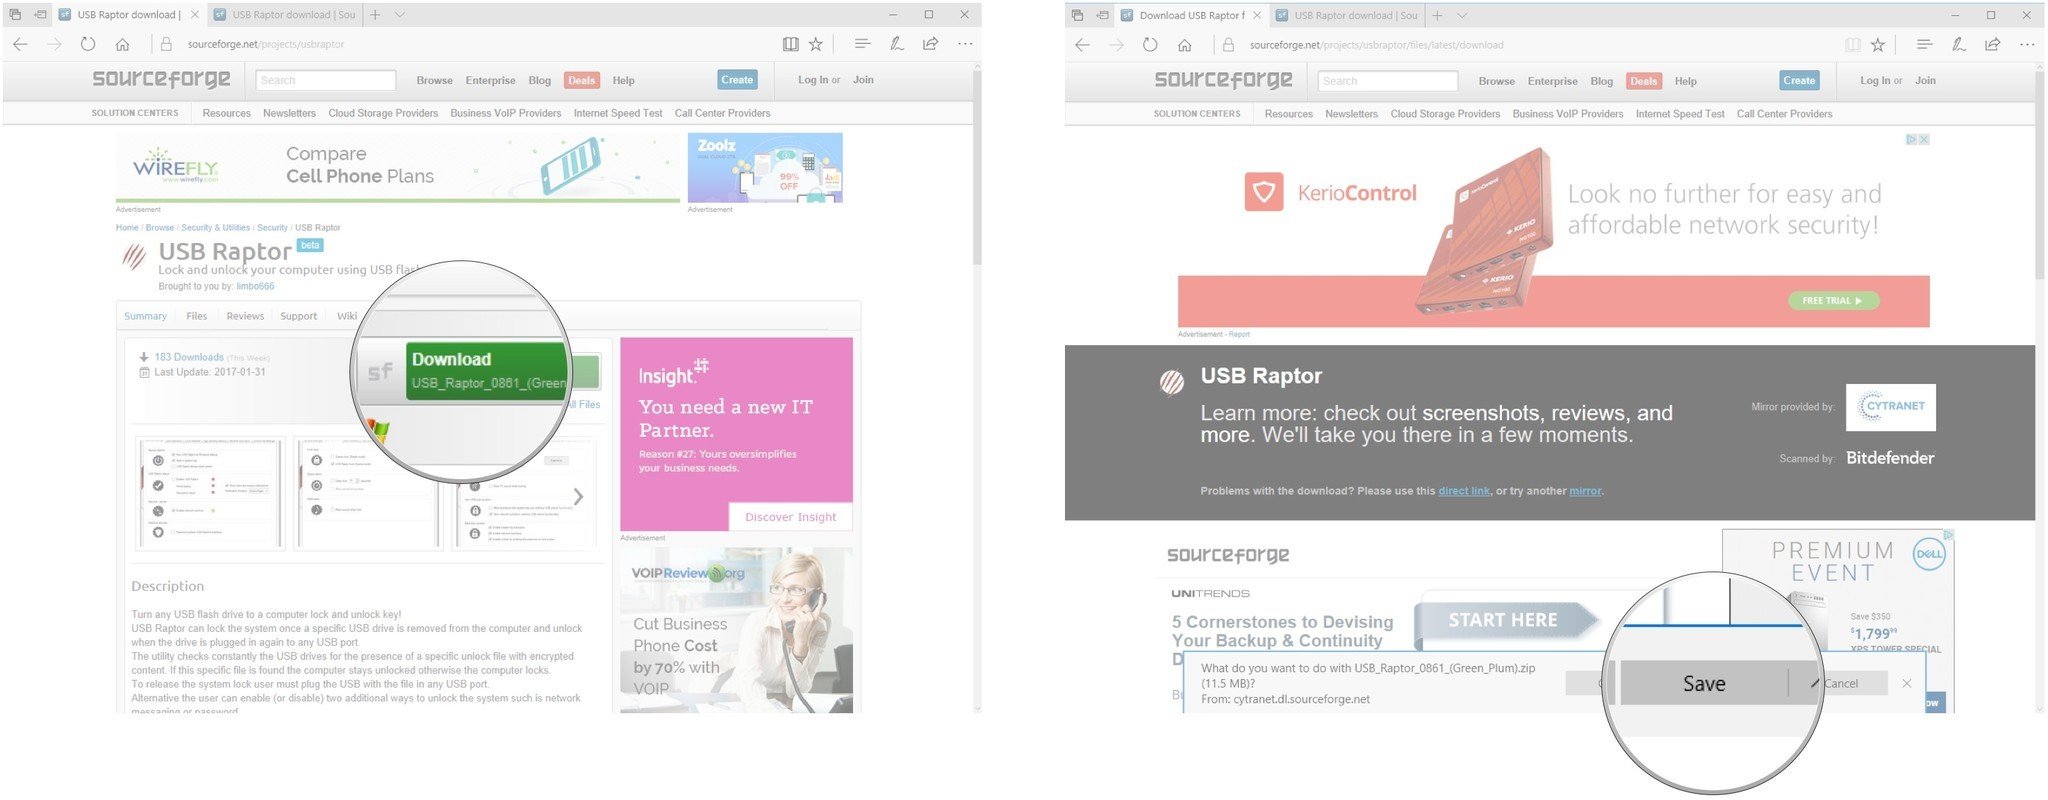
- Navigate to the USB Raptor SourceForge page.
- Click the Download button.
- Click Save.
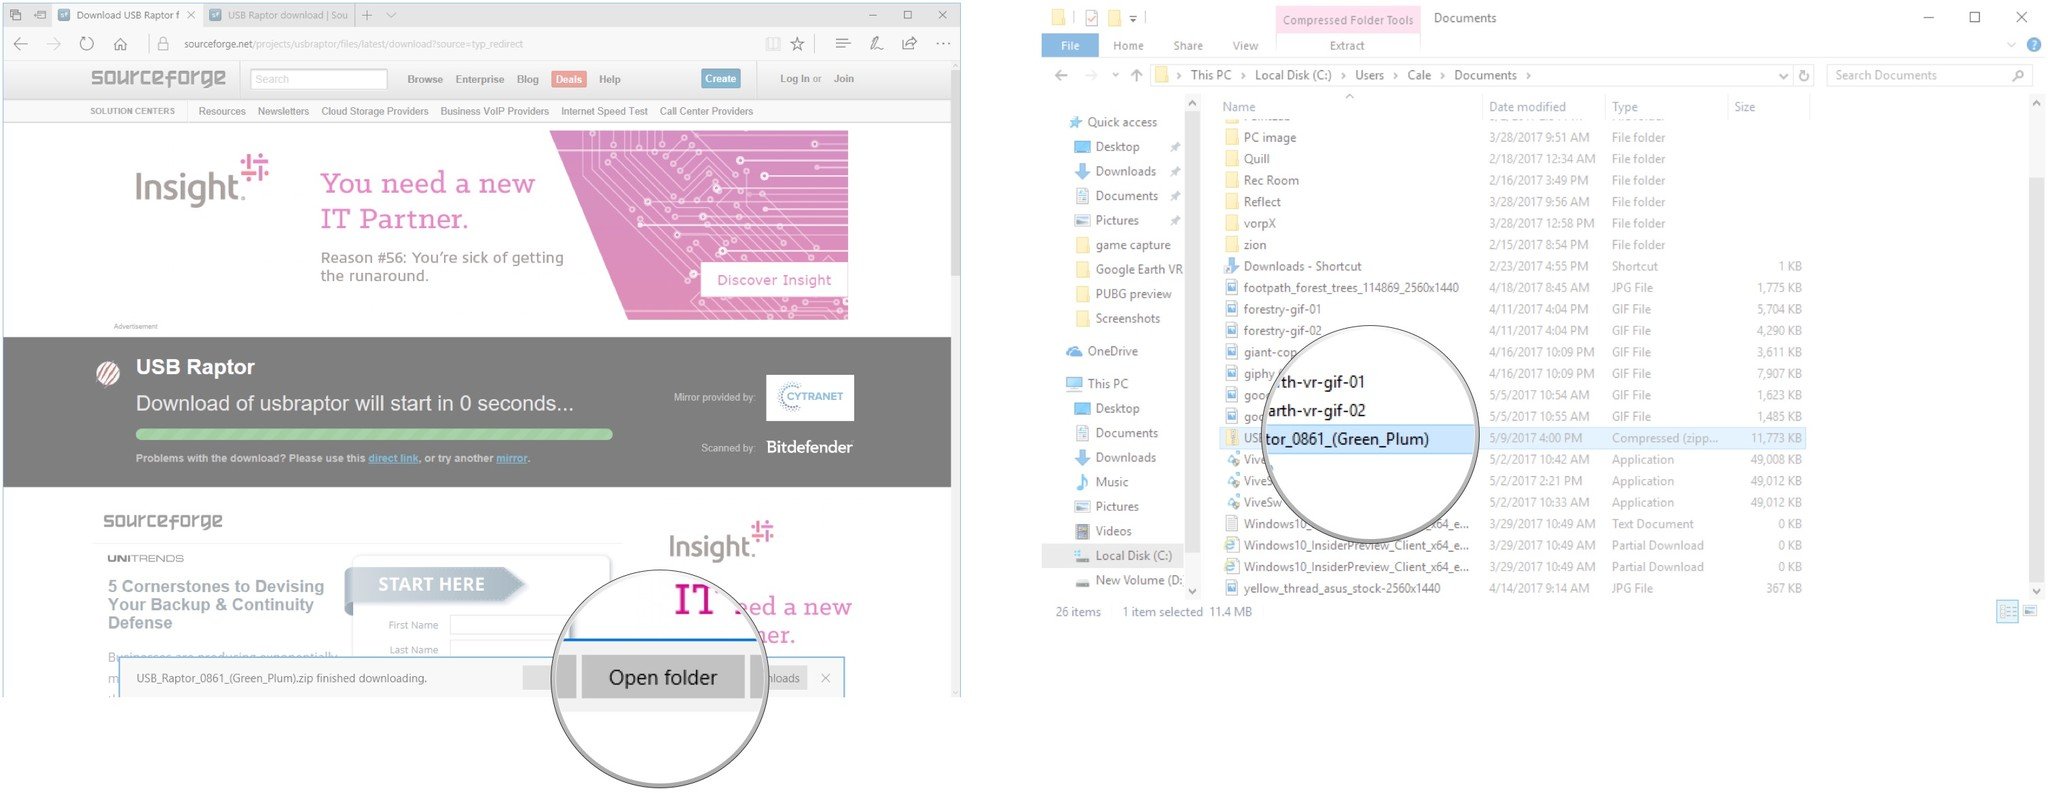
- Click Open folder.
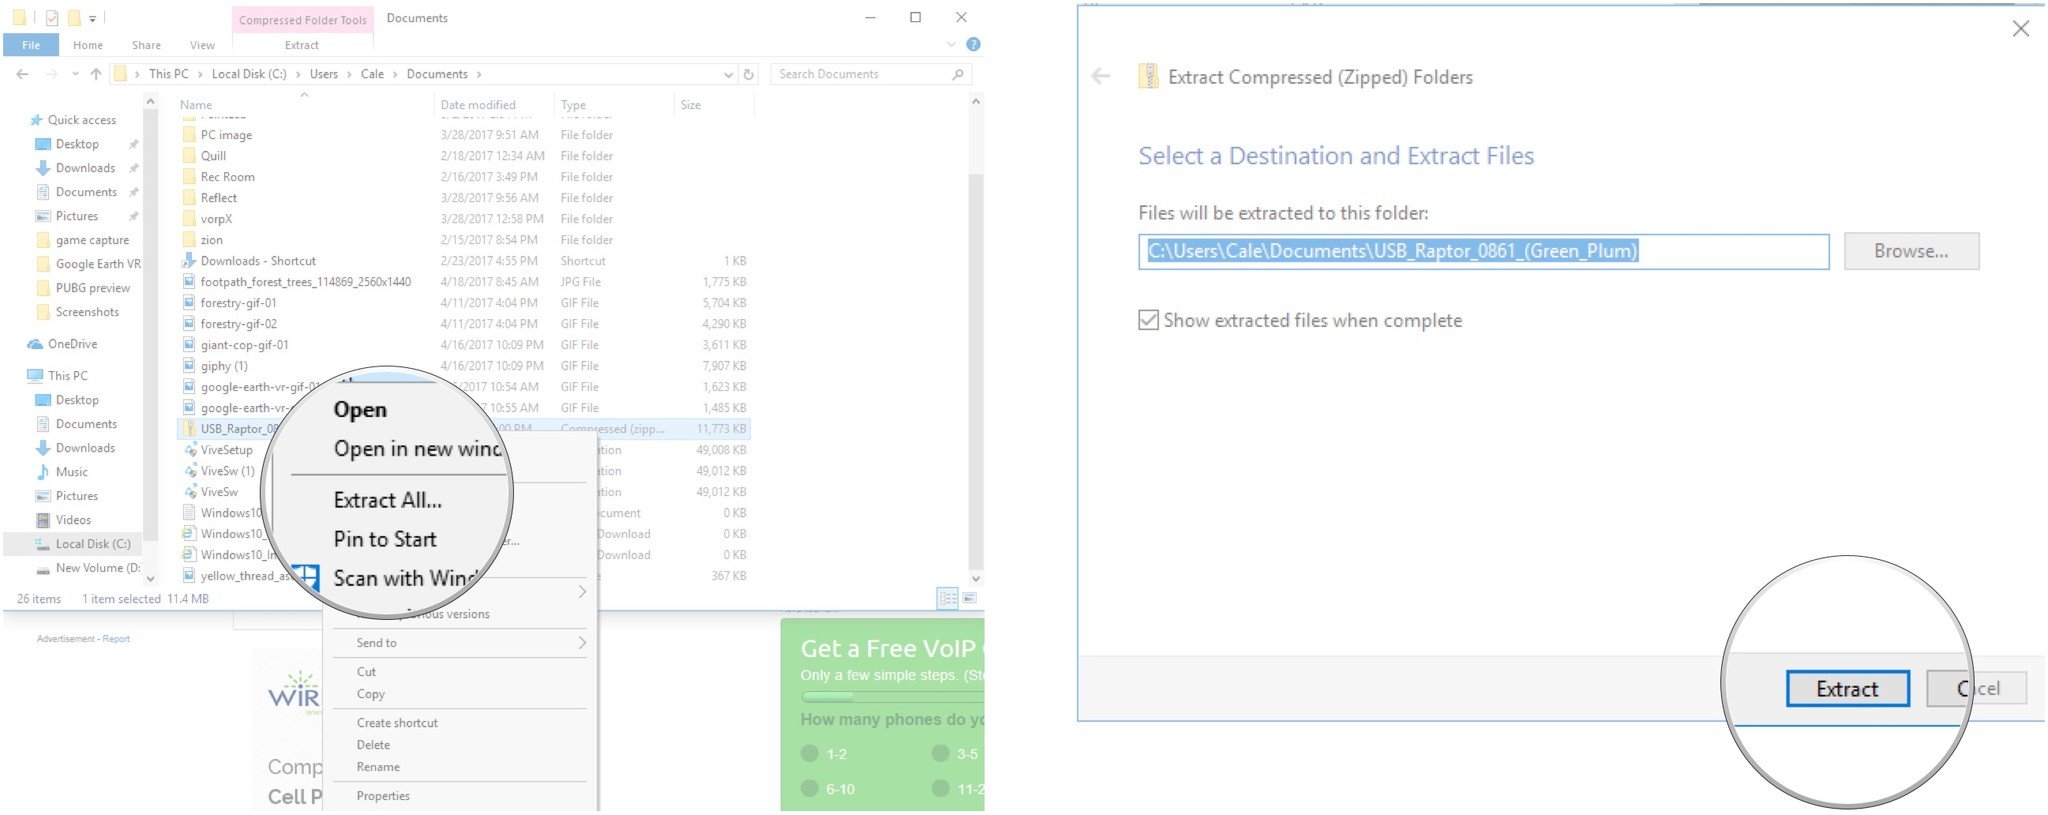
- Right-click the USB Raptor compressed folder.
- Click Extract All.
- Click Extract.
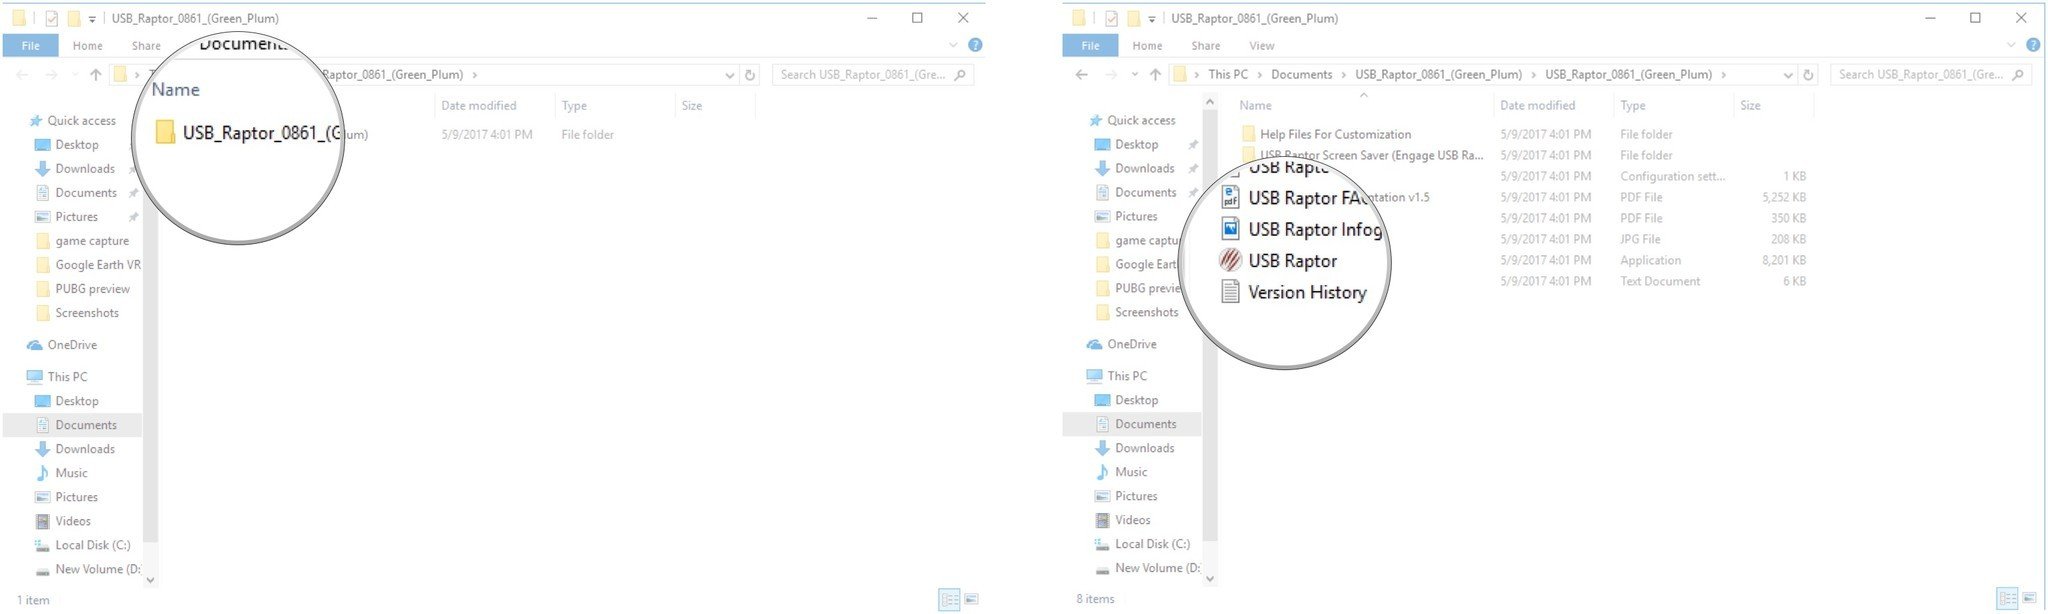
- Double-click the USB Raptor folder.
- Double-click the USB Raptor application.
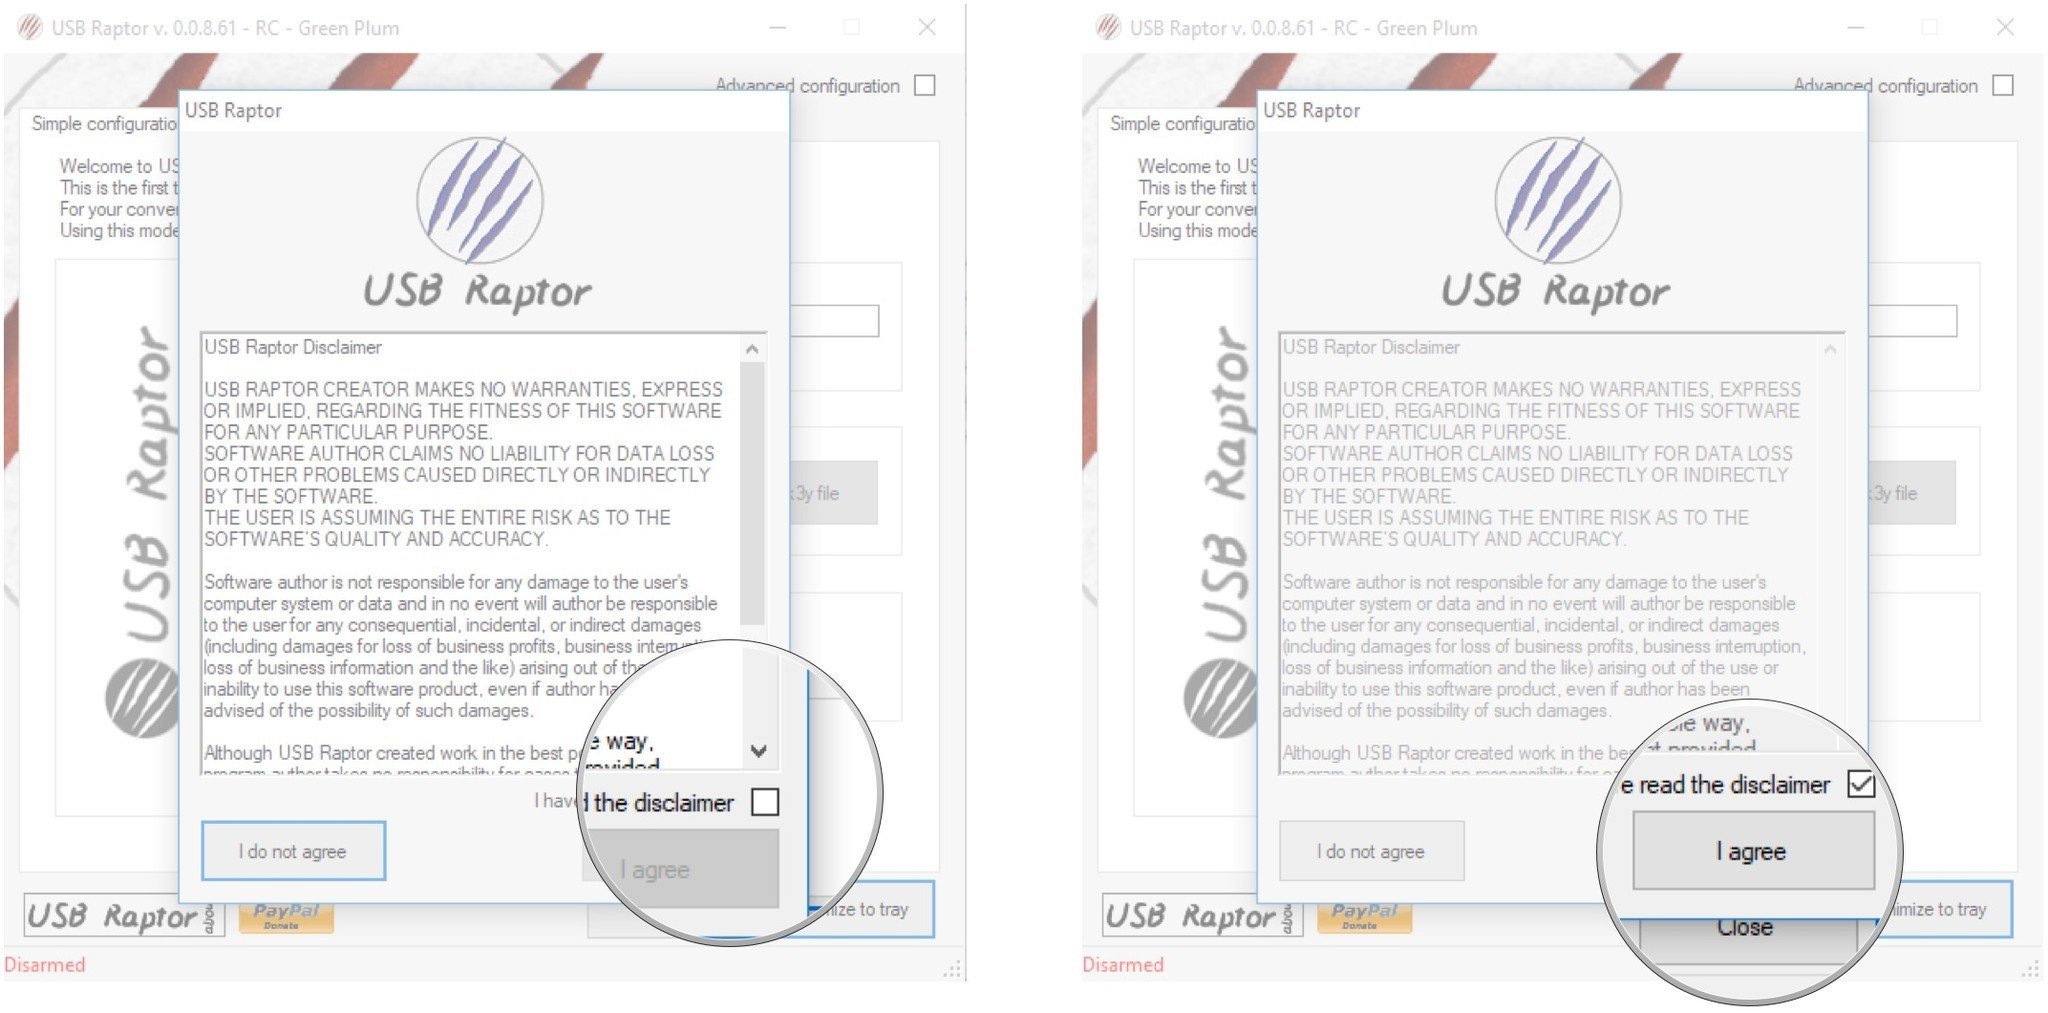
- Click the checkbox next to I have read the disclaimer.
- Click I agree.
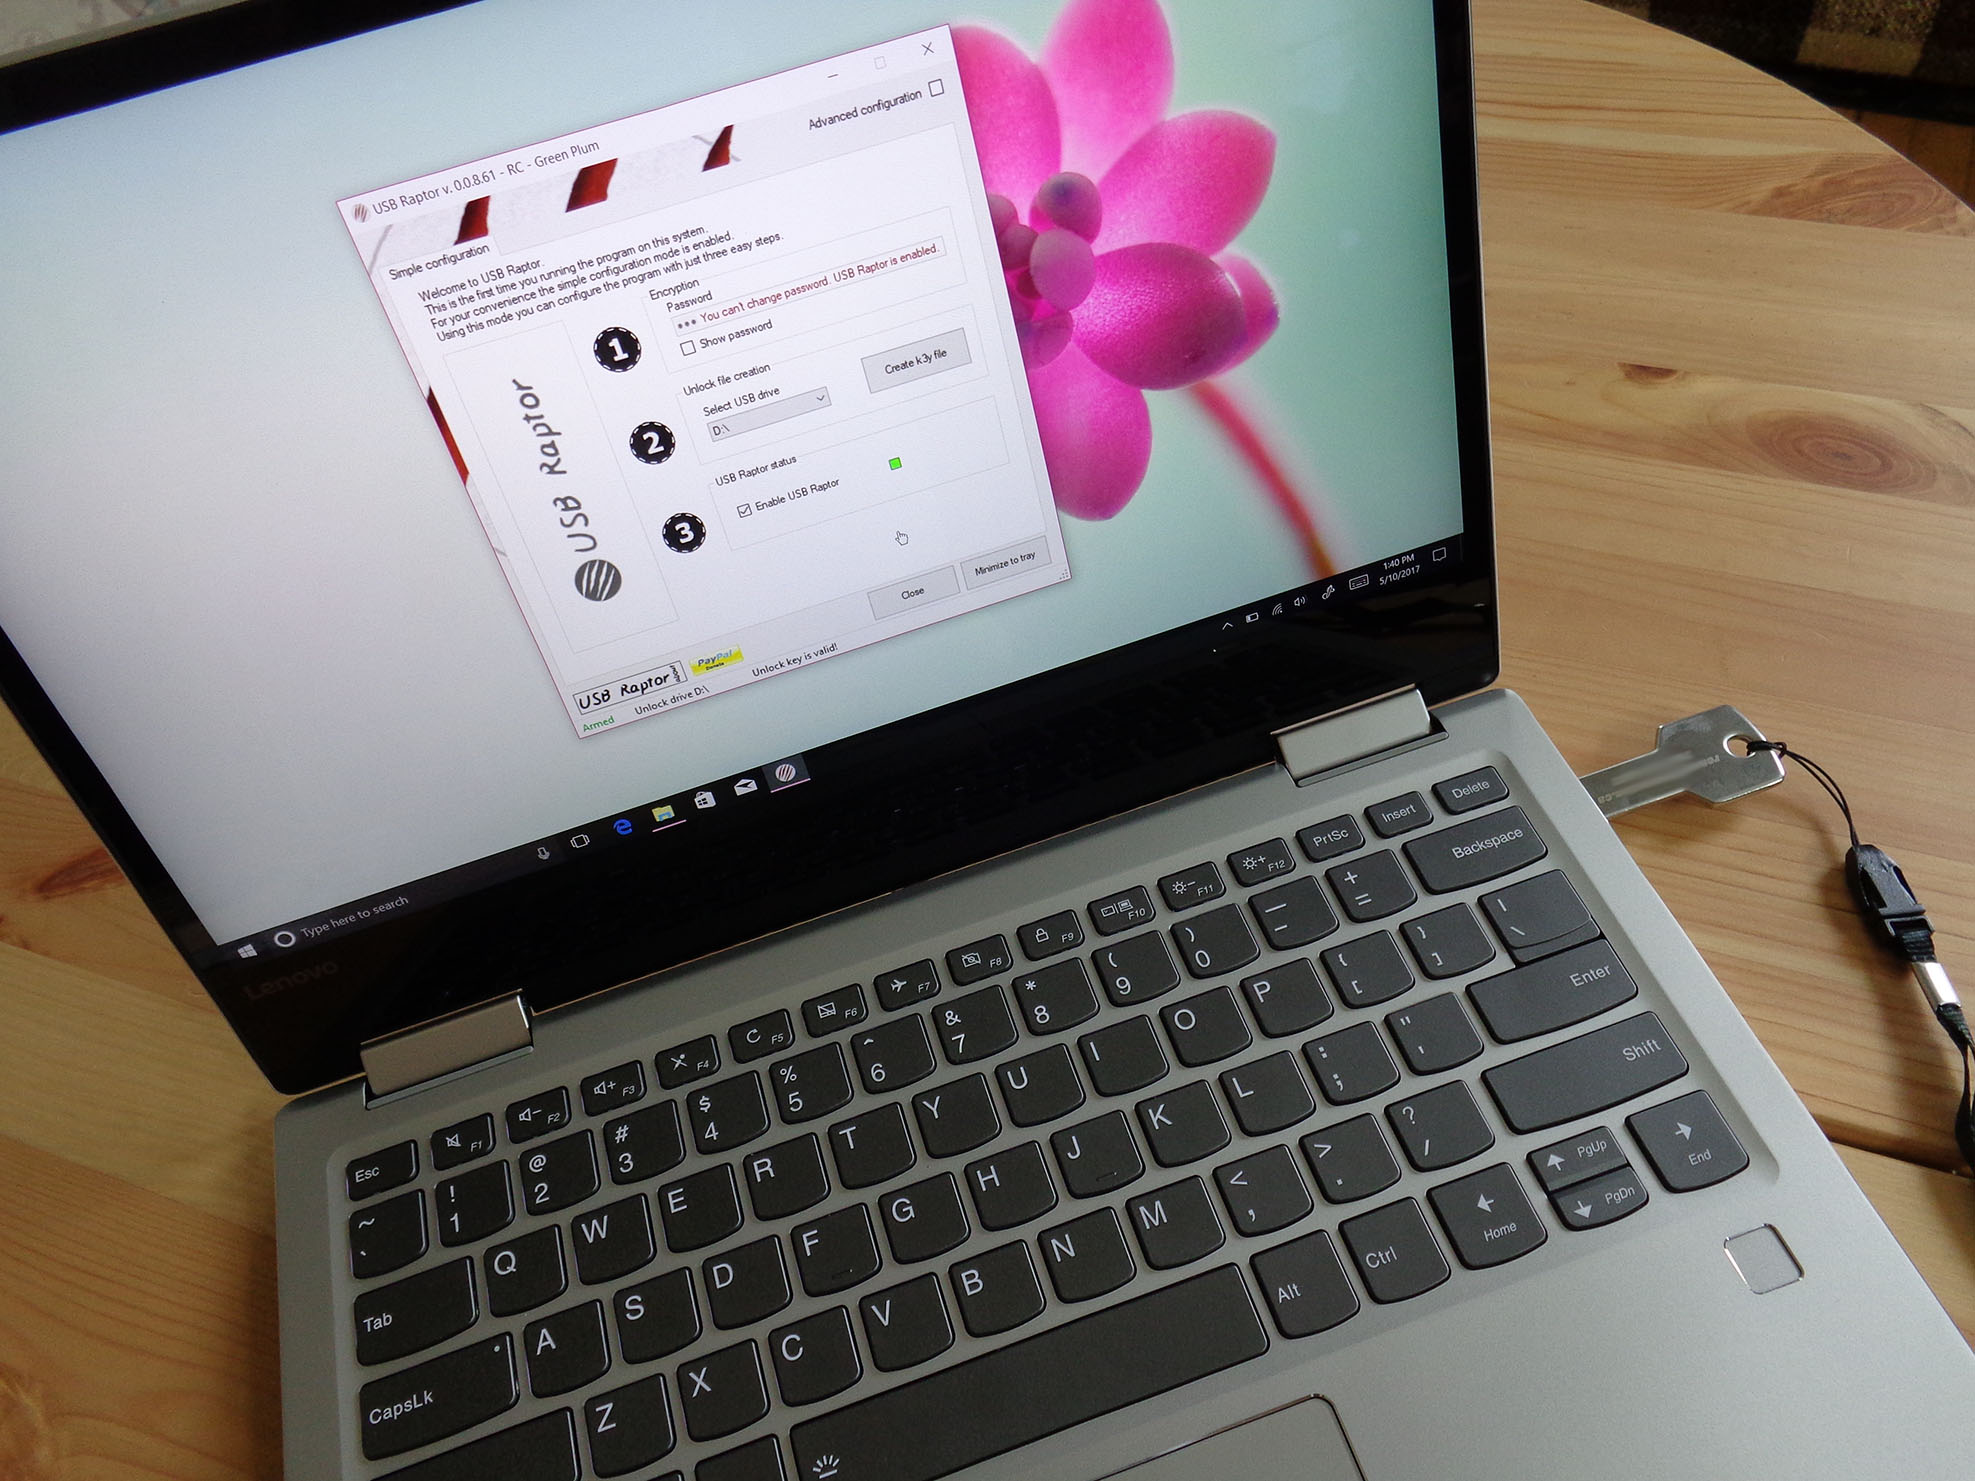
- USB Raptor will open. At this point, you can plug your USB thumb drive into your PC. Once it’s plugged in, you’ll be able to continue with the following steps.
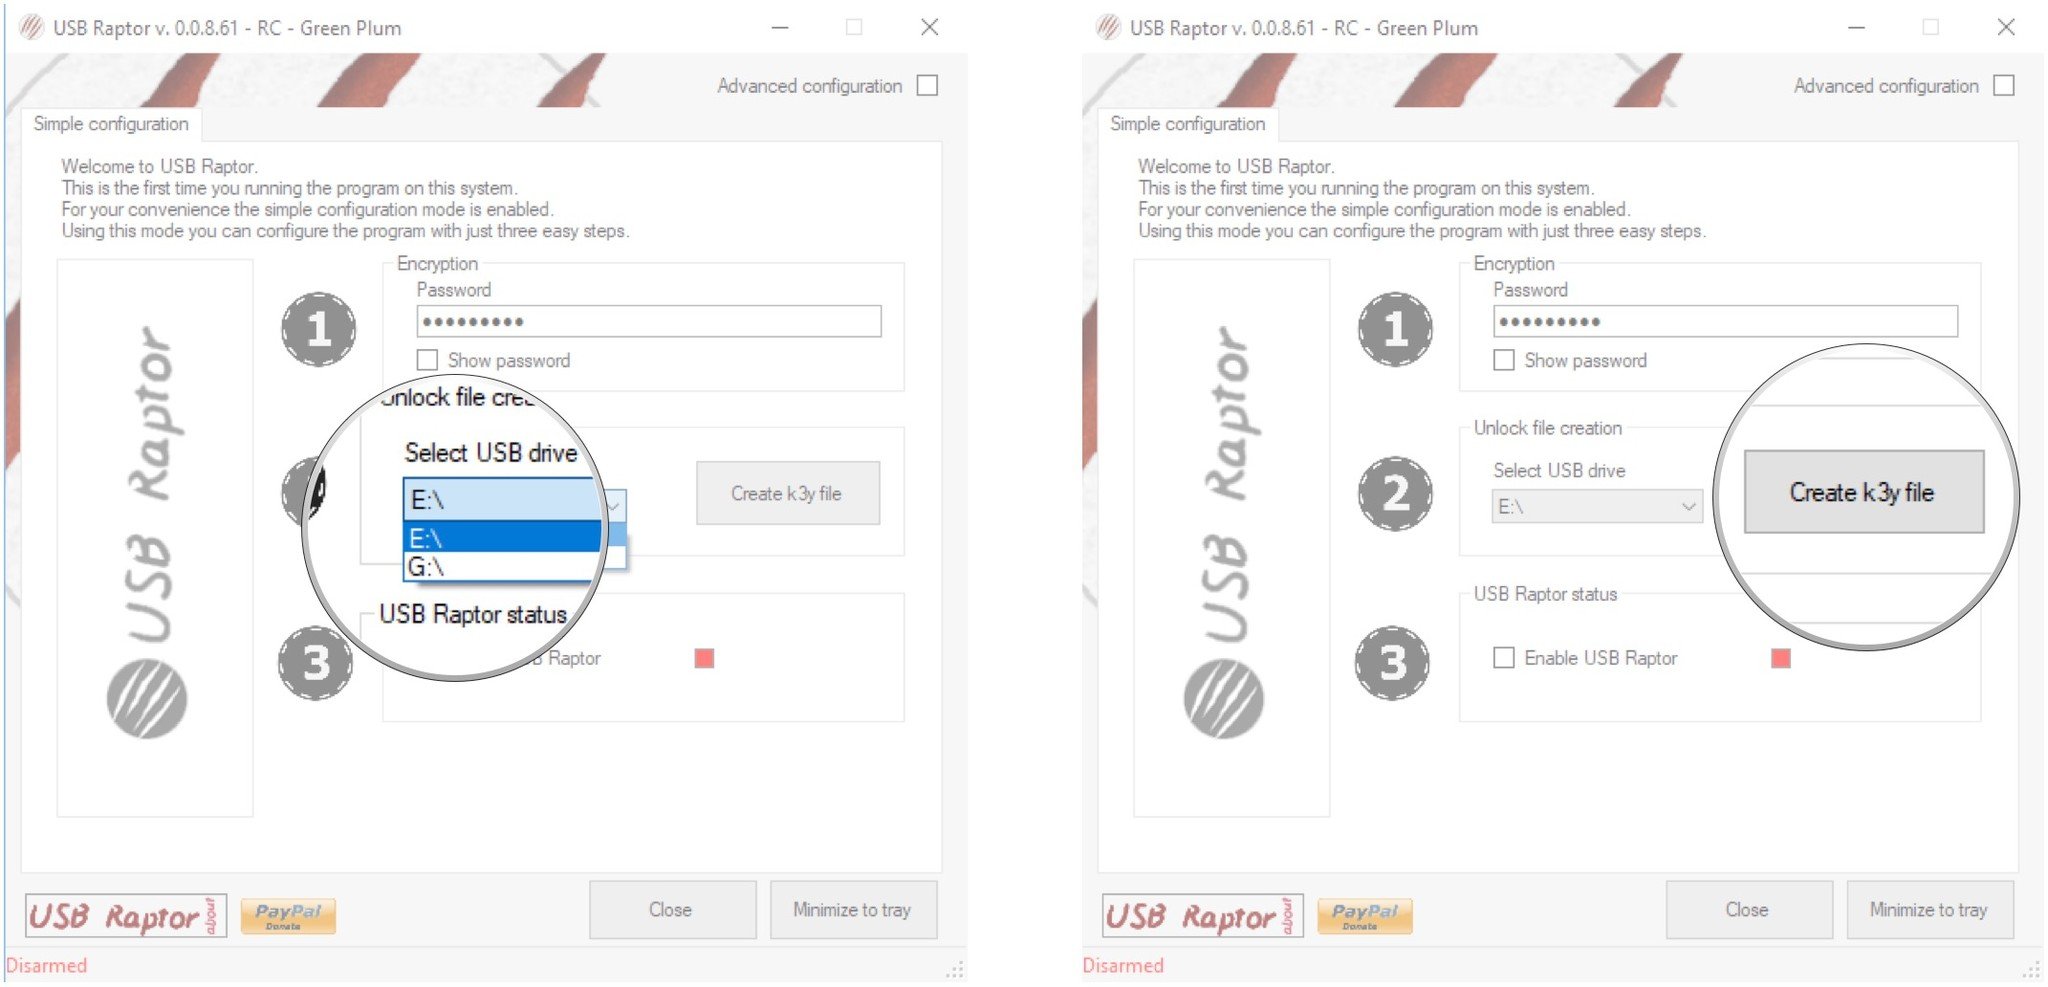
- Type a password. Be sure it’s spelled right, and don’t forget it!
- Click the dropdown arrow below Select USB drive.
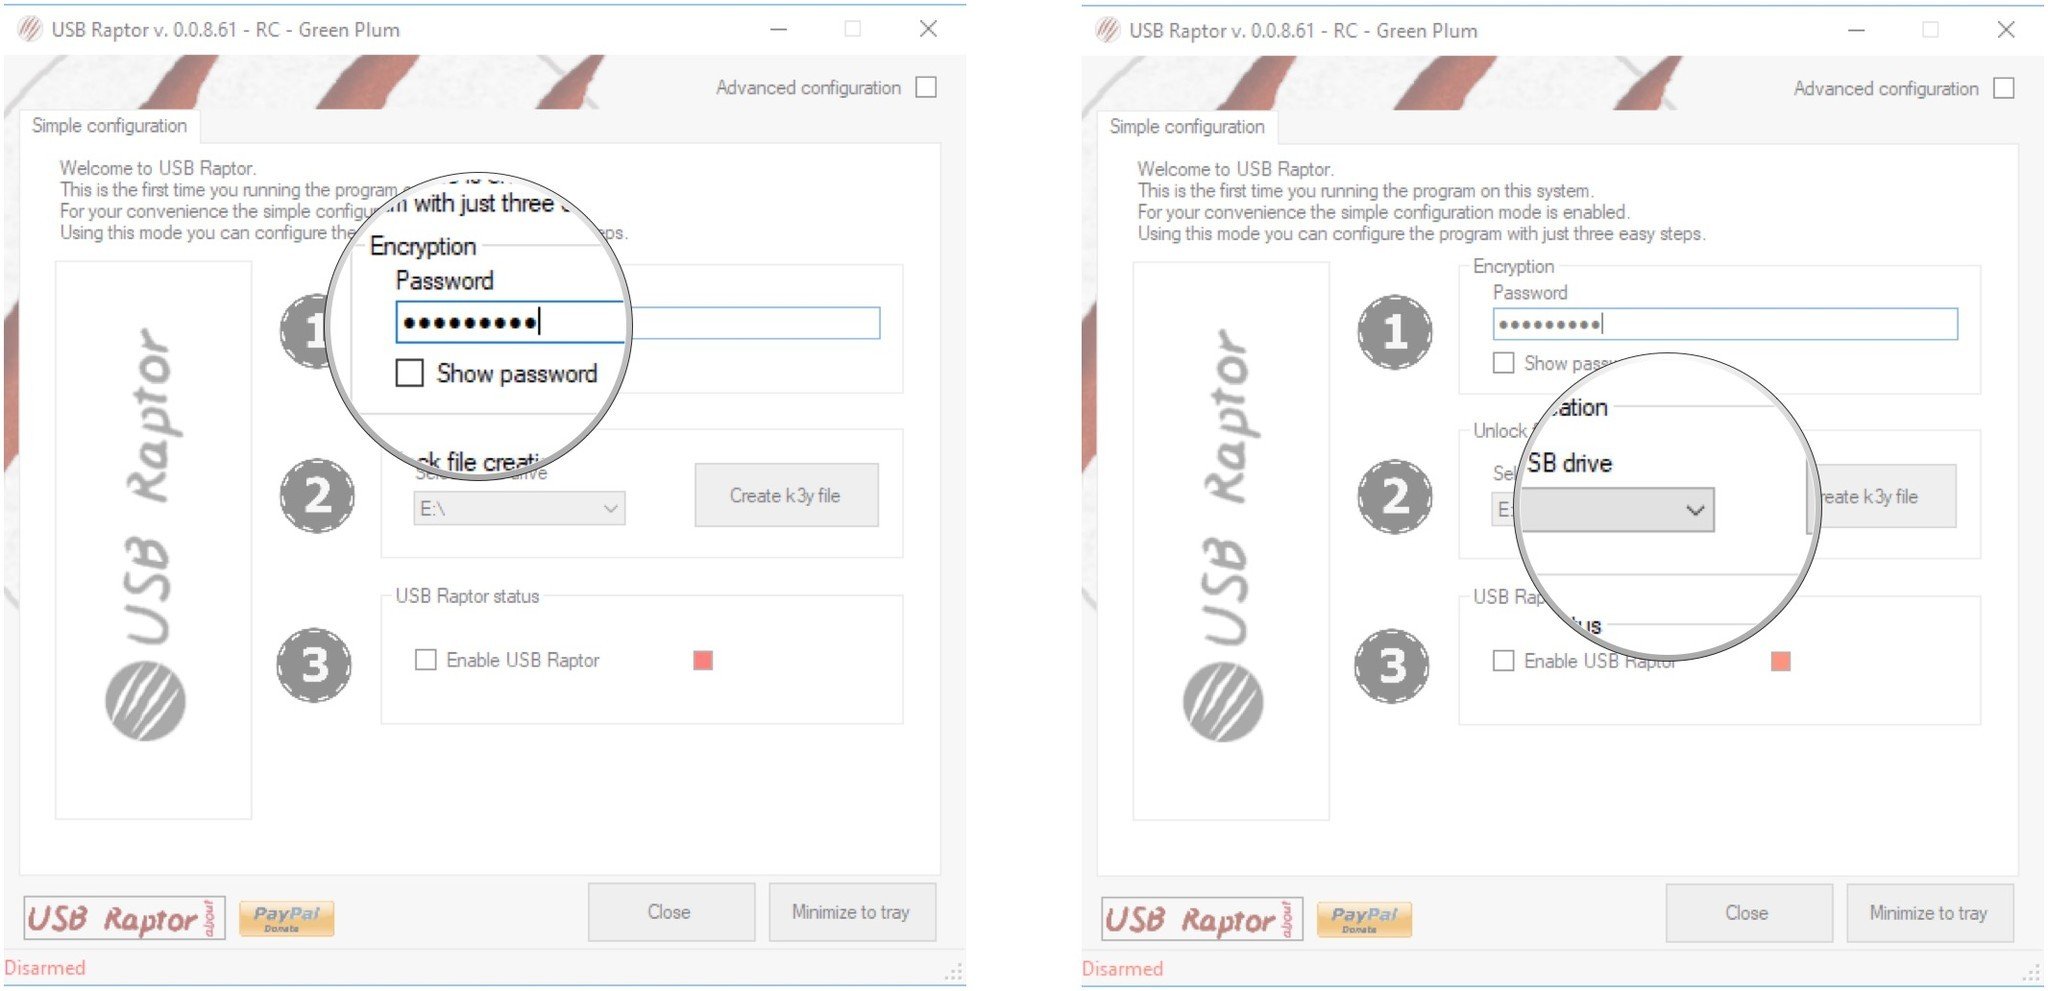
- Click a drive. If you only have your USB drive plugged into a USB port, there should only be one option available.
- Click Create k3y file.
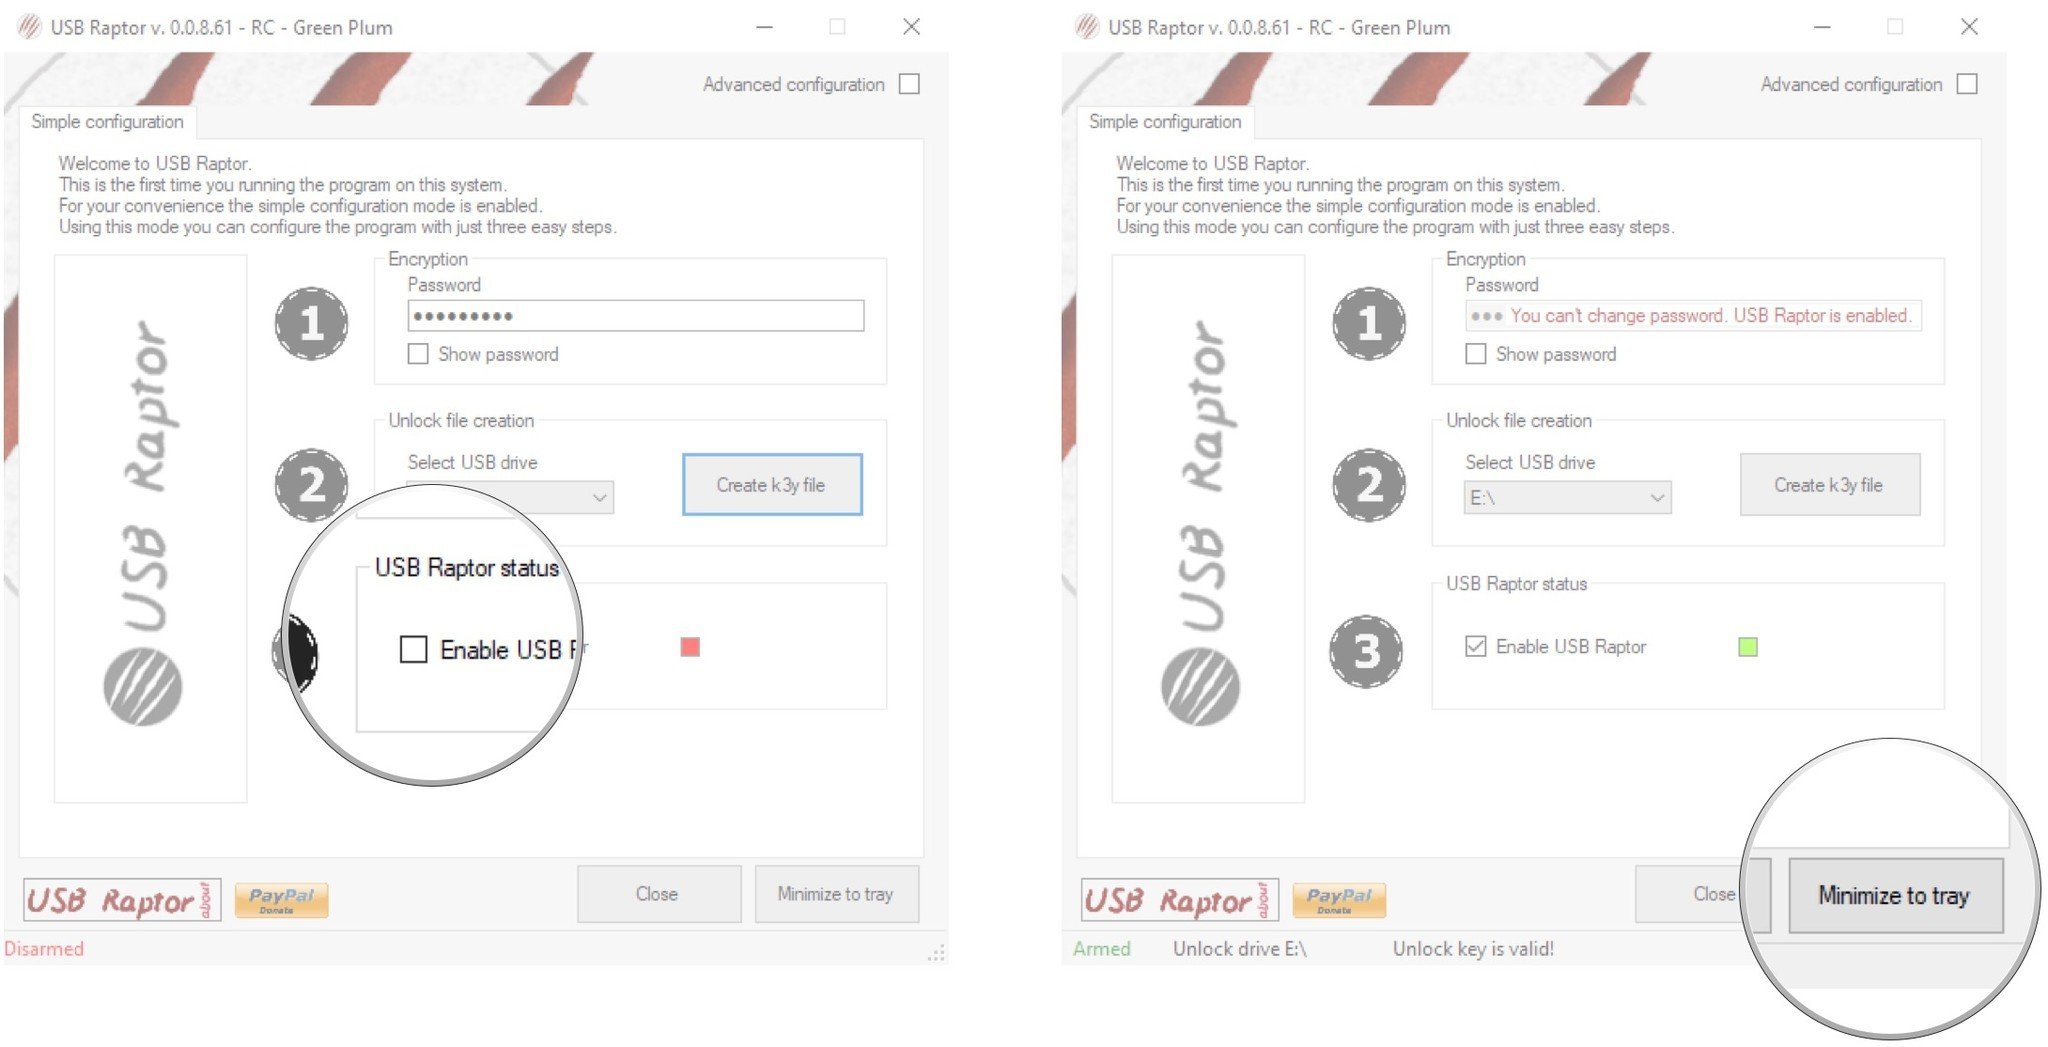
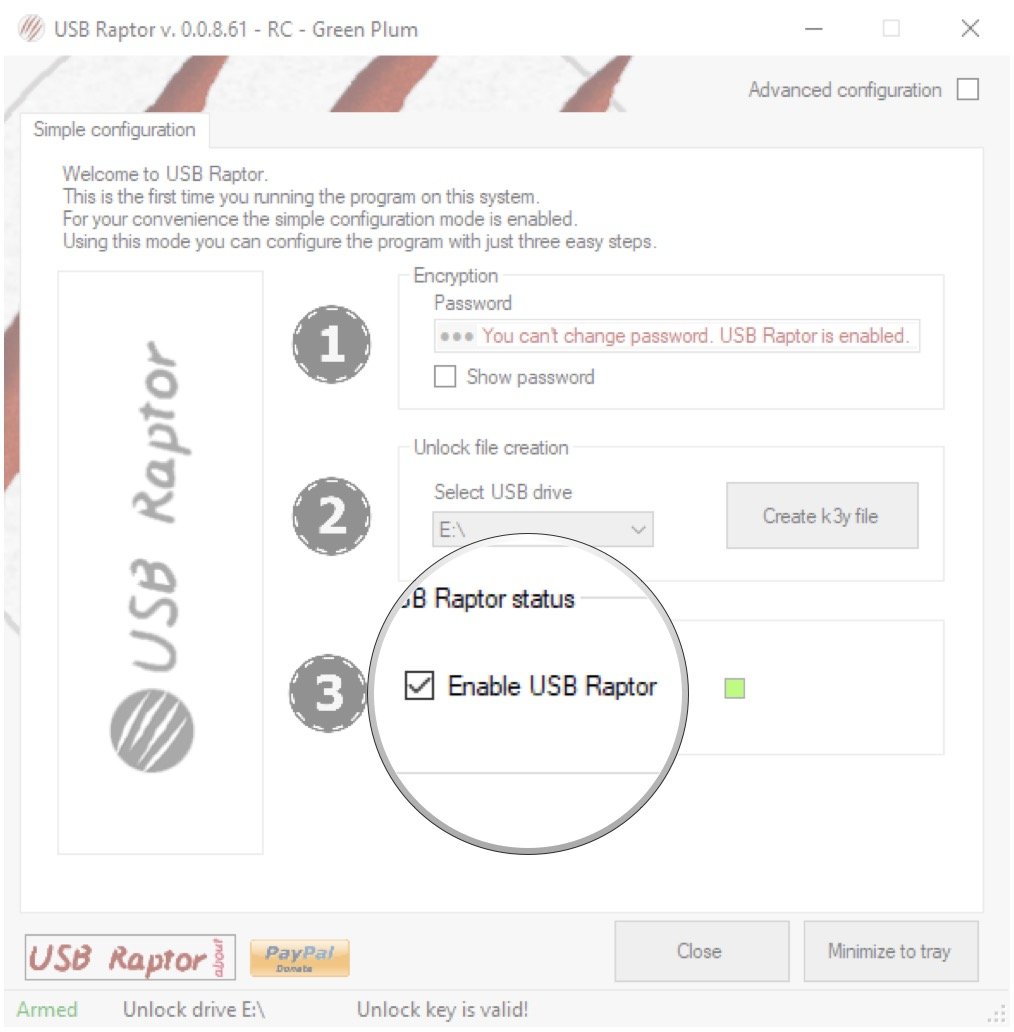
- Click the checkbox next to Enable USB Raptor when you’re ready to start using USB Raptor. A small window will pop up in the bottom-right corner of your screen letting you know that it is enabled.
- Click Minimize to tray.
As soon as you eject the USB drive or simply pull it out of the port, USB Raptor will kick in. A purple screen shows up with the USB Raptor logo. Only when you plug the USB key back in does it unlock, pretty much instantaneously.
To disable USB Raptor, simply open the app and uncheck the box next to Enable USB Raptor.
Advanced settings for USB Raptor
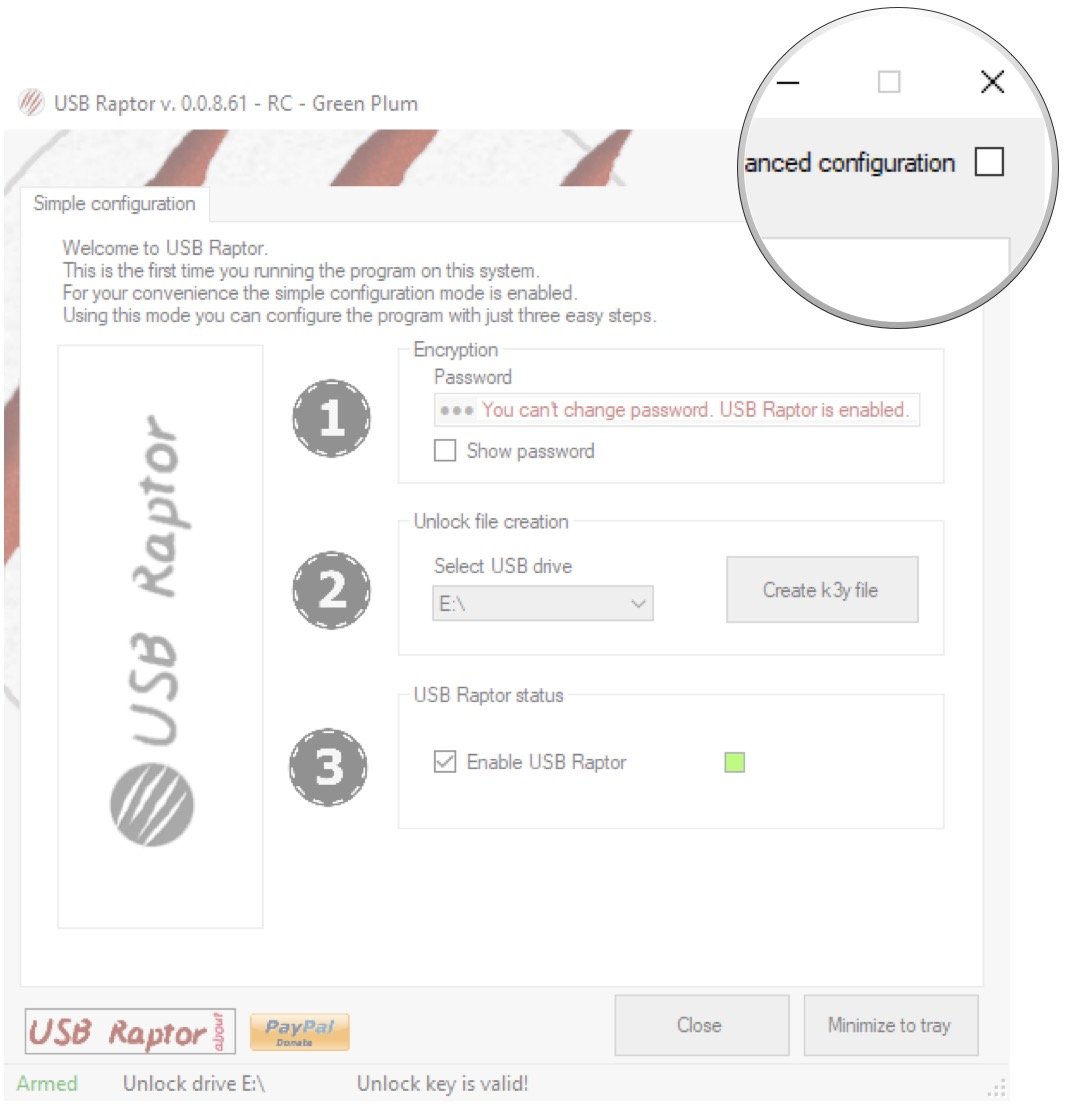
This covers the simple configuration that USB Raptor recommends, but there are quite a few advanced settings you can tweak by clicking the checkbox next to Advanced configurations near the top-right corner of the window.
Here you can choose whether or not you’d like to use a password as a backup in the event you lose your USB drive, whether there’s a delay on the lock when the USB drive is removed, whether or not the .k3y file is matched to the USB drive’s serial number (to prevent copying of the file), and more.
Of course, USB Raptor works perfectly well without messing with the advanced settings, so you don’t have to tweak anything you don’t want to.
Do you use a security key?
Have you tried out the YubiKey or created your own security key? How did it work? Any problems with losing your USB drive or having it fail? Let us know below.
Cale Hunt brings to Windows Central more than eight years of experience writing about laptops, PCs, accessories, games, and beyond. If it runs Windows or in some way complements the hardware, there’s a good chance he knows about it, has written about it, or is already busy testing it.
Gone are the days when you could just rely on the passwords for your device security. With the advancement in cybercrimes and the user’s reluctancy to create a secure password, cracking the passwords and hacking any device is not a big deal for the web criminals.

Stay malware-free with reliable antivirus
Don’t compromise your Data and Privacy. TotalAV is a top-notch antivirus program that handles various viruses, trojans, and other malware that may target your devices. It will safeguard your devices and enhance your system performance.
4.9/5
⭐ Editor’s Choice
✔️ Excellent Malware Detection
✔️ Multiple set of Features
✔️ 30 Day Money-Back
Get TotalAV >
The USB Security Key can be the ultimate solution for the people who are very concerned about their devices’ security. Also, you do not have to rely just on passwords anymore.
In this guide, we would discuss what a USB security key is and how to convert your regular USB drive into a device unlocker.
What is a USB Security Key?
The USB Security key or the physical security key is the advanced method of login authentication. This USB key can be used for locking and unlocking the PC and is a part of two-factor authentication. Obviously, it would be quite difficult for hackers to get their hands on the tangible key.
You can get such a physical security key from the manufacturer like Yubikey, Google, and Thetis. However, they are costly.
The cheaper alternative is creating your own USB login key. However, for that, you have to compromise one of your USB drives or get an affordable Pendrive specifically for this purpose.
Pros and Cons of the Physical Security Key
Every coin has two sides. Likewise, security keys also have two sides, positive and negative. Let us list them out.
Pros:
- A USB security would provide an extra layer of protection to your device by forming a two-factor authentication.
- Cybercriminals can hack your using several ways. Also, after exposure, a password is useless. On the other hand, USB keys are almost impossible to hack, and the hacker has to steal the key to get through your system, which is quite unlikely because usually, hackers work only online.
- You already have to memorize several passwords of your different accounts, getting a physical lock key would reduce some strain, and you can lock/unlock your computer hassle-free.
Cons:
- If you damage or lose the physical key, the recovery is possible but by a long and lethargic process.
- If you want to allow access to your system to someone else, you have to provide them with your key physically. That becomes impossible if you are far away.
- The USB security key would permanently occupy a USB port, which means you would lose one of your USB ports forever.
So, these are the Pros and Cons of the Physical Security key. Weigh them keeping your preference in mind and then choose whether to go for it or not.
You can create a USB security key on Windows 10 using an in-built program – Windows BitLocker. However, this method would only work for Pro and Enterprise versions of Windows as the Home version does not come with BitLocker.
The first step is to enable the BitLocker on your system Drive, that is, the drive where the Windows 10 is installed.
Enable Bitlocker
– Open File Explorer and go to “My PC.”
– Right-click on your system drive and choose “Turn on BitLocker.“

– Follow the on-screen steps, and at the end, click on “Start encrypting.“
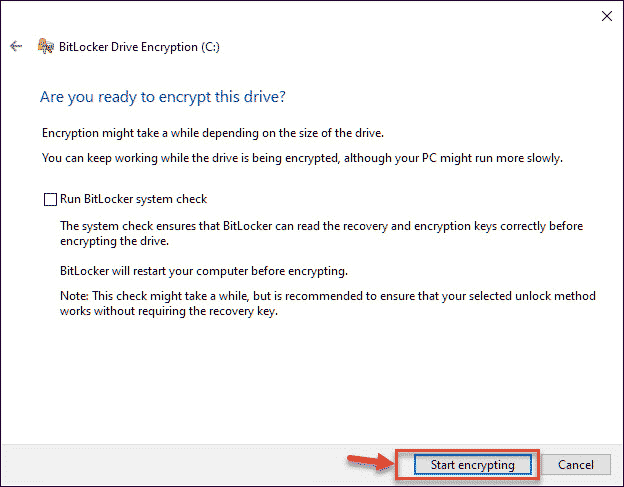
– Your system would restart, and then encryption would begin, which would take some time, depending on the size of the drive.
Enable Security Key using BitLocker
Once the BitLocker is enabled, we can proceed to create the security key.
- Open Group Policy Editor
In Windows search bar, type “group policy editor” and click on the relatable icon to open Group Policy Editor.
- Navigate to Operating System Drives
Follow this path Computer Configuration -> Administrative Templates -> Windows Components -> BitLocker Drive Encryption -> Operating System Drives
- Open Require Additional Authentication at startup
Look for “Require Additional Authentication at startup” and open it.

- Enable it and Configure its settings
A new window would open, click on Enable bullet option. There’s a drop-down menu labeled “Configure TPM startup key.” Change this to “Require Startup Key With TPM.“

- Run Command Prompt
In the final step, run Command Prompt as admin and type this command:
manage-bde -protectors -add c: -TPMAndStartupKey j:
Where ‘c:’ is the drive where Windows is installed and ‘j:’ is assigned to the USB drive.


That’s it. The security key is created, and you would be asked to insert it whenever you start the computer.
How to create a USB Security Key Using Third-party App?
If you are a Windows 10 home user or you didn’t want to use the complicated method of Windows Bitlocker to create your USB security key, then some third-party applications could help you.
USB Raptor

USB Raptor is one of the popular tools for turning a USB drive into a USB security key. The best part is that it is open-source software, and that is why it is entirely free to use for personal and non-commercial use. It is compatible with all the versions of Windows from Windows XP and above.
With Raptor, you can link the key to the serial number of the drive. The only problem with Raptor is, it does not encrypt the system as the BitLocker does. Yet, it would lock and unlock the device with the USB drive. However, it is easy to install and is quite flexible, so you can use it for a medium-security.
Predator

Predator is another popular program to turn a USB into a physical security key. After the USB drive is converted into a security key, your system would only be accessible when the USB is plugged in. As soon as the drive would be plugged out, the computer will be locked automatically.
Anybody who tries to access the system without the USB drive would receive an error message, “Access Denied.”
Installation of the Predator is easy. Download the installation file and open it. Later, you just have to follow the on-screen instructions.
Rohos Logon Key

Rohos Logon Key is a multi-platform security key maker software that provides two-factor authentication to unlock both Windows and macOS devices. It comes with both a free and paid version. Though the free version offers a lot of features, it is only available for Windows users.
Rohos store your login credential into the USB drive, and during startup, when you insert the drive, it automatically inputs the login details for unlocking the system.
Conclusion
These are the method using which you can convert a USB drive into a USB security key. As already mentioned, the physical keys can be of great use and provide extra security over passwords. Currently, you can use these keys for locking and unlocking the device; soon, you can also use them to log in to your different accounts.
1. How does a USB security key work?
A security key works by storing your login details in the drive, and when the drive is plugged in, it automatically inputs the stored credentials to unlock the device.
2. What happens if you lose your security key?
While creating a key, you would always be prompted to create a recovery method in case the key is lost or damaged. If you lose your key, immediately use the recovery method to log in and then remove the key as authentication.
3. How do I backup my YubiKey?
According to YubiKey, due to security reasons, the firmware of YubiKey does not allow the system to read the drive after it is written. Therefore, it is impossible to create a backup of YubiKey.
In today’s digital world, keeping your personal information secure is of utmost importance. One effective way to enhance the security of your Windows 10 device is by creating a USB security key. This small device acts as a physical authentication method and provides an additional layer of protection against unauthorized access to your computer.
Creating a USB security key on Windows 10 is a straightforward process. First, you need to ensure that your computer has a USB port and a compatible USB drive. Then, you can follow a few simple steps to set up the security key and strengthen the security of your device. By taking these precautions, you can significantly minimize the risk of unauthorized access and protect your sensitive data from potential threats.
To create a USB security key on Windows 10, follow these steps:
- Insert a USB flash drive into your computer.
- Open the Settings app and go to «Accounts».
- Select «Sign-in options» and scroll down to «Windows Hello»
- Click on «Set up» under «Windows Hello Security Key».
- Follow the on-screen instructions to set up your security key.

Understanding the Importance of USB Security Keys
In today’s digital age, ensuring the security of our personal information is of utmost importance. One effective way to enhance the security of your Windows 10 computer is by using a USB security key. USB security keys provide an extra layer of protection by acting as physical authentication devices that verify your identity before granting access to your computer or sensitive data. In this article, we will explore how to create a USB security key on Windows 10, allowing you to safeguard your information and protect against unauthorized access.
Pre-requisites for Creating a USB Security Key
Before diving into the process of creating a USB security key on Windows 10, there are a few essential pre-requisites that you need to fulfill:
- A USB flash drive with at least 4GB of storage capacity
- Windows 10 operating system
- Access to an administrator account on your computer
- Active internet connection
Step 1: Download and Install Windows 10 Security Key App
The first step towards creating a USB security key on Windows 10 is to download and install the Windows 10 Security Key app from the Microsoft Store. This app allows you to configure and manage your USB security key. Here’s how you can do it:
- Open the Microsoft Store on your Windows 10 computer.
- Search for the «Windows 10 Security Key» app.
- Click on the app and select «Get» or «Install» to download and install it.
Once the app is installed, you can proceed to the next step.
Step 2: Connect and Configure Your USB Security Key
After installing the Windows 10 Security Key app, you need to connect and configure your USB security key. Follow these steps:
- Insert your USB flash drive into a USB port on your computer.
- Launch the Windows 10 Security Key app.
- Click on the «Set up a security key» option.
- Choose your USB flash drive from the list of available devices.
- Click on «Next» and follow any additional on-screen instructions to complete the setup process.
Once the setup process is complete, your USB security key is ready for use.
Step 3: Set Up Windows Hello with USB Security Key
Now that your USB security key is configured, you can set up Windows Hello to use it as a form of authentication. Windows Hello is a biometric authentication feature in Windows 10 that allows you to log into your computer using various methods, including USB security keys. Here’s how to set it up:
- Open the Start menu and go to «Settings.»
- Click on «Accounts» and then select «Sign-in options.»
- Under Windows Hello, click on «Security Key.»
- Follow the on-screen instructions to set up Windows Hello with your USB security key.
Once you have completed the setup, your USB security key will be linked to your Windows Hello account.
Step 4: Testing the USB Security Key
To ensure that your USB security key is working as intended, it is recommended to test it before relying on it for authentication. Follow these steps to test your USB security key:
- Remove any other authentication methods, such as passwords, PINs, or fingerprint recognition.
- Restart your computer.
- Insert your USB security key into a USB port.
- When prompted, follow the on-screen instructions to authenticate using your USB security key.
If the authentication process is successful, congratulations, you have successfully created and tested your USB security key on Windows 10!
Enhancing Security with Your USB Security Key
Now that you have created a USB security key on Windows 10, it is essential to understand how it enhances your overall security. Here are a few key benefits of using a USB security key:
- Two-Factor Authentication: USB security keys provide an additional layer of protection as they require both something you have (the USB key) and something you know (your password) to access your computer or sensitive data.
- Physical Security: USB security keys are physical devices, which means they cannot be hacked remotely. This makes them highly secure against online threats.
- Protection Against Phishing: USB security keys help prevent phishing attacks, as even if an attacker manages to obtain your username and password, they won’t be able to access your account without the physical USB key.
- Portability and Convenience: USB security keys are compact and can be easily carried with you, allowing you to securely access your account on multiple devices.
By integrating a USB security key into your Windows 10 security measures, you can significantly enhance the protection of your personal information and keep your digital assets secure.

Creating a USB Security Key on Windows 10
Windows 10 offers a built-in feature that allows you to create a USB security key, providing an extra layer of protection for your computer. This key acts as a physical authentication device, ensuring only authorized individuals can access your device and data. Here’s a step-by-step guide on how to create a USB security key on Windows 10.
Requirements
- A USB drive with at least 256 MB of storage
- A Windows 10 computer with administrative privileges
Instructions
- Connect the USB drive to your Windows 10 computer.
- Open the Start menu and go to «Settings.»
- In the Settings menu, select «Accounts.»
- Choose «Sign-in options» from the left panel.
- Scroll down to the «Windows Hello» section and click on «Security Key.»
- Click on the «Set up» button.
- Follow the on-screen instructions to set up the security key using your USB drive.
Once the USB security key setup is complete, you can use it to sign in to your Windows 10 computer by inserting the
Key Takeaways: How to Create a USB Security Key on Windows 10
- A USB security key adds an extra layer of protection to your Windows 10 device.
- You can create a USB security key using Windows Hello and a compatible USB drive.
- Windows 10 allows you to use the USB security key as an alternative to passwords.
- Creating a USB security key involves setting up Windows Hello and registering the USB drive.
- Using a USB security key can help protect your sensitive data and prevent unauthorized access to your device.
Frequently Asked Questions
Creating a USB security key on Windows 10 can be a crucial step in safeguarding your sensitive information. Here are some frequently asked questions about creating a USB security key on Windows 10:
1. How can I create a USB security key on Windows 10?
Creating a USB security key on Windows 10 is relatively simple. Follow these steps:
- Insert a USB flash drive into your computer.
- Open Windows Settings and navigate to the Accounts section.
- Click on «Sign-in options» in the left sidebar.
- Scroll down to the «Windows Hello» section and click on «Security Key» under the Windows Hello PIN option.
- Click on the «Set up» button and follow the on-screen instructions to create your USB security key.
- Once the setup process is complete, you can use your USB security key for authentication.
Note that the exact steps may vary slightly depending on the version of Windows 10 you are using.
2. Can any USB flash drive be used as a security key on Windows 10?
No, not all USB flash drives can be used as security keys on Windows 10. To be compatible, the USB flash drive must support the FIDO2 or U2F standard. Look for USB flash drives that are specifically marketed as security keys or are FIDO2 certified.
Additionally, it’s important to note that once a USB flash drive is set up as a security key, it can no longer be used for regular storage purposes.
3. Is it possible to use multiple USB security keys on Windows 10?
Yes, Windows 10 allows you to set up and use multiple USB security keys for authentication. This can provide an extra layer of security as you can have backup keys in case one gets lost or damaged.
To add multiple USB security keys, simply follow the same setup process for each key.
4. Can I use a USB security key on multiple Windows 10 devices?
Yes, once you have set up a USB security key on Windows 10, you can use it on multiple devices. However, each device needs to have Windows 10 and the necessary settings to recognize and authenticate the USB security key.
It’s important to note that if a USB security key is lost or stolen, it can be used to access any device that has been set up to recognize it. Therefore, it’s essential to store your USB security key in a safe place to prevent unauthorized access.
5. What are the advantages of using a USB security key on Windows 10?
Using a USB security key on Windows 10 offers several advantages:
- Enhanced security: USB security keys provide an additional layer of security compared to traditional passwords or PINs.
- Protection against phishing attacks: USB security keys are resistant to phishing attacks as they rely on physical authentication.
- Convenience: Once set up, using a USB security key is quick and easy, requiring only a simple insertion and tap.
- Compatibility: USB security keys can be used across multiple platforms and websites that support FIDO2 or U2F.
By using a USB security key on Windows 10, you can significantly improve the security of your accounts and sensitive information.
In conclusion, creating a USB security key on Windows 10 is a simple way to enhance the security of your computer. By following the step-by-step process outlined in this article, you can protect your sensitive data and prevent unauthorized access to your system.
Remember to choose a strong password and keep your USB security key in a safe place. Regularly update your system and antivirus software to ensure maximum security. By taking these precautions, you can rest assured that your computer is well-protected.
Download Windows Speedup Tool to fix errors and make PC run faster
Ever wanted to lock and unlock your computer with a USB drive or a physical key? It does look cool and also adds another layer of security to your computer. Unlocking a computer with a USB drive is more convenient and quick, and USB Raptor is a great tool that lets you do this and adds USB protection to your computer. The tool is flexible and completely open-sourced so you can sneak into it to customize it your way. You can easily set up a USB lock mechanism as the program provides the best security possible.
We have already see how we can use the built-in SysKey Utility in Windows 11/10/8/7, to lock the computer using a USB stick, and take a look at some other free software to lock & unlock Windows PC using USB Pen Drive. Now let us take a look at USB Raptor.
To get started, you need a USB Pen Drive. You need to set up a master password when you run USB Raptor for the first time.
Once done with that, you can select your USB drive from the drop-down and then hit the ‘Create k3y file’ button. A hidden encrypted key file will be generated and saved on the USB drive. You must ensure that the file doesn’t get deleted or you’ll be unable to unlock your computer using that USB drive and in that case, you’ll need to unlock using any other alternate methods.

Having done this, you can enable USB Raptor and then minimize it to the system tray to keep it running in the background, so that the next time the USB Drive is removed from the computer, the computer will be locked and it will be again accessible only after you connect that USB drive or use the master password. This was all about the Basic Mode.
You can switch to Advanced Configuration Mode for more advanced features. I’ve discussed some of the advanced features here in this post.
There are two types of locks available: System Lock and USB Raptor Lock (Insane lock). USB Raptor Lock is tougher and recommended. There are also options to delay the lock for some duration, enable sounds, customize the lock screen, enable/disable the Clock, ID, USB Raptor Logos, write custom texts, add custom logos, and enable random colors as well.
For your information, the system can also be locked without using the USB drive, if you’ve disabled USB locking and if the tool is being used in the Network Mode.
Backdoor access can also be controlled. Features such as unlocking by a master password, network commands, etc, can be enabled as well.
Under the High-Security Options, you can enable some advanced features that will ensure maximum security to the USB unlocking setup. Serial number verification can be enabled so that no one can copy the security key file from your USB to any other USB drive and unlock the computer. Only the USB drive that was used while locking the system will be used to unlock it.

USB Raptor also supports network commands. You can run it in Master Mode to send commands to other computers. USB Raptor could be made to run in Slave Mode to receive commands from the master computer. You can enable Network sync so that if the master computer is locked, slave computers will also get automatically locked.
USB Raptor download
There are many other amazing features that are not covered in this post. Download the tool to know more and see these features in action. The tool is pretty easy to use and there is a fine division between simple and advanced mode. The division enables the basic users to stick to the lesser complex mode and on the same tile let, the advanced users enjoy all the advanced features of the tool. USB Raptor is completely free of cost and available to download at SourceForge.
Can I turn my USB into a security key?
Yes, you can turn your USB device into a security key. Although Windows 11 or Windows 10 doesn’t have any option by default, you can use third-party programs to get the job done. For your information, USB Raptor is one of the best apps you can find to convert your USB device into a security key on a Windows PC.
Read: How to set up Security Key for your Microsoft Account
How do I setup my USB Raptor?
The setup process for the USB Raptor is pretty straightforward, and you do not need to spend much time on this. You can go through the screen instructions to set things up. However, it is recommended to follow the aforementioned steps so that you can learn everything minutely and set up everything as per the requirements.
Read next: Free software to Lock and Unlock Windows PC using USB Pen Drive.
Lavish loves to follow up on the latest happenings in technology. He loves to try out new Windows-based software and gadgets and is currently learning JAVA. He loves to develop new software for Windows. Creating a System Restore Point first before installing a new software is always recommended, he feels.
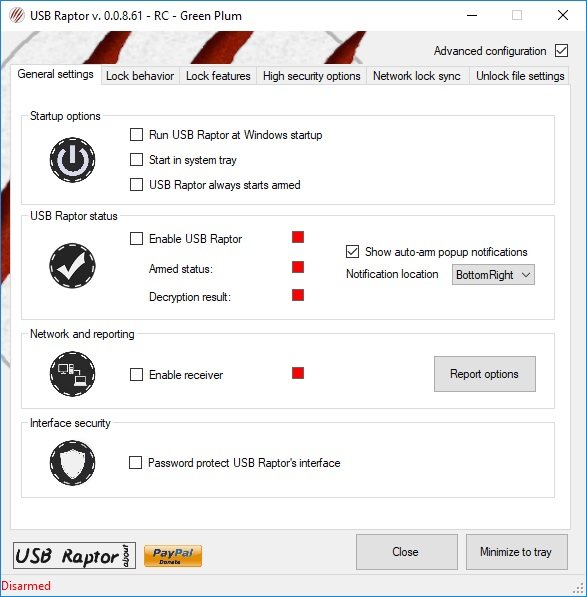
Функция Windows Hello позволяет разблокировать устройство специальным физическим ключом. Чтобы её найти, перейдите в Параметры → Учётные записи → Варианты входа → Windows Hello. Если у вас нет такого физического ключа, вы можете превратить обычную USB-флешку в его подобие, используя утилиту USB Raptor
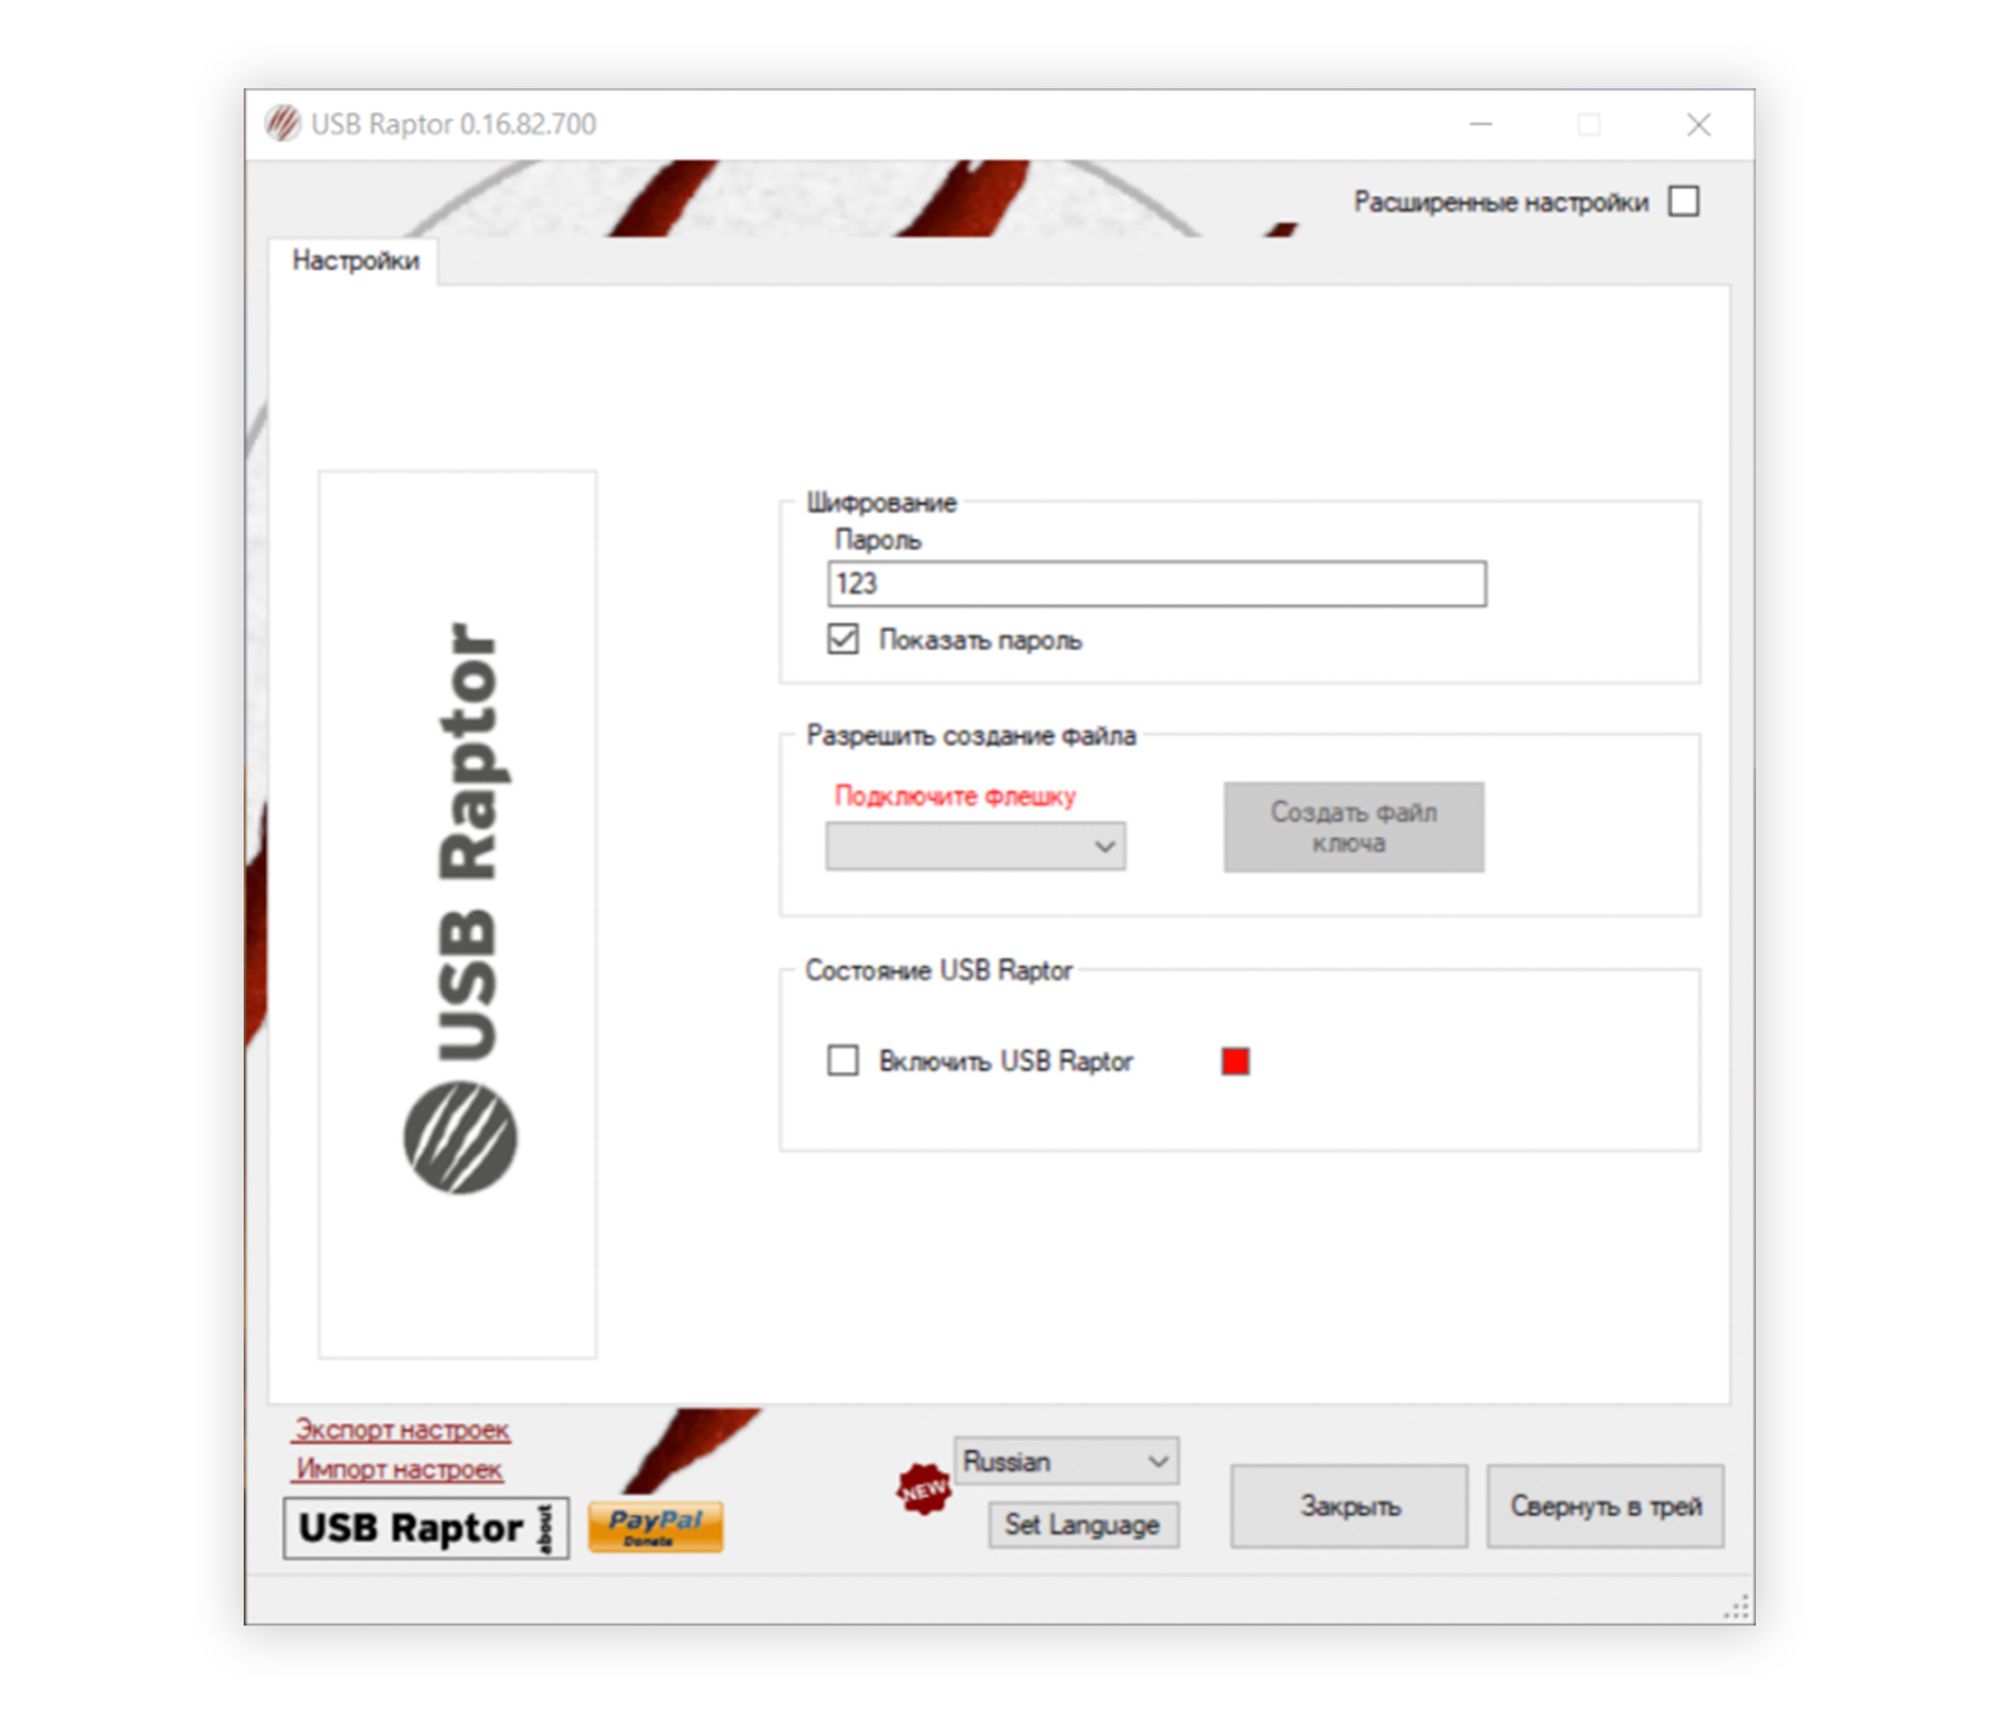
После запуска программы необходимо придумать пароль для разблокировки в случае утери внешнего устройства, выбрать флешку, которая будет использоваться в качестве физического ключа, нажать кнопку Создать файл ключа и установить галочку возле пункта Включить USB Raptor.
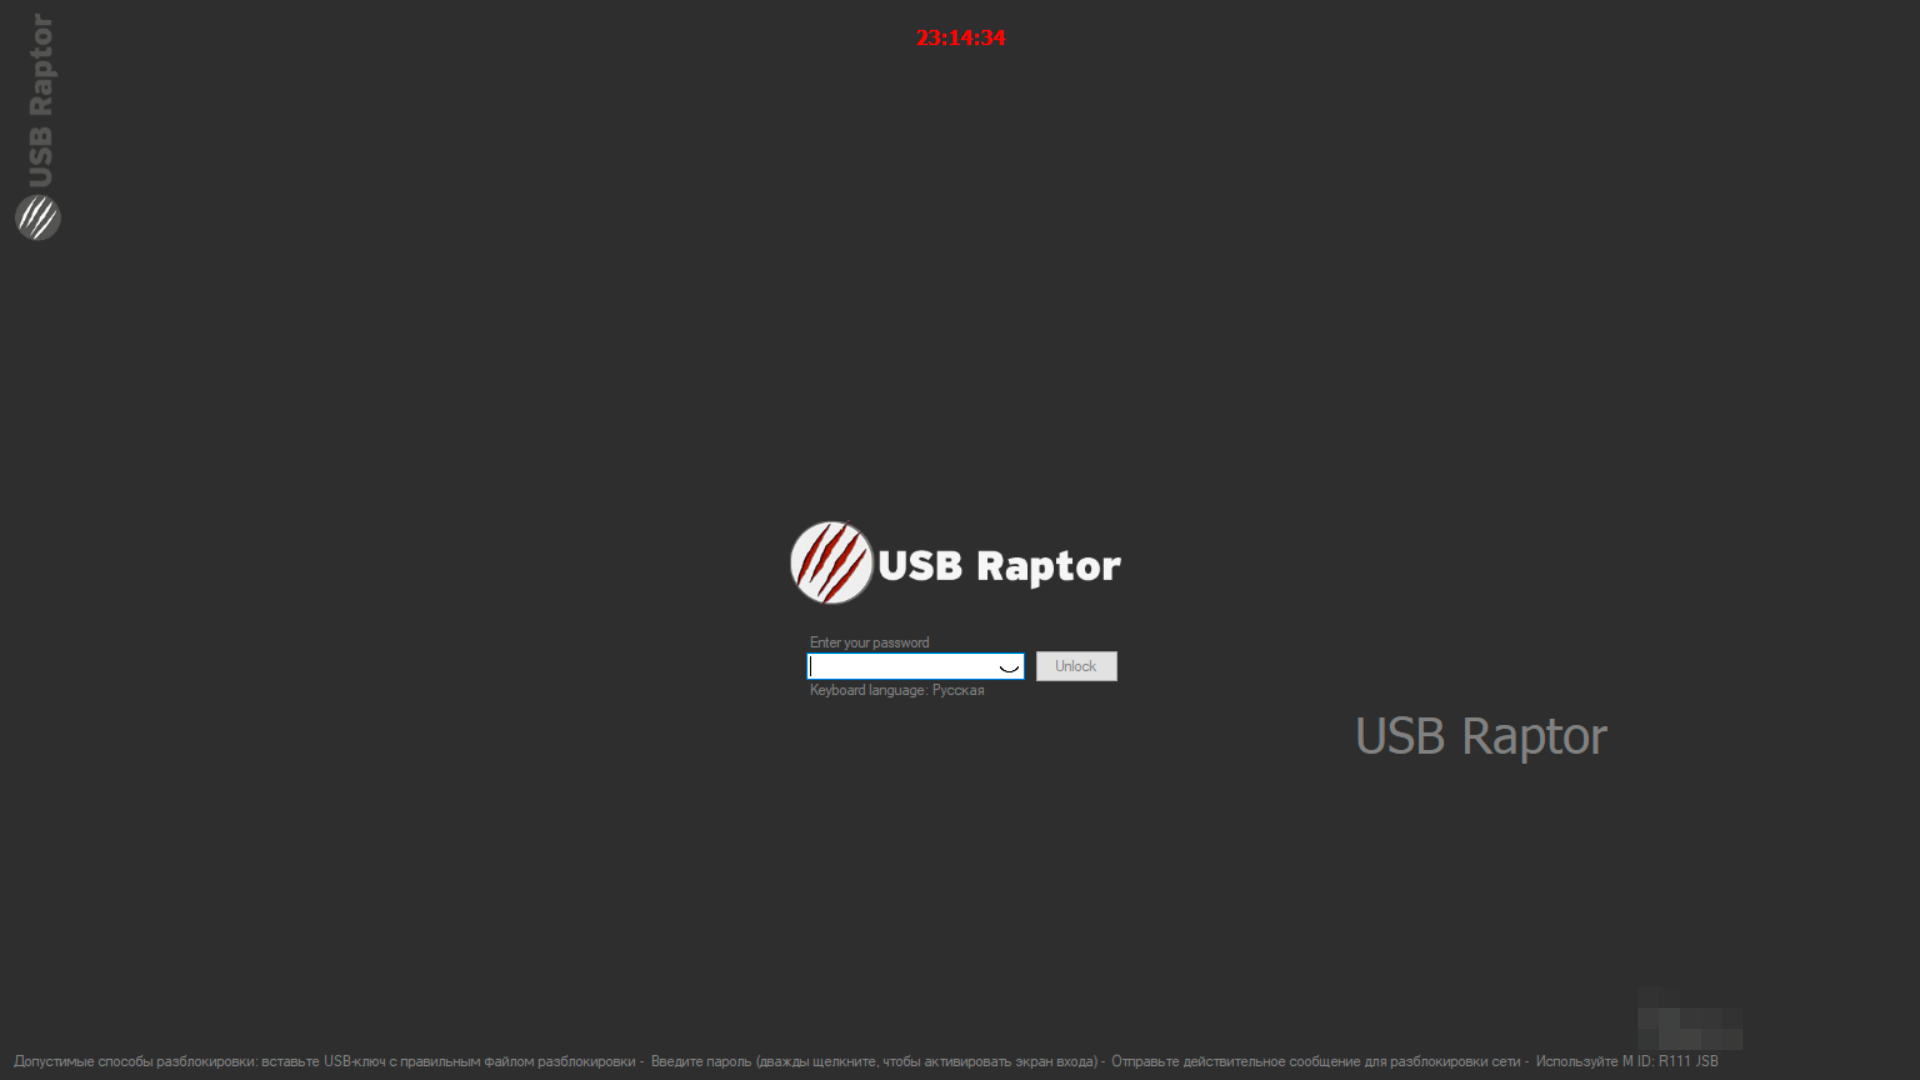
Если флешка будет извлечена из USB-разъёма компьютера, он будет заблокирован. Чтобы разблокировать его, вставьте флешку обратно или дважды щёлкните по экрану, чтобы ввести пароль, установленный ранее.