
Applies ToWindows 11 Windows 10
Создание диска сброса пароля — это мера предосторожности, которая позволяет сбросить пароль локальной учетной записи Windows, если вы забудете его. Диск сброса пароля — это USB-устройство флэш-памяти, которое выступает в качестве средства восстановления, предоставляя вам возможность восстановить доступ к файлам и параметрам, если вы забудете пароль.
Это особенно полезно, так как может избавить вас от сложной потери доступа к вашей учетной записи и данным, особенно если вы не используете учетную запись Майкрософт, которая может сбрасывать пароли через Интернет.
Ниже описано, как создать диск сброса пароля.
-
Обязательно войдите с помощью своей локальной учетной записи. Этот параметр недоступен для учетных записей Майкрософт
-
Подключите USB-устройство флэш-памяти к устройству
-
В поле поиска на панели задач введите панель управления, а затем выберите его в списке результатов.
-
В поле поиска панель управления введите create password reset (Создать сброс пароля).
-
Выберите Создать диск сброса пароля и следуйте остальным инструкциям.
-
По завершении удалите USB-устройство флэш-памяти и сохраните его в безопасном месте.
Примечание: Вам не нужно создавать новый диск при смене пароля.
Нужна дополнительная помощь?
Нужны дополнительные параметры?
Изучите преимущества подписки, просмотрите учебные курсы, узнайте, как защитить свое устройство и т. д.
There is a table for you to have a brief learning about how to create a password reset disk or USB for another PC:
| ⚙️Complex Level | Low, Beginners |
| ⏱️Duration | 2-4 minutes |
| 💻Tools |
|
Forgetting your Windows computer login password can be frustrating as it means you cannot log into the computer. Making a password reset disk for another computer can solve this problem. In this article from EaseUS, we will learn to create a password reset disk for another PC or laptop to regain access. Share this tutorial with more users who need help.
First, let’s see a real user case from the forum:
How do I create a password reset disk on Windows 10 for another computer? — Quora
To better answer this question, we need to learn more about this topic first.
🚩Further Reading: Reset Windows 7 Password With USB Drive, Can’t Create Windows 10 Password Reset Disk
Can You Create a Password Reset Disk for Another Computer
Sure. A password reset disk is a very handy tool that allows you to reset your computer password if you forget it. It is essentially a removable storage device such as a USB flash drive or DVD/CD. The password reset USB or Disk contains the files and instructions needed to reset your password.
You May Also Like to Learn the Following Topics:
In fact, Windows has a tool that can help create a password reset disk, but its limitation is that this password reset disk can only be used on the user’s current computer and not on another computer. So can we make a password reset disk for another computer? Certainly, you need to use a third-party tool, EaseUS Partition Master. Next, we’ll explore the best solutions for creating a password reset disk for another computer and resetting the Windows 10 password, ensuring you never find yourself locked out again.
As just mentioned, the password reset disk created by Windows’ built-in method can only be used on the current computer, and it must be created before the computer is locked or you forget the password. If you have forgotten your password or want to create a Windows password restart disk for other computers, use EaseUS WinRescuer.
It is a comprehensive disk partition management software that provides a series of functions that break the limitations of Windows’ own tools and make it possible and easy to create a password reset USB for another computer. This feature is especially useful if you own multiple computers or need to help someone reset their password.
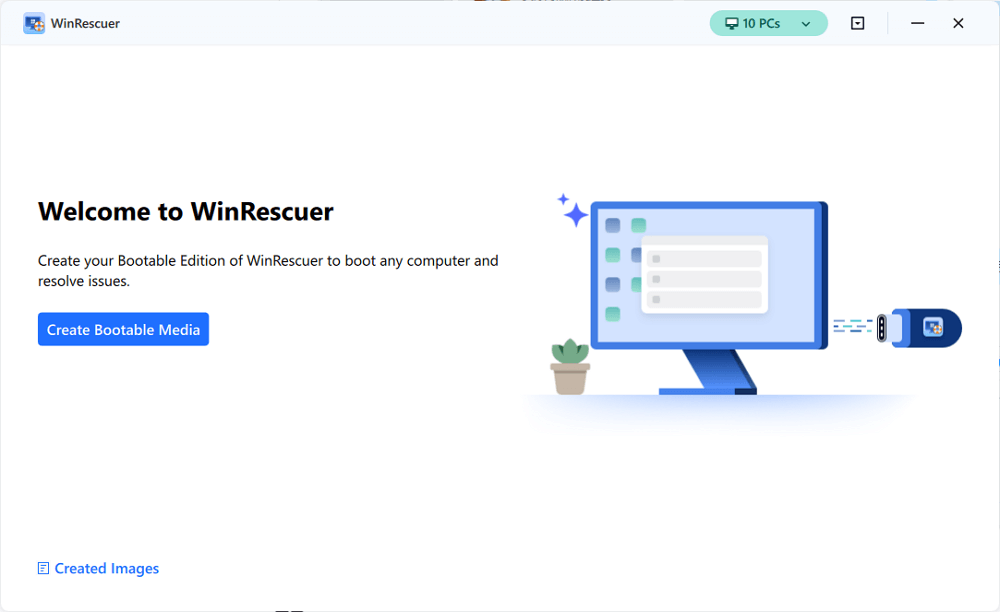
Step 1. Connect the USB drive/external drive to a working computer, open EaseUS WinRescuer, and click «Create Bootable Media.»
Step 2. Select EaseUS Boot Toolkits and other components you need. Then, click «Next.»

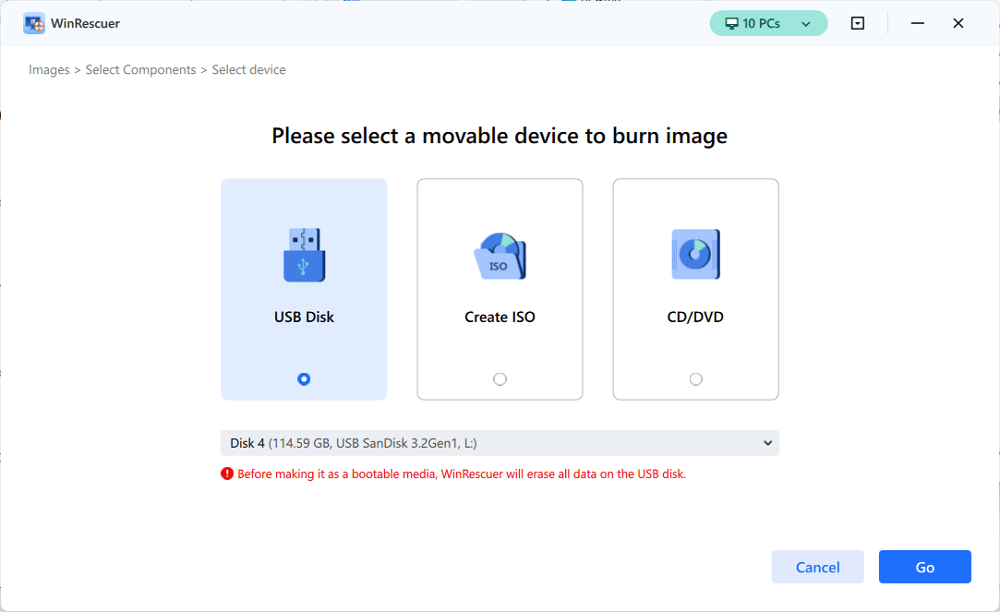
Step 3. Select your movable device and click «Go» to create an image on your USB drive/external drive.
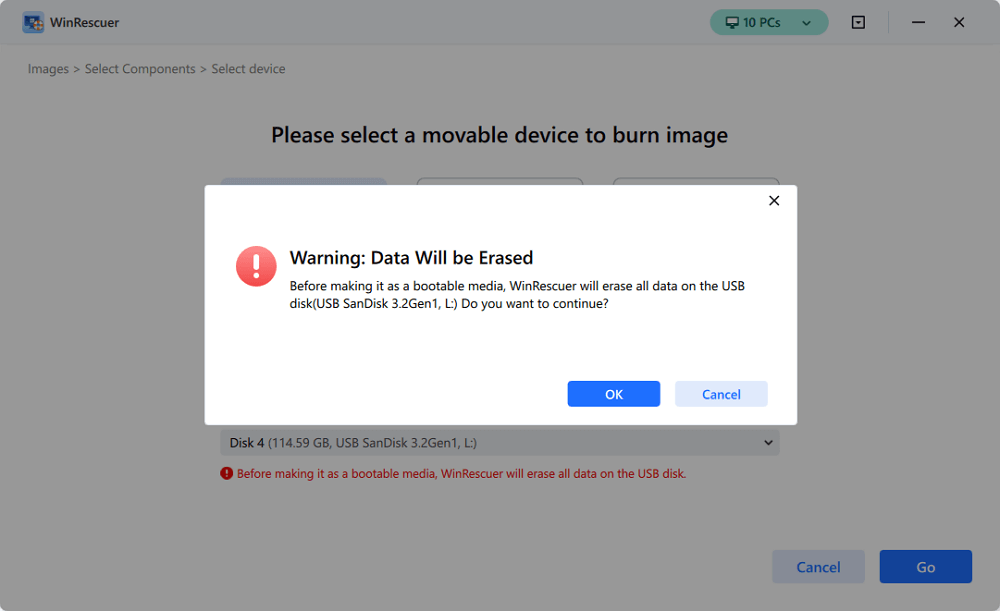
Step 4. Before making the bootable media, you will receive the warning message: data will be erased. Click «OK» to confirm.
Step 5. Connect the created bootable drive to the faulty computer and reboot it by pressing and holding «F2″/»Del» to enter the BIOS. Then, set the WinPE bootable drive as the boot disk and press «F10» to exit.

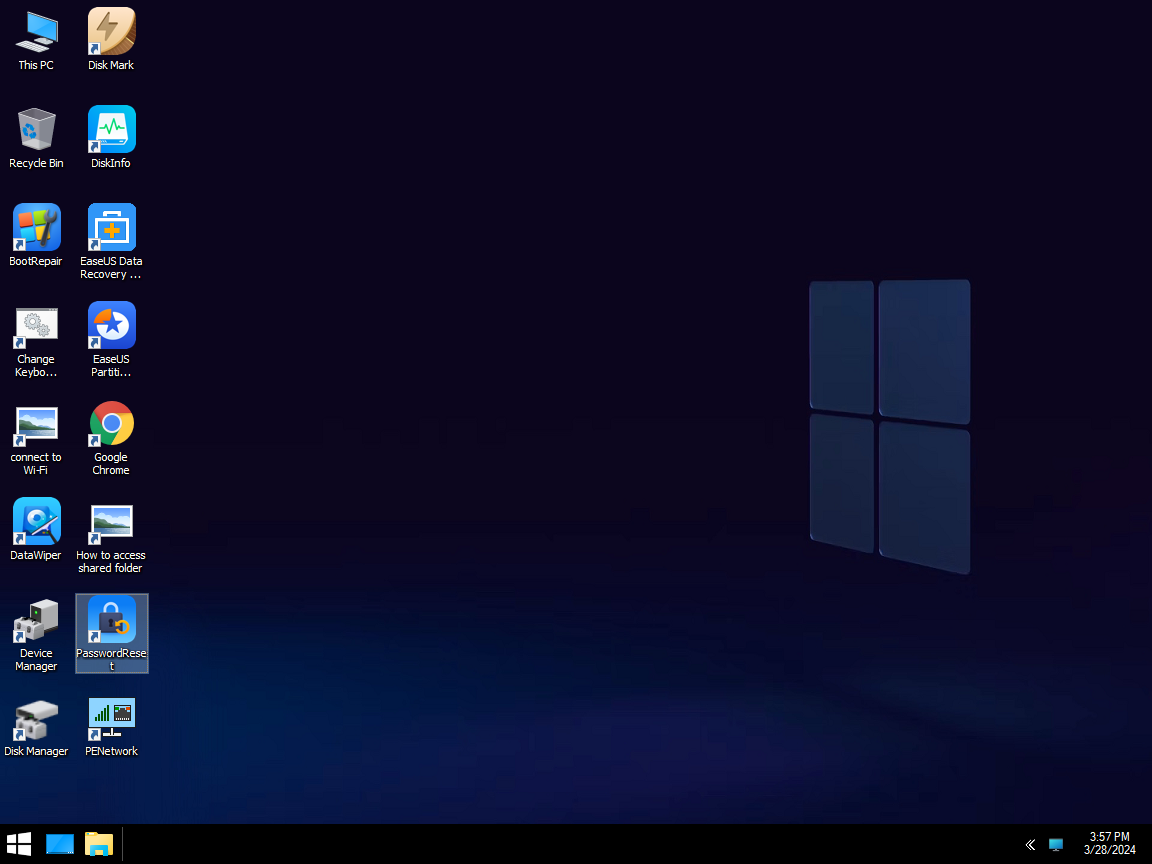
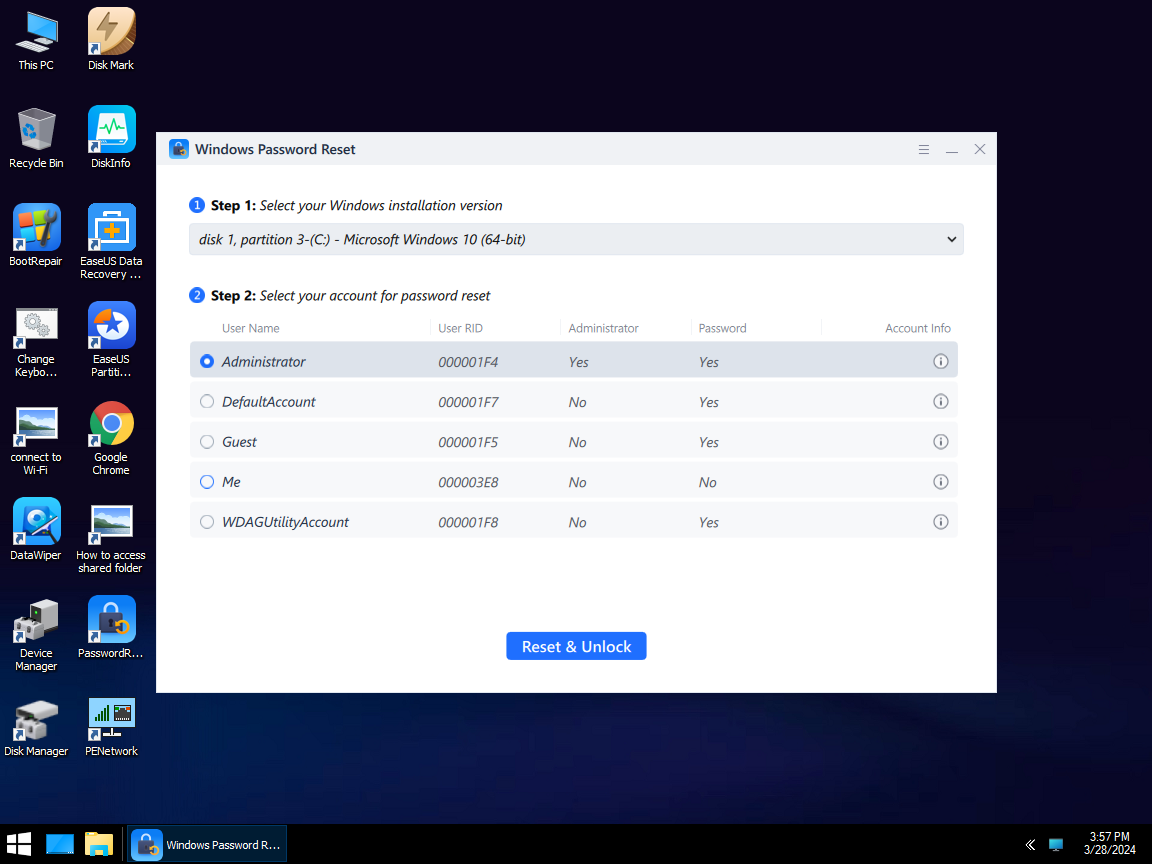
Step 6. Then, the computer will enter WinPE desktop. Find and launch Password Reset.
Step 7. Select your Windows version and choose the Windows account you want to reset.
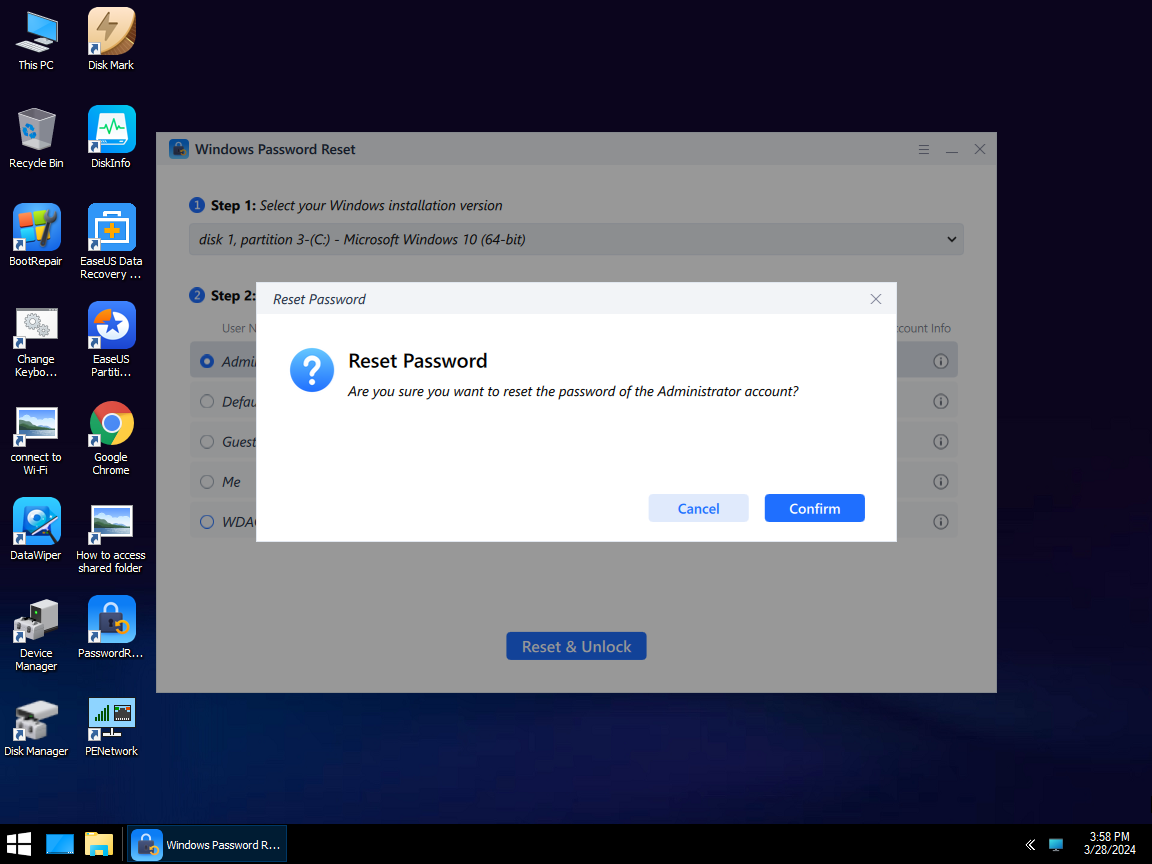
Step 8. When this prompts, click «Confirm» to continue resetting your Windows password.
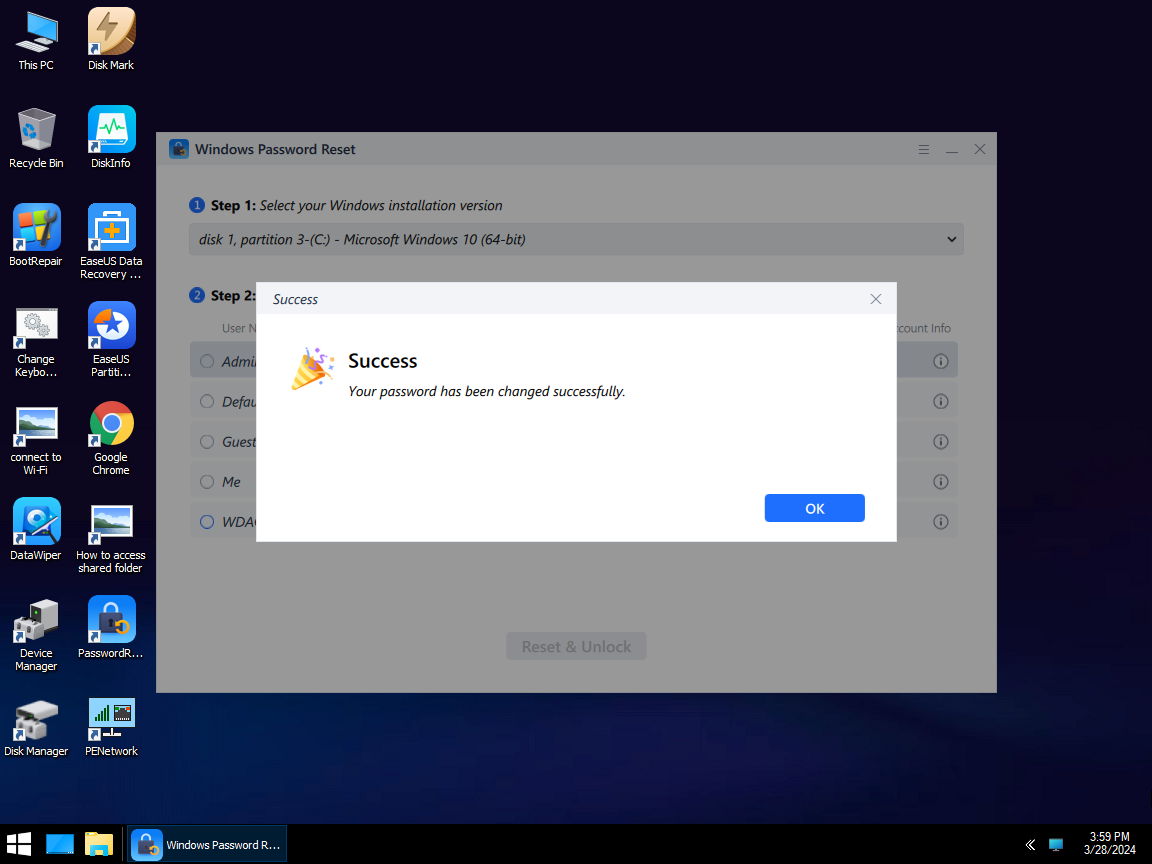
Step 9. Wait patiently, and you will receive an message that the password has been changed successfully. Click «OK» to complete the password reset process.
If you are interested in how to reset a forgotten Windows password without losing data, you may also like the guide video below:
This is how to create a Windows Password reset disk for another PC and unlock the target PC. Now, let’s see more features of EaseUS Partition Master:
- Reset Windows 10 forgotten password
- One-click remove the Windows 10 password
- Create bootable USB for locked laptops/PC
- Reset Windows 10 password without a disk
- Remove Microsoft login passwords safely and efficiently
You can use EaseUS Partition Master to create a password reset disk for another computer. This powerful software simplifies the entire process, ensuring you have a reliable password reset disk to regain access to any computer if you forget your password.
Conclusion
When people forget their Windows password and can’t log into their computer, they regret not creating a password reset disk beforehand. Therefore, it is very necessary to make a password reset disk. This page explains how to use tools to create a Windows password reset disk for other computers.
Password reset USBs created by EaseUS Partition Master can be used on different computers without the need to lock the system or perform a reinstallation. Don’t hesitate to share this tool and how to use it with more people.
Create the Password Reset Disk for Another PC FAQs
It can be possible and easy to create a password reset disk for another PC. Do you have any further questions about this topic? If you do, check the following questions and answers.
1. Are password reset disks universal?
Typically, A password reset disk created by the Windows built-in tools will only work on the computer it was made on. If you want to use a password reset disk on another PC, you can use EaseUS Partition Master to create a password reset disk.
2. How can I create a password reset disk if I forget my password?
Follow these steps, and you can create a password reset disk:
- To create a password reset disk, log in to Windows using the local account
- Insert a USB drive or connect an external hard drive to the computer.
- Type Password Reset in the search box and choose Create a password reset disk. Then, click next to continue.
- Select the USB disk to create the password key disk, and click Next.
- Enter the current account password and click Next.
- Click Next, wait for a moment, and click Finish.
3. How to unlock a laptop using the password reset disk?
Follow these steps to unlock your laptops using the password reset USB:
- Boot the PC and enter the key in the password.
- Click OK when the password fails.
- Insert the Password Reset Disk and choose Reset Password.
- Click Next to continue.
- Choose the Password Reset Disk option and click Next.
- Type and confirm a new password.
- Create a password hint.
- Click Next to finish the process.
Если вам потребовалась загрузочная (хотя необязательно) USB флешка для сброса пароля Windows 7, 8 или Windows 10, в этой инструкции вы найдете 2 способа сделать такой накопитель и информацию о том, как им пользоваться (а также некоторые ограничения, присущие каждому из них). Отдельное руководство: Сброс пароля Windows 10 (с помощью простой загрузочной флешки с ОС).
Отмечу также, что у меня описан и третий вариант — установочная флешка или диск с дистрибутивом Windows также может быть использован для сброса пароля на уже установленной системе, о чем я писал в статье Простой способ сбросить пароль Windows (должен подойти для всех последних версий ОС, начиная с Windows 7).
Официальный способ сделать USB флешку для сброса пароля
Первый способ создания USB накопителя, который можно использовать, если вы забыли пароль для входа в Windows, предоставляется встроенными средствами операционной системы, но имеет существенные ограничения, которые делают его достаточно редко используемым.
Прежде всего, он подойдет лишь в том случае, если прямо сейчас вы можете зайти в Windows, а флешку создаете на будущее, если вдруг понадобится сбросить забытый пароль (если это не про вас — можно сразу переходить к следующему варианту). Второе ограничение — подойдет он только для сброса пароля локального аккаунта (т.е. если в Windows 8 или Windows 10 вы используете аккаунт Microsoft, данный метод не сработает).
Сам порядок создания флешки выглядит следующим образом (работает одинаково в Windows 7, 8, 10):
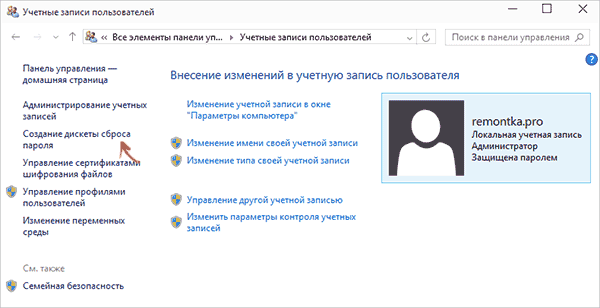
- Зайдите в Панель управления Windows (вверху справа выберите «Значки», а не категории), выберите пункт «Учетные записи пользователей».

- Нажмите по пункту «Создание дискеты сброса пароля» в списке слева. Если у вас не локальный аккаунт, то такого пункта не будет.
- Следуйте инструкциям мастера забытых паролей (очень простым, буквально три шага).


В результате на ваш USB накопитель будет записан файл userkey.psw, содержащий информацию, необходимую для сброса (и этот файл, при желании, можно перенести на любую другую флешку, все будет работать).
Чтобы использовать флешку, подключите ее к компьютеру и при входе в систему введите неправильный пароль. Если это локальная учетная запись Windows, то вы увидите, что ниже поля ввода появится пункт для сброса. Нажмите по нему и следуйте указаниям мастера.
Online NT Password & Registry Editor — мощный инструмент сброса паролей Windows и не только
Утилитой Online NT Password & Registry Editor я впервые успешно воспользовался около 10 лет назад и с тех пор она не потеряла актуальности, не забывая регулярно обновляться.
Данная бесплатная программа может быть помещена на загрузочную флешку или диск и использоваться для сброса пароля локальной учетной записи (и не только) Windows 7, 8, 8.1 и Windows 10 (а также предыдущих версий ОС от Microsoft). Если же у вас одна из последних версий и при этом используется не локальный, а онлайн аккаунт Microsoft для входа, с помощью Online NT Password & Registry Editor вы все равно сможете получить доступ к компьютеру обходным путем (тоже покажу).
Внимание: сброс пароля на системах, где используется шифрование файлов EFS приведет к тому, что эти файлы станут недоступны для чтения.
А теперь руководство по созданию загрузочной флешки для сброса пароля и инструкция по ее использованию.
- Зайдите на официальную страницу загрузки образа ISO и файлов загрузочной флешки Online NT Password & Registry Editor http://pogostick.net/~pnh/ntpasswd/bootdisk.html, пролистайте ее ближе к середине и загрузите последний релиз для USB (там же есть и ISO для записи на диск).

- Распакуйте содержимое архива на флешку, желательно на пустую и обязательно не на являющуюся загрузочной в настоящий момент.
- Запустите командную строку от имени администратора (в Windows 8.1 и 10 через правый клик по кнопке Пуск, в Windows 7 — отыскав командную строку в стандартных программах, потом через правый клик).
- В командной строке введите e:\syslinux.exe -ma e: (где e — буква вашей флешки). Если увидите сообщение об ошибке, выполните ту же команду, убрав из нее параметр -ma

Примечание: если по какой-то причине данный способ не сработал, то вы можете загрузить ISO образ данной утилиты и записать ее на флешку с помощью WinSetupFromUSB (используется загрузчик SysLinux).
Итак, USB накопитель готов, подключите его к компьютеру, где нужно сбросить пароль или же получить доступ к системе другим способом (если используется учетная запись Microsoft), поставьте загрузку с флешки в БИОС и приступите к активным действиям.
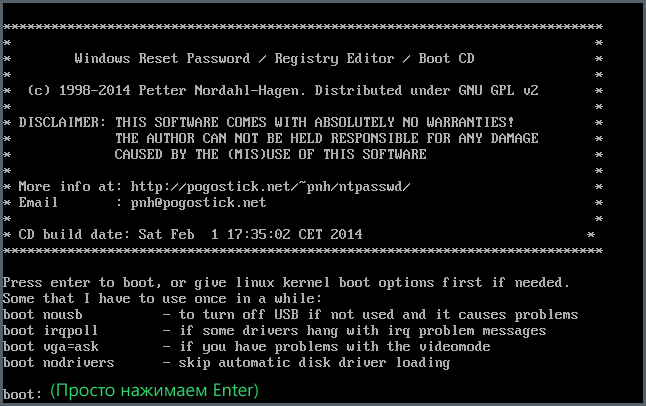
После загрузки, на первом экране вам будет предложено выбрать опции (в большинстве случаев можно просто нажать Enter, ничего не выбирая. Если в этом случае возникают проблемы, то используйте одну из опций, путем ввода указанных параметров, например, boot irqpoll (после этого — нажатие Enter), если возникают ошибки, связанные с IRQ.
На втором экране будет показан список разделов, в которых были обнаружены установленные Windows. Вам требуется указать номер этого раздела (есть и другие опции, в детали которых тут вдаваться не буду, тот кто ими пользуется и без меня знает, зачем. А обычным пользователям они не понадобятся).

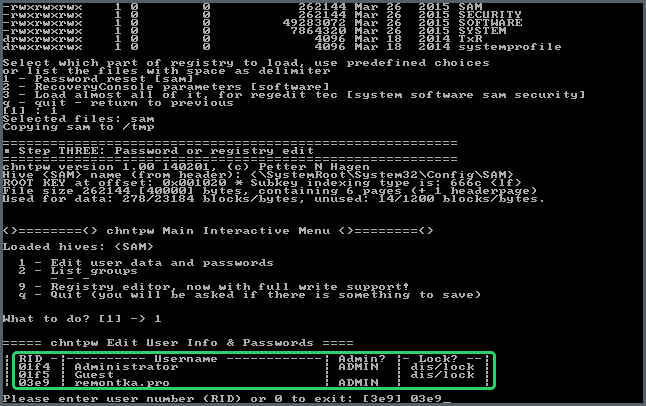
После того, как программа убедится в наличии необходимых файлов реестра в выбранном Windows и возможности операций записи на жесткий диск, вам будет предложены несколько вариантов, из которых нас интересует Password reset (сброс пароля), который и выбираем путем ввода 1 (единицы).

Далее выбираем опять 1 — Edit user data and passwords (редактирование пользовательских данных и паролей).

Со следующего экрана начинается самое интересное. Вы увидите таблицу пользователей, являются ли они администраторами, а также заблокированы или задействованы эти учетные записи. В левой части списка указаны номера RID каждого пользователя. Выбираем нужного путем ввода соответствующего номера и нажатием Enter.
Следующий шаг позволяет выбрать нам несколько действий при вводе соответствующей цифры:
- Сбросить пароль выбранного пользователя
- Разблокировать и задействовать пользователя (Как раз эта возможность позволяет на Windows 8 и 10 с аккаунтом Microsoft получить доступ к компьютеру — просто на предыдущем этапе выберите скрытый аккаунт Администратора и включите его с помощью данного пункта).
- Сделать выбранного пользователя администратором.
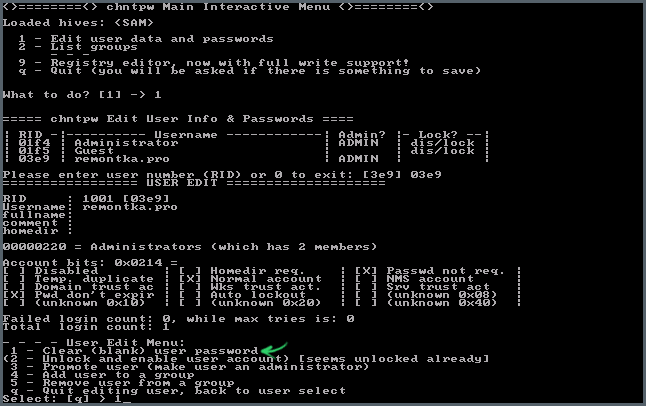
Если ничего не выбирать, то по нажатию Enter вы вернетесь к выбору пользователей. Итак, для сброса пароля Windows выбираем 1 и нажимаем Enter.

Вы увидите информацию о том, что пароль был сброшен и снова то же меню, что вы видели на предыдущем шаге. Для выхода нажимаем Enter, при следующем выборе — q, и, наконец, для сохранения сделанных изменений вводим y на запрос.
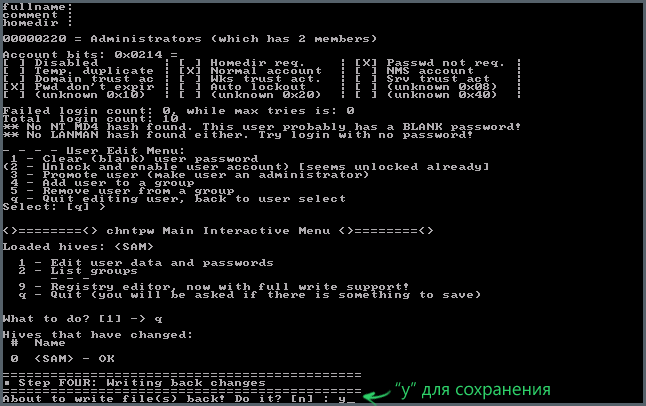
На этом сброс пароля Windows с помощью загрузочной флешки Online NT Password & Registry Editor завершен, вы можете извлечь ее из компьютера и нажать Ctrl+Alt+Del для перезагрузки (и поставить загрузку с жесткого диска в БИОС).
(Image credit: Future)
On Windows 10, forgetting a password and the security questions can be one of the more frustrating things to deal with, and if you’re unlucky enough to have forgotten the account password, you may be cursing to the heavens. The good news is you can avoid this by creating a password reset disk.
A password reset disk is a file you create on a USB drive, allowing you to reset your password from the Sign-in screen. The best part about the password reset disk is you only have to create it once, and it will work forever, no matter how many times you use it.
A password reset disk only works with a local account on your computer, not a Microsoft account. The steps for recovering a Microsoft account password are different.
This how-to guide will walk you through the steps to create a password recovery disk and the instructions to reset a password from the sign-in screen on Windows 10.
How to create a password reset disk on Windows 10
To create a password reset disk, connect a USB flash drive on your computer, and then use these steps:
- Open Control Panel.
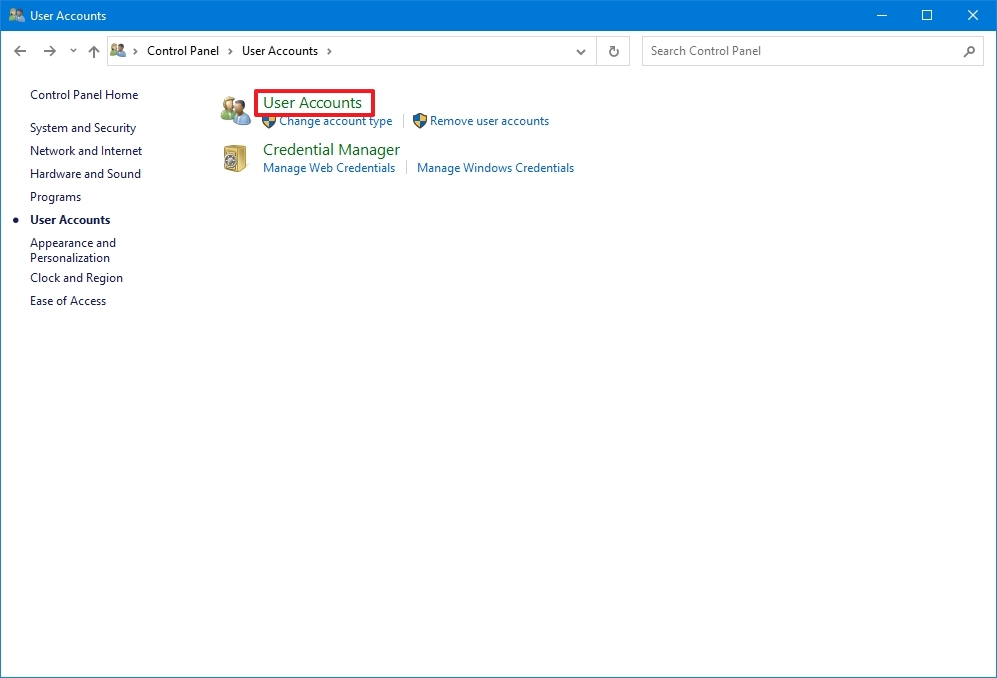
- Click on User Accounts.
- Click on User Accounts again.
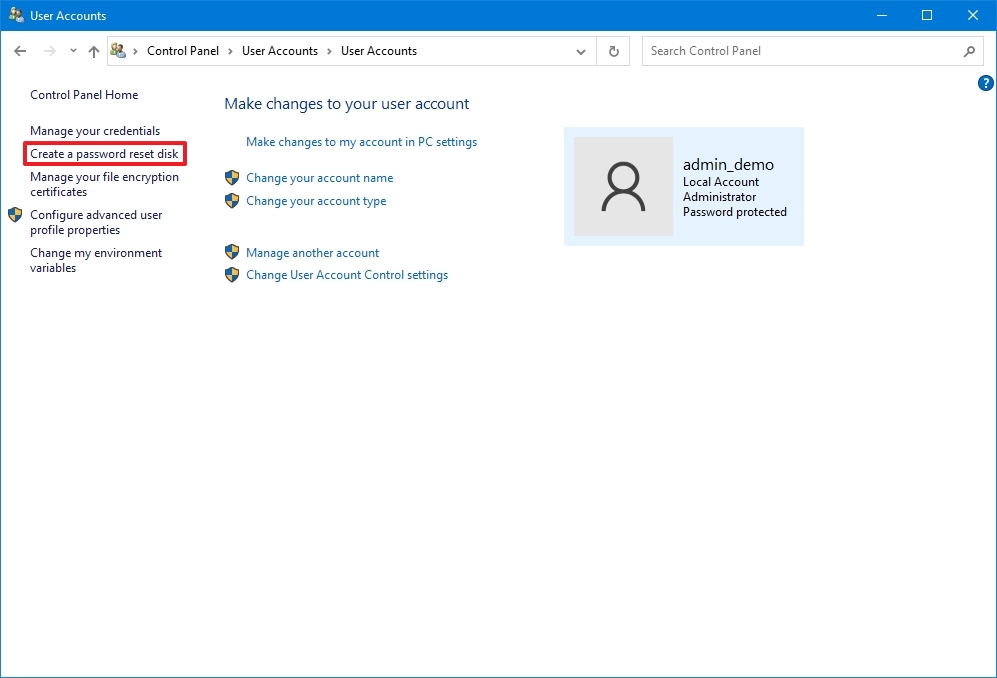
- Click the «Create a password reset disk» option from the left navigation pane.
- Click the Next button.
- Select the USB flash drive from the list.
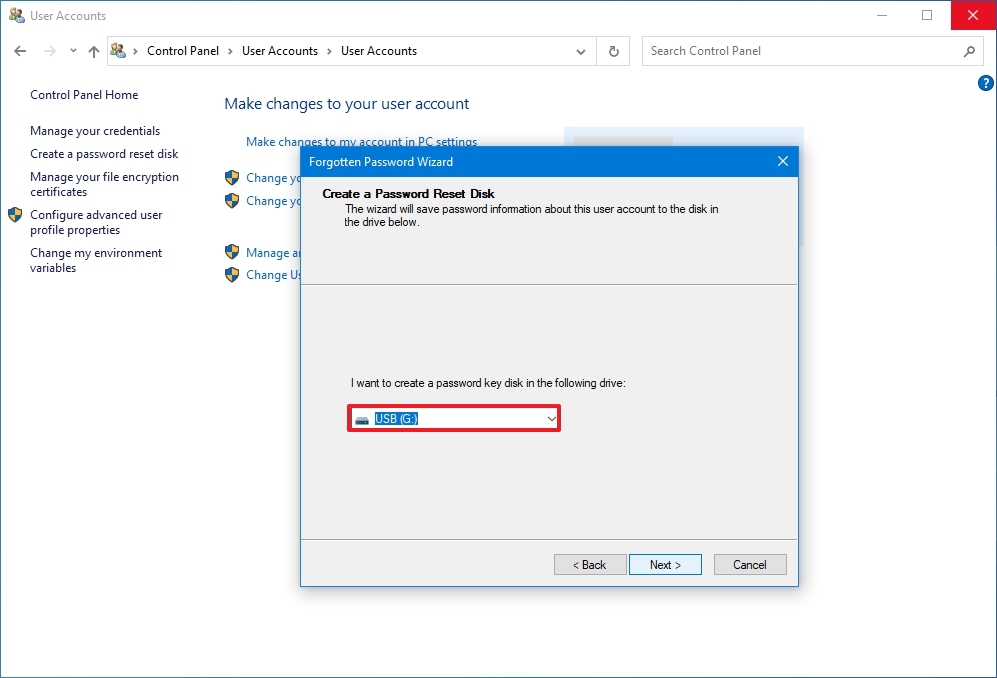
- Click the Next button.
- Confirm your current account password.
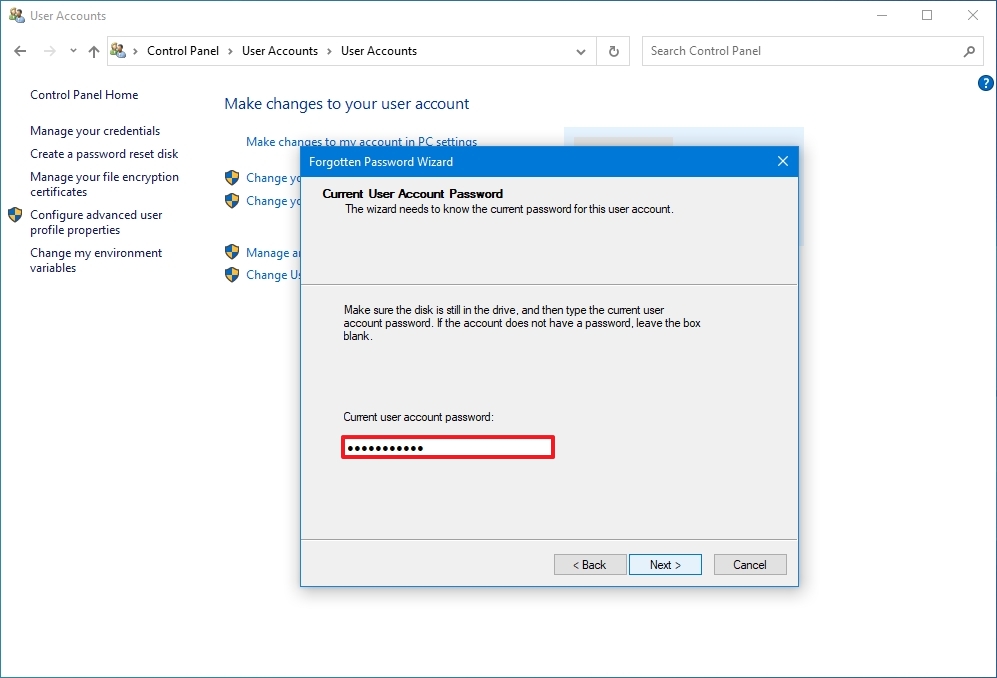
- Click the Next button.
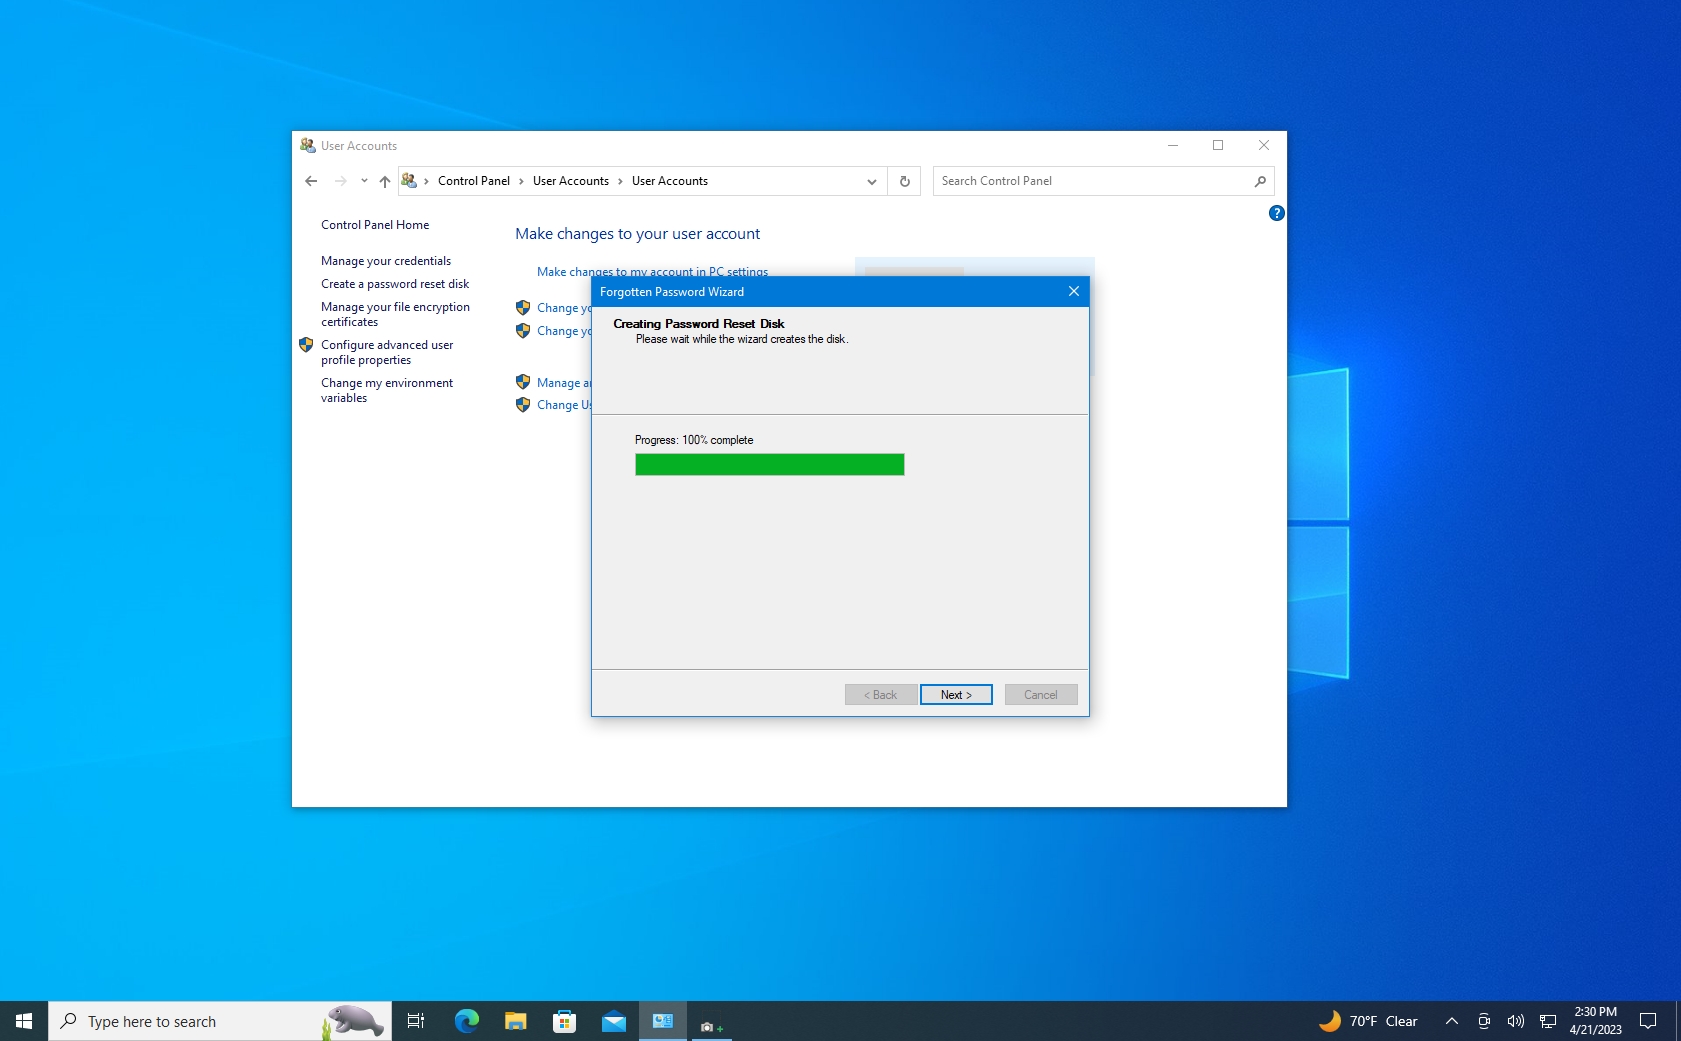
- Click the Next button again once the recovery disk is created.
- Click the Finish button.
Once you complete the steps, the USB flash drive will be created, but don’t lose it because anyone with it can get into your account easily. And don’t forget to put it in a safe place, maybe think about labeling it, and remember where you stashed it.
How to use a password reset disk on Windows 10
If you’ve forgotten your password and the password hint you provided isn’t working, you can now use the password reset disk to save the day.
All the latest news, reviews, and guides for Windows and Xbox diehards.
To reset your account password with the reset disk, connect the USB flash drive with the reset information and use these steps:
- Click the Sign-in options setting.

- Choose the password option.
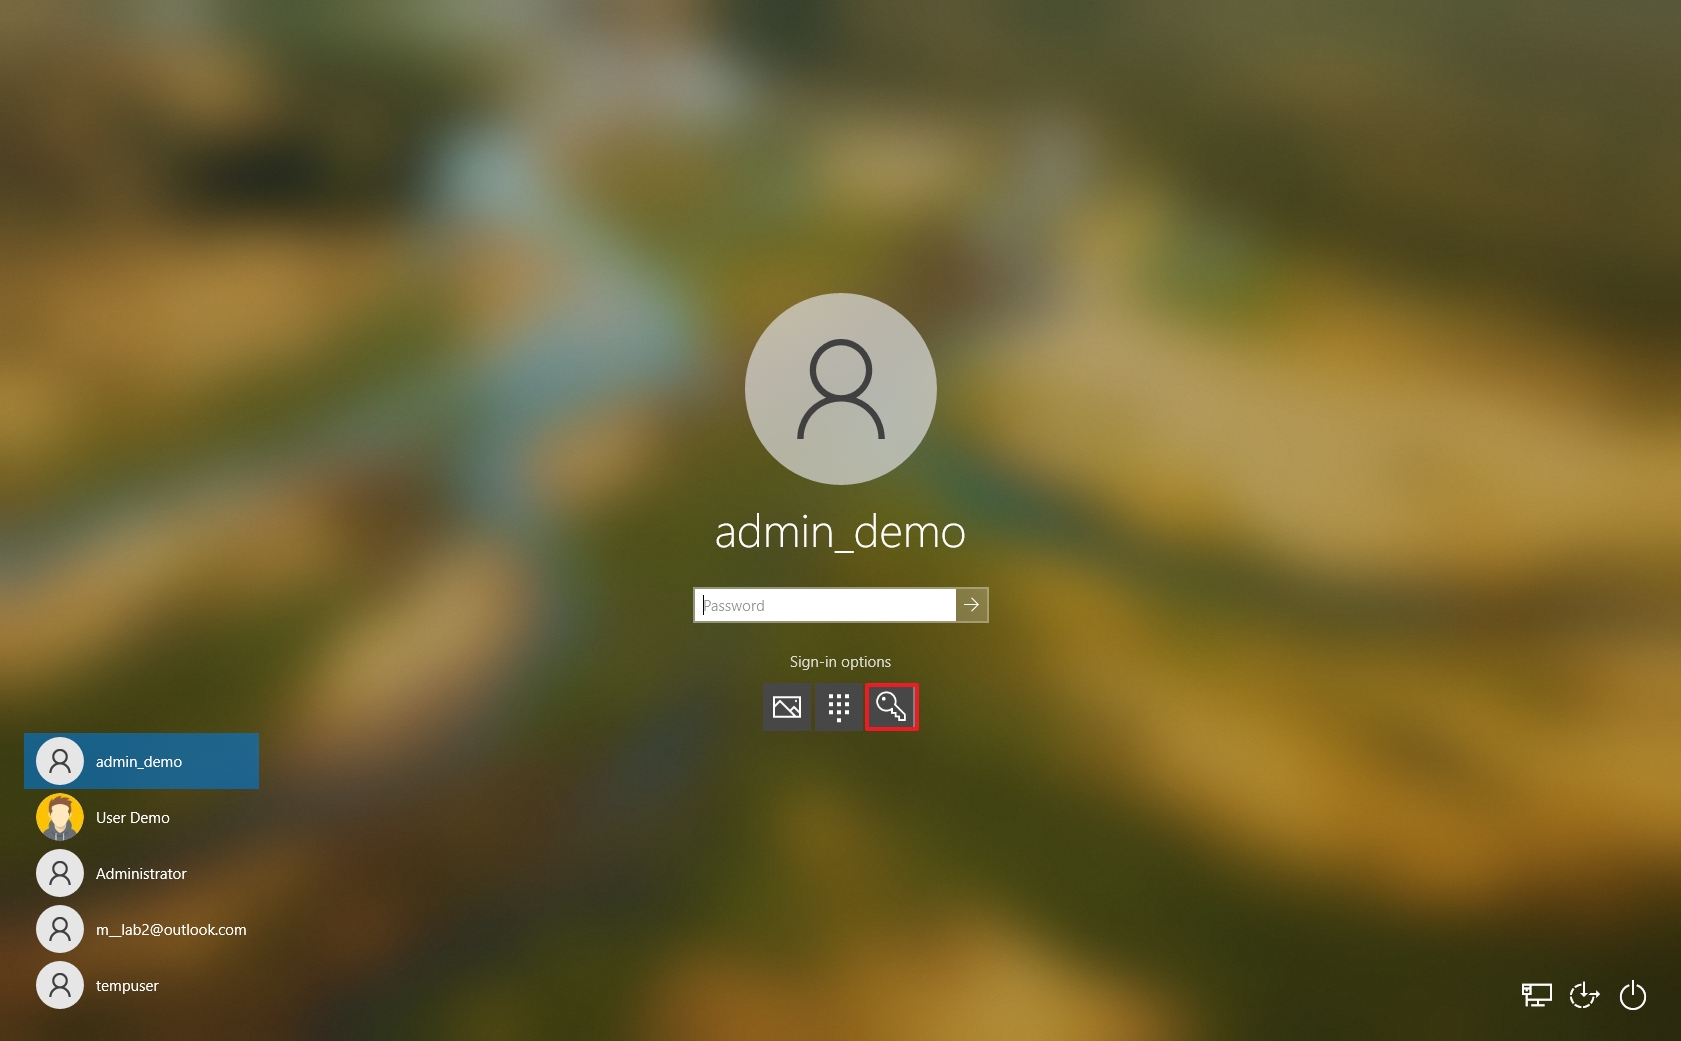
- Click the Submit button next to the password field.
- Click the OK button.
- Click the Reset password option.

- Under the security questions, click the «Use a password reset disk instead» option.
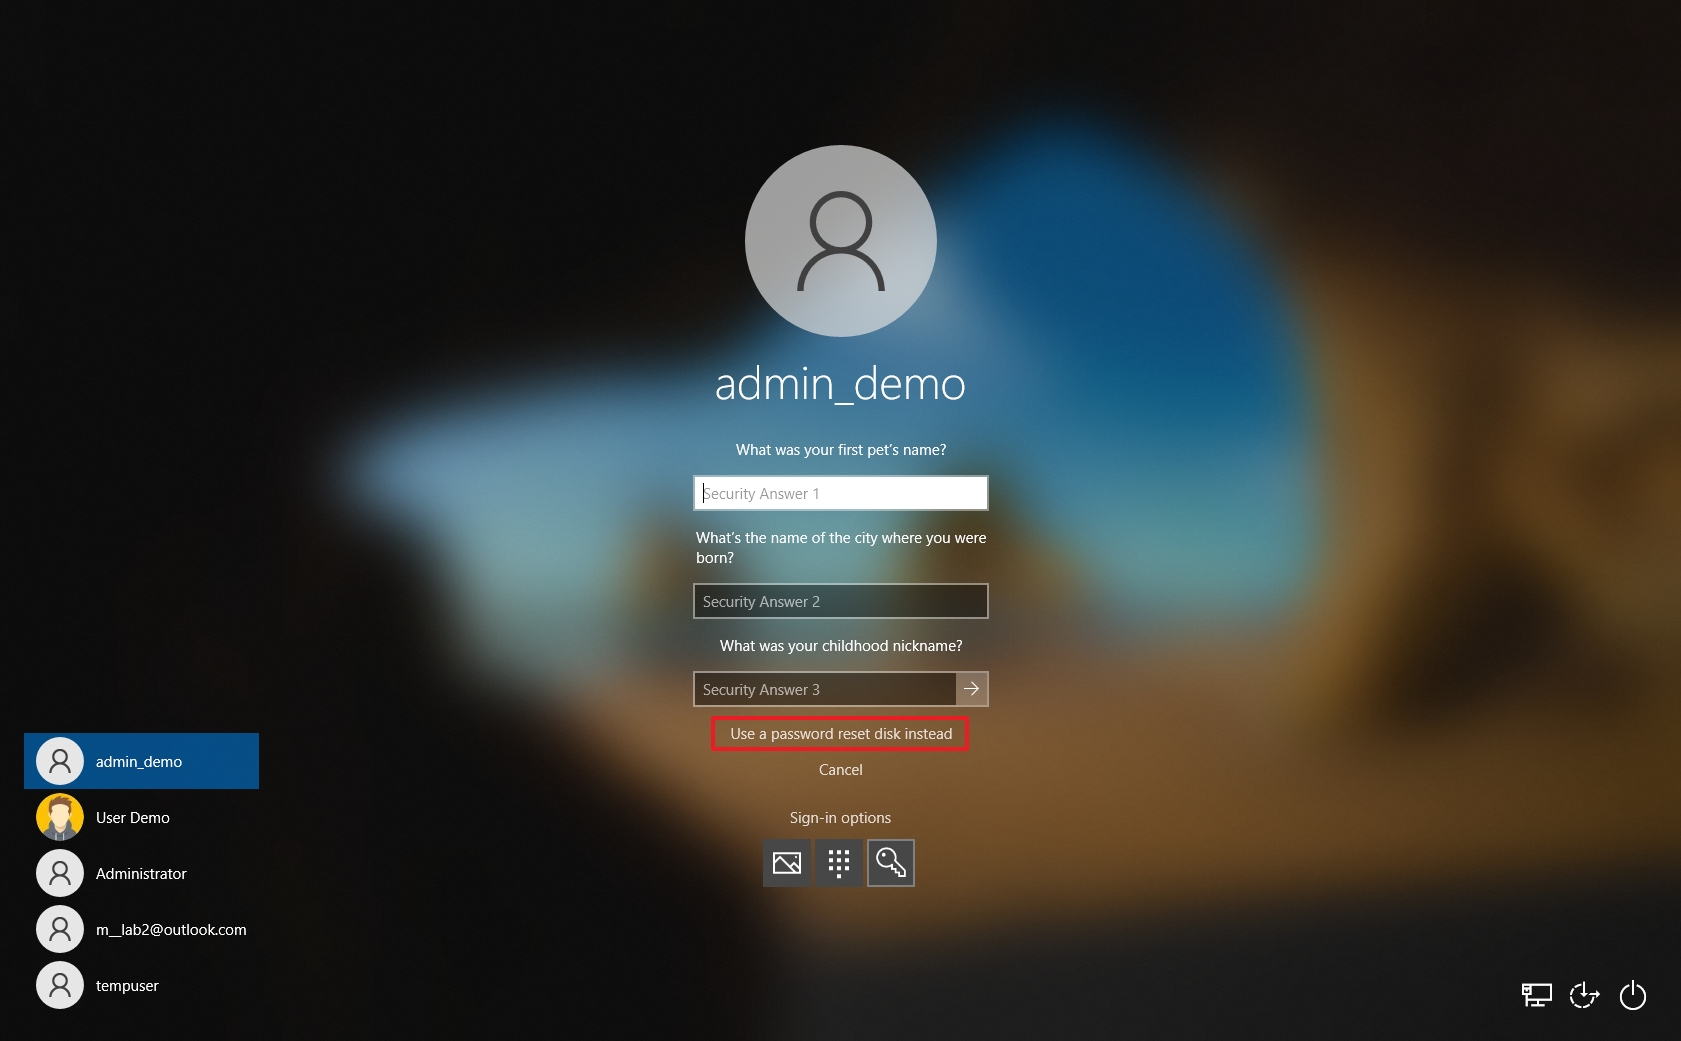
- Click the Next button.
- Select the USB flash drive with the password reset information.
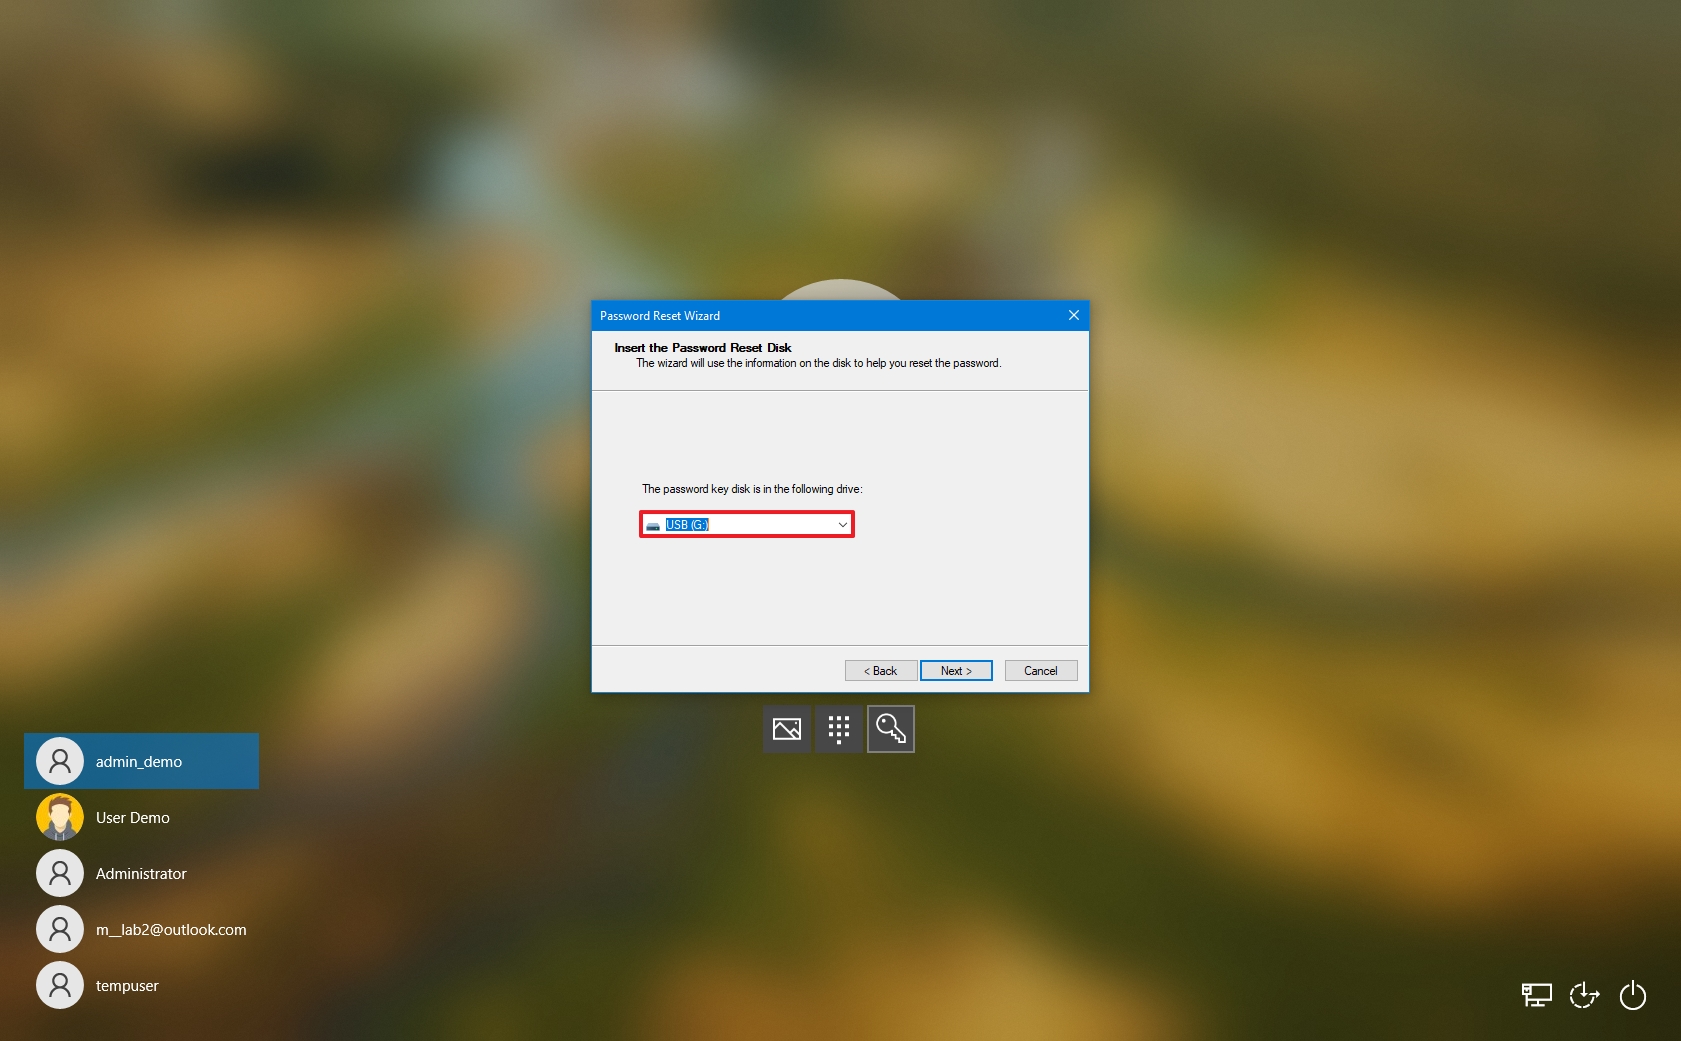
- Click the Next button.
- Create a new password and password hint for the account.
- Click the Next button.
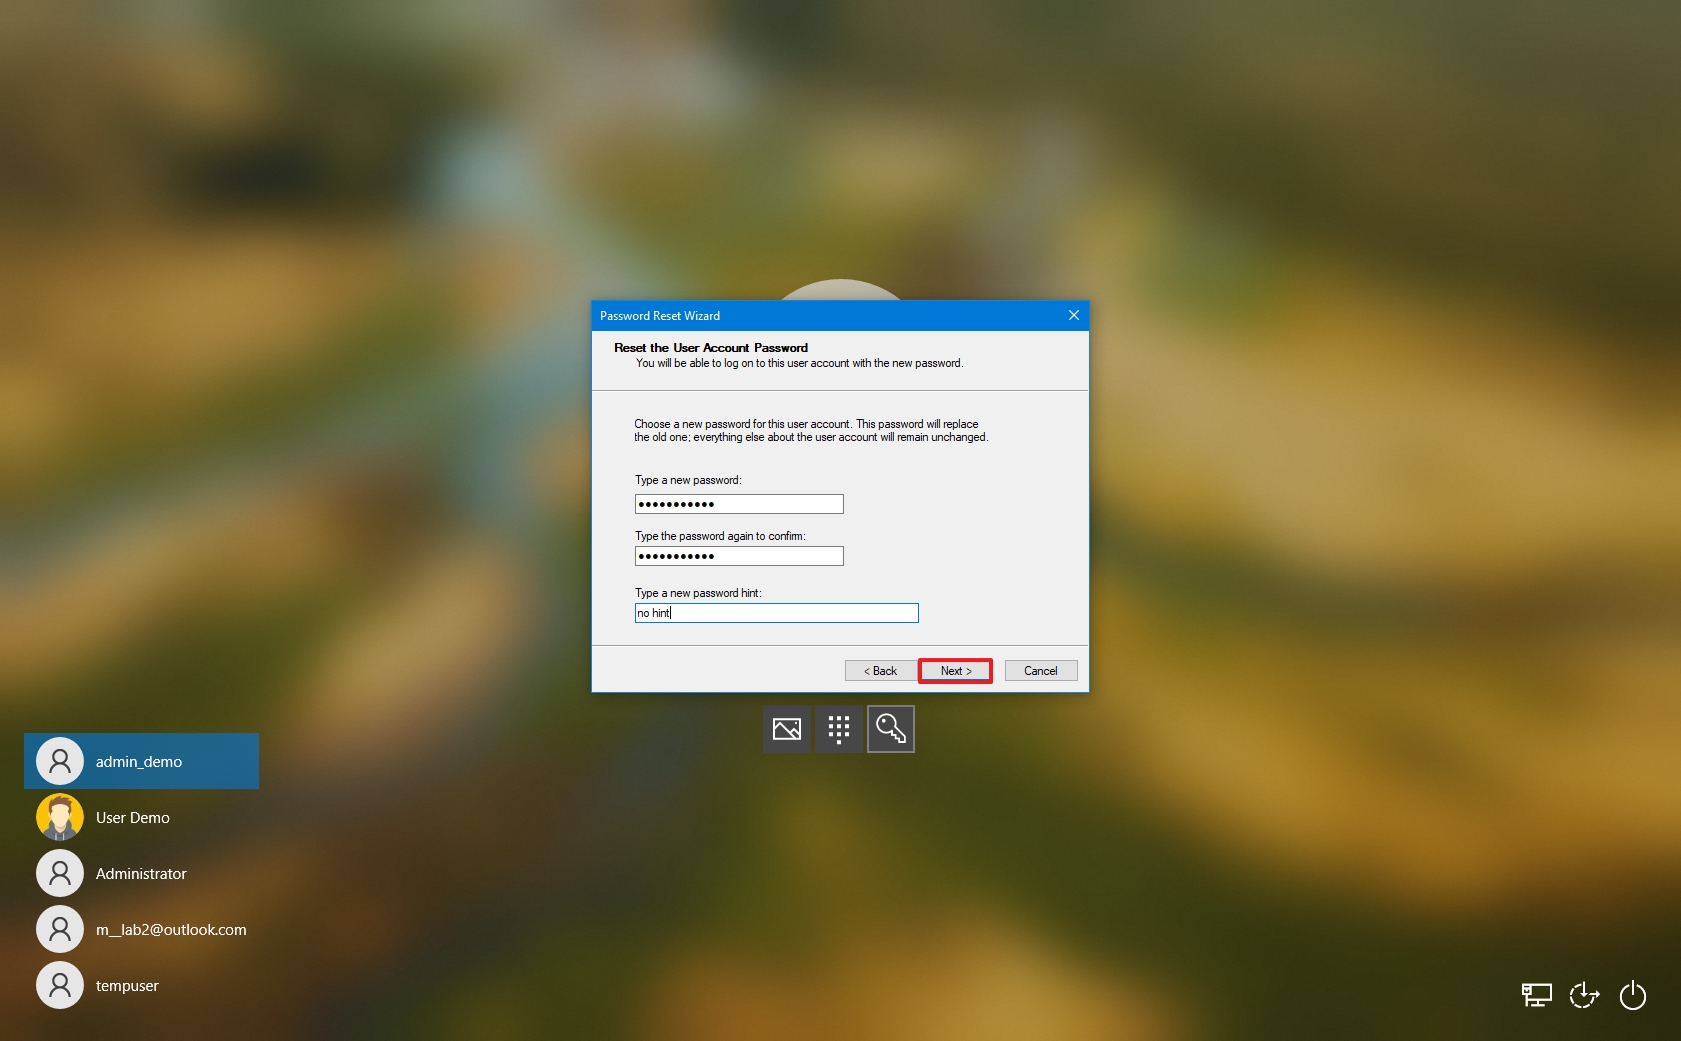
- Click the Finish button.
After you complete the steps, the password to your account will be reset. You can now sign into your account with the new password you just created.
More resources
For more helpful articles, coverage, and answers to common questions about Windows 10, visit the following resources:
- Windows 11 on Windows Central — All you need to know
- Windows 10 on Windows Central — All you need to know

Cutting-edge operating system
A refreshed design in Windows 11 enables you to do what you want effortlessly and safely, with biometric logins for encrypted authentication and advanced antivirus defenses.
Mauro Huculak has been a Windows How-To Expert contributor for WindowsCentral.com for nearly a decade and has over 15 years of experience writing comprehensive guides. He also has an IT background and has achieved different professional certifications from Microsoft, Cisco, VMware, and CompTIA. He has been recognized as a Microsoft MVP for many years.