
If you’re a tech enthusiast or need to back up or modify your laptop’s BIOS (Basic Input/Output System), you might be wondering how to dump the BIOS from your laptop. Whether it’s for troubleshooting, upgrading, or recovering a corrupted BIOS, the process requires some technical steps. In this guide, I will walk you through the methods of dumping your BIOS using both software tools and hardware techniques, ensuring that you can perform this task safely and effectively.
What is BIOS Dumping?
Before diving into the process, it’s important to understand what BIOS dumping is. BIOS dumping refers to the process of extracting the BIOS firmware from the motherboard of your laptop. The BIOS is a crucial component that allows your operating system to boot up. Dumping your BIOS means creating a backup copy of this firmware, which is helpful for situations like:
- Recovering from a failed BIOS update.
- Diagnosing issues with the BIOS.
- Restoring a corrupted BIOS to factory settings.
- Customizing BIOS settings or modifying firmware.
The process of dumping the BIOS can be useful if you need to tweak settings or reinstall a corrupted version. Let’s dive into the methods for dumping your laptop’s BIOS.
How to Dump the BIOS from Your Laptop: Software Methods
Method 1: Using Flashrom
One of the most popular tools for dumping BIOS from your laptop is Flashrom. Flashrom is an open-source utility that allows you to read, write, and verify the contents of your BIOS chip. It works well for Linux and Windows systems.
Steps to Use Flashrom:
- Install Flashrom: Download and install Flashrom for your operating system (Linux, Windows, or macOS). If you’re using Linux, you can install it using package managers like apt-get or yum. For Windows, download the installer from the official website.
- Run Flashrom: Open your command-line interface (CLI) and run Flashrom with administrator privileges. If you’re on Linux, you may need to use sudo to grant root permissions.
- Detect BIOS Chip: Flashrom will automatically detect your BIOS chip and the connected device. If your system doesn’t automatically recognize the chip, you might need to specify your motherboard’s chipset in the command line.
- Dump BIOS: Once Flashrom detects your BIOS chip, you can use the command flashrom -r bios_backup.bin to dump the BIOS into a binary file. This file will be stored in the specified location, typically on your desktop or a designated folder.
Flashrom is particularly effective for users with a bit of technical know-how, as it requires some command-line interaction.
Method 2: Using Manufacturer-Specific Tools
Many major laptop manufacturers, such as Dell, HP, Lenovo, and Asus, offer their own proprietary BIOS update tools that include options for dumping or backing up the BIOS. These tools are often built into the BIOS update utility itself.
Steps to Use Manufacturer-Specific Tools:
- Visit the Manufacturer’s Website: Go to your laptop manufacturer’s official support page. Search for the BIOS update utility specific to your laptop model.
- Download the Tool: Download the BIOS update tool or utility for your specific system model. Many of these tools have options to create a backup of your current BIOS before updating it.
- Run the Utility: Follow the on-screen instructions in the BIOS update utility. Most of these tools will have a clear option for dumping or backing up the BIOS.
- Save the BIOS File: After the process is completed, the tool will save the BIOS in a .bin file format, which you can use for future restorations or modifications.
These tools tend to be more user-friendly and are great for those who aren’t as familiar with command-line utilities like Flashrom.
Method 3: Using Universal BIOS Backup Toolkit
If your laptop manufacturer doesn’t offer a BIOS dumping utility, you can use third-party software like the Universal BIOS Backup Toolkit. This free tool works on most laptops and can help you extract the BIOS.
Steps to Use the Universal BIOS Backup Toolkit:
- Download the Toolkit: Find and download the Universal BIOS Backup Toolkit from a trusted source. Be cautious of the website you download it from, ensuring it’s secure and free of malware.
- Run the Program: After installing the tool, run the program with administrator privileges. You might need to disable antivirus software temporarily since some security tools flag BIOS-related programs as suspicious.
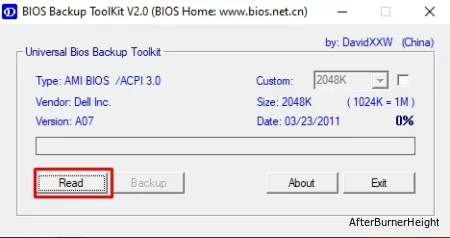
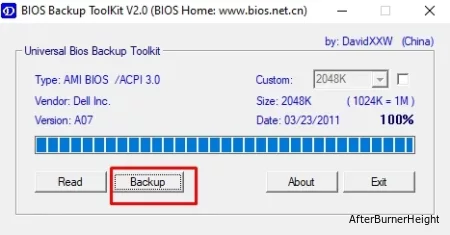
- Dump the BIOS: Click on the Read button to initiate the BIOS dumping process. The toolkit will automatically detect and read the BIOS from your laptop’s firmware.
- Save the BIOS: The BIOS file will be saved as a .bin file, which you can back up or use for modifications.
This tool is an excellent option for users who need a quick, no-frills solution to dump their BIOS.
Why Use Software-Based Methods?
Software-based methods are generally easier to perform, as they don’t require physical modifications to the laptop. They can also be done within the operating system without opening up the laptop or using additional hardware. However, these methods may not work if the laptop’s firmware is locked or protected by a password, write protection, or other security measures.
How to Dump the BIOS from Your Laptop: Hardware Methods
Sometimes, software tools fail due to locked BIOS or additional security layers. In such cases, you may need to resort to hardware-based methods, which are more complex but more effective in some scenarios.
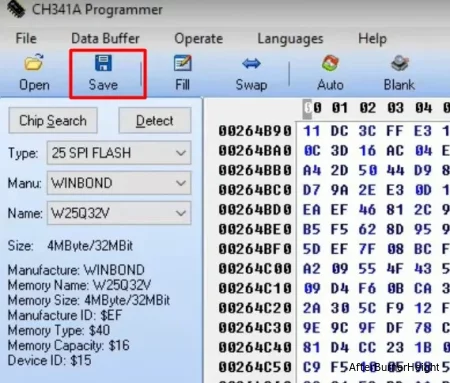
Method 4: Using a CH341A Programmer
The CH341A programmer is a popular USB device that enables you to read and write EEPROM chips, including BIOS chips. This method is often used when software methods are blocked or the BIOS is protected.
Steps to Use CH341A Programmer:
- Prepare the Hardware:
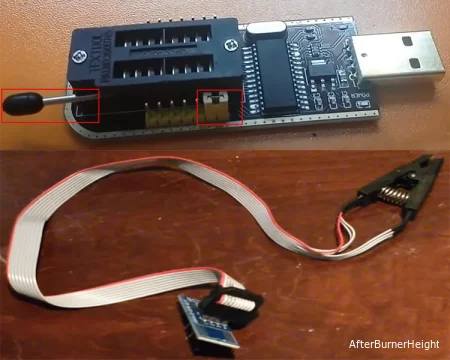
- Buy a CH341A Programmer: Purchase a CH341A USB programmer and the necessary cables or clip connectors.
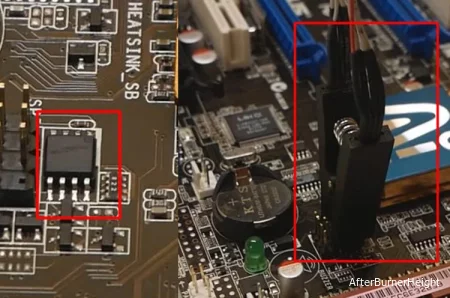
- Connect the Programmer: Attach the clip to the BIOS chip on your laptop’s motherboard. Depending on your laptop model, you may need to open the device to access the BIOS chip physically. The correct orientation is crucial, as improper connections can damage the chip.
- Install the Software:
- Install the CH341A programming software on your computer. The software will allow you to interact with the connected chip.
- Read the BIOS: After connecting the programmer and installing the software, you can use the program’s “Read” function to extract the BIOS. The programmer will directly read from the chip and generate a backup.
- Save the BIOS: Once the BIOS has been dumped, save it as a .bin file on your computer for backup or future use.
This method bypasses software-level restrictions and provides direct access to the BIOS chip, making it more reliable for advanced users.
Method 5: Soldering Directly to the Chip (Advanced)
In some cases, especially if the BIOS chip is physically damaged or if there are no accessible pins, you may need to solder wires directly to the chip to read the BIOS. This method is highly advanced and should only be attempted by users with knowledge of electronics.
Steps to Solder and Dump BIOS:
- Identify the BIOS Chip: Open up your laptop and locate the BIOS chip on the motherboard. It’s usually a small, rectangular chip labeled with a part number.
- Solder Wires: Using a fine soldering iron, attach small wires to the chip’s pins for reading and writing. This is a delicate process that requires precision.
- Use a Programmer: After soldering the wires, you can connect them to a programmer like the CH341A and dump the BIOS.
Why Use Hardware-Based Methods?
Hardware-based methods provide a more reliable way of dumping BIOS, especially when the firmware is locked or restricted by software. However, these methods require advanced knowledge of hardware and should only be attempted by experienced users.
Precautions When Dumping BIOS
- Backup First: Always back up your important data before proceeding. BIOS dumping and modifications can potentially cause your system to become unbootable.
- Check for Write Protection: Some laptops come with write protection enabled to prevent accidental BIOS corruption. Make sure you disable any write protection features before dumping the BIOS.
Use Trusted Tools: Only use trusted tools and methods to dump your BIOS. Malicious software could corrupt or compromise your system.
Final Conclusion
Learning how to dump the BIOS from your laptop can be incredibly useful for a variety of reasons—whether you’re troubleshooting, backing up data, or making modifications to your system. By following the methods outlined above, you can safely and efficiently extract the BIOS, whether using software tools or more advanced hardware techniques.
Make sure to take the necessary precautions and choose the method that best suits your needs and technical expertise. If you are still facing any problems, please let me know, I would like to help you with this. Happy tinkering!
FAQs About Dumping the BIOS
Can I use BIOS dumping for any laptop?
Yes, but it depends on the model. Some laptops have restrictions, such as write protection or secured boot settings, which can prevent BIOS dumping. However, most modern laptops support BIOS extraction using appropriate tools or hardware.
Is it safe to dump the BIOS?
If done correctly, it is generally safe. However, improper handling can lead to corruption of the BIOS or damage to the laptop. Always follow instructions carefully.
How do I restore a corrupted BIOS?
If the BIOS is corrupted, you can use a backup to restore it. Many modern laptops also have a secondary backup BIOS that can be used to recover from a failed BIOS update.
Can dumping the BIOS void my warranty?
Yes, modifying or dumping the BIOS could void your warranty, depending on the manufacturer’s policies. Always check the warranty terms before proceeding.
Nazim is a tech enthusiast and expert in laptops, computers, and cutting-edge technology. With a degree in Computer Engineering and experience as a Data Analyst, Nazim combines deep technical knowledge with real-world insights to help readers make informed decisions about their tech needs.
Home
Windows
By
abhinash
BIOS checks the hardware and peripherals’ availability and provides a pathway for them to receive instructions from the CPU.
If the BIOS gets corrupted or damaged, the hardware will have no gateway to receive initiation signals. Then, your system will not boot at all and your motherboard will be considered bricked.
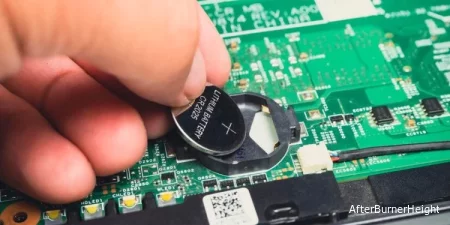
Having said that, it is also not an everyday thing for the BIOS to get damaged. We most often corrupt the firmware while updating BIOS. But your customized BIOS settings do get lost most of the time due to a faulty CMOS battery, by changing to default settings manually, or automatically because of system error.
Whatever the case, be it for recovery of BIOS or for loading your customized settings, it is better to backup the BIOS. It is quite easy to backup BIOS for some motherboards but for others, it can be quite tricky and you might need a few workarounds.
Nevertheless, you will be comfortable to backup the BIOS in your system after going through this article.
Before Backing Up the BIOS
You are probably looking to backup the BIOS as a preventive measure if something goes wrong while updating it. However, if you are able to resolve the issues on the motherboard or revert the settings that are causing you problems beforehand, you will not need to update or backup the BIOS.
If the problem lies on the motherboard setting, you may reset the board. To do so, you can either change the settings to default either from the BIOS page or clear the CMOS by removing the CMOS battery from the motherboard.

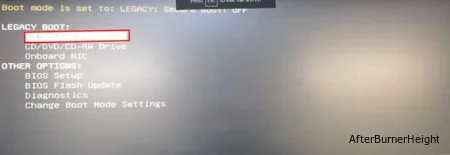
Similarly, if you are unable to boot your system, you can try to boot into secondary BIOS as some motherboards provide such dual-BIOS nowadays. Apart from these, sometimes changing boot mode to either UEFI or Legacy in BIOS also does the trick.
See if your problem is resolved after trying these steps. And if not, let’s move towards backing up the BIOS.
Backup Only The BIOS Settings of Motherboard
If you just want to backup your modified BIOS settings for future, you can manually note them down on your notebook or phone. You can also use a Frame Grabber to capture your BIOS or record the settings on your phone. Then, use that as your reference to change the BIOS settings.

Some motherboards also provide a list of changed settings when you try to load default settings on BIOS. After you press the key to Load Default settings, it will show you your customized settings that will be changed to default. You can take a screenshot of the settings there.
But, you should not apply the changes after pressing the Load Default key, otherwise, you might accidentally reset them without noting the modifications.
Note: Make sure to use the USB port from your motherboard. The front USB is connected through a hub inside and it can fail sometimes. If the port fails while saving backup, then it might create a corrupt BIOS image. This will brick your system when you restore the backup image next time.
Backup BIOS of Your Motherboard
Flashing a motherboard’s BIOS involves a few dangers. As we said earlier, if you installed the BIOS using a corrupted file, your system might get permanently damaged. So, most of the motherboards do not provide the feature to backup their BIOS to prevent users from updating BIOS from a corrupted backup, in case.
However, all motherboards have a function to update BIOS. You might be looking to backup BIOS to get back to this version at the time of need later. So, you can take advantage of the Update BIOS feature to downgrade your BIOS to the one you want.
Let’s see what you need for this and the process of doing it.
- Press Windows + ‘R’ to open the Run dialogue box.
- Type
msinfo32and press Enter. - You will see a window that has your motherboard’s name, current BIOS version, and other information. Note the current BIOS version.

- Go to your motherboard’s website and look for that particular version of BIOS.
- Download the BIOS file.
- Use the motherboard’s utility tool or BIOS page to update that version of BIOS.

Since it requires few precautions and has several methods, we have prepared a separate comprehensive guide for updating the BIOS.
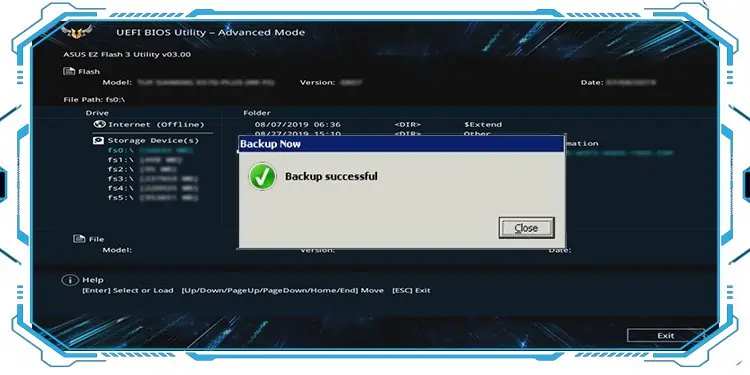
Backup BIOS in Motherboard with Q-Flash Feature
If your system’s BIOS has a Q-Flash feature, you are in luck here. It is a feature provided in some motherboards with the primary purpose of updating the BIOS. But it also has the function to back up your system’s BIOS.
One of the motherboards to feature Q-flash is Gigabyte. Hence, we are using the system with a Gigabyte motherboard to explain the process. You will just need a USB drive to save the backup with this method.
- First, get a USB flash drive and insert the drive into your Laptop. On a desktop, make sure you have inserted the USB on the motherboard’s USB port on the back of your system.
- Restart your system and press repeatedly the Delete, Esc, F2, or the corresponding key that opens BIOS in your PC right after the system starts.
- A BIOS page will appear on your screen. Inside the page, find the Q-flash option in it. You can also press F8 while remaining on the BIOS page to open the Q-flash page.

- Alternatively, press TAB repeatedly while your system is booting up and you will land on the Q-flash page directly.
- There, you can see the Update BIOS and Save BIOS options. Click on the Save BIOS to Drive option.

- Follow the instructions and save the backup on your USB flash drive.


You now have a backup image of your current BIOS version. You can perform this process using the BIOS utility or Motherboard utility tool provided by your vendor if it has the Q-flash option. The steps are similar and you can open the utility from Windows itself.
Backup BIOS in Windows
If your motherboard is the one that does not provide the option to backup BIOS, you can do it directly from Windows. You will have to take help from third-party applications to do it for you.
One of such programs that accommodate the function of backup BIOS is the Universal BIOS Backup Toolkit.
Let’s see how you can do this using the Universal BIOS Backup Toolkit on your system.
- Download Universal BIOS Backup Toolkit on your PC and Install the application.
- Search with the keyword BIOS Backup on the search box on your windows.
- Right-click on Universal BIOS Backup Toolkit and click Run as administrator to open the application.
- When the program runs, click on the Read option.

- After the process completes, click on Ok and select the Backup option.

- Save the
.binfile on the drive of your choice.


You will find the backup file of your BIOS in the drive.
Backup BIOS Using CH341a Programmer
CH341a programmer is a USB-like device that is used to flash the IC of several electronics including the EEPROM of a computer. The BIOS is contained in the EEPROM of a computer.
Hence, you can use the CH341a programmer to detect, change, backup as well as update the BIOS of your motherboard. The programmer can be used for 24-series I2C and 25-series SPI IC chips of any system.
Let’s look at the connection you have to make and the steps to be followed to backup BIOS using the CH341a programmer.
- Buy a CH341a programmer or mini programmer from the nearest electronics vendor or online.
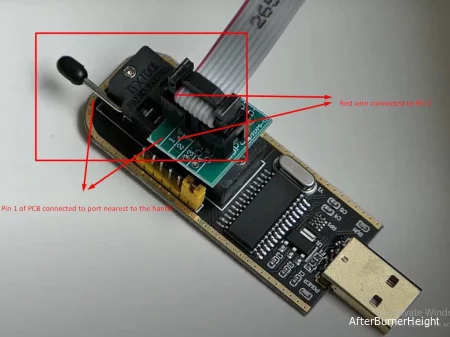
- You will find a circuit board connected to a USB dongle with a handle consisting of a yellow jumper connected to pins 1 and 2 for USB detection. Similarly, you will see a converter for a 25-series IC, another PCB where you can solder the IC, and an 8-pin clip converter with a PCB. We will be using this clip converter and PCB to connect to our BIOS chip.

- On the PCB, you will find pins with numbers from 1 to 8. Insert the connector to the pins such that the red color wire lies on pin 1. Remember a wrong connection can damage the BIOS chip.
- Now connect the PCB to the CH341a programmer in such a way that pin 1 of the circuit lies on the side near the handle.

- Disconnect all the connections to the motherboard whose BIOS you want to backup. Find the BIOS chip and connect the clip to it such that the pin of the red wire is connected to pin 1 of the BIOS.

- We advise you to use another computer to save the BIOS. Insert the programmer into the USB port keeping the handle downwards. Install the drivers for the device.

- Run the driver software after installing. If the installer does not appear, you can go to Device Manager and install it manually.
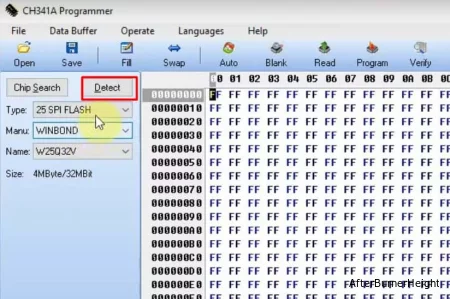
- Click on the Detect option to show the code of the BIOS file.

- Uncheck the Blank Check and Erase option on the Auto menu.
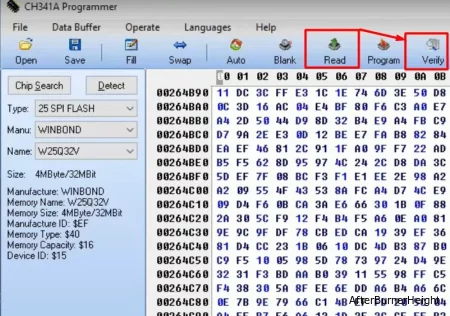
- Click on Read and then Verify after you see 100 % on the progress bar at the lower end.

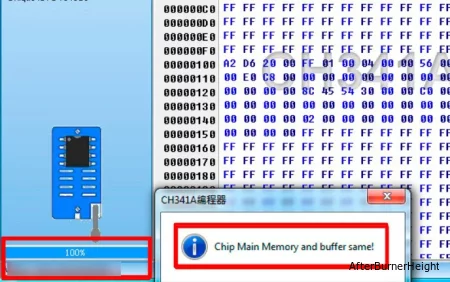
- You see the Chip Main Memory and Buffer Same dialogue box at the end.

- Click Save and enter the file name to save the backup BIOS image of your motherboard.


You can use this backup image to flash your BIOS later.
How to Restore the Backup BIOS in Windows?
It is not helpful to backup your BIOS and not know how to install it in the time of need. But installing the BIOS from the backup image is pretty much the same as updating the BIOS. Some motherboards like Gigabyte automatically boot into backup bios if the current BIOS fails and re-flashes it.
You must know that updating or restoring BIOS is risky and it might permanently damage your computer. Hence, you have to make sure to have a stable power supply. You can use a UPS for a desktop computer while reinstalling BIOS. Also, please do not close the system in the middle of the process.
Now that you know about the risk and the safety measures, you will just need a USB drive and software called Rufus to make the drive bootable. Let’s see the way to install the backup .rom file to your system.
- Download Rufus on your system. If your system is not working, then use a working system.
- Insert the USB drive and Open Rufus on the PC either through its icon on the desktop or by searching it in windows.
- On the opened window, select the USB drive and choose FreeDOS on the Boot Selection Menu. Click Start.

- Copy the Backup file you saved earlier to the USB.
- Restart your system and press F8 or the corresponding key repeatedly to go to the Boot Options.
- Choose the USB drive which you have kept the file in.

- You will see a window similar to the command prompt.
- Enter
dirin the window and find the.romfile you saved earlier as the BIOS backup.
- Type the name of the file along with the extension name at the end and press Enter.
- Go through the instructions on the installation window and complete the restoring process.


You will find your BIOS restored from the backup file that you created earlier.
Skip to content
How many times people have told me to update the BIOS or the UEFI firmware of motherboards or the graphics card to make sure that you have the best support for the hardware. But sometimes after you have updated the firmware to a new version, it starts to show some problems and then you may want to downgrade the firmware to an earlier version. This is why you should always make a backup of your original firmware before performing an update. And as far as the graphics cards are considered, you can use the well known tool GPU-Z to create a backup of your graphics card’s BIOS or UEFI.
First of all you have to download the GPU-Z tool which is free and can be used on any version of Windows. As you launch this tool, it will ask you whether you wish to install it or run it in a portable mode. No matter which option you choose, you will see the familiar GPU-Z window displaying you all the features and properties of your graphics card.

You have to click on the small shortcut icon shown under the logo of your graphics card manufacturer like Intel, AMD or NVidia. After this you can choose the option to Save to file. This will launch a small tool that reads the BIOS/UEFI and saves it in the same folder where the GPU-Z program is located.
GPU-Z uses a command line utility to perform this operation. For example, in the case of NVidia graphics cards it uses the command nvflash.exe -b bios.rom to pull the BIOS/UEFI from the graphics card. For other cards manufactured by other corporations, it uses other similar utilities. But these utilities do not support all the cards or all the manufacturers and perhaps they might fail to work on your system.
You can download GPU-Z from https://www.techpowerup.com/download/gpu-z/.
Tagged with GPU
We use cookies on our website to give you the most relevant experience by remembering your preferences and repeat visits. By clicking “Accept”, you consent to the use of ALL the cookies.
Содержание
- Dump bios from windows
- Бекап Биоса Universal BIOS Backup ToolKit 2.0
- Резервная копия BIOS
- Бекап Биоса Universal BIOS Backup ToolKit 2.0
- Бекап Биоса Universal BIOS Backup ToolKit 2.0: 4 комментария
- Dump bios from windows
Dump bios from windows
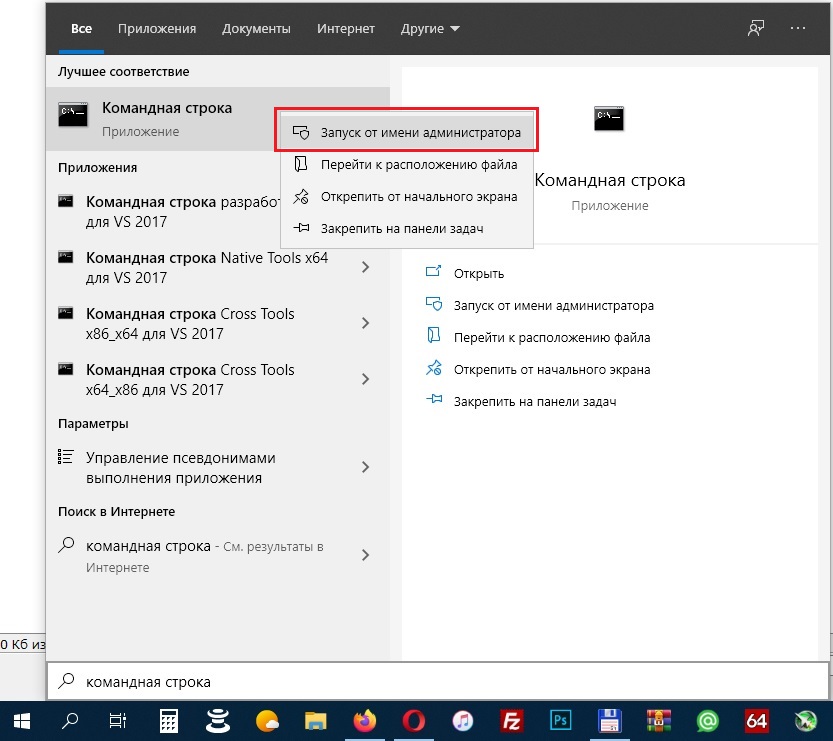
С помощью программы Intel Flash Programming Tool (FPT) можно сделать бэкап и прошить биос материнской платы. Если для брендовых материнок Asus, MSI, Gigabyte как правило есть фирменная утилита, то для Китайских плат такой утилиты нет, но мы можем прошить биос прямо из под Windows и без специальной фирменной утилиты — программой FPT.
Запустите командную строку от имени администратора:
Далее нужно перейти в папку «FPTBIOS» с программой для прошивки биоса, если вы распаковали архив в корень диска «C», то команда будет следующая:
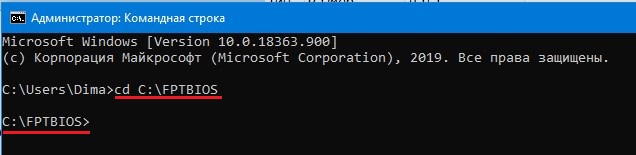
Для записи бэкапа биоса команда:
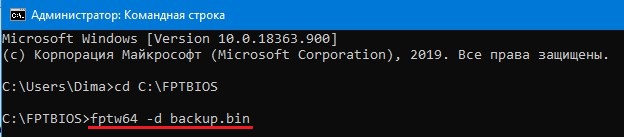
backup — это имя файла бэкапа, может быть любым
.bin — это расширение файла, может быть .bin, .rom и т.д., может быть даже без расширения
По завершению процесса бэкапа вы увидите надпись FPT Operation Passed , в папке «FPTBIOS» появится файл бэкапа backup.bin
Для записи биоса команда:
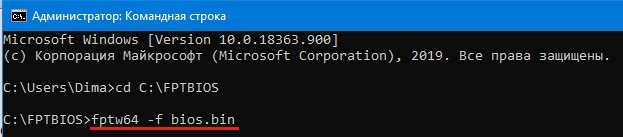
bios — имя файла биос
.bin — расширение файла биос
По завершению процесса прошивки вы увидите надпись FPT Operation Passed
Некоторые производители блокируют возможность прошивки из под Windows, проверить это легко, при создании бэкапа биос вы получите ошибку 26 , значит ваша плата не может быть прошита программой FPT из под Windows.
Но не стоит отчаиваться, такие платы можно прошить программой AFUDOS или программатором CH341A.
Архив с программой FPT.
При создание бэкапа ошибка 26 — Ваша плата не поддерживает прошивку из под Windows программой FPT.
Чтобы оставить комментарий, авторизуйтесь или зарегистрируйтесь.
1″ :pagination=»pagination» :callback=»loadData» :options=»paginationOptions»>
Универсальная программа для снятия прошивок и бекапов БИОСа с любых моделей ноутбуков и персональных компьютеров.
Дамп надо делать всегда, когда мы хотим сделать прошивку, обновление, update или откат БИОС. Иногда просят сделать копию БИОСа ноутбука или материнской платы персонального компьютера, для ремонта аналогичного оборудования.
А что же такое БИОС и как это расшифровывается эта аббревиатура.
БИОС это сокращения от английских слов Base_Input_Output_System и переводится это как базовая_система_ввода_вывода
Делать дамп БИОСа ноутбуков и компьютеров при помощи этой программы очень легко и просто.
Краткая инструкция как пользоваться программой Universal BIOS utility Backup ToolKit 2.0 для создания bios damp, а по-русски резервную копию.
Видео инструкция по работе с этой программой.
Многие антивирусы определяют эту программу как вирус, но это не так.
После скачивания можете проверить этот архив на сайте www.virustotal.com который, скажет что половина антивирусов найдут в нём различные вирусы, а вторая половина не найдёт.
Мой AVG определяет его то же как вирус. А на буке каспер говорит, что всё нормально.
После проверки этого файла посмотрите, находит ли ваш антивирус в нём вирус. Если да то отключите его на время работы программы.
Потом распаковываем архив и запускаем полученный файл с именем Universal BIOS Backup ToolKit 2.0.exe
Если ваша система скажет что требуются права администратора. Тогда щелкаем правой клавишей мыши по этому файлу и жмём пункт запустить от имени администратора.
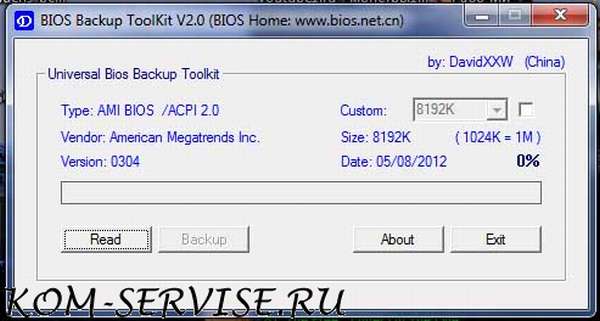
После этого открывается окно программы, в которой мы видим информацию о типе, версии, размере, производителе и дате вашего БИОСа.
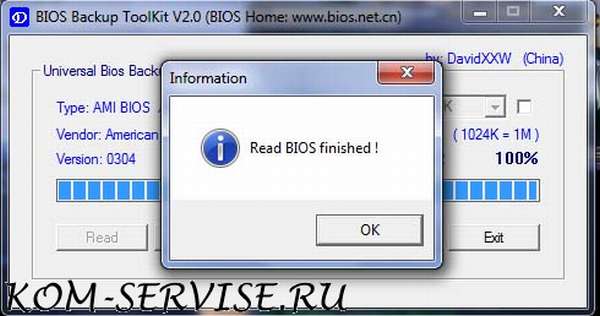
После этого, жмем кнопку Read и ждем, пока не закончится процесс чтения БИОСа.
После этого появится табличка с надписью, что чтение БИОСа завершено успешно.
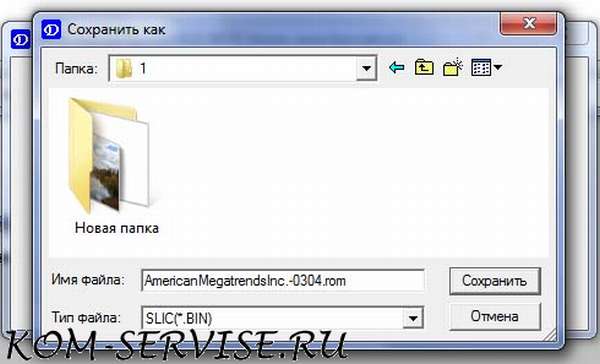
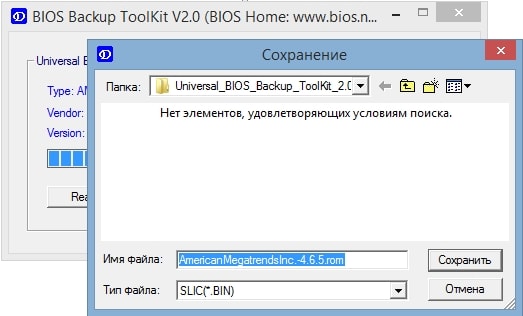
Жмём ОК. Потом жмём кнопку Backup.
Нам предлагают выбрать место, куда мы сохраним дамп БИОСа. Выбираем нужную папку и жмём кнопку сохранить.
Все мы с вами сделали резервную копию БИОСа, можно обновить версию, шить новую или старую стабильную версию БИОСа.
Резервная копия BIOS
Резервная копия (бэкап, дамп) BIOS может понадобится как просто на сохранение (на всякий случай), так и чтоб в последующем обновить BIOS или сделать его откат. В рамках этой статьи я не буду описывать эти процедуры, но если кому интересно прочитать именно на этом сайте, то напишите в комментариях и статьи появятся.
Сделать Бэкап биоса хорошо помогает универсальная программа под названием Universal BIOS Backup ToolKit
Если найдете где там скачать, то ищите в поисковиках программу Universal-BIOS-Backup-ToolKit-2.0
Программу нужно разархивировать (архиваторы) и запустить от имени администратора, иначе выдаст ошибку.
Если сделали правильно, то главное окно будет представлять следующий вид:


Программу можно закрывать, а полученный файл использовать по назначению.
В принципе в программе только две кнопки нужно — узнать версию и сделать дамп биоса. Легко и просто. Хорошая программа.
Пишите комментарии об использовании, другим они тоже интересны.

Представляю универсальную программу для снятия прошивок и бекапов БИОСа с любых моделей ноутбуков и персональных компьютеров.
Дамп БИОСа необходимо делать всегда, когда мы хотим сделать обновление, update или откат БИОС. Иногда просят сделать копию БИОСа ноутбука или материнской платы персонального компьютера, для ремонта аналогичного оборудования.
А что же такое БИОС и как это расшифровывается эта аббревиатура ?
БИОС это сокращения от английских слов Base_Input_Output_System и переводится это как базовая_система_ввода_вывода. Более подробно можно почитать в вики
Сделать дамп БИОСа ноутбуков и компьютеров при помощи этой программы очень легко и просто. Поехали…
Краткая инструкция как пользоваться программой Universal BIOS utility Backup ToolKit 2.0 для создания bios damp, а по-русски резервную копию.
Сначала скачиваем эту программу по ссылке снизу.
Многие антивирусы определяют эту программу как вирус, но это не так.
После скачивания можете проверить этот архив на сайте www.virustotal.com который, скажет что половина антивирусов найдут в нём различные вирусы, а вторая половина не найдёт.
После проверки этого файла посмотрите, находит ли ваш антивирус в нём вирус. Если да то отключите его на время работы программы.
Потом распаковываем архив и запускаем полученный файл с именем Universal BIOS Backup ToolKit 2.0.exe
Обязательно запускаем с правами администратора — правой клавишей мыши по этому файлу и жмём пункт запустить от имени администратора.
После этого открывается окно программы, в которой мы видим информацию о типе, версии, размере, производителе и дате вашего БИОСа.
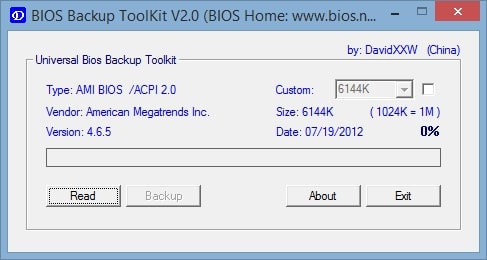
После этого, жмем кнопку Read и ждем, пока не закончится процесс чтения БИОСа.
После этого появится табличка с надписью, что чтение БИОСа завершено успешно.
Жмём ОК. Потом жмём кнопку Backup.

Нам предлагают выбрать место, куда мы сохраним дамп БИОСа. Выбираем нужную папку и жмём кнопку сохранить.
Все мы с вами сделали резервную копию БИОСа.
Теперь можно обновить версию, шить новую или старую стабильную версию БИОСа.
И чего делать с этим бекапом? если прошить его программатором комп не оживает.
Dump bios from windows
Комплект для изготовления загрузочной DOS флешки dos_boot_usb.zip ( 590,29 КБ )
В теме нет куратора. По вопросам наполнения шапки обращайтесь к модераторам раздела через кнопку под сообщениями, на которые необходимо добавить ссылки, или через QMS.
Сообщение отредактировал Rammsteiner — 29.03.20, 10:35
Статьи CodeRush «Устройство файла UEFI BIOS» часть ПЕРВАЯ ПОЛУТОРНАЯ ВТОРАЯ
Про nvram от того же автора: Часть1 Часть2
Practical BIOS Editing manual (english) Practical_BIOS_Editing.pdf ( 30,65 МБ )
Сообщение отредактировал Shoore — 05.07.16, 00:03
Вечер добрый.Вот в аиду залез, она пишет типо биос не обновлялся более двух лет, рекомендую обновить. А вы что скажете, стоит, не стоит?
Сообщение отредактировал sergei093 — 31.03.13, 21:22
На скрине не видно версию платы. И версию БИОС надо смотреть во вкладке Системная плата.
Не верю, что там нельзя включить немецкий :rofl:
Сообщение отредактировал Shoore — 31.03.13, 21:56
а так? да и немецкий что-то нихт шпрехен, давно это было. 🙂
Сообщение отредактировал sergei093 — 31.03.13, 22:04
Дело в том, что БИОС нужна для того, что бы включить компьютер, найти загрузчик системы и передать ОС управление железом. После того, как на экране появляется бутскрин операционки, БИОС никаким образом не влияет на работу железа, её коды не участвуют ни в каких процессах, просто потому, что могут исполняться только в реальном режиме работы процессора.
Так что, обновлять или нет, это дело хозяйское, в неумелых руках можно и кирпич получить.
P.S. все сообщения едут сюда BIOS и UEFI (EFI)
Сообщение отредактировал Shoore — 31.03.13, 22:39
BIOS проверяет доступность оборудования и периферийных устройств и предоставляет им путь для получения инструкций от центрального процессора.
Если BIOS поврежден, аппаратное обеспечение не будет иметь шлюза для приема сигналов инициализации. Тогда ваша система вообще не загрузится, и ваша материнская плата будет считаться заблокированной.
Сказав это, также не каждый день происходит повреждение BIOS. Чаще всего мы повреждаем прошивку при обновлении BIOS. Но ваши индивидуальные настройки BIOS в большинстве случаев теряются из-за неисправной батареи CMOS, при изменении настроек по умолчанию вручную или автоматически из-за системной ошибки.
В любом случае, будь то для восстановления BIOS или для загрузки ваших пользовательских настроек, лучше создать резервную копию BIOS. Создать резервную копию BIOS для некоторых материнских плат довольно просто, но для других это может быть довольно сложно, и вам может потребоваться несколько обходных путей.
Тем не менее, после прочтения этой статьи вам будет удобно создавать резервные копии BIOS в вашей системе.
Содержание
- Перед созданием резервной копии BIOS
- Создать резервную копию только настроек BIOS
- Создать резервную копию BIOS с помощью функции Q-Flash
- Резервное копирование BIOS в Windows
- Создать резервную копию BIOS с помощью программатора CH341a
- Как установить резервную копию BIOS в Windows?
Перед созданием резервной копии BIOS
Вероятно, вы хотите создать резервную копию BIOS в качестве превентивной меры, если что-то пойдет не так при его обновлении. Однако, если вы сможете заранее устранить неполадки на материнской плате или вернуть настройки, которые вызывают у вас проблемы, вам не нужно будет обновлять или создавать резервную копию BIOS.
Если проблема кроется в настройках материнской платы, вы можете перезагрузить плату. Для этого вы можете либо изменить настройки на значения по умолчанию на странице BIOS, либо очистить CMOS, вынув батарейку CMOS из материнской платы.
Аналогично, если вы не можете загрузить свою систему, вы можете попробовать загрузиться во вспомогательный BIOS, поскольку в настоящее время некоторые материнские платы поддерживают такой двойной BIOS. Помимо этого, иногда изменение режима загрузки на UEFI или Legacy в BIOS также помогает.
Посмотрите, устранена ли ваша проблема после выполнения этих действий. А если нет, давайте перейдем к резервному копированию BIOS.
Создать резервную копию только настроек BIOS
Если вы просто хотите создать резервную копию измененных настроек BIOS на будущее, вы можете вручную записать их на свой ноутбук или телефон. Вы также можете использовать Frame Grabber для захвата вашего BIOS или записи настроек на вашем телефоне. Затем используйте это в качестве ссылки для изменения настроек BIOS.
Некоторые материнские платы также предоставляют список измененных настроек при попытке загрузить настройки по умолчанию в BIOS. После того, как вы нажмете клавишу для загрузки настроек по умолчанию, она покажет вам ваши индивидуальные настройки, которые будут изменены на стандартные. Вы можете сделать скриншот настроек там.
Но вы не должны применять изменения после нажатия клавиши Загрузить по умолчанию, иначе вы можете случайно сбросить их, не заметив изменений.
Примечание: Обязательно используйте USB-порт вашей материнской платы. Передний USB подключен через концентратор внутри, и иногда он может выходить из строя. Если порт выходит из строя при сохранении резервной копии, это может привести к повреждению образа BIOS. Это приведет к блокировке вашей системы при следующем восстановлении образа резервной копии.
Прошивка BIOS материнской платы сопряжена с несколькими опасностями. Как мы говорили ранее, если вы установили BIOS с использованием поврежденного файла, ваша система может быть необратимо повреждена. Таким образом, большинство материнских плат не предоставляют функцию резервного копирования своего BIOS, чтобы пользователи не могли обновлять BIOS из поврежденной резервной копии, в случае.
Однако на всех материнских платах есть функция обновления BIOS. Возможно, вы захотите создать резервную копию BIOS, чтобы позже при необходимости вернуться к этой версии. Итак, вы можете воспользоваться функцией Обновить BIOS, чтобы понизить версию BIOS до той, которую вы хотите.
Давайте посмотрим, что вам для этого нужно и как это делается.
- Нажмите Windows + ‘R’, чтобы открыть диалоговое окно «Выполнить».
- Введите
msinfo32и нажмите Enter. - Вы увидите окно с названием вашей материнской платы, текущей версией BIOS и другой информацией. Обратите внимание на текущую версию BIOS.

- Зайдите на веб-сайт вашей материнской платы и найдите эту конкретную версию BIOS.
- Загрузите файл BIOS.
- Используйте утилиту материнской платы или страницу BIOS, чтобы обновить эту версию BIOS.
Поскольку это требует небольшого количества мер предосторожности и имеет несколько методов, мы подготовили отдельное всеобъемлющее руководство по обновлению BIOS.
Создать резервную копию BIOS с помощью функции Q-Flash
Если в BIOS вашей системы есть функция Q-Flash, то здесь вам повезло. Это функция, предусмотренная в некоторых материнских платах с основной целью обновления BIOS. Но у него также есть функция резервного копирования BIOS вашей системы.
Одной из материнских плат, оснащенных Q-flash, является Gigabyte. Следовательно, мы используем систему с материнской платой Gigabyte для объяснения процесса. Вам просто понадобится USB-накопитель, чтобы сохранить резервную копию с помощью этого метода.
- Во-первых, возьмите флэш-накопитель USB и вставьте его в свой ноутбук. На настольном компьютере убедитесь, что вы вставили USB-порт в USB-порт материнской платы на задней панели вашей системы.
- Перезагрузите систему и несколько раз нажмите Delete, Esc, F2 или соответствующую клавишу, которая открывает BIOS на вашем ПК сразу после запуска системы.
- На вашем экране появится страница BIOS. Внутри страницы найдите в ней опцию Q-flash. Вы также можете нажать F8, оставаясь на странице BIOS, чтобы открыть страницу Q-flash.
- В качестве альтернативы, несколько раз нажмите TAB во время загрузки системы, и вы сразу попадете на страницу Q-flash.
- Там вы можете увидеть опции Обновить BIOS и Сохранить BIOS. Нажмите на опцию Сохранить BIOS на диск.
- Следуйте инструкциям и сохраните резервную копию на флэш-накопителе USB.
Теперь у вас есть резервный образ вашей текущей версии BIOS. Вы можете выполнить этот процесс с помощью утилиты BIOS или утилиты материнской платы, предоставляемой вашим поставщиком, если у нее есть опция Q-flash. Шаги аналогичны, и вы можете открыть утилиту из самой Windows.
Резервное копирование BIOS в Windows
Если ваша материнская плата не предоставляет возможности резервного копирования BIOS, вы можете сделать это непосредственно из Windows. Вам придется воспользоваться помощью сторонних приложений, которые сделают это за вас.
Одной из таких программ, которая выполняет функцию резервного копирования BIOS, является Universal BIOS Backup Toolkit.
Давайте посмотрим, как вы можете это сделать, используя Universal BIOS Backup Toolkit в вашей системе.
- Загрузите Universal BIOS Backup Toolkit на свой компьютер и установите приложение.
- Выполните поиск по ключевому слову BIOS Backup в окне поиска вашей Windows.
- Щелкните правой кнопкой мыши на Universal BIOS Backup Toolkit и нажмите Запуск от имени администратора, чтобы открыть приложение.
- Когда программа запустится, нажмите на опцию Прочитать.
- После завершения процесса нажмите «Ок» и выберите опцию «Резервное копирование«.
- Сохраните
.binфайл на диске по вашему выбору.
Вы найдете файл резервной копии вашего BIOS на диске.
Создать резервную копию BIOS с помощью программатора CH341a
Программатор CH341a — это USB-подобное устройство, которое используется для прошивки микросхем нескольких электронных устройств, включая EEPROM компьютера. BIOS содержится в EEPROM компьютера.
Следовательно, вы можете использовать программатор CH341a для обнаружения, изменения, резервного копирования, а также обновления BIOS вашей материнской платы. Программатор может использоваться для микросхем I2C 24-й серии и SPI IC 25-й серии любой системы.
Давайте рассмотрим подключение, которое вам необходимо выполнить, и шаги, которые необходимо выполнить для создания резервной копии BIOS с помощью программатора CH341a.
- Купите программатор CH341a или mini programmer у ближайшего поставщика электроники или онлайн.
- Вы найдете печатную плату, подключенную к USB-ключу с ручкой, состоящей из желтой перемычки, подключенной к контактам 1 и 2 для обнаружения USB. Аналогичным образом вы увидите конвертер для микросхемы 25-й серии, другую печатную плату, на которую можно припаять микросхему, и 8-контактный разъемный конвертер с печатной платой. Мы будем использовать этот конвертер clip и печатную плату для подключения к нашему чипу BIOS.
- На печатной плате вы найдете контакты с номерами от 1 до 8. Вставьте разъем в контакты таким образом, чтобы провод красного цвета находился на выводе 1. Помните, что неправильное подключение может повредить микросхему BIOS.
- Теперь подключите печатную плату к программатору CH341a таким образом, чтобы вывод 1 схемы находился сбоку возле ручки.
- Отключите все подключения к материнской плате, BIOS которой вы хотите создать резервную копию. Найдите микросхему BIOS и подключите к ней зажим таким образом, чтобы вывод красного провода был подключен к выводу 1 BIOS.
- Мы советуем вам использовать другой компьютер для сохранения BIOS. Вставьте программатор в USB-порт, удерживая ручку вниз. Установите драйверы для устройства.
- Запустите программное обеспечение-драйвер после установки. Если программа установки не отображается, вы можете зайти в Диспетчер устройств и установить ее вручную.
- Нажмите на опцию Обнаружения, чтобы показать код файла BIOS.
- Снимите галочку с Пустой галочки и удалите опцию в меню Авто.
- Кликните на чтение , а затем проверить, после того как вы увидите 100 % на прогресс-бар на нижнем конце.
- В конце вы видите то же самое диалоговое окно с основной памятью чипа и буфером. Буферная система.
- Нажмите Сохранить и введите имя файла, чтобы сохранить резервный образ BIOS вашей материнской платы.

Вы можете использовать этот резервный образ для последующей прошивки вашего BIOS.
Как установить резервную копию BIOS в Windows?
Бесполезно создавать резервную копию вашего BIOS, не зная, как установить ее в нужный момент. Но установка BIOS из резервного образа — это почти то же самое, что обновление BIOS. Некоторые материнские платы, такие как Gigabyte, автоматически загружаются в резервную BIOS в случае сбоя текущей BIOS и перепрошивают ее.
Вы должны знать, что обновление или восстановление BIOS сопряжено с риском и может привести к необратимому повреждению вашего компьютера. Следовательно, вы должны убедиться, что у вас есть стабильный источник питания. Вы можете использовать ИБП для настольного компьютера при переустановке BIOS. Также, пожалуйста, не закрывайте систему в середине процесса.
Теперь, когда вы знаете о рисках и мерах безопасности, вам просто понадобится USB-накопитель и программное обеспечение под названием Rufus, чтобы сделать накопитель загрузочным. Давайте посмотрим, как установить .rom файл резервной копии в вашу систему.
- Загрузите Rufus в свою систему. Если ваша система не работает, то используйте рабочую систему.
- Вставьте USB-накопитель и откройте Rufus на ПК либо через его значок на рабочем столе, либо выполнив поиск в Windows.
- В открывшемся окне выберите USB-накопитель и выберите FreeDOS в меню выбора загрузки. Нажмите «Пуск».
- Скопируйте файл резервной копии, который вы сохранили ранее, на USB.
- Перезагрузите систему и нажмите F8 или соответствующую клавишу несколько раз, чтобы перейти к параметрам загрузки.
- Выберите USB-накопитель , на котором вы сохранили файл.
- Вы увидите окно, похожее на командную строку.
- Войдите
dirв окно и найдите.romфайл, который вы сохранили ранее в качестве резервной копии BIOS.
- Введите имя файла вместе с именем расширения в конце и нажмите Enter.
- Ознакомьтесь с инструкциями в окне установки и завершите процесс восстановления.

Вы обнаружите, что ваш BIOS восстановлен из файла резервной копии, который вы создали ранее.