
Running CHKDSK in Windows 10 is a simple process that helps you check and repair disk errors on your computer. By following a few easy steps, you can ensure your system’s storage is healthy and running efficiently. This guide will walk you through the process from start to finish, and provide tips and answers to common questions.
Running CHKDSK (Check Disk) on Windows 10 will help you locate and fix file system errors and bad sectors on your hard drive. The following steps will guide you through the process of running CHKDSK on your system.
Step 1: Open Command Prompt as an Administrator
First, you need to open the Command Prompt with administrative privileges.
To do this, press the Windows key, type «cmd» in the search bar, right-click on the «Command Prompt» result, and select «Run as administrator.» This will open a new window where you can enter commands.
Step 2: Enter the CHKDSK Command
Next, type chkdsk C: /f /r and hit Enter.
The C: specifies the drive you want to check. The /f flag tells CHKDSK to fix any errors it finds, and the /r flag instructs it to locate bad sectors and recover readable information. You can replace C: with the letter of any other drive you want to check.
Step 3: Schedule a Disk Check
If your drive is in use, CHKDSK will ask if you want to schedule the check the next time your system restarts.
Type Y for yes and press Enter. Your disk check will be scheduled to run the next time your computer reboots.
Step 4: Restart Your Computer
Restart your computer to allow CHKDSK to run.
Upon restarting, your computer will automatically initiate the CHKDSK process on the specified drive. This may take some time depending on the size and state of the drive.
Step 5: Review the Results
Once the process completes, Windows will boot normally and display a summary of the results.
You can find the detailed results in the Event Viewer under Windows Logs > Application.
After completing the above steps, your system should be free of disk errors, and you’ll have a detailed report of the disk’s health.
Tips for Running CHKDSK on Windows 10
- Backup Your Data: Always backup important data before running disk checks to avoid accidental data loss.
- Check Drive Letters: Make sure you’re running CHKDSK on the correct drive by double-checking the drive letter.
- Run Regularly: Running CHKDSK regularly can help you catch errors early and maintain disk health.
- Use Safe Mode: If CHKDSK doesn’t run properly, consider running it in Safe Mode.
- Monitor Performance: Keep an eye on your system’s performance after running CHKDSK to ensure issues are resolved.
Frequently Asked Questions
What is CHKDSK?
CHKDSK is a Windows utility that checks the integrity of your disks and can repair file system errors and locate bad sectors.
Can CHKDSK run on SSDs?
Yes, CHKDSK can be run on both HDDs and SSDs, although SSDs usually have fewer errors due to their lack of moving parts.
How often should I run CHKDSK?
Running CHKDSK once a month or when you notice performance issues is generally a good practice.
Does CHKDSK delete files?
CHKDSK can potentially delete corrupted files during the repair process, which is why backing up data is crucial.
Can I use my computer while CHKDSK runs?
No, it’s advisable not to use your computer while CHKDSK is running to ensure the process completes without interruptions.
Summary
- Open Command Prompt as an Administrator.
- Enter the CHKDSK command.
- Schedule a disk check if needed.
- Restart your computer.
- Review the results.
Conclusion
Running CHKDSK on Windows 10 is a great way to keep your computer’s storage in good shape. Like taking your car in for a routine check-up, CHKDSK helps identify and fix issues before they cause significant problems. By following the steps outlined in this guide, you’ll be well on your way to maintaining a smooth-running system. Make sure to incorporate this into your regular maintenance routine and keep an eye out for any irregularities. For more detailed instructions and tips, check out Microsoft’s documentation or other trusted tech sources. Happy computing!
Matt Jacobs has been working as an IT consultant for small businesses since receiving his Master’s degree in 2003. While he still does some consulting work, his primary focus now is on creating technology support content for SupportYourTech.com.
His work can be found on many websites and focuses on topics such as Microsoft Office, Apple devices, Android devices, Photoshop, and more.
One of the most frightening experiences a computer user can have is a hard disk failure. Depending on the type of failure, an error on the disk can irretrievably lose any stored data.
Backups can mitigate the fallout but restoring data can be time-consuming and expensive for organizations. Instead, an organization can neutralize the risk of a disk failure by ensuring the user or IT staff keeps an eye out for key indicators and knows how to use built-in utilities such as Windows 10 Check Disk.
Signs of disk failure
Disk failure can occur for several reasons. These can be catastrophic, such as dropping the computer and damaging the drive or something as simple as firmware that can no longer detect the drive. Disks can also fail gradually as sectors on the disk become unreadable to the read/write mechanism. Other indications of impending disk failure include poor performance while opening or saving files, booting the computer or accessing data.
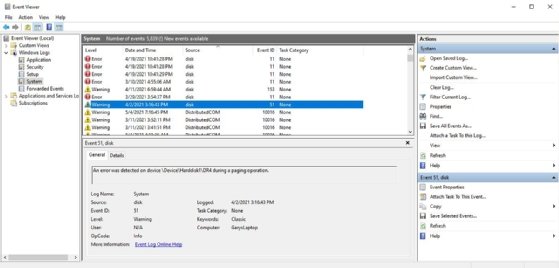
These signs are usually easily detected via errors and warnings in the Windows event log. Included in all versions of Windows, the event log records warnings and error events associated with the hard disk. Open the log by either searching for «event viewer» or entering Eventvwr.msc in the command line.
Once opened, expand the Windows logs and click on System in the Event Viewer (Figure 1). This shows informational events, warnings and critical errors for all system components such as the CPU, controllers, memory, network and disk.
Fixing disk errors
Two free utilities are very successful in fixing disk problems — the Disk Diagnostic or Repair utility built into the BIOS or EFI of most computers and Windows 10 Check Disk (CHKDSK). The BIOS utility varies by manufacturer and should be the first step to resolving disk issues. Each manufacturer has a different way of opening the utility on boot, but pressing the F10, F2 or Escape key usually works. Look for a text line on the screen that indicates what to do.
CHKDSK utility
The Windows 10 Check Disk command-line utility is reliable for finding and repairing disk problems by scanning the disk looking for bad sectors. A disk is divided into a sort of grid with concentric tracks and sectors, and the read/write head reads data in these sectors. If the disk is physically damaged and Windows has difficulty reading it, the system logs the error or warning. CHKDSK can find those bad sectors, write the data to a new sector and mark the old one so the disk won’t use it again.
A user can find the CHKDSK command window via the Windows search bar. After it opens, the user must select the Run as Administrator option on the right. At that point, the user can enter CHKDSK and any switches they wish to execute. If needed, the command Chkdsk /? generates a list of switches.
While CHKDSK is intuitive and easy to use, it is good to note the following:
- CHKDSK must run from the command-line utility (CMD);
- CHKDSK will not harm the computer or the disk — there is no risk to running it;
- CHKDSK can run against any physical hard disk;
- CHKDSK requires a disk to be offline to run, and if run against the System drive (C:), it will queue the request and run it on the next restart; and
- CHKDSK can run without starting Windows, so if Windows doesn’t start, run CHKDSK before Windows loads to repair the disk and hopefully resolve the problem.
Common CHKDSK switches
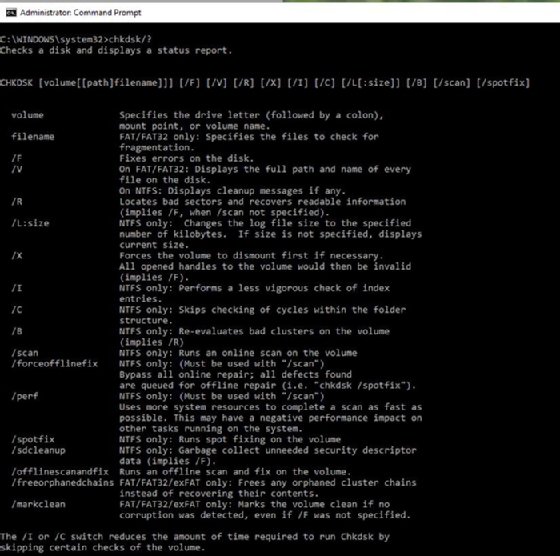
The CHKDSK utility has several switches that perform various tasks indicated by the CHKDSK /? command (Figure 2). The most common switches include the following:
- CHKDSK /? displays the help file.
- Chkdsk /F /R locates and repairs any encountered errors.
- CHKDSK (no switches) runs an analysis utility on the C: drive, which checks the file system, security descriptors, file name linkage and file system structure.
- CHKDSK /F fixes errors on the disk.
- CHKDSK /R locates bad sectors and recovers readable information.
- CHKDSK (volume/file path) runs against a specific volume, file or directory. This command quickly tests if a file can’t be accessed or has other performance issues.
Other switches might shorten the execution time by using more system resources or limiting the operations. These include the following:
- /perf allocates more system resources for faster execution at the cost of active applications.
- /scan /forceofflinefix queues the repair for offline work.
- /I does a quick, but not thorough, check.
Running CHKDSK before Windows boots
If Windows won’t boot, it is helpful to check the disk for failures. Boot the computer and do the following:
- When the computer is starting up, immediately press the F8 This should trigger Windows to display the Advance Startup Options menu.
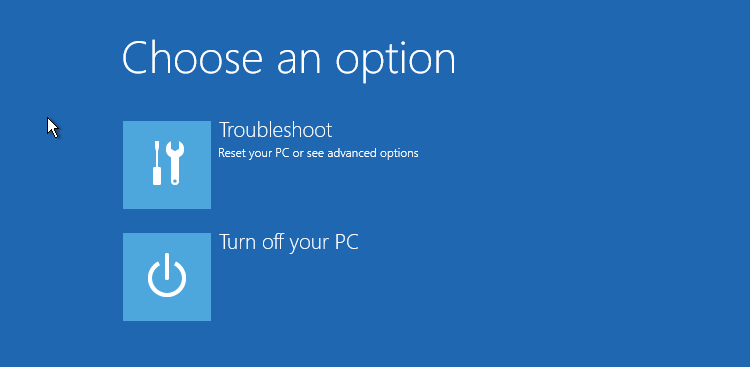
- Select Troubleshoot, then Advanced Options.
- Click Command Prompt to open a command-line window to run DiskPart or CHKDSK.
Managing disk health in a corporate environment
Windows 10 Disk Check is a fundamental tool that performs a quick fix on disk read/write errors and should be the initial step in resolving disk-related performance problems and errors listed in event logs. However, it is better used for general maintenance instead of repairing a known issue as it is impractical to run it on every computer in an organization.
Instead, many third-party programs allow an administrator to manage event logs, including the system event log and identify computers that need attention. Some of the more popular options are Manage Engine EventLog Analyzer, Sematext Logs, SolarWinds Log and Event Manager, Datadog Log Analysis and Logalyze.
Hard drive errors caused by power outages, hardware failure, system crash, or human error can lead to drive inaccessible, data loss or subpar performance. How to free check and fix hard drive error Windows 10? This article tells how to scan and resolve hard drive problems to its utmost by running CHKDSK Windows 10 in 4 methods.
Many Windows users check their hard drives regularly as disk error will slow down or damage a hard drive in an accumulated way. The best way to check and fix hard drive errors or bad sectors to keep it healthy is to use Windows built-in CHKDSK utility – a useful hard disk scanning and repair utility which helps to examine hard drives for errors and repair them.
What Is CHKDSK Utility
Some users may don’t know what CHKDSK is and how to run it. Actually, CHKDSK is the abbreviation of Check Disk, which is a system tool provided in Windows, OS/2 and DOS to check file system integrity of a partition and fix logical file errors.
CHKDSK can help you fix hard drive errors caused by bad sectors, improper or sudden shutdowns, corrupted software and meta data corruption. Whenever you have hard drive errors like you need to format the partition before you can use it caused by improper shutdown of the machine or abnormal removal of USB drives, you can use CHKDSK to find out errors and fix them.
Then how to repair hard drive windows 10 with CHKDSK utility? Here I will illustrate you 4 ways to run Windows 10 Check Disk utility and fix hard drive errors.
Method 1. Run Check Disk Windows 10 from Partition Property
You can run Windows 10 CHKDSK from Windows desktop and the detailed steps are as below.
Step 1. Right-click Windows Start Menu and select Disk Management to open it.
Step 2. When you get the main interface of Disk Management, you can select the drive that you want to check and fix, then right-click it and choose Property.

Step 3. On the Tools tab, click Check.
Step 4. If the system detects that there are errors, you will be asked to check the disk. If no errors are found, you will see a message as shown in the following picture. You can still choose to check the drive if you want to. Click on Scan drive.
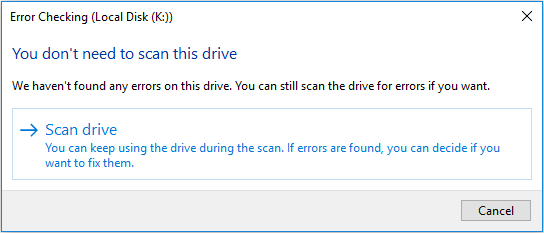
Step 5. Windows will display a message as below after completion. If no errors are found, it will say no error found. Then click Close to exit it. If there are some errors found on the drive, Windows will ask for a restart to fix the errors.
Method 2. CHKDSK Windows 10 with Elevated Command Prompt.
CHKDSK Windows 10 with elevated Command Prompt performs a couple of functions. Although running it may take some time, it does prevent hard disk from being damaged and loss of data in the long term. It is recommended to run it whenever Windows has shut down abnormally or hard disk performs abnormally.
Step 1. Input cmd in the Windows 10 Cortana search box. Right-click the best match then select Run as administrator.
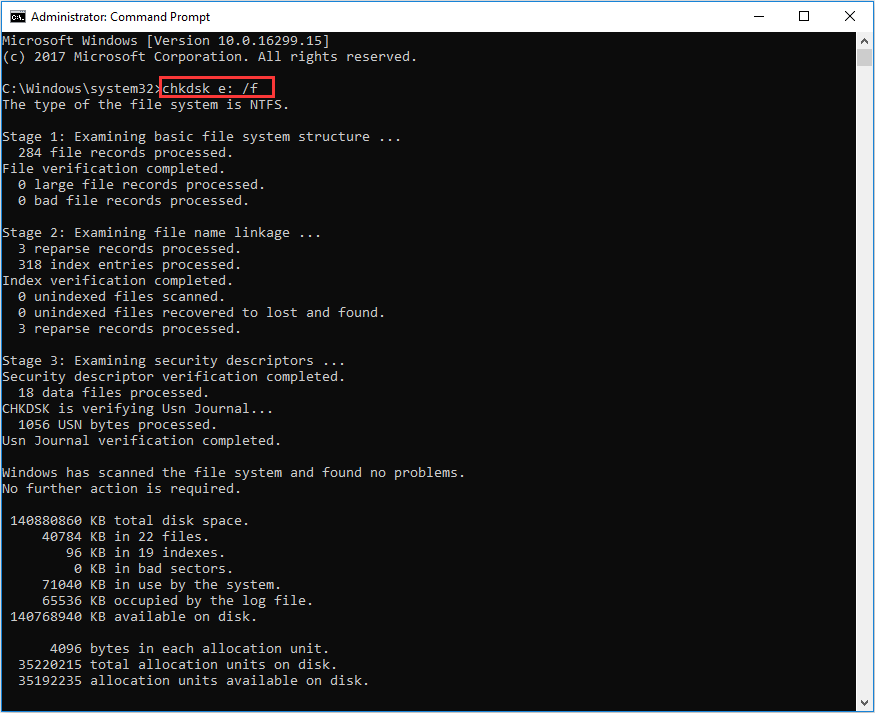
Step 2. In the elevated Command Prompt, type CHKDSK *: /f (* represents the drive letter of the specific drive that you want to scan and fix) and then press Enter. This CHKDSK Windows 10 command will scan your computer drive for errors and try to fix any that it finds.
Here I take CHKDSK e: /f as an example (e represent the drive letter that I want to scan). The bellowing picture shows there is no file system error with the partition. If there is any hard drive errors detected, CHKDSK will help you fix it automatically.
Tip: If you want to check and fix the partition that being used, you may see “CHKDSK cannot run because the volume is in use by another process. Would you like to schedule this volume to be checked the next time the system restarts?” in the Command Prompt Windows.
Type Y and press Enter to comfirm, and then restart your computer to continue with the CHKDSK repair. C drive and system partition will always ask for a reboot.
Step 3. Input exit to exit the Command Prompt Window after performing all operations.
Note: The command supports a number of hard disk operations, but we mainly focus on two of them: /f and /r.
/f – fix any errors it detected
/r – Locate bad sectors on the drive and try to recover any and all readable information from them
Apart from commonly used /f and /r, you can choose the following parameters valid for both FAT32 / NTFS partition when running the CHKDSK utility from an elevated Command Prompt.
- /v – Display list of every file in every directory on FAT32 partition. On NTFS, it displays the cleanup messages.
- /x – force the volume to dismount. Also invalidates all open file handles. This should be avoided in Desktop Editions of Windows, because it may cause data loss/corruption.
The following are valid for NTFS volumes only.
- /c – skip checking of cycles within the folder structure.
- /I – perform a less vigorous check of index entries.
- /L[:size] – change the size of the log file to specified number of kilobytes. If size is not specified, it will display current size.
- /b – re-evaluates bad clusters on the volume (implies /R)
Besides, CHKDSK cannot repair hard bad sectors, in which case, data can get lost and become unusable. If you have very important files and data stored on the drive, you’d better backup the hard drive as this occasion could happen sometimes.
If you cannot boot up your computer, you can run the tool from Command Prompt either by booting your computer into the Recovery Mode or by using the original installation disc to run Command Prompt (For detailed steps, please see Method 4). If you can, you may also run CHKDSK repair with third-party software, but be sure to choose a reliable one.
Method 3. Windows 10 CHKDSK Repair with Third-party Software
If you are not familiar with commands or find that using commands is error-prone as it requires you to input every command correctly, in this way, you can use a free CHKDSK repair alternative to repair hard drive Windows 10. It is recommended to use MiniTool Partition Wizard Free Edition, which makes CHKDSK Windows 10 as a breeze.
MiniTool Partition Wizard Free Edition is an easy-to-use partition manager. Its Check File System function can scan through your hard drive and fix all errors detected. It is not as complicated and time-consuming as running CHKDSK in Command Prompt. And it is simpler to operate with its intuitive interface.
Apart from Check file system function, it can also perform other operations like format partition, resize partition, extend partition, copy partition/disk, convert MBR to GPT without data loss, wipe disk, convert FAT to NTFS.
Note: This function can only be used when the selected partition has a drive letter. For the partition without drive letter, you should appoint it a drive letter and then use this function.
Next, let’s see detailed steps about how to run CHKDSK Windows 10 to fix hard drive error with third-party software.
Step 1. Download MiniTool Partition Wizard Free Edition by clicking the following button. Install it on your computer and launch it to get the main interface.
MiniTool Partition Wizard FreeClick to Download100%Clean & Safe
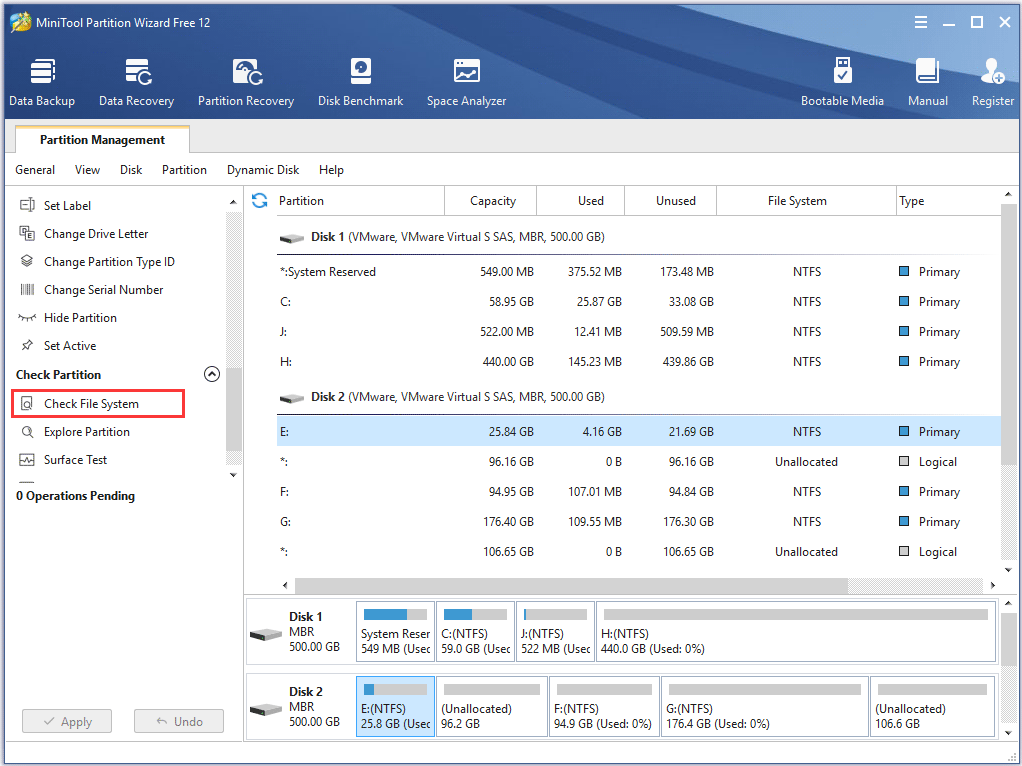
Then select the target partition, and choose “Check File System” from the Check Partition group or from Partition menu.
Step 2. You will see a new window with two options: Check only and Check & fix detected errors. If you only want to check, select Check only; if you want to recover mistakes during the checking process, select Check & fix detected errors. After that, click Start button. Once you click Start, MiniTool Partition Wizard will check/fix file system immediately.
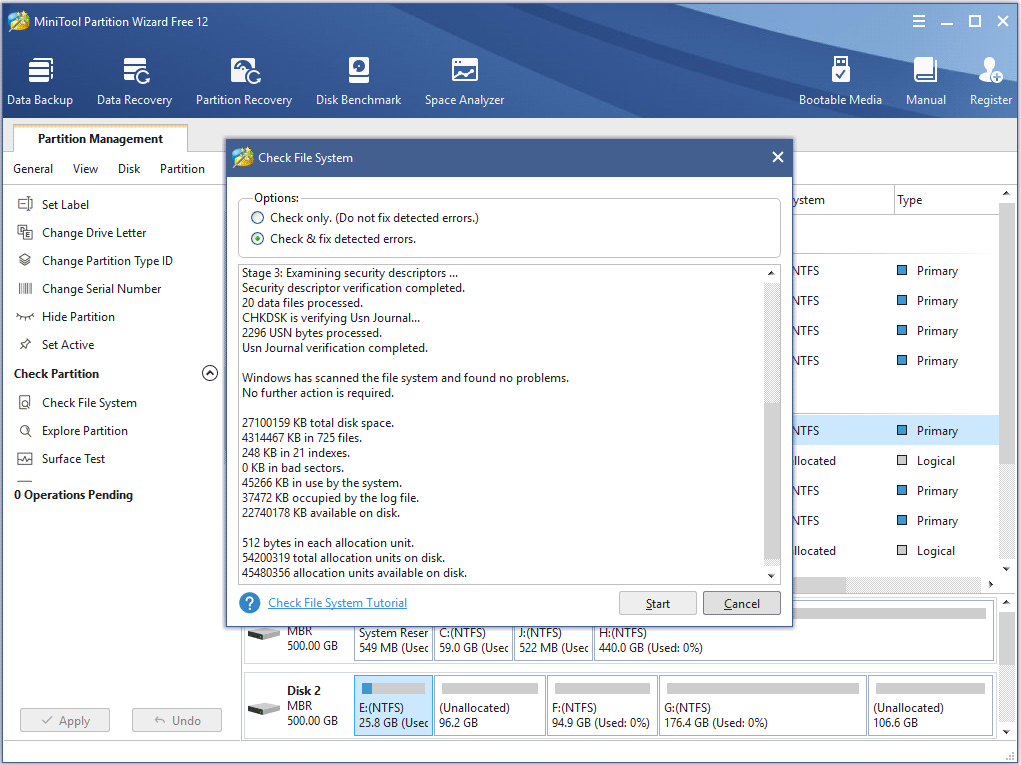
This page shows that MiniTool found no problems. If there is an error detected by MiniTool Partition Wizard, just let Partition Wizard fix it.
Method 4.Run Check Disk Windows 10 from Installation Disc/USB drive
The above three methods show you how to run CHKDSK when your computer can boot up successfully. However, if Windows won’t start, how can you check disk Windows 10?
Well, in this case, you can run CHKDSK on boot and check the hard drive for errors via Windows installation disc or USB drive. By following the steps as below, CHKDSK utility can be accessed easily.
Note: If you don’t have Windows 10 installation disc or USB flash drive to run CHKDSK, you can also run CHKDSK on MiniTool Partition Wizard Bootable Edition, which is very light and user-friendly.
Step 1. Insert Windows 10 installation disc or USB flash drive with Windows.
Step 2. Change the BIOS boot sequence to boot from the disc or USB drive.
Step 3. Select your language performance and click Next.
Step 4. Click Repair your computer.
Step 5. Then choose Troubleshoot on this page.
Step 6. On the Advanced options page, click Command Prompt to open it.
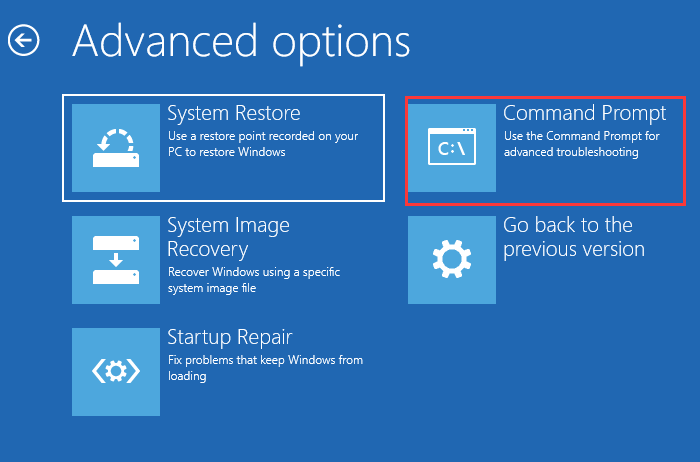
Step 6. When you successfully open the Command Prompt, you can follow the steps in Method 2 to execute CHKDSK commands.
After reading the 4 free methods in this post, I’m sure that you have learned how to use Windows 10 CHKDSK utility to repair hard drive errors. Now try one of them to complete hard drive repair by yourself.
“After reading this post, I learned how to repair hard drive Windows 10 with CHKDSK utility. People who don’t know how to run CHKDSK utility to fix hard drive error may check this post.”Click to Tweet
Wrapping Things Up
Have you fixed your hard drive with CHKDSK utility? Hope CHKDSK will help you fix all kinds of hard drive problems, and you can go back using your computer normally.
If you have any question about how to repair hard drive error with Window 10 Check Disk utility or if you have other better solutions, you can leave a message in the following comment zone and we will reply as soon as possible. If you need any help when using MiniTool software, you may contact us via [email protected].
CHKDSK Windows 10 FAQ
How do I run chkdsk in Windows 10?
To run chkdsk, please type cmd in the Windows 10 Cortana search box. Right-click the best match Command Prompt and select Run as administrator. In the command prompt window, type chkdsk e: /f (e represents the drive letter of the specific drive you want to scan and fix). Then CHKDSK will scan your drive and fix detected errors automatically.
Which is better chkdsk R or F?
Chkdsk /f will scan your drive and fix any errors it detected. Chkdsk /r will locate bad sectors on the drive and try to recover any and all readable information from them. Chkdsk /f will only check and fix disk errors, not bad sectors. So, chkdsk /r is better.
What is chkdsk f command?
Chkdsk /f is a Command Prompt command that is used to check a target drive on your computer and fix any hard drive errors it detects. Apart from chkdsk f, chkdsk /r is also commonly used to detect sectors on the hard drive and recovers any information still intact.
How do I repair my hard drive Windows 10?
Open Disk Management, select the drive that you want to check and fix, then right-click it and choose Property. On the Tools tab, click Check. Then it will scan your drive for hard drive errors and repair hard drive Windows 10 automatically.
Checking the status of our hard drive is a fundamental task if we want to keep our computer in good condition and avoid future problems. If you are a user of Windows 10, you may have wondered how to perform these types of checks, or even heard of a somewhat old term, ‘Scandisk’. Let’s break down step by step how you can check and fix errors on your drives in this version of Windows.
The Scandisk command may sound old-fashioned, but it still lives on to some extent under another name: CHKDSK. While the latter is still used today, the functionality has been the same for several generations of the operating system. Here’s how to use the CHKDSK command and how it replaces Scandisk in Windows 10.
What is CHKDSK and why does it replace Scandisk?
CHKDSK, which stands for ‘Check Disk’ in English, is a tool that Microsoft included in its operating system since very old versions such as MS-DOS. This utility replaces Scandisk, which was used in older versions of Windows such as 95, 98 and earlier versions. The basic function of CHKDSK is to scan the hard drive for logical and physical errors., and then proceed to repair it if necessary.
CHKDSK also has the ability to scan for bad sectors on your hard drive. These errors can occur due to different factors such as unexpected power outages, file crashes, or even continuous disk usage over time. So if you notice that your computer is starting to slow down or certain applications are not working as they should, running CHKDSK could resolve many of these hard drive-related issues. hardware.
When you should run CHKDSK
CHKDSK is a powerful tool, but It is not necessary to run it on a daily basisIt is intended for use in times when you suspect that something is wrong with your hard drive, such as when your computer takes longer than usual to start, when applications do not respond, or if you notice that the overall performance of the system is lower than usual.
Another key time to run CHKDSK is after a sudden shutdown or system crash. Certain sudden power interruptions can cause errors in files or disk sectors, it is important to carry out this check as soon as possible after an incident of this type.
Advantages of using CHKDSK
- Automatic error resolution: CHKDSK can detect and fix problems without user intervention.
- Locating bad sectors: If there are bad sectors, CHKDSK will mark them so that they will not be used in the future.
- Preventive Maintenance: Running CHKDSK periodically can prevent performance issues.
How to run CHKDSK
There are several ways to run CHKDSK, but the most common and simple It is through File Explorer in Windows 10. Here we will show you the different methods you can use to run this utility.
Run CHKDSK from File Explorer
The simplest way to run CHKDSK is through Windows File Explorer. This is an accessible and convenient option for most users.
Step 1: Open File Explorer (Windows + E) and go to the ‘This PC’ section.
Step 2: Select the drive you want to scan, usually this will be the C: drive.
Step 3: Right click on the drive and select ‘Properties’.
Step 4: In the ‘Tools’ tab, you will see an option that says ‘Check’. Click on it.
Step 5: The system will inform you if it found any problems. If you wish, you can proceed with the manual analysis by clicking ‘Scan drive’.
Run CHKDSK from the console (Command Prompt or PowerShell)
If you want more advanced control over CHKDSK and how it runs, You will be able to use the console commandsand Symbol of the system o PowerShellThese are more technical methods that allow for a greater level of detail in the process.
Step 1: Open the start menu and search for ‘cmd’ or ‘PowerShell’. Run either as administrator.
Step 2: Once the window opens, type the following command: chkdsk C: / f / r. This command will mean the following:
- /F: Orders to repair the detected errors
- / r: Locates bad sectors and recovers readable information
Step 3: The tool may ask you to schedule the scan for the next Boot from the system if you are trying to analyze the C: drive. Accept by typing ‘S’.
Step 4: Restart your computer and CHKDSK will run automatically before Windows boots.
Additional CHKDSK Commands
CHKDSK has a number of switches or parameters that allow you to further customize the disk scan. Here are some additional commands you can use:
- /x: Disassemble the unit before starting the test.
- /l:[size]: Change the size of the log file.
- /scan: Run an online scan.
Alternatives to CHKDSK
While CHKDSK is a very useful tool that comes with Windows itself, There are some alternatives that offer additional functions in the management and repair of hard drives.Tools like EaseUS Partition Master and MiniTool Partition Wizard allow you to manage your hard drive partitions, perform checks and error repairs without having to delve into the complexities of the command prompt.
EASEUS Partition Master
EASEUS Partition Master is a very complete disk and partition management software. It offers a user-friendly graphical interface to manage partitions, and one of the most useful functions is the ability to scan and repair file system errors in a very simple way.
The best thing about EaseUS is that you can perform these tasks without having to deal with text commands or typing anything into a terminal. You just need to select the partition or drive you want to analyze and the program will do everything for you.
MiniTool Partition Wizard
Another option you can consider is MiniTool Partition WizardThis software is very similar to EaseUS Partition Master. It has advanced features such as hard drive cloning, partition recovery or partition format conversion, but it also includes a useful function to scan and fix errors on hard drives.
Resolving common errors with CHKDSK
CHKDSK is not always able to solve all problems on its own. If you notice that CHKDSK gets stuck or cannot be repaired, it may be a sign that your hard drive is physically failing or that there is a more serious problem with the file system. In these cases, the following solutions may help you:
- Restart analysis from safe mode.
- Try the third-party utilities mentioned above.
- Check if the problem is a physical failure of the disk by checking the temperatures or noise of the disk.
If you’ve tried everything we’ve explained and your drive is still having problems, it may be time to consider replacing your hard drive.
CHKDSK is one of the main allies to keep your hard drive in an optimal state, but it is not the only solution. There are graphical alternatives such as EaseUS and MiniTool that make the job much easier without the need for technical knowledge. For most users, running CHKDSK from Explorer is more than enough, but if you have more serious problems, you can always resort to more advanced methods or try professional alternatives.
I’m Alberto Navarro and I’m passionate about everything related to technology, from cutting-edge gadgets to software and video games of all kinds. My interest in digital began with video games and continued in the world of digital marketing. I have been writing about the digital world on different platforms since 2019, sharing the latest news in the sector. I also try to write in an original way so that you can stay up to date while having fun.
I studied Sociology at university and completed my studies with a Master’s in Digital Marketing. So if you have any questions, I’ll share with you all my experience in the world of digital marketing, technology and video games.