(Image credit: Mauro Huculak)
On Windows 11 (or 10), creating frequent backups is one of the best strategies to protect your documents, pictures, videos, custom configurations, and system files against software problems, hardware failure, hackers, and malware (such as viruses and ransomware) attacks.
Although there are many third-party utilities that you can use, Windows ships with the legacy «Backup and Restore» tool, which allows you to create full backups automatically at regular intervals.
A full backup using this tool means that Windows 11 (or 10) will make a copy of everything on your computer, including installation files, settings, apps, and all your files stored in the primary drive, as well as those files stored in different locations. Then, when your device suddenly stops working, a critical error prevents the device from starting correctly, or files get damaged, you can use the «Backup and Restore» feature to recover individual files or the entire system as necessary.
In this how-to guide, I will walk you through the steps to set up full backups of your device automatically.
Important: The Backup and Restore feature is no longer maintained. You can still use it, but it may stop working in future releases. Also, as a deprecated feature, Microsoft can decide to remove this tool completely in future releases.
How to configure automatic backups on Windows
To configure automatic backups on Windows 11 (and 10), use these steps:
- Open Start.
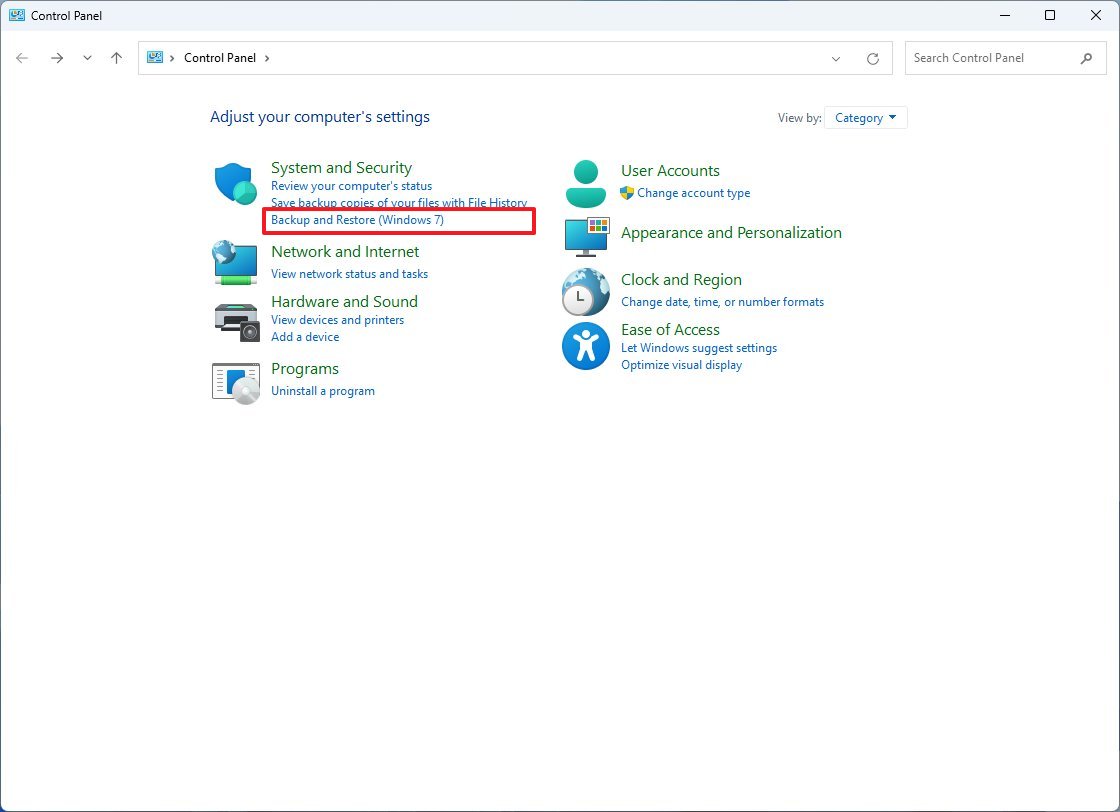
- Search for Control Panel and click the top result to open the app.
- Click the «Backup and Restore» setting under the «System and Security» section.
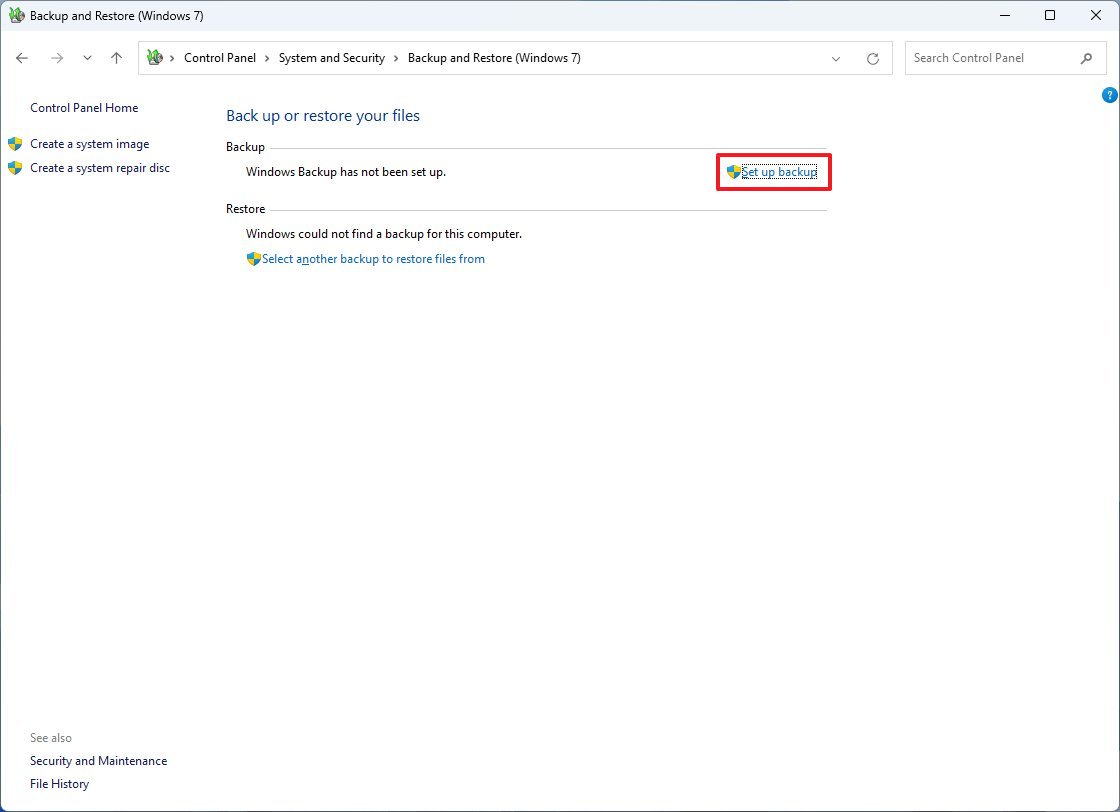
- Under the «Backup» section, click the «Set up backup» option on the right.
- Select the external drive to store the backups.
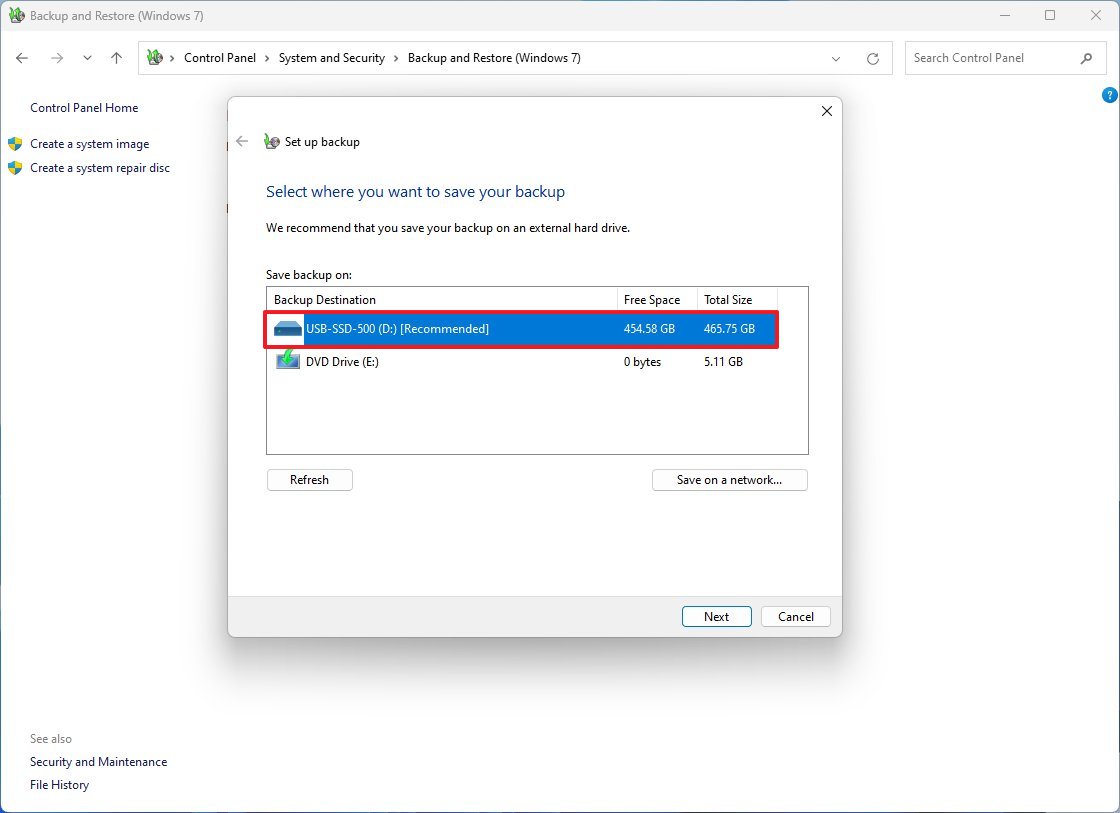
- Click the Next button.
- Select the «Let me choose» option under the «What do you want to backup?» section.
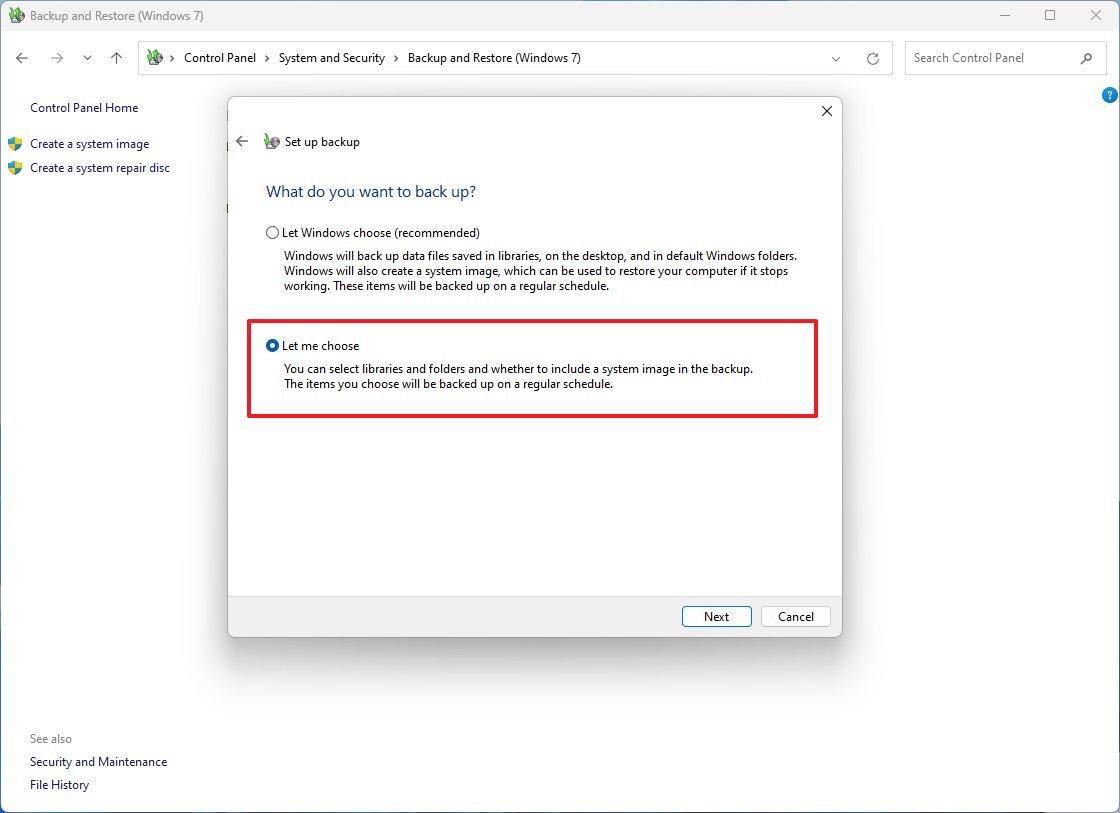
- Quick tip: You can select the «Let Windows choose» option, but if you want to make sure that everything you want is getting backed up, the «Let me choose» is the option that you want to select.
- Click the Next button.
- Under the «Data Files» section, check all the items as necessary.
- Under the «Computer» section, check the Local Disk (C:).
- Quick note: If you have multiple drives, they will also appear in this list.
- Check the «Include a system of drives: System Reserved, (C:)» option.
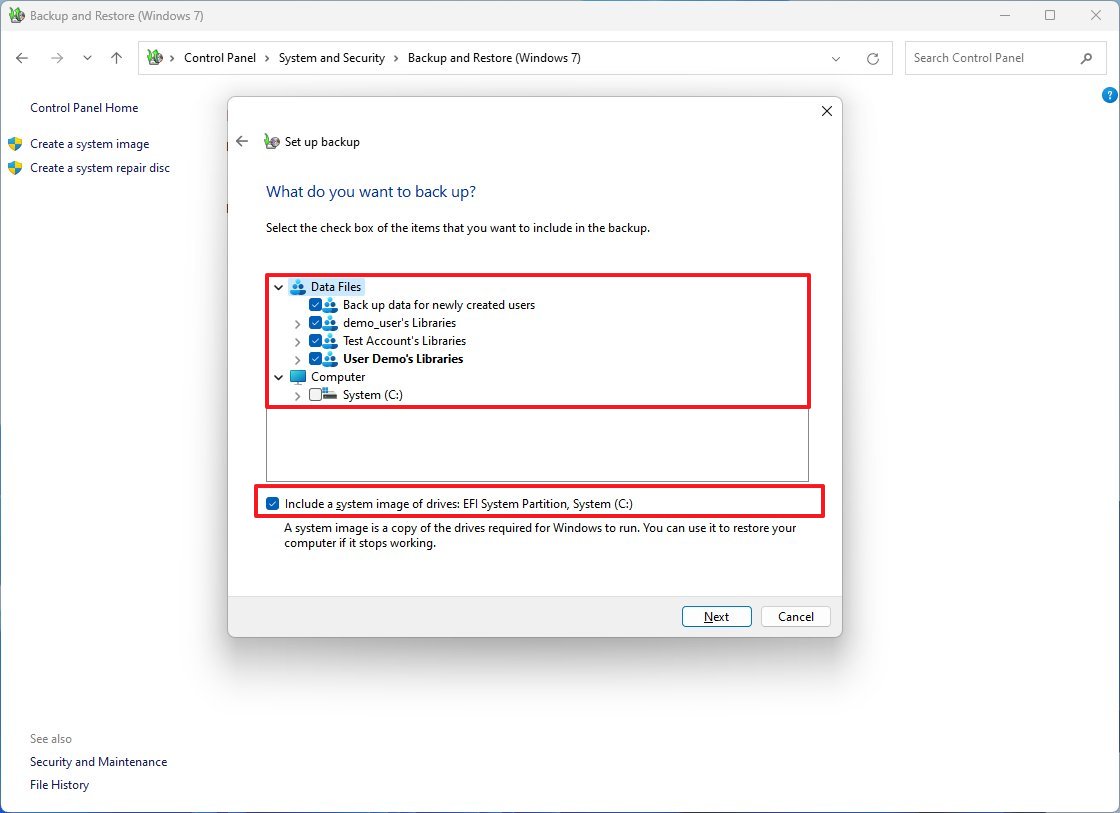
- Click the Next button.
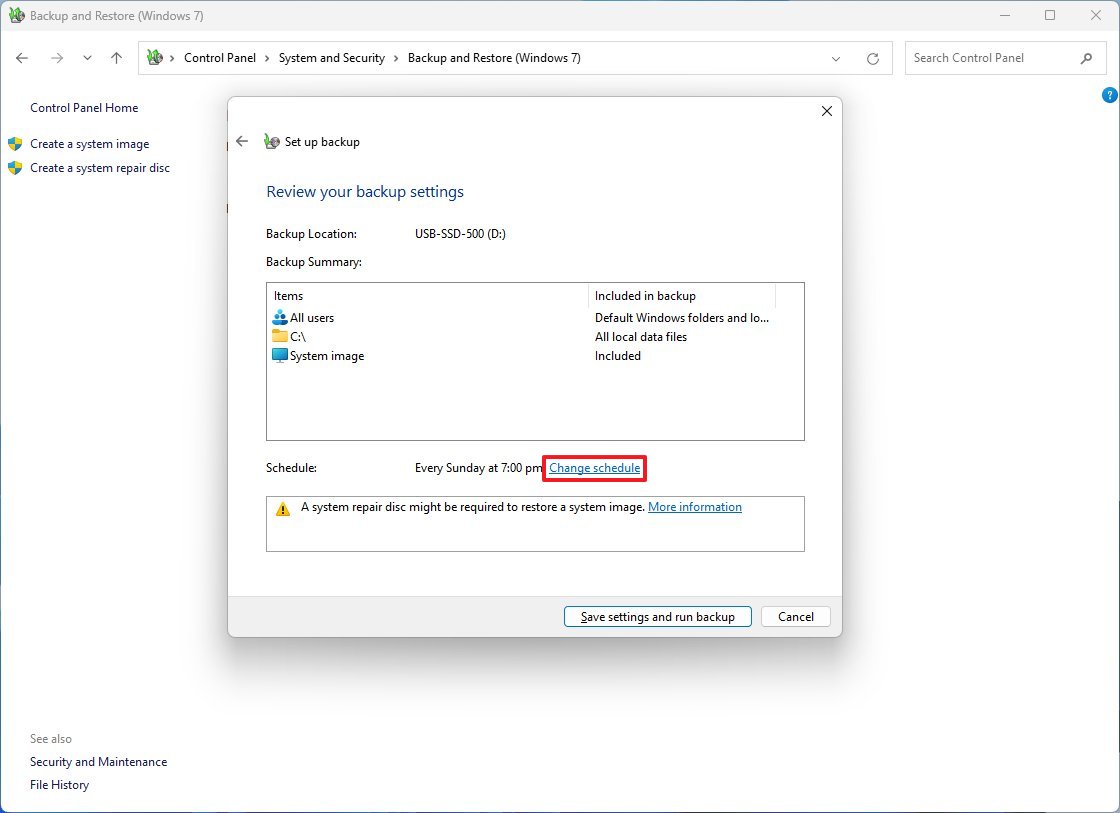
- Click the Change schedule option.
- Check the «Run backup on a schedule» option.
- Specify the frequency, date, and time when Windows should backup the device.
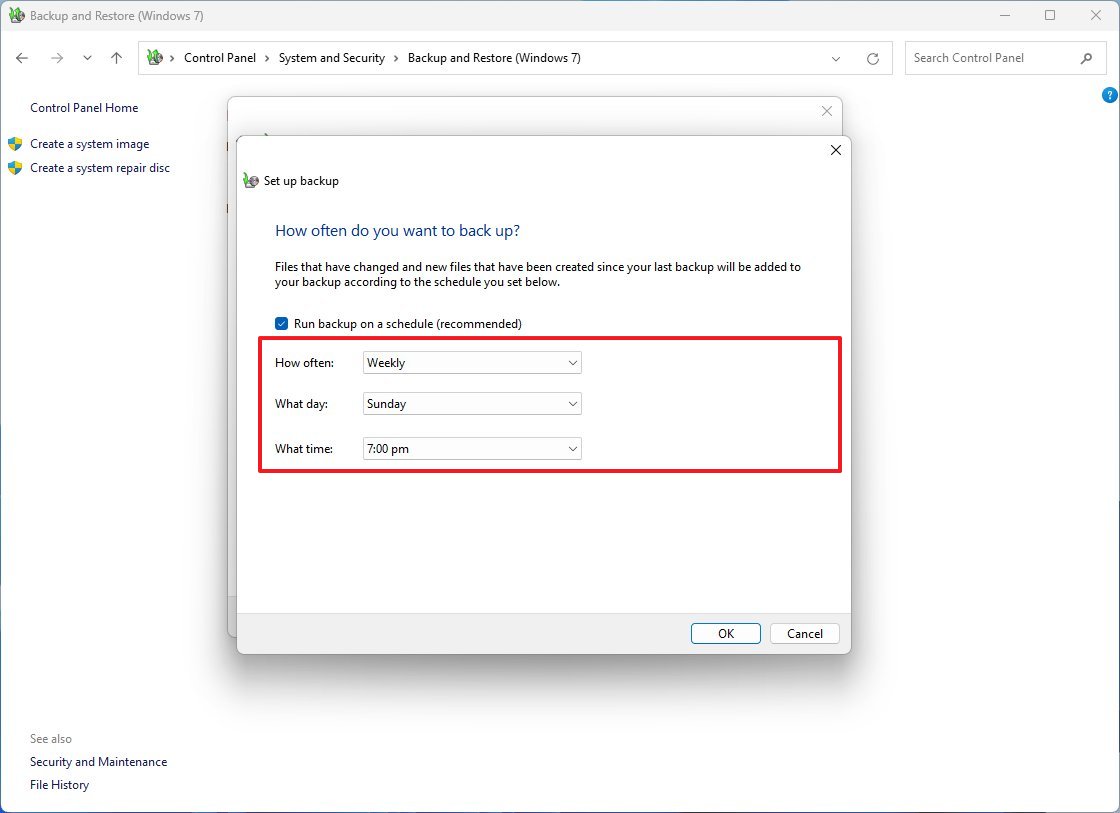
- Quick tip: If you’re working with essential data, such as work files, you should consider backing up using the «Daily» option.
- Click the OK button.
- Click the «Save settings and exit» button.
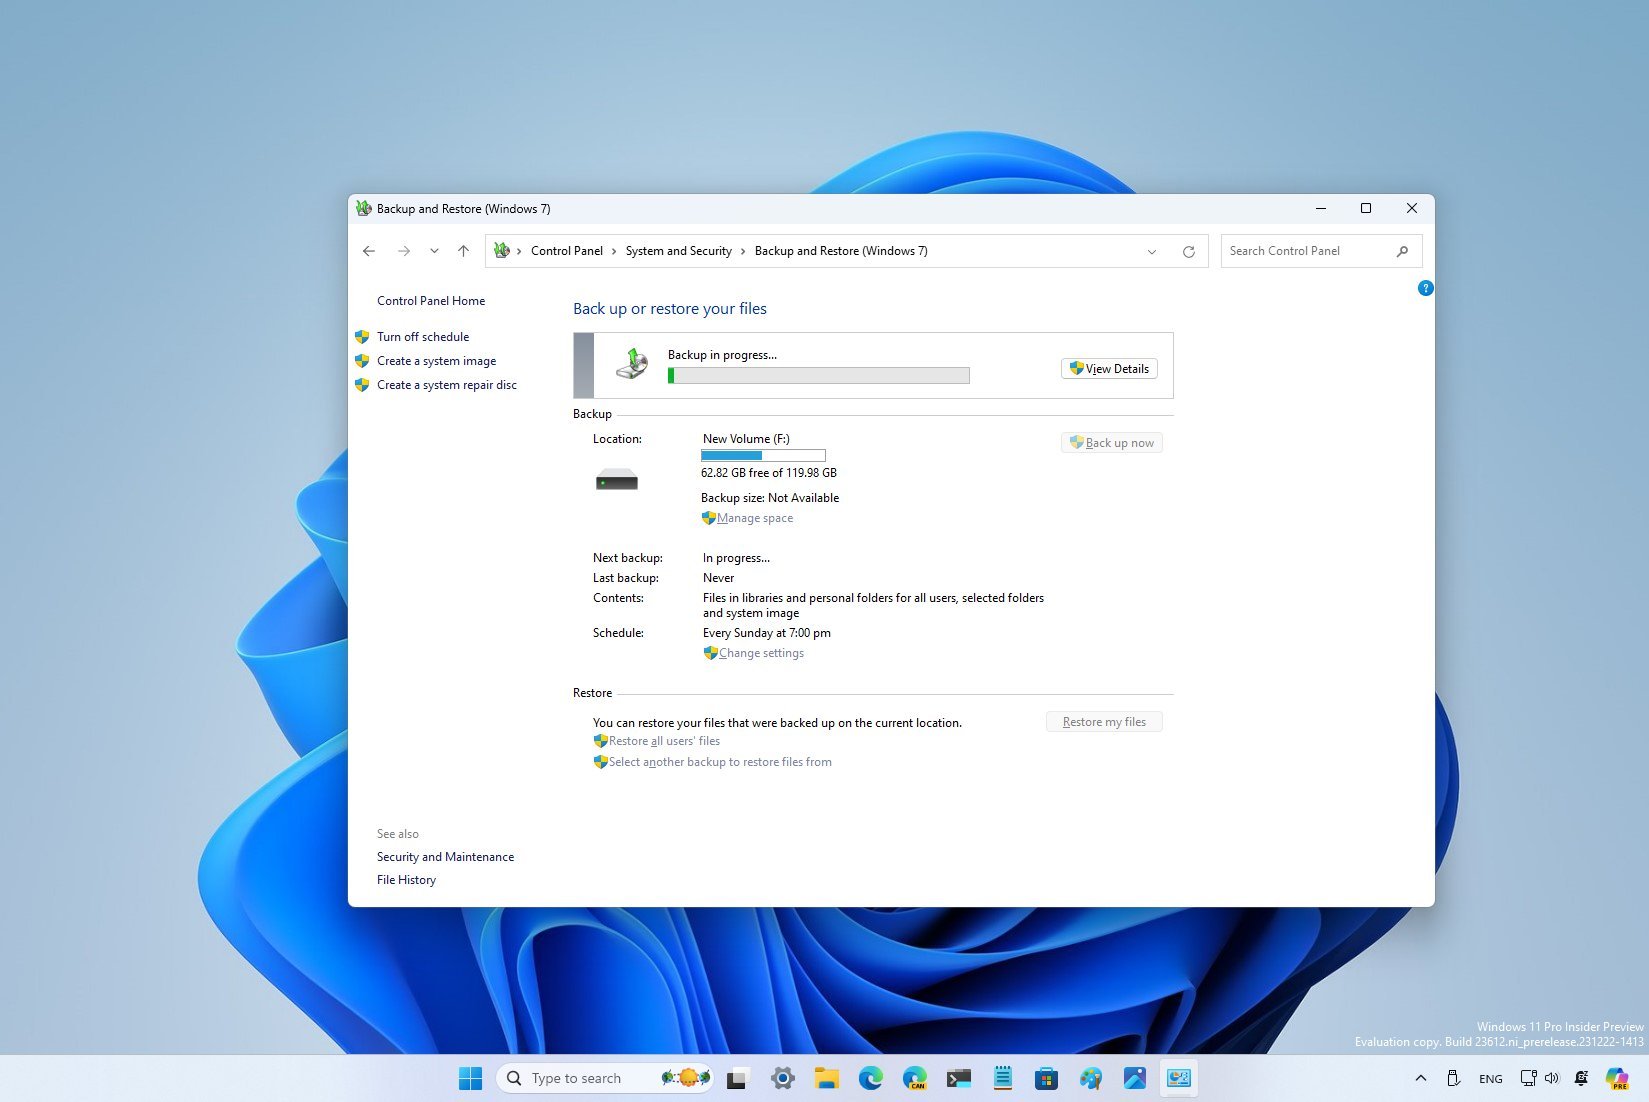
Once you complete the steps, an initial backup will be created, and incremental backups will be performed on the specified schedule.
All the latest news, reviews, and guides for Windows and Xbox diehards.
While the backup is in process, you can click the «View details» button to see more information about the files being copied and an option to interrupt the process (if necessary). After the process is complete, in the «Backup» section, you can view the current size of the backup and drive location and the date and time of the next and previous backup.
How to manage backup settings on Windows
After setting up the automatic backup feature on Windows 11 (or on your Windows 10 device), you can manage many settings to prevent running out of space in the external drive and changing the schedule as necessary.
Free up backup space
To free up space on the external backup drive, use these steps:
- Open Start.
- Search for Control Panel and click the top result to open the app.
- Click the «Backup and Restore» setting under the «System and Security» section.
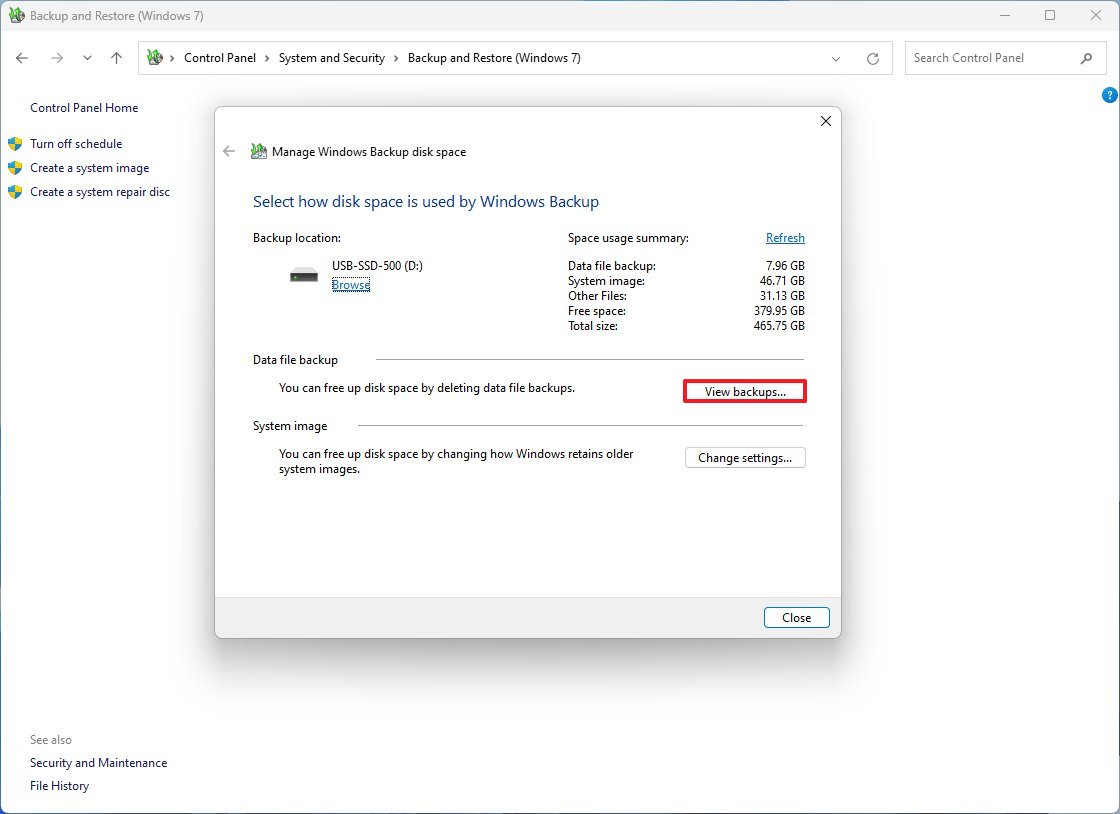
- Under the «Backup» section, click the Manage space option.

- Click the View backups button under the «Data file backup» section.
- Select the oldest backup from the list.
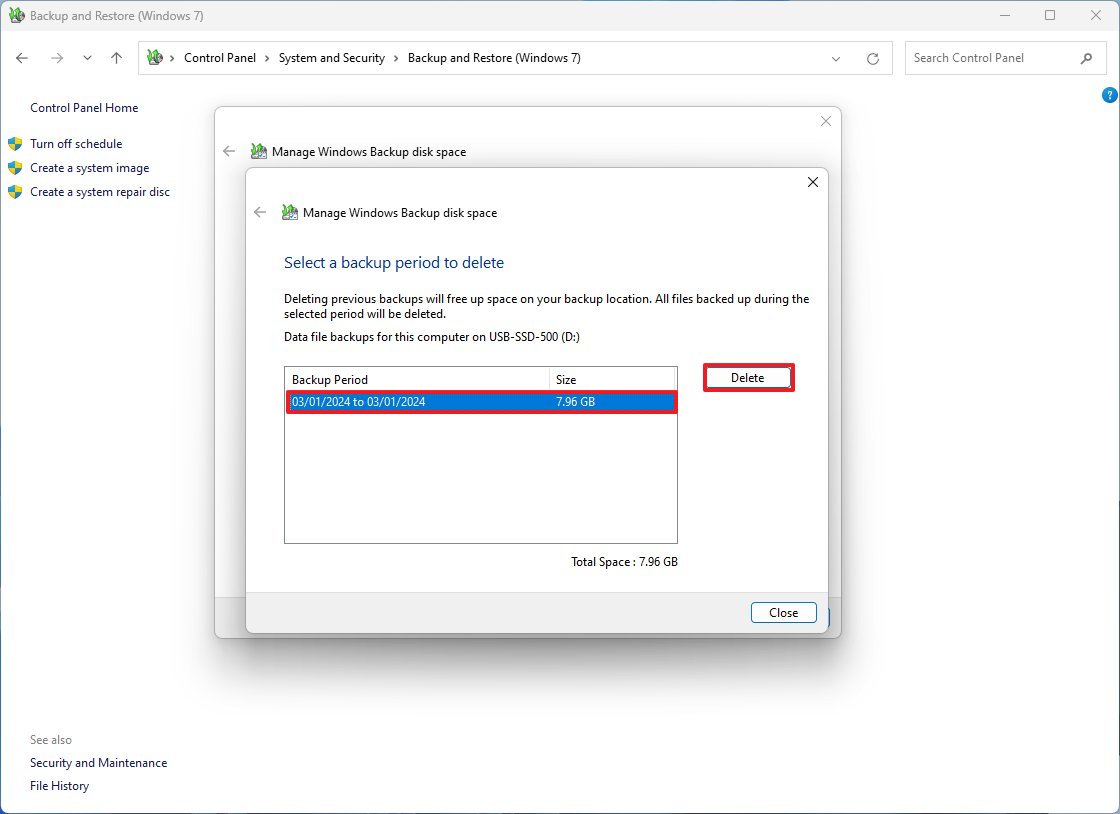
- Click the Delete button.
- Repeat steps 7 and 8 to delete additional backups as necessary.
- Click the Close button.
- Click the Change settings button under the «System image» section.

- Select the «Keep only the latest system image and minimize space used by backup» option.
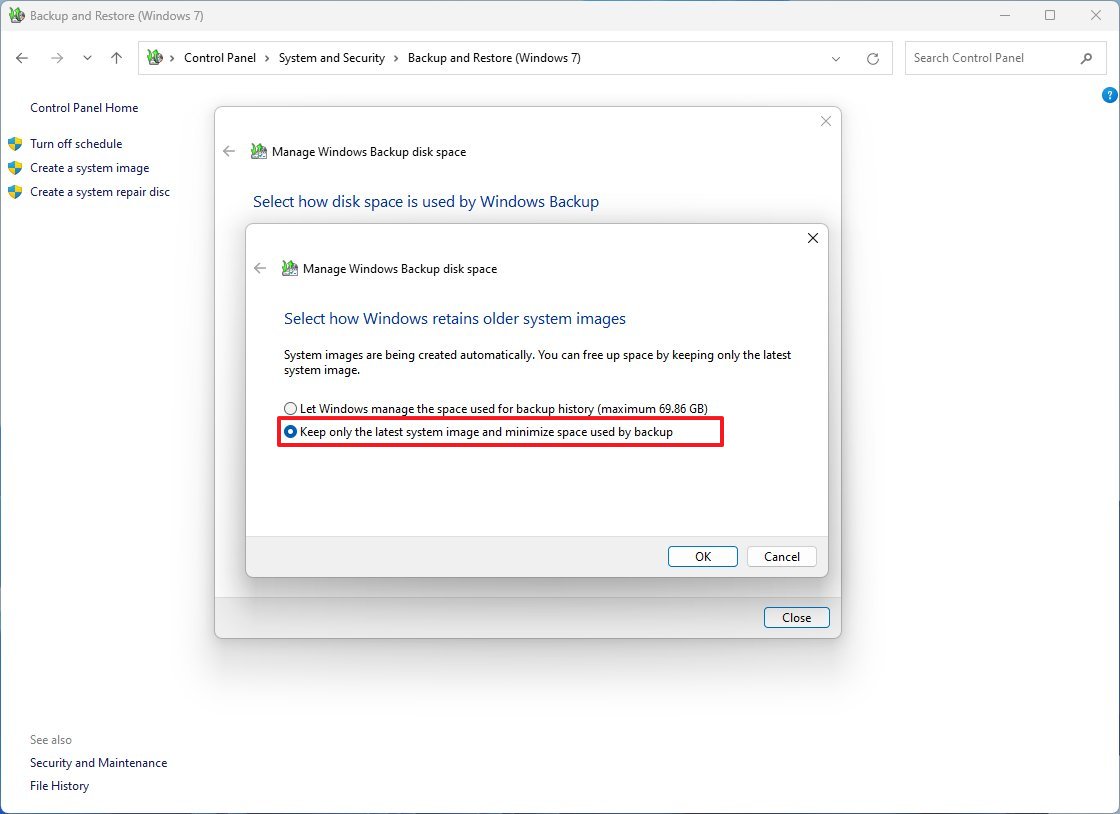
- Click the OK button.
- Click the Delete button.
- Click the Close button.
After you complete the steps, the external drive should have more space to allocate future backups.
If you have a lot of data to protect and optimizing the backup drive storage doesn’t make a difference, you should consider getting a larger external storage.
Change backup schedule
To set a different schedule to run backups automatically on Windows 11 (or 10), use these steps:
- Open Start.
- Search for Control Panel and click the top result to open the app.
- Click the «Backup and Restore» setting under the «System and Security» section.
- Under the «Schedule» section, click the Change settings option.
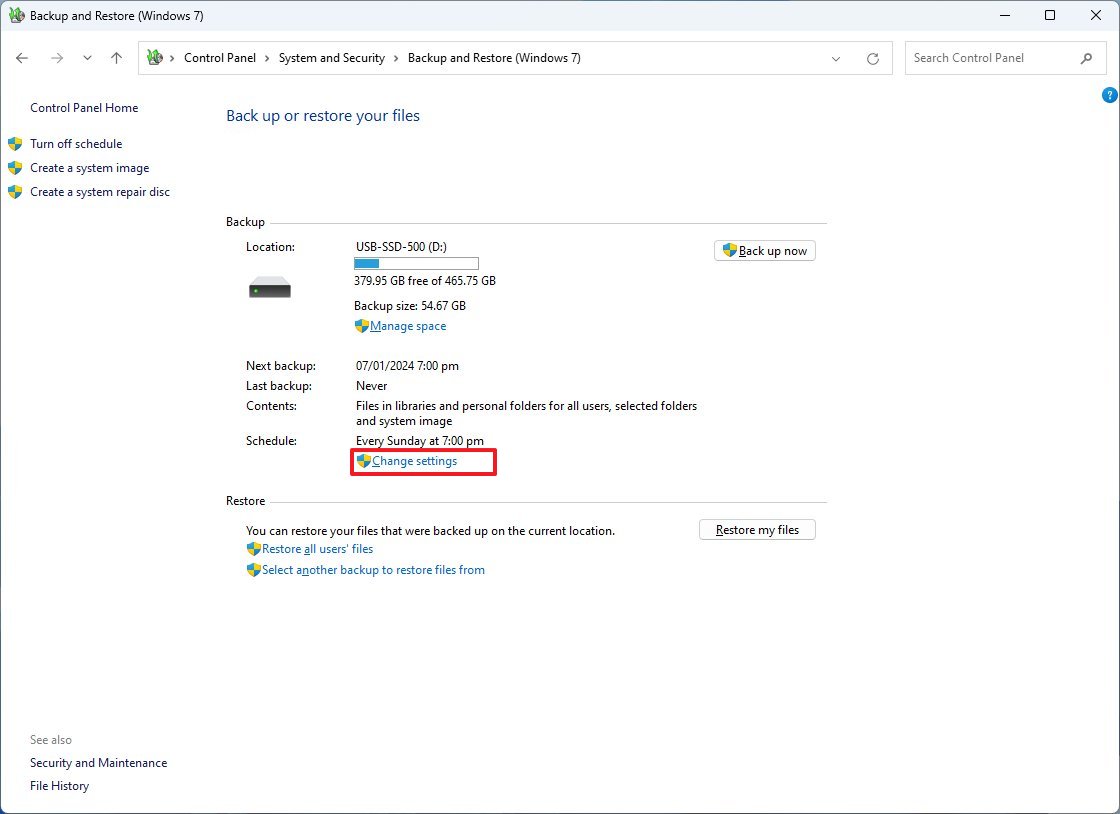
- Continue with the on-screen directions (without changing the settings) until you arrive on the «Review your backup settings» page.
- Click the Change schedule option.
- Specify a new schedule for the backup.
- Click the OK button.
- Click the «Save settings and exit» button.
Once you complete the steps, the system will run the backup automatically during the specified new schedule.
When the time comes to restore your computer from backup, you’ll need a bootable media. Although the tool includes an option to create a disc to boot your device to restore a backup, newer devices no longer come with disc drives.
If you don’t have a CD-ROM drive, you’ll need to use the Media Creation Tool to create a USB bootable media, which you can use to access the recovery environment when your computer doesn’t boot. (This is the link to download the tool for Windows 10, and this is the page to download the version of Windows 11.)
In the case that you still have a disc drive, insert a writable blank disc and use these steps:
- Open Start.
- Search for Control Panel and click the top result to open the app.
- Click the «Backup and Restore» setting under the «System and Security» section.
- Click the «Create a system repair disc» option from the left pane.
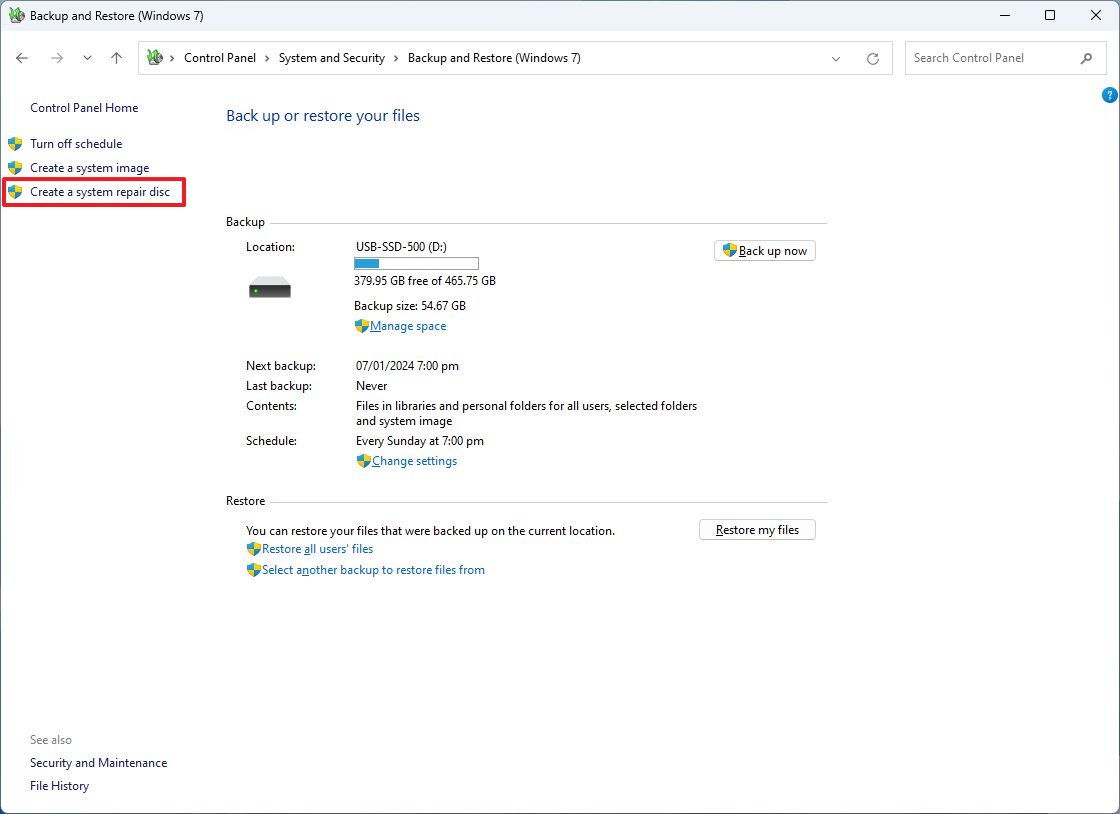
- Click the Create disc button.
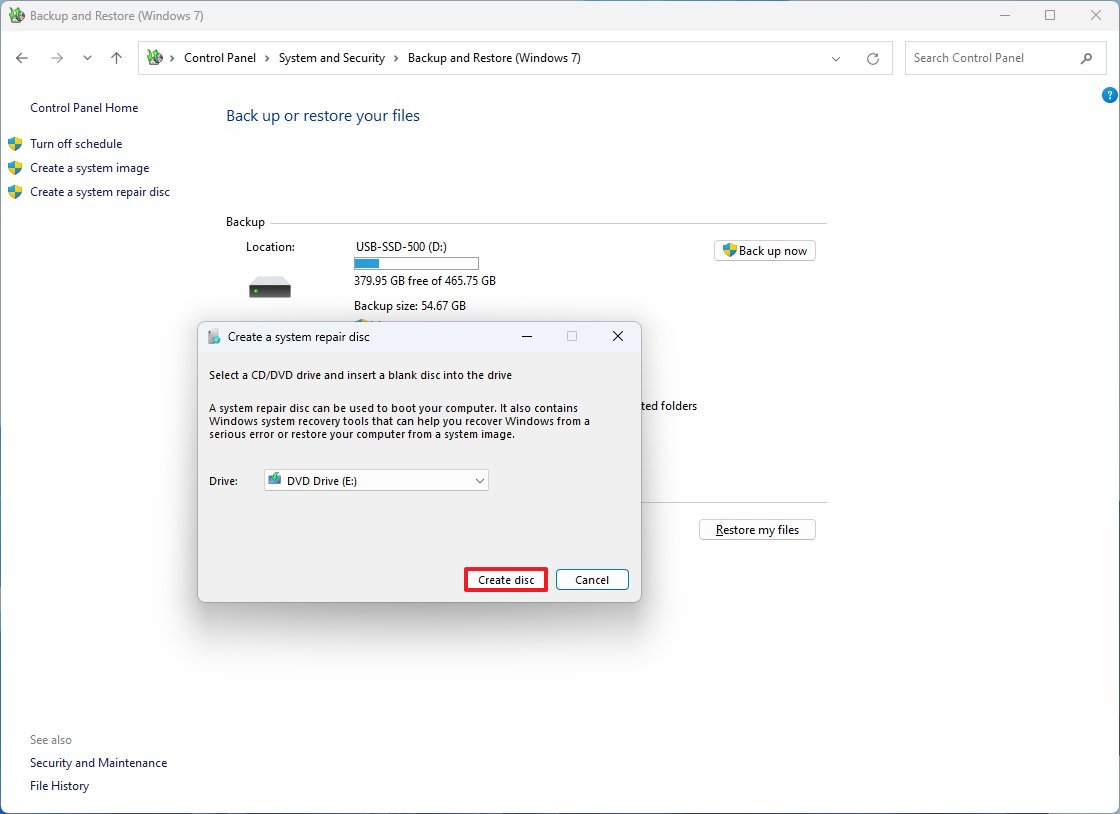
After you complete the steps, you can use the physical disc or USB bootable media to start your computer in the Advanced startup mode to recover your files.
How to restore backup on Windows
When the unexpected happens, you can use the «Backup and Restore» feature to restore files individually or recover your entire system and files.
Restore files from full backup
To restore one or multiple files, use these steps:
- Open Start.
- Search for Control Panel and click the top result to open the app.
- Click the «Backup and Restore» setting under the «System and Security» section.
- Click the «Restore my files» button under the «Restore» section.
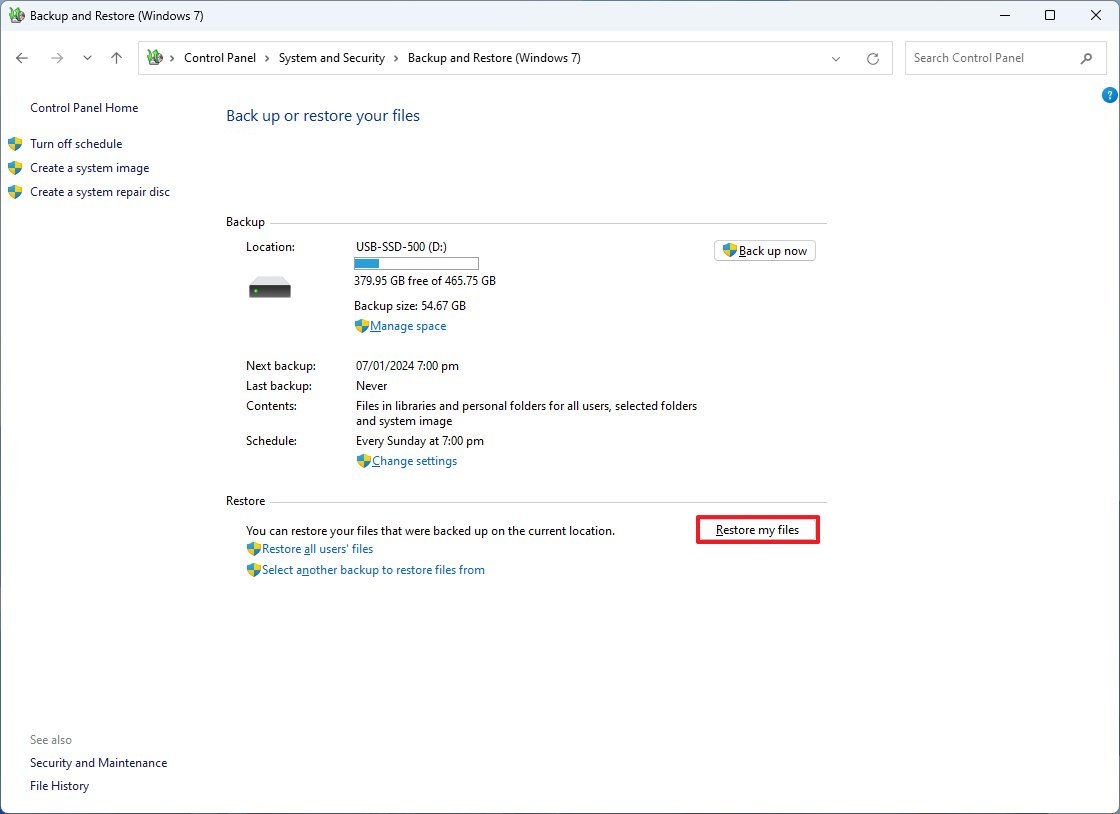
- Click the «Browse for files» button.
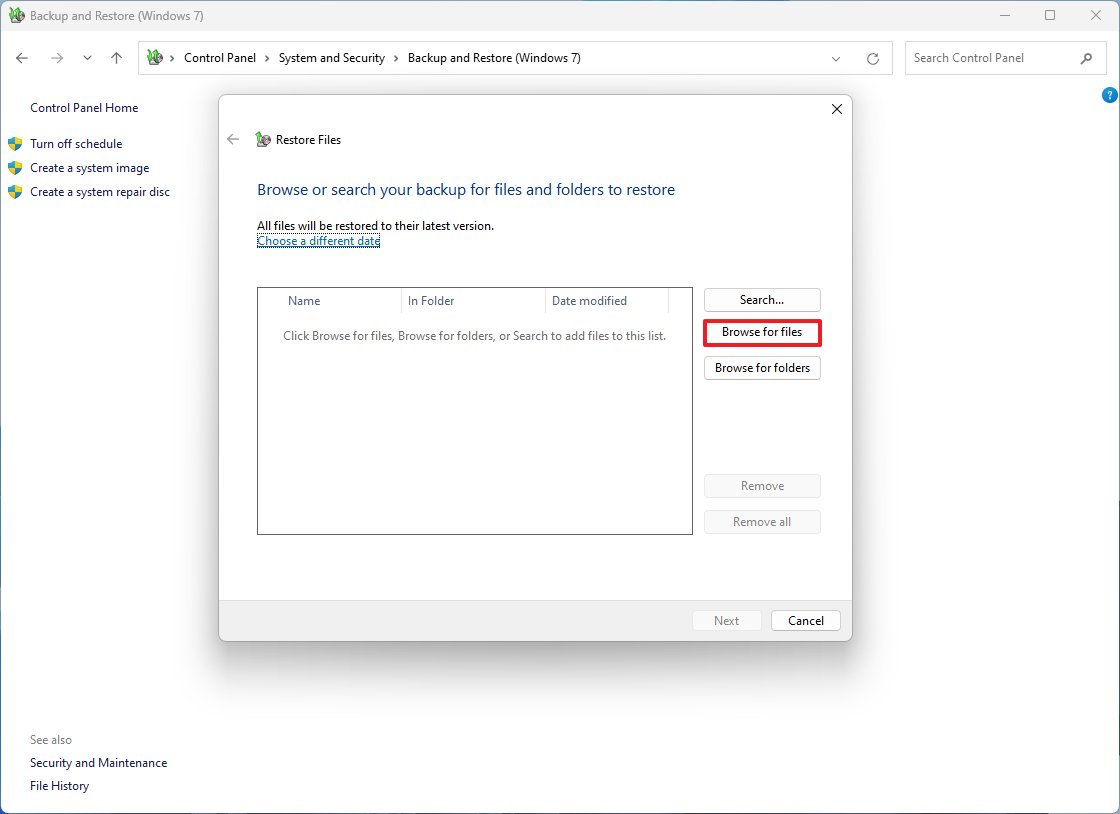
- Select the files that to restore from the automatic backup.
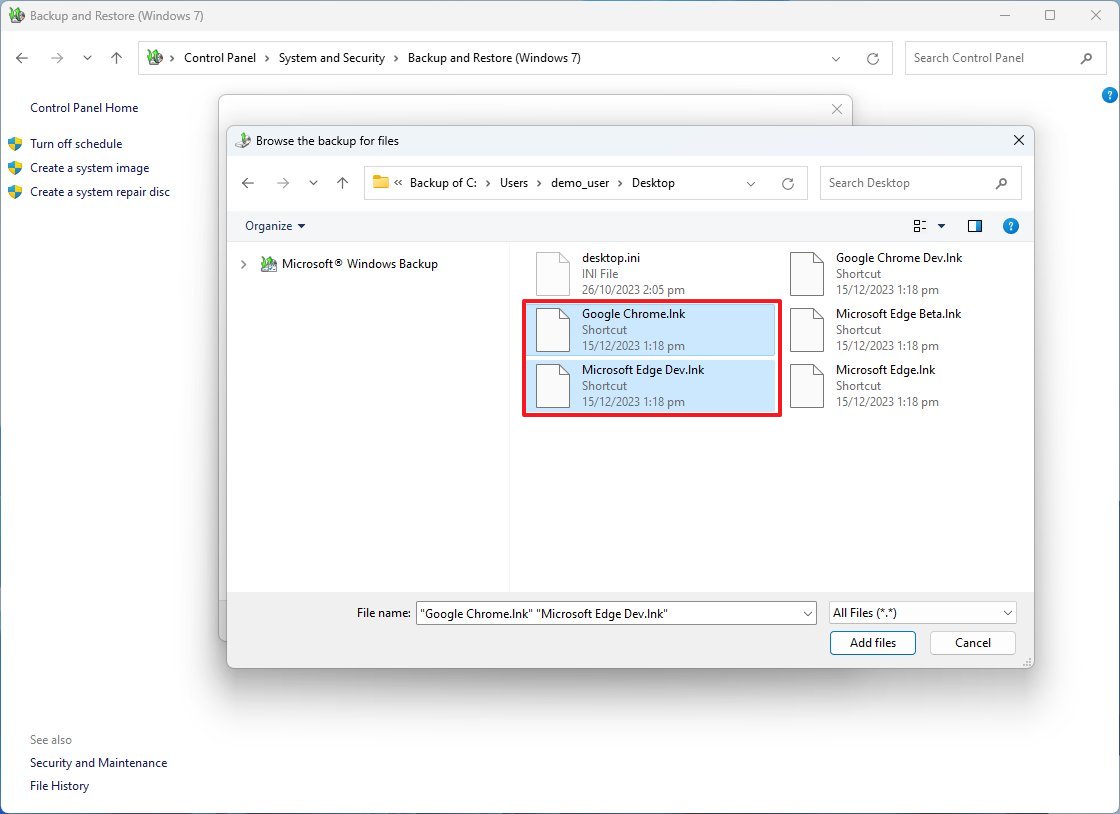
- Click the Add files button.
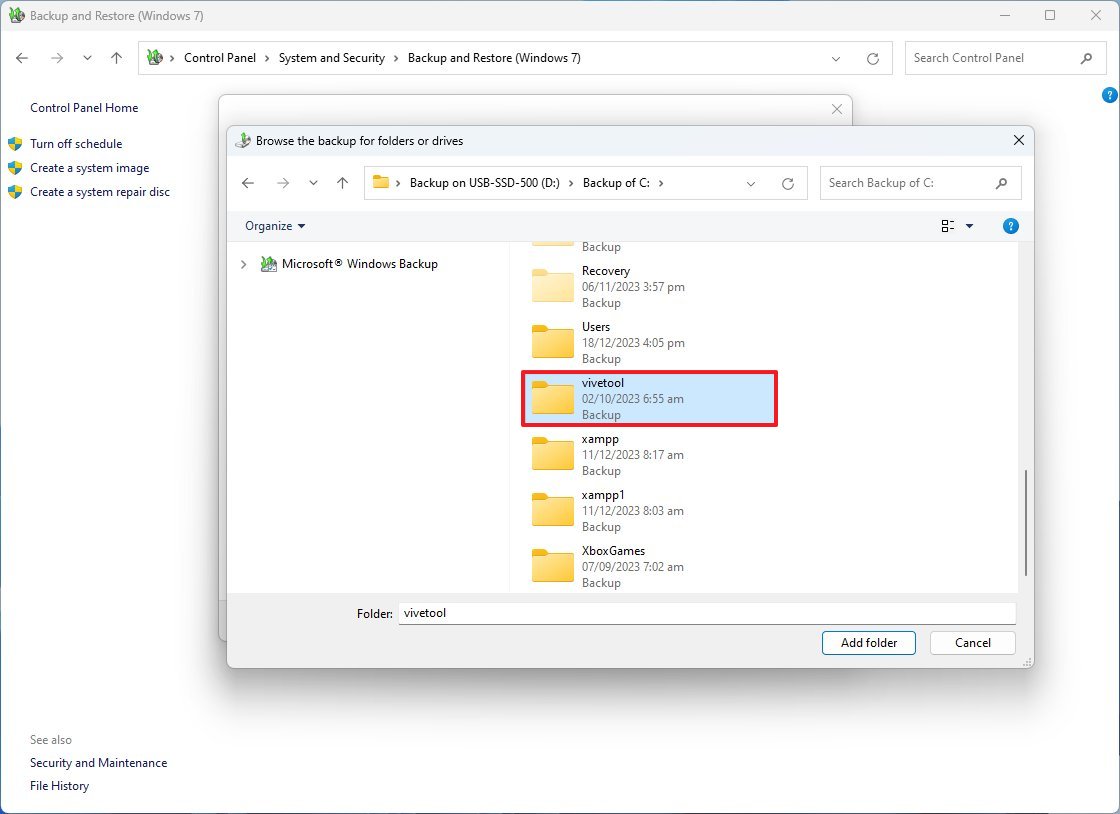
- Click the «Browse for folders» button.
- Select the folders to restore from the backup.
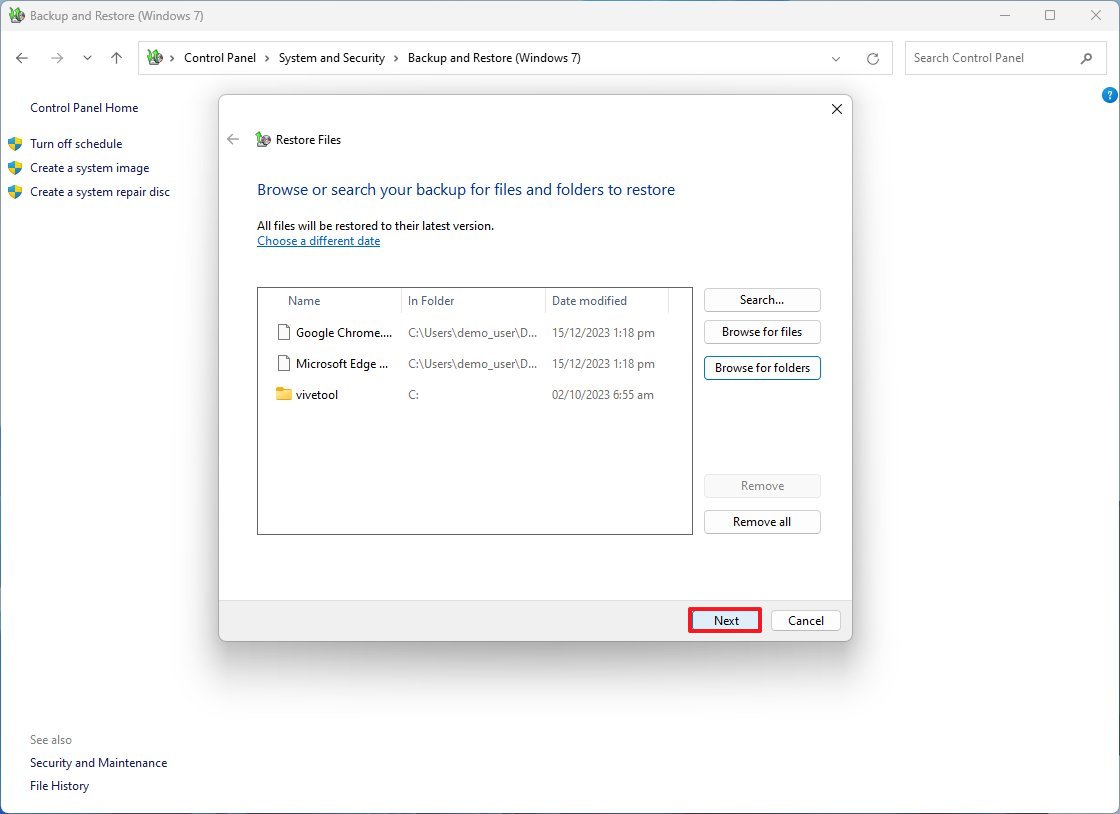
- (Optional) If you don’t know the location of the file, use the Search button to find it.
- Click the Next button.
- Select the «In the following location» option (recommended).
- Click the Browse button.
- Select the restore location.
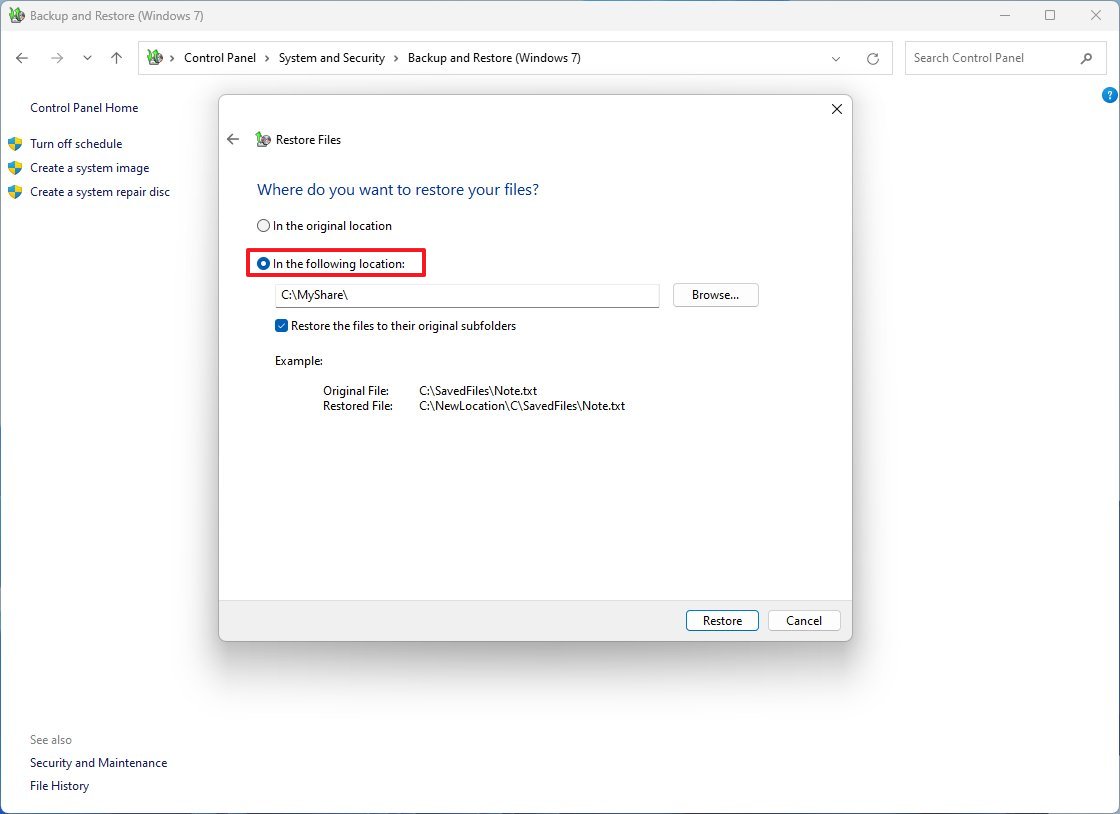
- Click the OK button.
- Click the Restore button.
- Click the Finish button.
Once you complete the steps, you can access the files and folders from the location you specified during the recovery process.
Restore computer from full backup
If your computer doesn’t boot or you’re replacing the main drive, it’s possible to restore your device using the most recent backup. However, before you can proceed, you have to make sure the computer can start from USB (or CD-ROM drive), which means that you may need to change the boot order inside the Basic Input/Output System (BIOS) or Unified Extensible Firmware Interface (UEFI) on your device.
Usually, the process involves pressing one of the function keys (F1, F2, F3, F10, or F12), the «ESC,» or «Delete» key as soon as the device starts. The only caveat is that the process often differs depending on the manufacturer and computer model. So check your device manufacturer’s support website for more specific instructions.
While in the firmware interface, find the «Boot» section, configure the boot order to start from the USB bootable drive (or CD-ROM drive), and save the new changes.
To perform a system restore using a backup on Windows 11 (or 10), use these steps:
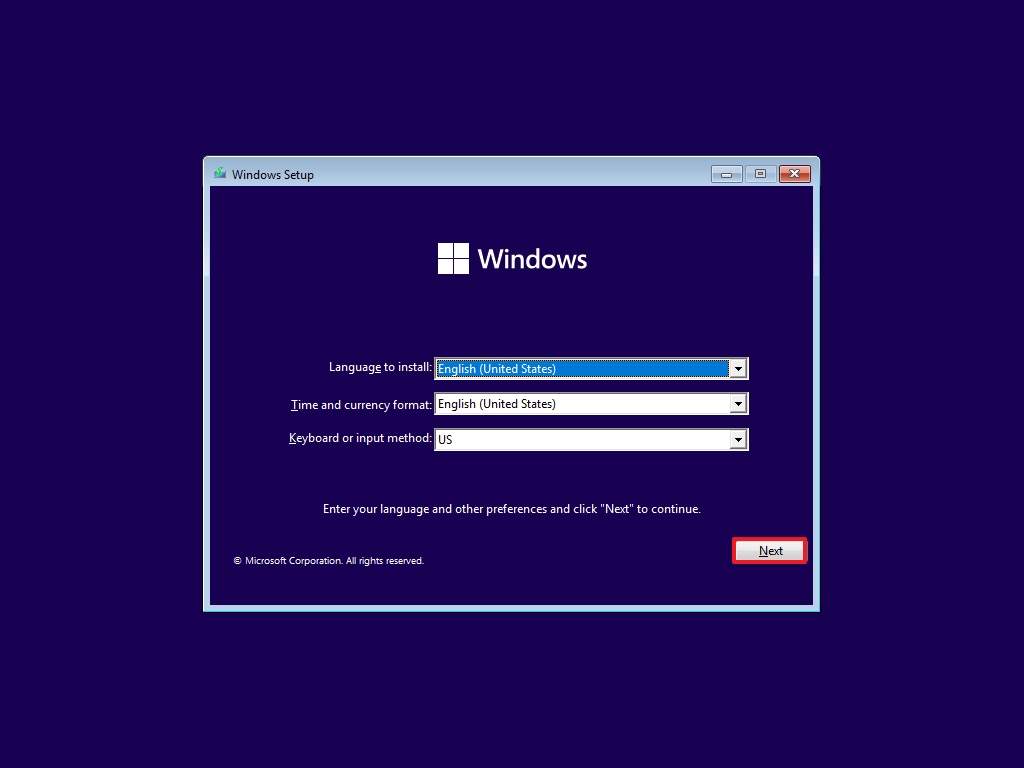
- Start the PC with a bootable media drive.
- Click the Next button.
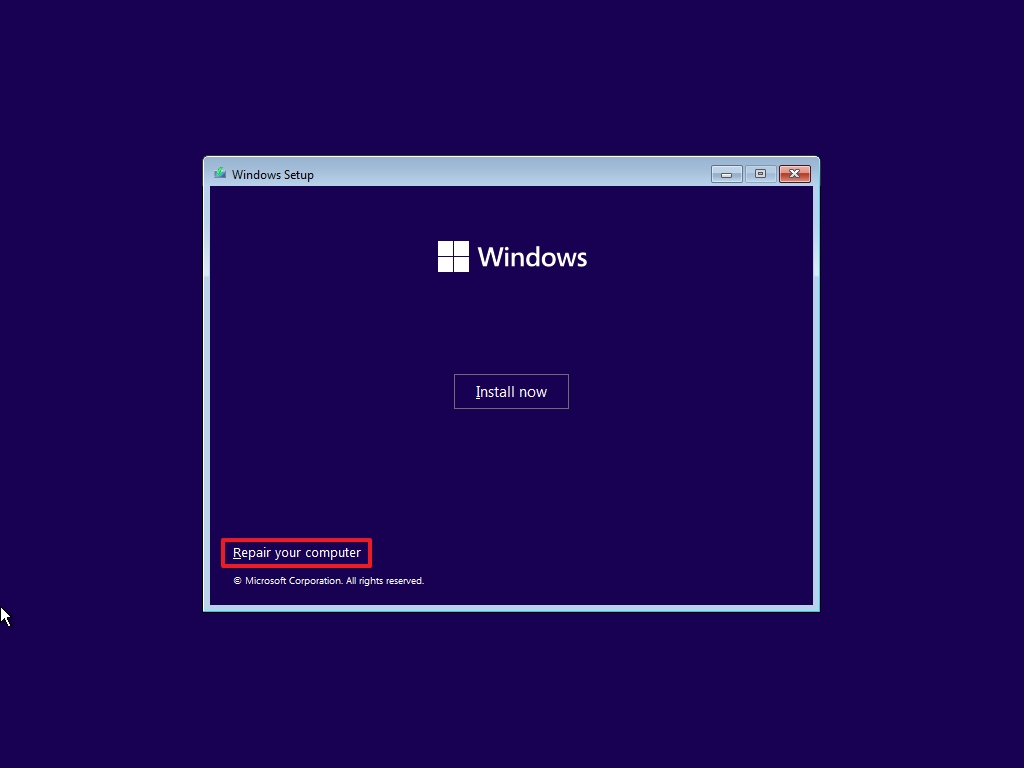
- Click the «Repair your computer» option at the bottom-left corner.
- Click the Troubleshoot option.
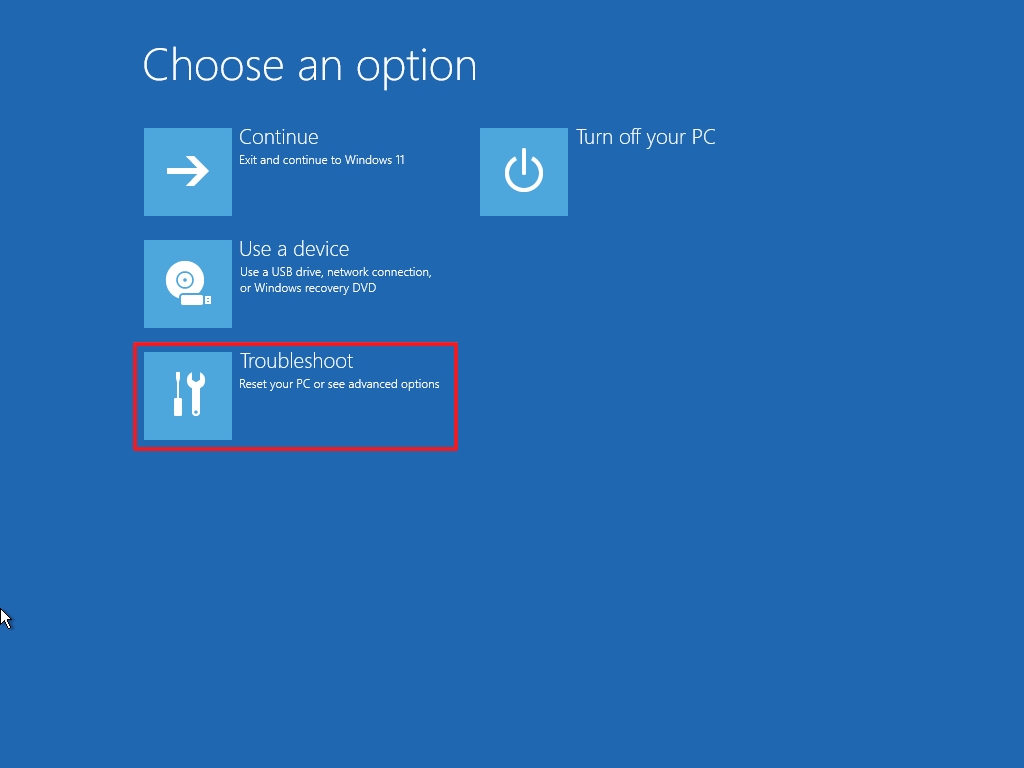
- Quick tip: If you need to restore your device from backup, and you still have access to the desktop, you can access the Advanced startup settings from Settings > Update & Security > Recovery, and clicking the «Restart now» button from the «Advanced startup» section.
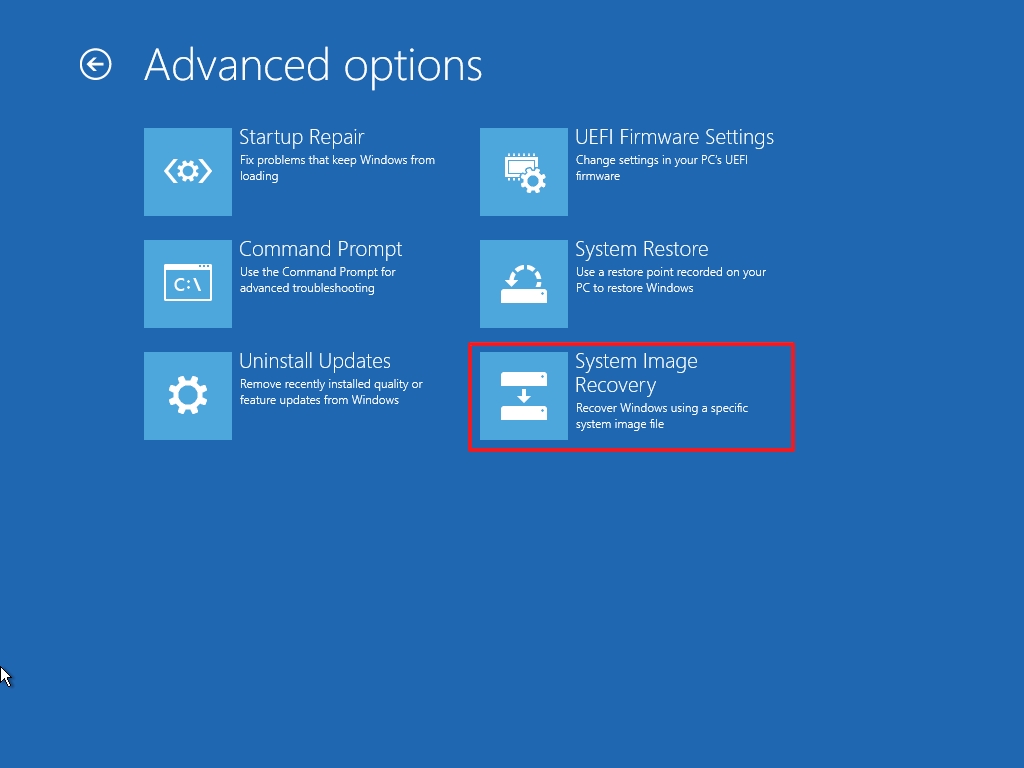
- Click the «System Image Recovery» option.
- Select the Windows version installed on the system as the target.
- Select the «Use the latest available system image» option.
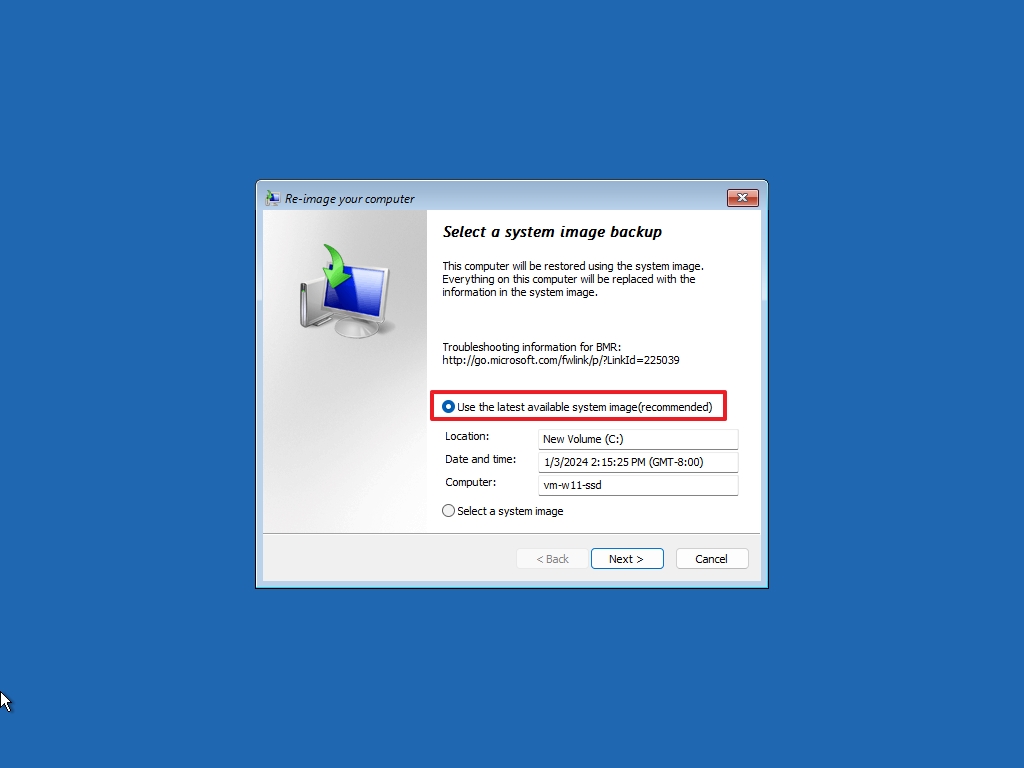
- Click the Next button.
- Select the «Format and repartition disks» option if you’re restoring a full backup to your computer or replacing the hard drive.
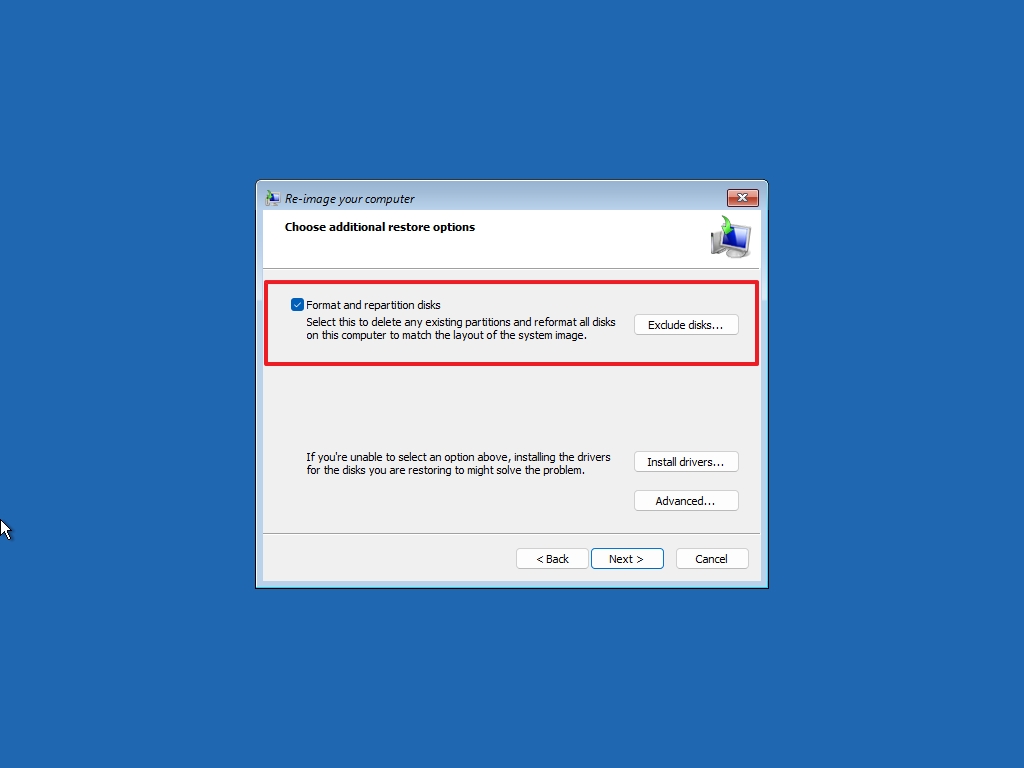
- Important: If you have multiple drives with data that you don’t want to erase, make sure to click the «Exclude disks» button to change the settings to prevent the process from wiping out those drives.
- Click the Next button.
- Click the Finish button.
- Click the Yes button.
After you complete the steps, the recovery process will start, restoring everything since the last backup. The completion time will depend upon the data and hardware configuration.
If you work with files frequently and don’t create backups daily, it’s recommended to complement the backup with another kind of file backup. For instance, a OneDrive subscription lets you keep a more up-to-date copy of all your personal files in the cloud.
Backup and Restore vs. system image backup
In addition to the Backup and Restore tool, the operating system also includes the system image backup tool to create a full copy of your entire computer. However, there are a few key differences between these tools.
You will create automatic backups during a specified schedule and get more options when using Backup and Restore. For example, you can configure the data you want to protect, manage the storage, and restore one or multiple files and the entire device.
However, this solution also has at least a few things to consider. When doing backups automatically, it means that the backup drive has to be always connected to the computer, which could be a risk as if malware infects the device, it may also damage the backup.
In contrast, the system image backup feature allows you to create a full backup, but you must go through the process manually every time you want to protect your files and installation. Typically, this feature is more suited as a temporary backup when making significant system changes or replacing the hard drive.
One significant benefit is that, unlike the automatic option, you can always disconnect the backup drive and store it in a safe location, which can protect your data from malware, hackers, and natural disasters.
Like the automated process, system image backup has a few caveats. You can only restore files since the last time you ran the backup. As a result, if you’re not proactive in creating backups, you could lose a lot of data during the restore process. Also, this feature is meant to restore your entire system, not individual files.
More resources
For more helpful articles, coverage, and answers to common questions about Windows 10 and Windows 11, visit the following resources:
- Windows 11 on Windows Central — All you need to know
- Windows 10 on Windows Central — All you need to know
Mauro Huculak has been a Windows How-To Expert contributor for WindowsCentral.com for nearly a decade and has over 15 years of experience writing comprehensive guides. He also has an IT background and has achieved different professional certifications from Microsoft, Cisco, VMware, and CompTIA. He has been recognized as a Microsoft MVP for many years.
After you set up a backup schedule, your files will be backed up at regular intervals. So, do you know how to create a scheduled backup in Windows 10? If you don’t know, this article will provide four ways to create a scheduled backup. And you can find the best solutions for your backup.
Benefits of Creating Scheduled Backup in Windows 10
Backing up important data is a time-consuming task, and creating multiple backups manually would consume even more time and energy. If you create a scheduled backup, you can set the time, content, and destination of the backup, and your files will start the backup task at the specified time. And there will be no manual intervention. There are many benefits to setting up a scheduled backup:
- Avoid data loss due to forgotten backups.
- Save backup time and increase backup efficiency.
- Increase data security and reliability.
- Eliminate complex tasks that can be affected by human error.
In short, it is essential to set up a backup plan. There exists a lot of software in the market that can provide automatic backup. Next, I will introduce the built-in backup tools and reliable third-party software on Windows 10.
Four Ways to Create a Scheduled Backup in Windows 10
We need to consider many factors when choosing software for a scheduled backup. For example, whether the software is easy to operate and whether it can securely protect data. And I provide four methods to help you create a scheduled backup in Windows 10, including both Windows built-in tools and third-party software:
- EaseUS Todo Backup Home
- Backup and Restore
- File History Windows 10
- OneDrive
All of the four solutions can set a scheduled backup. But they are different from the following four aspects when you are doing a scheduled backup.
| Comparison |
EaseUS Todo Backup |
Backup and Restore |
File History |
OneDrive |
|---|---|---|---|---|
| Cycle time | Daily, weekly, monthly | Daily, weekly, monthly | Daily, hours and minutes | Every minute |
| Space | 250GB free space | No free space | No free space | 5GB free space |
| Speed | Quick | Slow | Quick | Quickest |
| Content | Files and system | Files and system | Files | Files |
By comparing these four elements, we can see that:
1. OneDrive is the fastest, but it can only be used for file backups.
2. Backup and Restore can be used for system backups, but the backup process is slower, and no free backup space.
3. File History backup can only be used for file backups and does not offer free backup space.
4. EaseUS Todo Backup is the most comprehensive backup method.
So, if you want to back up files and folders, OneDrive is the better choice. It can meet basic needs and provide 5GB of free storage space. But EaseUS Todo Backup is better than others. It is the best alternative when File History and System Restore not working on Windows 10. And it is also the best incremental backup software to replace File History.
Next, I will introduce the simple steps of these methods, and you can choose the one you prefer.
Method 1: Use EaseUS Todo Backup to Create a Scheduled Backup in Windows 10
EaseUS Todo Backup is professional for rapid backup and restore. And it has a scheduled backup feature that allows users to set up automatic backups by setting the backup time and content. You can create a scheduled backup to save files, folders and systems. And it also supports disk backup and partition backup.
Besides, it is an easy-to-use software, and it can be fully mastered without professionals. Here are the steps.
Step 1. To begin the backup process, click the Select backup contents button.

Step 2. Four data backup categories are listed: File, Disk, OS, and Mail.

Step 3. Lists of both local and network files are shown on the left-hand side of the screen. Expanding the directory so that you can choose the files to back up.

Step 4. Follow the guidance on the screen and choose the place where you want to store the back up.

Make sure that the backup is encrypted and set the backup schedule by clicking Options in Backup Options. You can also choose to start the backup at a certain time in Backup Scheme by clicking Options. There are many other customizable options that you can look into.

Step 5. You can store the backup file either on your computer, in EaseUS’s cloud service, or on a network-attached storage device (NAS).

Step 6. EaseUS Todo Backup enables customers store backup copies of their files on a third-party cloud drive or on the company’s own cloud storage.
If you want to back up your data on a third-party cloud drive, select Local Drive and scroll down to add Cloud Device. Then fill in your account information.

Click EaseUS Cloud, then sign up and log in with your EaseUS account if you wish to store backup files to EaseUS’ own cloud storage service.

Step 7. Click on Backup Now to start a backup. When the backup process is done, it will display as a card on the left-hand side of the screen. A right-click will let you see more about how to handle the backup job in more depth.

Except for the scheduled backup, EaseUS Todo Backup has many other functions:
- It supports system clone and disk clone.
- It supports rapid system image recovery when the system crashes
- It will filter out some useless content to increase the use of space.
- It can backup files to cloud or NAS or backup flash drive automatically when plugged in.
Method 2: Use Backup and Restore to Create a Scheduled Backup in Windows 10
Backup and Restore can also be used to create a scheduled backup. And you can make a scheduled backup to save files and folders and create a system image with Backup and Restore. Using this tool, you can back up your files to a removable drive or network share folder on a NAS server. Here are the steps to use it to make a scheduled backup in Windows 10.
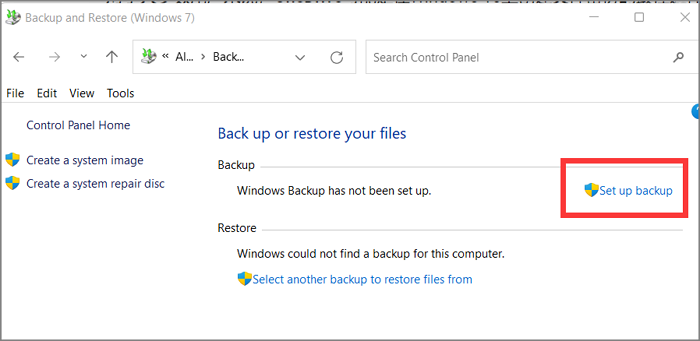
Step 1: Open «Control Panel» and choose «Backup and Restore(Windows7).»
Step 2: Click «Set up backup» to create a scheduled backup.
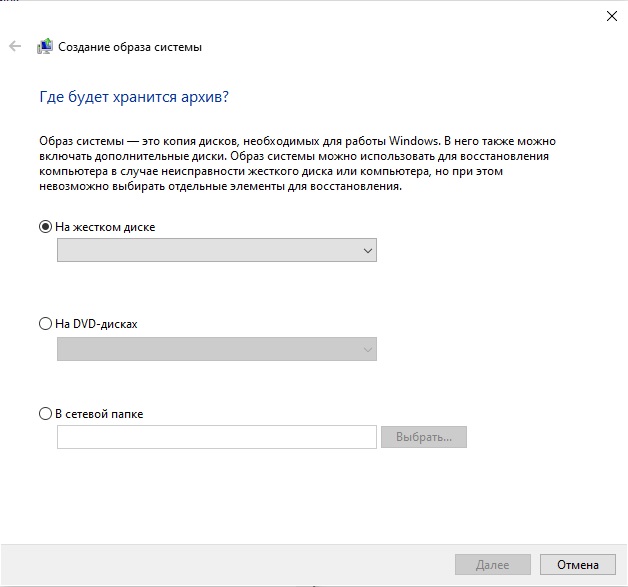
Step 3: Choose the backup destination and click «Next.»
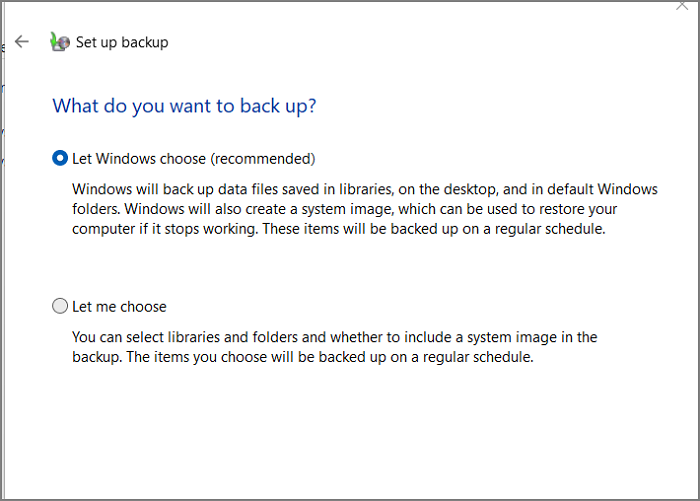
Step 4: Make a custom backup or let Windows choose. Then click «Next.»
Step 5: Review your backup settings and click «Change schedule» to set the time.

Step 6: Choose how often or what day you want to back up.

Step 7: Click «OK» to finish the process of creating a scheduled backup.
Method 3: Use File History to Create a Scheduled Backup in Windows 10
File History can be used to create a shceduled backup to save files and folders, including the changed files. By default, this tool will back up every hour and save the files in your user folder. Here are the steps you can use to create a scheduled backup:
Step 1: Open «Control Panel» and choose «File History.»

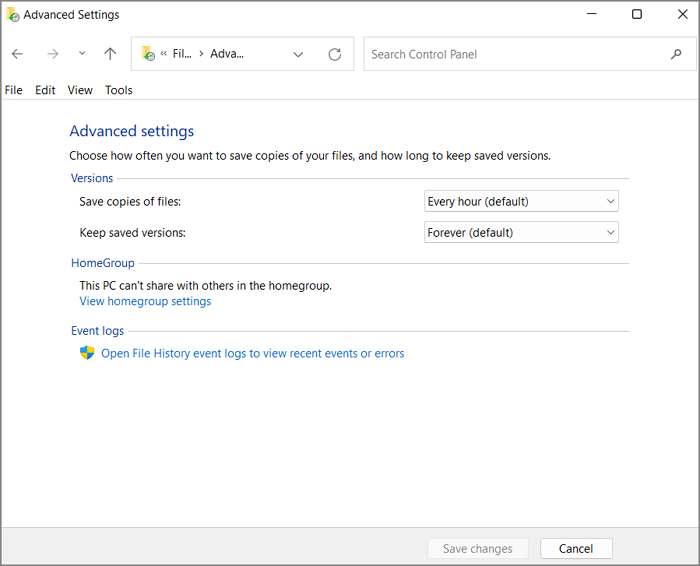
Step 2: Click «Advance settings» on the left side to create a scheduled backup.
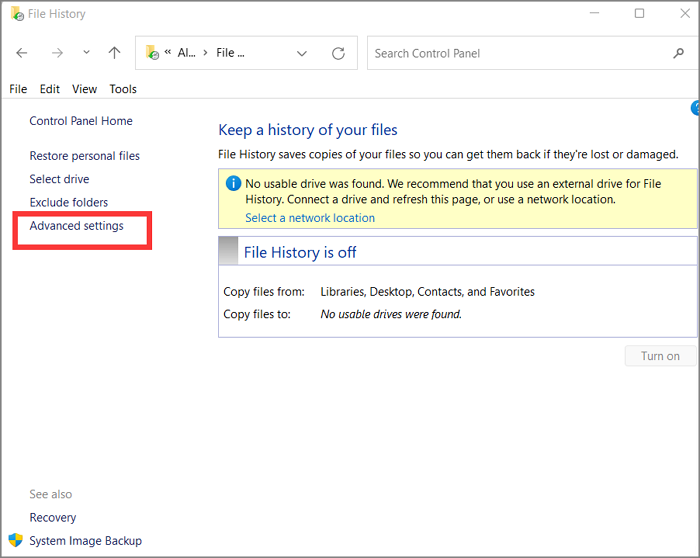
Step 3: Choose how often and how long you want to save the files. And click «Save changes.»
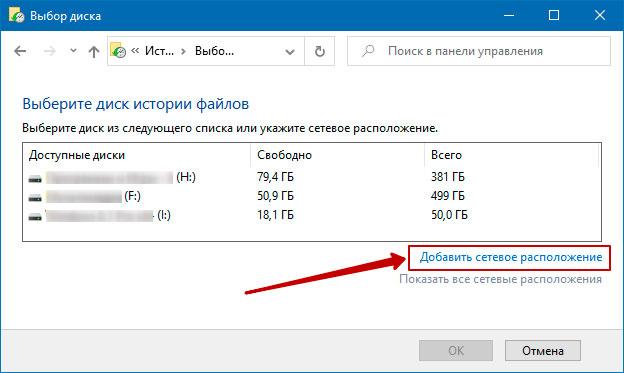
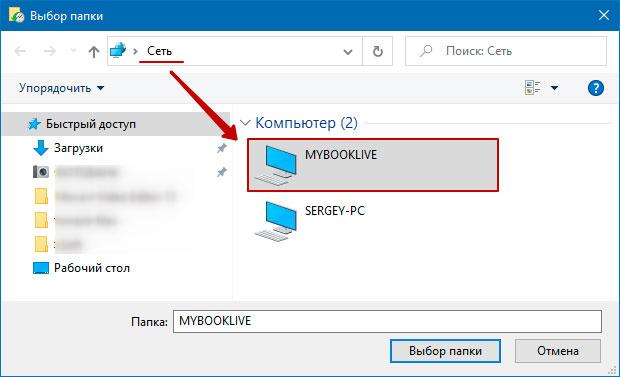
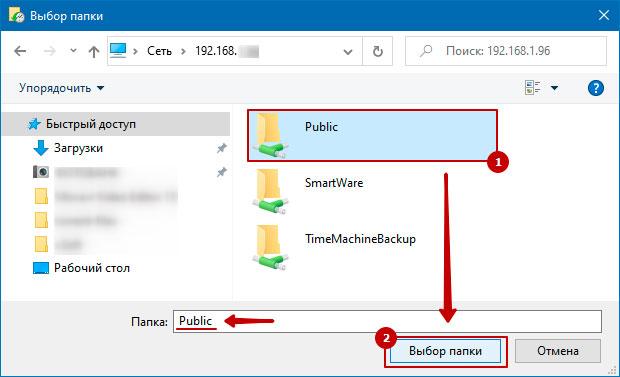
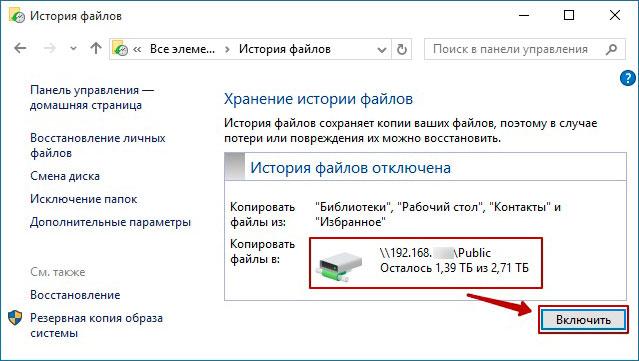
Step 4: Back to the previous screen and choose «Select drive». You can choose an external hard drive or a network location.
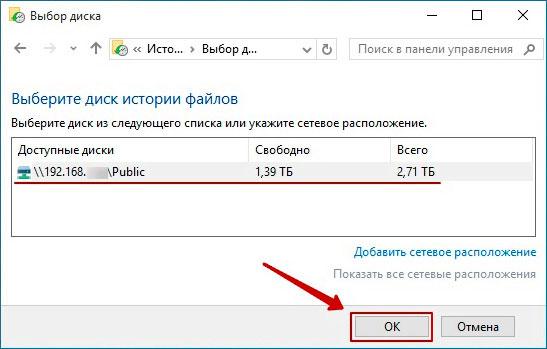
Step 5: Click «OK» after you select a drive and turn on the «File History.» And you create a scheduled backup successfully.
Method 4: Use OneDrive to Create a Scheduled Backup in Windows 10
OneDrive can be used to create a scheduled backup to save files and folders. And when you log in and save the files in the OneDrive folder, it will begin to backup up automatically. And the files are stored in the cloud. Here are the steps to create a scheduled backup:
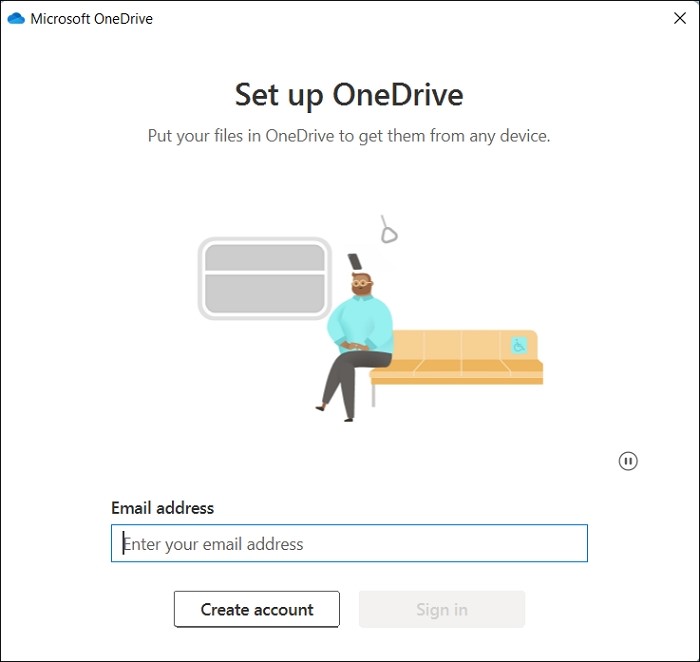
Step 1: Open OneDrive and sign in to your account.
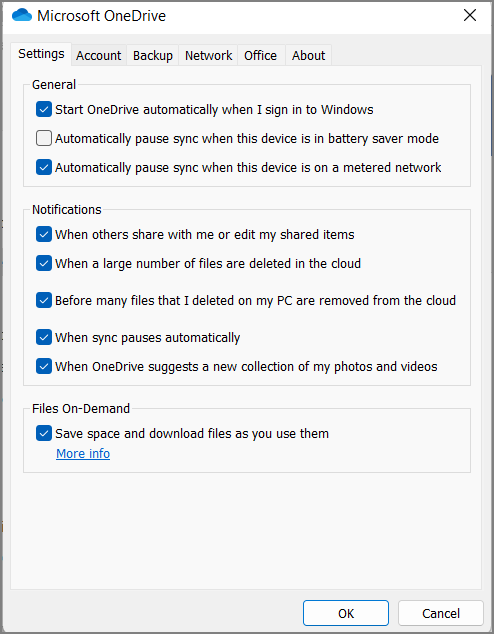
Step 2: Click on the pattern in the upper right corner and choose «Settings» to begin to set up the scheduled backup.
Step 3: Click «Settings» to choose when you want to back up.
Step 4: Choose «Backup» to create a custom backup.
Step 5: Click «OK» after the settings. And the scheduled backup is created.
Conclusion
In this guide, you will learn about four different ways to create a scheduled backup on windows 10. Among them, EaseUS Todo Backup is the comprehensive choice. And you can download it and have a try!
FQAs About How to Create a Scheduled Backup in Windows 10
It is easy to create a scheduled backup in Windows 10. You can follow the guide in this passage. And there are some frequently asked questions next.
1. Does Windows 10 backup overwrite old backups?
If you use File History to backup files, it will save all the files, including the new ones. So it will not overwrite old backups. You need to delete the old backups manually to free up more storage space.
2. How do I automatically backup my files to external hard drive Window 10?
You can use File History to back up your files to an external hard drive automatically.
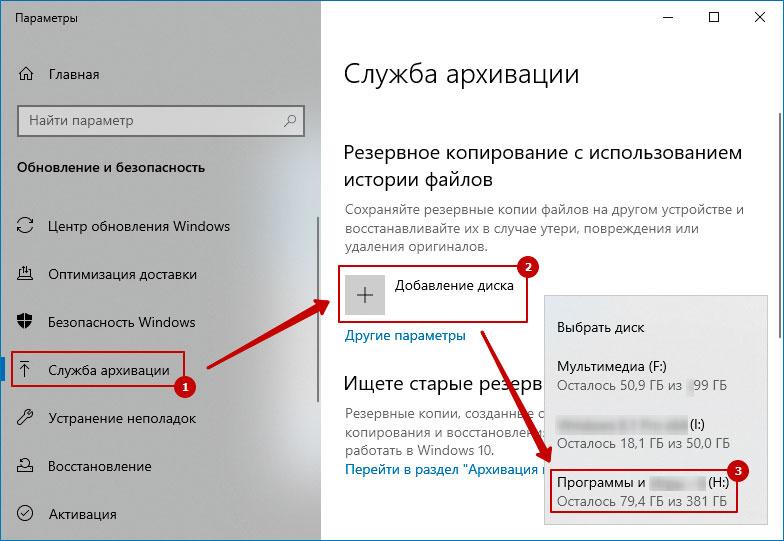
Step 1: Choose «Backup» on the settings window and click «Add a drive.»
Step 2: Select the external hard drive and turn on the «Automatically back up my files» option.
Step 3: Click «More options» to set the backup interval.
3. How do I change my Windows backup schedule?
You can change the Windows backup schedule on the «Control Panel.»
Step 1: Click «File History.»
Step 2: Click «Select drive» and «Advanced settings» to change the schedule.
Applies ToWindows 11 Windows 10
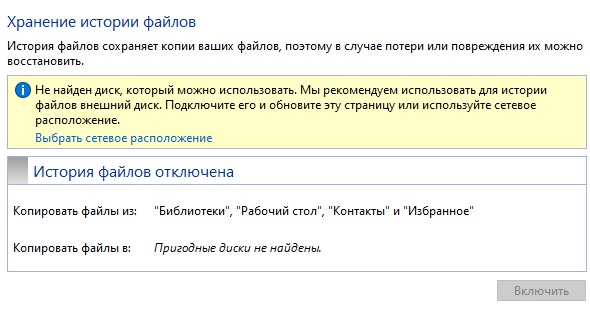
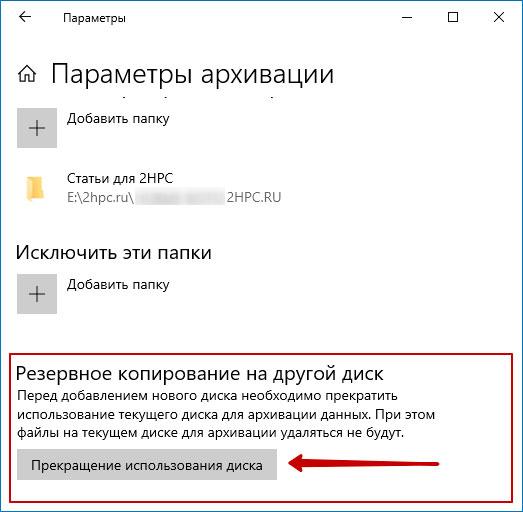
Ваш компьютер с Windows поставляется с единым решением для резервного копирования программа архивации данных, которое помогает создавать резервные копии многих наиболее важных для вас вещей. В файлах, темах и параметрах во многих установленных приложениях и Wi-Fi сведения программа архивации данных защищает все, что важно, и упрощает переход на новый компьютер.
В этом руководстве описывается использование программа архивации данных и различных параметров для резервного копирования и восстановления ключевых элементов на компьютере с Windows.
Резервное копирование компьютера

Это учетная запись, связанная с Windows, Microsoft 365, OneDrive, Xbox и т. д. Данные, для которых создана резервная копия, будут храниться в вашей учетной записи Майкрософт, поэтому получить доступ к вашим элементам на новом компьютере так же просто, как войти в систему.
-
В приложении «Параметры» на устройстве с Windows выберите Учетные записи > сведения или используйте следующее сочетание клавиш:
Ваши сведения
-
Выберите Войти вместо этого с учетной записью Майкрософт. Этот параметр отображается, только если вы используете локальную учетную запись. Если вместо этого отображается элемент Вход с локальной учетной записью, вы уже используете свою учетную запись Майкрософт.
Важно: В настоящее время приложение программа архивации данных ориентировано на потребительские устройства, например устройства, которые можно использовать, выполнив вход в личную учетную запись Майкрософт (MSA), например *@outlook.com , *@live.com и т. д. Рабочие или учебные учетные записи Майкрософт не будут работать.
Создание учетной записи Майкрософт
программа архивации данных — это простой и единый останов для всех ваших потребностей в резервном копировании. Ваша бесплатная учетная запись Майкрософт поставляется с 5 ГБ облачного хранилища OneDrive (при необходимости доступно дополнительное хранилище), а резервное копирование папок синхронизирует указанные папки с вашей учетной записью OneDrive, что делает их мгновенным доступом на всех компьютерах, которые вы используете с этой учетной записью Майкрософт. Так как они синхронизируются с OneDrive, после входа в OneDrive на новом компьютере эти файлы снова станут доступны.
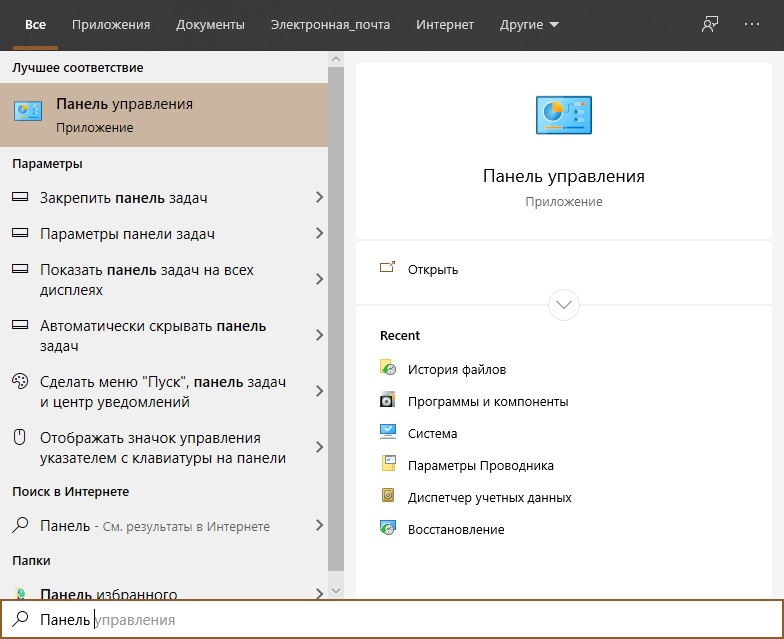
Чтобы открыть программа архивации данных, найдите его в меню Пуск:
-
Нажмите кнопку «Пуск»
-
Введите backup и выберите программа архивации данных в результатах.
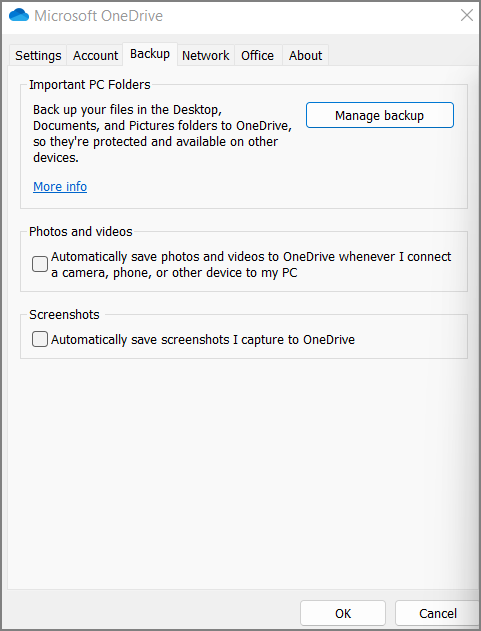
-
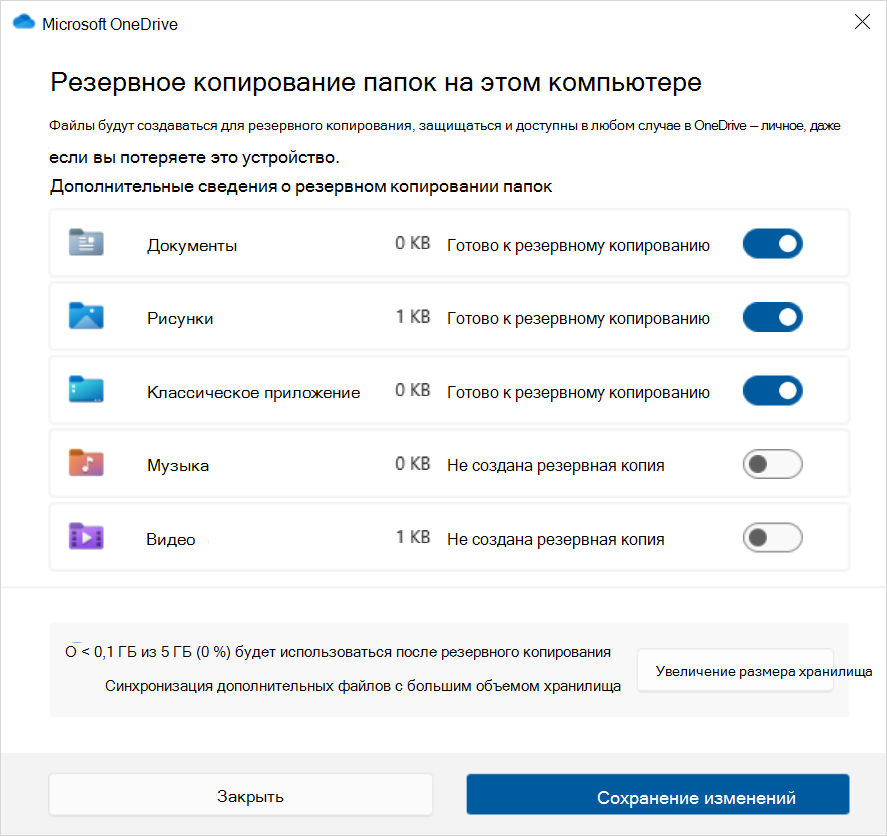
Разверните узел Папки и выберите, какие папки пользователей нужно создать в OneDrive. Вы можете создать резервную копию папок «Рабочий стол«, «Документы«, «Изображения«, «Видео» и «Музыка», переключив переключатель для каждой папки в положение Включено.
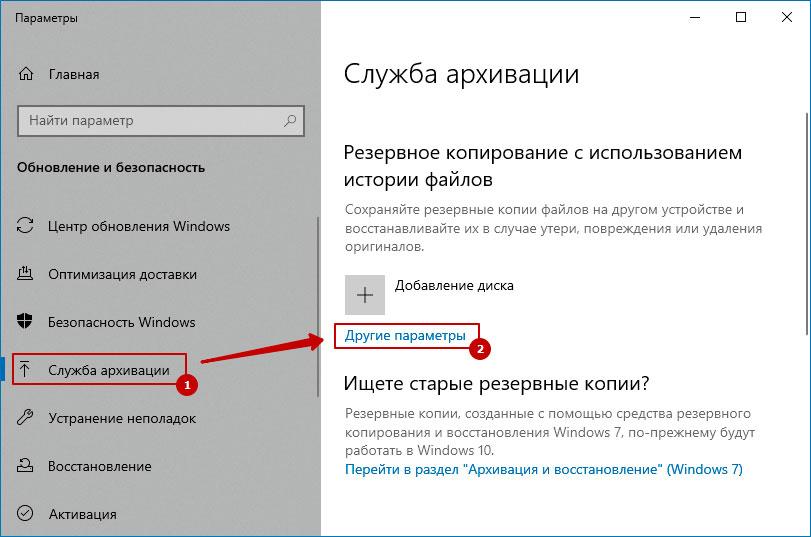
Совет: вы также можете управлять конфигурацией программа архивации данных в разделе Параметры. В приложении «Параметры» на устройстве с Windows выберите Учетные записи > резервное копирование Windows.
С помощью программа архивации данных вы также можете создавать резервные копии параметров Windows, в том числе:
-
Установленные приложения
-
Специальные возможности, языковые параметры и другие параметры, такие как обои и цвета
-
Wi-Fi сети и паролей
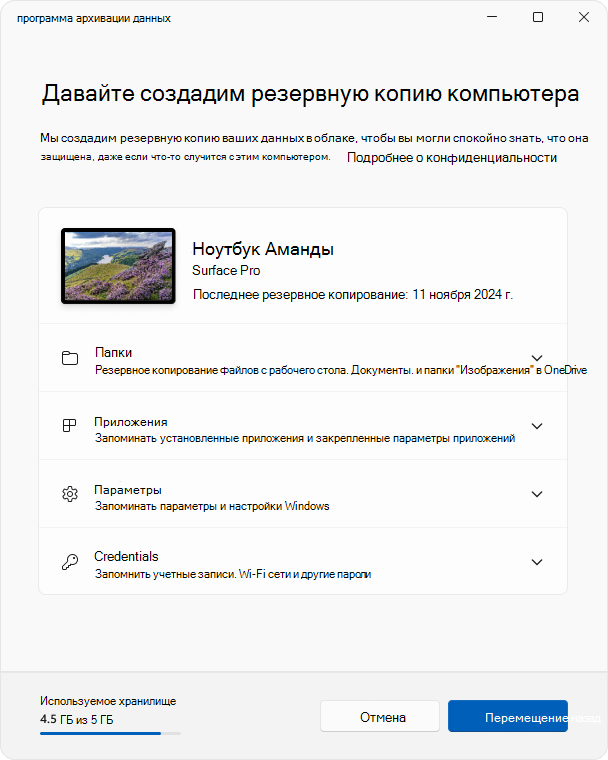
Чтобы проверка состояние всех этих параметров из программа архивации данных, разверните каждый элемент. Чтобы создать резервную копию параметра, установите переключатель Вкл.
Примечание: Если резервное копирование этих параметров было выполнено в прошлом (а некоторые из них по умолчанию), они будут отображаться как Резервные копии, а переключатель будет недоступен. Если вы хотите прекратить резервное копирование, см. статью Изменение конфигурации резервного копирования.
Когда все будет настроено так, как вы хотите, выберите Создать резервную копию.
Если при попытке создать резервную копию из OneDrive появляется сообщение об ошибке, возможно, вы не вошли в OneDrive или возникла другая проблема с OneDrive, которую необходимо устранить, чтобы программа архивации данных работали. Дополнительные сведения см. в статье Устранение проблем приложение синхронизации OneDrive.
Все готово! Создаются резервные копии папок и параметров, и вы можете получить доступ к файлам на всех компьютерах, на которые вы входите с помощью этой учетной записи Майкрософт.
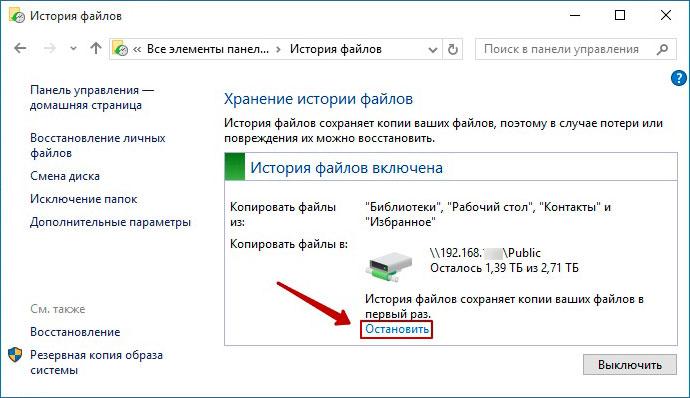
Если вы хотите проверка и убедиться, что резервная копия по-прежнему создана, вы можете открыть приложение программа архивации данных, и в нем отобразится текущее состояние резервной копии.
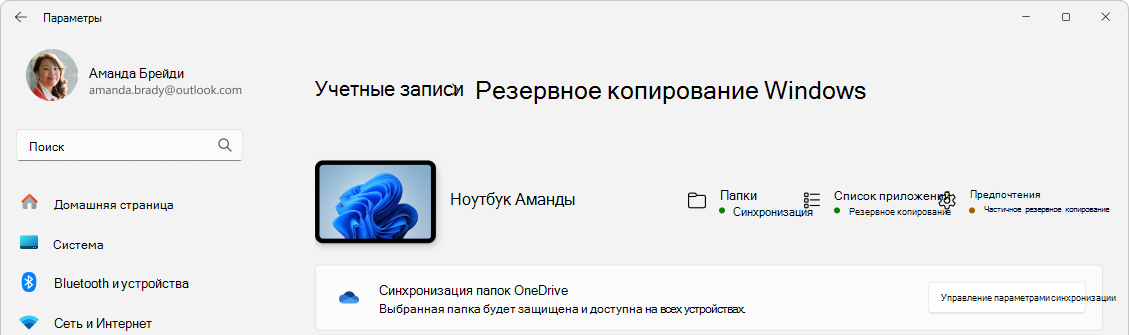
Вы также можете проверка состояние в приложении «Параметры», выберите Учетные записи > резервное копирование Windows
Как насчет моих настроек Microsoft Edge?
Чтобы легко просматривать веб-страницы с любого своего устройства и упорядочить избранное, войдите в Microsoft Edge и включите синхронизацию.
Вход для синхронизации данных Microsoft Edge на разных устройствах
Изменение конфигурации резервного копирования
Если вы хотите изменить конфигурацию резервного копирования, откройте раздел Параметры > Учетные записи > резервное копирование Windows или используйте следующее сочетание клавиш:
Резервное копирование Windows
-
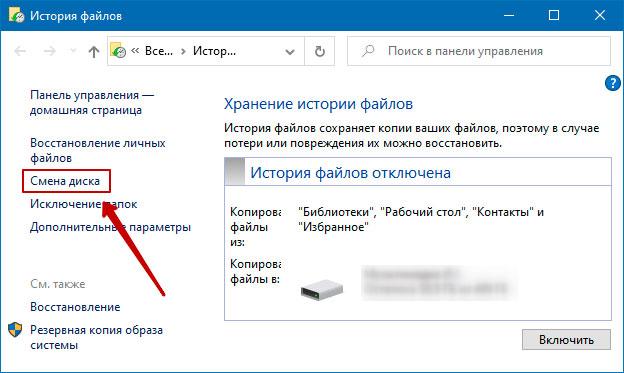
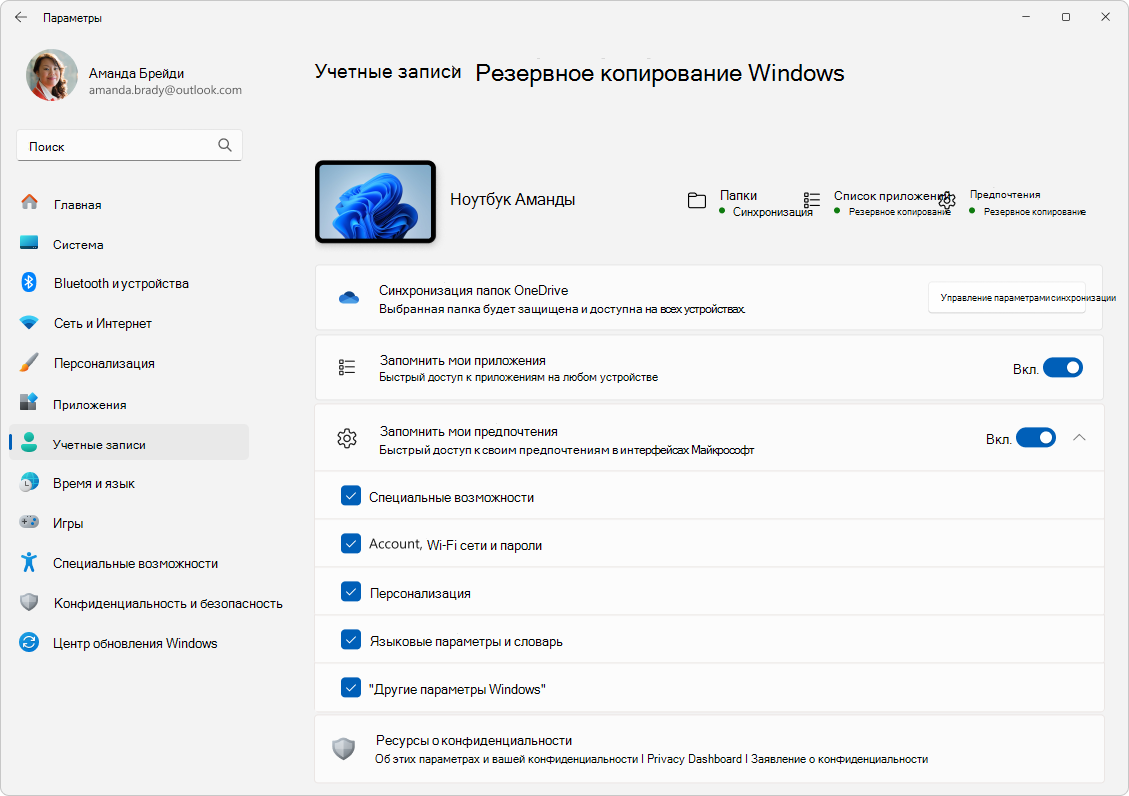
Чтобы изменить синхронизацию папок в OneDrive, выберите Управление параметрами синхронизации в разделе Синхронизация папок OneDrive и переключите папки, для которого требуется создать резервную копию.

-
Чтобы изменить резервную копию приложений, используйте переключатель Запомнить мои приложения. Этот параметр недоступен для рабочих или учебных учетных записей, и Windows не запоминает приложения для рабочих или учебных учетных записей.
-
Чтобы изменить резервную копию параметров, используйте флажки, указанные в разделе Запомнить мои настройки, и убедитесь, что флажки для любого из элементов, для которых требуется создать резервную копию. Если включить параметр Другие параметры Windows, Windows также будет синхронизировать некоторые параметры устройств (например, настройки принтера и мыши), параметры проводника и настройки уведомлений. Этот параметр доступен для рабочей или учебной учетной записи, если это разрешено вашей организацией. Дополнительные сведения см. в статье Включение enterprise State Roaming в Microsoft Entra ID
Если вы отключили резервное копирование и хотите удалить данные, которые были ранее созданы в вашей учетной записи Майкрософт, перейдите на страницу Устройства учетной записи Майкрософт, найдите раздел Параметры облачной синхронизации в нижней части страницы и выберите и выберите Очистить сохраненные параметры.
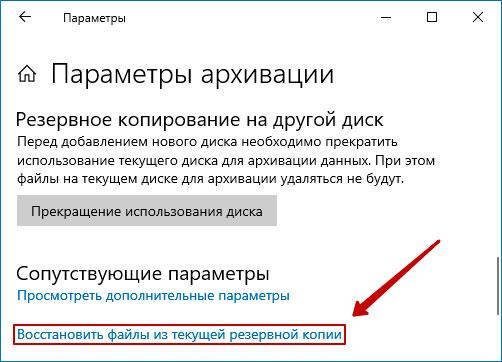
Восстановление компьютера
Разделы справки восстановить резервную копию?
У нас есть твоя спина! При получении нового компьютера или при необходимости переустановки Windows при его настройке просто войдите в систему с той же учетной записью Майкрософт, которая использовалась для создания резервной копии. Мы увидим, что у вас есть резервные копии, и спросим, хотите ли вы восстановить их.
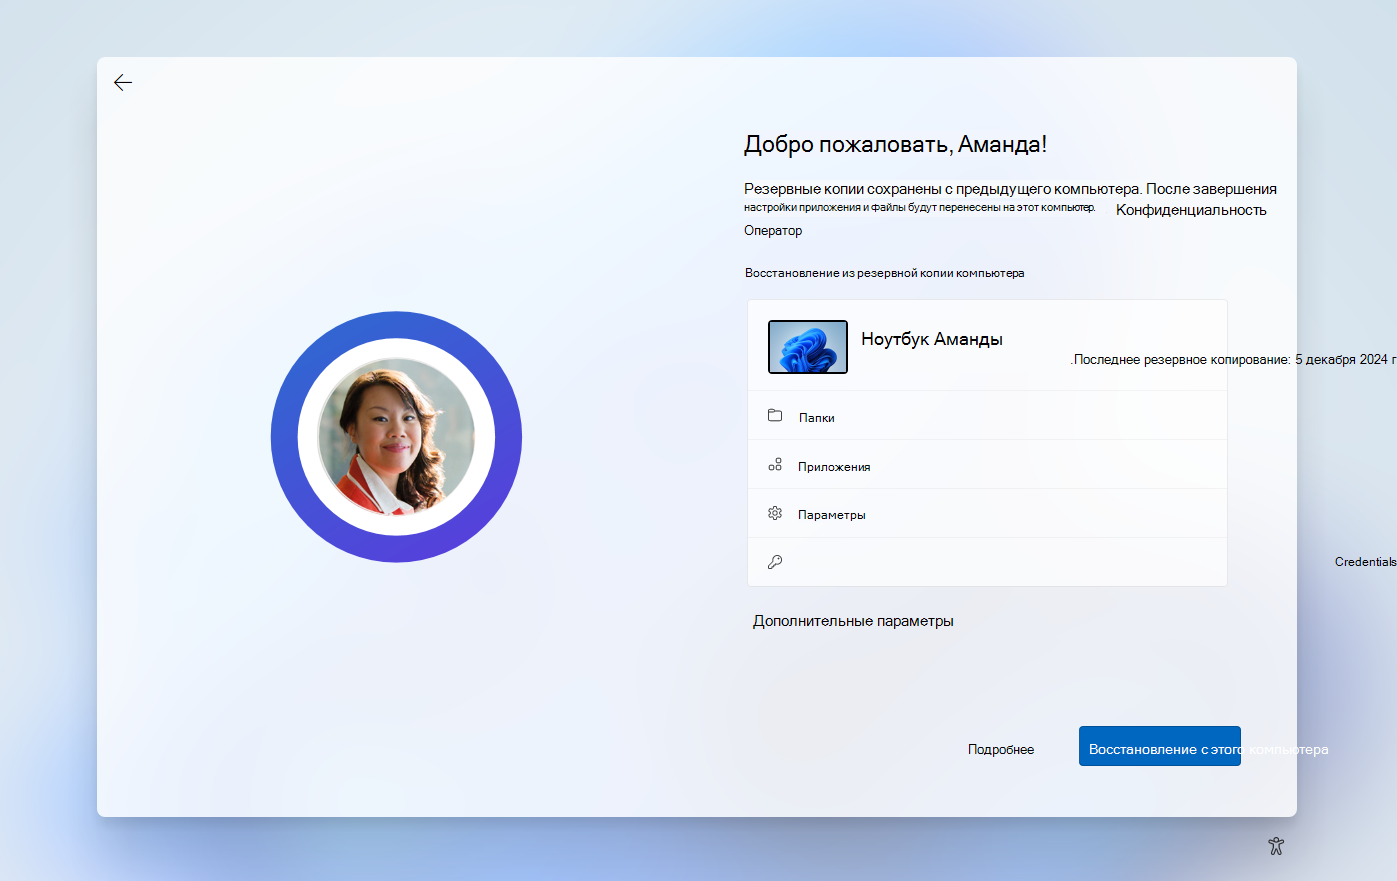
Если у вас есть несколько компьютеров с резервными копиями, можно выбрать Дополнительные параметры и выбрать резервную копию, из которой вы хотите восстановить. Когда вы вернетесь к вашему рабочему столу, все будет прямо там ждет вас!
-
Контакты приложений восстанавливаются там, где вы их оставили. Приложения, доступные в Microsoft Store, можно восстановить, щелкнув значок приложения, чтобы начать работу. Для приложений, недоступных в Магазине, вы будете перенаправлены в Интернет, чтобы скачать установщик.
-
Ваши самые важные параметры также будут восстановлены на новом устройстве. Полный список поддерживаемых параметров см. в разделе Каталог параметров программа архивации данных.
-
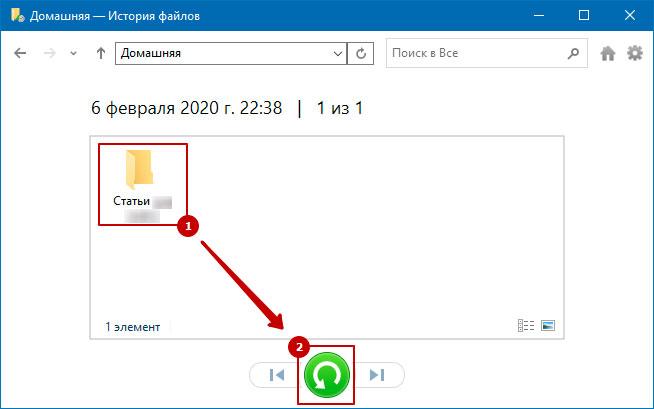
Файлы можно восстановить в любое время, войдя в OneDrive с той же учетной записью Майкрософт, которая использовалась для создания исходной резервной копии.
Статьи по теме
Каталог параметров программа архивации данных
Страница main учетной записи Майкрософт
Нужна дополнительная помощь?
Нужны дополнительные параметры?
Изучите преимущества подписки, просмотрите учебные курсы, узнайте, как защитить свое устройство и т. д.