
If you like to set 12-hour from the 24-hour clock or vice versa in Windows 10/11, then the below steps will be helpful. Also, you will learn how to display the AM or PM symbol and customize it in the system tray.
We have already published a guide about changing the date format in Windows 10 and other versions. This guide shows how to play around with the time format and change to the 12-hour or railway time format on your Windows 10/11, 8.1 and 7.
If you are new to Windows 11 and wondering how to display the ‘My Computer’ (This PC) icon on the desktop, here is the guide.
How To Change Laptop Time To 12-Hour
It doesn’t matter whether you use a desktop or laptop; changing the time format to the 12-hour clock is the same on Windows 10/11. Follow the below steps:
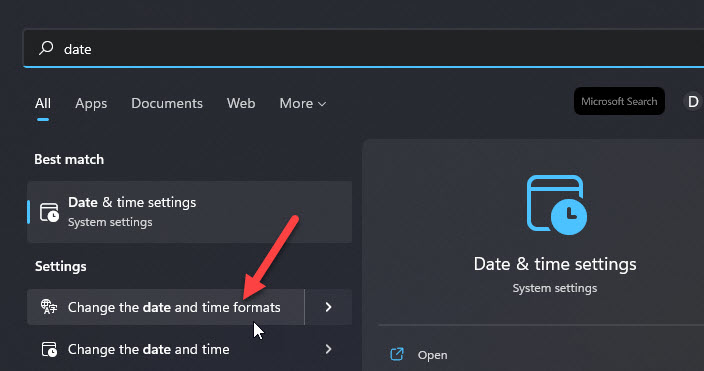
- Search for ‘date’ in Windows search (or Cortana), and select ‘Change date and time formats.’
- In ‘Short time’ format, click the drop-down and select the time with the Symbol (AM to PM) to change the laptop time to the 12-hour clock.
- Selecting the time format without AM or PM will make the format 24-hour on your computer.
Hint: ‘Railway time’ generally refers to the 24-hour time format. So, if you want railway time format on your Windows 10/11 desktop/laptop computer, change the time format to 24 hours, as shown above. Select the short or long time format without AM symbol.
You need to use the classic control panel on Windows 8.1 and 7 to change the clock formats.
Related: How to change the Sticky Notes font site
With the 24-hour clock format, the system tray time will look like below.
The below steps and screenshots are taken from Windows 10, but also Windows 8.1/8 and Windows 7 will have similar settings except for how you access the control panel. Hence the same steps are applicable for the older version of Windows OS.
Also, the settings app regional format change methods are applied to Windows 11 and Windows 10.
1) Visit Control Panel. You can search for it in Windows 10 search easily to access the classic Control panel.
2) In the category view of the control panel, click on the ‘Change date, time, or number formats’ as shown below.
3) You can change the settings for a short and long time. If your Windows 10/11 computer is showing a 24-hour clock, then the format settings would be in ‘H’.
‘H’ means 24-hour, and ‘h’ means a 12-hour clock format.
Click on the drop-down menu of the short and long-time format and change it to a 12-hour format by selecting the ‘h’ in the hours.
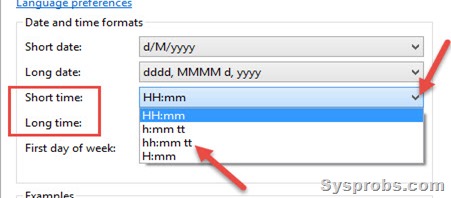
The ‘tt’ means AM or PM. When the time format is set to a 24-hour clock, it can’t show the AM or PM. When the 12-hour format is placed, you can select the ‘tt’ to show the AM or PM in Windows 10 or 8.1/7.
Press Apply to make the changes.
Your time format will change to a 12-hour format and show the AM or PM symbol.
Set 12-Hour Clock in Windows 11/10 by Settings App
By the way, changing the time format can also be done in the Windows 10/11 settings app.
- Search for date settings below and select ‘Change the date and time formats’.
- Select the format with the AM or PM symbol on the next screen. The time format with AM/PM is the 12-hour clock; the other one without the emblem is the 24-hour clock.
You must visit the classic control panel to customize the AM/PM symbol to any letters.
Change the AM/PM Symbol in Windows 10/11
Do you want to change the AM or PM symbol to something else? If yes, you can do that too. Most of the Windows Operating Systems allow changing this symbol.
Click on the Addition Settings in the formats settings, then select Time.
In the Time tab, type the text you want to display in the AM/PM symbol.
Once you press Apply, you can see the change in the system tray.
Credit to ASKVG for the hint.
How to Show Seconds in Windows 11 Clock?
Unfortunately, this feature is not supported in Windows 11. Microsoft removed the option (even via the registry modification) to display seconds in the taskbar clock. Microsoft claims that this option is not available due to performance considerations.
We can show the seconds in Windows 11 taskbar using third-party applications.
ElevenClock is one of the tools you can use for this purpose. It is a simple program to download and customize. It can show the date with month and year and the time with seconds in Windows 11/10 taskbar.
Setting the 12-hour clock in Windows 11 is a straightforward task that can be done in just a few steps. By tweaking your system settings, you can easily switch from the default 24-hour format to the more familiar 12-hour clock. Just follow the steps below, and you’ll be done in no time!
If you’re looking to switch your Windows 11 clock from the 24-hour format to the 12-hour one, you’re in the right place. Below are the steps you need to follow to make this change.
Step 1: Open the Settings App
Click on the Start menu and select the «Settings» app.
The Settings app is your go-to place for most system changes in Windows 11. You can also press «Windows + I» on your keyboard to open it directly.
Step 2: Go to Time & Language
In the Settings app, click on «Time & Language.»
This section is where you manage all date, time, and language settings. It’s super handy for all your localization needs.
Step 3: Click on Date & Time
Within Time & Language, click on «Date & Time.»
This page allows you to adjust your time zone, set the clock, and toggle automatic time settings.
Step 4: Scroll Down to Additional Settings
Scroll down and click on the «Additional settings.»
Here, you’ll find more advanced options for customizing your date and time format.
Step 5: Choose the Time Format
Under the Time Formats section, change «Short time» and «Long time» to the 12-hour format (e.g., h:mm tt or hh:mm tt).
The «h» stands for hour, «mm» for minutes, and «tt» for AM/PM. Make sure to save your changes!
Step 6: Apply the Changes
Click «Apply» and then «OK» to save your changes.
Your clock should now display in the 12-hour format.
Once you’ve followed all these steps, your Windows 11 clock will display the time in a 12-hour format. You’ll see AM and PM indicators instead of the 24-hour clock.
Tips for Setting 12 Hour Clock in Windows 11
-
Check for updates: Make sure your Windows 11 is up to date to avoid any issues when changing settings.
-
Use keyboard shortcuts: Press «Windows + I» to quickly open the Settings app.
-
Remember the format: «h:mm tt» for short time, «hh:mm tt» for long time.
-
Explore other settings: While you’re at it, explore other time and language settings for better customization.
-
Restart if necessary: If you don’t see changes immediately, a quick restart might help.
Frequently Asked Questions
How do I revert back to the 24-hour format?
Simply follow the same steps but select the 24-hour formats like «HH:mm» instead.
Will changing the time format affect my system performance?
No, changing the time format will not affect your system performance.
Can I set different time formats for different user accounts?
Yes, each user account can have its own time format settings.
What does «tt» stand for in time formatting?
«tt» stands for the AM/PM indicator in a 12-hour clock format.
Do these changes affect the BIOS clock?
No, these changes are purely at the software level and won’t affect your BIOS clock.
Summary
- Open the Settings App.
- Go to Time & Language.
- Click on Date & Time.
- Scroll Down to Additional Settings.
- Choose the Time Format.
- Apply the Changes.
Conclusion
Changing your clock format from 24-hour to 12-hour in Windows 11 is a quick and easy process. By following the steps outlined above, you can customize your system to better suit your preferences. Whether you’re more comfortable with AM and PM indicators or just prefer the 12-hour format for readability, this guide has got you covered.
If you encounter any issues along the way, don’t hesitate to explore other settings or restart your computer. The settings in Windows 11 are designed to be user-friendly, making it easy for anyone to customize their experience. Now that you know how to set the 12-hour clock in Windows 11, why not share this guide with friends or family who might find it useful? Happy customizing!
Matt Jacobs has been working as an IT consultant for small businesses since receiving his Master’s degree in 2003. While he still does some consulting work, his primary focus now is on creating technology support content for SupportYourTech.com.
His work can be found on many websites and focuses on topics such as Microsoft Office, Apple devices, Android devices, Photoshop, and more.
While the default option in Windows is to display Time in 12-Hour (AM/PM) format, it also provides the option to change the Time format on your computer to 24-Hour Military Time.
In general, the standard 12-Hour Time format that reports the time in Day/Night or AM/PM segments suits most users and industries that work during the day and remain closed at night.
However, those who work in Travel Industry, Airports, Sea Ports, Railways, Military, Navy, Public Safety and Public transport follow a 24-Hour Time Format.
Depending on your preference, you can make your computer to display time in either 12-Hour or 24-Hour Military Clock Format using the following steps.
Advertisement
1. Change 12-Hour Clock to 24-Hour
The easiest way to change the time format on a Windows computer from 12-Hour to 24-Hour or from 24 to 12-Hour format is by going to the “Time and Language” Settings on your computer.
1. Click on the Start button > click on Settings Icon in the Start menu.
2. On the next screen, select Time and Language in the left-pane and click on the Language & Region card in the right-pane.

3. Scroll down in the right-pane, click on Regional Format and then click on Change Formats button in the drop-down.

4. On the next screen, use the Down-Arrow to select time without AM/PM suffix for both Long Time and Short Time.

The change in the time format will be immediate and you should now find your computer displaying time in 24-Hour format, without the usual AM/PM Suffix.
2. Change 24-Hour Clock to 12-Hour Clock
If for some reason, your computer is showing time in 24-hour format, you can find below the steps to change 24-Hour Clock to the default 12-Hour Clock Format.
1. Click on the Start button > click on Settings Icon in the Start menu.
Advertisement
2. On the next screen, select Time and Language in the left-pane and click on the Language & Region card in the right-pane.
3. Scroll down in the right-pane, click on Regional Format and then click on Change Formats button in the drop-down.
4. On the next screen, use the Down-Arrow to select time with AM/PM suffix for both Long Time and Short Time.

The change in the time format will be immediate and you should now find your computer displaying the time in 12-Hour format, with the regular AM/PM Suffix.
3. Change Time Format Using Control Panel
The option to change Date and Time Format is still available in the Control Panel in Windows 11.
1. Type Control Panel in the search bar and click on Control Panel App in the Search results.

2. On Control Panel screen, switch to Category view and click on Change date, time or number formats link.

3. On the next screen, switch to Formats tab and select your desired Time Format (12-Hour or 24-Hour) by using the down arrow in Short Time and Long Time entries.

4. To set 12-Hour Time Format, select any entry with AM/PM Suffix in the drop-down. If you want to switch to 24-Hour Time Format, select any entry without AM/PM Suffix.
Make sure you click on Apply and OK to save this change in Time Display Format on your computer.
4. Display Time in “Hours:Minutes:Seconds” Format in Windows 11
Many users coming from Windows 10 are looking for a way to change the Taskbar Time Display on a Windows 11 computer from Short Time (Hours:Minutes) to Long Time Format (Hours:Minutes:Seconds).
However, the bad news is that Windows 11 does not provide any option to change the default Short Time Format display in the Taskbar to Long Time Format.
In Windows 10, users could view the Long-Time Format in the Calendar by clicking on Date/Time in the Taskbar. Also, it was possible to change the Taskbar Time Display to Long-Time Format by editing the registry.
However, in Windows 11 the Calendar does not display Time and Microsoft has also removed the optional registry hack that could add seconds to the Time Display in the Taskbar.
Applies ToWindows 11 Windows 10
Параметры времени, даты, часового пояса и летнего времени можно настроить в приложении «Параметры» в Windows. Чтобы задать эти параметры в Windows, выберите нужную задачу из следующего списка:
Чтобы задать дату и время, выполните следующие действия:
-
В окне Времени & языка > даты &:
-
Чтобы задать дату и время автоматически, убедитесь, что параметр Задать время автоматическивключен.
-
Чтобы задать дату и время вручную, убедитесь, что параметр Задать время автоматическиотключен, а затем нажмите кнопку Изменить рядом с полем Задать дату и время. Когда откроется окно Изменить дату и время , вручную задайте дату и время, а затем нажмите кнопку Изменить .
-
Чтобы задать часовой пояс, выполните следующие действия:
-
В окне Времени & языка > даты &:
-
Чтобы настроить часовой пояс автоматически, убедитесь, что параметр Задать часовой пояс автоматическивключен.
-
Чтобы задать часовой пояс вручную, убедитесь, что параметр Задать часовой пояс автоматическиотключен. В раскрывающемся меню рядом с полем Часовой пояс выберите нужный часовой пояс.
-
Чтобы установить переход на летнее время, выполните приведенные далее действия.
-
В окне Времени & языка > даты &:
-
Если параметр Задать часовой пояс автоматическивключен, переход на летнее время устанавливается автоматически.
-
Если параметр Задать часовой пояс автоматическиотключен:
-
Чтобы настроить переход на летнее время автоматически, убедитесь, что параметр Настроить переход на летнее время автоматическивключен.
-
Чтобы настроить переход на летнее время вручную, убедитесь, что параметр Настроить переход на летнее время автоматическиотключен, а затем при необходимости установите время вручную. Дополнительные сведения см. в разделе Настройка даты и времени этой статьи.
-
-
По умолчанию дата и время отображаются в области задач. Чтобы скрыть дату и время в системный лоток или добавить их обратно в системный лоток, если он скрыт:
-
В окне Времени & языка > даты &:
-
Чтобы добавить дату и время в системный лоток, убедитесь, что параметр Показывать время и дату в области системного лоткавключен.
Совет: Время в системном лотке обычно не показывает секунд. Чтобы время в системном лотке также отображалось в секундах, выберите параметр Показывать секунды в часах системного лотка (использует больше энергии).
-
Чтобы удалить дату и время из системного лотка, убедитесь, что параметр Показать время и дату в области системного лоткаотключен.
-
Нужна дополнительная помощь?
Нужны дополнительные параметры?
Изучите преимущества подписки, просмотрите учебные курсы, узнайте, как защитить свое устройство и т. д.
The Windows 10 and 11 clock uses the 12-hour format by default, but you can change the time to the 24-hour format, also referred to as military time.
Click on Start > Settings or press the Windows Key + I.
Click on Time & language.
Click on Date & time.
Follow below for Windows 11 or 10:
Windows 11
Click on Language and region for Windows 11
On Windows 11, click to expand Regional format.
Click on Change formats.
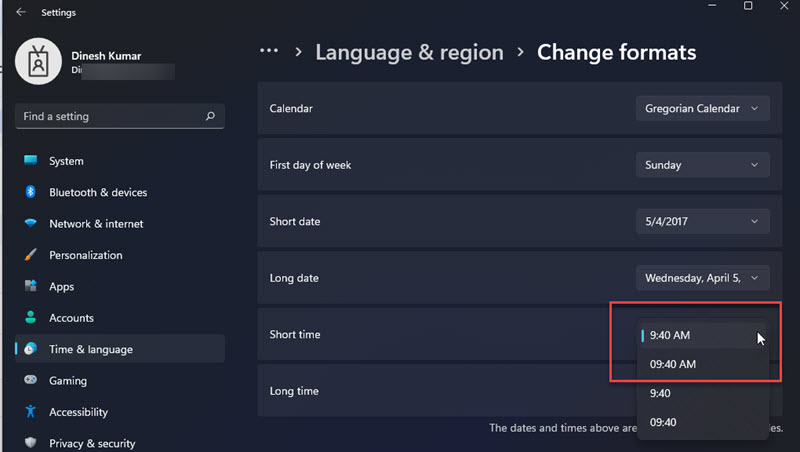
Click on Short time.
Choose 9:40 AM or 9:40 for the default 12-hour clock.
Choose 09:40 AM or 09:40 for the 24-hour clock.

You will see the Clock change when you select any available options.
Windows 10
Click on Date, time & regional formatting on the right.
Click on Additional date, time, & regional settings.
The Control Panel will open.
Click on Change date, time, or number formats.
Click on Short time.
Choose h:mm tt or hh:mm tt for the default 12-hour clock.
Choose H:mm or HH:mm for the 24-hour clock.
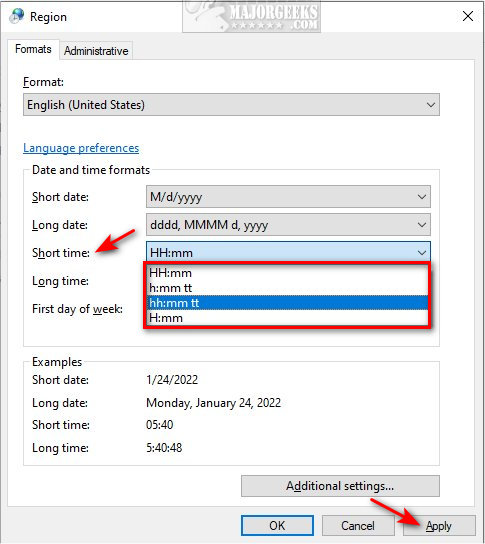
Click Apply to see the change.
Similar:
comments powered by Disqus