
-
Home
-
News
- Use Netsh Winsock Reset Command to Fix Windows 10 Network Problem
By Alisa |
Last Updated
You can use Netsh Winsock reset command to reset Winsock catalog and reset your network adapter’s software to default setting when you have Internet or network problems on Windows 10. Check the detailed step-by-step guide in this tutorial. MiniTool software also provides you many useful solutions in computer hard drive management, data recovery, system backup and restore, etc.
When you have network problems on Windows 10 computer, you can use Netsh Winsock reset command to reset Winsock Catalog, and reset your computer network adapter’s software back to default settings.
Winsock, short for Windows Socket, contains data that programs use to access the network. If a program needs to access the Internet, it has to use Windows Socket.
For how to troubleshoot Internet connection problems, performing a Netsh Winsock reset Windows 10 is a common troubleshooting step. Check the step-by-step guide below for how to use Netsh Winsock reset command to fix Windows 10 network problems.
How to Use Winsock Reset Command Windows 10 – 3 Steps
It’s quite easy to run Winsock reset command on Windows 10 to reset Winsock Catalog to default setting. Just follow the instructions below.
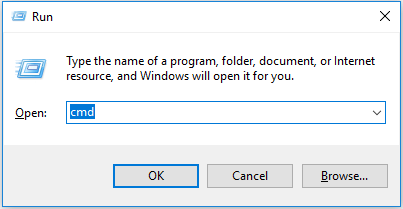
Step 1 – Run Command Prompt as Administrator
You can press Windows + R on the keyboard at the same time to open Run dialog. Type cmd in the search box. Press Ctrl + Shift + Enter to open and run Windows 10 Command Prompt as administrator.
You can also click Start, type cmd, right-click Command Prompt desktop app in the list, and choose Run as administrator to open the elevated Command Prompt.
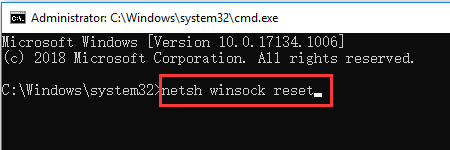
Step 2 – Run Netsh Winsock Reset Command Windows 10
Then you can type the Netsh Winsock reset command line below in Command Prompt window, and hit Enter button to execute the command.
netsh winsock reset
Step 3 – Restart Your Windows 10 Computer
After the Netsh Winsock reset process is completed, you can restart your Windows 10 computer to let this Windows 10 Winsock reset take effect.

Download VeePN for PC, Mac, Mobile, and Browser
This post gives a VeePN review and offers guides on how to download VeePN for Chrome, Edge, Firefox, PC, Mac, Android, iOS, etc. to use this VPN service.
Read More
What Internet Connection Problems Can Winsock Reset Command Tackle?
Winsock reset Win 10 can resolve many networking problems for you. Normally it can repair these Internet connection problems.
- Fix network problem after you remove malware, virus, etc.
- Can’t access Internet or can’t open some webpages like meeting an error “This site can’t be reached” when trying to visit a website.
- See some pop-up network connections errors on your Windows 10 computer.
- WiFi connected but no Internet access error due to registry errors.
- Resetting TCP/IP didn’t fix Internet connectivity issue.
- Find some problems in DNS lookup.
- Fail to renew IP address.
- Fix some other DHCP errors.
- Limited Internet connectivity in Windows 10.
- Other devices can connect to the same Internet but your Windows 10 PC can’t.
- Other network problems in Windows 10.

Hola VPN Free Download for Chrome, PC, Mac, Android, iOS, etc.
Learn how to download free Hola VPN for Chrome, Edge, PC, Mac, Android, iOS, etc. to use it to unblock and access worldwide content online with no limit.
Read More
Bottom Line
When you are facing network connection problems on Windows 10, you can follow the guide above to fix Internet problems with Netsh Winsock reset command Win 10.
If you have other problems on your Windows 10 computer, you can further repair Windows 10 with Startup Repair, SFC Scannow, etc.
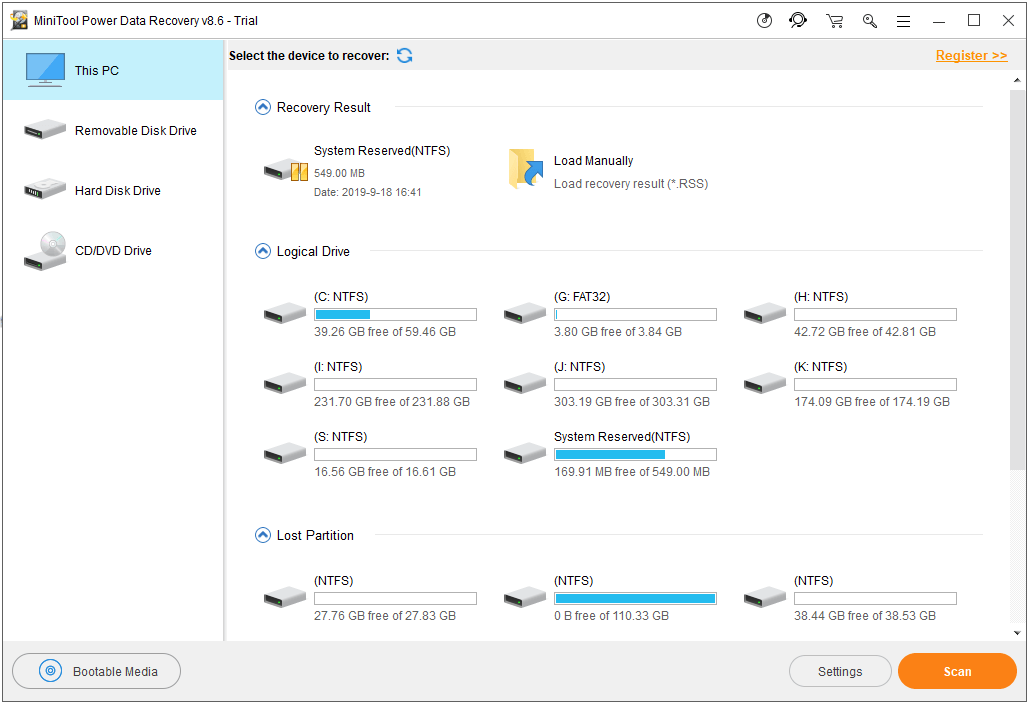
To recover lost data or mistakenly deleted files on Windows 10/8/7 computer, please turn to MiniTool Power Data Recovery. The free edition of this software allows you to recover up to 1GB data totally for free. Extremely intuitive interface and 100% clean.
About The Author
Position: Columnist
Alisa is a professional English editor with 4-year experience. She loves writing and focuses on sharing detailed solutions and thoughts for computer problems, data recovery & backup, digital gadgets, tech news, etc. Through her articles, users can always easily get related problems solved and find what they want. In spare time, she likes basketball, badminton, tennis, cycling, running, and singing. She is very funny and energetic in life, and always brings friends lots of laughs.
Resetting Winsock in Windows 10 is like giving your network settings a fresh start. It can fix various internet connectivity issues by resetting the TCP/IP stack. You’ll need to use some simple commands in the Command Prompt, and the whole process should take only a few minutes.
In this section, we’ll walk through the steps to reset Winsock on your Windows 10 computer. This will help clear up any networking problems you’re facing.
Step 1: Open Command Prompt as Administrator
To get started, you need to open the Command Prompt with administrative privileges.
Right-click the Start menu, then click on “Command Prompt (Admin)” or “Windows PowerShell (Admin).” This will open a black window where you’ll type the required commands.
Step 2: Type the Winsock Reset Command
Next, you need to enter the command to reset Winsock.
Type netsh winsock reset and press Enter. This command will reset the Winsock catalog to its default settings.
Step 3: Restart Your Computer
Finally, you need to restart your computer to apply the changes.
Click on the Start menu, select “Power,” and then choose “Restart.” Your computer will reboot, and the Winsock reset will take effect.
After completing these steps, your computer’s network settings will be refreshed, potentially solving any connectivity issues.
Tips for Resetting Winsock in Windows 10
- Make sure to close all applications that are using the internet before you reset Winsock.
- If the issue persists after resetting Winsock, you might need to update your network drivers.
- Running a full system scan with your antivirus software can also help identify any underlying issues.
- Consider creating a system restore point before making changes to your network settings.
- If you’re having trouble, consulting with a professional or referring to the official Windows support documentation can be beneficial.
Frequently Asked Questions
What is Winsock?
Winsock is a programming interface and the supporting program that handles input and output requests for internet applications in a Windows operating system.
Why should I reset Winsock?
Resetting Winsock can resolve a variety of network-related issues, including problems with connecting to the internet and slow internet speeds.
Will resetting Winsock delete my files?
No, resetting Winsock will not delete any of your files. It simply resets certain network configurations.
What if resetting Winsock doesn’t fix my issue?
If resetting Winsock doesn’t resolve your problem, you might need to look into updating your network drivers or checking for malware.
Is it safe to reset Winsock?
Yes, it is safe to reset Winsock. However, it’s always a good idea to create a system restore point before making any major system changes.
Summary
- Open Command Prompt as Administrator.
- Type the Winsock reset command:
netsh winsock reset. - Restart your computer.
Conclusion
Resetting Winsock on your Windows 10 computer can be a quick and effective way to resolve various network-related issues. By following the simple steps outlined above, you can reset Winsock and potentially restore your internet connectivity. If you’re still having problems after resetting Winsock, consider updating your network drivers or running a malware scan. Always remember that it’s safe to reset Winsock, but creating a system restore point is a good precautionary measure.
For further reading, you might want to check out more detailed guides or consult with tech forums. If you found this article helpful, please share it with others who might benefit from resetting Winsock on their Windows 10 systems.
Matt Jacobs has been working as an IT consultant for small businesses since receiving his Master’s degree in 2003. While he still does some consulting work, his primary focus now is on creating technology support content for SupportYourTech.com.
His work can be found on many websites and focuses on topics such as Microsoft Office, Apple devices, Android devices, Photoshop, and more.
Resetting Winsock is an essential troubleshooting step when faced with networking issues in Windows 10. This process can help resolve problems such as inability to connect to the internet, slow connection speeds, or other network-related errors. The article delves into various aspects of resetting Winsock in Windows 10, providing detailed steps and related tips.
What is Winsock?
Winsock, or Windows Sockets API, serves as the gateway for communication between software applications and the underlying Windows network services. Its primary role is to facilitate network connectivity and manage how data packets are sent and received over the network. Issues with Winsock often lead to network failures, making it crucial to maintain its integrity.
Reasons to Reset Winsock
Before embarking on the reset process, it’s important to recognize the reasons why one might need to reset Winsock. Common symptoms include:
- Inability to access the internet or specific websites.
- Frequent loss of connectivity or unstable connections.
- Applications that depend on an internet connection failing to perform properly.
Resetting Winsock can often resolve these problems by restoring the network settings to their original state.
How Do I Reset Winsock In Windows 10?
Follow these detailed steps to reset Winsock effectively:
Step 1: Open Command Prompt as Administrator
- Click on the Start menu or press the Windows key.
- Type «cmd» or «Command Prompt» in the search bar.
- Right-click on Command Prompt from the search results and select Run as administrator. A User Account Control (UAC) window may appear, prompting you to confirm your action. Click Yes to proceed.
Step 2: Execute the Winsock Reset Command
- In the Command Prompt window, type the following command:
netsh winsock reset - Carefully check for any typing errors, then press Enter.
- The system will execute the command, and you’ll see a success message indicating that Winsock has been reset.
Step 3: Restart Your Computer
- Close the Command Prompt window by clicking the X in the top-right corner.
- Go to the Start menu and select Power, then click on Restart.
- Once your computer boots up, the Winsock reset settings will take effect, and your network connectivity may improve.
Additional Troubleshooting Steps
If resetting Winsock does not resolve the network issues, consider taking the following additional steps:
-
Reset TCP/IP Stack: In the same Command Prompt window (run as administrator), type:
netsh int ip reset
and press Enter. Restart your computer afterward. -
Flush DNS Cache: Run the command:
ipconfig /flushdns
This can help clear any corrupted DNS entries. -
Update Network Drivers: Ensure your network drivers are up to date. Go to Device Manager, locate your network adapter, right-click on it, and choose Update driver.
- Check Network Services: Ensure that essential network services such as DHCP Client, TCP/IP Protocol Driver, and others are running.
FAQ
1. Will resetting Winsock delete my network settings?
Resetting Winsock will not delete your internet connection settings or user-created configurations. It merely restores Winsock to its default state, which can resolve underlying connectivity issues.
2. Can I undo the Winsock reset?
There is no direct way to undo a Winsock reset. However, noting down your current network settings before performing the reset can allow you to reconfigure them afterward if necessary.
3. How often should I reset Winsock?
There’s no fixed frequency; you should consider resetting Winsock when you encounter recurring network issues that aren’t resolved by other troubleshooting methods.
About the author
Raj Singh is an expert in operating systems such as Android, Ms Windows, Mac OS, Linux, and more. He simplifies complex system management tasks, offering guidance on optimizing and troubleshooting these platforms. With a focus on efficiency and customization, Raj helps individuals and businesses make the most of their operating environments. His technical expertise extends to creating tailored solutions for diverse needs, ensuring seamless operations and problem-solving across various platforms. Passionate about technology and innovation, Raj is dedicated to helping users unlock the full potential of their systems.
You may also like
Как сбросить сетевые настройки в Windows
Статья обновлена: 15 июля 2024
ID: 12378
Если у вас возникли проблемы с подключением к сети, сбросьте сетевые настройки в Windows. При этом будут сброшены также настройки прокси-сервера.
Как сбросить сетевые настройки с помощью командной строки
Как сбросить сетевые настройки в параметрах Windows 10 и Windows 11
Спасибо за ваш отзыв, вы помогаете нам становиться лучше!
Спасибо за ваш отзыв, вы помогаете нам становиться лучше!

This article will show you how to run the ‘netsh winsock reset’ command on your Windows computer. This command is a simple troubleshooting step that can fix many common problems with your internet connection, including browsing or gaming issues. In particular, if you see Error Code 10107, there’s a good chance that the below steps to fix your issue.
This command will reset Winsock (Windows sockets).
Running ‘Netsh Winsock Reset’ on Windows 10
Open a command prompt by clicking Start and typing ‘cmd’ into the Search Programs and files box.
Type in the following command: ‘netsh winsock reset’ and press enter

You should see the following message: ‘Successfully reset the Winsock Catalog. You must restart the computer in order to complete the reset.’
Restart the computer and check if your issue has been resolved.
Running ‘Netsh Winsock Reset’ on Windows 8
Open a command prompt by clicking Start and typing ‘cmd’ into the Search Programs and files box.
Type in the following command: ‘netsh winsock reset’ and press enter

You should see the following message: ‘Successfully reset the Winsock Catalog. You must restart the computer in order to complete the reset.’
Restart the computer and check if your issue has been resolved.
Running ‘Netsh Winsock Reset’ on Windows 7 (and Vista)
Open a command prompt by clicking Start and typing ‘cmd’ into the Search Programs and files box.
Type in the following command: ‘netsh winsock reset’ and press enter
You should see the following message: ‘Successfully reset the Winsock Catalog. You must restart the computer in order to complete the reset.’
Restart the computer and check if your issue has been resolved.
Additional Resources
https://support.microsoft.com/en-us/kb/299357