
In some cases, you need to format your computer and bring it back to the brand-new condition. Do you know how to make the Sony VAIO factory restore without disk?

In fact, it’s quite simple to factory restore a Sony VAIO laptop. You can rely on the built-in recovering and restoring software, VAIO Recovery Center or VAIO Care to format your Sony Vaio to the original factory condition. Here in this post, we will tell you how to restore Sony Vaio laptop to factory settings in details.
- Part 1. Sony VAIO Factory Restore Without Disk Using VAIO Care
- Part 2. Use VAIO Recovery Center to Format Sony VAIO Laptop
- Part 3. FAQs of Sony VAIO Laptop Factory Reset
Part 1. Sony VAIO Factory Restore Without Disk Using VAIO Care
If you are using a Sony VAIO laptop and want to factory restore it, you can rely on the built-in restoring software, VAIO Care. As a multi-purpose application, VAIO Care enables you to back up and restore files, troubleshoot, make diagnostic tests, and restore Windows system. It offers a simple way to factory restore Sony Vaio laptop without disk.
Step 1On your Sony Vaio laptop, click Start button or Windows icon to arise all programs. Here you can use the searching feature to quickly locate the VAIO Care and open it.
Note that, if your Sony laptop can’t boot normally. Here you can press and hold Power button to shut down your computer. Wait for a few seconds and then press Power again to restart it. As soon as you see the VAIO logo on the screen, press the Assist button on your laptop. By doing so, you can enter the VAIO Care and see the Troubleshooting section.
Step 2Choose Recovery under Recovery & Restore section on the left pane. Then click on the Recover Computer option on the right. When it prompts, click Yes to restart the VAIO and boot to the recovery partition.
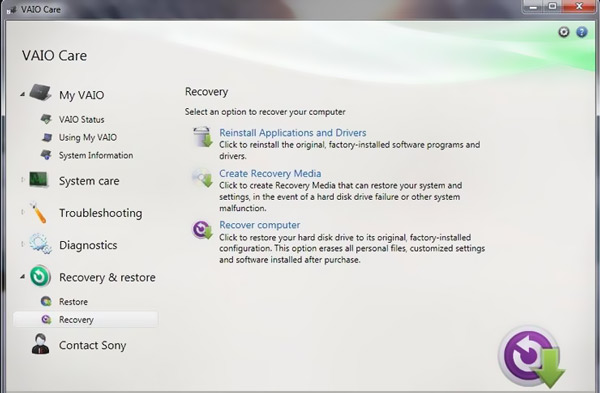
Step 3Now you can follow the on-screen instructions to back up your data. You can click Factory Condition to reformat the hard drive and restore your Sony VAIO to its factory state. After that, click Yes, I’m Sure to proceed. Then click Start Recovery to factory restore this Sony VAIO laptop without disk. When the whole process is complete, click Restart button to reboot your Sony laptop.
How to reset, remove or bypass password on Sony VAIO laptop
When you forgot the current password of your Sony Vaio laptop, you can rely on some hits to remember the forgotten passcode. If you still can’t log into your account, you have to rely on some professional tool to remove the Windows password and access your computer again.
Here we strongly recommend the professional imyPass Windows Password Reset for you to bypass or remove your forgotten password. It is specially designed to reset or remove any Windows administrator and other user account passwords.
4,000,000+ Downloads
Bypass/reset/remove Windows password for Windows 7/8/10 Sony Vaio laptop.
Get into a Sony Vaio laptop without the forgotten password.
Create Windows password reset USB drive or disk without the current one.
Recover Windows account password and add new Admin account to Windows.
Support file systems like FAT16, FAT32, NTFS, NTFS5, etc. and laptop brands like Sony, Dell, HP, Samsung, Lenovo, ASUS, Acer, and more.
Related Readings:
- Factory Reset Windows Without Passwords
- How to Reset HP Laptop
Part 2. Use VAIO Recovery Center to Format Sony VAIO Laptop
You should know that, some Sony VAIO laptops come with the VAIO Recovery Center. If your Sony computer ship with it, you can take the following guide to restore the Vaio laptop back to its factory settings.
Step 1Reboot your Sony Vaio laptop and keep pressing the F10 key immediately when you see the VAIO logo. When the Edit Boot Options screen appears on the screen, press the Enter key. You can also open VAIO Recovery Center from All Programs.

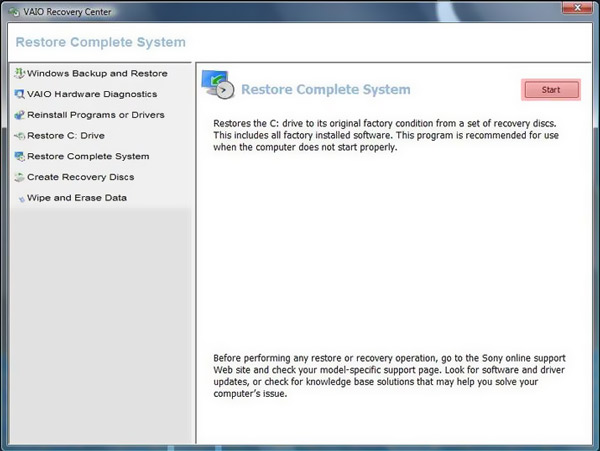
Step 2Choose the Restore complete system option on the left pane. Then click Start button on the right.
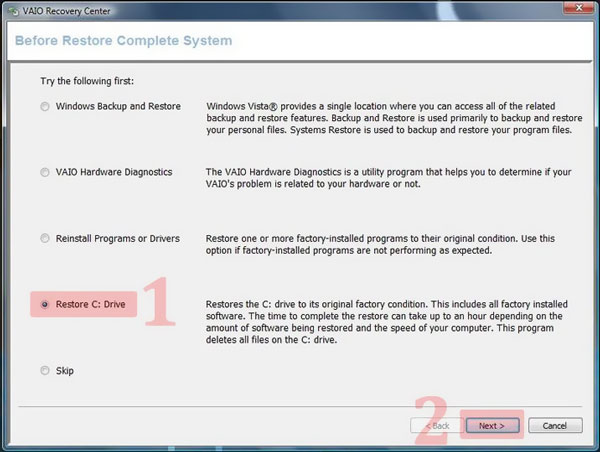
Step 3Select the Restore C: Drive option and then click on the Next button. When you see the warning message, click I understand and then hit Start to start the Sony Vaio factory restore without disk.
Part 3. FAQs of Sony VAIO Laptop Factory Reset
Question 1. Why to factory restore Sony Vaio laptop?
There are some main reasons that you need to factory restore Sony Vaio laptop. You may want to fix some issues, remove all personal data and related apps and settings. Or you want to format Sony Vaio laptop and improve its performance.
Question 2. How to perform a power reset on Sony Vaio laptop?
Shut down your Sony laptop and remove the battery and AC adapter from it. Press and hold the power button for 30 seconds. Reconnect the battery and AC adapter to Sony laptop and then press on the power button.
Question 3. How do I restore Sony laptop to factory settings?
To restore your Sony laptop back to the factory settings, you can go to the Settings app. Choose the Update & Security option and then click on the Recovery. Click the Get Started under Reset this PC. After that, you can choose Keep My Files or Remove Everything to start the restoring.
Conclusion
We have mainly talked about Sony Vaio factory restore without disk in this post. We shared 2 easy ways to format your Sony laptop to factory settings. Leave us a message if you still have any questions.
More Reading
- How to Reset Dell Laptop Latitude/Vostro/Inspiron/G Series
- Reset Password on Your Windows Vista Computer without Losing Data
- Delete/Disable Administrator Account on Windows 11/10/8/7
I have a Sony VAIO laptop with windows 7. When I turn it on, it gets through the VAIO screen perfectly fine, but, after that, the screen turns black and stays that way. So, I decided to format laptop to its factory settings. When I get to the screen that says “recovery setting is being launched please wait” it just keeps loading. I can move the mouse around so it isn’t frozen. What should I do?
The reason for the above situation is that the drive partition may be damaged or even non-existent, so you need to format the Sony VAIO. Therefore, in this situation, how to easily and effectively restore the Sony VAIO diskless to the factory has become a thorny issue. No worry, the problem is not as difficult as you think. You can format your Sony VAIO laptop through VAIO Recovery Center or VAIO Care. If you follow this paragraph, it won’t take too much effort and time to solve the problem.
Just choose one and put it into practice:
Part One: How to Format Sony VAIO Laptop without Disk?
As you might know that the VAIO Laptops do not come with a recovery disk, then how to reset Sony VAIO? To format or recover it, we can either use VAIO Recovery Center or Sony VAIO Assist Button. Here is a comparison table between both the methods. You can choose the option that suits you.
Warning:
Remember that formatting sony vaio removes all the data that is stored in your laptop,so if you do not want to lose any data, please make a backup before following this procedure.
Option 1: Format Sony VAIO Laptop with VAIO Recovery Center
Scenario 1: If your Sony VAIO Laptop cannot Boot Normally
- Turn on or restart your Sony VAIO laptop.
-
When the VAIO logo appears as shown in the following image, press the F10 key several times to enter the Sony VAIO BIOS Boot menu.
-
Edit Boot Options screen will appear. Press Enter to proceed.
Scenario 2: If your Sony VAIO Laptop can Boot Normally
- Open the Start menu.
- Go to All Programs.
-
Click on the VAIO Recovery Center to launch it.
- When the VAIO Recovery Center window opens, choose Restore Complete System from the left navigation menu.
-
Now click on the Start button to proceed.
-
In the following window, choose Restore C drive and click on the Next button
- A warning will appear on the screen. Check the ‘I understand’ box and click on the Start button.
The process of restoring the Windows and reformatting the Sony VAIO laptop will start.
After the process completes, all the settings in your laptop will be set to default, Windows will be reinstalled and all the other software will be removed. You can now reinstall the programs and make partitions in the C drive.
Option 2: Format Sony VAIO Laptop with ASSIST Button
You may ask how to format Sony Vaio laptop if it doesn’t turn on normally? In this case you can use the ASSIST button on Sony VAIO. What is the assist button on sony vaio? It is an additional button used to perform the regular maintenance of the laptop and to solve the problems that may occur while using the computer. The ASSIST button does different things based on the condition in which it was pressed.
Tips:
1) It starts VAIO Care when pressed while the laptop was on.
2) Displays VAIO Care in Rescue Mode when pressed while the laptop was off. You can use this option to recover the laptop in case of an emergency. Keep in mind that if the VAIO Care screen is displayed and no operation is performed for more than 5 minutes, the laptop gets turned off automatically.
You can use the assist keys to format your Sony VAIO laptop by the steps below.
- If your PC is turned on, you need to turn it off by pressing and holding the power key until the laptop turns off.
-
Restart the system and press the “Assist” button present on your laptop. The location of Assist button can vary based on different models of Sony VAIO series.
- The VAIO Care will open in Rescue Mode. A list of options with key names will appear on the screen.
-
Press the F10 key to choose Recover and maintain your system.
-
Now choose the preferred keyboard layout from the options displayed in the following window. Note that this layout will be used throughout the recovery process.
-
In the next window, choose Troubleshoot.
-
When the following options appear, choose Recovery and maintenance.
-
A list of Windows versions will appear. Choose the version that you want to install. The VAIO Care Rescue window will open. Click on Start Recovery Wizard from the options.
-
Now, you will be asked whether you want to rescue your data or not. It is good to rescue your data as it saves you from data loss while performing the recovery.
- Connect the hard disk.
-
Choose the drive and click Next.
- Click on the Start Rescue button to start backing up your data. Once the rescue has been completed, click on the Next button.
-
You will be asked whether you are sure that you want to start recovery. Check the ‘Yes, I am sure’ checkbox and click on the Start recovery button.
-
When it asks you to restart the laptop, click on the Restart button.
Tips:
If you reformat laptop without rescuing data, no backup will be available after the factory restore.
• Now, you will have two options i.e. Easy Rescue and Custom Rescue.
If you choose Easy Rescue, the system will automatically choose the location to store the backup of your data on the hard disk. If you choose Custom Rescue, you will have to choose the location to store the backup on the hard disk yourself.
Congratulations! Your Sony VAIO factory restore without disk has been completed successfully. It will automatically reset to factory settings. You can now install the required programs and change settings according to your requirements.
Part Two: No Format, No Password, How to Login Sony VAIO Laptop?
Forgetting or losing the device password is the worst thing that can happen to someone. There is nothing wrong with formatting your laptop system if it is a problem. But if you choose to format Sony Vaio because of forgetting your password, then you are totally wrong,which will put all data stored on your laptop at risk.
There are many ways to recover or reset a forgotten password, such as using an administrator account, using a password reset tool, etc. For your convenience, here are some of the best solutions:
Method 1: Resetting Sony VAIO Laptop Password Using PassFab 4WinKey Password Reset Tool
The best, recommended, easiest yet least risky way of resetting the password of your Sony VAIO laptop is using the PassFab 4Winkey windows Password Reset Tool. This tool provides you an attractive yet easy-to-use graphical interface that guides you step by step throughout the process of resetting the password. Using this tool, you can create a temporary recovery disk and unlock the password in few simple steps. To use this tool, follow these steps:
-
Download and install the PassFab 4WinKey Password Reset Tool on an unlocked PC and insert a USB/DVD/CD to burn Windows Password Reset Disk.
- Burn the disk following the steps shown on the screen. Now eject the drive from the PC and insert it in the locked Sony VAIO Laptop.
- Boot your locked laptop with the password reset disk you created in the previous step.
- When the password reset screen opens, choose the locked account and mark Change Account Password from the list of features.
-
Click on the Next button. You will be asked to enter the new password for that account. Enter the new password and click on the Reset button.
- Your Sony VAIO laptop will restart and the password will be reset.
You can now log in to your locked Sony VAIO laptop using the new password.
Method 2: Resetting Sony VAIO Laptop Password Using Microsoft Account (windows 8/10 only)
As a Windows 8 user, you should be familiar with Microsoft account features. As we know, local account is created and managed locally. Instead, a Microsoft account is the so-called Windows Live ID, which can be used to log in to all Microsoft products, including email, Windows Store, Outlook, and other partner websites.
Thus, you can reset the password of your Sony VAIO laptop online simply by clicking on the Reset Password link. You will be redirected to the Microsoft Accounts page.
- Visit the Microsoft login page via another system (mobile or working laptop).
-
Select the «I forgot my password» option. Click Next. Then type the Microsoft account and character
- Select the verification option you want, email or phone, and you will receive a verification code on your email or phone. Enter the code.
- Now enter the new password and confirm. Click Next. You can reset your password and log into your PC using the new password.
This method is easy to operate and straightforward. Certainly, if you had been familiar with the local account and hadn’t created a Microsoft account, this method cannot work for you. You can continue reading to find the method that suits you. Or you can try PassFab 4Winkey, whether you are using a local account or a Microsoft account,which is applicable.
Method 3: Resetting Sony VAIO Laptop Password using Safe Mode
You can reset the password of your Sony VAIO laptop by using the Safe Mode. This method is a bit more complicated, if you are familiar with computer technology, you can still give it a try. Unlike the previous method, you can use this method to perform Sony VAIO Windows 7 Recovery too.
-
To reset the password using this method, restart your laptop and press the F8 key (win8: press shift+F8key). The Advanced Boot Menu Options will appear.
- Use the arrow key to navigate to Safe mode and press Enter to reset your password. After resetting the password, re-open the Advanced Boot Options Menu and choose Start Windows Normally.
You can now log into the system using the new password and format your Sony VAIO laptop.
Method 4: Resetting Sony VAIO Laptop Password using CMD
You can reset your Sony VAIO laptop account password using the CMD.
- To reset the password using this method, you will again have to open Advanced Boot Menu Options by pressing the F8 key (win8: press shift+F8key). while the laptop restarts.
-
Now, navigate to Safe Mode with the CMD option using the arrow keys. Press Enter.
- The command prompt window with administrative rights will pop up. Enter the username of the locked account and new password in the following command:
C:\Windows\system32>net user username new_password - After typing the above command, press Enter. Your account password will be reset automatically. Close the command prompt window and log into your Sony VAIO laptop using the new password.
If you are not a computer fan, it is not recommended that you use command prompt to unlock the password. Or you may end up severely damaging the system or data. option 1 is your best choice.
Conclusion
This article proposes different ways to format a Sony VAIO Laptop without a Disk by using Sony VAIO Recovery Center and VAIO Care through the Sony VAIO ASSIST button. Furthermore, this article provides different ways of resetting the forgotten Sony VAIO laptop password for someone who is not technical enough to format a laptop without logging into the system. It is recommended to do so by using the PassFab 4Winkey Password Reset Tool as it is the safest way of resetting and recovering a locked account.
COMMENT
In the process of laptop usage, some problems happen accidentally. Sometimes we couldn’t solve them easily or directly and have to restore laptop to factory settings.
The following are problems with Sony Vaio laptop possibly from computer users.
Problem 1:
Hello,
I have a Sony Vaio laptop and I want to set it back to factory settings. But I do not have a recovery disk. I am using Windows Vista. How do I do this?
Problem 2:
I have a Sony Vaio and I want to restore it to original factory settings. But I don’t have a restore disc. How do I restore it without using a restore date? Please help.
Problem 3:
Hi, I have a Sony Vaio laptop and the model is PCG grt916v. I want to set it to factory settings but my Sony disk drive is broken and couldn’t recognize my recovery disk. I tried all the buttons for bringing up the Hudson thing but nothing happens. Every time I press a key it just goes to the welcome screen. Please help.
For problem 1 and problem 2, it is about how to restore Sony Vaio laptop to factory settings without recovery disc. And because Sony disk drive has been broken in problem 3, so that would be different from the first two problems.
Now according to the problems we face, we will introduce how Sony Vaio laptop factory reset without recovery disc and how to recover Sony laptop to factory reset when its disk drive is broken.
- Sony Vaio Laptop Factory Reset without Recovery Disc
- Restore Sony Vaio to Factory Settings When Hard Drive is Broken
One: Sony Vaio Laptop Factory Reset without Recovery Disc
Even though there is no recovery disc available, you still could use methods below to factory reset Sony Vaio laptop.
1. Factory Reset Sony laptop with one recovery menu.
Start your Sony laptop, and hold on pressing Alt + F10. Factory restore process would start, follow it and get factory default setup menu in Sony Vaio.
2. Factory Reset Sony laptop with system restore program.
System restore program set in Sony laptop could help you to restore the laptop to the early backup point, including the first one point when the laptop is factory default settings.
Click Start – Programs – Accessories – System Tools – System Restore. Select “Restore My Computer to Early Time”, click “Next”. And you would see several dates, and the dark date is the backup point. Select it and click “Next” to restore your system to this point.
If system restore couldn’t work in this mode, restart laptop and press F8 to enter Windows safe mode. The following steps in safe mode are the same as usual mode.
Two: Restore Sony Vaio Laptop to Factory Reset when Hard Drive is Broken
When the hard drive is broken, recovery disk would not work if you directly insert it into Sony laptop and try to boot the laptop from the recovery disc. At this time, you can use an external hard drive to read recovery disc.
- Find an external hard drive and connect it to Sony laptop.
- Insert system recovery disc into external hard drive.
- Access Sony BIOS and set laptop boot from recovery disc.
- Follow system recovery wizard to restore Sony laptop to factory default settings.
If these still couldn’t help you, call customer service to ask for help.
Related Articles:
- How to Reset Laptop Password If Forgot It
- Reset Laptop to Factory Settings without Disc
- How Does Data Recovery from Sony Memory Card
- How to Create Recovery Disc for Windows Forgotten Admin Password Reset
Обладатели устройств Sony VAIO нередко сталкиваются с такой неприятной проблемой, как зависание системы. Это не позволяет в полной мере использовать все возможности устройства. Избавиться от досадной неполадки помогает переустановка системы или возврат к настройкам ноутбука, которые были на устройстве в момент его приобретения.
При этом многие проблемы могут быть решены другими способами. Но в случае, если проблема достаточно сложно решаемая, подчас помочь может только возвращение к настройкам завода-изготовителя. Это позволит ликвидировать все имеющиеся неполадки и вернуть устройству прежнюю работоспособность. Кроме того, благодаря восстановлению заводских настроек удастся избавиться от любого вредоносного ПО.
- Для того чтобы вернуть ноутбуку заводские настройки, необходимо сделать несколько шагов:
- кликните на значок «Пуск» и откройте вкладку «Программы»;
- кликните на иконку VAIO Care;
- нажмите на иконку «Восстановление и архивация»;
- кликните на «Восстановить предшествующее состояние устройства»;
- после того, как вы кликните на «Да», система начнет восстанавливаться и стартует ее возврат к заводским настройкам.
В процессе восстановления системы все ваши личные данные и программы будут удалены: желательно заранее сохранить всю ценную информацию.
После окончания процесса операционная система очистится, а значит, скорость работы устройства вернется к прежнему уровню.