
Applies ToWindows 8 Windows 8.1 Windows 7 Windows Vista Windows XP Windows 10 Windows 11
Summary
This article helps you reset the Hosts file back to the default.
What’s the Hosts file
The Hosts file is used by the operating system to map human-friendly hostnames to numerical Internet Protocol (IP) addresses which identify and locate a host in an IP network. The hosts file is one of several system resources that address network nodes in a computer network and is a common part of an operating system’s IP implementation.
The Hosts file contains lines of text consisting of an IP address in the first text field followed by one or more host names. Each field is separated by white space (Tabs are often preferred for historical reasons, but spaces are also used). Comment lines may be included, and they are indicated by a hash character (#) in the first position of such lines. Entirely blank lines in the file are ignored.
If the Hosts file is changed from default, resetting it can help resolve some connectivity issues.
Resolution
To reset the Hosts file back to the default, follow these steps according to your operating system:
To reset the Hosts file back to the default, follow these steps:
1. Open Notepad. To do this, search for “Notepad”, and then tap or click the Notepad icon.
2. Copy the following text, and then paste the text into the file:
-
# Copyright (c) 1993-2006 Microsoft Corp. # # This is a sample HOSTS file used by Microsoft TCP/IP for Windows. # # This file contains the mappings of IP addresses to host names. Each # entry should be kept on an individual line. The IP address should # be placed in the first column followed by the corresponding host name. # The IP address and the host name should be separated by at least one # space. # # Additionally, comments (such as these) may be inserted on individual # lines or following the machine name denoted by a ‘#’ symbol. # # For example: # # 102.54.94.97 rhino.acme.com # source server # 38.25.63.10 x.acme.com # x client host # localhost name resolution is handle within DNS itself. # 127.0.0.1 localhost # ::1 localhost
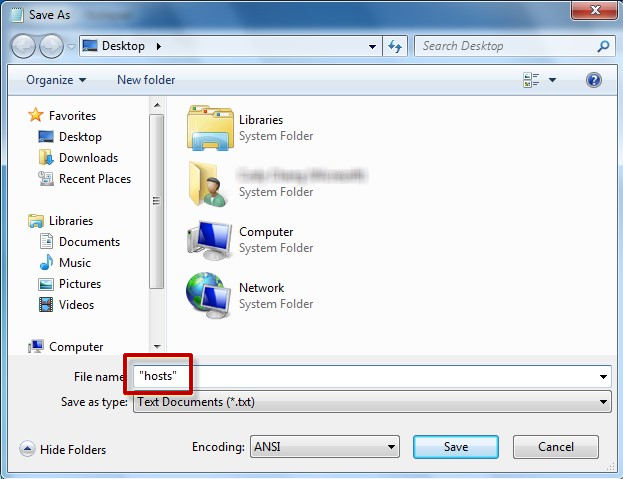
3. On the File menu, select Save as, type «hosts» in the File name box (as displayed in the following image), and then save the file to the desktop.

4. Close Notepad.
5. Search for %WinDir%\System32\Drivers\Etc, and then select the File folder icon.
6. Tap and hold or right-click the Hosts file, select Rename, and then rename the file as «Hosts.old».
7. Copy or move the Hosts file that you created in step 3 from the desktop to the %WinDir%\System32\Drivers\Etc folder. If you are prompted to enter an administrator password, select Continue.
To reset the Hosts file back to the default, follow these steps:
1. Open Notepad. To do this, search for “Notepad” using Cortana, and then tap or click the Notepad icon.
2. Copy the following text, and then paste the text into the file:
-
# Copyright (c) 1993-2006 Microsoft Corp. # # This is a sample HOSTS file used by Microsoft TCP/IP for Windows. # # This file contains the mappings of IP addresses to host names. Each # entry should be kept on an individual line. The IP address should # be placed in the first column followed by the corresponding host name. # The IP address and the host name should be separated by at least one # space. # # Additionally, comments (such as these) may be inserted on individual # lines or following the machine name denoted by a ‘#’ symbol. # # For example: # # 102.54.94.97 rhino.acme.com # source server # 38.25.63.10 x.acme.com # x client host # localhost name resolution is handle within DNS itself. # 127.0.0.1 localhost # ::1 localhost
3. On the File menu, select Save as, type «hosts» in the File name box (as displayed in the following image), and then save the file to the desktop.
4. Close Notepad.
5. Search for %WinDir%\System32\Drivers\Etc using Cortana, and then select the File folder icon.
6. Tap and hold or right-click the Hosts file, select Rename, and then rename the file as «Hosts.old».
7. Copy or move the Hosts file that you created in step 3 from the desktop to the %WinDir%\System32\Drivers\Etc folder. If you are prompted to enter an administrator password, select Continue.
To reset the Hosts file back to the default, follow these steps:
1. Open Notepad. To do this, swipe in from the right edge of the screen, tap Search, type Notepad, and then tap the Notepad icon. Or, if you are using a mouse, point to the upper-right corner of the screen, move the mouse pointer down, click Search, type Notepad, and then click Notepad.
2. Copy the following text, and then paste the text into the file:
-
# Copyright (c) 1993-2006 Microsoft Corp. # # This is a sample HOSTS file used by Microsoft TCP/IP for Windows. # # This file contains the mappings of IP addresses to host names. Each # entry should be kept on an individual line. The IP address should # be placed in the first column followed by the corresponding host name. # The IP address and the host name should be separated by at least one # space. # # Additionally, comments (such as these) may be inserted on individual # lines or following the machine name denoted by a ‘#’ symbol. # # For example: # # 102.54.94.97 rhino.acme.com # source server # 38.25.63.10 x.acme.com # x client host # localhost name resolution is handle within DNS itself. # 127.0.0.1 localhost # ::1 localhost
3. On the File menu, select Save as, type «hosts» in the File name box (as displayed in the following image), and then save the file to the desktop.
4. Close Notepad.
5. Open the %WinDir%\System32\Drivers\Etc folder. To do this, follow these steps:
-
a. Swipe in from the right edge of the screen, tap Search, type run, and then tap the Run icon. Or, if you are using a mouse, point to the upper-right corner of the screen, move the mouse pointer down, select Search, type run, and then select the Run icon.
-
b. Type %WinDir%\System32\Drivers\Etc in the Open box, and then select OK.
6. Select the Hosts file, select Rename, and then rename the file as «Hosts.old».
7. Copy or move the Hosts file that you created in step 3 to the %WinDir%\System32\Drivers\Etc folder. If you are prompted to enter an administrator password, tap or click Continue.
To reset the Hosts file back to the default yourself, follow these steps:
-
Click Start, click Run, type Notepad, and then click OK.
-
Look for your version of Windows from the list below and then copy the following text for that version of Windows, and then paste it into Notepad:
-
For Windows 7:
- # Copyright (c) 1993-2006 Microsoft Corp. # # This is a sample HOSTS file used by Microsoft TCP/IP for Windows. # # This file contains the mappings of IP addresses to host names. Each # entry should be kept on an individual line. The IP address should # be placed in the first column followed by the corresponding host name. # The IP address and the host name should be separated by at least one # space. # # Additionally, comments (such as these) may be inserted on individual # lines or following the machine name denoted by a ‘#’ symbol. # # For example: # # 102.54.94.97 rhino.acme.com # source server # 38.25.63.10 x.acme.com # x client host # localhost name resolution is handle within DNS itself. # 127.0.0.1 localhost # ::1 localhost
-
For Windows Vista or for Windows Server 2008:
- # Copyright (c) 1993-2006 Microsoft Corp. # # This is a sample HOSTS file used by Microsoft TCP/IP for Windows. # # This file contains the mappings of IP addresses to host names. Each # entry should be kept on an individual line. The IP address should # be placed in the first column followed by the corresponding host name. # The IP address and the host name should be separated by at least one # space. # # Additionally, comments (such as these) may be inserted on individual # lines or following the machine name denoted by a ‘#’ symbol. # # For example: # # 102.54.94.97 rhino.acme.com # source server # 38.25.63.10 x.acme.com # x client host 127.0.0.1 localhost ::1 localhost
-
For Windows XP or for Windows Server 2003:
- # Copyright (c) 1993-1999 Microsoft Corp. # # This is a sample HOSTS file used by Microsoft TCP/IP for Windows. # # This file contains the mappings of IP addresses to host names. Each # entry should be kept on an individual line. The IP address should # be placed in the first column followed by the corresponding host name. # The IP address and the host name should be separated by at least one # space. # # Additionally, comments (such as these) may be inserted on individual # lines or following the machine name denoted by a ‘#’ symbol. # # For example: # # 102.54.94.97 rhino.acme.com # source server # 38.25.63.10 x.acme.com # x client host 127.0.0.1 localhost
3. On the File menu, select Save as, type «hosts» in the File name box, and then save the file to the desktop.
4. Select Start > Run, type %WinDir%\System32\Drivers\Etc, and then select OK.
5. Select the Hosts file, and rename it «Hosts.old.»
6. Copy or move the Hosts file that you created in step 3 to the %WinDir%\System32\Drivers\Etc folder. If you are prompted to enter an administrator password, select Continue.
More Information
Support for Windows XP has ended
Microsoft ended support for Windows XP on April 8, 2014. This change has affected your software updates and security options. Learn what this means for you and how to stay protected.
Support for Windows Server 2003 ended on July 14, 2015
Microsoft ended support for Windows Server 2003 on July 14, 2015. This change has affected your software updates and security options. Learn what this means for you and how to stay protected.
Need more help?
Want more options?
Explore subscription benefits, browse training courses, learn how to secure your device, and more.
Товарищи, добрый день. Кажется в ноябре, я уже писал на подобную тему, статья была о редактировании файла hosts. Сегодня же мы поговорим о том, как вернуть этот файл в исходное состояние. Также эта инструкция может понадобится для тех, кто нарвался на вредителей и теперь восстанавливает операционную систему.
Итак, всё довольно просто. Необходимо открыть файл hosts, как указано в инструкции о редактировании. Для тех кто в теме, напоминаю, файл находится по следующему пути:
C:\Windows\system32\drivers\etc\hosts
А открывать его необходимо любым текстовым редактором, запущенным от имени администратора.
Если вы удалили файл hosts, то создаем простой текстовый файл с названием hosts.txt, включаем отображение расширений и удаляем его расширение вместе с точкой, оставляя просто hosts
Чтобы полностью исправить всё то, что вы или вирус натворил, рекомендую сделать следующее:
Жмём Ctrl+A, для того чтобы выделить весь текст. У меня оригинальный файл, буду показывать на этом. Это и есть оригинальный документ, к которому мы будем приводить сегодня ваш.
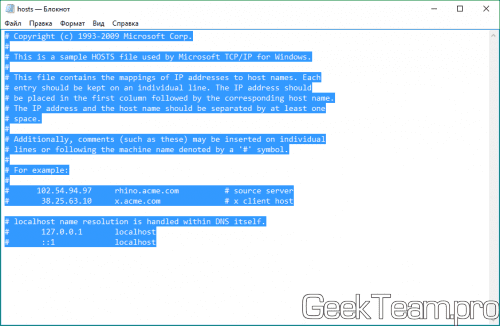
Кстати, обратите внимание на полосу прокрутку. Как видите на скриншоте, она не задействована, так как на экране выведены все строки, которые есть в документе. Если она есть, прокрутите страницу вниз, если там есть строки, значит на компьютере есть вирус и нужно пройти систему парой хороших антивирусов типа Dr.Web CureIt и Kaspersky.
После выделения, удаляем всё содержимое клавишей Delete.
И вставляем следующий текст:
# Copyright (c) 1993-2009 Microsoft Corp.
#
# This is a sample HOSTS file used by Microsoft TCP/IP for Windows.
#
# This file contains the mappings of IP addresses to host names. Each
# entry should be kept on an individual line. The IP address should
# be placed in the first column followed by the corresponding host name.
# The IP address and the host name should be separated by at least one
# space.
#
# Additionally, comments (such as these) may be inserted on individual
# lines or following the machine name denoted by a '#' symbol.
#
# For example:
#
#      102.54.94.97     rhino.acme.com          # source server
#       38.25.63.10     x.acme.com              # x client host

# localhost name resolution is handled within DNS itself.
#	127.0.0.1       localhost
#	::1             localhost
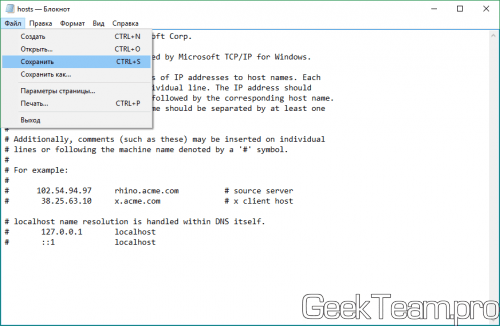
Осталось только нажать «Файл» — «Сохранить».
Перезапустите компьютер и проверьте файл. Если добавились новые строки, значит вредитель всё ещё на вашем компьютере и прежде, чем повторно попробовать внести изменения, необходимо от него избавиться.
Вроде всё. Надеюсь эта статья оказалась вам полезной, нажмите одну из кнопок ниже, чтобы рассказать о ней друзьям. Также подпишитесь на обновления сайта, введя свой e-mail в поле справа или подписавшись на группу во Вконтакте и канал YouTube.
Спасибо за внимание
Материал сайта geekteam.pro
Для внесения изменений в файл hosts в операционной системе Windows 10 необходимо выполнить следующие шаги:
1) Создать резервную копию файла C:\Windows\System32\drivers\etc\hosts, сохранить его в любом месте. Так как изменения будут вноситься в этот файл.
2) Запустить текстовый редактор Блокнот от имени Администратора:

3) Нажать на меню Файл -> Открыть.
В строке адрес ввести: C:\Windows\System32\drivers\etc\hosts

Нажать на клавишу Enter, в появившемся окне выбрать «Блокнот» и нажать «ОК«.

Откроется файл hosts.
4) Существующие строки можно не удалять, а добавить необходимые:
178.159.245.54 vashdomen.by www.vashdomen.by
5) Поле этого необходимо нажать меню Файл -> Сохранить.

Чтобы убедиться в том, что настройка выполнена верно и сайт будет открываться именно с необходимого нам сервера, необходимо «пропинговать» домен.
Сделать это можно с помощью командной строки Windows. Для запуска командной строки необходимо:
Нажать комбинацию клавиш Windows+R на клавиатуре вашего компьютера. В открывшемся окне прописать cmd и нажать кнопку «ОК»

В командной строке написать команду ping vashdomen.by, где вместо vashdomen.by впишите доменное имя Вашего сайта и нажмите «Enter».

В случае, если IP-адрес при ответе на запрос ping верный — необходимо открыть приватное окно браузера и проверить работу сайта на указанном сервере.
Внимание! После того как все работы завершены, то есть проверки выполнены. Рекомендуем восстановить файл C:\Windows\System32\drivers\etc\hosts к исходному состоянию. Удалить внесенные изменения либо восстановить его из копии, которую создали на шаге 1.
Windows позволяет осуществить довольно тонкую настройку любых параметров подключения к сети. Одной из частей этого механизма является системный файл hosts, который чаще всего используется для ограничения доступа к некоторым ресурсам интернета. В этой инструкции мы расскажем всё про hosts — что это такое, где он хранится, как его открыть, отредактировать и восстановить, а также что делать, если система работает с ним некорректно.
Зачем нужен файл hosts
Файл hosts предназначен для включения или отключения доступа к тем или иным ресурсам локальной сети и интернета. С его помощью ваш системный администратор или какие-либо программы могут ограничить посещение каких-нибудь сайтов. Иногда файл используется вредоносными программами: с его помощью они перенаправляют все попытки зайти на какие-либо сайты на, например, рекламные ресурсы.
Вы можете использовать файл hosts в Windows 10 для ограничения доступа, к примеру, детей к конкретным сайтам, а также для снятия запретов, установленных системным администратором.
Где находится файл hosts в Windows 10
Чтобы получить доступ к файлу hosts, вам надо узнать, где он располагается.
Где находится файл hosts по умолчанию
По умолчанию файл hosts располагается в папке C:\Windows\System32\drivers\etc. Но, посетив эту папку, вы можете запутаться. Дело в том, что в ней могут находиться ещё несколько файлов с похожими названиями, но с другими расширениями (например, .sam, .txt). У файла hosts расширения нет! Для определения правильного файла сделайте следующее:
- Откройте Проводник.
- Перейдите во вкладку Вид.
- Поставьте галочку Расширения имен файлов.


Теперь вы легко сможете отыскать нужный файл hosts.

Что делать, если в стандартной папке нет файла hosts
Может случиться, что в указанной выше папке нет файла hosts. В таком случае следует узнать, куда Windows (или ваш системный администратор) могла его поместить.
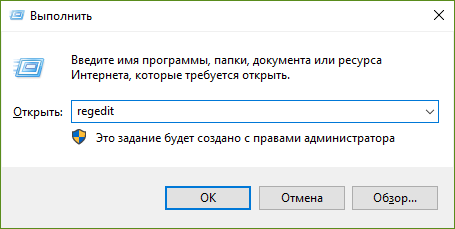
- Нажмите Win + R.
- Введите команду regedit и нажмите Enter.

- Перейдите в следующую ветвь: HKEY_LOCAL_MACHINE \ SYSTEM \ CurrentControlSet \ Services \ Tcpip \ Parameters.
- Найдите справа ключ DataBasePath и кликните по нему два раза.

- Скопируйте его значение.
- Откройте Проводник, вставьте скопированный путь в его адресную строку и нажмите Enter.

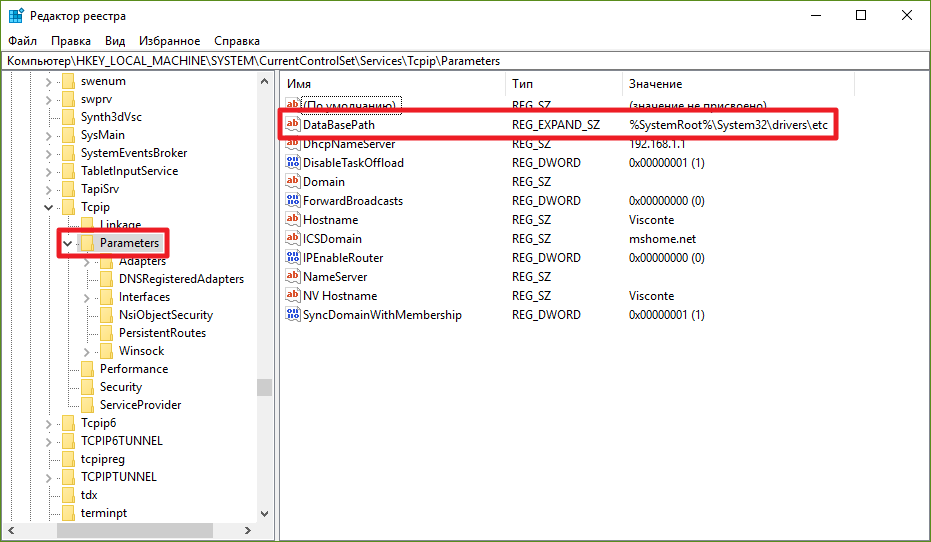
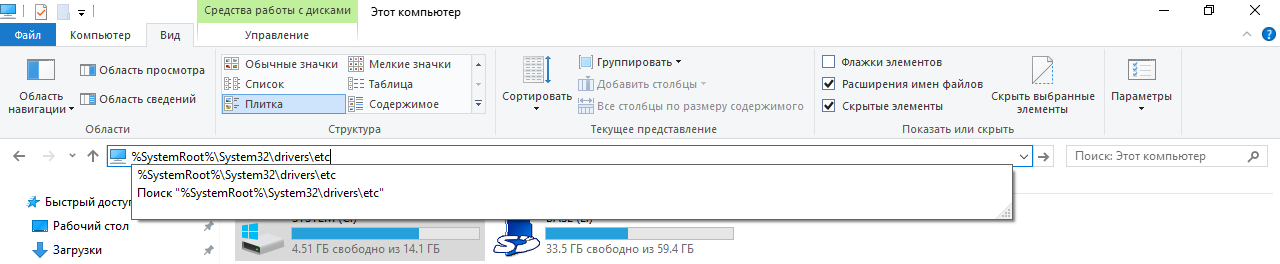
Открылась стандартная папка (C:\Windows\System32\drivers\etc)
Если откроется стандартная папка, которую вы уже посещали, и в которой файла hosts нет, то система его просто не создала. В таком случае вы можете добавить его вручную.
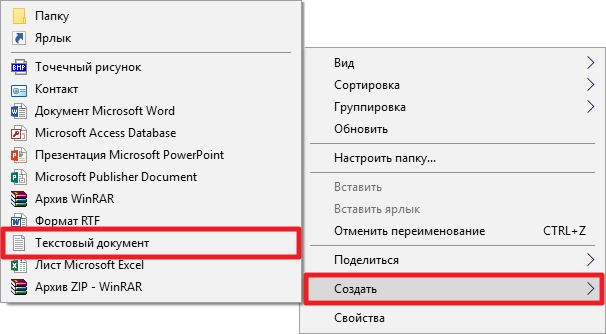
- Кликните правой клавишей мыши.
- Выберите Создать — Текстовый документ.

- Назовите его hosts и удалите расширение .txt из названия.
- Пропустите предупреждение о том, что изменение расширения может сделать файл недоступным.


Есть вероятность, что у вас будет недостаточно прав для создания файла сразу в указанной папке. В таком случае сделайте следующее:
- Создайте файл на рабочем столе или в любой другой папке.
- Скопируйте и вставьте его в папку C:\Windows\System32\drivers\etc.
Готово, теперь у вас существует файл hosts.
Открылась другая папка
Если откроется какая-либо другая папка, то, значит, ваш системный администратор или стороннее ПО переместили файл hosts в неё. Если он в ней присутствует, то всё в порядке. Если же его там нет, то воспользуйтесь инструкцией выше для его создания.
Как изменить файл hosts
Редактирование файла hosts может потребоваться для установки или снятия каких-нибудь ограничений. Для этого понадобится запустить Блокнот с правами администратора, открыть в нём файл hosts и записать/стереть необходимые строки.
Как запустить блокнот с правами администратора
Существует несколько способов сделать это, причем некоторые работают только в Windows 10. Если какая-то инструкция для вас не подошла, воспользуйтесь следующей.
Как запустить Блокнот с правами администратора через поиск
- Нажмите Win + S.
- Наберите в поисковой строке Блокнот.
- Кликните по найденной программе правой клавишей мыши и выберите пункт Запустить от имени администратора.
Как запустить Блокнот с правами администратора через командную строку
- Нажмите Win + S.
- Наберите в поисковой строке Командная строка.
- Кликните по найденной программе правой клавишей мыши и выберите пункт Запустить от имени администратора.
- Введите команду notepad и нажмите Enter.


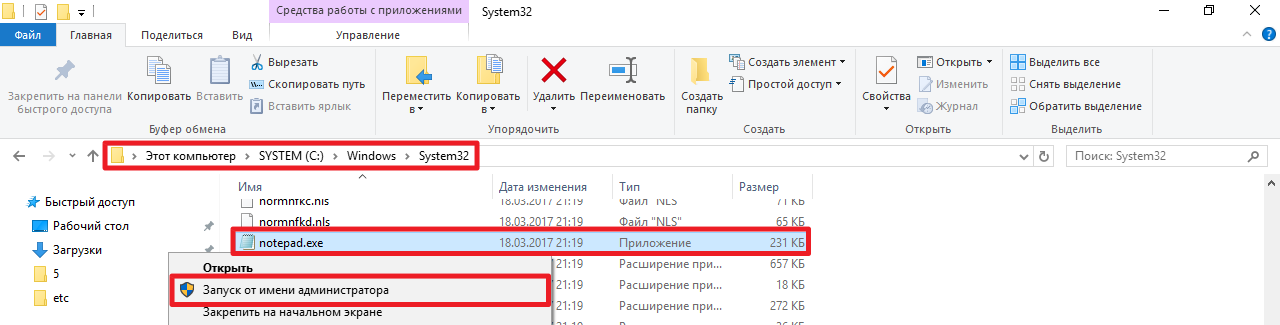
Как запустить Блокнот с правами администратора через исполняемый файл
Этот способ сработает также для сторонних приложений, вроде Notepad++.
- Откройте Проводник.
- Перейдите в папку C:\Windows\system32.
- Найдите файл notepad.exe, кликните по нему правой клавишей мыши и выберите пункт Запуск от имени администратора.

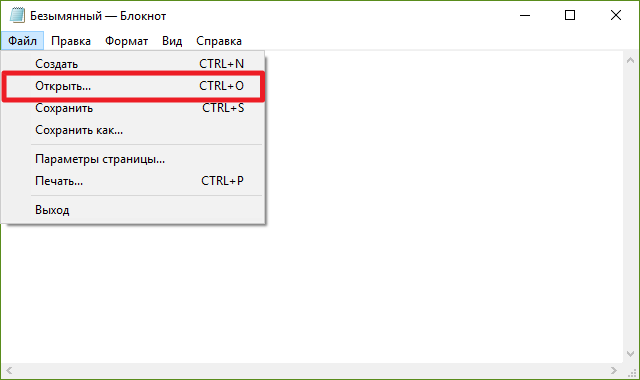
Как открыть файл hosts
Когда у вас открыт Блокнот, сделайте следующее:
- Нажмите Файл — Открыть.

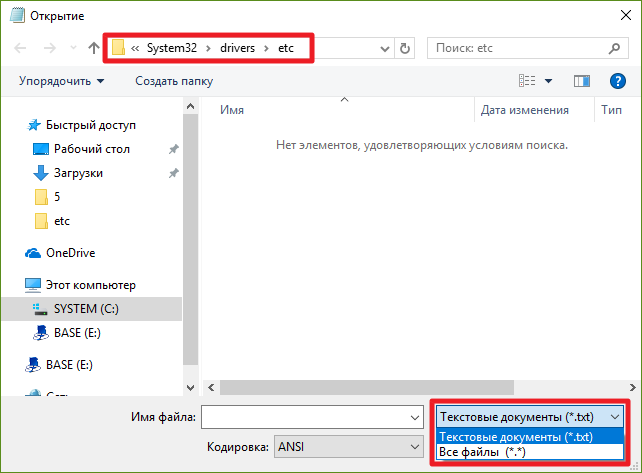
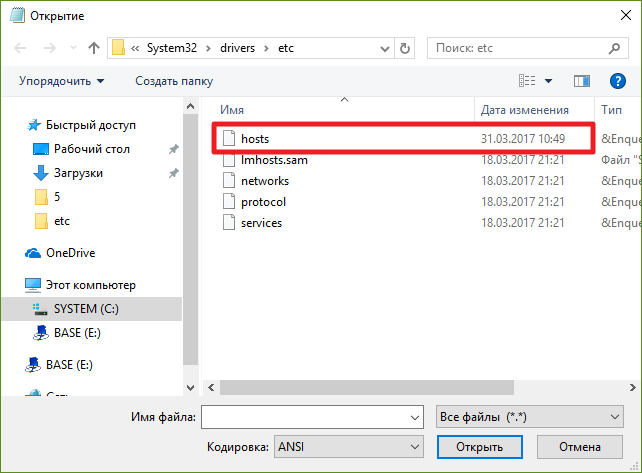
- Перейдите в папку, где хранится файл hosts.
- В выпадающем списке справа от имени файла замените Текстовые документы (*.txt) на Все файлы (*.*).

- Выберите файл hosts.
Как отредактировать файл hosts
Структура файла hosts довольно проста. В каждой строке записаны какие-либо данные, причём каждую строку система рассматривает по отдельности. Существует два вида строк:
- В начале строки стоит решётка (#). В таком случае эта строка распознаётся, как комментарий, и система с ней ничего не делает.
- В строке записан IP-адрес, а затем какой-либо сайт. В таком случае при открытии данного сайта в любом браузере или другой программе система автоматически перебросит вас на данный IP-адрес.
По умолчанию в файле hosts содержится около двух десятков закомментированных строк. Возможны случаи, когда файл полностью пуст.

Как удалить ограничения в файле hosts
Если ваш системный администратор или какое-либо ПО (в том числе вредоносное) оставили в файле hosts какие-либо строки без решётки (#), то при попытках посещения указанных в них сайтов вы будете перенаправлены на соответствующие IP-адреса. Системными администраторами чаще всего используется адрес 127.0.0.1 — это перенаправление на самого себя, то есть сайт просто не откроется. Вредоносные программы могут перенаправлять на какие-либо рекламные ресурсы.
Чтобы удалить ограничение, достаточно просто стереть строку с ним. Если вы хотите избавиться от всех ограничений, нажмите Ctrl + A, после чего Delete. Не забудьте сохранить файл после редактирования. Для этого нажмите Ctrl + S либо кликните на Файл — Сохранить.
Как добавить ограничения в файл hosts
Для непосредственно отключения возможности посещения какого-либо сайта нужно использовать перенаправление на IP-адрес 127.0.0.1. Если же вы хотите, например, чтобы какой-то сайт переадресовывал вас на страницу настроек роутера, вам нужно будет ввести другой IP.
- В новой строке введите IP-адрес.
- Нажмите пробел один или несколько раз.
- Введите адрес сайта, запросы на который будут перенаправляться.
- Сохраните изменения. Для этого нажмите Ctrl + S либо кликните на Файл — Сохранить.
В качестве примера покажем файл hosts, который будет блокировать несколько социальных сетей, а также перенаправлять пользователя с сайта router.com на настройки его роутера:

Несколько примечаний о дополнительных требованиях к файлу hosts в Windows 10:
- В файле не должно быть пустых строк. Если вы хотите добавить какие-то отступы, не забудьте поставить в начале пустой строки решётку (#). Пример такого отступа можно увидеть на скриншоте выше.
- IP-адрес должен находиться в самом начале строки, без пробелов перед ним.
- В качестве разделителя между IP-адресом и сайтом должны использоваться несколько пробелов или несколько табуляций. Не следует смешивать их.
- Если вы блокируете какой-либо сайт вида xyz.com, то необходимо отдельно заблокировать и сайт www.xyz.com.
- Исходные комментарии, которые оставила система, можно стереть — они ни на что не влияют.
Как восстановить файл hosts
В случае необходимости вы всегда можете вернуть файл hosts в стандартное состояние. Это можно сделать несколькими путями.
- Откройте файл hosts и удалите все ограничения. Можно просто нажать Ctrl + A, а затем Delete. Не забудьте сохранить файл с помощью комбинации клавиш Ctrl + S или кликнув на кнопку Файл — Сохранить.
- Удалите старый файл hosts и создайте пустой новый. О том, как это сделать, мы писали выше.
Что делать, если файл hosts не работает
Иногда случается, что система работает с файлом hosts некорректно, из-за чего перенаправление не происходит. Если вы попали в такую ситуацию, убедитесь, что:
- У вас отключен прокси-сервер, VPN и тому подобное.
- Ваш файл hosts составлен правильно, при его редактировании вы учли примечания, список которых можно увидеть выше.
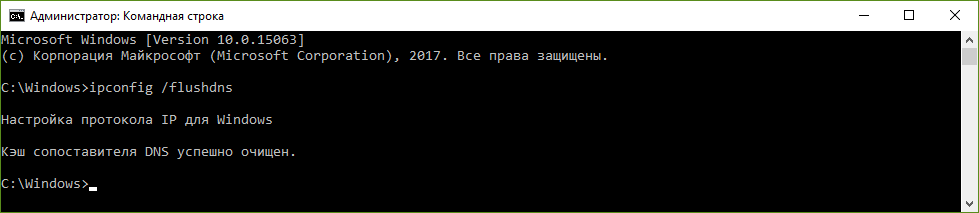
Если с этим всё в порядке, следует попробовать очистить кэш DNS:
- Нажмите Win + S.
- Наберите в поисковой строке Командная строка.
- Кликните по найденной программе правой клавишей мыши и выберите пункт Запустить от имени администратора.
- Введите команду ipconfig /flushdns и нажмите Enter.

- После окончания процесса перезагрузите систему.
Эта инструкция должна была помочь вам разобраться с файлом hosts в Windows 10, а также научить вас просматривать и редактировать его.
,
The HOSTS file (C:\Windows\System32\drivers\etc\hosts), is a plain text file that is used in operating systems (Windows, Mac, Linux, etc.) to map hostnames to numerical IP Addresses. The hosts file can override DNS and redirect websites to different locations.
Sometimes users modify the hosts file in order to block unwanted sites or to reach specific sites faster (increase Internet Speed). In other cases the hosts file may be incorrectly modified (compromised) by a malicious program to prevent Internet access or to redirect users to malicious content (URLs).

For all these cases, there is the need to restore the hosts file to its default settings (values) in order to resolve Internet connectivity problems.
In this tutorial you can find instructions on how to check hosts file’s integrity and how to reset host file to its default state.
How to Check and Restore HOSTS file’s integrity.
Step 1. Check HOSTS’s file integrity.
1. Open Windows Explorer and navigate to this location on your disk:
- C:\Windows\System32\drivers\etc
2. Right click at hosts file and select Open.

3. From the list of programs select the Notepad and click OK.

4. If, when opening the hosts file, you see the screen below (Screenshot No1), that means that the hosts file is untouched and there is no need to modify or restore it to its default state.
[Screenshot No1. Default (Unmodified) hosts file]

5. In the case that the hosts file has been modified incorrectly by you or by a malicious program, then you should see additional entries at the end of the hosts file (Screenshot No2). In that case proceed to the next step and reset the hosts file to its original settings. *
*Note: If the hosts file has not modified by you, then after restoring it to its default values, perform a virus scan.
[Screenshot No2. Modified hosts file]

Step 2. Restore HOSTS file to Default.
You can restore/reset the hosts file to its default (original) settings, by using two methods:
Method 1. Automatically Reset HOSTS file with Host Mechanic Freeware utility.
Method 2. Manual Edit and Restore HOSTS file.
Method 1. Automatically Reset HOSTS file with Host Mechanic Freeware utility.
1. Download ASKVG’s Host Mechanic Freeware utility. (Source). *
* Note: Some security software might show that the Host Mechanic is unsafe, when you try to download or run this software. Please ignore the message, it’s a false positive, since this tool tries to modify a system file. On the other hand, if you feel uncomfortable to run this file, then proceed to Method-2 below and restore manually the HOSTS file.
2. Extract the downloaded zipped file (Host-Mechanic.zip)

3. Run Host Mechanic application.

4. Click at Restore Default Host File button.

5. Close Host Mechanic and restart your computer.
Method 2. Manual Edit and Restore HOSTS file.
To manual reset (restore) hosts file to its default values:
1. Navigate to C:\Windows\System32\drivers\etc folder.
2. Copy the hosts file to your desktop. To do that:
a. Right click at the hosts file and select Copy.
b. Then right click at an empty space on your desktop and select Paste.
3. Right click at the hosts file (on your desktop) and select Open.
4. From the list of programs select the Notepad and click OK.
5. Select the text below and press Ctrl + C (Copy).
# Copyright (c) 1993-2006 Microsoft Corp.
#
# This is a sample HOSTS file used by Microsoft TCP/IP for Windows.
#
# This file contains the mappings of IP addresses to host names. Each
# entry should be kept on an individual line. The IP address should
# be placed in the first column followed by the corresponding host name.
# The IP address and the host name should be separated by at least one
# space.
#
# Additionally, comments (such as these) may be inserted on individual
# lines or following the machine name denoted by a '#' symbol.
#
# For example:
#
#      102.54.94.97     rhino.acme.com          # source server
#       38.25.63.10     x.acme.com              # x client host
# localhost name resolution is handle within DNS itself.
#       127.0.0.1       localhost
#       ::1             localhost
6. Go to the open «host – Notepad» window and erase anything on it. [press Ctrl + A and press Delete (Del)].
7. Then press Ctrl + V to paste the above – copied – text.
* The hosts file should look like this:
8. From the File menu, select Save and then close the «host – Notepad» window.
9. Finally, copy the hosts file from your desktop and paste it back to «C:\Windows\System32\drivers\etc» folder. *
10. Choose Copy and Replace when asked.

11. Restart your computer.
That’s it! Let me know if this guide has helped you by leaving your comment about your experience. Please like and share this guide to help others.
If this article was useful for you, please consider supporting us by making a donation. Even $1 can a make a huge difference for us in our effort to continue to help others while keeping this site free:
- Author
- Recent Posts
Konstantinos is the founder and administrator of Wintips.org. Since 1995 he works and provides IT support as a computer and network expert to individuals and large companies. He is specialized in solving problems related to Windows or other Microsoft products (Windows Server, Office, Microsoft 365, etc.).